SpringMVC总结 我的学习笔记
SpringMVC总结 我的学习笔记
- 一、SpringMVC简介
- 1.MVC
- 2.SpringMVC概述
- 3. SpringMVC中的核心组件
- 4.SpringMVC核心架构流程
- 二、SpringMVC框架实例
- 具体实现
- 使用注解实现
- 四、数据处理及跳转
- 1.结果跳转方式
- 2.处理器方法的参数与返回值
- 处理提交数据
- 数据显示到前端
- 五、RestFul风格
- 1.RESTful简介
- 2.使用RESTful
- 六、拦截器
- 1.拦截器概述
- 2.实现拦截器
- 七、Ajax Json交互
- Controller返回JSON数据
- 接收AJAX提交json数据
- 八、文件上传和下载
- 1.文件上传
- 2.文件下载
- 九、springMVC常用注解
一、SpringMVC简介
1.MVC
- MVC是模型(Model)、视图(View)、控制器(Controller)的简写,是一种软件设计规范。
- 是将业务逻辑、数据、显示分离的方法来组织代码。
- MVC主要作用是降低了视图与业务逻辑间的双向偶合。
- MVC不是一种设计模式,MVC是一种架构模式。当然不同的MVC存在差异。
2.SpringMVC概述
Spring MVC是Spring Framework的一部分,是基于Java实现MVC的轻量级Web框架。
官方文档:https://docs.spring.io/spring-framework/docs/5.2.0.RELEASE/spring-framework-reference/web.html#spring-web
3. SpringMVC中的核心组件
| 名称 | 组件名称 | 介绍 |
|---|---|---|
| 前端控制器 | DispactherServlet | 接收请求、响应结果,相当于转发器,它是SpringMVC框架最核心的组件, 有了它就能减少其他组件之间的耦合度。(不需要程序员开发) |
| 处理器映射器 | HandlerMapping | 处理器映射器:根据配置的映射规则(根据请求的URL),找到对应的处理器。(不需要程序员开发) |
| 处理器适配器 | HandlerAdapter | 适配调用具体的处理器,并且执行处理器中处理请求的方法,执行完毕之后返回一个ModelAndView对象。 |
| 处理器 | Handler | (需要程序员手动开发)。 |
| 视图解析器 | ViewResolver | 会根据传递过来的ModelAndView对象进行视图解析,根据视图解析名解析称真正的视图View。(不需要程序员开发) |
| 视图 | View | View是一个接口,它的实现类支持不同类型的视图 |
4.SpringMVC核心架构流程

- 当用户通过浏览器发起一个HTTP请求,请求直接到前端控制器DispatcherServlet;
- 前端控制器接收到请求以后调用处理器映射器HandlerMapping,处理器映射器根据请求的URL找到具体 的Handler,并将它返回给前端控制器;
- 前端控制器调用处理器适配器HandlerAdapter去适配调用Handler;
- 处理器适配器会根据Handler去调用真正的处理器去处理请求,并且处理对应的业务逻辑;
- 当处理器处理完业务之后,会返回一个ModelAndView对象给处理器适配器,HandlerAdapter再将该对象返回给前端控制器;这里的Model是返回的数据对象,View是逻辑上的View。
- 前端控制器DispatcherServlet将返回的ModelAndView对象传给视图解析器ViewResolver进行解析,解析完成之后就会返回一个具体的视图View给前端控制器。(ViewResolver根据逻辑的View查找具体的View)
- 前端控制器DispatcherServlet将具体的视图进行渲染,渲染完成之后响应给用户(浏览器显示)。
二、SpringMVC框架实例
具体实现
1.创建Maven工程

2.添加依赖
<dependencies><dependency><groupId>junit</groupId><artifactId>junit</artifactId><version>4.13</version></dependency><dependency><groupId>org.springframework</groupId><artifactId>spring-webmvc</artifactId><version>5.2.12.RELEASE</version></dependency><dependency><groupId>javax.servlet</groupId><artifactId>servlet-api</artifactId><version>2.5</version></dependency><dependency><groupId>javax.servlet.jsp</groupId><artifactId>jsp-api</artifactId><version>2.2</version></dependency><dependency><groupId>javax.servlet.jsp.jstl</groupId><artifactId>jstl-api</artifactId><version>1.2</version></dependency></dependencies>
3.配置web.xml
<?xml version="1.0" encoding="UTF-8"?>
<web-appversion="4.0"xmlns="http://xmlns.jcp.org/xml/ns/javaee"xmlns:javaee="http://xmlns.jcp.org/xml/ns/javaee"xmlns:xml="http://www.w3.org/XML/1998/namespace"xmlns:xsi="http://www.w3.org/2001/XMLSchema-instance"xsi:schemaLocation="http://xmlns.jcp.org/xml/ns/javaee http://xmlns.jcp.org/xml/ns/javaee/web-app_4_0.xsd"><display-name>Archetype Created Web Application</display-name><!-- 注册DispatcherServlet --><servlet><servlet-name>springmvc</servlet-name><servlet-class>org.springframework.web.servlet.DispatcherServlet</servlet-class><!-- 也可不配置参数,默认加载 /WEB-INF/springmvc-servlet.xml --><!-- 关联Spring MVC配置文件 --><init-param><param-name>contextConfigLocation</param-name><param-value>classpath:springmvc-servlet.xml</param-value></init-param><!-- 启动顺序,数字越小,启动越早 --><load-on-startup>1</load-on-startup></servlet><!--/ 匹配所有的请求: (不包括jsp)--><!--/* 匹配所有的请求:(包括jsp) --><servlet-mapping><servlet-name>springmvc</servlet-name><url-pattern>/</url-pattern></servlet-mapping>
</web-app>
4.编写SpringMVC的配置文件springmvc-servlet.xml
<?xml version="1.0" encoding="UTF-8"?>
<beans xmlns="http://www.springframework.org/schema/beans"xmlns:xsi="http://www.w3.org/2001/XMLSchema-instance" xmlns:mvc="http://www.springframework.org/schema/mvc"xmlns:context="http://www.springframework.org/schema/context"xsi:schemaLocation="http://www.springframework.org/schema/beanshttp://www.springframework.org/schema/beans/spring-beans.xsdhttp://www.springframework.org/schema/mvchttps://www.springframework.org/schema/mvc/spring-mvc.xsdhttp://www.springframework.org/schema/contexthttps://www.springframework.org/schema/context/spring-context.xsd"><!--添加处理映射器--><bean class="org.springframework.web.servlet.handler.BeanNameUrlHandlerMapping"/><!--添加处理器适配器--><bean class="org.springframework.web.servlet.mvc.SimpleControllerHandlerAdapter"/><!--添加视图解析器--><!--视图解析器:DispatcherServlet给他的ModelAndView1.获取ModelAndView的数据2.解析ModelAndView的视图名字3.拼接视图名字,找到对应的视图,/WEB-INF/jsp/springMVC.jsp4.将数据渲染到这个视图上--><bean class="org.springframework.web.servlet.view.InternalResourceViewResolver" id="InternalResourceViewResolver"><!--前缀--><property name="prefix" value="/WEB-INF/jsp/"/><!--后缀--><property name="suffix" value=".jsp"/></bean>
</beans>
5.编写操作业务Controller
public class HelloSpringMVC implements Controller {@Overridepublic ModelAndView handleRequest(HttpServletRequest httpServletRequest, HttpServletResponse httpServletResponse) throws Exception {//创建ModelAndView 模型和视图ModelAndView mv = new ModelAndView();//封装对象,放在ModelAndView中mv.addObject("msg","Hello SpringMVC");//封装要跳转的视图,放在ModelAndView中mv.setViewName("hello");return mv;}
}
6.将Controller交给SpringIOC容器
<!--Handler--><bean id="/hello" class="com.lxyk.controller.HelloController"/>
7.在WEB-INF下创建jsp包创建hello.jsp
<%@ page contentType="text/html;charset=UTF-8" language="java" %>
<html>
<head><title>Title</title>
</head>
<body>${msg}
</body>
</html>
8.启动Tomcat运行
访问地址: http://localhost:8080/SpringMVC/hello

使用注解实现
1.更改springmvc-servlet.xml
<?xml version="1.0" encoding="UTF-8"?>
<beans xmlns="http://www.springframework.org/schema/beans"xmlns:xsi="http://www.w3.org/2001/XMLSchema-instance" xmlns:mvc="http://www.springframework.org/schema/mvc"xmlns:context="http://www.springframework.org/schema/context"xsi:schemaLocation="http://www.springframework.org/schema/beanshttp://www.springframework.org/schema/beans/spring-beans.xsdhttp://www.springframework.org/schema/mvchttps://www.springframework.org/schema/mvc/spring-mvc.xsdhttp://www.springframework.org/schema/contexthttps://www.springframework.org/schema/context/spring-context.xsd"><!--此标签能够自动加载注解的处理器映射和注解的处理器适配,而且还默认加载了很多其他方法。 比如:参数绑定到控制器参数、json转换解析器--><mvc:annotation-driven/><!-- 开启注解扫描,将包下带有@Controller注解的类纳入Spring容器中--><context:component-scan base-package="com.chq.controller" /><!-- 让SpringMVC不处理静态资源  .css   .js   .html  --><mvc:default-servlet-handler/><!--添加视图解析器--><bean class="org.springframework.web.servlet.view.InternalResourceViewResolver" id="InternalResourceViewResolver"><!--前缀--><property name="prefix" value="/WEB-INF/jsp/"/><!--后缀--><property name="suffix" value=".jsp"/></bean>
</beans>
2.在创建一个Controller
@Controller
@RequestMapping("/hello")
public class HelloSpringMVC2 {//访问地址http://localhost:8080/SpringMVC/hello/h1@RequestMapping("/h1")public String hello(Model model) {//封装数据model.addAttribute("msg", "Hello SpringMVC");//返回视图  被视图解析器处理return "hello";}
}
四、数据处理及跳转
1.结果跳转方式
创建test.jsp 用于测试
通过SpringMVC来实现转发和重定向 无需视图解析器;
@Controller
public class HelloSpringMVC3 {@RequestMapping("/t1")public String test1(Model model){model.addAttribute("msg","Hello SpringMVC test1");//转发return "/WEB-INF/jsp/test.jsp";}@RequestMapping("/t2")public String test2(Model model){model.addAttribute("msg","Hello SpringMVC test2");//转发二return "forward:/WEB-INF/jsp/hello.jsp";}@RequestMapping("/t3")public String test3(HttpServletRequest request){//重定向HttpSession session = request.getSession();session.setAttribute("msg","Hello SpringMVC test3");return "redirect:/index.jsp";}
}
2.处理器方法的参数与返回值
处理提交数据
处理器方法参数
SpringMVC也是基于Spring的,所以可以直接给处理器方法注入参数,自动绑定默认支持的各种数据类型。 这些默认支持的数据类型,或者说可以注入的对象类型有:
- HttpServletRequest对象。
- HttpServletResponse对象。
- HttpSession对象。(注意:ServletContext不会注入。)
- 简单数据类型。作用:获取客户端提交的单值参数。
//处理器方法的参数名必须与提交参数名一致
//http://localhost:8080/springmvc/hello/h1?userName=zhangsan&password=123
public String hello(String userName,String password) throws Exception {
}//处理器方法的参数名提交参数名不一致,使用@RequestParam注解来匹配参数。
//@RequestParam的value值必须与提交参数名一致。
//http://localhost:8080/springmvc/hello/h1?name=zhangsan&pwd=123
public String hello(@RequestParam("name") String username, @RequestParam("pwd") String password) throws Exception {}
- 数组类型。 作用:获取客户端提交的多值参数。
public String hello(Integer[] ids) throws Exception {}
- 对象类型。 作用:获取客户端提交参数。
public String hello(User user) throws Exception {}
数据显示到前端
通过ModelAndView
public class HelloSpringMVC implements Controller {@Overridepublic ModelAndView handleRequest(HttpServletRequest httpServletRequest, HttpServletResponse httpServletResponse) throws Exception {//创建ModelAndView 模型和视图ModelAndView mv = new ModelAndView();//封装对象,放在ModelAndView中mv.addObject("msg","Hello SpringMVC");//封装要跳转的视图,放在ModelAndView中mv.setViewName("hello");return mv;}
}
通过ModelMap
@RequestMapping("/hello")
public String hello(@RequestParam("username") String name, ModelMap model){//封装要显示到视图中的数据//相当于req.setAttribute("name",name);model.addAttribute("name",name);return "hello";
}
通过Model
@RequestMapping("/hello")
public String hello(@RequestParam("username") String name, Model model){//封装要显示到视图中的数据//相当于req.setAttribute("name",name);model.addAttribute("msg",name);return "test";
}
- Model 简化了新手对于Model对象的操作和理解;
- ModelMap 继承了 LinkedMap ,同样的继承 LinkedMap 的方法和特性;
- ModelAndView 可以在储存数据的同时,可以进行设置返回的逻辑视图,进行控制展示层的跳转。
五、RestFul风格
1.RESTful简介
概念
Restful就是一个资源定位及资源操作的风格。不是标准也不是协议,只是一种风格。基于这个风格设计的软件可以更简洁,更有层次,更易于实现缓存等机制。
功能
- 对url进行规范,写出符合RESTful格式的url。优雅RESTful风格的资源URL不希望带 .html 或 .do 或?或& 等后缀。
- 指定请求资源格式。也就是说:在RESTful架构中,每个URI代表一种资源,客户端通过四个HTTP方法(四个动词),对服务器端资源进行操作:
- GET用来获取资源;
- POST用来新建资源(也可以用于更新资源);
- PUT用来更新资源;
- DELETE用来删除资源;
优点:
- 隐藏资源的访问行为,无法通过地址得知对资源是何种操作
- 书写简化
2.使用RESTful
** 新建一个类 RestFulController**
@Controller
public class RestFulController {// @PathVariable  形参注解  绑定路径参数与处理器方法形参间的关系,要求路径参数名与形参名一 一对应//method = RequestMethod.GET 请求方式为GET请求//访问路径 http://localhost:8080/SpringMVC/add/1/2@RequestMapping(value = "/add/{a}/{b}",method = RequestMethod.GET)public String test(@PathVariable int a, @PathVariable int b, Model model){int sum = a + b;model.addAttribute("msg","结果为"+sum);return "hello";}
}
Spring MVC 的 @RequestMapping 注解能够处理 HTTP 请求的方法
- @GetMapping 处理get请求 是 @RequestMapping(method =RequestMethod.GET) 的一个快捷方式
- @PostMapping 处理post请求
- @PutMapping put是对整体的更新,
- @DeleteMapping 处理delete请求
- @PatchMapping patch是对局部的更新。
六、拦截器
1.拦截器概述
SpringMVC的处理器拦截器类似于Servlet开发中的过滤器Filter,用于对处理器进行预处理和后处理。开发者可以自己定义一些拦截器来实现特定的功能。
- 拦截器是SpringMVC框架自己的,只有使用了SpringMVC框架的工程才能使用
- 拦截器只会拦截访问的控制器方法, 如果访问的是jsp/html/css/image/js是不会进行拦截的
拦截器与过滤器的区别
- Filter是Servlet容器的,Interceptor是SpringMVC实现的(结合springBoot看)
- Filter对所有请求起作用,Intercptor可以设置拦截规则,而且只对经过DispatchServlet的请求起作用。
- Filter只能拿到request和response,interceptor可以拿到整个请求上下文,包括request和response。
- Filter是基于函数回调,Interceptor是基于反射(AOP思想)
2.实现拦截器
只需要实现 HandlerInterceptor 接口即可。 接口中有三个方法需要实现:
- preHandle:在请求处理的方法之前执行 如果返回true执行下一个拦截器 如果返回false就不执行下一个拦截器
- postHandle:该方法在处理器执行后,生成视图前执行。这里有机会修改视图层数据。
- afterCompletion:最后执行,通常用于记录日志,释放资源,处理异常。
编写一个拦截器
public class MyInterceptor implements HandlerInterceptor {public boolean preHandle(HttpServletRequest request, HttpServletResponse response, Object handler) throws Exception {System.out.println("------------处理前------------");return true;}
//在请求处理方法执行之后执行public void postHandle(HttpServletRequest request, HttpServletResponse response, Object handler, ModelAndView modelAndView) throws Exception {System.out.println("------------处理后------------");}
//在dispatcherServlet处理后执行,做清理工作.public void afterCompletion(HttpServletRequest request, HttpServletResponse response, Object handler, Exception ex) throws Exception {System.out.println("------------清理------------");}
}
在springmvc的配置文件中配置拦截器
<!--关于拦截器的配置-->
<mvc:interceptors><mvc:interceptor><!--/** 包括路径及其子路径--><!--/user/* 拦截的是/user/add等等这种 , /user/add/user不会被拦截--><!--/user/** 拦截的是/user/下的所有--><mvc:mapping path="/**"/><!--bean配置的就是拦截器--><bean class="com.chq.config.MyInterceptor"/></mvc:interceptor>
</mvc:interceptors>
编写一个Controller,接收请求
@RestController
public class TestController {@GetMapping("/t1")public String test(){System.out.println("TestController执行了.........");return "OK";}
}
index.jsp
<a href="${pageContext.request.contextPath}/t1">拦截器测试</a>
测试
------------处理前------------
TestController执行了.........
------------处理后------------
------------清理------------
七、Ajax Json交互
Controller返回JSON数据
1.添加依赖
<!--json解析工具--><dependency><groupId>com.fasterxml.jackson.core</groupId><artifactId>jackson-databind</artifactId><version>2.13.4</version></dependency>
2.配置Web.xml文件
<?xml version="1.0" encoding="UTF-8"?>
<web-app xmlns="http://xmlns.jcp.org/xml/ns/javaee"xmlns:xsi="http://www.w3.org/2001/XMLSchema-instance"xsi:schemaLocation="http://xmlns.jcp.org/xml/ns/javaee http://xmlns.jcp.org/xml/ns/javaee/web-app_4_0.xsd"version="4.0"><!--注册servlet--><servlet><servlet-name>SpringMVC</servlet-name><servlet-class>org.springframework.web.servlet.DispatcherServlet</servlet-class><!--通过初始化参数指定SpringMVC配置文件的位置,进行关联--><init-param><param-name>contextConfigLocation</param-name><param-value>classpath:springmvc-servlet.xml</param-value></init-param><!-- 启动顺序,数字越小,启动越早 --><load-on-startup>1</load-on-startup></servlet><!--所有请求都会被springmvc拦截 --><servlet-mapping><servlet-name>SpringMVC</servlet-name><url-pattern>/</url-pattern></servlet-mapping><filter><filter-name>encoding</filter-name><filter-class>org.springframework.web.filter.CharacterEncodingFilter</filter-class><init-param><param-name>encoding</param-name><param-value>utf-8</param-value></init-param></filter><filter-mapping><filter-name>encoding</filter-name><url-pattern>/*</url-pattern></filter-mapping>
</web-app>
- springmvc-servlet.xml文件
<?xml version="1.0" encoding="UTF-8"?>
<beans xmlns="http://www.springframework.org/schema/beans"xmlns:xsi="http://www.w3.org/2001/XMLSchema-instance"xmlns:context="http://www.springframework.org/schema/context"xmlns:mvc="http://www.springframework.org/schema/mvc"xsi:schemaLocation="http://www.springframework.org/schema/beanshttp://www.springframework.org/schema/beans/spring-beans.xsdhttp://www.springframework.org/schema/contexthttps://www.springframework.org/schema/context/spring-context.xsdhttp://www.springframework.org/schema/mvchttps://www.springframework.org/schema/mvc/spring-mvc.xsd"><!-- 自动扫描指定的包,下面所有注解类交给IOC容器管理 --><context:component-scan base-package="com.chq.controller"/><!-- 视图解析器 --><bean class="org.springframework.web.servlet.view.InternalResourceViewResolver"id="internalResourceViewResolver"><!-- 前缀 --><property name="prefix" value="/WEB-INF/jsp/" /><!-- 后缀 --><property name="suffix" value=".jsp" /></bean>
</beans>
4.编写User类
//需要导入lombok
@Data
@AllArgsConstructor
@NoArgsConstructor
public class User {private String name;private int age;private String gender;
}
5.编写Controller
//@Controller
//在类上直接使用 @RestController ,这样子,
//里面所有的方法都只会返回 json 字符串了,不用再每一个都添加@ResponseBody
@RestController
public class UserController {@RequestMapping(value = "/user",produces = "application/json;charset=utf-8")//@ResponseBody //不会走视图解析器,会直接返回一个字符串public String json() throws JsonProcessingException {//创建一个jackson的对象映射器,用来解析数据ObjectMapper mapper = new ObjectMapper();User user = new User("蔡徐坤",25,"男");String str = mapper.writeValueAsString(user);return str;}
}
接收AJAX提交json数据
**1.编写MyData 类 **
@Data
@AllArgsConstructor
@NoArgsConstructor
public class MyData {  private String name;  private int age;
}
2.创建一个Spring MVC控制器来处理AJAX请求
@PostMapping("/submit")public ResponseEntity<String> submitJson(@RequestBody MyData myData) {// 处理接收到的数据System.out.println("接收的数据 " + myData);// 返回响应return new ResponseEntity<>("成功接收数据", HttpStatus.OK);}
3.发送AJAX请求
<!DOCTYPE html>
<html lang="en">
<head>  <meta charset="UTF-8">  <title>AJAX发送请求</title>
</head>
<body>  <button id="sendData">发送数据</button>  <script>  $(document).ready(function() {  $('#sendData').click(function() {  var data = {  name: "灰太狼",  age: 30  };  $.ajax({  url: '/submit',  type: 'POST',  contentType: 'application/json;charset=utf-8',  data: JSON.stringify(data),  success: function(response) {  alert(response);  },  error: function(xhr, status, error) {  alert("Error: " + error);  }  });  });  });  </script>
</body>
</html>
八、文件上传和下载
1.文件上传
- Servlet3.0规范已经提供方法来处理文件上传,但这种上传需要在Servlet中完成。
- 而Spring MVC则提供了更简单的封装。
- Spring MVC为文件上传提供了直接的支持,这种支持是用即插即用的MultipartResolver实现的。
- Spring MVC使用Apache Commons FileUpload技术实现了一个MultipartResolver实现类
- SpringMVC的文件上传还需要依赖Apache Commons FileUpload的组件。
SpringMVC实现文件上传
1.导入文件上传的jar包,commons-fileupload
<!--文件上传--><dependency><groupId>commons-fileupload</groupId><artifactId>commons-fileupload</artifactId><version>1.4</version></dependency><dependency><groupId>commons-io</groupId><artifactId>commons-io</artifactId><version>2.13.0</version></dependency><!--导入servlet-api--><dependency><groupId>javax.servlet</groupId><artifactId>javax.servlet-api</artifactId><version>4.0.1</version></dependency>
2、配置bean:multipartResolver
<!--文件上传配置 必须是此ID名--><bean id="multipartResolver" class="org.springframework.web.multipart.commons.CommonsMultipartResolver"><!-- 请求的编码格式,必须和jSP的pageEncoding属性一致,以便正确读取表单的内容,默认为ISO-8859-1 --><property name="defaultEncoding" value="utf-8"/><!-- 上传文件大小上限,单位为字节(10485760=10M) --><property name="maxUploadSize" value="10485760"/><property name="maxInMemorySize" value="40960"/></bean>
3.编写前端页面
<form action="${pageContext.request.contextPath}/upload" enctype="multipart/form-data" method="post"><input type="file" name="file"/><input type="submit" value="upload"></form>
4.Controller
@RestController
public class FileController {//@RequestParam("file") 将name=file控件得到的文件封装成CommonsMultipartFile 对象//批量上传CommonsMultipartFile则为数组即可@RequestMapping("/upload")public String fileUpload(@RequestParam("file") CommonsMultipartFile file , HttpServletRequest request) throws IOException {
//获取文件名 : file.getOriginalFilename();String uploadFileName = file.getOriginalFilename();
//如果文件名为空,直接回到首页!if ("".equals(uploadFileName)){return "redirect:/index.jsp";}System.out.println("上传文件名 : "+uploadFileName);
//上传路径保存设置String path = request.getServletContext().getRealPath("/upload");//如果路径不存在,创建一个File realPath = new File(path);if (!realPath.exists()){realPath.mkdir();}System.out.println("上传文件保存地址:"+realPath);
InputStream is = file.getInputStream(); //文件输入流OutputStream os = new FileOutputStream(new File(realPath,uploadFileName)); //文件输出流
//读取写出int len=0;byte[] buffer = new byte[1024];while ((len=is.read(buffer))!=-1){os.write(buffer,0,len);os.flush();}os.close();is.close();return "redirect:/index.jsp";}
}
5.采用file.Transto 来保存上传的文件
/*
* 采用file.Transto 来保存上传的文件
*/
@RequestMapping("/upload2")
public String fileUpload2(@RequestParam("file") CommonsMultipartFile file, HttpServletRequest request) throws IOException {
//上传路径保存设置String path = request.getServletContext().getRealPath("/upload");File realPath = new File(path);if (!realPath.exists()){realPath.mkdir();}//上传文件地址System.out.println("上传文件保存地址:"+realPath);
//通过CommonsMultipartFile的方法直接写文件(注意这个时候)file.transferTo(new File(realPath +"/"+ file.getOriginalFilename()));
return "redirect:/index.jsp";
}
2.文件下载
1.代码实现
@RequestMapping(value="/download")
public String downloads(HttpServletResponse response ,HttpServletRequest request) throws Exception{//要下载的图片地址String path = request.getServletContext().getRealPath("/upload");String fileName = "1.jpg";
//1、设置response 响应头response.reset(); //设置页面不缓存,清空bufferresponse.setCharacterEncoding("UTF-8"); //字符编码response.setContentType("multipart/form-data"); //二进制传输数据//设置响应头response.setHeader("Content-Disposition", "attachment;fileName="+URLEncoder.encode(fileName, "UTF-8"));File file = new File(path,fileName);//2、 读取文件--输入流InputStream input=new FileInputStream(file);//3、 写出文件--输出流OutputStream out = response.getOutputStream();
byte[] buff =new byte[1024];int index=0;//4、执行 写出操作while((index= input.read(buff))!= -1){out.write(buff, 0, index);out.flush();}out.close();input.close();return null;
}
前端
<a href="${pageContext.request.contextPath}/download">下载</a>
九、springMVC常用注解
参考网址: https://www.cnblogs.com/leskang/p/5445698.html#autoid-0-3-0
| 注解 | 说明 |
|---|---|
| @Controller 组合注解(组合了@Component注解) | 应用在MVC层(控制层),DispatcherServlet会自动扫描注解了此注解的类, 然后将web请求映射到注解了@RequestMapping的方法上。 |
| @Service | 组合注解(组合了@Component注解),应用在service层(业务逻辑层) |
| @Repository | 组合注解(组合了@Component注解),应用在dao层(数据访问层) |
| @Component | 表示一个带注释的类是一个“组件”,成为Spring管理的Bean。当使用基于注解的配置和类路径扫描时, 这些类被视为自动检测的候选对象。同时@Component还是一个元注解。 |
| @Autowired | Spring提供的工具(由Spring的依赖注入工具(BeanPostProcessor、BeanFactoryPostProcessor)自动注入。) |
| @Configuration | 声明当前类是一个配置类(相当于一个Spring配置的xml文件) |
| @ComponentScan | 自动扫描指定包下所有使用@Service,@Component,@Controller,@Repository的类并注册 |
| @Bean | 注解在方法上,声明当前方法的返回值为一个Bean。返回的Bean对应的类中可以定义init()方法和destroy()方法,然后在@Bean(initMethod=”init”,destroyMethod=”destroy”)定义,在构造之后执行init,在销毁之前执行destroy |
| @Aspect | 声明一个切面(就是说这是一个额外功能) |
| @After | 后置建言(advice),在原方法前执行。 |
| @Before | 前置建言(advice),在原方法后执行。 |
| @Around | 环绕建言(advice),在原方法执行前执行,在原方法执行后再执行(@Around可以实现其他两种advice) |
| @PointCut | 声明切点,即定义拦截规则,确定有哪些方法会被切入 |
| @Transactional | 声明事务(一般默认配置即可满足要求,当然也可以自定义) |
| @RequestMapping | 用来映射web请求(访问路径和参数),处理类和方法的。可以注解在类和方法上,注解在方法上的@RequestMapping路径会继承注解在类上的路径。同时支持Serlvet的request和response作为参数,也支持对request和response的媒体类型进行配置。其中有value(路径),produces(定义返回的媒体类型和字符集),method(指定请求方式)等属性。 |
| @ResponseBody | 将返回值放在response体内。返回的是数据而不是页面 |
| @RequestBody | 允许request的参数在request体中,而不是在直接链接在地址的后面。此注解放置在参数前。 |
| @PathVariable | 放置在参数前,用来接受路径参数。 |
| @RestController | 组合注解,组合了@Controller和@ResponseBody,当我们只开发一个和页面交互数据的控制层的时候可以使用此注解。 |
相关文章:

SpringMVC总结 我的学习笔记
SpringMVC总结 我的学习笔记 一、SpringMVC简介1.MVC2.SpringMVC概述3. SpringMVC中的核心组件4.SpringMVC核心架构流程 二、SpringMVC框架实例具体实现使用注解实现 四、数据处理及跳转1.结果跳转方式2.处理器方法的参数与返回值处理提交数据数据显示到前端 五、RestFul风格1.…...

DevCheck Pro手机硬件检测工具v5.33
前言 DevCheck Pro是一款手机硬件和操作系统信息检测查看工具,该软件的功能非常强大,为用户提供了系统、硬件、应用程序、相机、网络、电池等一系列信息查看功能 安装环境 [名称]:DevCheckPro [版本]:5.33 [大小]&a…...

数据分析ReAct工作流
让我用一个数据分析项目的例子来展示plan-and-execute框架的应用。这个例子会涉及数据处理、分析和可视化等任务。 from typing import List, Dict, Any from dataclasses import dataclass import json from enum import Enum import logging from datetime import datetime#…...

Rust-AOP编程实战
文章本天成,妙手偶得之。粹然无疵瑕,岂复须人为?君看古彝器,巧拙两无施。汉最近先秦,固已殊淳漓。胡部何为者,豪竹杂哀丝。后夔不复作,千载谁与期? ——《文章》宋陆游 【哲理】文章…...

Flutter鸿蒙next 中的 Expanded 和 Flexible 使用技巧详解
在 Flutter 开发中,Expanded 和 Flexible 是两个非常常用的布局控件,它们可以帮助开发者更加灵活地管理 UI 布局的空间分配。虽然它们看起来非常相似,但它们的功能和使用场景有所不同。理解这两者的区别,能帮助你在构建复杂 UI 布…...

【微信小游戏学习心得】
这里是引用 微信小游戏学习心得 简介了解微信小游戏理解2d游戏原理数据驱动视图总结 简介 本人通过学习了解微信小游戏,学习微信小游戏,加深了对前端框架,vue和react基于数据驱动视图的理解,及浏览器文档模型和javaScript之间的关…...

Python | Leetcode Python题解之第539题最小时间差
题目: 题解: def getMinutes(t: str) -> int:return ((ord(t[0]) - ord(0)) * 10 ord(t[1]) - ord(0)) * 60 (ord(t[3]) - ord(0)) * 10 ord(t[4]) - ord(0)class Solution:def findMinDifference(self, timePoints: List[str]) -> int:n len…...

Zookeeper运维秘籍:四字命令基础、详解及业务应用全解析
文章目录 一、四字命令基础二、四字命令详解三、四字命令的开启与配置四、结合业务解读四字命令confconsenvi命令Stat命令MNTR命令ruok命令dump命令wchswchp ZooKeeper,作为一款分布式协调服务,提供了丰富的四字命令(也称为四字短语ÿ…...

Error: `slot-scope` are deprecated报错解决
本人新手菜鸡,文章为自己遇到问题的记录,如有错误或不足还请大佬批评指正 问题描述 在Vue3环境下使用slot插槽,出现‘slot-scope’ are deprecated报错问题,经过查找发现,是因为在slot插槽使用中,vue2和vu…...
中使用上标下标)
Excel(图例)中使用上标下标
单元格中 1、在Excel单元格中刷黑要设置成上标的字符,如m2中的2; 2、单击右键,在弹出的对话框中选择“设置单元格格式”; 3、在弹出的“设置单元格格式”对话框中选择上标(或下标); 4、最后…...

熔断和降级
目录 隔离和降级 FeignClient整合Sentinel 通过Feign设置服务降级 1.创建类实现FallbackFactory接口,并让这个类和使用FeignClient的接口类绑定 2.让order-service服务的feign开启sentinel 3.测试,只开启order-service服务,而不开启user-…...

【学习笔记】Linux系统基础知识 6 —— su命令详解
提示:学习Linux系统基础命令 su 命令详解,包含通过 su 命令切换用户实例 一、前期准备 1.已经正确安装并成功进入Linux系统 说明:本实验采用的 Redhat 系统(因系统不一致,可能部分显示存在差异) 二、学…...

docker-compose命令介绍
docker-compose命令介绍 docker-compose1. docker-compose是什么2. Compose file format3. 命令3.1 服务相关命令upruncreatestartrestartdownstopkillrmpauseunpause 3.2 镜像相关命令3.3 查看相关命令 docker-compose 学了docker,然后就直接去学k8s了。恍恍惚惚几…...

Spring学习笔记_29——@Transactional
Transactional 1. 介绍 Transactional 是 Spring 框架提供的一个注解,用于声明方法或类级别的事务属性。 Spring事务:Spring学习笔记_28——事务-CSDN博客 当你在一个方法或类上使用 Transactional 注解时,Spring 会为该方法或类创建一个…...

github使用基础
要通过终端绑定GitHub账号并进行文件传输,你需要使用Git和SSH密钥来实现安全连接和操作。以下是一个基本流程: 设置GitHub和SSH 检查Git安装 通过终端输入以下命令查看是否安装Git: bash 复制代码 git --version配置Git用户名和邮箱 bash …...

Flink-Kafka-Connector
Apache Flink 是一个用于处理无界和有界数据的开源流处理框架。它支持高吞吐量、低延迟以及精确一次的状态一致性等特性。Flink 社区提供了丰富的连接器(Connectors)以方便与不同的数据源进行交互,其中就包括了 Apache Kafka 连接器。 Apach…...

远程终端vim里使用系统剪切板
1、本地通过终端远程linux server,由于不是桌面环境/GUI,终端vim里似乎没办法直接使用系统剪切板,即便已经是clipboard。 $ vim --version | grep clipboard clipboard keymap printer vertsplit eval …...

底层视角看C语言
文章目录 main函数很普通main函数之前调用了什么main函数和自定义函数的对比 变量名只为人而存在goto是循环的本质指针变量指针是一个特殊的数字汇编层面看指针 数组和指针数组越界问题低端地址越界高端地址越界 引用就是指针 main函数很普通 main函数是第一个被调用的函数吗&…...

【点云学习笔记】——分割任务学习
3D点云实例分割 vs 3D点云语义分割 1. 功能对比 代码1(实例分割):用于3D点云中的实例分割任务,其目标是将点云中的物体分割成独立的实例。每个实例可能属于相同类别但需要被分开,比如在自动驾驶中的多个行人、汽车&am…...
Qt——窗口
一.窗口概述 Qt 窗口是通过 QMainWindow 类来实现的。 QMainWindow是一个为用户提供主窗口程序的类,继承QWidget类,并且提供一个预定义的布局。包含一个菜单栏(menu bar),多个工具栏(tool bars࿰…...

[2025CVPR]DeepVideo-R1:基于难度感知回归GRPO的视频强化微调框架详解
突破视频大语言模型推理瓶颈,在多个视频基准上实现SOTA性能 一、核心问题与创新亮点 1.1 GRPO在视频任务中的两大挑战 安全措施依赖问题 GRPO使用min和clip函数限制策略更新幅度,导致: 梯度抑制:当新旧策略差异过大时梯度消失收敛困难:策略无法充分优化# 传统GRPO的梯…...
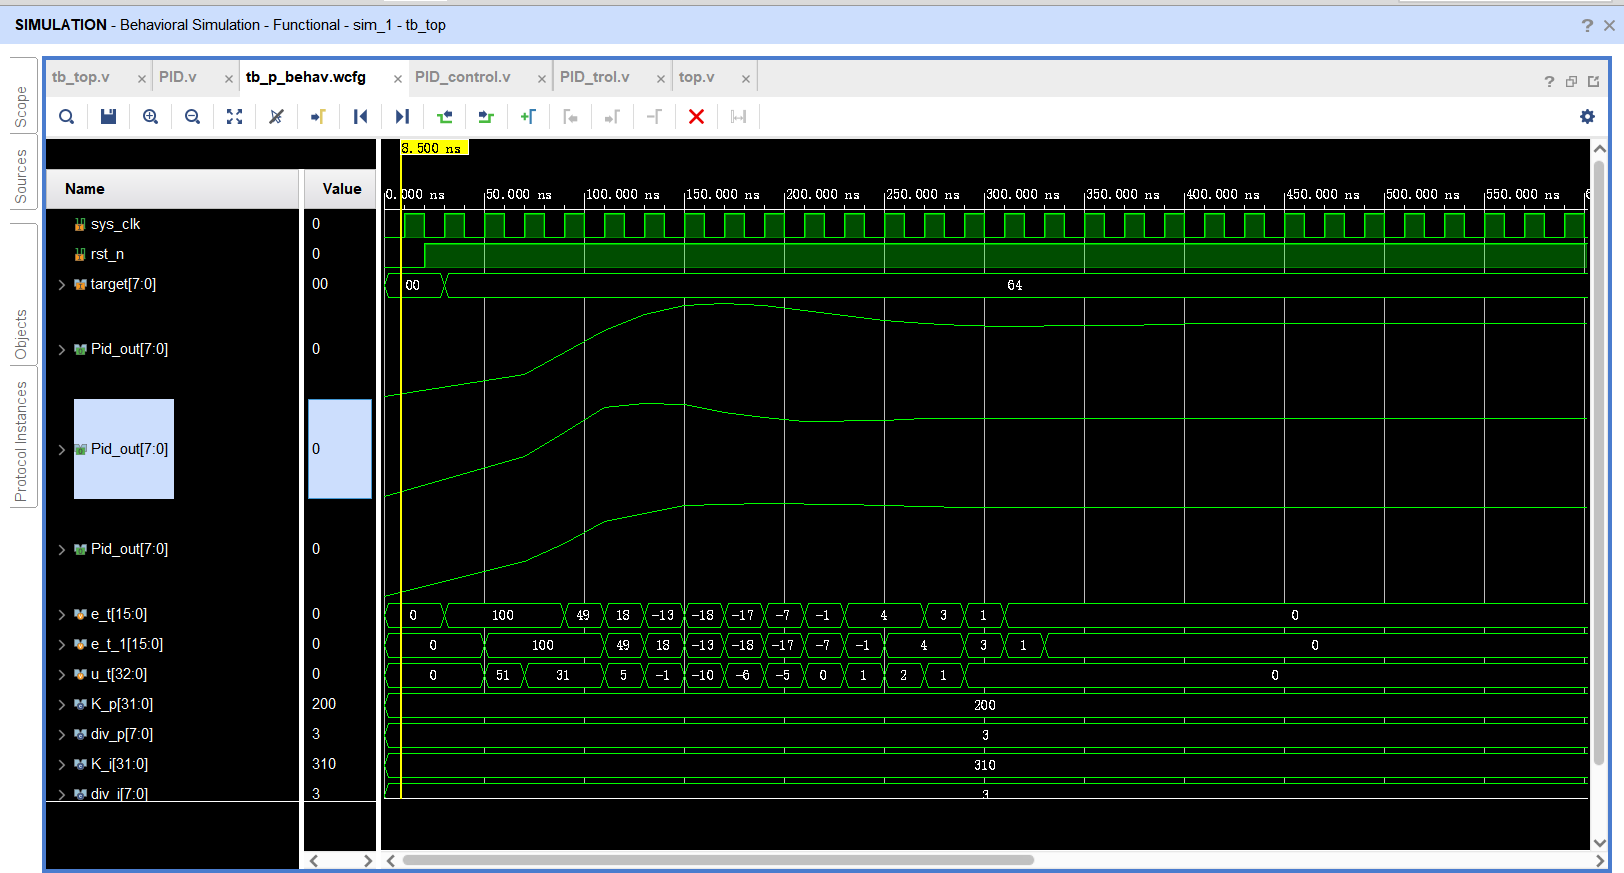
基于FPGA的PID算法学习———实现PID比例控制算法
基于FPGA的PID算法学习 前言一、PID算法分析二、PID仿真分析1. PID代码2.PI代码3.P代码4.顶层5.测试文件6.仿真波形 总结 前言 学习内容:参考网站: PID算法控制 PID即:Proportional(比例)、Integral(积分&…...
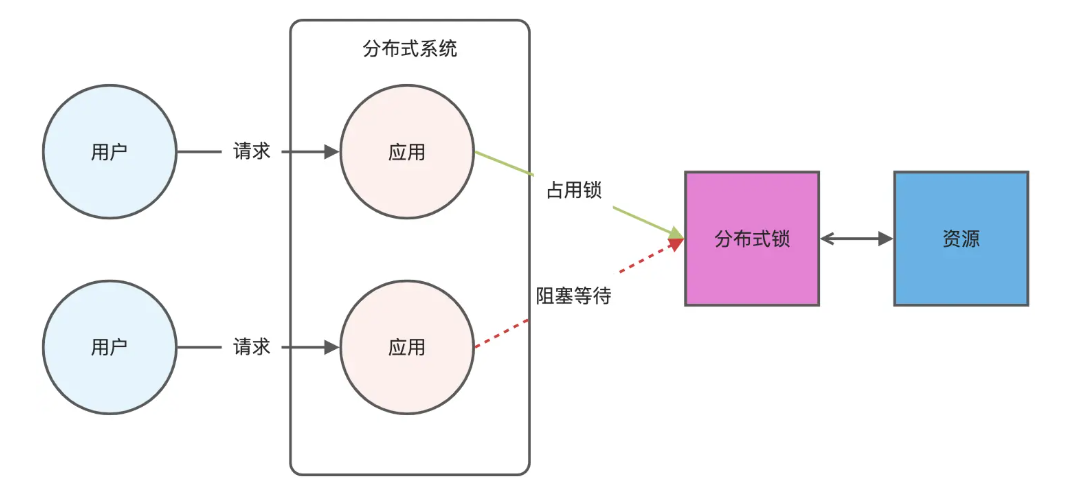
Redis相关知识总结(缓存雪崩,缓存穿透,缓存击穿,Redis实现分布式锁,如何保持数据库和缓存一致)
文章目录 1.什么是Redis?2.为什么要使用redis作为mysql的缓存?3.什么是缓存雪崩、缓存穿透、缓存击穿?3.1缓存雪崩3.1.1 大量缓存同时过期3.1.2 Redis宕机 3.2 缓存击穿3.3 缓存穿透3.4 总结 4. 数据库和缓存如何保持一致性5. Redis实现分布式…...

Swift 协议扩展精进之路:解决 CoreData 托管实体子类的类型不匹配问题(下)
概述 在 Swift 开发语言中,各位秃头小码农们可以充分利用语法本身所带来的便利去劈荆斩棘。我们还可以恣意利用泛型、协议关联类型和协议扩展来进一步简化和优化我们复杂的代码需求。 不过,在涉及到多个子类派生于基类进行多态模拟的场景下,…...
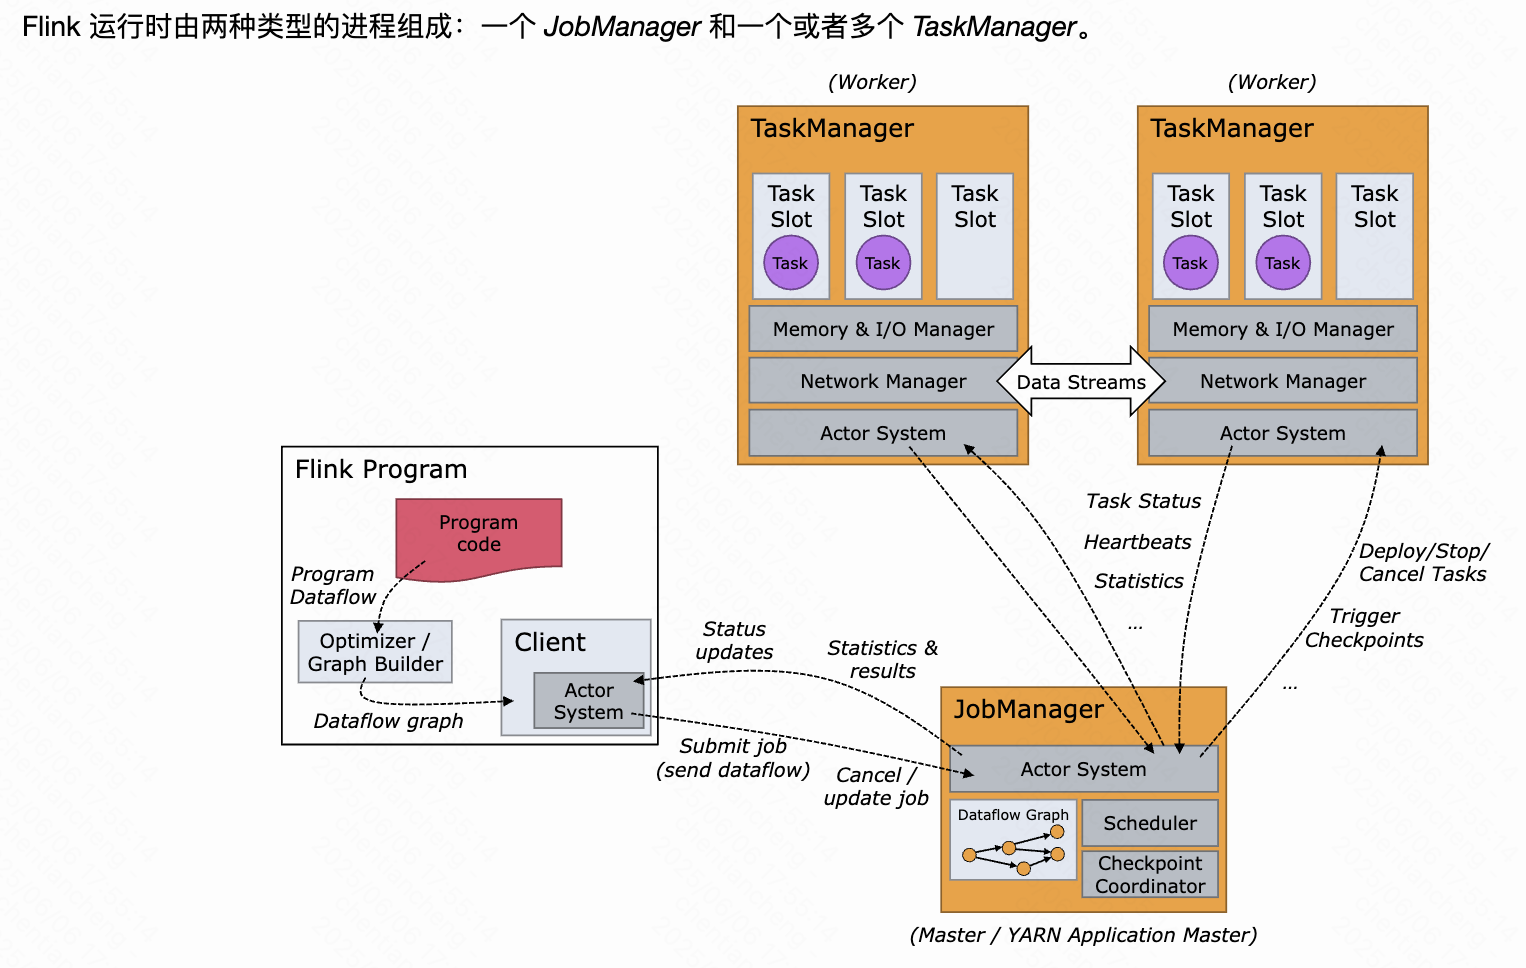
《基于Apache Flink的流处理》笔记
思维导图 1-3 章 4-7章 8-11 章 参考资料 源码: https://github.com/streaming-with-flink 博客 https://flink.apache.org/bloghttps://www.ververica.com/blog 聚会及会议 https://flink-forward.orghttps://www.meetup.com/topics/apache-flink https://n…...

Pinocchio 库详解及其在足式机器人上的应用
Pinocchio 库详解及其在足式机器人上的应用 Pinocchio (Pinocchio is not only a nose) 是一个开源的 C 库,专门用于快速计算机器人模型的正向运动学、逆向运动学、雅可比矩阵、动力学和动力学导数。它主要关注效率和准确性,并提供了一个通用的框架&…...

Java + Spring Boot + Mybatis 实现批量插入
在 Java 中使用 Spring Boot 和 MyBatis 实现批量插入可以通过以下步骤完成。这里提供两种常用方法:使用 MyBatis 的 <foreach> 标签和批处理模式(ExecutorType.BATCH)。 方法一:使用 XML 的 <foreach> 标签ÿ…...
)
C++课设:简易日历程序(支持传统节假日 + 二十四节气 + 个人纪念日管理)
名人说:路漫漫其修远兮,吾将上下而求索。—— 屈原《离骚》 创作者:Code_流苏(CSDN)(一个喜欢古诗词和编程的Coder😊) 专栏介绍:《编程项目实战》 目录 一、为什么要开发一个日历程序?1. 深入理解时间算法2. 练习面向对象设计3. 学习数据结构应用二、核心算法深度解析…...

MySQL 部分重点知识篇
一、数据库对象 1. 主键 定义 :主键是用于唯一标识表中每一行记录的字段或字段组合。它具有唯一性和非空性特点。 作用 :确保数据的完整性,便于数据的查询和管理。 示例 :在学生信息表中,学号可以作为主键ÿ…...
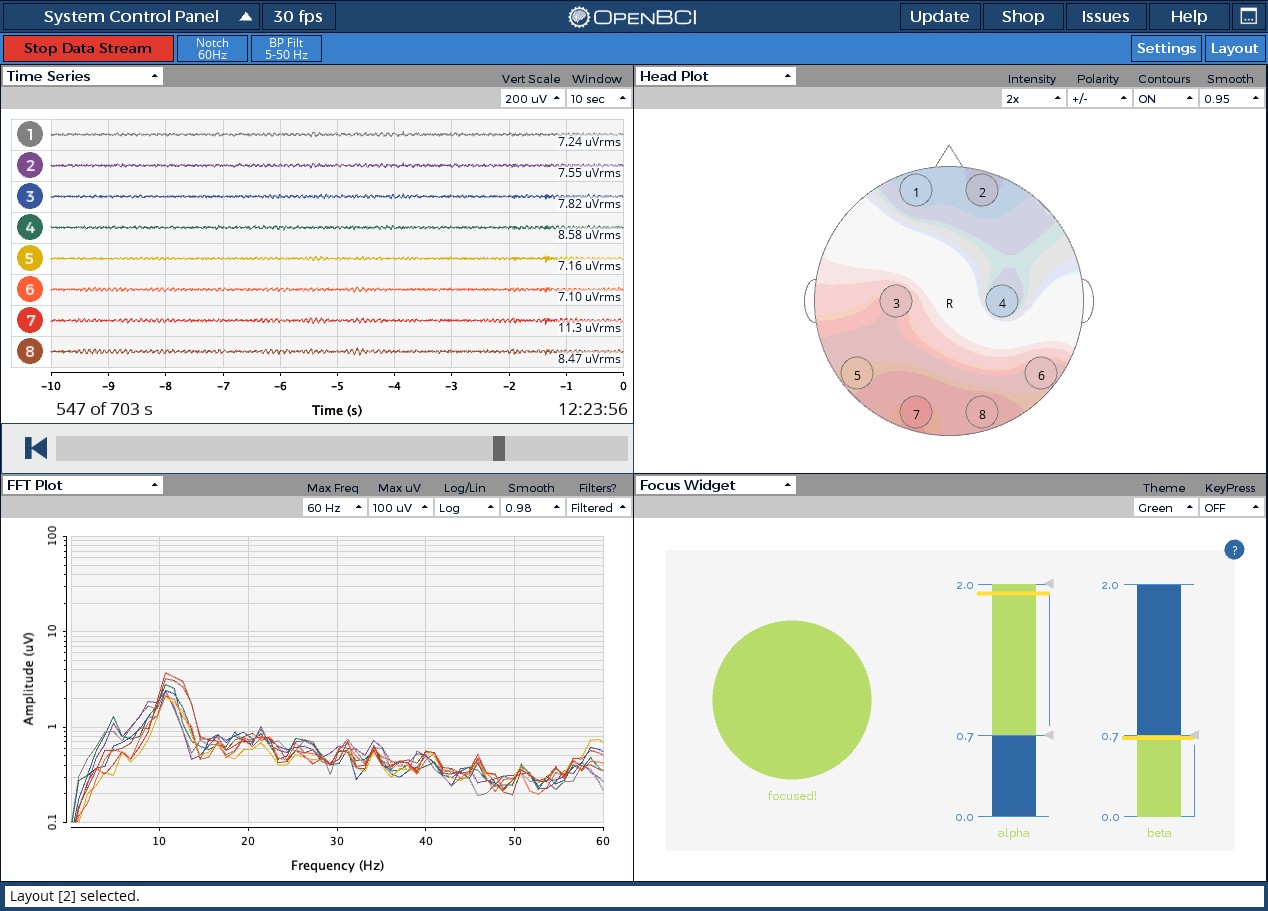
脑机新手指南(七):OpenBCI_GUI:从环境搭建到数据可视化(上)
一、OpenBCI_GUI 项目概述 (一)项目背景与目标 OpenBCI 是一个开源的脑电信号采集硬件平台,其配套的 OpenBCI_GUI 则是专为该硬件设计的图形化界面工具。对于研究人员、开发者和学生而言,首次接触 OpenBCI 设备时,往…...
