完整微服务设计 功能实现
我们将以一个简单的电商系统为例,实现微服务架构,逐步用Java代码详细实现每个模块,并配合注释帮助小白理解。在这个实现中,我们使用以下工具和框架:
- Spring Boot:用于构建微服务。
- Spring Cloud:用于服务注册、发现、负载均衡等。
- Docker:用于容器化服务。
- Kubernetes (K8s):用于部署到生产环境。
- MySQL/MongoDB/PostgreSQL:不同服务独立数据库。
- RabbitMQ:用于消息队列。
- Prometheus + Grafana:用于监控。
以下是完整的实现步骤。
一、用户服务 (User Service)的实现
1. 环境搭建
1.1 必备工具安装
确保安装以下工具:
- Java 17+
- Maven
- Docker
- Kubernetes (minikube 或云上的K8s服务)
- RabbitMQ
- 数据库(MySQL/PostgreSQL/MongoDB)
- IDE(IntelliJ IDEA 或 VS Code)
2. 功能:
管理用户信息(用户注册、查询)。
2.1 数据库准备
我们使用 PostgreSQL 来存储用户数据。
- 创建数据库和表:
CREATE DATABASE user_service;
CREATE TABLE users (id SERIAL PRIMARY KEY,username VARCHAR(255) NOT NULL UNIQUE,email VARCHAR(255) NOT NULL UNIQUE,created_at TIMESTAMP DEFAULT CURRENT_TIMESTAMP
);
2.2 创建 Spring Boot 项目
生成项目:Spring Initializr
依赖:
- Spring Web
- Spring Data JPA
- PostgreSQL Driver
2.3 实现用户服务
application.yml 配置文件
配置数据库连接:
server:port: 8081 # 服务运行的端口号spring:datasource:url: jdbc:postgresql://localhost:5432/user_serviceusername: postgres # 数据库用户名password: password # 数据库密码jpa:hibernate:ddl-auto: update # 自动更新数据库结构show-sql: true # 显示 SQL 查询日志
User 实体类
package com.example.userservice.model;import jakarta.persistence.*;
import java.time.LocalDateTime;/*** 用户实体类,对应数据库表 users。*/
@Entity
@Table(name = "users")
public class User {@Id@GeneratedValue(strategy = GenerationType.IDENTITY)private Long id;  // 用户唯一 ID@Column(nullable = false, unique = true)private String username;  // 用户名(唯一)@Column(nullable = false, unique = true)private String email;  // 用户邮箱(唯一)@Column(name = "created_at", updatable = false)private LocalDateTime createdAt = LocalDateTime.now();  // 用户注册时间// Getters 和 Setters,用于封装字段访问public Long getId() {return id;}public void setId(Long id) {this.id = id;}public String getUsername() {return username;}public void setUsername(String username) {this.username = username;}public String getEmail() {return email;}public void setEmail(String email) {this.email = email;}public LocalDateTime getCreatedAt() {return createdAt;}public void setCreatedAt(LocalDateTime createdAt) {this.createdAt = createdAt;}
}
UserRepository 接口
package com.example.userservice.repository;import com.example.userservice.model.User;
import org.springframework.data.jpa.repository.JpaRepository;
import org.springframework.stereotype.Repository;/*** 用户数据访问接口,提供 CRUD 操作。*/
@Repository
public interface UserRepository extends JpaRepository<User, Long> {User findByUsername(String username);  // 根据用户名查询用户
}
UserService 服务层
package com.example.userservice.service;import com.example.userservice.model.User;
import com.example.userservice.repository.UserRepository;
import org.springframework.stereotype.Service;import java.util.Optional;/*** 用户服务类,包含业务逻辑。*/
@Service
public class UserService {private final UserRepository userRepository;public UserService(UserRepository userRepository) {this.userRepository = userRepository;}/*** 注册新用户。* * @param user 包含用户名和邮箱的用户对象* @return 保存后的用户对象,包含生成的 ID 和注册时间*/public User registerUser(User user) {return userRepository.save(user);  // 保存到数据库}/*** 根据用户名查找用户。* * @param username 要查询的用户名* @return 包含用户对象的 Optional,如果未找到则为空*/public Optional<User> findUserByUsername(String username) {return Optional.ofNullable(userRepository.findByUsername(username));}
}
UserController 控制器
package com.example.userservice.controller;import com.example.userservice.model.User;
import com.example.userservice.service.UserService;
import org.springframework.http.ResponseEntity;
import org.springframework.web.bind.annotation.*;import java.util.Optional;/*** 用户服务的 REST 控制器。*/
@RestController
@RequestMapping("/api/users")
public class UserController {private final UserService userService;public UserController(UserService userService) {this.userService = userService;}/*** 注册新用户的 API。* * @param user 从请求体接收的用户对象* @return 返回注册成功的用户*/@PostMappingpublic ResponseEntity<User> registerUser(@RequestBody User user) {return ResponseEntity.ok(userService.registerUser(user));}/*** 根据用户名查找用户的 API。* * @param username 请求路径中的用户名* @return 返回找到的用户或 404*/@GetMapping("/{username}")public ResponseEntity<User> findUserByUsername(@PathVariable String username) {Optional<User> user = userService.findUserByUsername(username);return user.map(ResponseEntity::ok).orElse(ResponseEntity.notFound().build());}
}
2.4 测试用户服务
启动服务后:
-
注册用户:
curl -X POST -H "Content-Type: application/json" \ -d '{"username": "haha_jam", "email": "haha@example.com"}' \ http://localhost:8081/api/users响应:
{"id": 1,"username": "haha_jam","email": "haha@example.com","createdAt": "2024-12-20T10:00:00" } -
查询用户:
curl http://localhost:8081/api/users/haha_jam响应:
{"id": 1,"username": "haha_jam","email": "haha@example.com","createdAt": "2024-12-20T10:00:00"
}
3. 服务注册与发现
在完整微服务中,我们使用 Spring Cloud Eureka 来实现服务注册和发现。
3.1 什么是服务注册与发现?
在微服务架构中,服务是分布式的,每个服务都可能运行在不同的主机或容器中。为了让服务之间能够互相通信,需要一种机制来找到其他服务的地址和端口。
服务注册与发现原理:
- Eureka Server:服务注册中心,用来维护所有服务的地址列表。每个服务(如用户服务、订单服务)都会向 Eureka Server 注册自己。
- Eureka Client:微服务实例本身会向 Eureka Server 注册,并定期发送心跳来告诉注册中心它是健康的。
- 服务发现:当一个服务需要调用另一个服务时,它会向 Eureka Server 查询目标服务的地址列表。
配置步骤包括:
- 创建 Eureka Server。
- 将用户服务注册到 Eureka。
- 添加 API 网关。
3.2 创建 Eureka Server
Eureka Server 是服务注册中心,所有服务都会向它注册。
3.2.1 生成 Eureka Server 项目
-
打开 Spring Initializr。
-
配置项目:
- Project: Maven
- Language: Java
- Spring Boot: 3.0.0+
- Dependencies:
- Spring Cloud Eureka Server
-
下载生成的项目并解压。
3.2.2 配置 Eureka Server
1. 添加依赖
在 pom.xml 中确认以下依赖已经存在:
<dependency><groupId>org.springframework.cloud</groupId><artifactId>spring-cloud-starter-netflix-eureka-server</artifactId>
</dependency>
2. 配置 application.yml
在 src/main/resources/application.yml 中配置 Eureka Server:
server:port: 8761 # Eureka Server 的默认端口spring:application:name: eureka-server # 应用名称eureka:client:register-with-eureka: false # Eureka Server 本身不需要向其他注册中心注册fetch-registry: false # Eureka Server 不需要获取注册信息server:enable-self-preservation: false # 关闭自我保护模式(测试环境可以关闭,生产环境建议打开)
3. 启动类
在 src/main/java/com/example/eurekaserver/EurekaServerApplication.java 文件中添加 @EnableEurekaServer 注解。
package com.example.eurekaserver;import org.springframework.boot.SpringApplication;
import org.springframework.boot.autoconfigure.SpringBootApplication;
import org.springframework.cloud.netflix.eureka.server.EnableEurekaServer;/*** Eureka Server Application - 服务注册中心*/
@SpringBootApplication
@EnableEurekaServer  // 启用 Eureka Server 功能
public class EurekaServerApplication {public static void main(String[] args) {SpringApplication.run(EurekaServerApplication.class, args);}
}
3.2.3 启动 Eureka Server
- 使用 IDE 或命令行运行
EurekaServerApplication。 - 打开浏览器访问:http://localhost:8761
- 你会看到 Eureka Server 的管理页面,显示 "No instances available"。
3.3 将用户服务注册到 Eureka
现在我们需要将前面实现的 用户服务(User Service) 注册到 Eureka Server。
3.3.1 添加依赖
在用户服务的 pom.xml 中添加 Eureka Client 依赖:
<dependency><groupId>org.springframework.cloud</groupId><artifactId>spring-cloud-starter-netflix-eureka-client</artifactId>
</dependency>
3.3.2 配置 application.yml
在 src/main/resources/application.yml 中添加 Eureka Client 配置:
server:port: 8081 # 用户服务运行的端口spring:application:name: user-service # 服务名称,Eureka 注册时的标识eureka:client:service-url:defaultZone: http://localhost:8761/eureka/ # Eureka Server 的地址
3.3.3 修改启动类
在用户服务的启动类中添加 @EnableEurekaClient 注解:
package com.example.userservice;import org.springframework.boot.SpringApplication;
import org.springframework.boot.autoconfigure.SpringBootApplication;
import org.springframework.cloud.netflix.eureka.EnableEurekaClient;/*** User Service Application - 用户服务*/
@SpringBootApplication
@EnableEurekaClient  // 启用 Eureka Client 功能
public class UserServiceApplication {public static void main(String[] args) {SpringApplication.run(UserServiceApplication.class, args);}
}
3.3.4 验证注册
- 启动 Eureka Server。
- 启动 用户服务。
- 在浏览器访问:http://localhost:8761
- 你会看到
user-service出现在 "Instances currently registered with Eureka" 列表中。
- 你会看到
3.4 添加 API 网关
API 网关用于转发客户端请求到具体的微服务,并支持负载均衡。
3.4.1 创建 API 网关项目
- 打开 Spring Initializr。
- 配置项目:
- Project: Maven
- Language: Java
- Spring Boot: 3.0.0+
- Dependencies:
- Spring Cloud Gateway
- Spring Cloud Eureka Discovery
3.4.2 配置 API 网关
1. 添加依赖
在 pom.xml 中确认以下依赖:
<dependency><groupId>org.springframework.cloud</groupId><artifactId>spring-cloud-starter-gateway</artifactId>
</dependency>
<dependency><groupId>org.springframework.cloud</groupId><artifactId>spring-cloud-starter-netflix-eureka-client</artifactId>
</dependency>
2. 配置 application.yml
在 src/main/resources/application.yml 中配置网关:
server:port: 8080 # API 网关运行的端口spring:application:name: api-gateway # 应用名称cloud:gateway:routes:- id: user-service # 路由 IDuri: lb://user-service # 用户服务(通过 Eureka 注册的服务名)predicates:- Path=/api/users/** # 匹配以 /api/users 开头的请求eureka:client:service-url:defaultZone: http://localhost:8761/eureka/ # Eureka Server 地址
3. 启动类
在 src/main/java/com/example/apigateway/ApiGatewayApplication.java 文件中添加 @EnableEurekaClient 注解。
package com.example.apigateway;import org.springframework.boot.SpringApplication;
import org.springframework.boot.autoconfigure.SpringBootApplication;
import org.springframework.cloud.netflix.eureka.EnableEurekaClient;/*** API Gateway Application - 网关服务*/
@SpringBootApplication
@EnableEurekaClient  // 启用 Eureka Client 功能
public class ApiGatewayApplication {public static void main(String[] args) {SpringApplication.run(ApiGatewayApplication.class, args);}
}
3.4.3 验证 API 网关
- 启动 Eureka Server。
- 启动 用户服务。
- 启动 API 网关。
- 测试 API:
curl http://localhost:8080/api/users/john_doe- API 网关会将请求转发到用户服务,返回用户数据。
4. 部署到K8S
4.1 容器化服务 (Docker)
在项目根目录下创建 Dockerfile:
FROM openjdk:17-jdk-slim
COPY target/user-service-0.0.1-SNAPSHOT.jar user-service.jar
ENTRYPOINT ["java", "-jar", "/user-service.jar"]
4.2 构建Docker镜像:
-
打包项目:
mvn clean package -DskipTests -
构建镜像:
docker build -t user-service:1.0 . -
运行容器:
docker run -d -p 8081:8081 user-service:1.0
4.3 部署到 Kubernetes
创建 user-service-deployment.yml:
apiVersion: apps/v1
kind: Deployment
metadata:name: user-service
spec:replicas: 3selector:matchLabels:app: user-servicetemplate:metadata:labels:app: user-servicespec:containers:- name: user-serviceimage: user-service:1.0ports:- containerPort: 8081
---
apiVersion: v1
kind: Service
metadata:name: user-service
spec:selector:app: user-serviceports:- protocol: TCPport: 80targetPort: 8081type: LoadBalancer
4.4 部署到 K8s 集群
-
应用配置:
kubectl apply -f user-service-deployment.yml -
查看服务:
kubectl get services
二、产品服务 (Product Service) 和订单服务 (Order Service)的实现
每个服务有自己的数据库,提供REST API,并实现服务注册和发现,确保服务之间的解耦和可扩展性。
1. 产品服务 (Product Service)
功能:管理商品信息,包括商品的添加、修改和查询。
1.1 数据库准备
我们使用 MongoDB 来存储商品数据。
- 创建数据库和集合:
use product_service;
db.createCollection("products");
1.2 创建 Spring Boot 项目
生成项目:Spring Initializr
依赖:
- Spring Web
- Spring Data MongoDB
1.3 实现产品服务
application.yml 配置文件
配置MongoDB连接:
server:port: 8082spring:data:mongodb:uri: mongodb://localhost:27017/product_service
Product 实体类
package com.example.productservice.model;import org.springframework.data.annotation.Id;
import org.springframework.data.mongodb.core.mapping.Document;/*** 在MongoDB中表示产品文档的产品实体类。*/
@Document(collection = "products")
public class Product {@Idprivate String id;  // 商品ID,由MongoDB生成private String name;  // 商品名称private String description;  // 商品描述private double price;  // 商品价格private int stock;  // 商品库存// Getters and Setterspublic String getId() {return id;}public void setId(String id) {this.id = id;}public String getName() {return name;}public void setName(String name) {this.name = name;}public String getDescription() {return description;}public void setDescription(String description) {this.description = description;}public double getPrice() {return price;}public void setPrice(double price) {this.price = price;}public int getStock() {return stock;}public void setStock(int stock) {this.stock = stock;}
}
ProductRepository 接口
package com.example.productservice.repository;import com.example.productservice.model.Product;
import org.springframework.data.mongodb.repository.MongoRepository;
import org.springframework.stereotype.Repository;/*** 用于在Product实体上执行CRUD操作的存储库接口。*/
@Repository
public interface ProductRepository extends MongoRepository<Product, String> {Product findByName(String name);  // 根据商品名称查询商品
}
ProductService 服务层
package com.example.productservice.service;import com.example.productservice.model.Product;
import com.example.productservice.repository.ProductRepository;
import org.springframework.stereotype.Service;import java.util.Optional;/*** 管理产品的服务类。包含产品相关操作的业务逻辑。*/
@Service
public class ProductService {private final ProductRepository productRepository;public ProductService(ProductRepository productRepository) {this.productRepository = productRepository;}/*** 添加新产品。* * @param product 包含产品详细信息的产品对象。* @return Saved 带生成ID的产品对象*/public Product addProduct(Product product) {return productRepository.save(product);}/*** 按名称查找产品。* * @param name 产品名称。* @return 含有找到的产品,如果没有找到则为空。*/public Optional<Product> findProductByName(String name) {return Optional.ofNullable(productRepository.findByName(name));}/*** 按指定数量减少库存。* * @param productId 产品ID。* @param quantity 数量减少。* @return 更新了Product对象。*/public Product decreaseStock(String productId, int quantity) {Product product = productRepository.findById(productId).orElseThrow(() -> new RuntimeException("Product not found"));if (product.getStock() >= quantity) {product.setStock(product.getStock() - quantity);return productRepository.save(product);} else {throw new RuntimeException("Insufficient stock");}}
}
ProductController 控制器
package com.example.productservice.controller;import com.example.productservice.model.Product;
import com.example.productservice.service.ProductService;
import org.springframework.http.ResponseEntity;
import org.springframework.web.bind.annotation.*;/*** 与产品相关的端点的REST控制器。*/
@RestController
@RequestMapping("/api/products")
public class ProductController {private final ProductService productService;public ProductController(ProductService productService) {this.productService = productService;}/*** 添加新产品的端点。* * @param product 请求体中的产品对象。* @return 包含已保存产品的responseentity。*/@PostMappingpublic ResponseEntity<Product> addProduct(@RequestBody Product product) {return ResponseEntity.ok(productService.addProduct(product));}/*** 根据名称查找产品的端点。* * @param name 产品名称作为路径变量传递。* @return 包含产品,如果找到。*/@GetMapping("/{name}")public ResponseEntity<Product> findProductByName(@PathVariable String name) {return productService.findProductByName(name).map(ResponseEntity::ok).orElse(ResponseEntity.notFound().build());}/*** 减少产品库存的终点。* * @param productId 产品ID。* @param quantity 数量减少。* @return 包含更新后的产品。*/@PutMapping("/{productId}/decrease-stock/{quantity}")public ResponseEntity<Product> decreaseStock(@PathVariable String productId, @PathVariable int quantity) {return ResponseEntity.ok(productService.decreaseStock(productId, quantity));}
}
1.4 测试产品服务
启动服务后:
-
添加商品:
curl -X POST -H "Content-Type: application/json" \ -d '{"name": "Laptop", "description": "High-performance laptop", "price": 1000, "stock": 50}' \ http://localhost:8082/api/products响应:
{"id": "605c72ef1532072a20b0f119","name": "Laptop","description": "High-performance laptop","price": 1000,"stock": 50 } -
查询商品:
curl http://localhost:8082/api/products/Laptop响应:
{"id": "605c72ef1532072a20b0f119","name": "Laptop","description": "High-performance laptop","price": 1000,"stock": 50
}
2. 订单服务 (Order Service)
功能:管理用户的订单,包括创建订单、查询订单、更新订单状态等。
2.1 数据库准备
我们使用 MySQL 来存储订单数据。
- 创建数据库和表:
CREATE DATABASE order_service;
CREATE TABLE orders (id INT AUTO_INCREMENT PRIMARY KEY,user_id INT NOT NULL,product_id VARCHAR(255) NOT NULL,quantity INT NOT NULL,total_price DOUBLE NOT NULL,order_status VARCHAR(255) DEFAULT 'PENDING',created_at TIMESTAMP DEFAULT CURRENT_TIMESTAMP
);
2.2 创建 Spring Boot 项目
生成项目:Spring Initializr
依赖:
- Spring Web
- Spring Data JPA
- MySQL Driver
2.3 实现订单服务
application.yml 配置文件
配置MySQL连接:
server:port: 8083spring:datasource:url: jdbc:mysql://localhost:3306/order_serviceusername: rootpassword: rootjpa:hibernate:ddl-auto: updateshow-sql: true
Order 实体类
package com.example.orderservice.model;import jakarta.persistence.*;
import java.time.LocalDateTime;/*** 表示数据库中的订单表的订单实体类。*/
@Entity
@Table(name = "orders")
public class Order {@Id@GeneratedValue(strategy = GenerationType.IDENTITY)private Long id;@Column(nullable = false)private Long userId;  // 用户ID@Column(nullable = false)private String productId;  // 商品ID@Column(nullable = false)private int quantity;  // 购买数量@Column(nullable = false)private double totalPrice;  // 总金额@Column(name = "order_status", nullable = false)private String orderStatus = "PENDING";  // 订单状态@Column(name = "created_at", updatable = false
)private LocalDateTime createdAt = LocalDateTime.now();  // 订单创建时间// Getters and Setters
}
OrderRepository 接口
package com.example.orderservice.repository;import com.example.orderservice.model.Order;
import org.springframework.data.jpa.repository.JpaRepository;
import org.springframework.stereotype.Repository;/*** 用于在Order实体上执行CRUD操作的存储库接口。*/
@Repository
public interface OrderRepository extends JpaRepository<Order, Long> {Order findByUserIdAndOrderStatus(Long userId, String orderStatus);  // 根据用户ID和订单状态查询订单
}
OrderService 服务层
package com.example.orderservice.service;import com.example.orderservice.model.Order;
import com.example.orderservice.repository.OrderRepository;
import org.springframework.stereotype.Service;import java.util.Optional;/*** 用于管理订单的服务类。包含订单相关操作的业务逻辑。*/
@Service
public class OrderService {private final OrderRepository orderRepository;public OrderService(OrderRepository orderRepository) {this.orderRepository = orderRepository;}/*** 创建一个新订单。* * @param order 包含订单详细信息的订单对象。* @return 保存订单对象。*/public Order createOrder(Order order) {return orderRepository.save(order);}/*** 通过用户ID和状态查找订单。* * @param userId 用户ID。* @param orderStatus 订单状态(例如,‘PENDING’)。* @return 可选,包含找到的订单,如果没有找到则为空。*/public Optional<Order> findOrderByUserIdAndStatus(Long userId, String orderStatus) {return Optional.ofNullable(orderRepository.findByUserIdAndOrderStatus(userId, orderStatus));}
}
OrderController 控制器
package com.example.orderservice.controller;import com.example.orderservice.model.Order;
import com.example.orderservice.service.OrderService;
import org.springframework.http.ResponseEntity;
import org.springframework.web.bind.annotation.*;/*** 与订单相关的端点的REST控制器。*/
@RestController
@RequestMapping("/api/orders")
public class OrderController {private final OrderService orderService;public OrderController(OrderService orderService) {this.orderService = orderService;}/*** 创建新订单的端点。* * @param order 从请求体中订购对象。* @return ResponseEntity包含保存的订单。*/@PostMappingpublic ResponseEntity<Order> createOrder(@RequestBody Order order) {return ResponseEntity.ok(orderService.createOrder(order));}/*** 根据用户ID和状态查找订单的端点。* * @param userId 用户ID。* @param orderStatus 订单状态作为路径变量传递。* @return ResponseEntity包含找到的订单,如果存在。*/@GetMapping("/{userId}/{orderStatus}")public ResponseEntity<Order> findOrderByUserIdAndStatus(@PathVariable Long userId, @PathVariable String orderStatus) {return orderService.findOrderByUserIdAndStatus(userId, orderStatus).map(ResponseEntity::ok).orElse(ResponseEntity.notFound().build());}
}
总结
在这个扩展中,我们设计了三个服务:用户服务,产品服务和订单服务。每个服务具有自己的数据库,提供REST API,能够完成各自的功能,如商品管理、订单创建与查询。服务之间通过HTTP协议相互通信,服务之间通过微服务架构进行解耦,确保系统可扩展和维护。
相关文章:

完整微服务设计 功能实现
我们将以一个简单的电商系统为例,实现微服务架构,逐步用Java代码详细实现每个模块,并配合注释帮助小白理解。在这个实现中,我们使用以下工具和框架: Spring Boot:用于构建微服务。Spring Cloud:…...

JWT令牌与微服务
1. 什么是JWT JWT(JSON Web Token)是一种开放标准(RFC 7519),它定义了一种紧凑且自包含的方式,用于作为JSON对象在各方之间安全地传输信息。JWT通常用于身份验证和信息交换。 以下是JWT的一些关键特性: 紧凑ÿ…...

C# WinForm移除非法字符的输入框
C# WinForm移除非法字符的输入框 文章目录 namespace System.Windows.Forms {using System.ComponentModel;/// <summary>/// 支持移除 非法字符 的输入框。/// </summary>public class RemoveInvalidCharTextBox : TextBox{/// <summary>/// 测试代码&#…...
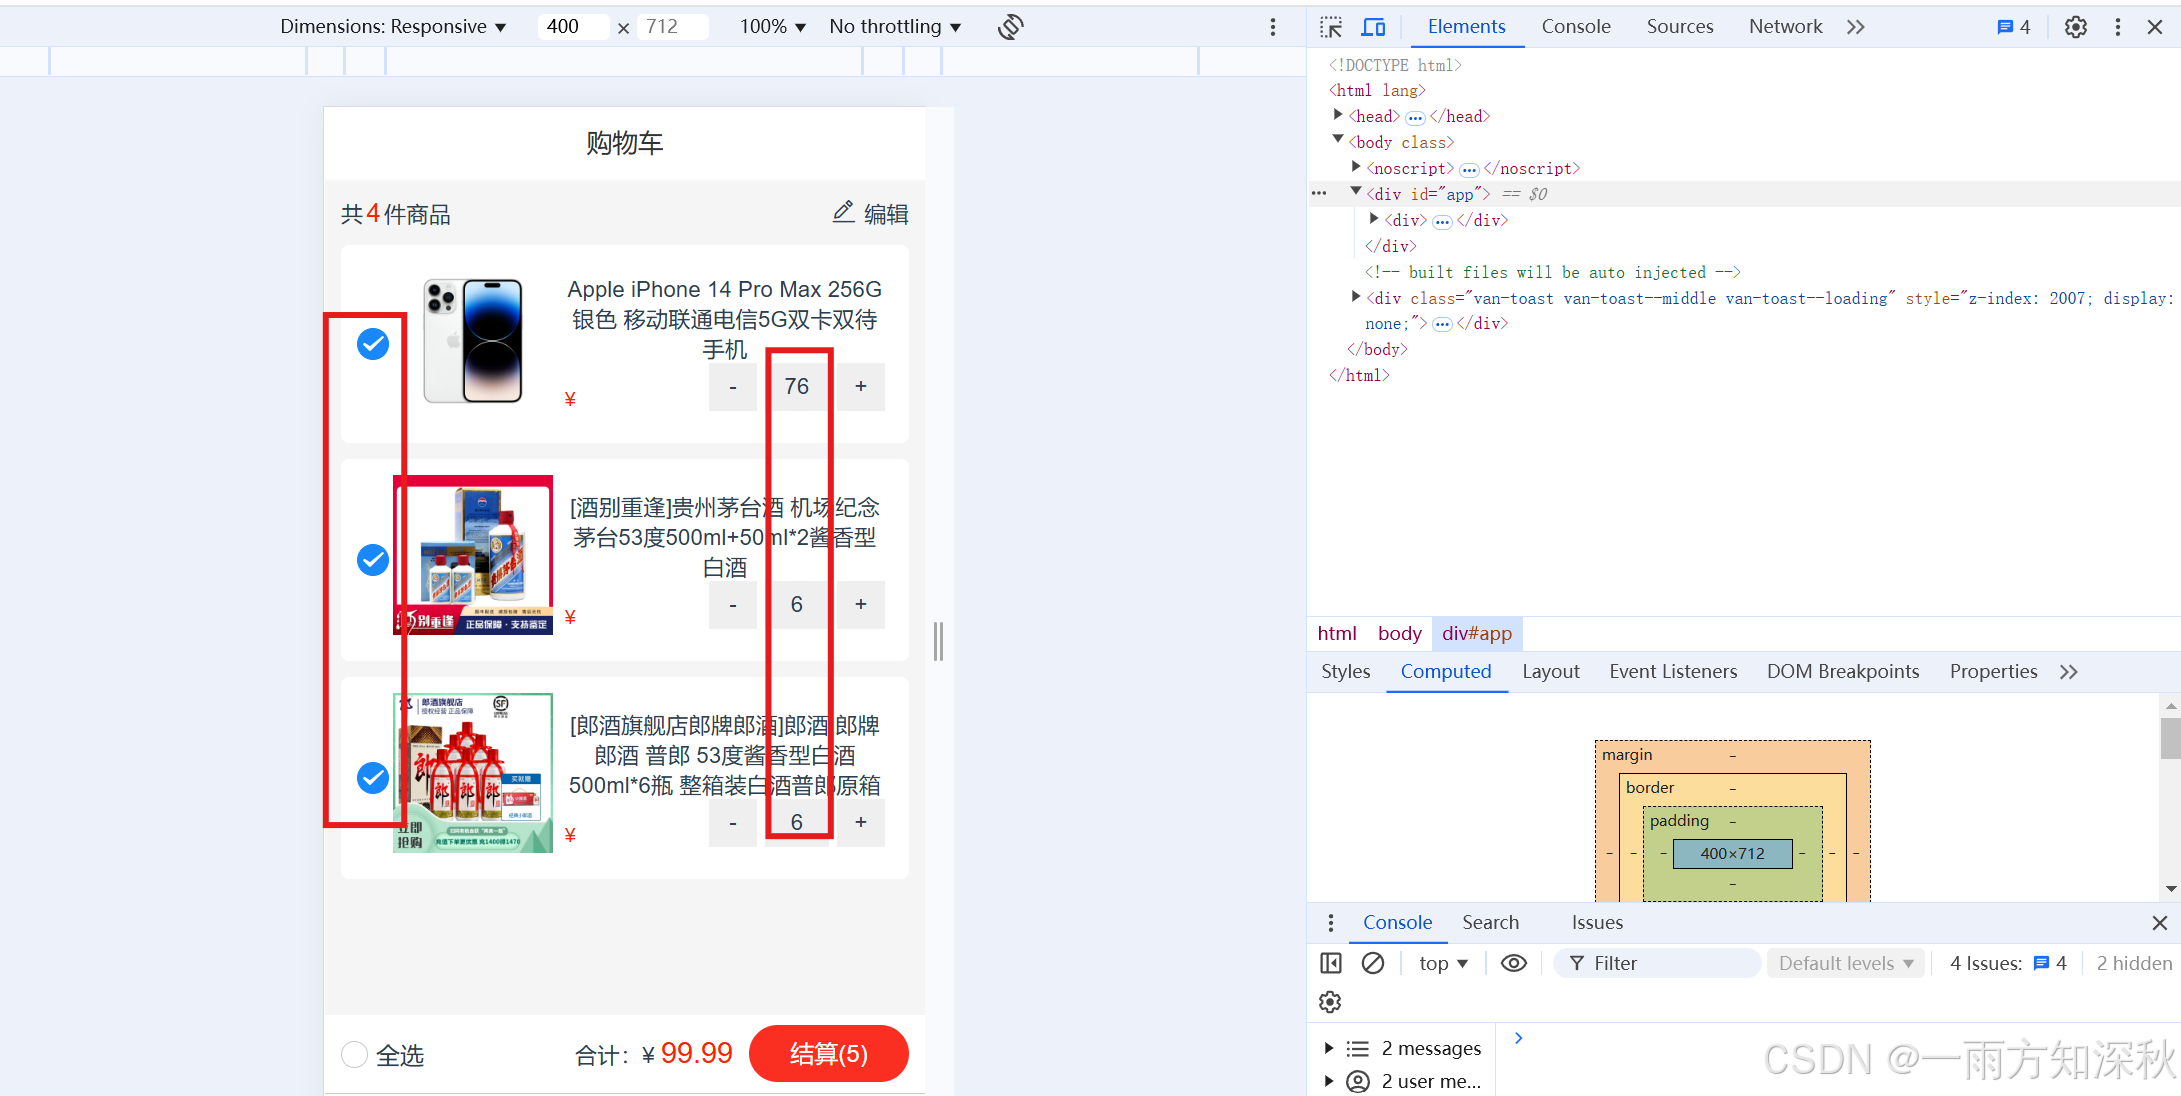
智慧商城:基于请求数据动态渲染购物车列表
进入购物车列表页面,当即触发请求,打印出解构出来的data.list 查看数据是否添加到 vuex 中。 将物品加入购物车,点击购物车进入购物车列表页,点击 vue 调试工具,可以看到 cart 模块state中新增添加的几个物品信息 渲染…...

医疗信息化浪潮下 SSM+Vue 医院预约挂号系统的崛起
2相关技术 2.1 MYSQL数据库 MySQL是一个真正的多用户、多线程SQL数据库服务器。 是基于SQL的客户/服务器模式的关系数据库管理系统,它的有点有有功能强大、使用简单、管理方便、安全可靠性高、运行速度快、多线程、跨平台性、完全网络化、稳定性等,非常…...

QScreen在Qt5.15与Qt6.8版本下的区别
简述 QScreen主要用于提供与屏幕相关的信息。它可以获取有关显示设备的分辨率、尺寸、DPI(每英寸点数)等信息。本文主要是介绍Qt5.15与Qt6环境下,QScreen的差异,以及如何判断高DPI设备。 属性说明 logicalDotsPerInch࿱…...

模具生产过程中的标签使用流程图
①NFC芯片嵌入周转筐,通过读卡器读取CK_Label_v3的数据,并将这些信息上传至服务器进行存储; ②服务器随后与客户的WMS(仓库管理系统)进行交互,记录和同步注塑机的原始数据; ③当周转筐内的模具…...

Unity-URP设置单独渲染UI相机
Unity-URP设置单独渲染UI相机 1、设置主相机层级,剔除UI层 2、新建UICamera,设置RenderType为Overiay;显示层级只选择UI层 3、选择主相机,Stack参数添加UICamera 4、Canvas设置成ScreenSpace-Camera,并指定UICamera渲…...

如何使用java来解析一个pdf文件呢?
最近搞到一个任务是要解析一套雅思题目并提取其中的高频单词。那如何使用java来解析一个pdf文件呢? 首先我们要知道这需要springboot框架来进行创建,需要的PDFTextStripper是一个用于PDF文档中提取文本的类,它是Apache PDFBox的一个类用于处…...

asp.net core发布配置端口号,支持linux
方式一,修改配置文件 appsettings.json 找到文件 appsettings.json, 添加如下节点配置,在linux环境需要设置0.0.0.0才可以正常代表本机,然后被其他机器访问,此处设置端口8000, "Kestrel": {&quo…...

M3D: 基于多模态大模型的新型3D医学影像分析框架,将3D医学图像分析从“看图片“提升到“理解空间“的层次,支持检索、报告生成、问答、定位和分割等8类任务
M3D: 基于多模态大模型的新型3D医学影像分析框架,将3D医学图像分析从“看图片“提升到“理解空间“的层次,支持检索、报告生成、问答、定位和分割等8类任务 论文大纲理解1. 确认目标2. 分析过程(目标-手段分析)核心问题拆解 3. 实…...

JavaScript中,常用crypto模块进行rsa加密,crypto-js模块进行md5算法
Node.js 的 crypto 模块 Node.js 内置的 crypto 模块提供了基本的加密功能,可以用于生成 RSA 密钥对和执行加密、解密操作。 代码案例: const crypto require(crypto);const { publicKey, privateKey } crypto.generateKeyPairSync(rsa, {modulusLen…...

机器学习04-为什么Relu函数
机器学习0-为什么Relu函数 文章目录 机器学习0-为什么Relu函数 [toc]1-手搓神经网络步骤总结2-为什么要用Relu函数3-进行L1正则化修改后的代码解释 4-进行L2正则化解释注意事项 5-Relu激活函数多有夸张1-细数Relu函数的5宗罪2-Relu函数5宗罪详述 6-那为什么要用这个Relu函数7-文…...
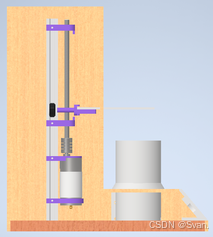
基于Arduino的自动开瓶系统
自动瓶盖开启器:结合Arduino和线性运动系统的创新解决方案 展示视频: 基于Arduino的自动开瓶器 引言 在日常生活中,开启瓶盖看似是一件简单的事情,但对于某些人来说,这可能是一个挑战。特别是对于患有类风湿性关节炎…...

通过使用 contenteditable=“true“,我们彻底防止了 iOS 系统键盘的弹出
明白了,对于苹果手机(iOS),即使使用了 bindtap 和 e.preventDefault() 来阻止默认行为,系统键盘仍然可能会弹出。这是因为 iOS 对输入框的处理方式与 Android 不同,尤其是在处理 input 元素时,iOS 会更加积极地弹出键盘。 解决方案 为了彻底防止 iOS 系统键盘弹出,我…...

20241217使用M6000显卡在WIN10下跑whisper来识别中英文字幕
20241217使用M6000显卡在WIN10下跑whisper来识别中英文字幕 2024/12/17 17:21 缘起,最近需要识别法国电影《地下铁》的法语字幕,使用 字幕小工具V1.2【whisper套壳/GUI封装了】 无效。 那就是直接使用最原始的whisper来干了。 当你重装WIN10的时候&#…...

搜索召回:召回聚合
召回聚合 用户的查询意图往往是复杂多样的,可能涉及到不同的领域、主题和语义层面。因此,召回体系中通常通过多路召回的方式从不同角度去理解和满足用户的查询需求。此外,多路召回通过各召回通道并行计算可以在海量数据中能够快速响应&#…...

NTFS 文件搜索库
NTFS 文件搜索库 中文 | English 一个快速搜索NTFS卷文件的库 在这里插入图片描述 特性 快速扫描 NTFS 格式驱动器上的所有文件实时快速同步文件变更(创建, 更名, 删除)支持通配符查询文件名或文件路径重启自动更新文件变动, 无需重新进行全盘扫描 API描述 初始化并指定…...
)
【GoF23种设计模式】02_单例模式(Singleton Pattern)
文章目录 前言一、什么是单例模式?二、为什么要用单例模式?三、如何实现单例模式?总结 前言 提示:设计者模式有利于提高开发者的编程效率和代码质量: GoF(Gang of Four,四人帮)设计…...

UniApp:uni-segmented-control 自定义布局
自定义tabs选项,items 为tabs名称数组,横向滚动 <scroll-view scroll-x><view class"segmented-control"><view v-for"(item, index) in items" :key"index" class"control-item ":class"…...

BabelDOC终极指南:5个技巧让你的PDF翻译又快又好
BabelDOC终极指南:5个技巧让你的PDF翻译又快又好 【免费下载链接】BabelDOC Yet Another Document Translator 项目地址: https://gitcode.com/GitHub_Trending/ba/BabelDOC 还在为PDF翻译后格式错乱、公式丢失而烦恼吗?作为一款专业的智能PDF翻译…...

别只盯着apt-get install:深入理解Linux头文件路径与编译器搜索机制的坑
别只盯着apt-get install:深入理解Linux头文件路径与编译器搜索机制的坑 当你在Linux环境下进行C/C开发时,是否曾遇到过这样的场景:明明已经安装了所有看似必要的依赖包,却依然被fatal error: drm.h: No such file or directory这…...

30天学会AI工程师|Day 14:自己实现一个小工具,你才会真正理解 Agent 是怎么“动起来”的
你先知道一件事 昨天你理解了 Tool Calling 的概念,今天最好亲手做一个最小工具。 为什么这一步重要 你完全可以从一个非常简单的例子开始。比如做一个计算器工具,输入两个数字和一个运算符,返回结果。或者做一个时间查询工具,返回…...

如何实现快速排名?老站降权后恢复收录的4步挽救法
企业站点日常维护期间,可能遭遇搜索访问量大面积滑坡。周一早晨九点登录系统,常会看到令人震惊的数据:原先稳定排在搜索结果前十名的50个主商业名词,在一夜之间完全不见踪迹。管理控制台页面显示的单日整体曝光量从25000次骤然缩减…...

【独家首发】ElevenLabs未公开的粤语语音增强技巧:3个隐藏prompt指令+2个音频后处理脚本
更多请点击: https://intelliparadigm.com 第一章:ElevenLabs广东话语音合成的技术边界与本地化挑战 ElevenLabs 作为全球领先的语音合成平台,其多语言支持能力广受关注,但粤语(广东话)尚未被官方列为正式…...

Omnizart代码实现原理:解密音乐AI背后的深度学习算法
Omnizart代码实现原理:解密音乐AI背后的深度学习算法 【免费下载链接】omnizart Omniscient Mozart, being able to transcribe everything in the music, including vocal, drum, chord, beat, instruments, and more. 项目地址: https://gitcode.com/gh_mirrors…...

【Midjourney宝丽来风格终极指南】:20年AI影像专家亲授3步调参法,97%用户忽略的胶片颗粒校准秘钥
更多请点击: https://codechina.net 第一章:宝丽来风格的视觉基因解码 宝丽来(Polaroid)成像并非仅关乎化学显影,其独特视觉语言根植于物理光学、色彩衰减模型与模拟噪声的协同作用。理解这一“视觉基因”,…...

Obsidian Local REST API:解锁个人知识库的自动化编程接口
Obsidian Local REST API:解锁个人知识库的自动化编程接口 【免费下载链接】obsidian-local-rest-api A secure REST API and Model Context Protocol (MCP) server for your vault. 项目地址: https://gitcode.com/gh_mirrors/ob/obsidian-local-rest-api 你…...

Super IO插件:Blender一键复制粘贴导入导出终极指南
Super IO插件:Blender一键复制粘贴导入导出终极指南 【免费下载链接】super_io blender addon for copy paste import / export 项目地址: https://gitcode.com/gh_mirrors/su/super_io 想要在Blender中实现一键导入导出模型和图像吗?Super IO插件…...

MLP-Mixer真的比CNN简单吗?深入拆解它的计算开销与内存瓶颈
MLP-Mixer真的比CNN简单吗?深入拆解它的计算开销与内存瓶颈 当谷歌研究院在2021年提出MLP-Mixer架构时,整个计算机视觉社区都为它的极简设计感到惊艳——没有注意力机制、没有卷积操作,仅用多层感知机(MLP)就实现了媲…...