optuna和 lightgbm
文章目录
- optuna使用
- 1.导入相关包
- 2.定义模型可选参数
- 3.定义训练代码和评估代码
- 4.定义目标函数
- 5.运行程序
- 6.可视化
- 7.超参数的重要性
- 8.查看相关信息
- 9.可视化的一个完整示例
- 10.lightgbm实验
optuna使用
1.导入相关包
import torch
import torch.nn as nn
import torch.nn.functional as F
import torchvision
from fvcore.nn import FlopCountAnalysisimport optunaDEVICE = torch.device("cuda") if torch.cuda.is_available() else torch.device("cpu")
DIR = ".."
BATCHSIZE = 128
N_TRAIN_EXAMPLES = BATCHSIZE * 30   # 128 * 30个训练
N_VALID_EXAMPLES = BATCHSIZE * 10   # 128 * 10个预测
2.定义模型可选参数
optuna支持很多种搜索方式:
(1)trial.suggest_categorical(‘optimizer’, [‘MomentumSGD’, ‘Adam’]):表示从SGD和adam里选一个使用;
(2)trial.suggest_int(‘num_layers’, 1, 3):从1~3范围内的int里选;
(3)trial.suggest_uniform(‘dropout_rate’, 0.0, 1.0):从0~1内的uniform分布里选;
(4)trial.suggest_loguniform(‘learning_rate’, 1e-5, 1e-2):从1e-5~1e-2的log uniform分布里选;
(5)trial.suggest_discrete_uniform(‘drop_path_rate’, 0.0, 1.0, 0.1):从0~1且step为0.1的离散uniform分布里选;
def define_model(trial):n_layers = trial.suggest_int("n_layers", 1, 3) # 从[1,3]范围里面选一个layers = []in_features = 28 * 28for i in range(n_layers):out_features = trial.suggest_int("n_units_l{}".format(i), 4, 128)layers.append(nn.Linear(in_features, out_features))layers.append(nn.ReLU())p = trial.suggest_float("dropout_{}".format(i), 0.2, 0.5)layers.append(nn.Dropout(p))in_features = out_featureslayers.append(nn.Linear(in_features, 10))layers.append(nn.LogSoftmax(dim=1))return nn.Sequential(*layers)
3.定义训练代码和评估代码
# Defines training and evaluation.
def train_model(model, optimizer, train_loader):model.train()for batch_idx, (data, target) in enumerate(train_loader):data, target = data.view(-1, 28 * 28).to(DEVICE), target.to(DEVICE)optimizer.zero_grad()F.nll_loss(model(data), target).backward()optimizer.step()def eval_model(model, valid_loader):model.eval()correct = 0with torch.no_grad():for batch_idx, (data, target) in enumerate(valid_loader):data, target = data.view(-1, 28 * 28).to(DEVICE), target.to(DEVICE)pred = model(data).argmax(dim=1, keepdim=True)correct += pred.eq(target.view_as(pred)).sum().item()accuracy = correct / N_VALID_EXAMPLESflops = FlopCountAnalysis(model, inputs=(torch.randn(1, 28 * 28).to(DEVICE),)).total()return flops, accuracy
4.定义目标函数
def objective(trial):train_dataset = torchvision.datasets.FashionMNIST(DIR, train=True, download=True, transform=torchvision.transforms.ToTensor())train_loader = torch.utils.data.DataLoader(torch.utils.data.Subset(train_dataset, list(range(N_TRAIN_EXAMPLES))),batch_size=BATCHSIZE,shuffle=True,)val_dataset = torchvision.datasets.FashionMNIST(DIR, train=False, transform=torchvision.transforms.ToTensor())val_loader = torch.utils.data.DataLoader(torch.utils.data.Subset(val_dataset, list(range(N_VALID_EXAMPLES))),batch_size=BATCHSIZE,shuffle=True,)model = define_model(trial).to(DEVICE)optimizer = torch.optim.Adam(model.parameters(), trial.suggest_float("lr", 1e-5, 1e-1, log=True))for epoch in range(10):train_model(model, optimizer, train_loader)flops, accuracy = eval_model(model, val_loader)return flops, accuracy
5.运行程序
运行30次实验,每次实验返回 flops,accuracy
study = optuna.create_study(directions=["minimize", "maximize"]) # flops 最小化, accuracy 最大化
study.optimize(objective, n_trials=30, timeout=300)print("Number of finished trials: ", len(study.trials))
6.可视化
flops, accuracy 二维图
optuna.visualization.plot_pareto_front(study, target_names=[“FLOPS”, “accuracy”])

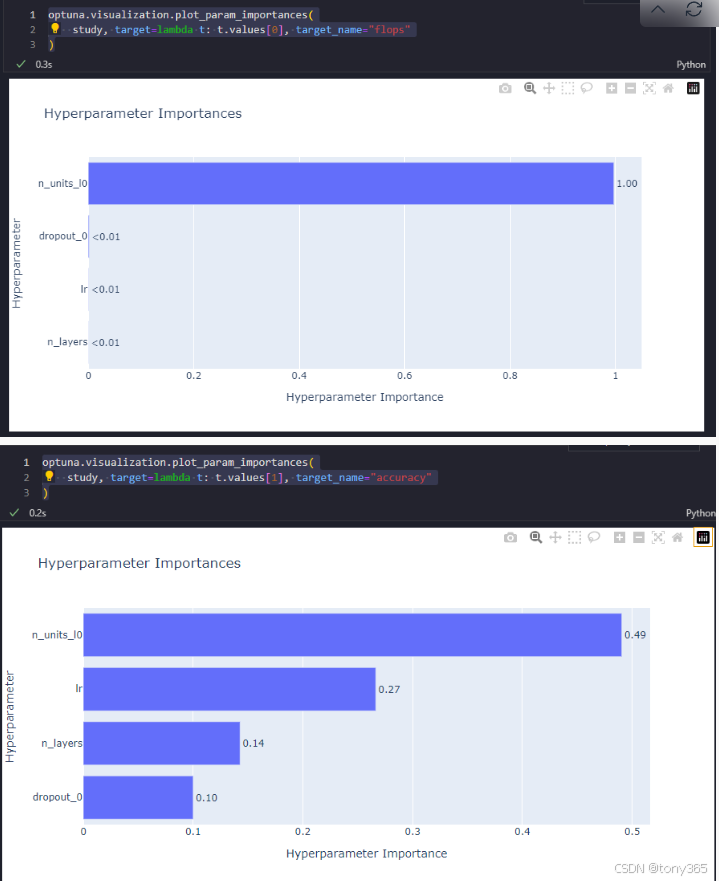
7.超参数的重要性
对于flops
optuna.visualization.plot_param_importances(
study, target=lambda t: t.values[0], target_name=“flops”
)
对于accuracy
optuna.visualization.plot_param_importances(
study, target=lambda t: t.values[1], target_name=“accuracy”
)
8.查看相关信息
# https://optuna.readthedocs.io/en/stable/tutorial/20_recipes/002_multi_objective.html
# 利用pytorch mnist 识别
# 设置了一些超参数,lr, layer number, feature_number等
# 然后目标是 flops 和 accurary# 最后是可视化:
# 显示试验的一些结果:
# optuna.visualization.plot_pareto_front(study, target_names=["FLOPS", "accuracy"])
# 左上角是最好的# 显示重要性:
# optuna.visualization.plot_param_importances(
#     study, target=lambda t: t.values[0], target_name="flops"
# )
# optuna.visualization.plot_param_importances(
#     study, target=lambda t: t.values[1], target_name="accuracy"
# )# trials的属性:
print(f"Number of trials on the Pareto front: {len(study.best_trials)}")trial_with_highest_accuracy = max(study.best_trials, key=lambda t: t.values[1])
print(f"Trial with highest accuracy: ")
print(f"\tnumber: {trial_with_highest_accuracy.number}")
print(f"\tparams: {trial_with_highest_accuracy.params}")
print(f"\tvalues: {trial_with_highest_accuracy.values}")
9.可视化的一个完整示例
# You can use Matplotlib instead of Plotly for visualization by simply replacing `optuna.visualization` with
# `optuna.visualization.matplotlib` in the following examples.
from optuna.visualization import plot_contour
from optuna.visualization import plot_edf
from optuna.visualization import plot_intermediate_values
from optuna.visualization import plot_optimization_history
from optuna.visualization import plot_parallel_coordinate
from optuna.visualization import plot_param_importances
from optuna.visualization import plot_rank
from optuna.visualization import plot_slice
from optuna.visualization import plot_timelinedef objective(trial):train_dataset = torchvision.datasets.FashionMNIST(DIR, train=True, download=True, transform=torchvision.transforms.ToTensor())train_loader = torch.utils.data.DataLoader(torch.utils.data.Subset(train_dataset, list(range(N_TRAIN_EXAMPLES))),batch_size=BATCHSIZE,shuffle=True,)val_dataset = torchvision.datasets.FashionMNIST(DIR, train=False, transform=torchvision.transforms.ToTensor())val_loader = torch.utils.data.DataLoader(torch.utils.data.Subset(val_dataset, list(range(N_VALID_EXAMPLES))),batch_size=BATCHSIZE,shuffle=True,)model = define_model(trial).to(DEVICE)optimizer = torch.optim.Adam(model.parameters(), trial.suggest_float("lr", 1e-5, 1e-1, log=True))for epoch in range(10):train_model(model, optimizer, train_loader)val_accuracy = eval_model(model, val_loader)trial.report(val_accuracy, epoch)if trial.should_prune():raise optuna.exceptions.TrialPruned()return val_accuracystudy = optuna.create_study(direction="maximize",sampler=optuna.samplers.TPESampler(seed=SEED),pruner=optuna.pruners.MedianPruner(),
)
study.optimize(objective, n_trials=30, timeout=300)
运行之后可视化:


10.lightgbm实验
"""
Optuna example that optimizes a classifier configuration for cancer dataset using LightGBM.In this example, we optimize the validation accuracy of cancer detection using LightGBM.
We optimize both the choice of booster model and their hyperparameters."""import numpy as np
import optunaimport lightgbm as lgb
import sklearn.datasets
import sklearn.metrics
from sklearn.model_selection import train_test_split# FYI: Objective functions can take additional arguments
# (https://optuna.readthedocs.io/en/stable/faq.html#objective-func-additional-args).
def objective(trial):data, target = sklearn.datasets.load_breast_cancer(return_X_y=True)train_x, valid_x, train_y, valid_y = train_test_split(data, target, test_size=0.25)dtrain = lgb.Dataset(train_x, label=train_y)param = {"objective": "binary","metric": "binary_logloss","verbosity": -1,"boosting_type": "gbdt","lambda_l1": trial.suggest_float("lambda_l1", 1e-8, 10.0, log=True),"lambda_l2": trial.suggest_float("lambda_l2", 1e-8, 10.0, log=True),"num_leaves": trial.suggest_int("num_leaves", 2, 256),"feature_fraction": trial.suggest_float("feature_fraction", 0.4, 1.0),"bagging_fraction": trial.suggest_float("bagging_fraction", 0.4, 1.0),"bagging_freq": trial.suggest_int("bagging_freq", 1, 7),"min_child_samples": trial.suggest_int("min_child_samples", 5, 100),}gbm = lgb.train(param, dtrain)preds = gbm.predict(valid_x)pred_labels = np.rint(preds)accuracy = sklearn.metrics.accuracy_score(valid_y, pred_labels)return accuracyif __name__ == "__main__":study = optuna.create_study(direction="maximize")study.optimize(objective, n_trials=100)print("Number of finished trials: {}".format(len(study.trials)))print("Best trial:")trial = study.best_trialprint("  Value: {}".format(trial.value))print("  Params: ")for key, value in trial.params.items():print("    {}: {}".format(key, value))
运行结果:

https://github.com/microsoft/LightGBM/tree/master/examples
https://blog.csdn.net/yang1015661763/article/details/131364826
相关文章:
optuna和 lightgbm
文章目录 optuna使用1.导入相关包2.定义模型可选参数3.定义训练代码和评估代码4.定义目标函数5.运行程序6.可视化7.超参数的重要性8.查看相关信息9.可视化的一个完整示例10.lightgbm实验 optuna使用 1.导入相关包 import torch import torch.nn as nn import torch.nn.functi…...

Android 设置铃声和闹钟
Android设置铃声和闹钟使用的方法是一样的,但是要区别的去获取对应的权限。 统一权限,不管是设置闹钟还是铃声,他们都需要一个系统设置权限如下: //高版本需要WRITE_SETTINGS权限//此权限是敏感权限,无法动态申请,需要…...

自动化测试模型(一)
8.8.1 自动化测试模型概述 在自动化测试运用于测试工作的过程中,测试人员根据不同自动化测试工具、测试框架等所进行的测试活动进行了抽象,总结出线性测试、模块化驱动测试、数据驱动测试和关键字驱动测试这4种自动化测试模型。 线性测试 首先&#…...

解决nuxt3下载慢下载报错问题
在下载nuxt3时总是下不下来,最后还报错了。即使改成国内镜像源也不行。 解决方法: 直接去github上下载 https://github.com/nuxt/starter/tree/v3 解压后得到如下目录: 手动修改项目名和文件夹名 安装依赖 npm install可能会比较慢或下不…...

Ubuntu修改swap大小
查看swap位置和大小: swapon -s 方案一:修改原有文件大小方式 第一步:进入系统根目录cd /; 第二步:执行:sudo dd if/dev/zero of/swap bs1M count16384 //每段块1M 共16384块,即16G 第三步:执行…...

[C#] 复数乘法的跨平台SIMD硬件加速向量算法(不仅支持X86的Sse、Avx、Avx512,还支持Arm的AdvSimd)
文章目录 一、简单算法二、向量算法2.1 算法思路2.1.1 复数乘法的数学定义2.1.2 复数的数据布局2.1.3 第1步:计算 (a*c) (-b*d)i2.1.4 第2步:计算 (a*d) (b*c)i2.1.5 第3步:计算结果合并 2.2 算法实现(UseVectors)2.…...

C#WPF基础介绍/第一个WPF程序
什么是WPF WPF(Windows Presentation Foundation)是微软公司推出的一种用于创建窗口应用程序的界面框架。它是.NET Framework的一部分,提供了一套先进的用户界面设计工具和功能,可以实现丰富的图形、动画和多媒体效果。 WPF 使用…...
强大的接口测试可视化工具:Postman Flows
Postman Flows是一种接口测试可视化工具,可以使用流的形式在Postman工作台将请求接口、数据处理和创建实际流程整合到一起。如下图所示 Postman Flows是以API为中心的可视化应用程序开发界面。它提供了一个无限的画布用于编排和串连API,数据可视化来显示…...

系统设计及解决方案
发送验证码 1:根据手机号从Redis中获取value(验证码_时间戳) 2:如果value不为空,并且时间戳与当前时间戳的间隔小于60秒,则返回一个错误信息 3:生成随机验证码 4:调用阿里云短信服务API给用户发送短信验证码…...

从0入门自主空中机器人-2-2【无人机硬件选型-PX4篇】
1. 常用资料以及官方网站 无人机飞控PX4用户使用手册(无人机基本设置、地面站使用教程、软硬件搭建等):https://docs.px4.io/main/en/ PX4固件开源地址:https://github.com/PX4/PX4-Autopilot 飞控硬件、数传模块、GPS、分电板等…...
Linux之ARM(MX6U)裸机篇----2.汇编LED驱动实验
一,alpha的LED灯硬件原理分析 STM32 IO初始化流程 ①,使能GPIO时钟 ②,设置IO复用,复用为GPIO ③,配置GPIO的电气属性推挽,上拉下拉 ④,使用GPIO,输出高/低电平 MX6ULL IO初始化…...

e3 1220lv3 cpu-z分数
e3 1220lv3 双核四线程,1.1G频率,最低可在800MHZ运行,TDP 13W。 使用PE启动后测试cpu-z分数。 现在e3 1220lv3的价格落到69元。...

HTML5适配手机
要使 HTML5 网站适配手机设备,您可以遵循以下几个步骤和最佳实践: 1. 使用视口(Viewport) 在 HTML 文档的 <head> 部分添加视口元标签,以确保页面在移动设备上正确缩放和显示: <meta name"…...

C# 中使用 MassTransit
在生产环境中使用 MassTransit 时,通常需要进行详细的配置,包括设置连接字符串、配置队列、配置消费者、处理重试和错误队列等。以下是一个完整的示例,展示了如何在 ASP.NET Core 应用程序中配置 MassTransit,包括请求/响应模式和…...

网络编程 实现联网 b+Tree
网络编程是客户端和服务器之间通信的基础,也是现代应用开发中不可或缺的技能。在 Unity 中实现网络功能,需要结合计算机网络原理、数据结构与算法,以及网络协议的实际应用。以下是对这一块内容的详细介绍,包括每个涉及到的知识点&…...

zentao ubuntu上安装
#下载ZenTaoPMS-21.2-zbox_amd64.tar.gz(https://www.zentao.net/downloads.html) https://dl.zentao.net/zentao/21.2/ZenTaoPMS-21.2-zbox_amd64.tar.gzcd /opt tar -zxvf ZenTaoPMS-21.2-zbox_amd64.tar.gz#启动 /opt/zbox/zbox start /opt/zbox/zbox…...

Java 网络原理 ①-IO多路复用 || 自定义协议 || XML || JSON
这里是Themberfue 在学习完简单的网络编程后,我们将更加深入网络的学习——HTTP协议、TCP协议、UDP协议、IP协议........... IO多路复用 ✨在上一节基于 TCP 协议 编写应用层代码时,我们通过一个线程处理连接的申请,随后通过多线程或者线程…...

Bash Shell知识合集
1. chmod命令 创建一个bash shell脚本 hello.sh ~script $ touch hello.sh脚本创建完成后并不能直接执行,我们要用chmod命令授予它可执行的权限: ~script $ chmod 755 hello.sh授权后的脚本可以直接执行: ~script $ ./hello.sh2.指定运行…...

从0入门自主空中机器人-1【课程介绍】
关于本课程: 本次课程是一套面向对自主空中机器人感兴趣的学生、爱好者、相关从业人员的免费课程,包含了从硬件组装、机载电脑环境设置、代码部署、实机实验等全套详细流程,带你从0开始,组装属于自己的自主无人机,并让…...

Doris使用注意点
自己学习过程中整理,非官方 dws等最后用于查询的表可以考虑使用row存储加快查询,即用空间换时间duplicate key的选择要考虑最常查询使用适当使用bloomfilter 加速查询适当使用aggregate 模式降低max,avg,min之类的计算并加快查询…...

比迪丽LoRA模型Mathtype式交互:设计公式化提示词编辑器提升创作精度
比迪丽LoRA模型Mathtype式交互:设计公式化提示词编辑器提升创作精度 不知道你有没有过这样的经历:面对一个功能强大的AI绘画模型,比如集成了各种LoRA的比迪丽,脑子里明明有非常具体的画面,但就是不知道该怎么用文字描…...

Power BI视觉对象交互设计秘籍--巧用书签按钮实现动态提示
1. 为什么需要动态提示功能? 做数据分析报表最怕什么?不是数据不准,而是看报表的人看不懂。我见过太多这样的场景:精心设计的柱状图被用户误读,复杂的折线图被理解成完全相反的趋势。这时候你会想,要是有个…...

Tendis水平扩展实战:在线数据迁移与节点扩容最佳实践
Tendis水平扩展实战:在线数据迁移与节点扩容最佳实践 【免费下载链接】Tendis Tendis is a high-performance distributed storage system fully compatible with the Redis protocol. 项目地址: https://gitcode.com/gh_mirrors/te/Tendis Tendis作为腾讯开…...

为什么你的Markdown文档总是乱糟糟?vscode-markdownlint帮你告别格式噩梦
为什么你的Markdown文档总是乱糟糟?vscode-markdownlint帮你告别格式噩梦 【免费下载链接】vscode-markdownlint Markdown linting and style checking for Visual Studio Code 项目地址: https://gitcode.com/gh_mirrors/vs/vscode-markdownlint 你是否曾因…...

杰理之spp收发数据处理没有找到的问题处理【篇】
原因:开启#define CONFIG_APP_BT_ENABLE 宏配置后,spp的收发处理的回调默认会被库里面接管,所以在app层是看不到的。...

无线音频桥接实战指南:让传统音响实现跨设备兼容的完整方案
无线音频桥接实战指南:让传统音响实现跨设备兼容的完整方案 【免费下载链接】AirConnect Use AirPlay to stream to UPnP/Sonos & Chromecast devices 项目地址: https://gitcode.com/gh_mirrors/ai/AirConnect 🎶 从"音响孤岛"到&…...

协议数采网关在智慧水务场景中的应用与功能
水资源管理作为生态文明建设的关键组成部分,其重要性不言而喻。在智慧水务建设不断深化的当下,水质监测、水量调度以及设备运维等各个环节,都对智能化水平提出了更为严苛的要求。然而,当前水务行业面临着诸多难题,监测…...
)
职场新人必看:用豆包+WPS AI+Canva免费版1小时搞定专业述职PPT(附真实案例)
职场新人1小时速成专业述职PPT:豆包WPS AICanva黄金组合实战指南 刚结束试用期的你,是否正为述职报告焦头烂额?看着同事那些排版精美、数据可视化的PPT,再对比自己Word转PPT的简陋作品,这种落差感我太懂了。三年前我刚…...
)
Python自动化运维实战:用Paramiko库5分钟搞定SSH批量管理(附完整代码)
Python自动化运维实战:用Paramiko库5分钟搞定SSH批量管理(附完整代码) 运维工程师的日常工作中,服务器管理往往占据大量时间。想象一下,当你需要同时更新50台服务器的安全补丁,或者批量收集100台设备的日志…...

拆解Lite-HRNet的‘轻量’魔法:ShuffleBlock与CCWBlock如何省下80%算力
拆解Lite-HRNet的‘轻量’魔法:ShuffleBlock与CCWBlock如何省下80%算力 在计算机视觉领域,高分辨率网络(HRNet)因其出色的特征保持能力而备受推崇,但随之而来的计算成本却让许多实际应用望而却步。Lite-HRNet的出现&a…...