Flume的安装和使用
一、安装Flume
1. 下载flume-1.7.0
http://mirrors.shu.edu.cn/apache/flume/1.7.0/apache-flume-1.7.0-bin.tar.gz
2. 解压改名
tar xvf apache-flume-1.7.0-bin.tar.gz
mv apache-flume-1.7.0-bin flume
二、配置Flume
1. 配置sh文件
cp conf/flume-env.sh.template conf/flume-env.sh
2. 配置conf文件
cp conf/flume-conf.properties.template conf/flume.conf
三、将文件输出到日志
1、配置源是那里,目标是那里
# source: avro, channel: memory, sink: log
# Define a memory channel called ch1 on agent1
agent1.channels.ch1.type = memory
# Define an Avro source called avro-source1 on agent1 and tell it
# to bind to 0.0.0.0:41414. Connect it to channel ch1.
agent1.sources.avro-source1.channels = ch1
agent1.sources.avro-source1.type = avro
agent1.sources.avro-source1.bind = 0.0.0.0
agent1.sources.avro-source1.port = 41414
# Define a logger sink that simply logs all events it receives
# and connect it to the other end of the same channel.
agent1.sinks.log-sink1.channel = ch1
agent1.sinks.log-sink1.type = logger
# Finally, now that we've defined all of our components, tell
# agent1 which ones we want to activate.
agent1.channels = ch1
agent1.sources = avro-source1
agent1.sinks = log-sink1
2、启动Flume agent
bin/flume-ng agent --conf ./conf/ -f conf/flume.conf -Dflume.root.logger=DEBUG,console -n agent1
3、启动Flume Client
echo hello, world! > /usr/local/flume-test.log
echo hello, hadoop! >> /usr/local/flume-test.log
echo hello, flume! >> /usr/local/flume-test.log
echo hello, spark! >> /usr/local/flume-test.log
bin/flume-ng avro-client --conf conf -H localhost -p 41414 -F /usr/local/flume-test.log -Dflume.root.logger=DEBUG,console
4、client启动结果
2018-05-11 11:24:05,624 (main) [DEBUG - org.apache.flume.api.NettyAvroRpcClient.configure(NettyAvroRpcClient.java:498)] Batch size string = 5
2018-05-11 11:24:05,644 (main) [WARN - org.apache.flume.api.NettyAvroRpcClient.configure(NettyAvroRpcClient.java:634)] Using default maxIOWorkers
2018-05-11 11:24:06,100 (main) [DEBUG - org.apache.flume.client.avro.AvroCLIClient.run(AvroCLIClient.java:233)] Finished
2018-05-11 11:24:06,100 (main) [DEBUG - org.apache.flume.client.avro.AvroCLIClient.run(AvroCLIClient.java:236)] Closing reader
2018-05-11 11:24:06,101 (main) [DEBUG - org.apache.flume.client.avro.AvroCLIClient.run(AvroCLIClient.java:240)] Closing RPC client
2018-05-11 11:24:06,107 (main) [DEBUG - org.apache.flume.client.avro.AvroCLIClient.main(AvroCLIClient.java:84)] Exiting
5、Flume Server结果
2018-05-11 11:24:05,772 (New I/O server boss #3) [INFO - org.apache.avro.ipc.NettyServer$NettyServerAvroHandler.handleUpstream(NettyServer.java:171)] [id: 0xce7f8eac, /127.0.0.1:52790 => /127.0.0.1:41414] OPEN
2018-05-11 11:24:05,773 (New I/O worker #1) [INFO - org.apache.avro.ipc.NettyServer$NettyServerAvroHandler.handleUpstream(NettyServer.java:171)] [id: 0xce7f8eac, /127.0.0.1:52790 => /127.0.0.1:41414] BOUND: /127.0.0.1:41414
2018-05-11 11:24:05,773 (New I/O worker #1) [INFO - org.apache.avro.ipc.NettyServer$NettyServerAvroHandler.handleUpstream(NettyServer.java:171)] [id: 0xce7f8eac, /127.0.0.1:52790 => /127.0.0.1:41414] CONNECTED: /127.0.0.1:52790
2018-05-11 11:24:06,076 (New I/O worker #1) [DEBUG - org.apache.flume.source.AvroSource.appendBatch(AvroSource.java:378)] Avro source avro-source1: Received avro event batch of 4 events.
2018-05-11 11:24:06,104 (New I/O worker #1) [INFO - org.apache.avro.ipc.NettyServer$NettyServerAvroHandler.handleUpstream(NettyServer.java:171)] [id: 0xce7f8eac, /127.0.0.1:52790 :> /127.0.0.1:41414] DISCONNECTED
2018-05-11 11:24:06,104 (New I/O worker #1) [INFO - org.apache.avro.ipc.NettyServer$NettyServerAvroHandler.handleUpstream(NettyServer.java:171)] [id: 0xce7f8eac, /127.0.0.1:52790 :> /127.0.0.1:41414] UNBOUND
2018-05-11 11:24:06,104 (New I/O worker #1) [INFO - org.apache.avro.ipc.NettyServer$NettyServerAvroHandler.handleUpstream(NettyServer.java:171)] [id: 0xce7f8eac, /127.0.0.1:52790 :> /127.0.0.1:41414] CLOSED
2018-05-11 11:24:06,104 (New I/O worker #1) [INFO - org.apache.avro.ipc.NettyServer$NettyServerAvroHandler.channelClosed(NettyServer.java:209)] Connection to /127.0.0.1:52790 disconnected.
2018-05-11 11:24:08,870 (SinkRunner-PollingRunner-DefaultSinkProcessor) [INFO - org.apache.flume.sink.LoggerSink.process(LoggerSink.java:95)] Event: { headers:{} body: 68 65 6C 6C 6F 2C 20 77 6F 72 6C 64 21 hello, world! }
2018-05-11 11:24:08,870 (SinkRunner-PollingRunner-DefaultSinkProcessor) [INFO - org.apache.flume.sink.LoggerSink.process(LoggerSink.java:95)] Event: { headers:{} body: 68 65 6C 6C 6F 2C 20 68 61 64 6F 6F 70 21 hello, hadoop! }
2018-05-11 11:24:08,870 (SinkRunner-PollingRunner-DefaultSinkProcessor) [INFO - org.apache.flume.sink.LoggerSink.process(LoggerSink.java:95)] Event: { headers:{} body: 68 65 6C 6C 6F 2C 20 66 6C 75 6D 65 21 hello, flume! }
2018-05-11 11:24:08,871 (SinkRunner-PollingRunner-DefaultSinkProcessor) [INFO - org.apache.flume.sink.LoggerSink.process(LoggerSink.java:95)] Event: { headers:{} body: 68 65 6C 6C 6F 2C 20 73 70 61 72 6B 21 hello, spark! }
可以看到server端收到了client写入的数据
四、用Flume监控目录将新文件上传到HDFS
1、配置方式
# 将/usr/local/flume/tmpData下的文本文件上传到hdfs://node10:9000/test/
# source: spooldir, channel: memory, sink: hdfs
# Define a memory channel called ch1 on agent1
agent1.channels.ch1.type = memory
# Define an Avro source called avro-source1 on agent1 and tell it
# to bind to 0.0.0.0:41414. Connect it to channel ch1.
agent1.sources.spooldir-source1.channels = ch1
agent1.sources.spooldir-source1.type = spooldir
agent1.sources.spooldir-source1.spoolDir=/usr/local/flume/tmpData
# Event的headers增加文件名如:headers:{basename=a.txt}
agent1.sources.spooldir-source1.basenameHeader = true
# Define a logger sink that simply logs all events it receives
# and connect it to the other end of the same channel.
# 文件名是:a.txt.1536559992413
agent1.sinks.hdfs-sink1.channel = ch1
agent1.sinks.hdfs-sink1.type = hdfs
agent1.sinks.hdfs-sink1.hdfs.path = hdfs://node10:9000/test
# hdfs.filePrefix = log_%Y%m%d_%H 如:log_20151016_13.1444973768543
agent1.sinks.hdfs-sink1.hdfs.filePrefix = %{basename}
agent1.sinks.hdfs-sink1.hdfs.useLocalTimeStamp = true
agent1.sinks.hdfs-sink1.hdfs.round = true
agent1.sinks.hdfs-sink1.hdfs.roundValue = 10
agent1.sinks.hdfs-sink1.hdfs.rollSize = 0
agent1.sinks.hdfs-sink1.hdfs.rollCount = 0
# Finally, now that we've defined all of our components, tell
# agent1 which ones we want to activate.
agent1.channels = ch1
agent1.sources = spooldir-source1
agent1.sinks = hdfs-sink1
2、通过Flume启动agent
bin/flume-ng agent --conf ./conf/ -f ./conf/flume.conf --name agent1 -Dflume.root.logger=DEBUG,console
3、查看hdfs
http://node10(节点ip):50070
3、监控目录的文件
每个文件读取完之后,修改后缀为.COMPLETED,重启flume时忽略这些文件
五、多个Agent - 多个Collector配置
1、Flume Agent配置
#flume-client.properties
##### source: log(node1), channel: memory, sink: avro(node2, node3)
#agent1 name
agent1.channels = c1
agent1.sources = r1
agent1.sinks = k1 k2
#set gruop
agent1.sinkgroups = g1
#set channel
agent1.channels.c1.type = memory
agent1.channels.c1.capacity = 1000
agent1.channels.c1.transactionCapacity = 100
agent1.sources.r1.channels = c1
agent1.sources.r1.type = exec
agent1.sources.r1.command = tail -F /usr/local/hadoop/logs/hadoop-root-namenode-node1.log
agent1.sources.r1.interceptors = i1 i2
agent1.sources.r1.interceptors.i1.type = static
agent1.sources.r1.interceptors.i1.key = Type
agent1.sources.r1.interceptors.i1.value = LOGIN
agent1.sources.r1.interceptors.i2.type = timestamp
# set sink1
agent1.sinks.k1.channel = c1
agent1.sinks.k1.type = avro
agent1.sinks.k1.hostname = node2
agent1.sinks.k1.port = 52020
# set sink2
agent1.sinks.k2.channel = c1
agent1.sinks.k2.type = avro
agent1.sinks.k2.hostname = node3
agent1.sinks.k2.port = 52020
#set sink group
agent1.sinkgroups.g1.sinks = k1 k2
#设置失效恢复
agent1.sinkgroups.g1.processor.type = failover
agent1.sinkgroups.g1.processor.priority.k1 = 10
agent1.sinkgroups.g1.processor.priority.k2 = 1
agent1.sinkgroups.g1.processor.maxpenalty = 10000
2、Flume Collector配置
# flume-server.properties
#set Agent name
a1.sources = r1
a1.channels = c1
a1.sinks = k1
#set channel
a1.channels.c1.type = memory
a1.channels.c1.capacity = 1000
a1.channels.c1.transactionCapacity = 100
# other node,change node2 to node3
a1.sources.r1.type = avro
a1.sources.r1.bind = node2
a1.sources.r1.port = 52020
a1.sources.r1.interceptors = i1
a1.sources.r1.interceptors.i1.type = static
a1.sources.r1.interceptors.i1.key = Collector
a1.sources.r1.interceptors.i1.value = NNA
a1.sources.r1.channels = c1
#set sink to hdfs
a1.sinks.k1.type=hdfs
a1.sinks.k1.hdfs.path=/flume/logdfs
a1.sinks.k1.hdfs.fileType=DataStream
a1.sinks.k1.hdfs.writeFormat=TEXT
a1.sinks.k1.hdfs.rollInterval=1
a1.sinks.k1.channel=c1
a1.sinks.k1.hdfs.filePrefix=%Y-%m-%d
2、Flume启动Agent
flume-ng agent -n agent1 -c conf -f conf/flume-client.properties -Dflume.root.logger=DEBUG,console
3、Flume启动Collector
flume-ng agent -n a1 -c conf -f conf/flume-server.properties -Dflume.root.logger=DEBUG,console
4、Flume Failover测试
Collector1的权重比Collector2大
kill掉Collector1,Collector2工作
恢复Collector1,Collector1工作
5、Flume LoadBalancer
# 设置负载均衡
#agent1.sinkgroups.g1.processor.type = load_balance
#agent1.sinkgroups.g1.processor.backoff = true
#agent1.sinkgroups.g1.processor.selector = round_robin
六、Flume 整合Kafka
#设置Kafka接收器
a1.sinks.k2.type= org.apache.flume.sink.kafka.KafkaSink
#设置Kafka的broker地址和端口号
a1.sinks.k2.kafka.bootstrap.servers=node1:9092,node2:9092,node3:9092
#a1.sinks.k2.defaultPartitionId=0
a1.sinks.k2.producer.type=sync
#设置Kafka的Topic
a1.sinks.k2.kafka.topic=TestTopic
#设置序列化方式
a1.sinks.k2.serializer.class=kafka.serializer.StringEncoder
a1.sinks.k2.channel=c1
七、flume传递header到spark
#a1.sinks.k2.serializer.class=org.apache.kafka.common.serialization.BytesDeserializer
a1.sinks.k2.useFlumeEventFormat = true
val kafkaParams = Map[String, Object](
"bootstrap.servers" -> "192.168.60.15:9092",
"key.deserializer" -> classOf[StringDeserializer],
"value.deserializer" -> classOf[BytesDeserializer],
"group.id" -> "use_a_separate_group_id_for_each_stream",
"auto.offset.reset" -> "latest",
"enable.auto.commit" -> (false: java.lang.Boolean))
val topics = Array("sspclick")
val sspclick = KafkaUtils.createDirectStream[String, Bytes](
ssc,
PreferConsistent,
Subscribe[String, Bytes](topics, kafkaParams))
val reader = new SpecificDatumReader[AvroFlumeEvent](classOf[AvroFlumeEvent])
val a = sspclick.map(f => {
var body = f.value().get
var decoder = DecoderFactory.get().binaryDecoder(body, null);
var result = reader.read(null, decoder);
var hostname = result.getHeaders.get(new Utf8("hostname"))
var text = new String(result.getBody.array())
var array = text.split("\t")
相关文章:

Flume的安装和使用
一、安装Flume 1. 下载flume-1.7.0 http://mirrors.shu.edu.cn/apache/flume/1.7.0/apache-flume-1.7.0-bin.tar.gz 2. 解压改名 tar xvf apache-flume-1.7.0-bin.tar.gz mv apache-flume-1.7.0-bin flume 二、配置Flume 1. 配置sh文件 cp conf/flume-env.sh.template …...

[Hive]七 Hive 内核
1. Hive架构 Hive架构主要包括: 用户界面:命令行(CLI)和web UIThrift Server:公开了一个非常简单的客户端执行HiveQL语句的API,包括JDBC(Java)和ODBC(C)&…...

Druid密码错误重试导致数据库超慢
文章目录 密码错误重试导致数据库超慢如何避免呢? 密码错误重试导致数据库超慢 有同事把项目的数据库密码配错了,导致其他所有连接该数据库的项目全部连接都获取缓慢了,一个页面加载要花费十几秒。排查mysql连接发现很多connect命令的连接 …...

Ubuntu 24.04安装和使用WPS 2019
为Ubuntu找一款免费、功能丰富的 Microsoft Office 替代品?WPS Office是理想选择!在本文中,包含在Ubuntu上安装 WPS Office,修复初次使用出现问题的修复。 安装WPS,参考链接>>How to Install WPS Office on Ubu…...

week05_nlp大模型训练·词向量文本向量
1、词向量训练 1.1 CBOW(两边预测中间) 一、CBOW 基本概念 CBOW 是一种用于生成词向量的方法,属于神经网络语言模型的一种。其核心思想是根据上下文来预测中心词。在 CBOW 中,输入是目标词的上下文词汇,输出是该目标…...

【RabbitMQ消息队列原理与应用】
RabbitMQ消息队列原理与应用 一、消息队列概述 (一)概念 消息队列(Message Queue,简称MQ)是一种应用程序间的通信方式,它允许应用程序通过将消息放入队列中,而不是直接调用其他应用程序的接口…...
反欺诈风控体系及策略
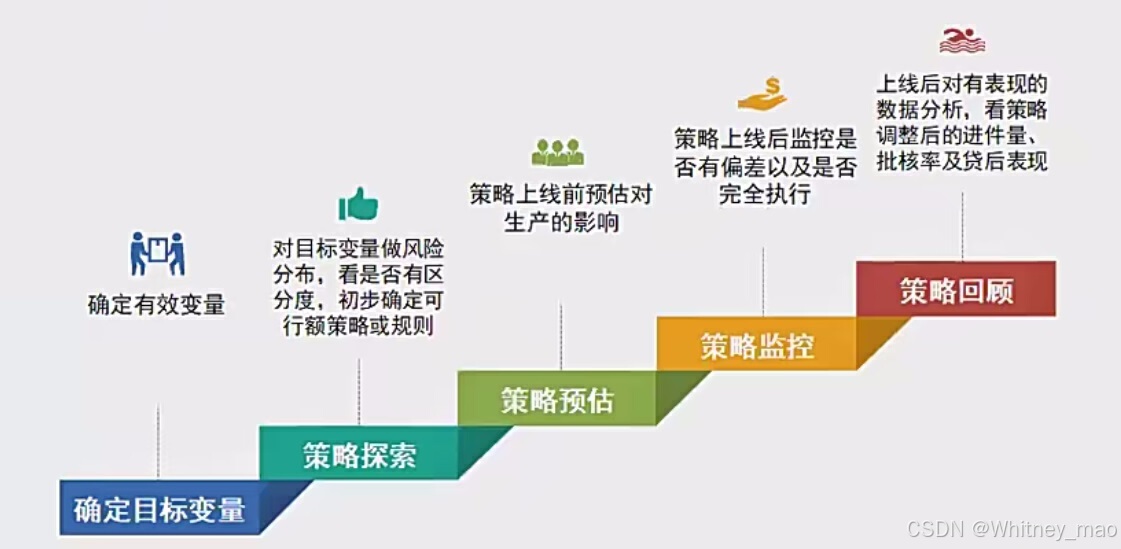
本文详细介绍了互联网领域金融信贷行业的反欺诈策略。首先,探讨了反欺诈的定义、重要性以及在当前互联网发展背景下欺诈风险的加剧。接着,分析了反欺诈的主要手段和基础技术,包括对中介和黑产的了解、欺诈风险的具体类型和表现方式࿰…...

Mac 12.1安装tiger-vnc问题-routines:CRYPTO_internal:bad key length
背景:因为某些原因需要从本地mac连接远程linxu桌面查看一些内容,必须使用桌面查看,所以ssh无法满足,所以决定安装vnc客户端。 问题: 在mac上通过 brew install tiger-vnc命令安装, 但是报错如下: > D…...

【代码分析】Unet-Pytorch
1:unet_parts.py 主要包含: 【1】double conv,双层卷积 【2】down,下采样 【3】up,上采样 【4】out conv,输出卷积 """ Parts of the U-Net model """import torch im…...

【LLM入门系列】01 深度学习入门介绍
NLP Github 项目: NLP 项目实践:fasterai/nlp-project-practice 介绍:该仓库围绕着 NLP 任务模型的设计、训练、优化、部署和应用,分享大模型算法工程师的日常工作和实战经验 AI 藏经阁:https://gitee.com/fasterai/a…...

安卓系统主板_迷你安卓主板定制开发_联发科MTK安卓主板方案
安卓主板搭载联发科MT8766处理器,采用了四核Cortex-A53架构,高效能和低功耗设计。其在4G网络待机时的电流消耗仅为10-15mA/h,支持高达2.0GHz的主频。主板内置IMG GE832 GPU,运行Android 9.0系统,内存配置选项丰富&…...

关键点检测——HRNet原理详解篇
🍊作者简介:秃头小苏,致力于用最通俗的语言描述问题 🍊专栏推荐:深度学习网络原理与实战 🍊近期目标:写好专栏的每一篇文章 🍊支持小苏:点赞👍🏼、…...

25考研总结
11408确实难,25英一直接单科斩杀😭 对过去这一年多备考的经历进行复盘,以及考试期间出现的问题进行思考。 考408的人,政治英语都不能拖到最后,408会惩罚每一个偷懒的人! 政治 之所以把政治写在最开始&am…...

网络安全态势感知
一、网络安全态势感知(Cyber Situational Awareness)是一种通过收集、处理和分析网络数据来理解当前和预测未来网络安全状态的能力。它的目的是提供实时的、安全的网络全貌,帮助组织理解当前网络中发生的事情,评估风险,…...

在K8S中,节点状态notReady如何排查?
在kubernetes集群中,当一个节点(Node)的状态变为NotReady时,意味着该节点可能无法运行Pod或不能正确相应kubernetes控制平面。排查NotReady节点通常涉及以下步骤: 1. 获取基本信息 使用kubectl命令行工具获取节点状态…...

深度学习在光学成像中是如何发挥作用的?
深度学习在光学成像中的作用主要体现在以下几个方面: 1. **图像重建和去模糊**:深度学习可以通过优化图像重建算法来处理模糊图像或降噪,改善成像质量。这涉及到从低分辨率图像生成高分辨率图像,突破传统光学系统的分辨率限制。 …...

树莓派linux内核源码编译
Raspberry Pi 内核 托管在 GitHub 上;更新滞后于上游 Linux内核,Raspberry Pi 会将 Linux 内核的长期版本整合到 Raspberry Pi 内核中。 1 构建内核 操作系统随附的默认编译器和链接器被配置为构建在该操作系统上运行的可执行文件。原生编译使用这些默…...
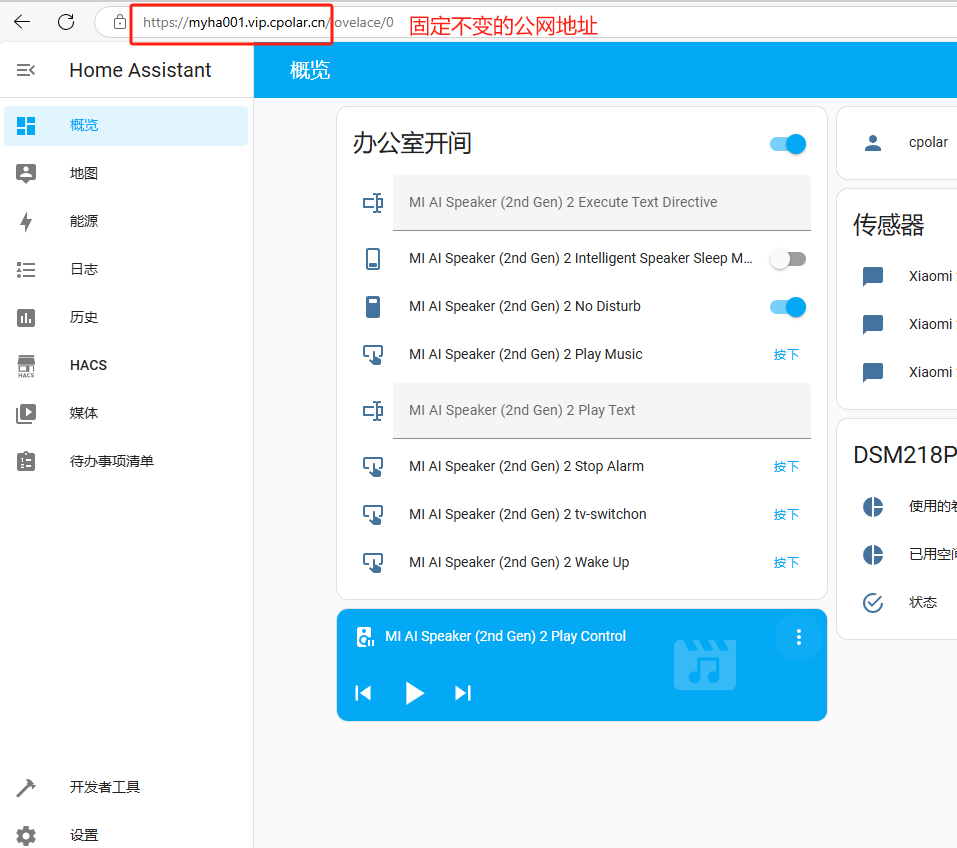
本地小主机安装HomeAssistant开源智能家居平台打造个人AI管家
文章目录 前言1. 添加镜像源2. 部署HomeAssistant3. HA系统初始化配置4. HA系统添加智能设备4.1 添加已发现的设备4.2 添加HACS插件安装设备 5. 安装cpolar内网穿透5.1 配置HA公网地址 6. 配置固定公网地址 前言 大家好!今天我要向大家展示如何将一台迷你的香橙派Z…...

SpringBoot返回文件让前端下载的几种方式
01 背景 在后端开发中,通常会有文件下载的需求,常用的解决方案有两种: 不通过后端应用,直接使用nginx直接转发文件地址下载(适用于一些公开的文件,因为这里不需要授权)通过后端进行下载&#…...

人工智能及深度学习的一些题目
1、一个含有2个隐藏层的多层感知机(MLP),神经元个数都为20,输入和输出节点分别由8和5个节点,这个网络有多少权重值? 答:在MLP中,权重是连接神经元的参数,每个连接都有一…...

企业AI安全新范式:基于终端本地代理的数据防泄露架构与实践
1. 项目概述:企业AI应用端点安全治理的破局点在生成式AI工具如ChatGPT、Gemini、Cursor、Claude以及各类Copilot插件席卷企业办公环境的今天,一个尖锐的矛盾正摆在每一位安全负责人面前:如何在不扼杀生产力的前提下,防止敏感数据通…...

AUTOSAR BSW里的“共享文件夹”:ECUC模块如何管理PDU路由与多核分区?
AUTOSAR BSW中的ECUC模块:多核与PDU路由的"中央调度站" 想象一下,在一个大型跨国企业的IT部门中,不同团队需要频繁交换文件,但又不希望直接访问彼此的服务器。这时候,一个设计精良的共享文件夹系统就成了必需…...

wmux:让终端窗格变独立窗口,实现桌面级终端管理
1. 项目概述:一个为窗口管理而生的终端复用器如果你和我一样,常年泡在终端里,与多个服务器、多个项目、多个命令行工具打交道,那你一定对窗口管理这件事深有感触。传统的终端复用器,比如大名鼎鼎的tmux,功能…...

Product Hunt 2025-10-03 每日热榜背后:技术架构深度剖析
Product Hunt 的每日热榜,对于很多开发者来说,是产品曝光和用户增长的绝佳机会。但对于 Product Hunt 本身,每日热榜也意味着巨大的流量冲击。尤其是在 2025-10-03 这种流量高峰日,如果后端架构不能承受,轻则影响用户体…...

10个核心概念,小白也能轻松入门大模型,速收藏!
本文介绍了学习大模型必须掌握的10个核心概念,包括LLM(大语言模型)、Prompt(提示词)、Token(词元)、RAG(检索增强生成)、Embedding(嵌入)、向量数…...

Nextpy框架深度解析:编译型AI应用开发与自修改软件实践
1. 项目概述:Nextpy,一个为自修改软件而生的框架最近在探索AI驱动的应用开发时,我深度体验了一个名为Nextpy的开源框架。它给我的第一印象,就像是为那些不满足于静态代码、希望构建能够自我进化系统的开发者量身打造的工具箱。简单…...

# 019、Semantic Kernel 与微软生态:Planner、Plugin、Memory 深度解析
从一次诡异的 Planner 死循环说起 上个月帮一个做工业质检的团队调 Semantic Kernel,他们的 Agent 在调用一个“检测结果汇总”的 Plugin 时,Planner 突然开始疯狂重试同一个步骤。日志里反复出现“Plan execution failed, retrying with adjusted conte…...

FastbootEnhance:Windows平台上的专业级Fastboot工具箱与Payload解析器
FastbootEnhance:Windows平台上的专业级Fastboot工具箱与Payload解析器 【免费下载链接】FastbootEnhance A user-friendly Fastboot ToolBox & Payload Dumper for Windows 项目地址: https://gitcode.com/gh_mirrors/fa/FastbootEnhance FastbootEnhan…...

taotoken 的按 token 计费模式让实验性项目成本可控
Taotoken 的按 Token 计费模式让实验性项目成本可控 1. 实验性项目的成本挑战 在开发AI实验性项目时,个人开发者常常面临成本控制的难题。传统的大模型接入方式通常要求预先购买固定套餐或订阅服务,这对于不确定需求量的实验阶段来说,往往导…...

终极指南:3分钟掌握VideoDownloadHelper免费视频下载神器
终极指南:3分钟掌握VideoDownloadHelper免费视频下载神器 【免费下载链接】VideoDownloadHelper Chrome Extension to Help Download Video for Some Video Sites. 项目地址: https://gitcode.com/gh_mirrors/vi/VideoDownloadHelper 想要轻松下载网页视频却…...