spring mvc源码学习笔记之六
- pom.xml 内容如下
<?xml version="1.0" encoding="UTF-8"?>
<project xmlns="http://maven.apache.org/POM/4.0.0"xmlns:xsi="http://www.w3.org/2001/XMLSchema-instance"xsi:schemaLocation="http://maven.apache.org/POM/4.0.0 http://maven.apache.org/xsd/maven-4.0.0.xsd"><modelVersion>4.0.0</modelVersion><parent><groupId>com.qsm</groupId><artifactId>learn</artifactId><version>1.0.0</version></parent><groupId>com.qs.demo</groupId><artifactId>demo-077</artifactId><properties><maven.compiler.source>8</maven.compiler.source><maven.compiler.target>8</maven.compiler.target><project.build.sourceEncoding>UTF-8</project.build.sourceEncoding></properties><dependencies><dependency><groupId>org.springframework</groupId><artifactId>spring-webmvc</artifactId><version>5.3.28</version></dependency><dependency><groupId>javax.servlet</groupId><artifactId>javax.servlet-api</artifactId><version>4.0.1</version><scope>provided</scope></dependency></dependencies></project>
- com.qs.demo.MyWebApplicationInitializer 内容如下
package com.qs.demo;import com.qs.demo.root.AppConfig;
import com.qs.demo.sub.DispatcherConfig;import org.springframework.web.WebApplicationInitializer;
import org.springframework.web.context.ContextLoaderListener;
import org.springframework.web.context.support.AnnotationConfigWebApplicationContext;
import org.springframework.web.servlet.DispatcherServlet;import javax.servlet.ServletContext;
import javax.servlet.ServletRegistration;/*** @author qs* @date 2024/09/24*/
public class MyWebApplicationInitializer implements WebApplicationInitializer {// 这个例子来自于 WebApplicationInitializer 的文档@Overridepublic void onStartup(ServletContext container) {// Create the 'root' Spring application contextAnnotationConfigWebApplicationContext rootContext =new AnnotationConfigWebApplicationContext();rootContext.register(AppConfig.class);// Manage the lifecycle of the root application contextcontainer.addListener(new ContextLoaderListener(rootContext));// Create the dispatcher servlet's Spring application contextAnnotationConfigWebApplicationContext dispatcherContext =new AnnotationConfigWebApplicationContext();dispatcherContext.register(DispatcherConfig.class);// Register and map the dispatcher servletServletRegistration.Dynamic dispatcher =container.addServlet("dispatcher", new DispatcherServlet(dispatcherContext));dispatcher.setLoadOnStartup(1);// 一个 DispatcherServlet 包圆了所有的请求// 可以搞多个 DispatcherServlet 分别处理不同的请求dispatcher.addMapping("/");}
}
- com.qs.demo.root.AppConfig 内容如下
package com.qs.demo.root;import org.springframework.context.annotation.ComponentScan;
import org.springframework.context.annotation.Configuration;/*** @author qs* @date 2024/09/24*/
@Configuration
@ComponentScan("com.qs.demo.root")
public class AppConfig {}
- com.qs.demo.root.AppleService 内容如下
package com.qs.demo.root;import org.springframework.beans.BeansException;
import org.springframework.context.ApplicationContext;
import org.springframework.context.ApplicationContextAware;
import org.springframework.stereotype.Service;import java.util.UUID;/*** @author qs* @date 2024/09/24*/
@Service
public class AppleService implements ApplicationContextAware {private ApplicationContext applicationContext;public String a() {System.out.println(applicationContext);return UUID.randomUUID().toString();}@Overridepublic void setApplicationContext(ApplicationContext applicationContext) throws BeansException {this.applicationContext = applicationContext;}
}
- com.qs.demo.sub.DispatcherConfig 内容如下
package com.qs.demo.sub;import org.springframework.context.annotation.ComponentScan;
import org.springframework.context.annotation.Configuration;
import org.springframework.web.servlet.config.annotation.EnableWebMvc;/*** @author qs* @date 2024/09/24*/
@EnableWebMvc
@Configuration
@ComponentScan(basePackages = "com.qs.demo.sub")
public class DispatcherConfig {}
- com.qs.demo.sub.BananaService 内容如下
package com.qs.demo.sub;import org.springframework.beans.BeansException;
import org.springframework.context.ApplicationContext;
import org.springframework.context.ApplicationContextAware;
import org.springframework.stereotype.Service;import java.util.UUID;/*** @author qs* @date 2024/09/24*/
@Service
public class BananaService implements ApplicationContextAware {public String a() {return UUID.randomUUID().toString();}@Overridepublic void setApplicationContext(ApplicationContext applicationContext) throws BeansException {System.out.println(applicationContext);}
}
- com.qs.demo.sub.Demo01Controller 内容如下
package com.qs.demo.sub;import com.qs.demo.root.AppleService;import org.springframework.web.bind.annotation.GetMapping;
import org.springframework.web.bind.annotation.RestController;import javax.annotation.Resource;/*** @author qs* @date 2024/09/24*/
@RestController
public class Demo01Controller {@Resource private AppleService appleService;@Resource private BananaService bananaService;@GetMapping("/01")public String a() {return "01";}@GetMapping("/02")public String b() {return appleService.a();}@GetMapping("/03")public String c() {return bananaService.a();}
}
以上就是全部代码
写这个例子主要是为了介绍 WebApplicationInitializer 这个接口。简单点儿讲就是这个接口等价于 web.xml 这个配置文件。
写了这个接口就不用写 web.xml 配置文件了。
下面重点看下这个接口的 javadoc
/**
* <p>
* 下面这段话的关键点:
* 1、适用于 servlet 3.0+ 环境
* 2、该接口可以看做是传统的 web.xml 的替代品
* </p>
*
* Interface to be implemented in Servlet 3.0+ environments in order to configure the
* {@link ServletContext} programmatically -- as opposed to (or possibly in conjunction
* with) the traditional {@code web.xml}-based approach.
*
* <p>
* 下面这段话的意思:
* 1、该接口的实现会自动被 SpringServletContainerInitializer 检测到
* 2、而 SpringServletContainerInitializer 又会被 servlet 3.0 容器自动带起来
* </p>
*
* <p>Implementations of this SPI will be detected automatically by {@link
* SpringServletContainerInitializer}, which itself is bootstrapped automatically
* by any Servlet 3.0 container. See {@linkplain SpringServletContainerInitializer its
* Javadoc} for details on this bootstrapping mechanism.
*
* <p>注意下面这个例子。看本接口是怎样替换 web.xml 配置的</p>
*
* <h2>Example</h2>
* <h3>The traditional, XML-based approach</h3>
* Most Spring users building a web application will need to register Spring's {@code
* DispatcherServlet}. For reference, in WEB-INF/web.xml, this would typically be done as
* follows:
* <pre class="code">
* {@code
* <servlet>
* <servlet-name>dispatcher</servlet-name>
* <servlet-class>
* org.springframework.web.servlet.DispatcherServlet
* </servlet-class>
* <init-param>
* <param-name>contextConfigLocation</param-name>
* <param-value>/WEB-INF/spring/dispatcher-config.xml</param-value>
* </init-param>
* <load-on-startup>1</load-on-startup>
* </servlet>
*
* <servlet-mapping>
* <servlet-name>dispatcher</servlet-name>
* <url-pattern>/</url-pattern>
* </servlet-mapping>}</pre>
*
* <h3>The code-based approach with {@code WebApplicationInitializer}</h3>
* Here is the equivalent {@code DispatcherServlet} registration logic,
* {@code WebApplicationInitializer}-style:
* <pre class="code">
* public class MyWebAppInitializer implements WebApplicationInitializer {
*
* @Override
* public void onStartup(ServletContext container) {
* XmlWebApplicationContext appContext = new XmlWebApplicationContext();
* appContext.setConfigLocation("/WEB-INF/spring/dispatcher-config.xml");
*
* ServletRegistration.Dynamic dispatcher =
* container.addServlet("dispatcher", new DispatcherServlet(appContext));
* dispatcher.setLoadOnStartup(1);
* dispatcher.addMapping("/");
* }
*
* }</pre>
*
* <p>
* 上面的例子是实现 WebApplicationInitializer 接口。
* 也可以继承 AbstractDispatcherServletInitializer 类。
* </p>
*
* As an alternative to the above, you can also extend from {@link
* org.springframework.web.servlet.support.AbstractDispatcherServletInitializer}.
*
* As you can see, thanks to Servlet 3.0's new {@link ServletContext#addServlet} method
* we're actually registering an <em>instance</em> of the {@code DispatcherServlet}, and
* this means that the {@code DispatcherServlet} can now be treated like any other object
* -- receiving constructor injection of its application context in this case.
*
* <p>This style is both simpler and more concise. There is no concern for dealing with
* init-params, etc, just normal JavaBean-style properties and constructor arguments. You
* are free to create and work with your Spring application contexts as necessary before
* injecting them into the {@code DispatcherServlet}.
*
* <p>Most major Spring Web components have been updated to support this style of
* registration. You'll find that {@code DispatcherServlet}, {@code FrameworkServlet},
* {@code ContextLoaderListener} and {@code DelegatingFilterProxy} all now support
* constructor arguments. Even if a component (e.g. non-Spring, other third party) has not
* been specifically updated for use within {@code WebApplicationInitializers}, they still
* may be used in any case. The Servlet 3.0 {@code ServletContext} API allows for setting
* init-params, context-params, etc programmatically.
*
* <p>
* 在上面的例子中,web.xml 被替换了,但是 dispatcher-config.xml 依然存在。
* 下面的例子就彻底摆脱 xml 配置了。
* </p>
*
* <h2>A 100% code-based approach to configuration</h2>
* In the example above, {@code WEB-INF/web.xml} was successfully replaced with code in
* the form of a {@code WebApplicationInitializer}, but the actual
* {@code dispatcher-config.xml} Spring configuration remained XML-based.
* {@code WebApplicationInitializer} is a perfect fit for use with Spring's code-based
* {@code @Configuration} classes. See @{@link
* org.springframework.context.annotation.Configuration Configuration} Javadoc for
* complete details, but the following example demonstrates refactoring to use Spring's
* {@link org.springframework.web.context.support.AnnotationConfigWebApplicationContext
* AnnotationConfigWebApplicationContext} in lieu of {@code XmlWebApplicationContext}, and
* user-defined {@code @Configuration} classes {@code AppConfig} and
* {@code DispatcherConfig} instead of Spring XML files. This example also goes a bit
* beyond those above to demonstrate typical configuration of the 'root' application
* context and registration of the {@code ContextLoaderListener}:
* <pre class="code">
* public class MyWebAppInitializer implements WebApplicationInitializer {
*
* @Override
* public void onStartup(ServletContext container) {
* // Create the 'root' Spring application context
* AnnotationConfigWebApplicationContext rootContext =
* new AnnotationConfigWebApplicationContext();
* rootContext.register(AppConfig.class);
*
* // Manage the lifecycle of the root application context
* container.addListener(new ContextLoaderListener(rootContext));
*
* // Create the dispatcher servlet's Spring application context
* AnnotationConfigWebApplicationContext dispatcherContext =
* new AnnotationConfigWebApplicationContext();
* dispatcherContext.register(DispatcherConfig.class);
*
* // Register and map the dispatcher servlet
* ServletRegistration.Dynamic dispatcher =
* container.addServlet("dispatcher", new DispatcherServlet(dispatcherContext));
* dispatcher.setLoadOnStartup(1);
* dispatcher.addMapping("/");
* }
*
* }</pre>
*
* As an alternative to the above, you can also extend from {@link
* org.springframework.web.servlet.support.AbstractAnnotationConfigDispatcherServletInitializer}.
*
* Remember that {@code WebApplicationInitializer} implementations are <em>detected
* automatically</em> -- so you are free to package them within your application as you
* see fit.
*
* <p>
* 多个 WebApplicationInitializer 之间可以指定顺序。但是这种一般不常用。一个 WebApplicationInitializer 就够了。
* </p>
*
* <h2>Ordering {@code WebApplicationInitializer} execution</h2>
* {@code WebApplicationInitializer} implementations may optionally be annotated at the
* class level with Spring's @{@link org.springframework.core.annotation.Order Order}
* annotation or may implement Spring's {@link org.springframework.core.Ordered Ordered}
* interface. If so, the initializers will be ordered prior to invocation. This provides
* a mechanism for users to ensure the order in which servlet container initialization
* occurs. Use of this feature is expected to be rare, as typical applications will likely
* centralize all container initialization within a single {@code WebApplicationInitializer}.
*
* <h2>Caveats</h2>
*
* <p>
* 注意 web.xml 和 WebApplicationInitializer 不是相互排斥的。
* 二者可以同时存在。
* </p>
*
* <h3>web.xml versioning</h3>
* <p>{@code WEB-INF/web.xml} and {@code WebApplicationInitializer} use are not mutually
* exclusive; for example, web.xml can register one servlet, and a {@code
* WebApplicationInitializer} can register another. An initializer can even
* <em>modify</em> registrations performed in {@code web.xml} through methods such as
* {@link ServletContext#getServletRegistration(String)}. <strong>However, if
* {@code WEB-INF/web.xml} is present in the application, its {@code version} attribute
* must be set to "3.0" or greater, otherwise {@code ServletContainerInitializer}
* bootstrapping will be ignored by the servlet container.</strong>
*
* <h3>Mapping to '/' under Tomcat</h3>
* <p>Apache Tomcat maps its internal {@code DefaultServlet} to "/", and on Tomcat versions
* <= 7.0.14, this servlet mapping <em>cannot be overridden programmatically</em>.
* 7.0.15 fixes this issue. Overriding the "/" servlet mapping has also been tested
* successfully under GlassFish 3.1.<p>
*
* @author Chris Beams
* @since 3.1
* @see SpringServletContainerInitializer
* @see org.springframework.web.context.AbstractContextLoaderInitializer
* @see org.springframework.web.servlet.support.AbstractDispatcherServletInitializer
* @see org.springframework.web.servlet.support.AbstractAnnotationConfigDispatcherServletInitializer
*/
多说一嘴,这个例子中用到了 DispatcherServlet 的有参构造(DispatcherServlet只有2个构造方法,一个无参一个有参,无参构造在其他文章中介绍了)。
这里就顺便详细看下这个有参构造的 javadoc
/*** 使用给定的 web 应用上下文来创建一个 DispatcherServlet。* 无参的构造是在 DispatcherServlet 内部自己创建维护 web 应用上下文。* 这个有参的构造是用外部传过来的 web 应用上下文。* 这个构造方法主要是用在 servlet 3.0+ 的环境中。* 用了这个构造方法以后,setContextClass setContextConfigLocation setContextAttribute setNamespace 这4个方法就无效了。* 对应的 contextClass contextConfigLocation contextAttribute namespace 等四个 servlet init-param 也无效了。* 传进来的 web 应用上下文可能已经 refresh() 了,也可能没有 refresh()。* 建议是不要 refresh()。* 如果不刷新的话,将会发生这些事情:* 1、如果传进来的web应用上下文还没有设置父应用上下文,则将 root web 应用上下文设置为它的父应用上下文。* 2、如果传进来的web应用上下文还没有设置id,将会给它设置一个id。* 3、将ServletContext和ServletConfig存到web应用上下文中。* 4、postProcessWebApplicationContext 方法会被调用。* 5、ApplicationContextInitializer 会被调用。可以用这个东西对web应用上下文进行自定义配置,其他文章也有提过。* 6、如果传进来的web应用上下文实现了ConfigurableApplicationContext的话,refresh()方法将会被调用。* 如果传进来的web应用上下文已经 refresh() 过了,上面提到的几点都不会发生。* * 另外,这个有参构造怎么用,可以参考 WebApplicationInitializer 接口。这不就跟本文写的代码对应上了么。** Create a new {@code DispatcherServlet} with the given web application context. This* constructor is useful in Servlet 3.0+ environments where instance-based registration* of servlets is possible through the {@link ServletContext#addServlet} API.* <p>Using this constructor indicates that the following properties / init-params* will be ignored:* <ul>* <li>{@link #setContextClass(Class)} / 'contextClass'</li>* <li>{@link #setContextConfigLocation(String)} / 'contextConfigLocation'</li>* <li>{@link #setContextAttribute(String)} / 'contextAttribute'</li>* <li>{@link #setNamespace(String)} / 'namespace'</li>* </ul>* <p>The given web application context may or may not yet be {@linkplain* ConfigurableApplicationContext#refresh() refreshed}. If it has <strong>not</strong>* already been refreshed (the recommended approach), then the following will occur:* <ul>* <li>If the given context does not already have a {@linkplain* ConfigurableApplicationContext#setParent parent}, the root application context* will be set as the parent.</li>* <li>If the given context has not already been assigned an {@linkplain* ConfigurableApplicationContext#setId id}, one will be assigned to it</li>* <li>{@code ServletContext} and {@code ServletConfig} objects will be delegated to* the application context</li>* <li>{@link #postProcessWebApplicationContext} will be called</li>* <li>Any {@code ApplicationContextInitializer}s specified through the* "contextInitializerClasses" init-param or through the {@link* #setContextInitializers} property will be applied.</li>* <li>{@link ConfigurableApplicationContext#refresh refresh()} will be called if the* context implements {@link ConfigurableApplicationContext}</li>* </ul>* If the context has already been refreshed, none of the above will occur, under the* assumption that the user has performed these actions (or not) per their specific* needs.* <p>See {@link org.springframework.web.WebApplicationInitializer} for usage examples.* @param webApplicationContext the context to use* @see #initWebApplicationContext* @see #configureAndRefreshWebApplicationContext* @see org.springframework.web.WebApplicationInitializer*/
public DispatcherServlet(WebApplicationContext webApplicationContext) {super(webApplicationContext);setDispatchOptionsRequest(true);
}
相关文章:

spring mvc源码学习笔记之六
pom.xml 内容如下 <?xml version"1.0" encoding"UTF-8"?> <project xmlns"http://maven.apache.org/POM/4.0.0"xmlns:xsi"http://www.w3.org/2001/XMLSchema-instance"xsi:schemaLocation"http://maven.apache.org/P…...

树莓派4b如何连接ov7670摄像头
在树莓派4B上连接和使用OV7670摄像头是一项具有一定技术挑战的任务。这是因为OV7670摄像头是一个原始的CMOS摄像头模块,它通过并行接口与主机通信,而树莓派的GPIO接口通常用于串行接口(如I2C、SPI、UART)通信,不直接支持并行摄像头接口。因此,需要一些额外的硬件和软件工…...

[微服务]分布式搜索Java客户端
快速入门 使用RestClient客户端进行数据搜索可以分为两步 构建并发起请求 代码解读: 第一步,创建SearchRequest对象,指定索引库名第二步,利用request.source()构建DSL,DSL中可以包含查询、分页、排序、高亮等 query…...

如何使用 `uiautomator2` 控制 Android 设备并模拟应用操作_VIVO手机
在 Android 自动化测试中,uiautomator2 是一个非常强大的工具,能够帮助我们通过 Python 控制 Android 设备执行各种操作。今天,我将通过一个简单的示例,介绍如何使用 uiautomator2 控制 Android 设备,执行特定的应用启动、广告跳过以及其他 UI 操作。此示例的目标是自动化…...

在Ubuntu 18.04.6 LTS安装OpenFace流程
一、修改配置:将gcc8,g8作为默认选项 sudo update-alternatives --install /usr/bin/gcc gcc /usr/bin/gcc-8 100 sudo update-alternatives --config gcc 选择版本,再查看gcc --version sudo update-alternatives --install /usr/bin/g g /usr/bin/g-…...

C 语言的整型提升问题
目录 引言 一、什么是整型提升 二、为什么会有整型提升 三、整型提升的规则 四、整型提升的影响 五、如何避免整型提升带来的问题 六、总结 引言 在 C 语言中,整型提升(Integer Promotion)是一个常常被忽视但却非常重要的概念。理解整…...

第0章 机器人及自动驾驶SLAM定位方法全解析及入门进阶学习建议
嗨,各位同学大家好!笔者自985硕士毕业后,在机器人算法领域已经深耕 7 年多啦。这段时间里,我积累了不少宝贵经验。本专栏《机器人工程师带你从零入门SLAM》将结合下面的SLAM知识体系思维导图及多年的工作实战总结,将逐…...

video.js视频播放上手
html案例 <!DOCTYPE html> <html lang"en"><head><meta charset"UTF-8"><title>videojs视频播放</title> </head> <link href"https://cdnjs.cloudflare.com/ajax/libs/video.js/7.3.0/video-js.min.cs…...

【LLM-Agent】Building effective agents和典型workflows
note Anthropic的工程经验: 大道至简,尽量维护系统的简洁;尽量让过程更加透明(因为你依赖的是LLM的决策,如果只看输出不看过程,很容易陷入难以debug的情况);对LLM需要调用的工具&am…...

《量子比特大阅兵:不同类型量子比特在人工智能领域的优劣势剖析》
在科技的前沿,量子比特与人工智能的融合正开启一扇全新的大门。不同类型的量子比特,如超导、离子阱、光量子等,在与人工智能结合时展现出独特的优势与劣势。 超导量子比特 超导量子比特是目前应用较为广泛且研究相对成熟的量子比特类型。它…...

《探秘开源大模型:AI 世界的“超级引擎”》
《探秘开源大模型:AI 世界的“超级引擎”》 一、开源大模型崛起之路二、开源大模型发展历程回顾(一)早期奠基:理论突破与初步实践(二)快速发展:百花齐放的模型格局(三)当下态势:走向成熟与多元融合三、开源大模型核心技术剖析(一)Transformer 架构:基石之稳(二)…...

el-table行列转换简单版,仅限单行数据
原始数据格式如下,如果不是此格式,请转换成以下格式在进行以下操作 [{ label: name, value: Tom },{ label: age, value: 25 },{ label: country, value: UK } ]代码如下 <template><el-table :data"tableData" style"width: …...

2025年1月4日蜻蜓q旗舰版st完整开源·包含前后端所有源文件·开源可商用可二开·优雅草科技·优雅草kir|优雅草星星|优雅草银满|优雅草undefined
2025年1月4日蜻蜓q旗舰版st完整开源包含前后端所有源文件开源可商用可二开优雅草科技优雅草kir|优雅草星星|优雅草银满|优雅草undefined 产品介绍: 本产品主要贡献者优雅草科技优雅草kir|优雅草星星|优雅草银满|优雅草undefined-青史留名,时光如川浪淘…...

SQL把字符串按逗号分割成记录
在 SQL 中,可以通过以下方法将字符串按逗号分割,并将每个分割的值作为单独的记录插入到结果集中。以下是针对不同数据库系统的实现方法: 1. 使用 STRING_SPLIT(SQL Server 2016) STRING_SPLIT 是 SQL Server 提供的内置…...
:观察者模式)
C#设计模式(行为型模式):观察者模式
C#设计模式:观察者模式,让对象间通信更优雅 在软件开发中,我们经常会遇到一个对象的状态发生改变,其他对象需要自动更新或做出相应反应的场景。例如: GUI事件处理: 当用户点击按钮时,按钮需要…...

pytorch镜像源
我以为的 pip install torch2.3.1cu118 torchvision0.18.1cu118 torchaudio2.3.1cu118 -f https://download.pytorch.org/whl/torch_stable.html实际上,有很多加速方案 为提高下载速度可以使用国内的镜像源来安装与 CUDA 11.8 兼容的 PyTorch。 方法 1:…...

Verilog语法之常用行为级语法
摘要:本文主要介绍了一些在verilog中的行为级语法,并且提供了大量的运行实际例子,可以通过这些例子感受行为级语法在仿真中的巨大作用。 概述:行为级语法是RTL级的上一层,或者说是比RTL级更高级的语法,其语…...

PADS Logic原理图中有很多页原理图,如何(怎样)删除其中一页或者多页
我们在进行PADS Logic进行原理图设计的时候,有时候可能遇到一次性设计了很多页的原理图,比如说十几页的原理图。那么我们在进行PADS Layout的时候,可能将这些原理图绘制两块板或者多块PCB板,那么这时候我们需要将其中的一张原理图…...

蓝色简洁引导页网站源码
一款蓝色的简洁引导页,适合资源分发和网站备用引导。 1.源码上传至虚拟机或者服务器 2.绑定域名和目录 3.访问域名安装 4.安装完成后就行了 https://pan.quark.cn/s/b2d8b9c5dc7f https://pan.baidu.com/s/17h1bssUNhhR9DMyNTc-i9Q?pwd84sf https://caiyun.139.com…...

Apache PDFBox添加maven依赖,pdf转成图片
要使用Apache PDFBox将PDF文件转换为图片,并将其添加到Maven项目中,您可以按照以下步骤操作: 1. 添加Maven依赖 在您的pom.xml文件中添加Apache PDFBox的依赖。请确保使用最新版本的PDFBox库。截至2025年,以下是推荐的配置&…...

stm32G473的flash模式是单bank还是双bank?
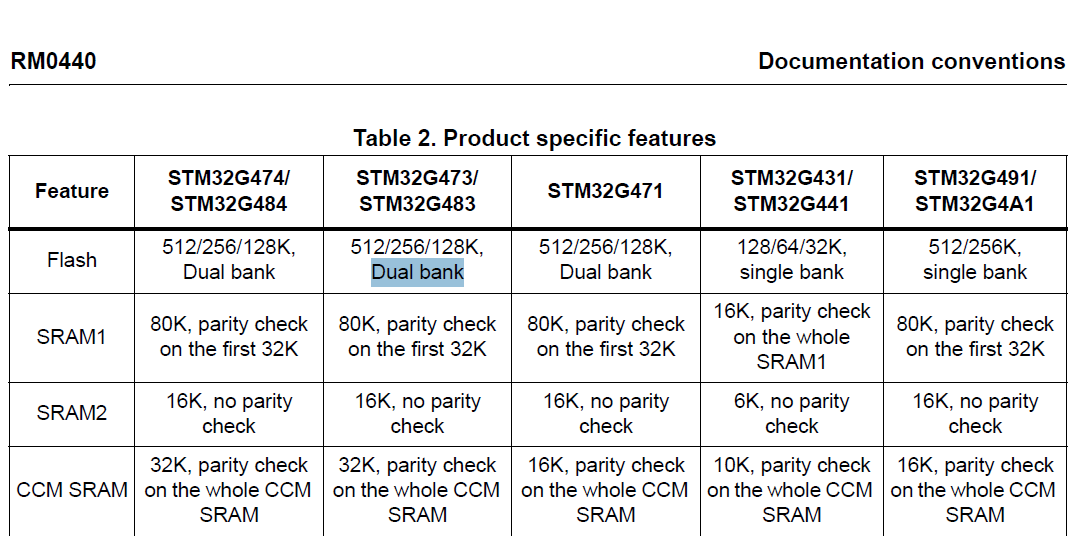
今天突然有人stm32G473的flash模式是单bank还是双bank?由于时间太久,我真忘记了。搜搜发现,还真有人和我一样。见下面的链接:https://shequ.stmicroelectronics.cn/forum.php?modviewthread&tid644563 根据STM32G4系列参考手…...

ubuntu搭建nfs服务centos挂载访问
在Ubuntu上设置NFS服务器 在Ubuntu上,你可以使用apt包管理器来安装NFS服务器。打开终端并运行: sudo apt update sudo apt install nfs-kernel-server创建共享目录 创建一个目录用于共享,例如/shared: sudo mkdir /shared sud…...

QMC5883L的驱动
简介 本篇文章的代码已经上传到了github上面,开源代码 作为一个电子罗盘模块,我们可以通过I2C从中获取偏航角yaw,相对于六轴陀螺仪的yaw,qmc5883l几乎不会零飘并且成本较低。 参考资料 QMC5883L磁场传感器驱动 QMC5883L磁力计…...
【机器视觉】单目测距——运动结构恢复
ps:图是随便找的,为了凑个封面 前言 在前面对光流法进行进一步改进,希望将2D光流推广至3D场景流时,发现2D转3D过程中存在尺度歧义问题,需要补全摄像头拍摄图像中缺失的深度信息,否则解空间不收敛…...

el-switch文字内置
el-switch文字内置 效果 vue <div style"color:#ffffff;font-size:14px;float:left;margin-bottom:5px;margin-right:5px;">自动加载</div> <el-switch v-model"value" active-color"#3E99FB" inactive-color"#DCDFE6"…...

工业自动化时代的精准装配革新:迁移科技3D视觉系统如何重塑机器人定位装配
AI3D视觉的工业赋能者 迁移科技成立于2017年,作为行业领先的3D工业相机及视觉系统供应商,累计完成数亿元融资。其核心技术覆盖硬件设计、算法优化及软件集成,通过稳定、易用、高回报的AI3D视觉系统,为汽车、新能源、金属制造等行…...

06 Deep learning神经网络编程基础 激活函数 --吴恩达
深度学习激活函数详解 一、核心作用 引入非线性:使神经网络可学习复杂模式控制输出范围:如Sigmoid将输出限制在(0,1)梯度传递:影响反向传播的稳定性二、常见类型及数学表达 Sigmoid σ ( x ) = 1 1 +...

rnn判断string中第一次出现a的下标
# coding:utf8 import torch import torch.nn as nn import numpy as np import random import json""" 基于pytorch的网络编写 实现一个RNN网络完成多分类任务 判断字符 a 第一次出现在字符串中的位置 """class TorchModel(nn.Module):def __in…...

C++使用 new 来创建动态数组
问题: 不能使用变量定义数组大小 原因: 这是因为数组在内存中是连续存储的,编译器需要在编译阶段就确定数组的大小,以便正确地分配内存空间。如果允许使用变量来定义数组的大小,那么编译器就无法在编译时确定数组的大…...

LangChain知识库管理后端接口:数据库操作详解—— 构建本地知识库系统的基础《二》
这段 Python 代码是一个完整的 知识库数据库操作模块,用于对本地知识库系统中的知识库进行增删改查(CRUD)操作。它基于 SQLAlchemy ORM 框架 和一个自定义的装饰器 with_session 实现数据库会话管理。 📘 一、整体功能概述 该模块…...
