【python】OpenCV—Extract Horizontal and Vertical Lines—Morphology

文章目录
- 1、功能描述
- 2、代码实现
- 3、效果展示
- 4、完整代码
- 5、参考
更多有趣的代码示例,可参考【Programming】
1、功能描述
基于 opencv-python 库,利用形态学的腐蚀和膨胀,提取图片中的水平或者竖直线条
2、代码实现
导入基本的库函数
import numpy as np
import cv2 as cv
读入图片(https://raw.githubusercontent.com/opencv/opencv/5.x/doc/tutorials/imgproc/morph_lines_detection/images/src.png),增加读错图片的判断机制
1.jpg

def main(save=False):# Load the imagesrc = cv.imread("./1.jpg", cv.IMREAD_COLOR)# Check if image is loaded fineif src is None:print('Error opening image')return -1
可视化图片,并将其转化为灰度图
# Show source imagecv.imshow("src", src)# [load_image]# [gray]# Transform source image to gray if it is not alreadyif len(src.shape) != 2:gray = cv.cvtColor(src, cv.COLOR_BGR2GRAY)else:gray = srcif save:cv.imwrite("gray.jpg", gray)# Show gray imageshow_wait_destroy("gray", gray)# [gray]
gray.jpg

show_wait_destroy 实现如下 ,关闭图片后才运行后续代码
def show_wait_destroy(winname, img):cv.imshow(winname, img)cv.moveWindow(winname, 500, 0)cv.waitKey(0)cv.destroyWindow(winname)
二进制求反灰度图, 并自适应阈值二值化
# [bin]# Apply adaptiveThreshold at the bitwise_not of gray, notice the ~ symbolgray = cv.bitwise_not(gray)if save:cv.imwrite("bitwise_not_gray.jpg", gray)bw = cv.adaptiveThreshold(gray, 255, cv.ADAPTIVE_THRESH_MEAN_C, \cv.THRESH_BINARY, 15, -2)if save:cv.imwrite("adaptiveThreshold.jpg", bw)# Show binary imageshow_wait_destroy("binary", bw)# [bin]
bitwise_not_gray.jpg

adaptiveThreshold.jpg

复制图片 adaptiveThreshold.jpg ,准备提取水平线和竖直线
# [init]# Create the images that will use to extract the horizontal and vertical lineshorizontal = np.copy(bw)vertical = np.copy(bw)# [init]
提取水平线
# [horiz]# Specify size on horizontal axiscols = horizontal.shape[1] # 1024 colshorizontal_size = cols // 30 # 34# Create structure element for extracting horizontal lines through morphology operationshorizontalStructure = cv.getStructuringElement(cv.MORPH_RECT, (horizontal_size, 1))# Apply morphology operationshorizontal = cv.erode(horizontal, horizontalStructure)if save:cv.imwrite("erode-horizontal.jpg", horizontal)horizontal = cv.dilate(horizontal, horizontalStructure)if save:cv.imwrite("dilate-horizontal.jpg", horizontal)# Show extracted horizontal linesshow_wait_destroy("horizontal", horizontal)# [horiz]
首先会构建结构元素 horizontalStructure(定义了形态学操作的邻域形状和大小)
图片列数 // 30 得到全为 1 的数组
array([[1, 1, 1, 1, 1, 1, 1, 1, 1, 1, 1, 1, 1, 1, 1, 1, 1, 1, 1, 1, 1, 1,1, 1, 1, 1, 1, 1, 1, 1, 1, 1, 1, 1]], dtype=uint8)
接着腐蚀操作 erode-horizontal.jpg

最后膨胀操作 dilate-horizontal.jpg

至此我们就提取到了图片中的水平方向的线条
接下来我们提取竖直方向的线条
# [vert]# Specify size on vertical axisrows = vertical.shape[0] # 134verticalsize = rows // 30 # 4# Create structure element for extracting vertical lines through morphology operationsverticalStructure = cv.getStructuringElement(cv.MORPH_RECT, (1, verticalsize))# Apply morphology operationsvertical = cv.erode(vertical, verticalStructure)if save:cv.imwrite("erode-vertical.jpg", vertical)vertical = cv.dilate(vertical, verticalStructure)if save:cv.imwrite("dilate-vertical.jpg", vertical)# Show extracted vertical linesshow_wait_destroy("vertical", vertical)# [vert]
同理,也是先构建一个结构元素 verticalStructure
array([[1],[1],[1],[1]], dtype=uint8)
腐蚀 erode-vertical.jpg

膨胀 dilate-vertical.jpg

至此我们提取出了竖直方向的线条
可以拓展一下,
As you can see we are almost there. However, at that point you will notice that the edges of the notes are a bit rough. For that reason we need to refine the edges in order to obtain a smoother result
'''Extract edges and smooth image according to the logic1. extract edges2. dilate(edges)3. src.copyTo(smooth)4. blur smooth img5. smooth.copyTo(src, edges)'''
dilate-vertical.jpg 二进制求反,
# [smooth]# Inverse vertical imagevertical = cv.bitwise_not(vertical)if save:cv.imwrite("bitwise_not_vertical.jpg", vertical)show_wait_destroy("vertical_bit", vertical)
bitwise_not_vertical.jpg

cv2.adaptiveThreshold 适应性阈值二值化
# Step 1edges = cv.adaptiveThreshold(vertical, 255, cv.ADAPTIVE_THRESH_MEAN_C, \cv.THRESH_BINARY, 3, -2)if save:cv.imwrite("step1_edges.jpg", edges)show_wait_destroy("edges", edges)
得到 step1_edges.jpg,实现了边缘检测

看看 cv2.adaptiveThreshold 的介绍仔细分析下实现过程
dst = cv2.adaptiveThreshold(src, maxValue, adaptiveMethod, thresholdType, blockSize, C)

形参 C 从邻域像素的平均值或加权平均值中减去的常数,配置的为负数,附近颜色相近的变黑(eg 纯白区域,像素 255,阈值 255-(-2)=257,都变黑,再 eg,纯黑区域,像素 0,阈值 0-(-2)=2,也是黑),附近颜色变动的变白(黑白交替,白色的部分保留,黑色的部分变黑),可以实现边缘提取,妙
膨胀强化边缘
# Step 2kernel = np.ones((2, 2), np.uint8)edges = cv.dilate(edges, kernel)if save:cv.imwrite("step2_edges.jpg", edges)show_wait_destroy("dilate", edges)
kernel 为
array([[1, 1],[1, 1]], dtype=uint8)
step2_edges.jpg

复制 bitwise_not_vertical.jpg
# Step 3smooth = np.copy(vertical)
模糊处理 step4_smooth.jpg
# Step 4smooth = cv.blur(smooth, (2, 2))if save:cv.imwrite("step4_smooth.jpg", smooth)

记录下 step2_edges.jpg 中像素不为零的部分的坐标,也即边缘部分坐标
边缘部分用平滑后的像素替换原来的像素
# Step 5(rows, cols) = np.where(edges != 0)vertical[rows, cols] = smooth[rows, cols]# Show final resultshow_wait_destroy("smooth - final", vertical)if save:cv.imwrite("smooth_final.jpg", vertical)# [smooth]

3、效果展示
输入

水平线条

竖直线条

平滑竖直线条后的结果

输入图片

水平线

竖直线

平滑竖直线条后的结果

4、完整代码
"""
@brief Use morphology transformations for extracting horizontal and vertical lines sample code
"""
import numpy as np
import cv2 as cvdef show_wait_destroy(winname, img):cv.imshow(winname, img)cv.moveWindow(winname, 500, 0)cv.waitKey(0)cv.destroyWindow(winname)def main(save=False):# Load the imagesrc = cv.imread("./1.jpg", cv.IMREAD_COLOR)# Check if image is loaded fineif src is None:print('Error opening image')return -1# Show source imagecv.imshow("src", src)# [load_image]# [gray]# Transform source image to gray if it is not alreadyif len(src.shape) != 2:gray = cv.cvtColor(src, cv.COLOR_BGR2GRAY)else:gray = srcif save:cv.imwrite("gray.jpg", gray)# Show gray imageshow_wait_destroy("gray", gray)# [gray]# [bin]# Apply adaptiveThreshold at the bitwise_not of gray, notice the ~ symbolgray = cv.bitwise_not(gray)  # (134, 1024)if save:cv.imwrite("bitwise_not_gray.jpg", gray)bw = cv.adaptiveThreshold(gray, 255, cv.ADAPTIVE_THRESH_MEAN_C, \cv.THRESH_BINARY, 15, -2)if save:cv.imwrite("adaptiveThreshold.jpg", bw)# Show binary imageshow_wait_destroy("binary", bw)# [bin]# [init]# Create the images that will use to extract the horizontal and vertical lineshorizontal = np.copy(bw)vertical = np.copy(bw)# [init]# [horiz]# Specify size on horizontal axiscols = horizontal.shape[1]  # 1024 colshorizontal_size = cols // 30  # 34# Create structure element for extracting horizontal lines through morphology operationshorizontalStructure = cv.getStructuringElement(cv.MORPH_RECT, (horizontal_size, 1))# Apply morphology operationshorizontal = cv.erode(horizontal, horizontalStructure)if save:cv.imwrite("erode-horizontal.jpg", horizontal)horizontal = cv.dilate(horizontal, horizontalStructure)if save:cv.imwrite("dilate-horizontal.jpg", horizontal)# Show extracted horizontal linesshow_wait_destroy("horizontal", horizontal)# [horiz]# [vert]# Specify size on vertical axisrows = vertical.shape[0]  # 134verticalsize = rows // 30  # 4# Create structure element for extracting vertical lines through morphology operationsverticalStructure = cv.getStructuringElement(cv.MORPH_RECT, (1, verticalsize))# Apply morphology operationsvertical = cv.erode(vertical, verticalStructure)if save:cv.imwrite("erode-vertical.jpg", vertical)vertical = cv.dilate(vertical, verticalStructure)if save:cv.imwrite("dilate-vertical.jpg", vertical)# Show extracted vertical linesshow_wait_destroy("vertical", vertical)# [vert]# [smooth]# Inverse vertical imagevertical = cv.bitwise_not(vertical)if save:cv.imwrite("bitwise_not_vertical.jpg", vertical)show_wait_destroy("vertical_bit", vertical)'''Extract edges and smooth image according to the logic1. extract edges2. dilate(edges)3. src.copyTo(smooth)4. blur smooth img5. smooth.copyTo(src, edges)'''# Step 1edges = cv.adaptiveThreshold(vertical, 255, cv.ADAPTIVE_THRESH_MEAN_C, \cv.THRESH_BINARY, 3, -2)if save:cv.imwrite("step1_edges.jpg", edges)show_wait_destroy("edges", edges)# Step 2kernel = np.ones((2, 2), np.uint8)edges = cv.dilate(edges, kernel)if save:cv.imwrite("step2_edges.jpg", edges)show_wait_destroy("dilate", edges)# Step 3smooth = np.copy(vertical)# Step 4smooth = cv.blur(smooth, (2, 2))if save:cv.imwrite("step4_smooth.jpg", smooth)# Step 5(rows, cols) = np.where(edges != 0)vertical[rows, cols] = smooth[rows, cols]# Show final resultshow_wait_destroy("smooth - final", vertical)if save:cv.imwrite("smooth_final.jpg", vertical)# [smooth]return 0if __name__ == "__main__":main(save=True)
5、参考
- Extract horizontal and vertical lines by using morphological operations
更多有趣的代码示例,可参考【Programming】
相关文章:

【python】OpenCV—Extract Horizontal and Vertical Lines—Morphology
文章目录 1、功能描述2、代码实现3、效果展示4、完整代码5、参考 更多有趣的代码示例,可参考【Programming】 1、功能描述 基于 opencv-python 库,利用形态学的腐蚀和膨胀,提取图片中的水平或者竖直线条 2、代码实现 导入基本的库函数 im…...

Redis十大数据类型详解
Redis(一) 十大数据类型 redis字符串(String) string是redis最基本的类型,一个key对应一个value string类型是二进制安全的,意思是redis的string可以包含任何数据。例如说是jpg图片或者序列化对象 一个re…...

Open FPV VTX开源之betaflight配置
Open FPV VTX开源之betaflight配置 1. 源由2. 配置3. 总结4. 参考资料5. 补充 - 飞控固件版本 1. 源由 飞控嵌入式OSD - ardupilot配置使用betaflight配套OSD图片。 Choose correct font depending on Flight Controller SW. ──> /usr/share/fonts/├──> font_btfl…...

AT32 bootloader程序与上位机程序
从8051到stm32, 从串口下载到JLINK调试,从keil到arm-none-eabi-gcc,从"Hello wrold"到通信协议,一路起来已学会很多,是时候写一下bootloader了。 基本原理 单片机代码编译完后可以生成".hex"和".bin"文件&…...
)
数据结构与算法之栈: LeetCode 151. 反转字符串中的单词 (Ts版)
反转字符串中的单词 https://leetcode.cn/problems/reverse-words-in-a-string/ 描述 给你一个字符串 s ,请你反转字符串中 单词 的顺序单词 是由非空格字符组成的字符串。s 中使用至少一个空格将字符串中的 单词 分隔开 返回 单词 顺序颠倒且 单词 之间用单个空…...

使用 configparser 读取 INI 配置文件
使用 configparser 读取 INI 配置文件 适合于读取 .ini 格式的配置文件。 配置文件示例 (config.ini): [DEFAULT] host localhost port 3306 [database] user admin password secret import configparser# 创建配置解析器 config configparser.ConfigParser()# 读取配…...

idea 自动导包,并且禁止自动导 *(java.io.*)
自动导包配置 进入 idea 设置,可以按下图所示寻找位置,也可以直接输入 auto import 快速定位到配置。 Add unambiguous imports on the fly:自动帮我们优化导入的包Optimize imports on the fly:自动去掉一些没有用到的包 禁止导…...

RK3588-NPU pytorch-image-models 模型编译测试
RK3588-NPU pytorch-image-models 模型编译测试 一.背景二.操作步骤1.下载依赖2.创建容器3.安装依赖4.创建脚本A.生成模型名列表B.生成ONNX模型C.生成RKNN模型D.批量测试脚本 一.背景 测试RK3588-NPU对https://github.com/huggingface/pytorch-image-models.git中模型的支持程…...

低代码从“产品驱动”向“场景驱动”转型,助力数字化平台构建
一、前言 在数字化时代的大潮中,从宏观层面来看,新技术的落地速度不断加快,各行各业的数字化进程呈现出如火如荼的态势。而从微观层面剖析,企业面临着行业格局快速变化、市场竞争日益激烈以及成本压力显著增强等诸多挑战。 据专…...

相加交互效应函数发布—适用于逻辑回归、cox回归、glmm模型、gee模型
在统计分析中交互作用是指某因素的作用随其他因素水平变化而变化,两因素共同作用不等于两因素单独作用之和(相加交互作用)或之积(相乘交互作用)。相互作用的评估是尺度相关的:乘法或加法。乘法尺度上的相互作用意味着两次暴露的综合效应大于(…...

用gpg和sha256验证ubuntu.iso
链接 https://ubuntu.com/tutorials/how-to-verify-ubuntuhttps://releases.ubuntu.com/jammy/ 本文是2的简明版 sha256sum介绍 sha256sum -c SHA256SUMS 2>&1这段脚本的作用是验证文件的 SHA-256 校验和。具体来说,命令的各个部分含义如下: …...

深入解析 ZooKeeper:分布式协调服务的原理与应用
1.说说 Zookeeper 是什么? ZooKeeper 是一个开源的分布式协调服务,由 Apache Software Foundation 开发维护。它为构建分布式应用程序提供了一套简单且高效的协调接口。ZooKeeper 的设计目的是为了简化分布式系统中常见的任务,例如命名、配置…...

【Rust自学】11.10. 集成测试
喜欢的话别忘了点赞、收藏加关注哦,对接下来的教程有兴趣的可以关注专栏。谢谢喵!(・ω・) 11.10.1. 什么是集成测试 在Rust里,集成测试完全位于被测试库的外部。集成测试调用库的方式和其他代码一样,这也…...

对当前日期进行按年、按月、按日的取值
对当前日期进行按年、按月、按日的取值。 其规则为: 按年 为当前日期到来年同一日期的前一天(2024-12-01到2025-11-30)。 按月 为当前日期到下个月的同一日期的前一天 (2024-12-01 到 2024-12-31)。 按日 为当前日…...

【Rust自学】12.2. 读取文件
12.2.0. 写在正文之前 第12章要做一个实例的项目——一个命令行程序。这个程序是一个grep(Global Regular Expression Print),是一个全局正则搜索和输出的工具。它的功能是在指定的文件中搜索出指定的文字。 这个项目分为这么几步: 接收命令行参数读…...

C++内存泄露排查
内存泄漏是指程序动态分配的内存未能及时释放,导致系统内存逐渐耗尽,最终可能造成程序崩溃或性能下降。在C中,内存泄漏通常发生在使用new或malloc等分配内存的操作时,但没有正确地使用delete或free来释放这块内存。 在日常开发过程…...

Http 响应状态码 前后端联调
http 响应状态码 :是服务器在处理HTTP请求时返回的状态信息,用于表示请求的处理结果 1xx : 信息性状态码 100 Continue: 服务器已收到请求头部,客户端应继续发送请求体。 101 Switching Protocols : 切换协议。服务器已理解客户端的请求&a…...

48_Lua错误处理
在编写Lua应用时,都可能会遇到不可预见的错误,而错误处理是确保程序稳定性和健壮性的关键环节。有效的错误处理不仅能防止程序崩溃,还能提供有用的反馈信息给开发者或最终用户,从而提高应用程序的质量。本文将详细介绍Lua中的错误处理机制。 1.错误类型 Lua中的错误类型主…...

shell脚本回顾1
1、shell 脚本写出检测 /tmp/size.log 文件如果存在显示它的内容,不存在则创建一个文件将创建时间写入。 一、 ll /tmp/size.log &>/dev/null if [ $? -eq 0 ];then cat /tmp/size.log else touch /tmp/size.log echo date > /tmp/size.log fi二、 if …...

【3】管理无线控制器
1.概述 本文主要介绍AireOS WLC的管理。WLC的管理可以通过CLI和GUI两种方式,而CLI主要分为console接入、telnet以及SSH的登录管理;GUI的管理分为HTTP和HTTPS。 2.CLI的管理 通过console实现的CLI管理这里就单独进行说明了,只要能找到设备的console接口,通过一般的RJ45接…...

Linux 文件类型,目录与路径,文件与目录管理
文件类型 后面的字符表示文件类型标志 普通文件:-(纯文本文件,二进制文件,数据格式文件) 如文本文件、图片、程序文件等。 目录文件:d(directory) 用来存放其他文件或子目录。 设备…...

MVC 数据库
MVC 数据库 引言 在软件开发领域,Model-View-Controller(MVC)是一种流行的软件架构模式,它将应用程序分为三个核心组件:模型(Model)、视图(View)和控制器(Controller)。这种模式有助于提高代码的可维护性和可扩展性。本文将深入探讨MVC架构与数据库之间的关系,以…...
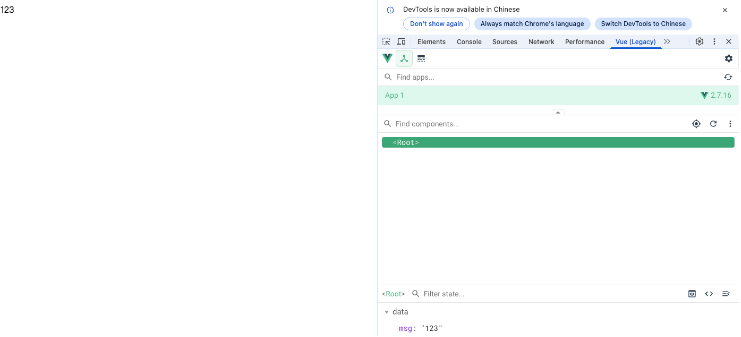
Vue2 第一节_Vue2上手_插值表达式{{}}_访问数据和修改数据_Vue开发者工具
文章目录 1.Vue2上手-如何创建一个Vue实例,进行初始化渲染2. 插值表达式{{}}3. 访问数据和修改数据4. vue响应式5. Vue开发者工具--方便调试 1.Vue2上手-如何创建一个Vue实例,进行初始化渲染 准备容器引包创建Vue实例 new Vue()指定配置项 ->渲染数据 准备一个容器,例如: …...

ServerTrust 并非唯一
NSURLAuthenticationMethodServerTrust 只是 authenticationMethod 的冰山一角 要理解 NSURLAuthenticationMethodServerTrust, 首先要明白它只是 authenticationMethod 的选项之一, 并非唯一 1 先厘清概念 点说明authenticationMethodURLAuthenticationChallenge.protectionS…...
零基础设计模式——行为型模式 - 责任链模式
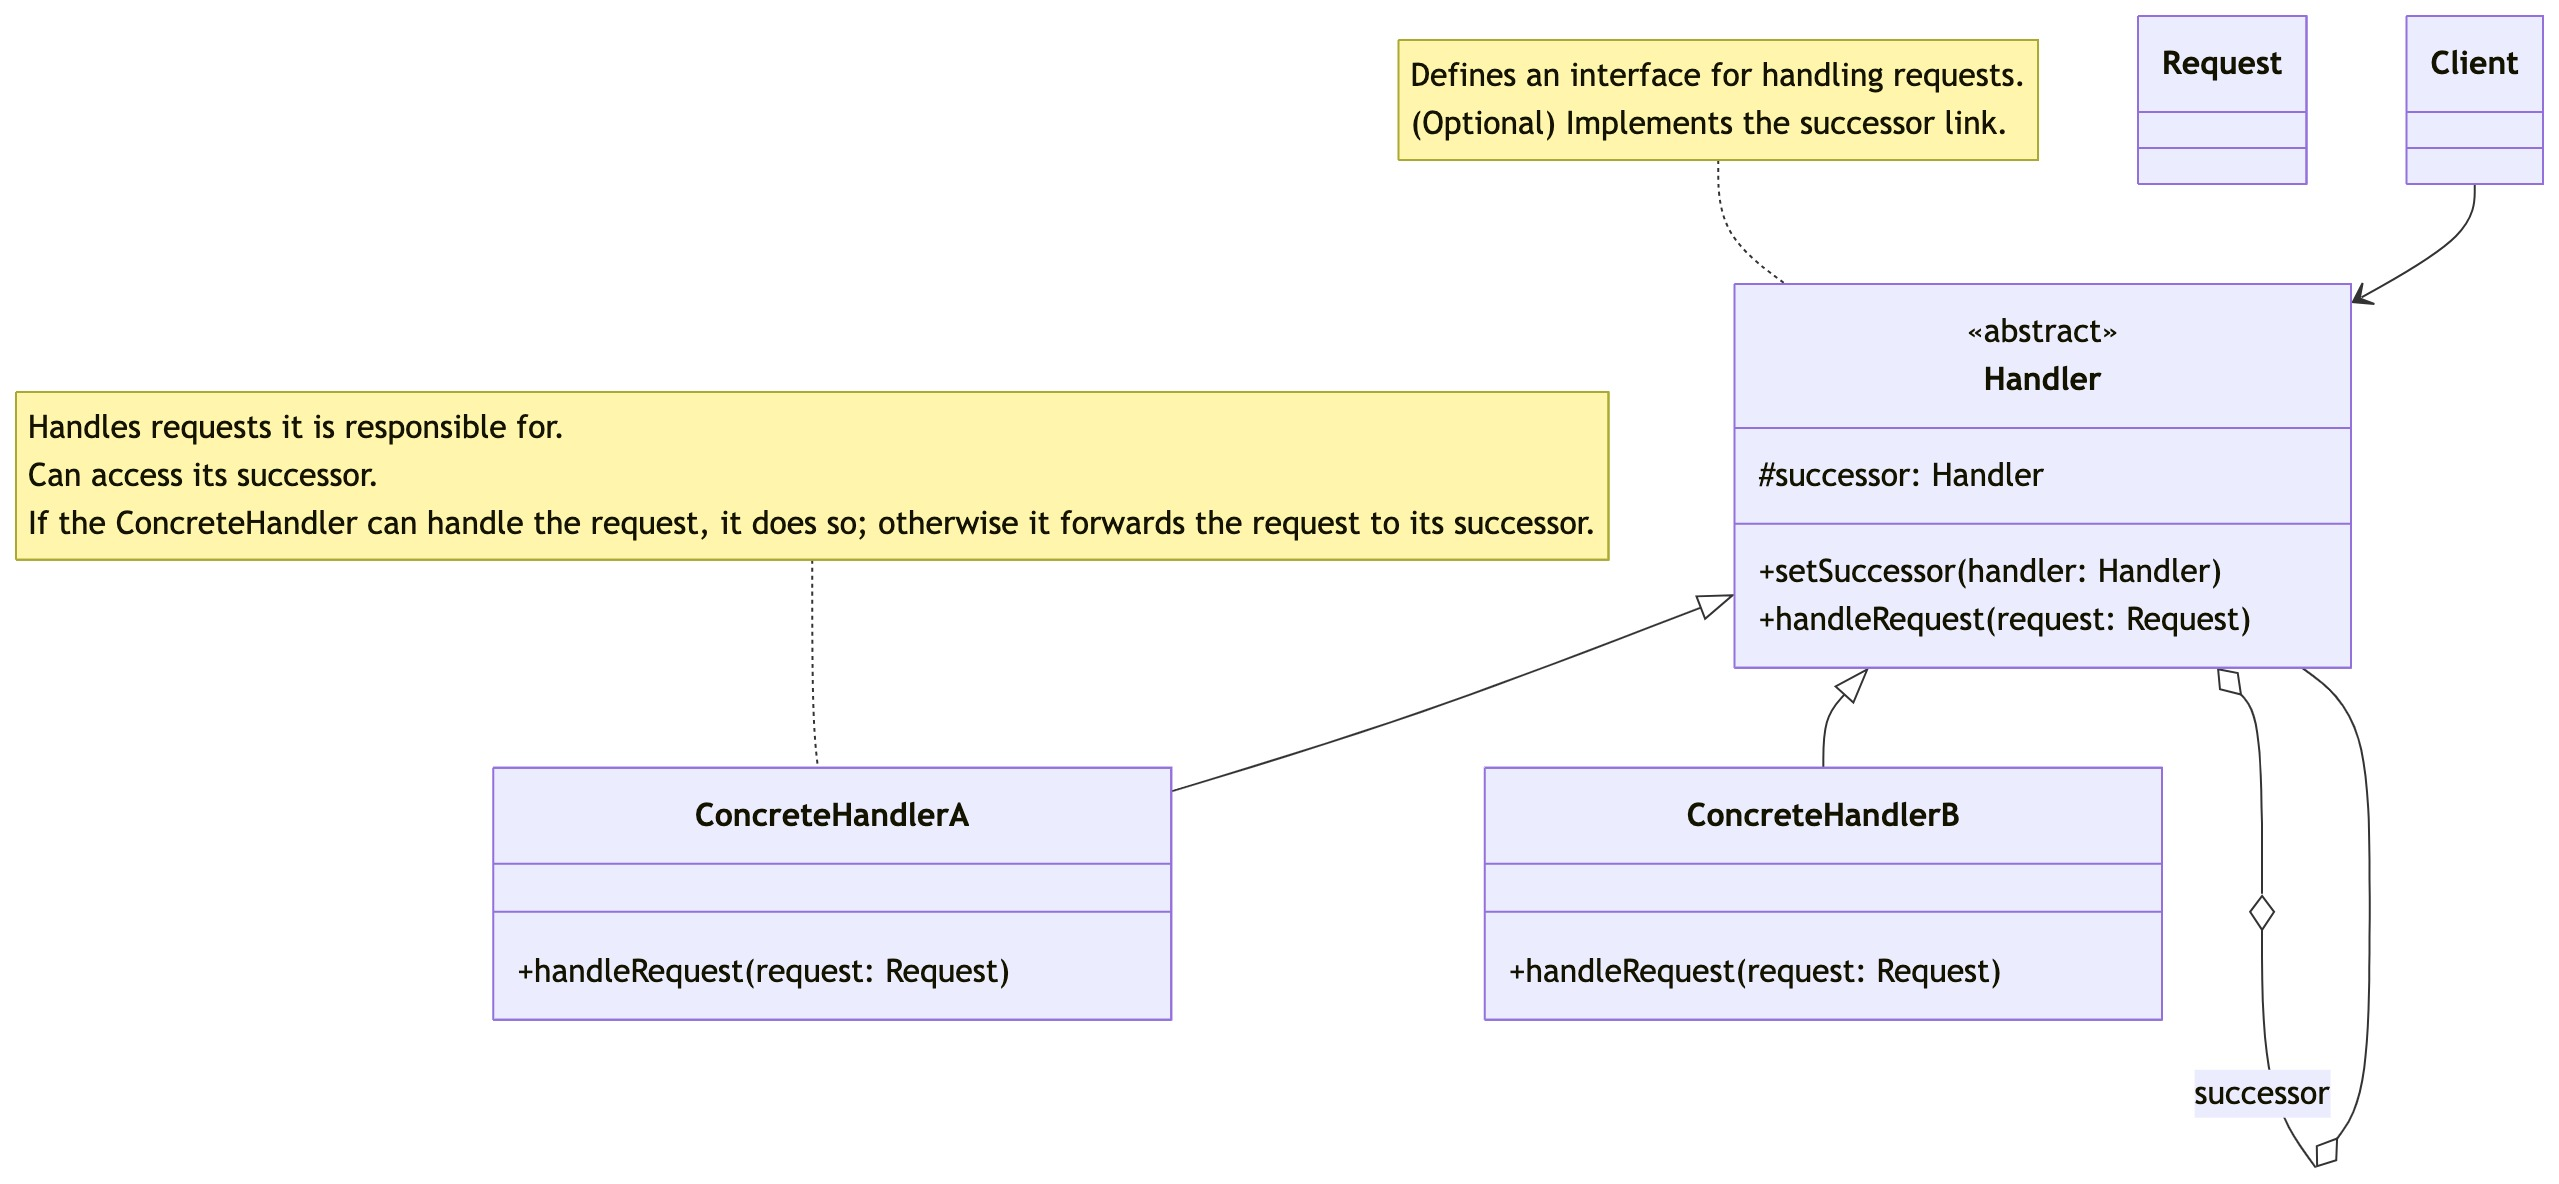
第四部分:行为型模式 - 责任链模式 (Chain of Responsibility Pattern) 欢迎来到行为型模式的学习!行为型模式关注对象之间的职责分配、算法封装和对象间的交互。我们将学习的第一个行为型模式是责任链模式。 核心思想:使多个对象都有机会处…...
IT供电系统绝缘监测及故障定位解决方案
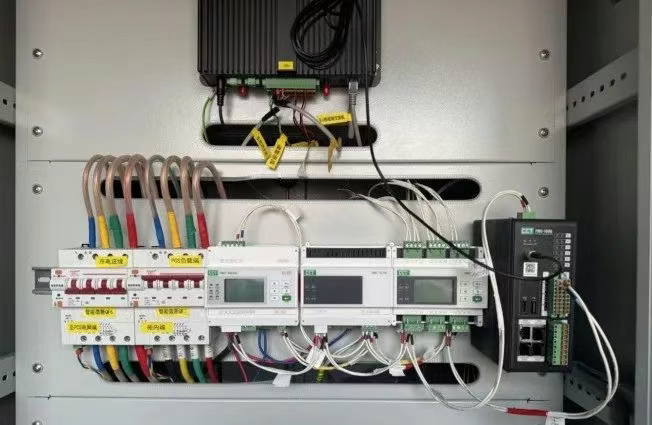
随着新能源的快速发展,光伏电站、储能系统及充电设备已广泛应用于现代能源网络。在光伏领域,IT供电系统凭借其持续供电性好、安全性高等优势成为光伏首选,但在长期运行中,例如老化、潮湿、隐裂、机械损伤等问题会影响光伏板绝缘层…...

ABAP设计模式之---“简单设计原则(Simple Design)”
“Simple Design”(简单设计)是软件开发中的一个重要理念,倡导以最简单的方式实现软件功能,以确保代码清晰易懂、易维护,并在项目需求变化时能够快速适应。 其核心目标是避免复杂和过度设计,遵循“让事情保…...

IP如何挑?2025年海外专线IP如何购买?
你花了时间和预算买了IP,结果IP质量不佳,项目效率低下不说,还可能带来莫名的网络问题,是不是太闹心了?尤其是在面对海外专线IP时,到底怎么才能买到适合自己的呢?所以,挑IP绝对是个技…...
C/C++ 中附加包含目录、附加库目录与附加依赖项详解
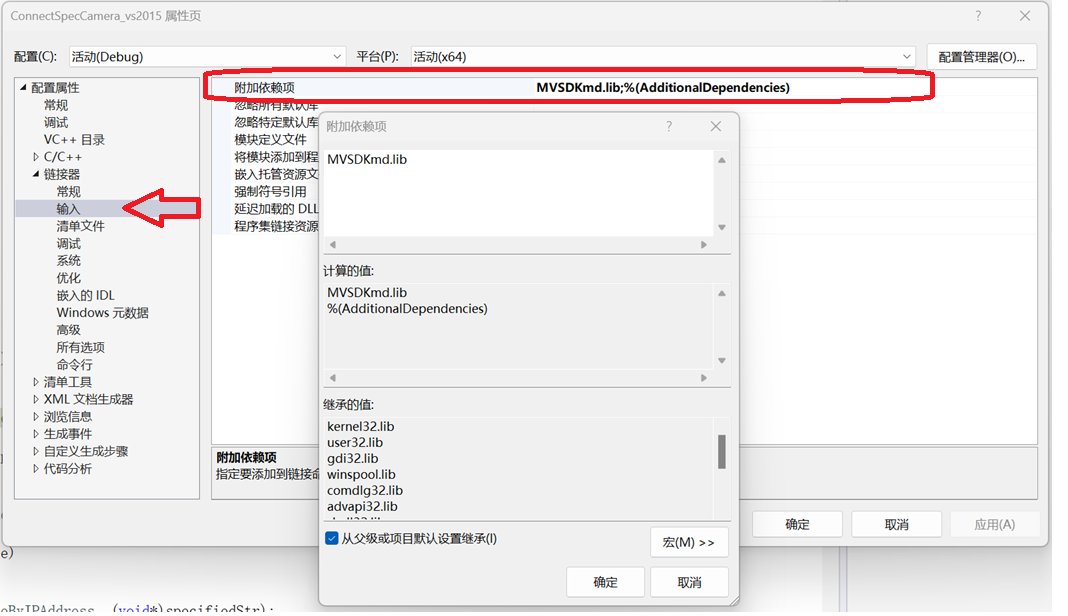
在 C/C 编程的编译和链接过程中,附加包含目录、附加库目录和附加依赖项是三个至关重要的设置,它们相互配合,确保程序能够正确引用外部资源并顺利构建。虽然在学习过程中,这些概念容易让人混淆,但深入理解它们的作用和联…...
论文阅读笔记——Muffin: Testing Deep Learning Libraries via Neural Architecture Fuzzing
Muffin 论文 现有方法 CRADLE 和 LEMON,依赖模型推理阶段输出进行差分测试,但在训练阶段是不可行的,因为训练阶段直到最后才有固定输出,中间过程是不断变化的。API 库覆盖低,因为各个 API 都是在各种具体场景下使用。…...
