Android中Service在新进程中的启动流程2
目录
1、Service在客户端的启动入口
2、Service启动在AMS的处理
3、Service在新进程中的启动
4、Service与AMS的关系再续
上一篇文章中我们了解了Service在新进程中启动的大致流程,同时认识了与客户端进程交互的接口IApplicationThread以及与AMS交互的接口IActivityManager,客户端进程与AMS则借助于Binder驱动实现了二者之间的通信,这一篇文章我们将深入源码分析startService是如何一步步启动新服务的,源码同样基于Android2.3.7。
首先放上上一篇的流程概览图,方便源码分析。
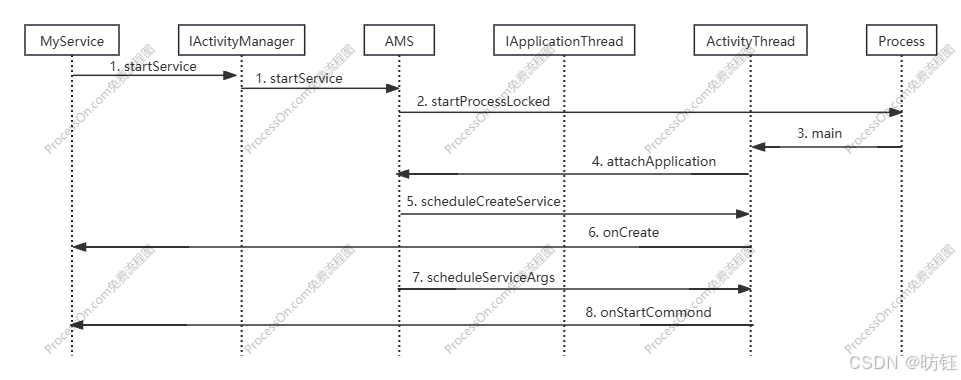
1、Service在客户端的启动入口
该步骤对应流程图中的第一步,通过调用Context.startService启动服务,该动作最终会走到ContextImpl的startService函数中,代码如下:
//frameworks\base\core\java\android\app\Contextlmpl.java@Overridepublic ComponentName startService(Intent service) {try {ComponentName cn = ActivityManagerNative.getDefault().startService(mMainThread.getApplicationThread(), service,service.resolveTypeIfNeeded(getContentResolver()));if (cn != null && cn.getPackageName().equals("!")) {throw new SecurityException("Not allowed to start service " + service+ " without permission " + cn.getClassName());}return cn;} catch (RemoteException e) {return null;}}通过调用ActivityManagerNative.getDefault()来启动服务,ActivityManagerNative.getDefault()返回的是AMS的一个代理对象ActivityManagerProxy,上一篇我们说过ActivityManagerProxy实现了IActivityManager接口,这里通过该代理把请求转发到AMS去,代码如下:
//frameworks\base\core\java\android\app\ActivityManagerNative.java
class ActivityManagerProxy implements IActivityManager
{public ActivityManagerProxy(IBinder remote){mRemote = remote;}public IBinder asBinder(){return mRemote;}//...//启动服务public ComponentName startService(IApplicationThread caller, Intent service,String resolvedType) throws RemoteException{Parcel data = Parcel.obtain();Parcel reply = Parcel.obtain();data.writeInterfaceToken(IActivityManager.descriptor);data.writeStrongBinder(caller != null ? caller.asBinder() : null);service.writeToParcel(data, 0);data.writeString(resolvedType);mRemote.transact(START_SERVICE_TRANSACTION, data, reply, 0);reply.readException();ComponentName res = ComponentName.readFromParcel(reply);data.recycle();reply.recycle();return res;}//停止服务public int stopService(IApplicationThread caller, Intent service,String resolvedType) throws RemoteException{Parcel data = Parcel.obtain();Parcel reply = Parcel.obtain();data.writeInterfaceToken(IActivityManager.descriptor);data.writeStrongBinder(caller != null ? caller.asBinder() : null);service.writeToParcel(data, 0);data.writeString(resolvedType);mRemote.transact(STOP_SERVICE_TRANSACTION, data, reply, 0);reply.readException();int res = reply.readInt();reply.recycle();data.recycle();return res;}public boolean stopServiceToken(ComponentName className, IBinder token,int startId) throws RemoteException {Parcel data = Parcel.obtain();Parcel reply = Parcel.obtain();data.writeInterfaceToken(IActivityManager.descriptor);ComponentName.writeToParcel(className, data);data.writeStrongBinder(token);data.writeInt(startId);mRemote.transact(STOP_SERVICE_TOKEN_TRANSACTION, data, reply, 0);reply.readException();boolean res = reply.readInt() != 0;data.recycle();reply.recycle();return res;}public void setServiceForeground(ComponentName className, IBinder token,int id, Notification notification, boolean removeNotification) throws RemoteException {Parcel data = Parcel.obtain();Parcel reply = Parcel.obtain();data.writeInterfaceToken(IActivityManager.descriptor);ComponentName.writeToParcel(className, data);data.writeStrongBinder(token);data.writeInt(id);if (notification != null) {data.writeInt(1);notification.writeToParcel(data, 0);} else {data.writeInt(0);}data.writeInt(removeNotification ? 1 : 0);mRemote.transact(SET_SERVICE_FOREGROUND_TRANSACTION, data, reply, 0);reply.readException();data.recycle();reply.recycle();}//绑定服务public int bindService(IApplicationThread caller, IBinder token,Intent service, String resolvedType, IServiceConnection connection,int flags) throws RemoteException {Parcel data = Parcel.obtain();Parcel reply = Parcel.obtain();data.writeInterfaceToken(IActivityManager.descriptor);data.writeStrongBinder(caller != null ? caller.asBinder() : null);data.writeStrongBinder(token);service.writeToParcel(data, 0);data.writeString(resolvedType);data.writeStrongBinder(connection.asBinder());data.writeInt(flags);mRemote.transact(BIND_SERVICE_TRANSACTION, data, reply, 0);reply.readException();int res = reply.readInt();data.recycle();reply.recycle();return res;}//解绑服务public boolean unbindService(IServiceConnection connection) throws RemoteException{Parcel data = Parcel.obtain();Parcel reply = Parcel.obtain();data.writeInterfaceToken(IActivityManager.descriptor);data.writeStrongBinder(connection.asBinder());mRemote.transact(UNBIND_SERVICE_TRANSACTION, data, reply, 0);reply.readException();boolean res = reply.readInt() != 0;data.recycle();reply.recycle();return res;}public void publishService(IBinder token,Intent intent, IBinder service) throws RemoteException {Parcel data = Parcel.obtain();Parcel reply = Parcel.obtain();data.writeInterfaceToken(IActivityManager.descriptor);data.writeStrongBinder(token);intent.writeToParcel(data, 0);data.writeStrongBinder(service);mRemote.transact(PUBLISH_SERVICE_TRANSACTION, data, reply, 0);reply.readException();data.recycle();reply.recycle();}    //...
}
这里列举了与服务相关的操作,我们关注启动服务mRemote.transact(START_SERVICE_TRANSACTION, data, reply, 0),mRemote代表了远程AMS对象,它会把请求发送给Binder驱动,然后由Binder驱动负责把请求转发到AMS去,参数caller代表了源进程即发起请求的进程,service代表了我们要启动的服务。
以上动作都发生在源进程,下面进入AMS服务侧的系统进程了。
接收到startService动作的是ActivityManagerNative,根据标识START_SERVICE_TRANSACTION回调到以下代码:
//frameworks\base\core\java\android\app\ActivityManagerNative.java
public abstract class ActivityManagerNative extends Binder implements IActivityManager
{/*** Cast a Binder object into an activity manager interface, generating* a proxy if needed.*/static public IActivityManager asInterface(IBinder obj){if (obj == null) {return null;}IActivityManager in =(IActivityManager)obj.queryLocalInterface(descriptor);if (in != null) {return in;}return new ActivityManagerProxy(obj);}/*** Retrieve the system's default/global activity manager.*/static public IActivityManager getDefault(){if (gDefault != null) {//if (Config.LOGV) Log.v(//    "ActivityManager", "returning cur default = " + gDefault);return gDefault;}IBinder b = ServiceManager.getService("activity");if (Config.LOGV) Log.v("ActivityManager", "default service binder = " + b);gDefault = asInterface(b);if (Config.LOGV) Log.v("ActivityManager", "default service = " + gDefault);return gDefault;}//...public ActivityManagerNative(){attachInterface(this, descriptor);}public boolean onTransact(int code, Parcel data, Parcel reply, int flags)throws RemoteException {switch (code) {//...//启动服务case START_SERVICE_TRANSACTION: {data.enforceInterface(IActivityManager.descriptor);IBinder b = data.readStrongBinder();IApplicationThread app = ApplicationThreadNative.asInterface(b);Intent service = Intent.CREATOR.createFromParcel(data);String resolvedType = data.readString();ComponentName cn = startService(app, service, resolvedType);reply.writeNoException();ComponentName.writeToParcel(cn, reply);return true;}case STOP_SERVICE_TRANSACTION: {data.enforceInterface(IActivityManager.descriptor);IBinder b = data.readStrongBinder();IApplicationThread app = ApplicationThreadNative.asInterface(b);Intent service = Intent.CREATOR.createFromParcel(data);String resolvedType = data.readString();int res = stopService(app, service, resolvedType);reply.writeNoException();reply.writeInt(res);return true;}case STOP_SERVICE_TOKEN_TRANSACTION: {data.enforceInterface(IActivityManager.descriptor);ComponentName className = ComponentName.readFromParcel(data);IBinder token = data.readStrongBinder();int startId = data.readInt();boolean res = stopServiceToken(className, token, startId);reply.writeNoException();reply.writeInt(res ? 1 : 0);return true;}case SET_SERVICE_FOREGROUND_TRANSACTION: {data.enforceInterface(IActivityManager.descriptor);ComponentName className = ComponentName.readFromParcel(data);IBinder token = data.readStrongBinder();int id = data.readInt();Notification notification = null;if (data.readInt() != 0) {notification = Notification.CREATOR.createFromParcel(data);}boolean removeNotification = data.readInt() != 0;setServiceForeground(className, token, id, notification, removeNotification);reply.writeNoException();return true;}case BIND_SERVICE_TRANSACTION: {data.enforceInterface(IActivityManager.descriptor);IBinder b = data.readStrongBinder();IApplicationThread app = ApplicationThreadNative.asInterface(b);IBinder token = data.readStrongBinder();Intent service = Intent.CREATOR.createFromParcel(data);String resolvedType = data.readString();b = data.readStrongBinder();int fl = data.readInt();IServiceConnection conn = IServiceConnection.Stub.asInterface(b);int res = bindService(app, token, service, resolvedType, conn, fl);reply.writeNoException();reply.writeInt(res);return true;}case UNBIND_SERVICE_TRANSACTION: {data.enforceInterface(IActivityManager.descriptor);IBinder b = data.readStrongBinder();IServiceConnection conn = IServiceConnection.Stub.asInterface(b);boolean res = unbindService(conn);reply.writeNoException();reply.writeInt(res ? 1 : 0);return true;}case PUBLISH_SERVICE_TRANSACTION: {data.enforceInterface(IActivityManager.descriptor);IBinder token = data.readStrongBinder();Intent intent = Intent.CREATOR.createFromParcel(data);IBinder service = data.readStrongBinder();publishService(token, intent, service);reply.writeNoException();return true;}case UNBIND_FINISHED_TRANSACTION: {data.enforceInterface(IActivityManager.descriptor);IBinder token = data.readStrongBinder();Intent intent = Intent.CREATOR.createFromParcel(data);boolean doRebind = data.readInt() != 0;unbindFinished(token, intent, doRebind);reply.writeNoException();return true;}//...}
}
这里关注START_SERVICE_TRANSACTION分支的处理, 从binder中读出了IApplicationThread对象,这个对象代表了发起请求的源进程,取出service,该Intent代表了我们要启动的服务。接着调用startService(app, service, resolvedType),该函数的实现正是位于AMS中,接下来我们进入AMS分析它是如何启动服务的。
2、Service启动在AMS的处理
现在我们进入到AMS的处理中,继续调用分析startService函数调用,代码如下:
//frameworks\base\servicesljava\com\android\server\am\ActivityManagerService.javapublic ComponentName startService(IApplicationThread caller, Intent service,String resolvedType) {// Refuse possible leaked file descriptorsif (service != null && service.hasFileDescriptors() == true) {throw new IllegalArgumentException("File descriptors passed in Intent");}synchronized(this) {final int callingPid = Binder.getCallingPid();final int callingUid = Binder.getCallingUid();final long origId = Binder.clearCallingIdentity();ComponentName res = startServiceLocked(caller, service,resolvedType, callingPid, callingUid);Binder.restoreCallingIdentity(origId);return res;}}直接转发到函数startServiceLocked中,代码如下:
ComponentName startServiceLocked(IApplicationThread caller, Intent service, String resolvedType, int callingPid, int callingUid) {synchronized(this) {//...ServiceLookupResult res =retrieveServiceLocked(service, resolvedType, callingPid, callingUid);if (res == null) {return null;}if (res.record == null) {return new ComponentName("!", res.permission != null? res.permission : "private to package");}ServiceRecord r = res.record;int targetPermissionUid = checkGrantUriPermissionFromIntentLocked(callingUid, r.packageName, service);if (unscheduleServiceRestartLocked(r)) {if (DEBUG_SERVICE) Slog.v(TAG, "START SERVICE WHILE RESTART PENDING: " + r);}r.startRequested = true;r.callStart = false;r.lastStartId++;if (r.lastStartId < 1) {r.lastStartId = 1;}r.pendingStarts.add(new ServiceRecord.StartItem(r, r.lastStartId,service, targetPermissionUid));r.lastActivity = SystemClock.uptimeMillis();synchronized (r.stats.getBatteryStats()) {r.stats.startRunningLocked();}if (!bringUpServiceLocked(r, service.getFlags(), false)) {return new ComponentName("!", "Service process is bad");}return r.name;}}首先通过调用retrieveServiceLocked拿到对应的ServiceLookupResult对象,该对象包含了ServiceRecord对象,ServiceRecord则是解析参数service拿到的。
接下来设置ServiceRecord的几个参数startRequested = true、callStart = false、lastStartId++。接着创建ServiceRecord.StartItem对象并放到ServiceRecord的pendingStarts成员变量中,代表了接下来有需要启动的Service。接着继续调用bringUpServiceLocked启动服务,代码如下:
private final boolean bringUpServiceLocked(ServiceRecord r,int intentFlags, boolean whileRestarting) {//1if (r.app != null && r.app.thread != null) {sendServiceArgsLocked(r, false);return true;}//2if (!whileRestarting && r.restartDelay > 0) {// If waiting for a restart, then do nothing.return true;}// We are now bringing the service up, so no longer in the// restarting state.mRestartingServices.remove(r);//3final String appName = r.processName;ProcessRecord app = getProcessRecordLocked(appName, r.appInfo.uid);if (app != null && app.thread != null) {try {realStartServiceLocked(r, app);return true;} catch (RemoteException e) {Slog.w(TAG, "Exception when starting service " + r.shortName, e);}// If a dead object exception was thrown -- fall through to// restart the application.}// Not running -- get it started, and enqueue this service record// to be executed when the app comes up.//4if (startProcessLocked(appName, r.appInfo, true, intentFlags,"service", r.name, false) == null) {bringDownServiceLocked(r, true);return false;}//5if (!mPendingServices.contains(r)) {mPendingServices.add(r);}return true;}函数参数中ServiceRecord就是我们要启动的Service对应的对象,whileRestarting为false,intentFlags则是与服务相关的一些参数。代码中我标记了5个地方,这里会一一说明:
- r.app != null && r.app.thread != null:这个代表了我们要启动的进程以及起来了,不需要再启动新进程了,所以接下来调用sendServiceArgsLocked执行服务的生命周期函数,函数返回。由于新进程还没有启动,所以不会进入该分支。
- !whileRestarting && r.restartDelay > 0:whileRestarting为false,但是restartDelay参数并没有设置。所以不会进入该分支。
- app != null && app.thread != null:代表新进程是否以及存在,明显不存在;所以也不会进入这里。
- startProcessLocked:由于新进程没有启动,所以调用startProcessLocked启动服务要运行在的进程。
- mPendingServices.add(r):把ServiceRecord对象加入到集合mPendingServices中,也就是说,当进程起来以后需要从集合mPendingServices中拿到需要运行的服务。
第四点启动新进程会把需要运行服务的进程创建起来,接下来我们进入startProcessLocked,代码如下:
final ProcessRecord startProcessLocked(String processName,ApplicationInfo info, boolean knownToBeDead, int intentFlags,String hostingType, ComponentName hostingName, boolean allowWhileBooting) {ProcessRecord app = getProcessRecordLocked(processName, info.uid);// We don't have to do anything more if:// (1) There is an existing application record; and// (2) The caller doesn't think it is dead, OR there is no thread// object attached to it so we know it couldn't have crashed; and// (3) There is a pid assigned to it, so it is either starting or// already running.//...if (app == null) {app = newProcessRecordLocked(null, info, processName);mProcessNames.put(processName, info.uid, app);} else {// If this is a new package in the process, add the package to the listapp.addPackage(info.packageName);}//...startProcessLocked(app, hostingType, hostingNameStr);return (app.pid != 0) ? app : null;}代码省略了一些相关的判断,如果需要创建新进程, 则会调用newProcessRecordLocked创建一个ProcessRecord对象用于记录新进程的一些信息。继续调用到startProcessLocked,代码如下:
private final void startProcessLocked(ProcessRecord app,String hostingType, String hostingNameStr) {//...try {//1 设置一些启动参数int uid = app.info.uid;int[] gids = null;//...int debugFlags = 0;if ((app.info.flags & ApplicationInfo.FLAG_DEBUGGABLE) != 0) {debugFlags |= Zygote.DEBUG_ENABLE_DEBUGGER;}// Run the app in safe mode if its manifest requests so or the// system is booted in safe mode.if ((app.info.flags & ApplicationInfo.FLAG_VM_SAFE_MODE) != 0 ||Zygote.systemInSafeMode == true) {debugFlags |= Zygote.DEBUG_ENABLE_SAFEMODE;}if ("1".equals(SystemProperties.get("debug.checkjni"))) {debugFlags |= Zygote.DEBUG_ENABLE_CHECKJNI;}if ("1".equals(SystemProperties.get("debug.assert"))) {debugFlags |= Zygote.DEBUG_ENABLE_ASSERT;}//2 启动新进程,入口类为android.app.ActivityThreadint pid = Process.start("android.app.ActivityThread",mSimpleProcessManagement ? app.processName : null, uid, uid,gids, debugFlags, null);//...if (pid == 0 || pid == MY_PID) {// Processes are being emulated with threads.app.pid = MY_PID;app.removed = false;mStartingProcesses.add(app);} else if (pid > 0) {//3 发送了一个超时消息app.pid = pid;app.removed = false;synchronized (mPidsSelfLocked) {this.mPidsSelfLocked.put(pid, app);Message msg = mHandler.obtainMessage(PROC_START_TIMEOUT_MSG);msg.obj = app;mHandler.sendMessageDelayed(msg, PROC_START_TIMEOUT);}} else {app.pid = 0;//...}} catch (RuntimeException e) {// XXX do better error recovery.app.pid = 0;Slog.e(TAG, "Failure starting process " + app.processName, e);}}该函数中有三个关键位置,接下来我们一一说明:
- 这里主要设置一些新进程的启动参数,比如uid、gids、debugFlags。
- 启动新进程,入口类为android.app.ActivityThread
- 新进程创建成功返回了,获得了进程id,也即是返回值pid ;同时还把ProcessRecord对象放入到集合mPidsSelfLocked中,然后发送了一个超时消息PROC_START_TIMEOUT_MSG。
- mPidsSelfLocked:是AMS用来记录当前启动进程信息的集合。
- PROC_START_TIMEOUT_MSG:则是新进程创建成功后发送的一个延时消息,AMS这里采取的策略是新进程必须在启动之后的一段时间内回调到AMS,此时会把消息该消息移除掉;如果新进程启动太久了,没有及时回调AMS则该消息会弹出ANR弹窗提醒用户。言下之意就是新进程启动太慢了,影响了用户体验,所以通过这种方式告知用户,用户可以选择继续等待或者杀死待启动的应用。
新进程启动的入口类为android.app.ActivityThread,首先调用的是ActivityThread.main,接下来运行流程就到了客户端的MyService进程中了。
有关新进程如何启动,可以再写一遍文章分析,这里关注Service的启动流程,先简单跳过了。
3、Service在新进程中的启动
新进程启动后的入口为android.app.ActivityThread.main,代码如下:
//frameworks\base\core\java\android\app\ActivityThread.javapublic static final void main(String[] args) {SamplingProfilerIntegration.start();Process.setArgV0("<pre-initialized>");Looper.prepareMainLooper();if (sMainThreadHandler == null) {sMainThreadHandler = new Handler();}ActivityThread thread = new ActivityThread();thread.attach(false);if (false) {Looper.myLooper().setMessageLogging(newLogPrinter(Log.DEBUG, "ActivityThread"));}Looper.loop();if (Process.supportsProcesses()) {throw new RuntimeException("Main thread loop unexpectedly exited");}thread.detach();String name = (thread.mInitialApplication != null)? thread.mInitialApplication.getPackageName(): "<unknown>";Slog.i(TAG, "Main thread of " + name + " is now exiting");}通过Looper.prepareMainLooper()/Looper.loop();建立消息循环,这就是主线程消息循环建立的地方。同时创建了ActivityThread对象,该对象代表了客户端MyService进程,然后调用thread.attach(false),注意参数为false。
创建ActivityThread对象的时候其实还创建了IApplicationThread对象。
//frameworks\base\core\java\android\app\ActivityThread.java
final ApplicationThread mAppThread = new ApplicationThread();
该对象代表了客户端,AMS就是通过这个对象与客户端通信的。attach的实现如下:
private final void attach(boolean system) {sThreadLocal.set(this);mSystemThread = system;if (!system) {//1 ViewRoot.addFirstDrawHandler(new Runnable() {public void run() {ensureJitEnabled();}});android.ddm.DdmHandleAppName.setAppName("<pre-initialized>");RuntimeInit.setApplicationObject(mAppThread.asBinder());IActivityManager mgr = ActivityManagerNative.getDefault();try {mgr.attachApplication(mAppThread);} catch (RemoteException ex) {}} else {//2 // Don't set application object here -- if the system crashes,// we can't display an alert, we just want to die die die.android.ddm.DdmHandleAppName.setAppName("system_process");try {mInstrumentation = new Instrumentation();ContextImpl context = new ContextImpl();context.init(getSystemContext().mPackageInfo, null, this);Application app = Instrumentation.newApplication(Application.class, context);mAllApplications.add(app);mInitialApplication = app;app.onCreate();} catch (Exception e) {throw new RuntimeException("Unable to instantiate Application():" + e.toString(), e);}}ViewRoot.addConfigCallback(new ComponentCallbacks() {public void onConfigurationChanged(Configuration newConfig) {synchronized (mPackages) {// We need to apply this change to the resources// immediately, because upon returning the view// hierarchy will be informed about it.if (applyConfigurationToResourcesLocked(newConfig)) {// This actually changed the resources! Tell// everyone about it.if (mPendingConfiguration == null ||mPendingConfiguration.isOtherSeqNewer(newConfig)) {mPendingConfiguration = newConfig;queueOrSendMessage(H.CONFIGURATION_CHANGED, newConfig);}}}}public void onLowMemory() {}});}这里说明以下两处:
- 参数system为false,所以会进入这个分支,然后调用attachApplication
- 这个分支表示system为true,代表了系统进程。
由于system为false,所以流程走第一个分支,IActivityManager mgr = ActivityManagerNative.getDefault(),拿到AMS的代理,调用attachApplication;该函数调用会进入AMS侧,我们直接到AMS那边分析接下来的流程。
4、Service与AMS的关系再续
进入AMS后,先调用attachApplication,代码如下:
public final void attachApplication(IApplicationThread thread) {synchronized (this) {int callingPid = Binder.getCallingPid();final long origId = Binder.clearCallingIdentity();attachApplicationLocked(thread, callingPid);Binder.restoreCallingIdentity(origId);}}直接转发到函数 attachApplicationLocked,代码如下:
private final boolean attachApplicationLocked(IApplicationThread thread,int pid) {//1 找到ProcessRecord对象,还记得该对象是啥时候加到集合mPidsSelfLocked的吗ProcessRecord app;if (pid != MY_PID && pid >= 0) {synchronized (mPidsSelfLocked) {app = mPidsSelfLocked.get(pid);}} else if (mStartingProcesses.size() > 0) {app = mStartingProcesses.remove(0);app.setPid(pid);} else {app = null;}if (app == null) {//...return false;}//...String processName = app.processName;//...//2 设置ProcessRecord对象的一些参数app.thread = thread;app.curAdj = app.setAdj = -100;app.curSchedGroup = Process.THREAD_GROUP_DEFAULT;app.setSchedGroup = Process.THREAD_GROUP_BG_NONINTERACTIVE;app.forcingToForeground = null;app.foregroundServices = false;app.debugging = false;//3 移除延时消息mHandler.removeMessages(PROC_START_TIMEOUT_MSG, app);//...try {//...//4 执行dex优化ensurePackageDexOpt(app.instrumentationInfo != null? app.instrumentationInfo.packageName: app.info.packageName);if (app.instrumentationClass != null) {ensurePackageDexOpt(app.instrumentationClass.getPackageName());}//5 回调应用程序thread.bindApplication(processName, app.instrumentationInfo != null? app.instrumentationInfo : app.info, providers,app.instrumentationClass, app.instrumentationProfileFile,app.instrumentationArguments, app.instrumentationWatcher, testMode, isRestrictedBackupMode || !normalMode,mConfiguration, getCommonServicesLocked());updateLruProcessLocked(app, false, true);app.lastRequestedGc = app.lastLowMemory = SystemClock.uptimeMillis();} catch (Exception e) {//...return false;}//....boolean badApp = false;boolean didSomething = false;// 6 See if the top visible activity is waiting to run in this process...ActivityRecord hr = mMainStack.topRunningActivityLocked(null);if (hr != null && normalMode) {if (hr.app == null && app.info.uid == hr.info.applicationInfo.uid&& processName.equals(hr.processName)) {try {if (mMainStack.realStartActivityLocked(hr, app, true, true)) {didSomething = true;}} catch (Exception e) {Slog.w(TAG, "Exception in new application when starting activity "+ hr.intent.getComponent().flattenToShortString(), e);badApp = true;}} else {mMainStack.ensureActivitiesVisibleLocked(hr, null, processName, 0);}}// 7 Find any services that should be running in this process...if (!badApp && mPendingServices.size() > 0) {ServiceRecord sr = null;try {for (int i=0; i<mPendingServices.size(); i++) {sr = mPendingServices.get(i);if (app.info.uid != sr.appInfo.uid|| !processName.equals(sr.processName)) {continue;}mPendingServices.remove(i);i--;realStartServiceLocked(sr, app);didSomething = true;}} catch (Exception e) {Slog.w(TAG, "Exception in new application when starting service "+ sr.shortName, e);badApp = true;}}// 8 Check if the next broadcast receiver is in this process...BroadcastRecord br = mPendingBroadcast;if (!badApp && br != null && br.curApp == app) {try {mPendingBroadcast = null;processCurBroadcastLocked(br, app);didSomething = true;} catch (Exception e) {Slog.w(TAG, "Exception in new application when starting receiver "+ br.curComponent.flattenToShortString(), e);badApp = true;logBroadcastReceiverDiscardLocked(br);finishReceiverLocked(br.receiver, br.resultCode, br.resultData,br.resultExtras, br.resultAbort, true);scheduleBroadcastsLocked();// We need to reset the state if we fails to start the receiver.br.state = BroadcastRecord.IDLE;}}//...return true;}代码中标记了一些关键的地方,下面一一说明:
- 找到ProcessRecord对象,主要是从mPidsSelfLocked集合中找到pid对应的ProcessRecord对象。
- 设置ProcessRecord对象的一些参数,其中最主要的是设置thread参数,该参数是IApplicationThread对象,代表了客户端;AMS就是通过这个对象与客户端通信的。
- 移除延时消息PROC_START_TIMEOUT_MSG,此时代表了新进程以及成功启动。
- 调用ensurePackageDexOpt执行dex优化,这里我们不关注。
- 调用bindApplication回调客户端,这里会调用到ActivityThread.handleBindApplication函数,然后执行Application的onCreate函数。从这里我们知道Application的onCreate运行于主线程中,所以我们在开发APP的时候最好只在里面做一些必要的初始化,否则会影响APP的启动速度。
- 此处是启动activity的,我们这里不关注。
- 启动service,这是我们需要关注的部分;还记得调用bringUpServiceLocked的时候mPendingServices集合加入了我们要启动的ServiceRecord对象吗?这里取出ServiceRecord对象,然后调用realStartServiceLocked继续启动服务。
- 广播处理,我们这里也不关注。
realStartServiceLocked以ServiceRecord及ProcessRecord为参数,代码如下:
private final void realStartServiceLocked(ServiceRecord r,ProcessRecord app) throws RemoteException {//...r.app = app;r.restartTime = r.lastActivity = SystemClock.uptimeMillis();app.services.add(r);bumpServiceExecutingLocked(r, "create");updateLruProcessLocked(app, true, true);boolean created = false;try {//...//1 回调客户端app.thread.scheduleCreateService(r, r.serviceInfo);r.postNotification();created = true;} finally {if (!created) {app.services.remove(r);scheduleServiceRestartLocked(r, false);}}requestServiceBindingsLocked(r);//2设置一些参数if (r.startRequested && r.callStart && r.pendingStarts.size() == 0) {r.lastStartId++;if (r.lastStartId < 1) {r.lastStartId = 1;}r.pendingStarts.add(new ServiceRecord.StartItem(r, r.lastStartId, null, -1));}//3 回调客户端onStartsendServiceArgsLocked(r, true);}scheduleCreateService将会回调到客户端,进入到ActivityThead.handleCreateService,而sendServiceArgsLocked将会回调客户端的onStartCommond方法。
先来看看handleCreateService函数,代码如下:
private final void handleCreateService(CreateServiceData data) {// If we are getting ready to gc after going to the background, well// we are back active so skip it.unscheduleGcIdler();LoadedApk packageInfo = getPackageInfoNoCheck(data.info.applicationInfo);Service service = null;try {//1java.lang.ClassLoader cl = packageInfo.getClassLoader();service = (Service) cl.loadClass(data.info.name).newInstance();} catch (Exception e) {//...}try {ContextImpl context = new ContextImpl();context.init(packageInfo, null, this);Application app = packageInfo.makeApplication(false, mInstrumentation);context.setOuterContext(service);service.attach(context, this, data.info.name, data.token, app,ActivityManagerNative.getDefault());//2service.onCreate();mServices.put(data.token, service);try {ActivityManagerNative.getDefault().serviceDoneExecuting(data.token, 0, 0, 0);} catch (RemoteException e) {// nothing to do.}} catch (Exception e) {//...}}这里比较简单,首先loadClass加载了我们实现的服务类,然后调用服务的onCreate方法,嗯,终于看到了熟悉的onCreate了。
好啦,感觉这篇有点长了,先不写了。
这里只是回调到了服务的onCreate,我们知道在服务的onCreate里面执行耗时任务会导致ANR,下一篇,我们将继续分析服务的生命周期调用是如何在AMS侧实现的、同时分析为何onCreate、onStartCommond执行耗时任务会导致ANR。
相关文章:
Android中Service在新进程中的启动流程2
目录 1、Service在客户端的启动入口 2、Service启动在AMS的处理 3、Service在新进程中的启动 4、Service与AMS的关系再续 上一篇文章中我们了解了Service在新进程中启动的大致流程,同时认识了与客户端进程交互的接口IApplicationThread以及与AMS交互的接口IActi…...
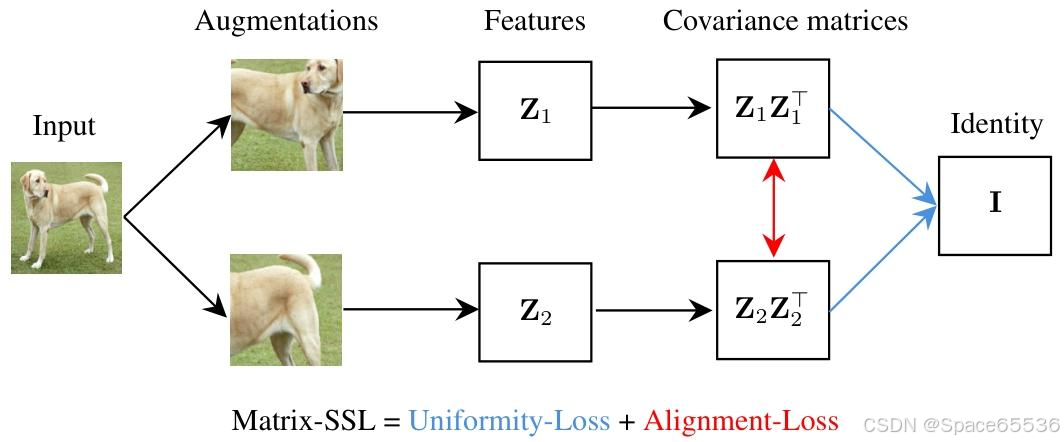
论文速读|Matrix-SSL:Matrix Information Theory for Self-Supervised Learning.ICML24
论文地址:Matrix Information Theory for Self-Supervised Learning 代码地址:https://github.com/yifanzhang-pro/matrix-ssl bib引用: article{zhang2023matrix,title{Matrix Information Theory for Self-Supervised Learning},author{Zh…...
)
ubunut22.04安装docker(基于阿里云 Docker 镜像源安装 Docker)
安装 更新包管理器: sudo apt update 安装 Docker 的依赖包 sudo apt install apt-transport-https ca-certificates curl gnupg lsb-release添加阿里云 Docker 镜像源 GPG 密钥: curl -fsSL https://mirrors.aliyun.com/docker-ce/linux/ubuntu/gp…...

k8s namespace绑定节点
k8s namespace绑定节点 1. apiserver 启用准入控制 PodNodeSelector2. namespace 添加注解 scheduler.alpha.kubernetes.io/node-selector3. label node 1. apiserver 启用准入控制 PodNodeSelector vim /etc/kubernetes/manifests/kube-apiserver.yaml spec:containers:- co…...
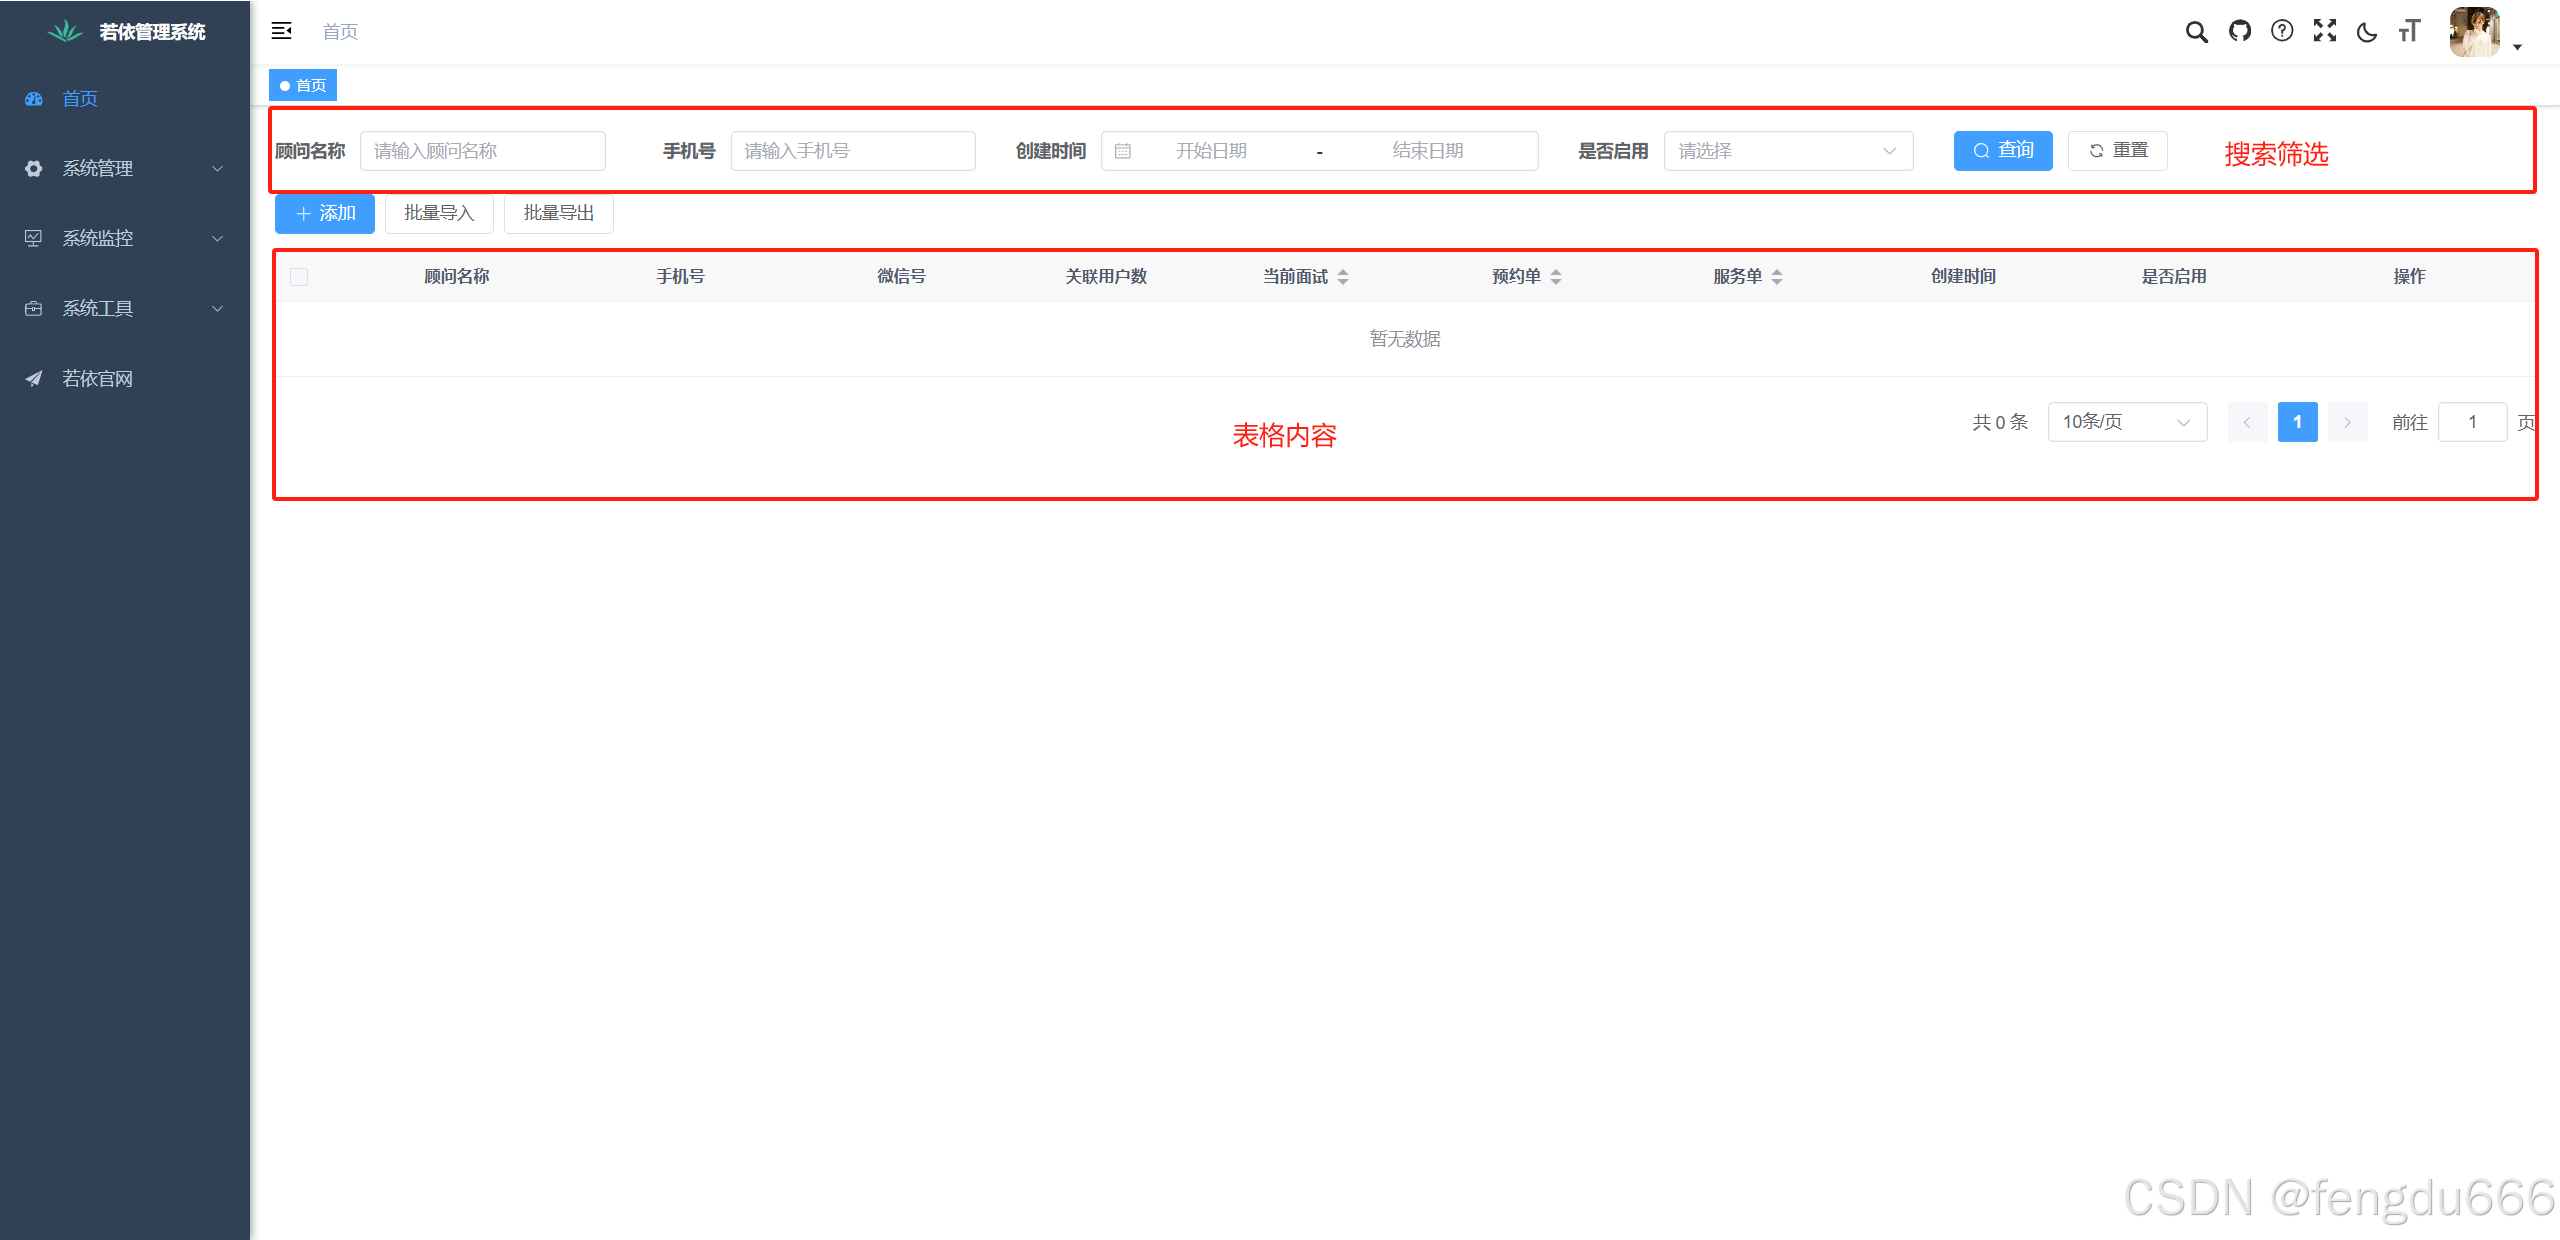
【ElementPlus】在Vue3中实现表格组件封装
预览 搜索筛选组件 <template><div><el-formref"formView":model"formData"label-width"auto"label-position"right":label-col-style"{ min-width: 100px }":inline"true"><el-form-item …...
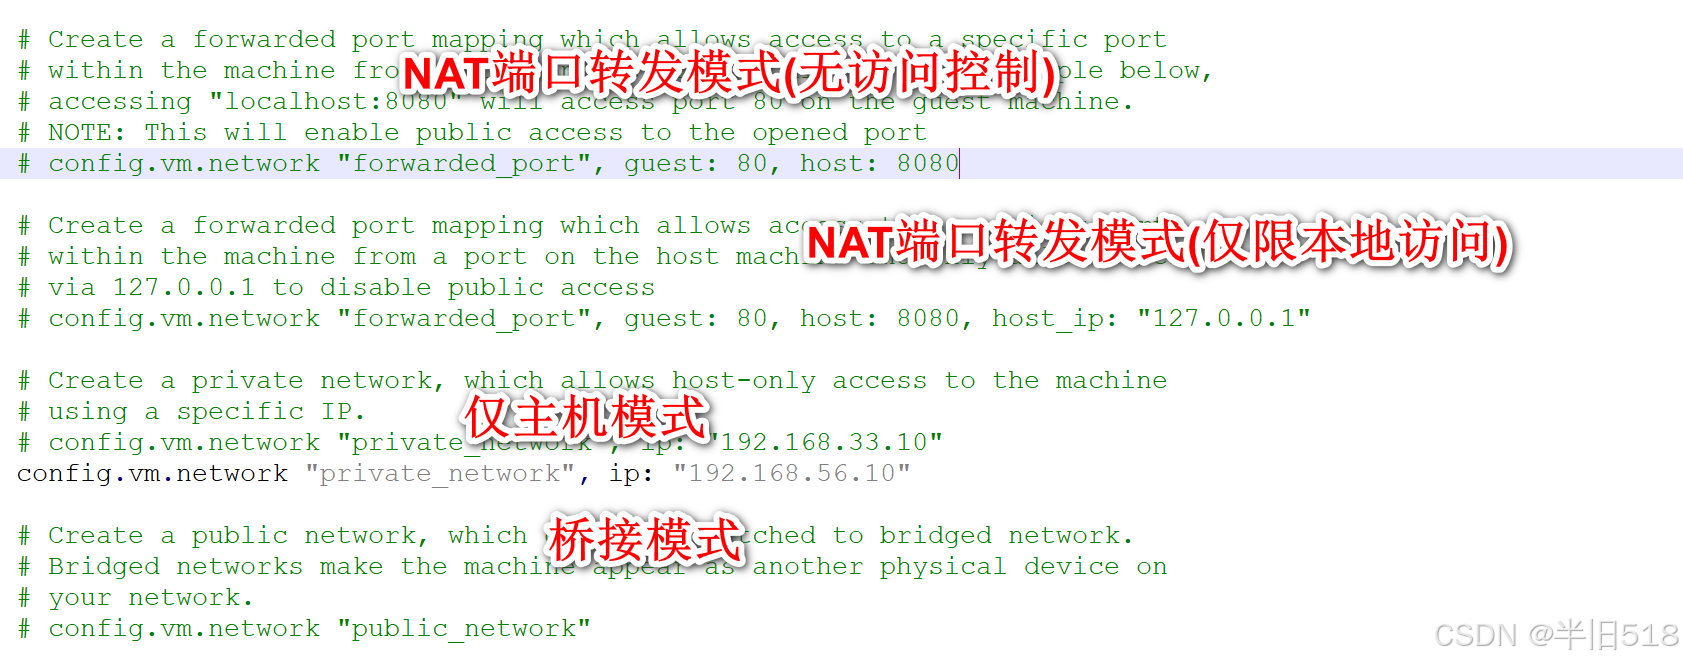
cursor重构谷粒商城04——vagrant技术快速部署虚拟机
前言:这个系列将使用最前沿的cursor作为辅助编程工具,来快速开发一些基础的编程项目。目的是为了在真实项目中,帮助初级程序员快速进阶,以最快的速度,效率,快速进阶到中高阶程序员。 本项目将基于谷粒商城…...
26、正则表达式
目录 一. 匹配字符 .:匹配除换行符外的任意单个字符。 二. 位置锚点 ^:匹配输入字符串的开始位置。 $:匹配输入字符串的结束位置。 \b:匹配单词边界。 \B:匹配非单词边界。 三. 重复限定符 *:匹配…...

SpringBoot使用MockMVC通过http请求controller控制器调用测试
说明 在Spring Boot中编写测试控制器调用是一个常见的需求,通常使用Spring的测试框架来完成。Spring Boot提供了多种方式来测试控制器,包括使用MockMvc进行模拟HTTP请求和响应的测试。 基本示例 1. 创建Spring Boot项目 首先,确保你已经创建了一个Spring Boot项目。如果…...

【Unity3D】Unity混淆工具Obfuscator使用
目录 一、导入工具 二、各种混淆形式介绍 2.1 程序集混淆 2.2 命名空间混淆 2.3 类混淆 2.4 函数混淆 2.5 参数混淆 2.6 字段混淆 2.7 属性混淆 2.8 事件混淆 三、安全混淆 四、兼容性处理 4.1 动画方法兼容 4.2 GUI方法兼容 4.3 协程方法兼容 五、选项 5.1 调…...
)
C语言语法基础学习—动态分配空间(new和malloc的用法及区别)
前言 在 C 语言中,动态内存分配主要是通过 malloc() 和 free() 函数来完成的。而在 C 中是使用new和delete关键字,来动态分配内存。 虽然 C 语言没有 new,但 malloc() 和 new 在内存分配上的作用是相似的。下面我们详细解释 malloc() 和 ne…...
QT:控件属性及常用控件(3)-----输入类控件(正则表达式)
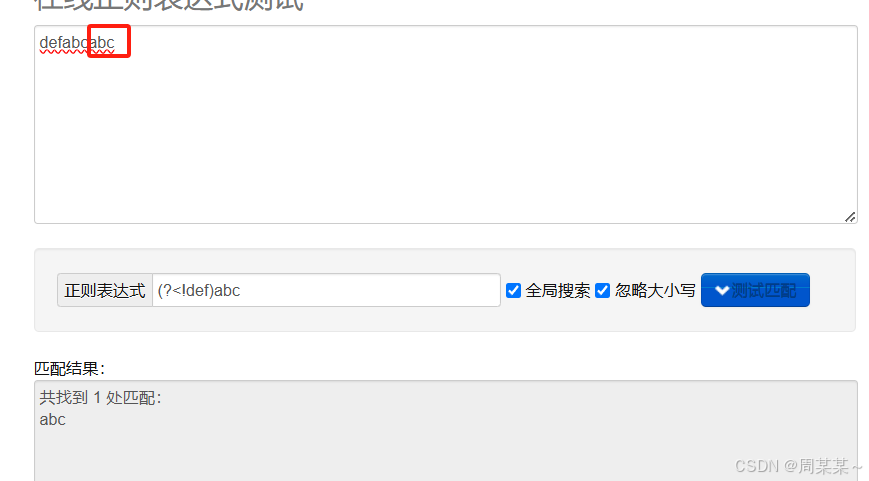
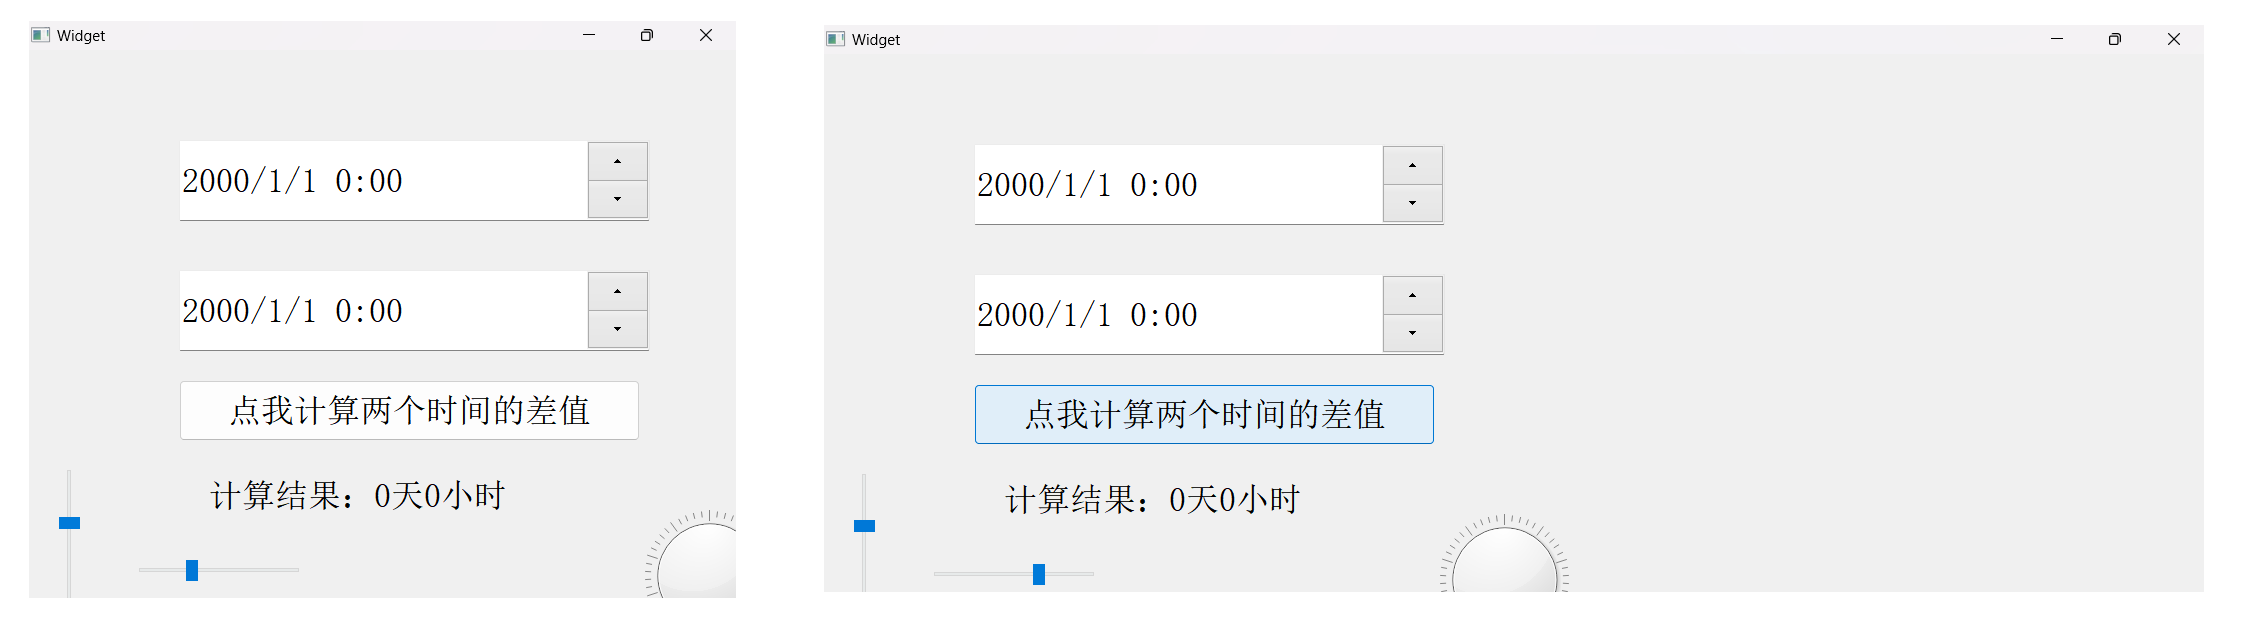
输入类控件既可以进行显示,也能让用户输入一些内容! 文章目录 1.Line Edit1.1 用户输入个人信息1.2 基于正则表达式的文本限制1.3 验证两次输入的密码是否一致1.4 让输入的密码可以被查看 2.Text Edit2.1 输入和显示同步2.1 其他信号出发情况 3.ComboBox…...

Hive SQL 执行计划解析
Hive SQL 执行计划解析 一、 explain用法 1. SQL 查询 EXPLAIN SELECT SUM(view_dsp) AS view_sum FROM ads.table_a WHERE p_day 2025-01-06;2. 执行计划 STAGE DEPENDENCIES:Stage-1 is a root stageStage-0 depends on stages: Stage-1STAGE PLANS:Stage: Stage-1Map …...
热更新杂乱记
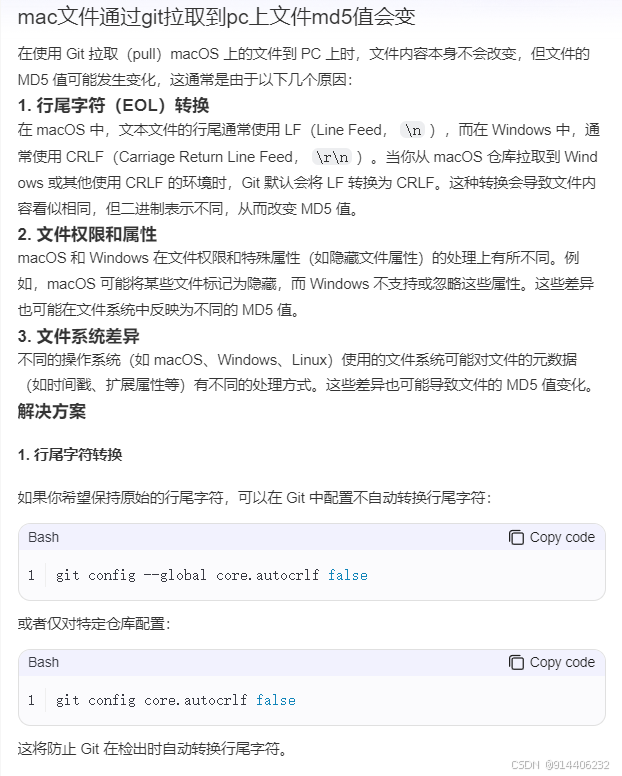
热更新主要有一个文件的MD5值的比对过程,期间遇到2个问题,解决起来花费了一点时间 1. png 和 plist 生成zip的时候再生成MD5值会发生变动。 这个问题解决起来有2种方案: (1).第一个方案是将 png和plist的文件时间改…...

博客搭建 — GitHub Pages 部署
关于 GitHub Pages GitHub Pages 是一项静态站点托管服务,它直接从 GitHub 上的仓库获取 HTML、CSS 和 JavaScript 文件,通过构建过程运行文件,然后发布网站。 本文最终效果是搭建出一个域名为 https://<user>.github.io 的网站 创建…...

翻译:How do I reset my FPGA?
文章目录 背景翻译:How do I reset my FPGA?1、Understanding the flip-flop reset behavior2、Reset methodology3、Use appropriate resets to maximize utilization4、Many options5、About the author 背景 在写博客《复位信号的同步与释放(同步复…...

Linux 进程环境变量:深入理解与实践指南
🌟 快来参与讨论💬,点赞👍、收藏⭐、分享📤,共创活力社区。🌟 🚩用通俗易懂且不失专业性的文字,讲解计算机领域那些看似枯燥的知识点🚩 在 Linux 系统里…...
Linux探秘坊-------5.git
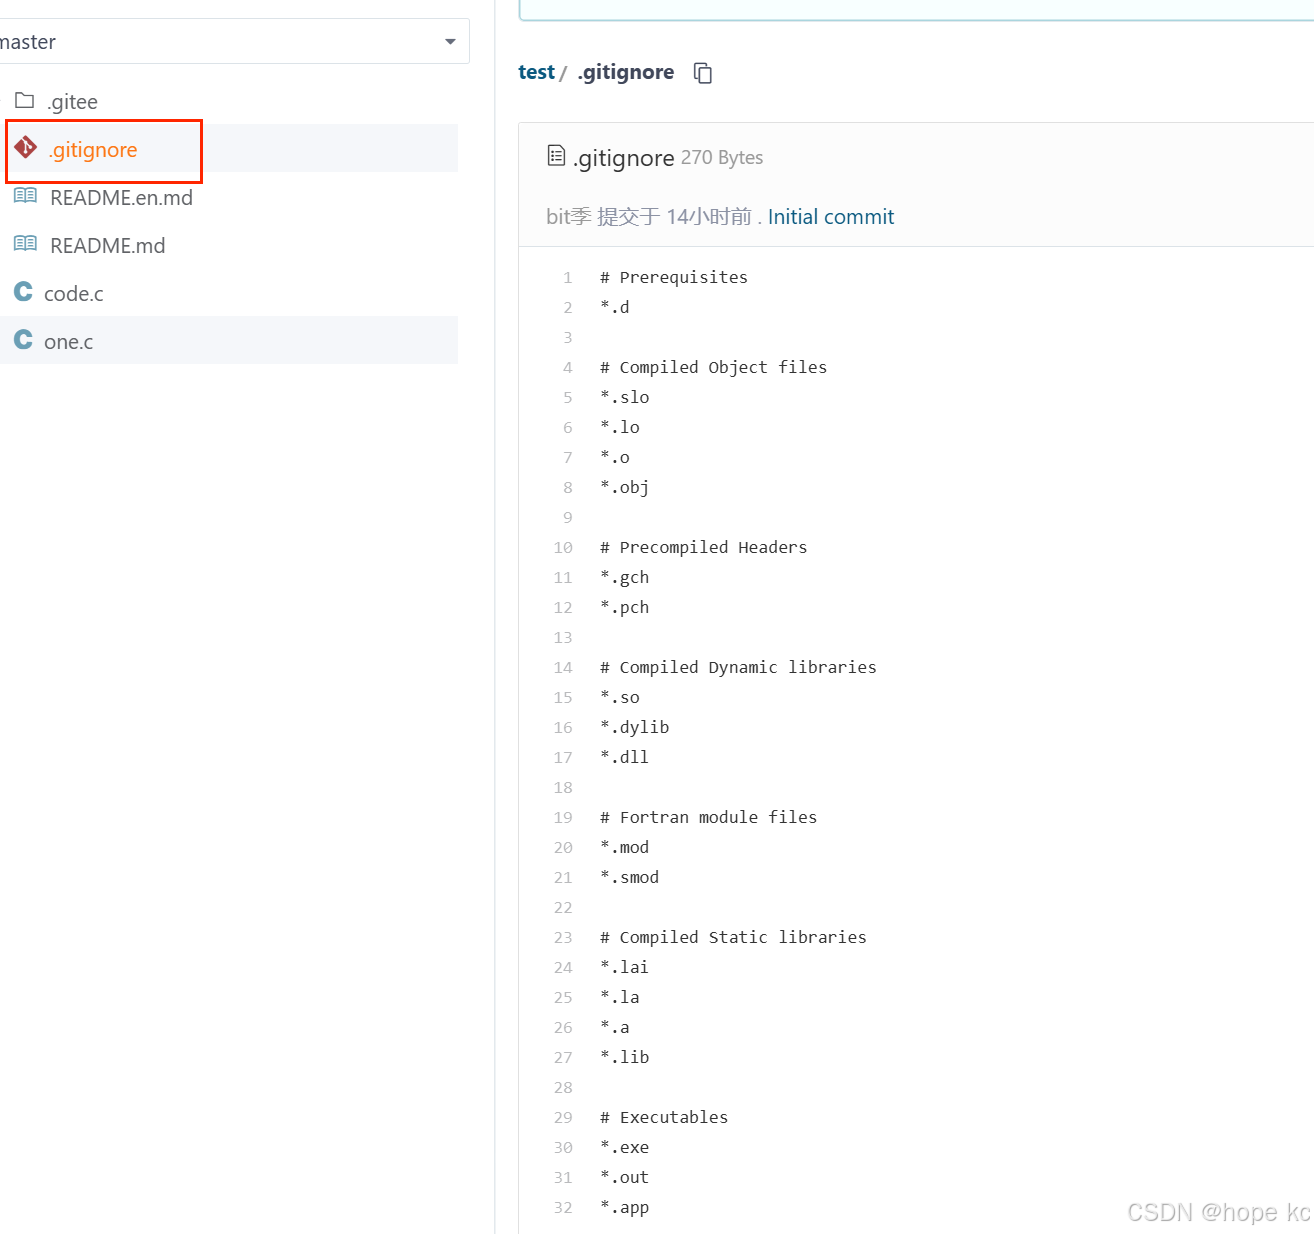
1.git介绍 1.版本控制器 为了能够更⽅便我们管理这些不同版本的⽂件,便有了版本控制器。所谓的版本控制器,就是能让你了解到⼀个⽂件的历史,以及它的发展过程的系统。通俗的讲就是⼀个可以记录⼯程的每⼀次改动和版本迭代的⼀个管理系统&am…...

Linux中的几个基本指令(二)
文章目录 1、cp指令例一:例二:例三:例四:例五: 2、mv 指令例一:例二: 3、cat指令例一: 4、tac指令5、which指令6、date指令时间戳:7、zip指令 今天我们继续学习Linux下的…...
)
Java入门笔记(1)
引言 在计算机编程的广袤宇宙中,Java无疑是一颗格外耀眼的恒星。那么,Java究竟是什么呢? Java是美国Sun公司(Stanford University Network)在1995年推出的一门计算机高级编程语言。曾经辉煌的Sun公司在2009年被Oracle&…...
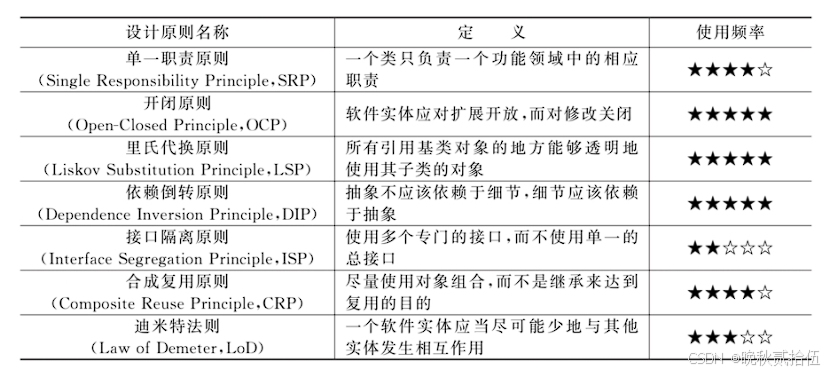
设计模式的艺术-开闭原则
原则使用频率图(仅供参考) 1.如何理解开闭原则 简单来说,开闭原则指的是 “对扩展开放,对修改关闭”。 当软件系统需要增加新的功能时,应该通过扩展现有代码的方式来实现,而不是去修改已有的代码。 例如我…...

从选型到集成:带式输送机传动装置的系统化设计实践
1. 带式输送机传动装置设计概述 带式输送机作为工业生产中常见的物料输送设备,其传动装置的设计直接关系到整个系统的运行效率和可靠性。我参与过多个矿山和水泥厂的输送系统改造项目,深刻体会到传动装置设计的重要性。一套优秀的传动系统不仅要满足基本…...

告别ROS!在Win10上搞定Intel RealSense L515与ORB-SLAM2的保姆级避坑指南
Windows 10环境下Intel RealSense L515与ORB-SLAM2深度整合实战指南 为什么选择Windows平台进行SLAM开发? 对于大多数计算机视觉和机器人领域的开发者来说,Ubuntu和ROS似乎是SLAM开发的"标准配置"。但现实情况是,许多实验室、教育机…...

如何在电脑上玩手游:Scrcpy Mask终极指南与实战技巧
如何在电脑上玩手游:Scrcpy Mask终极指南与实战技巧 【免费下载链接】scrcpy-mask A Scrcpy client in Rust, Bevy and React, aimed at providing mouse and key mapping to control Android device, similar to a game emulator 项目地址: https://gitcode.com/…...
的解析与应用)
车载网络诊断实战 - UDS协议篇 - 故障码(DTC)的解析与应用
1. 故障码(DTC)的实战价值 第一次拆解汽车ECU时,我发现密密麻麻的线束中藏着个有趣现象:每个控制器都像会"说话"的智能体。当ECU检测到异常时,不是沉默地罢工,而是通过UDS协议发出特定编码——这就是我们今天要聊的故障…...

软件继承管理化的特性传递与代码复用
软件继承管理化的特性传递与代码复用 在软件开发中,继承管理化是一种通过结构化设计实现特性传递和代码复用的重要手段。它不仅能提升开发效率,还能减少重复劳动,降低维护成本。随着软件规模不断扩大,如何高效地利用继承机制传递…...

全面掌握FanControl:Windows平台最强大的风扇控制软件实战指南
全面掌握FanControl:Windows平台最强大的风扇控制软件实战指南 【免费下载链接】FanControl.Releases This is the release repository for Fan Control, a highly customizable fan controlling software for Windows. 项目地址: https://gitcode.com/GitHub_Tre…...

如何高效解密SHc加密脚本:UnSHc工具实战应用完整指南
如何高效解密SHc加密脚本:UnSHc工具实战应用完整指南 【免费下载链接】UnSHc UnSHc - How to decrypt SHc *.sh.x encrypted file ? 项目地址: https://gitcode.com/gh_mirrors/un/UnSHc 在Shell脚本安全领域,SHc加密工具因其强大的保护能力而广…...

别再乱选路由策略了!XXL-Job 2.3.0实战:从FIRST到分片广播,手把手教你根据业务场景选对策略
XXL-Job路由策略深度指南:如何根据业务场景做出最优选择 在分布式任务调度领域,路由策略的选择往往决定了系统的可靠性和效率。XXL-Job作为业界广泛采用的分布式任务调度平台,提供了多达10种路由策略,但这也让许多开发者陷入了&qu…...

VirtualBrowser 2.1.15版本重磅升级:批量代理管理革新与SSH连接稳定性飞跃
VirtualBrowser 2.1.15版本重磅升级:批量代理管理革新与SSH连接稳定性飞跃 【免费下载链接】VirtualBrowser Free anti fingerprint browser, 指纹浏览器, 隐私浏览器, 防识别浏览器, 反识别浏览器, 防关联浏览器, 免费的web3空投专用指纹浏览器 https://virtualbro…...

给程序员的真心话:读研三年 vs 本科直接进大厂,我用亲身经历帮你算笔账
程序员职业路径抉择:三年读研与直接就业的量化分析框架 凌晨两点的宿舍里,显示器蓝光映照着代码与招聘网站交替切换的界面——这是无数计算机专业学子毕业季的常态。当"是否读研"这个问题摆在面前时,我们需要的不是泛泛而谈的"…...