C#windows窗体人脸识别
一、创建一个数据库,名为TestFaceDB
里面有一张表就OK了,表名Users,表里面有几个字段我说明一下:
id--------------------bigint----------------------编号
name--------------varchar(50)-----------------用户名
phone--------------varchar(50)----------------电话
password--------------varchar(50)------------密码
address--------------varchar(50)--------------地址
picture--------------varchar(50)---------------脸的图片
数据库脚本:
USE [master]
GO
/****** Object:  Database [TestFaceDB]    Script Date: 2017-11-30 22:09:36 ******/
CREATE DATABASE [TestFaceDB]CONTAINMENT = NONEON  PRIMARY
( NAME = N'TestFaceDB', FILENAME = N'E:\DB\TestFaceDB.mdf' , SIZE = 5120KB , MAXSIZE = UNLIMITED, FILEGROWTH = 1024KB )LOG ON
( NAME = N'TestFaceDB_log', FILENAME = N'E:\DB\TestFaceDB_log.ldf' , SIZE = 2048KB , MAXSIZE = 2048GB , FILEGROWTH = 10%)
GO
ALTER DATABASE [TestFaceDB] SET COMPATIBILITY_LEVEL = 110
GO
IF (1 = FULLTEXTSERVICEPROPERTY('IsFullTextInstalled'))
begin
EXEC [TestFaceDB].[dbo].[sp_fulltext_database] @action = 'enable'
end
GO
ALTER DATABASE [TestFaceDB] SET ANSI_NULL_DEFAULT OFF
GO
ALTER DATABASE [TestFaceDB] SET ANSI_NULLS OFF
GO
ALTER DATABASE [TestFaceDB] SET ANSI_PADDING OFF
GO
ALTER DATABASE [TestFaceDB] SET ANSI_WARNINGS OFF
GO
ALTER DATABASE [TestFaceDB] SET ARITHABORT OFF
GO
ALTER DATABASE [TestFaceDB] SET AUTO_CLOSE OFF
GO
ALTER DATABASE [TestFaceDB] SET AUTO_CREATE_STATISTICS ON
GO
ALTER DATABASE [TestFaceDB] SET AUTO_SHRINK OFF
GO
ALTER DATABASE [TestFaceDB] SET AUTO_UPDATE_STATISTICS ON
GO
ALTER DATABASE [TestFaceDB] SET CURSOR_CLOSE_ON_COMMIT OFF
GO
ALTER DATABASE [TestFaceDB] SET CURSOR_DEFAULT  GLOBAL
GO
ALTER DATABASE [TestFaceDB] SET CONCAT_NULL_YIELDS_NULL OFF
GO
ALTER DATABASE [TestFaceDB] SET NUMERIC_ROUNDABORT OFF
GO
ALTER DATABASE [TestFaceDB] SET QUOTED_IDENTIFIER OFF
GO
ALTER DATABASE [TestFaceDB] SET RECURSIVE_TRIGGERS OFF
GO
ALTER DATABASE [TestFaceDB] SET  DISABLE_BROKER
GO
ALTER DATABASE [TestFaceDB] SET AUTO_UPDATE_STATISTICS_ASYNC OFF
GO
ALTER DATABASE [TestFaceDB] SET DATE_CORRELATION_OPTIMIZATION OFF
GO
ALTER DATABASE [TestFaceDB] SET TRUSTWORTHY OFF
GO
ALTER DATABASE [TestFaceDB] SET ALLOW_SNAPSHOT_ISOLATION OFF
GO
ALTER DATABASE [TestFaceDB] SET PARAMETERIZATION SIMPLE
GO
ALTER DATABASE [TestFaceDB] SET READ_COMMITTED_SNAPSHOT OFF
GO
ALTER DATABASE [TestFaceDB] SET HONOR_BROKER_PRIORITY OFF
GO
ALTER DATABASE [TestFaceDB] SET RECOVERY FULL
GO
ALTER DATABASE [TestFaceDB] SET  MULTI_USER
GO
ALTER DATABASE [TestFaceDB] SET PAGE_VERIFY CHECKSUM
GO
ALTER DATABASE [TestFaceDB] SET DB_CHAINING OFF
GO
ALTER DATABASE [TestFaceDB] SET FILESTREAM( NON_TRANSACTED_ACCESS = OFF )
GO
ALTER DATABASE [TestFaceDB] SET TARGET_RECOVERY_TIME = 0 SECONDS
GO
EXEC sys.sp_db_vardecimal_storage_format N'TestFaceDB', N'ON'
GO
USE [TestFaceDB]
GO
/****** Object:  Table [dbo].[Users]    Script Date: 2017-11-30 22:09:36 ******/
SET ANSI_NULLS ON
GO
SET QUOTED_IDENTIFIER ON
GO
SET ANSI_PADDING ON
GO
CREATE TABLE [dbo].[Users]([id] [bigint] NOT NULL,[name] [varchar](50) NULL,[age] [int] NULL,[phone] [varchar](50) NULL,[password] [varchar](50) NULL,[address] [varchar](50) NULL,[picture] [varchar](max) NULL,CONSTRAINT [PK_Users] PRIMARY KEY CLUSTERED
([id] ASC
)WITH (PAD_INDEX = OFF, STATISTICS_NORECOMPUTE = OFF, IGNORE_DUP_KEY = OFF, ALLOW_ROW_LOCKS = ON, ALLOW_PAGE_LOCKS = ON) ON [PRIMARY]
) ON [PRIMARY] TEXTIMAGE_ON [PRIMARY]GO
SET ANSI_PADDING OFF
GO
USE [master]
GO
ALTER DATABASE [TestFaceDB] SET  READ_WRITE
GO
二、引入一个AForgeDLL文件库
C#(Winform)通过添加AForge添加并使用系统摄像机-CSDN博客
三、在vs里面新建个项目 Name: Camtest
在新建个sqlhelper,这个文件是用来操作数据库的,主要是人脸注册和认证以及登陆的时候用。
using System;
using System.Collections.Generic;
using System.Data;
using System.Data.SqlClient;
using System.Linq;
using System.Text;
using System.Threading.Tasks;
using System.Data.SqlClient;
using System.Configuration;
using System.Data;namespace face
{/// <summary>/// 数据库工具类/// </summary>public class SqlHelper{#region 获取数据库连接private static string GetConnectionString{get{return "Data Source=.;Initial Catalog=TestFaceDB;Persist Security Info=True;User ID=sa;Password=171268"; //转换成string类型}}#endregion#region 查询多条记录/// <summary>/// 查询多条记录/// params SqlParameter  param  表示既可以传过来数组  也可以传过来单个值/// </summary>/// <param name="sql"></param>/// <param name="type"></param>/// <param name="param"></param>/// <returns></returns>public static SqlDataReader ExcuteReader(string sql, CommandType type, params SqlParameter[] param){SqlConnection conn = new SqlConnection(GetConnectionString);SqlCommand cmd = new SqlCommand(sql, conn);PreaPareCommand(sql, conn, cmd, type, param);//参数是关闭连接return cmd.ExecuteReader(CommandBehavior.CloseConnection);}#endregion#region DataSetpublic static DataSet ExexuteDataset(string sql, CommandType type, params SqlParameter[] param){using (SqlConnection conn = new SqlConnection(GetConnectionString)){SqlCommand cmd = new SqlCommand(sql, conn);PreaPareCommand(sql, conn, cmd, type, param);SqlDataAdapter sda = new SqlDataAdapter(cmd);DataSet ds = new DataSet();sda.Fill(ds);return ds;}}#endregion#region 查询返回一条记录/// <summary>/// 查询返回一条记录/// </summary>/// <param name="sql"></param>/// <param name="type"></param>/// <param name="param"></param>/// <returns></returns>public static Object ExecuteScalar(string sql, CommandType type, params SqlParameter[] param){using (SqlConnection conn = new SqlConnection(GetConnectionString)){SqlCommand cmd = new SqlCommand(sql, conn);PreaPareCommand(sql, conn, cmd, type, param);return cmd.ExecuteScalar();}}#endregion#region 命令对象装配//命令对象装配private static void PreaPareCommand(string sql, SqlConnection conn, SqlCommand cmd, CommandType type, params SqlParameter[] param){if (conn.State != ConnectionState.Open){conn.Close();conn.Open();}cmd.CommandType = type;if (param != null){foreach (SqlParameter p in param){cmd.Parameters.Add(p);}}}#endregion#region 增删改public static int ExecuteNonQuery(string sql, CommandType type, params SqlParameter[] param){using (SqlConnection conn = new SqlConnection(GetConnectionString)){SqlCommand cmd = new SqlCommand(sql, conn);PreaPareCommand(sql, conn, cmd, type, param);return cmd.ExecuteNonQuery();}}#endregion}
}
再新建一个实体类,命名为:Users
using System;
using System.Collections.Generic;
using System.Linq;
using System.Text;
using System.Threading.Tasks;namespace Camtest
{public class Users{//编号public long id { get; set; }//姓名public string name { get; set; }//密码public string password { get; set; }//年龄public int age { get; set; }//电话public string phone { get; set; }//地址public string address { get; set; }//脸public string picture { get; set; }}
}
四、人脸检测

空间组成:
1. videoSourcePlayer,所在的dll是Aforge.Controls.Video这个里面,名称是videoSourcePlayer1
2. groupBox控件,名称是groupBox1
3.comboBox控件,名称是comboBoxCameras和picsize
4.button控件,名称是button2和close
5. label控件,名称是(左边从上到下)label3,label6,label8,label10,label12,label14。右边从上到下:label4,label5,label7,label9,label11,label13
6窗体,名称是facedetection
1.加载窗体的时候先检测一遍我们的摄像头:
// 刷新可用相机的列表videoDevices = new FilterInfoCollection(FilterCategory.VideoInputDevice);comboBoxCameras.Items.Clear();for (int i = 0; i < videoDevices.Count; i++){comboBoxCameras.Items.Add(videoDevices[i].Name.ToString());}if (comboBoxCameras.Items.Count > 0)comboBoxCameras.SelectedIndex = 0;picsize.SelectedIndex = 0;2.打开摄像头的方法
/// <summary>/// 打开摄像头/// </summary>public void openCan(){selectedPICIndex = picsize.SelectedIndex;selectedDeviceIndex = comboBoxCameras.SelectedIndex;//连接摄像头。videoSource = new VideoCaptureDevice(videoDevices[selectedDeviceIndex].MonikerString);videoSource.VideoResolution = videoSource.VideoCapabilities[selectedDeviceIndex];// 枚举所有摄像头支持的像素,设置拍照为1920*1080foreach (VideoCapabilities capab in videoSource.VideoCapabilities){if (selectedPICIndex == 0){if (capab.FrameSize.Width == 1920 && capab.FrameSize.Height == 1080){videoSource.VideoResolution = capab;break;}if (capab.FrameSize.Width == 1280 && capab.FrameSize.Height == 720){videoSource.VideoResolution = capab;break;}}else{if (capab.FrameSize.Width == 1280 && capab.FrameSize.Height == 720){videoSource.VideoResolution = capab;break;}}}videoSourcePlayer1.VideoSource = videoSource;// set NewFrame event handlervideoSourcePlayer1.Start();}
3.保存人脸成一张图片,顺便调用人脸检测库:
//保存图片private void button2_Click(object sender, EventArgs e){if (videoSource == null)return;Bitmap bitmap = videoSourcePlayer1.GetCurrentVideoFrame();//图片名称,年月日时分秒毫秒.jpgstring fileName = DateTime.Now.ToString("yyyyMMddHHmmssff") + ".jpg";//获取项目的根目录String path = AppDomain.CurrentDomain.BaseDirectory;//将图片保存在服务器里面bitmap.Save(path + "\\picture\\" + fileName, ImageFormat.Jpeg);bitmap.Dispose();//进行面部特征识别facemodel facem = face_test.FaceDetect(path + "\\picture\\" + fileName);this.label4.Text = facem.age; //年龄this.label5.Text = facem.beauty; //漂亮度string expression = facem.expression;//表情if (expression.Equals("0")){this.label7.Text = "不笑";}else if (expression.Equals("1")){this.label7.Text = "微笑";}else if (expression.Equals("2")){this.label7.Text = "大笑";}string gender = facem.gender;//性别if (gender.Equals("male")){this.label9.Text = "男";}else{this.label9.Text = "女";}string glasses = facem.glasses;//是否戴眼镜if (glasses.Equals("0")){this.label11.Text = "无眼镜";}else if (glasses.Equals("1")){this.label11.Text = "普通眼镜";}else{this.label11.Text = "墨镜";}string race = facem.race;//人种if (race.Equals("yellow")){this.label13.Text = "黄人";}else if (race.Equals("white")){this.label13.Text = "白人";}else if (race.Equals("black")){this.label13.Text = "黑人";}else if (race.Equals("arabs")){this.label13.Text = "棕人";}}
4.解析json的类
using face;
using Newtonsoft.Json;
using Newtonsoft.Json.Linq;
using System;
using System.Collections.Generic;
using System.IO;
using System.Linq;
using System.Text;
using System.Threading.Tasks;namespace Camtest
{public class face_test{public static string Api_Key = "你的Api_Key";public static string Secret_Key = "你的Secret_Key";/// <summary>/// 脸部比对/// </summary>/// <param name="img"></param>/// <returns></returns>public static facemodel FaceDetect(String img){var client = new Baidu.Aip.Face.Face(Api_Key, Secret_Key);var image = File.ReadAllBytes(img);var options = new Dictionary<string, object>(){{"face_fields", "age,beauty,expression,gender,glasses,race"}};string result = client.FaceDetect(image, options).ToString();//解析json数据return json_test(result.ToString());}/// <summary>/// 解析json数据/// </summary>/// <param name="json"></param>public static facemodel json_test(string json){//得到根节点JObject jo_result = (JObject)JsonConvert.DeserializeObject(json.ToString());//得到result节点JArray jo_age = (JArray)JsonConvert.DeserializeObject(jo_result["result"].ToString());//查找某个字段与值facemodel facem = new facemodel();foreach (var val in jo_age){facem.age = ((JObject)val)["age"].ToString();facem.beauty = ((JObject)val)["beauty"].ToString();facem.expression = ((JObject)val)["expression"].ToString();facem.gender = ((JObject)val)["gender"].ToString();facem.glasses = ((JObject)val)["glasses"].ToString();facem.race = ((JObject)val)["race"].ToString();}return facem;}}
}
5.人脸检测的model类facemodel
using System;
using System.Collections.Generic;
using System.Linq;
using System.Text;
using System.Threading.Tasks;namespace face
{public class facemodel{//年龄public string age { get; set; }//美丑public string beauty { get; set; }//表情public string expression { get; set; }//性别public string gender { get; set; }//是否戴眼镜public string glasses { get; set; }//人种public string race { get; set; }}
}
6.人脸检测源代码
using System;
using System.Collections.Generic;
using System.ComponentModel;
using System.Data;
using System.Drawing;
using System.Drawing.Imaging;
using System.Linq;
using System.Text;
using System.Threading.Tasks;
using System.Windows.Forms;
using AForge;
using AForge.Controls;
using AForge.Imaging;
using AForge.Video;
using AForge.Video.DirectShow;
using face;namespace Camtest
{public partial class facedetection : Form{/// <summary>/// 人脸检测/// </summary>public facedetection(){InitializeComponent();//启动默认在屏幕中间this.StartPosition = System.Windows.Forms.FormStartPosition.CenterScreen;}FilterInfoCollection videoDevices;VideoCaptureDevice videoSource;public int selectedDeviceIndex = 0;public int selectedPICIndex = 0;/// <summary>/// 加载窗体/// </summary>/// <param name="sender"></param>/// <param name="e"></param>private void Form1_Load(object sender, EventArgs e){// 刷新可用相机的列表videoDevices = new FilterInfoCollection(FilterCategory.VideoInputDevice);comboBoxCameras.Items.Clear();for (int i = 0; i < videoDevices.Count; i++){comboBoxCameras.Items.Add(videoDevices[i].Name.ToString());}if (comboBoxCameras.Items.Count > 0)comboBoxCameras.SelectedIndex = 0;picsize.SelectedIndex = 0;this.label4.Text = this.label5.Text = this.label7.Text = this.label9.Text = this.label11.Text = this.label13.Text = "正在识别";this.label4.ForeColor = Color.Red;this.label5.ForeColor = Color.Red;this.label7.ForeColor = Color.Red;this.label9.ForeColor = Color.Red;this.label11.ForeColor = Color.Red;this.label13.ForeColor = Color.Red;openCan();}//关闭窗体private void Form1_FormClosing(object sender, FormClosingEventArgs e){DialogResult r = MessageBox.Show("确定要退出程序?", "操作提示", MessageBoxButtons.OKCancel, MessageBoxIcon.Question);if (r != DialogResult.OK){e.Cancel = true;}videoSourcePlayer1.Stop();//停止摄像头videoSourcePlayer1.Dispose();}//实时显示照片private void videoSourcePlayer1_Click(object sender, EventArgs e){}/// <summary>/// 打开摄像头/// </summary>public void openCan(){selectedPICIndex = picsize.SelectedIndex;selectedDeviceIndex = comboBoxCameras.SelectedIndex;//连接摄像头。videoSource = new VideoCaptureDevice(videoDevices[selectedDeviceIndex].MonikerString);videoSource.VideoResolution = videoSource.VideoCapabilities[selectedDeviceIndex];// 枚举所有摄像头支持的像素,设置拍照为1920*1080foreach (VideoCapabilities capab in videoSource.VideoCapabilities){if (selectedPICIndex == 0){if (capab.FrameSize.Width == 1920 && capab.FrameSize.Height == 1080){videoSource.VideoResolution = capab;break;}if (capab.FrameSize.Width == 1280 && capab.FrameSize.Height == 720){videoSource.VideoResolution = capab;break;}}else{if (capab.FrameSize.Width == 1280 && capab.FrameSize.Height == 720){videoSource.VideoResolution = capab;break;}}}videoSourcePlayer1.VideoSource = videoSource;// set NewFrame event handlervideoSourcePlayer1.Start();}//保存图片private void button2_Click(object sender, EventArgs e){if (videoSource == null)return;Bitmap bitmap = videoSourcePlayer1.GetCurrentVideoFrame();//图片名称,年月日时分秒毫秒.jpgstring fileName = DateTime.Now.ToString("yyyyMMddHHmmssff") + ".jpg";//获取项目的根目录String path = AppDomain.CurrentDomain.BaseDirectory;//将图片保存在服务器里面bitmap.Save(path + "\\picture\\" + fileName, ImageFormat.Jpeg);bitmap.Dispose();//进行面部特征识别facemodel facem = face_test.FaceDetect(path + "\\picture\\" + fileName);this.label4.Text = facem.age;      //年龄this.label5.Text = facem.beauty;  //漂亮度string expression = facem.expression;//表情if (expression.Equals("0")){this.label7.Text = "不笑";}else if (expression.Equals("1")){this.label7.Text = "微笑";}else if (expression.Equals("2")){this.label7.Text = "大笑";}string gender = facem.gender;//性别if (gender.Equals("male")){this.label9.Text = "男";}else{this.label9.Text = "女";}string glasses = facem.glasses;//是否戴眼镜if (glasses.Equals("0")){this.label11.Text = "无眼镜";}else if (glasses.Equals("1")){this.label11.Text = "普通眼镜";}else{this.label11.Text = "墨镜";}string race = facem.race;//人种if (race.Equals("yellow")){this.label13.Text = "黄人";}else if (race.Equals("white")){this.label13.Text = "白人";}else if (race.Equals("black")){this.label13.Text = "黑人";}else if (race.Equals("arabs")){this.label13.Text = "棕人";}}//取消的按钮private void close_Click(object sender, EventArgs e){//停止摄像头videoSourcePlayer1.Stop();this.Close();welcome we = new welcome();we.Show();}}
}
五、人脸注册
新建一个窗体,名称是:faceregiste

1.调用的是百度的API,所以需要Api_Key和Secret_Key,关于这两个,大家可以自行百度。
//Api_Keypublic static string Api_Key = "这里是你的Api_Key";//Secret_Keypublic static string Secret_Key = "这里是你的Secret_Key ";2.刷新可用摄像头列表
//加载项目private void faceregiste_Load(object sender, EventArgs e){// 刷新可用相机的列表videoDevices = new FilterInfoCollection(FilterCategory.VideoInputDevice);comboBoxCameras.Items.Clear();for (int i = 0; i < videoDevices.Count; i++){comboBoxCameras.Items.Add(videoDevices[i].Name.ToString());}if (comboBoxCameras.Items.Count > 0)comboBoxCameras.SelectedIndex = 0;picsize.SelectedIndex = 0;//打开摄像头openCamera();}3..打开摄像头
//打开摄像头public void openCamera() {selectedPICIndex = picsize.SelectedIndex;selectedDeviceIndex = comboBoxCameras.SelectedIndex;//连接摄像头。videoSource = new VideoCaptureDevice(videoDevices[selectedDeviceIndex].MonikerString);videoSource.VideoResolution = videoSource.VideoCapabilities[selectedDeviceIndex];// 枚举所有摄像头支持的像素,设置拍照为1920*1080foreach (VideoCapabilities capab in videoSource.VideoCapabilities){if (selectedPICIndex == 0){if (capab.FrameSize.Width == 1920 && capab.FrameSize.Height == 1080){videoSource.VideoResolution = capab;break;}if (capab.FrameSize.Width == 1280 && capab.FrameSize.Height == 720){videoSource.VideoResolution = capab;break;}}else{if (capab.FrameSize.Width == 1280 && capab.FrameSize.Height == 720){videoSource.VideoResolution = capab;break;}}}videoSourcePlayer1.VideoSource = videoSource;// set NewFrame event handlervideoSourcePlayer1.Start();}4.点击注册执行的方法
//注册的按钮private void register_Click(object sender, EventArgs e){Users user = new Users();user.name = this.name.Text;user.id = DateTime.Now.Ticks / 10000;user.password = this.password.Text;user.phone = this.phone.Text;user.age =(int)this.age.Value;user.address = this.address.Text;user.picture = SavePicture() ;//注册人脸通过的话进去if (FaceRegister(user)){int rel = AddUsers(user);//添加信息if (rel > 0){MessageBox.Show("注册成功", "提示信息");}else{MessageBox.Show("添加失败", "提示信息");}}}
5.保存图片方法
/// <summary>/// 保存图片/// </summary>public string SavePicture() {if (videoSource == null){return null;}Bitmap bitmap = videoSourcePlayer1.GetCurrentVideoFrame();//图片名称,年月日时分秒毫秒.jpgstring fileName = DateTime.Now.ToString("yyyyMMddHHmmssff") + ".jpg";//获取项目的根目录string path = AppDomain.CurrentDomain.BaseDirectory;string picture = path + "\\picture\\" + fileName;//将图片保存在服务器里面bitmap.Save(picture, ImageFormat.Jpeg);bitmap.Dispose();return picture;}6.取消按钮方法
//取消的按钮private void close_Click(object sender, EventArgs e){//停止摄像头videoSourcePlayer1.Stop();this.Close();welcome we = new welcome();we.Show();}7..用户注册的方法
/// <summary>/// 用户注册/// </summary>/// <param name="users"></param>/// <returns></returns>public int AddUsers(Users users){int rel = 0;string sql = "insert INTO Users VALUES(@id,@name,@age,@phone,@password,@address,@picture)";SqlParameter[] param = {new SqlParameter("@id",users.id),new SqlParameter("@name",users.name),new SqlParameter("@age",users.age),new SqlParameter("@phone",users.phone),new SqlParameter("@password",users.password),new SqlParameter("@address",users.address),new SqlParameter("@picture",users.picture)};rel = SqlHelper.ExecuteNonQuery(sql, CommandType.Text, param);return rel;}8.人脸注册方法
/// <summary>/// 人脸注册/// </summary>/// <param name="picture"></param>public static bool FaceRegister(Users user){var client = new Baidu.Aip.Face.Face(Api_Key, Secret_Key);//当前毫秒数可能是负数,取绝对值var image1 = File.ReadAllBytes(user.picture);var result = client.User.Register(image1, user.id.ToString(), user.name, new[] { "gr_test" });//得到根节点JObject jo_result = (JObject)JsonConvert.DeserializeObject(result.ToString());if ((string)jo_result["error_msg"] != null){MessageBox.Show("对不起,请把脸放上!","提示",MessageBoxButtons.OK,MessageBoxIcon.Stop);return false;}return true;}9.关闭窗体方法
//关闭窗体private void faceregiste_FormClosing(object sender, FormClosingEventArgs e){DialogResult r = MessageBox.Show("确定要退出程序?", "操作提示", MessageBoxButtons.OKCancel, MessageBoxIcon.Question);if (r != DialogResult.OK){e.Cancel = true;}videoSourcePlayer1.Stop();//停止摄像头videoSourcePlayer1.Dispose();}10、人脸注册源代码
using System;
using System.Collections.Generic;
using System.ComponentModel;
using System.Data;
using System.Drawing;
using System.Linq;
using System.Text;
using System.Threading.Tasks;
using System.Windows.Forms;
using AForge;
using AForge.Controls;
using AForge.Imaging;
using AForge.Video;
using AForge.Video.DirectShow;
using face;
using System.Data.SqlClient;
using System.Drawing.Imaging;
using System.IO;
using Newtonsoft.Json.Linq;
using Newtonsoft.Json;namespace Camtest
{public partial class faceregiste : Form{//Api_Keypublic static string Api_Key = "OVYw5Ok0y9U8n6CfVPYt0wfZ";//Secret_Keypublic static string Secret_Key = "aCN3lupCarq3rC9G8Rylqz1d36Towp8G";public faceregiste(){InitializeComponent();//启动默认在屏幕中间this.StartPosition = System.Windows.Forms.FormStartPosition.CenterScreen;}FilterInfoCollection videoDevices;VideoCaptureDevice videoSource;public int selectedDeviceIndex = 0;public int selectedPICIndex = 0;//加载项目private void faceregiste_Load(object sender, EventArgs e){// 刷新可用相机的列表videoDevices = new FilterInfoCollection(FilterCategory.VideoInputDevice);comboBoxCameras.Items.Clear();for (int i = 0; i < videoDevices.Count; i++){comboBoxCameras.Items.Add(videoDevices[i].Name.ToString());}if (comboBoxCameras.Items.Count > 0)comboBoxCameras.SelectedIndex = 0;picsize.SelectedIndex = 0;//打开摄像头openCamera();}//打开摄像头public void openCamera() {selectedPICIndex = picsize.SelectedIndex;selectedDeviceIndex = comboBoxCameras.SelectedIndex;//连接摄像头。videoSource = new VideoCaptureDevice(videoDevices[selectedDeviceIndex].MonikerString);videoSource.VideoResolution = videoSource.VideoCapabilities[selectedDeviceIndex];// 枚举所有摄像头支持的像素,设置拍照为1920*1080foreach (VideoCapabilities capab in videoSource.VideoCapabilities){if (selectedPICIndex == 0){if (capab.FrameSize.Width == 1920 && capab.FrameSize.Height == 1080){videoSource.VideoResolution = capab;break;}if (capab.FrameSize.Width == 1280 && capab.FrameSize.Height == 720){videoSource.VideoResolution = capab;break;}}else{if (capab.FrameSize.Width == 1280 && capab.FrameSize.Height == 720){videoSource.VideoResolution = capab;break;}}}videoSourcePlayer1.VideoSource = videoSource;// set NewFrame event handlervideoSourcePlayer1.Start();}//注册的按钮private void register_Click(object sender, EventArgs e){Users user = new Users();user.name = this.name.Text;user.id = DateTime.Now.Ticks / 10000;user.password = this.password.Text;user.phone = this.phone.Text;user.age =(int)this.age.Value;user.address = this.address.Text;user.picture = SavePicture() ;//注册人脸通过的话进去if (FaceRegister(user)){int rel = AddUsers(user);//添加信息if (rel > 0){MessageBox.Show("注册成功", "提示信息");}else{MessageBox.Show("添加失败", "提示信息");}}}/// <summary>/// 保存图片/// </summary>public string SavePicture() {if (videoSource == null){return null;}Bitmap bitmap = videoSourcePlayer1.GetCurrentVideoFrame();//图片名称,年月日时分秒毫秒.jpgstring fileName = DateTime.Now.ToString("yyyyMMddHHmmssff") + ".jpg";//获取项目的根目录string path = AppDomain.CurrentDomain.BaseDirectory;string picture = path + "\\picture\\" + fileName;//将图片保存在服务器里面bitmap.Save(picture, ImageFormat.Jpeg);bitmap.Dispose();return picture;}//取消的按钮private void close_Click(object sender, EventArgs e){//停止摄像头videoSourcePlayer1.Stop();this.Close();welcome we = new welcome();we.Show();}/// <summary>/// 用户注册/// </summary>/// <param name="users"></param>/// <returns></returns>public int AddUsers(Users users){int rel = 0;string sql = "insert INTO Users VALUES(@id,@name,@age,@phone,@password,@address,@picture)";SqlParameter[] param = {new SqlParameter("@id",users.id),new SqlParameter("@name",users.name),new SqlParameter("@age",users.age),new SqlParameter("@phone",users.phone),new SqlParameter("@password",users.password),new SqlParameter("@address",users.address),new SqlParameter("@picture",users.picture)};rel = SqlHelper.ExecuteNonQuery(sql, CommandType.Text, param);return rel;}//关闭窗体private void faceregiste_FormClosing(object sender, FormClosingEventArgs e){DialogResult r = MessageBox.Show("确定要退出程序?", "操作提示", MessageBoxButtons.OKCancel, MessageBoxIcon.Question);if (r != DialogResult.OK){e.Cancel = true;}videoSourcePlayer1.Stop();//停止摄像头videoSourcePlayer1.Dispose();}/// <summary>/// 人脸注册/// </summary>/// <param name="picture"></param>public static bool FaceRegister(Users user){var client = new Baidu.Aip.Face.Face(Api_Key, Secret_Key);//当前毫秒数可能是负数,取绝对值var image1 = File.ReadAllBytes(user.picture);var result = client.User.Register(image1, user.id.ToString(), user.name, new[] { "gr_test" });//得到根节点JObject jo_result = (JObject)JsonConvert.DeserializeObject(result.ToString());if ((string)jo_result["error_msg"] != null){MessageBox.Show("对不起,请把脸放上!","提示",MessageBoxButtons.OK,MessageBoxIcon.Stop);return false;}return true;}}
}
六、人脸登录


1. 窗体加载刷新摄像头列表:
//窗体加载private void faceIdentify_Load(object sender, EventArgs e){//显示为正在检测this.label1.Text = this.label2.Text = this.label6.Text = this.label9.Text = "正在识别";// 刷新可用相机的列表videoDevices = new FilterInfoCollection(FilterCategory.VideoInputDevice);comboBoxCameras.Items.Clear();for (int i = 0; i < videoDevices.Count; i++){comboBoxCameras.Items.Add(videoDevices[i].Name.ToString());}if (comboBoxCameras.Items.Count > 0)comboBoxCameras.SelectedIndex = 0;picsize.SelectedIndex = 0;//打开摄像头openCamera();}2.打开摄像头:
//打开摄像头public void openCamera(){selectedPICIndex = picsize.SelectedIndex;selectedDeviceIndex = comboBoxCameras.SelectedIndex;//连接摄像头。videoSource = new VideoCaptureDevice(videoDevices[selectedDeviceIndex].MonikerString);videoSource.VideoResolution = videoSource.VideoCapabilities[selectedDeviceIndex];// 枚举所有摄像头支持的像素,设置拍照为1920*1080foreach (VideoCapabilities capab in videoSource.VideoCapabilities){if (selectedPICIndex == 0){if (capab.FrameSize.Width == 1920 && capab.FrameSize.Height == 1080){videoSource.VideoResolution = capab;break;}if (capab.FrameSize.Width == 1280 && capab.FrameSize.Height == 720){videoSource.VideoResolution = capab;break;}}else{if (capab.FrameSize.Width == 1280 && capab.FrameSize.Height == 720){videoSource.VideoResolution = capab;break;}}}videoSourcePlayer1.VideoSource = videoSource;// set NewFrame event handlervideoSourcePlayer1.Start();}3.点击确定的按钮,(人脸登陆):
/// <summary>/// 点击确定的按钮/// </summary>/// <param name="sender"></param>/// <param name="e"></param>private void button2_Click(object sender, EventArgs e){//先获取用户名//然后在提取图片//先查询用户名,看看有没有该用户名//有该用户名的话继续判断人脸对应不,没有的话提示没有该用户string name = this.textBox1.Text;Users user = QueryUsersByName(name);if (((string)(user.name))!=""){//有该用户,判断摄入的人脸和人脸库中的对比FaceVerify(SavePicture(),user);}else { //说明没有该用户,提示用户重新输入用户名MessageBox.Show("对不起,检测到没有该用户,请重新输入", "操作提示", MessageBoxButtons.OK, MessageBoxIcon.Stop);}}4.人脸认证【登陆】:
/// <summary>/// 人脸认证【登陆】/// </summary>public void FaceVerify(string filename,Users users){var client = new Baidu.Aip.Face.Face(Api_Key ,Secret_Key);var image1 = File.ReadAllBytes(filename);var result = client.User.Verify(image1,(users.id).ToString(), new[] { "gr_test" }, 1);//先判断脸是不是在上面,在继续看有匹配的没,否则提示放上脸//得到根节点JObject jo_result = (JObject)JsonConvert.DeserializeObject(result.ToString());if ((string)jo_result["error_msg"] != null){MessageBox.Show("对不起,请把脸放上!", "提示", MessageBoxButtons.OK, MessageBoxIcon.Stop);}else{//检测到脸//得到result节点JArray jo_age = (JArray)JsonConvert.DeserializeObject(jo_result["result"].ToString());string resu = jo_age.ToString();int num1 = resu.IndexOf("\n") + 2;int num2 = resu.LastIndexOf("]") - 8;string ids = resu.Substring(num1, num2);if (ids != null || !ids.Equals("")){double scores_num = double.Parse(ids);if (scores_num > 80){MessageBox.Show("登陆成功,已检测到您的信息", "操作提示", MessageBoxButtons.OK, MessageBoxIcon.Information);}else{MessageBox.Show("对不起,脸与账户不对应,请换张脸试试", "操作提示", MessageBoxButtons.OK, MessageBoxIcon.Stop);}}}}5.根据编号查询用户信息:
/// <summary>/// 根据编号查询用户信息/// </summary>/// <param name="id"></param>/// <returns></returns>public static Users QueryUsersByName(string name){Users user = new Users();string sql = "select * from users where name = @name";using (SqlDataReader reader = SqlHelper.ExcuteReader(sql, CommandType.Text, new SqlParameter("@name", name))){if (reader.Read()){user.id = long.Parse(reader[0].ToString());user.name = reader[1].ToString();user.age = Convert.ToInt32(reader[2]);user.phone = reader[3].ToString();user.password = reader[4].ToString();user.address = reader[5].ToString();user.picture = reader[6].ToString();}}return user;}6..保存图片:
/// <summary>/// 保存图片/// </summary>public string SavePicture(){if (videoSource == null){return null;}Bitmap bitmap = videoSourcePlayer1.GetCurrentVideoFrame();//图片名称,年月日时分秒毫秒.jpgstring fileName = DateTime.Now.ToString("yyyyMMddHHmmssff") + ".jpg";//获取项目的根目录string path = AppDomain.CurrentDomain.BaseDirectory;string picture = path + "\\picture\\" + fileName;//将图片保存在服务器里面bitmap.Save(picture, ImageFormat.Jpeg);bitmap.Dispose();return picture;}7.人脸登录facelogin
using AForge.Video.DirectShow;
using face;
using Newtonsoft.Json;
using Newtonsoft.Json.Linq;
using System;
using System.Collections.Generic;
using System.ComponentModel;
using System.Data;
using System.Data.SqlClient;
using System.Drawing;
using System.Drawing.Imaging;
using System.IO;
using System.Linq;
using System.Text;
using System.Threading.Tasks;
using System.Windows.Forms;namespace Camtest
{public partial class facelogin : Form{//Api_Keypublic static string Api_Key = "OVYw5Ok0y9U8n6CfVPYt0wfZ";//Secret_Keypublic static string Secret_Key = "aCN3lupCarq3rC9G8Rylqz1d36Towp8G";public facelogin(){InitializeComponent();//启动默认在屏幕中间this.StartPosition = System.Windows.Forms.FormStartPosition.CenterScreen;}FilterInfoCollection videoDevices;VideoCaptureDevice videoSource;public int selectedDeviceIndex = 0;public int selectedPICIndex = 0;//窗体加载private void facelogin_Load(object sender, EventArgs e){// 刷新可用相机的列表videoDevices = new FilterInfoCollection(FilterCategory.VideoInputDevice);comboBoxCameras.Items.Clear();for (int i = 0; i < videoDevices.Count; i++){comboBoxCameras.Items.Add(videoDevices[i].Name.ToString());}if (comboBoxCameras.Items.Count > 0)comboBoxCameras.SelectedIndex = 0;picsize.SelectedIndex = 0;//打开摄像头openCamera();}//打开摄像头public void openCamera(){selectedPICIndex = picsize.SelectedIndex;selectedDeviceIndex = comboBoxCameras.SelectedIndex;//连接摄像头。videoSource = new VideoCaptureDevice(videoDevices[selectedDeviceIndex].MonikerString);videoSource.VideoResolution = videoSource.VideoCapabilities[selectedDeviceIndex];// 枚举所有摄像头支持的像素,设置拍照为1920*1080foreach (VideoCapabilities capab in videoSource.VideoCapabilities){if (selectedPICIndex == 0){if (capab.FrameSize.Width == 1920 && capab.FrameSize.Height == 1080){videoSource.VideoResolution = capab;break;}if (capab.FrameSize.Width == 1280 && capab.FrameSize.Height == 720){videoSource.VideoResolution = capab;break;}}else{if (capab.FrameSize.Width == 1280 && capab.FrameSize.Height == 720){videoSource.VideoResolution = capab;break;}}}videoSourcePlayer1.VideoSource = videoSource;// set NewFrame event handlervideoSourcePlayer1.Start();}/// <summary>/// 点击确定的按钮/// </summary>/// <param name="sender"></param>/// <param name="e"></param>private void button2_Click(object sender, EventArgs e){//先获取用户名//然后在提取图片//先查询用户名,看看有没有该用户名//有该用户名的话继续判断人脸对应不,没有的话提示没有该用户string name = this.textBox1.Text;Users user = QueryUsersByName(name);if (((string)(user.name))!=""){//有该用户,判断摄入的人脸和人脸库中的对比FaceVerify(SavePicture(),user);}else { //说明没有该用户,提示用户重新输入用户名MessageBox.Show("对不起,检测到没有该用户,请重新输入", "操作提示", MessageBoxButtons.OK, MessageBoxIcon.Stop);}}/// <summary>/// 人脸认证【登陆】/// </summary>public  void FaceVerify(string filename,Users users){var client = new Baidu.Aip.Face.Face(Api_Key ,Secret_Key);var image1 = File.ReadAllBytes(filename);var result = client.User.Verify(image1,(users.id).ToString(), new[] { "gr_test" }, 1);//先判断脸是不是在上面,在继续看有匹配的没,否则提示放上脸//得到根节点JObject jo_result = (JObject)JsonConvert.DeserializeObject(result.ToString());if ((string)jo_result["error_msg"] != null){MessageBox.Show("对不起,请把脸放上!", "提示", MessageBoxButtons.OK, MessageBoxIcon.Stop);}else{//检测到脸//得到result节点JArray jo_age = (JArray)JsonConvert.DeserializeObject(jo_result["result"].ToString());string resu = jo_age.ToString();int num1 = resu.IndexOf("\n") + 2;int num2 = resu.LastIndexOf("]") - 8;string ids = resu.Substring(num1, num2);if (ids != null || !ids.Equals("")){double scores_num = double.Parse(ids);if (scores_num > 80){MessageBox.Show("登陆成功,已检测到您的信息", "操作提示", MessageBoxButtons.OK, MessageBoxIcon.Information);}else{MessageBox.Show("对不起,脸与账户不对应,请换张脸试试", "操作提示", MessageBoxButtons.OK, MessageBoxIcon.Stop);}}}}/// <summary>/// 根据编号查询用户信息/// </summary>/// <param name="id"></param>/// <returns></returns>public static Users QueryUsersByName(string name){Users user = new Users();string sql = "select * from users where name = @name";using (SqlDataReader reader = SqlHelper.ExcuteReader(sql, CommandType.Text, new SqlParameter("@name", name))){if (reader.Read()){user.id = long.Parse(reader[0].ToString());user.name = reader[1].ToString();user.age = Convert.ToInt32(reader[2]);user.phone = reader[3].ToString();user.password = reader[4].ToString();user.address = reader[5].ToString();user.picture = reader[6].ToString();}}return user;}/// <summary>/// 保存图片/// </summary>public string SavePicture(){if (videoSource == null){return null;}Bitmap bitmap = videoSourcePlayer1.GetCurrentVideoFrame();//图片名称,年月日时分秒毫秒.jpgstring fileName = DateTime.Now.ToString("yyyyMMddHHmmssff") + ".jpg";//获取项目的根目录string path = AppDomain.CurrentDomain.BaseDirectory;string picture = path + "\\picture\\" + fileName;//将图片保存在服务器里面bitmap.Save(picture, ImageFormat.Jpeg);bitmap.Dispose();return picture;}/// <summary>/// 取消的按钮/// </summary>/// <param name="sender"></param>/// <param name="e"></param>private void close_Click(object sender, EventArgs e){//停止摄像头videoSourcePlayer1.Stop();this.Close();welcome we = new welcome();we.Show();}}
}
相关文章:

C#windows窗体人脸识别
一、创建一个数据库,名为TestFaceDB 里面有一张表就OK了,表名Users,表里面有几个字段我说明一下: id--------------------bigint----------------------编号 name--------------varchar(50)-----------------用户名 phone--------------v…...

【第11章:生成式AI与创意应用—11.1 文本生成与创意写作辅助的实现与优化】
凌晨三点的书房,作家李明第27次删除了刚写好的段落。窗外路灯在稿纸上投下斑驳光影,就像他此刻支离破碎的创作灵感。突然,写作软件弹出提示:"检测到情感转折生硬,建议尝试’雨夜独白’场景模板?"这个由生成式AI驱动的建议,不仅拯救了濒临崩溃的章节,更揭开了…...

【Elasticsearch】通过运行时字段在查询阶段动态覆盖索引字段
在 Elasticsearch 中,Override field values at query time是指通过运行时字段(runtime fields)在查询阶段动态覆盖索引字段的值,而无需修改原始索引数据。这种功能特别适用于以下场景: 1. 动态修改字段值:…...

电解电容的参数指标
容量 这个值通常是室温25℃,在一定频率和幅度的交流信号下测得的容量。容量会随着温度、直流电压、交流电压值的变化而改变。 额定电压 施加在电容上的最大直流电压,通常要求降额使用。 例如额定电压是4V,降额到70%使用,最高施…...

linux 内核编译报错 unknown assembler invoked
在编译内核时,出现如下错误 : scripts/gcc-wrapper.py aarch64-linux-gnu-gcc: unknown assembler invoked scripts/Kconfig.include:47: Sorry, this assembler is not supported. make[1]: *** [scripts/kconfig/Makefile:29:menuconfig] 错误 1 make…...

HTML,API,RestFul API基础
一文搞懂RESTful API - bigsai - 博客园 1. API 路径 开头必须 /,表示绝对路径,不支持 . 或 ..(相对路径)。API 结尾 / 通常不需要,但部分框架会自动处理 / → 无 /。 ✅ 推荐 GET /api/v1/products # 资源集合…...

js 使用缓存判断在规定时间内显示一次弹框
js 使用缓存判断在规定时间内显示一次弹框 功能拆分,新用户注册完成登录跳转首页 , js根据注册时间判断显示一个新手指引的弹窗,只在注册当天登录且显示一次 <script>jQuery(document).ready(function($) {getWinnerModalShow()});// 新…...

使用新版本golang项目中goyacc依赖问题的处理
背景 最近项目使用中有用到go mod 和 goyacc工具。goyacc涉及到编译原理的词法分析,文法分析等功能,可以用来生成基于golang的语法分析文件。本期是记录一个使用中遇到的依赖相关的问题。因为用到goyacc,需要生成goyacc的可执行文件。 而项目…...

洛谷 P2574 XOR的艺术/CF242E XOR on Segment 题解
1.XOR的艺术 题意 给定一个长度为 n n n的、只含有数字 0 , 1 0,1 0,1的字符串和两种操作。 对于每种操作,给定 o p , l , r op,l,r op,l,r: o p 0 op0 op0表示将字符串的 [ l , r ] [l, r] [l,r]区间内的 0 0 0变成 1 1 1, 1 1 1变成 0 …...

包管理器-汇总介绍
包管理器是一种在操作系统或软件开发环境中用于自动化软件包(程序、库等)的安装、升级、配置和卸载等操作的工具。它能帮助用户更方便地管理软件及其依赖关系,以下是不同操作系统和开发环境中常见的包管理器介绍: 操作系统层面的…...

mysql系列8—Innodb的undolog
背景 本文涉及的内容较为底层,做了解即可,是以前学习《高性能mysql》和《mysql是怎样运行的》的笔记整理所得。 undolog设计的初始目的是保证事务的原子性。mysql的修改操作发生后,如果所在的事务未被提交,如mysql服务或者操作系统…...

静默安装OGG for MySQL微服务版本,高效开展数据同步和迁移
一、背景 本文从Oracle GoldenGate微服务版的概念和组件介绍开始,从零介绍了怎么开始安装GoldenGate 21c for Oracle微服务版本的软件及部署。当然了,微服务版除新功能外包含传统版所有的功能。 二、安装部署 (一)下载OGG for …...

【Golang 面试题】每日 3 题(五十五)
✍个人博客:Pandaconda-CSDN博客 📣专栏地址:http://t.csdnimg.cn/UWz06 📚专栏简介:在这个专栏中,我将会分享 Golang 面试中常见的面试题给大家~ ❤️如果有收获的话,欢迎点赞👍收藏…...

PHP关键字入门指南:分类与功能全解析
如果你是刚接触PHP的新手,可能会对代码中那些“特殊单词”感到困惑。别担心!本文将用最通俗易懂的方式,带你认识PHP中的关键字——它们就像编程世界的“魔法咒语”,每个都有独特的作用。文末还附有代码示例,帮你快速上手! 一、什么是PHP关键字? PHP关键字是语言内置的特…...

消息中间件深度剖析:以 RabbitMQ 和 Kafka 为核心
在现代分布式系统和微服务架构的构建中,消息中间件作为一个不可或缺的组件,承担着系统间解耦、异步处理、流量削峰、数据传输等重要职能。尤其是在面临大规模并发、高可用性和可扩展性需求时,如何选择合适的消息中间件成为了开发者和架构师们…...

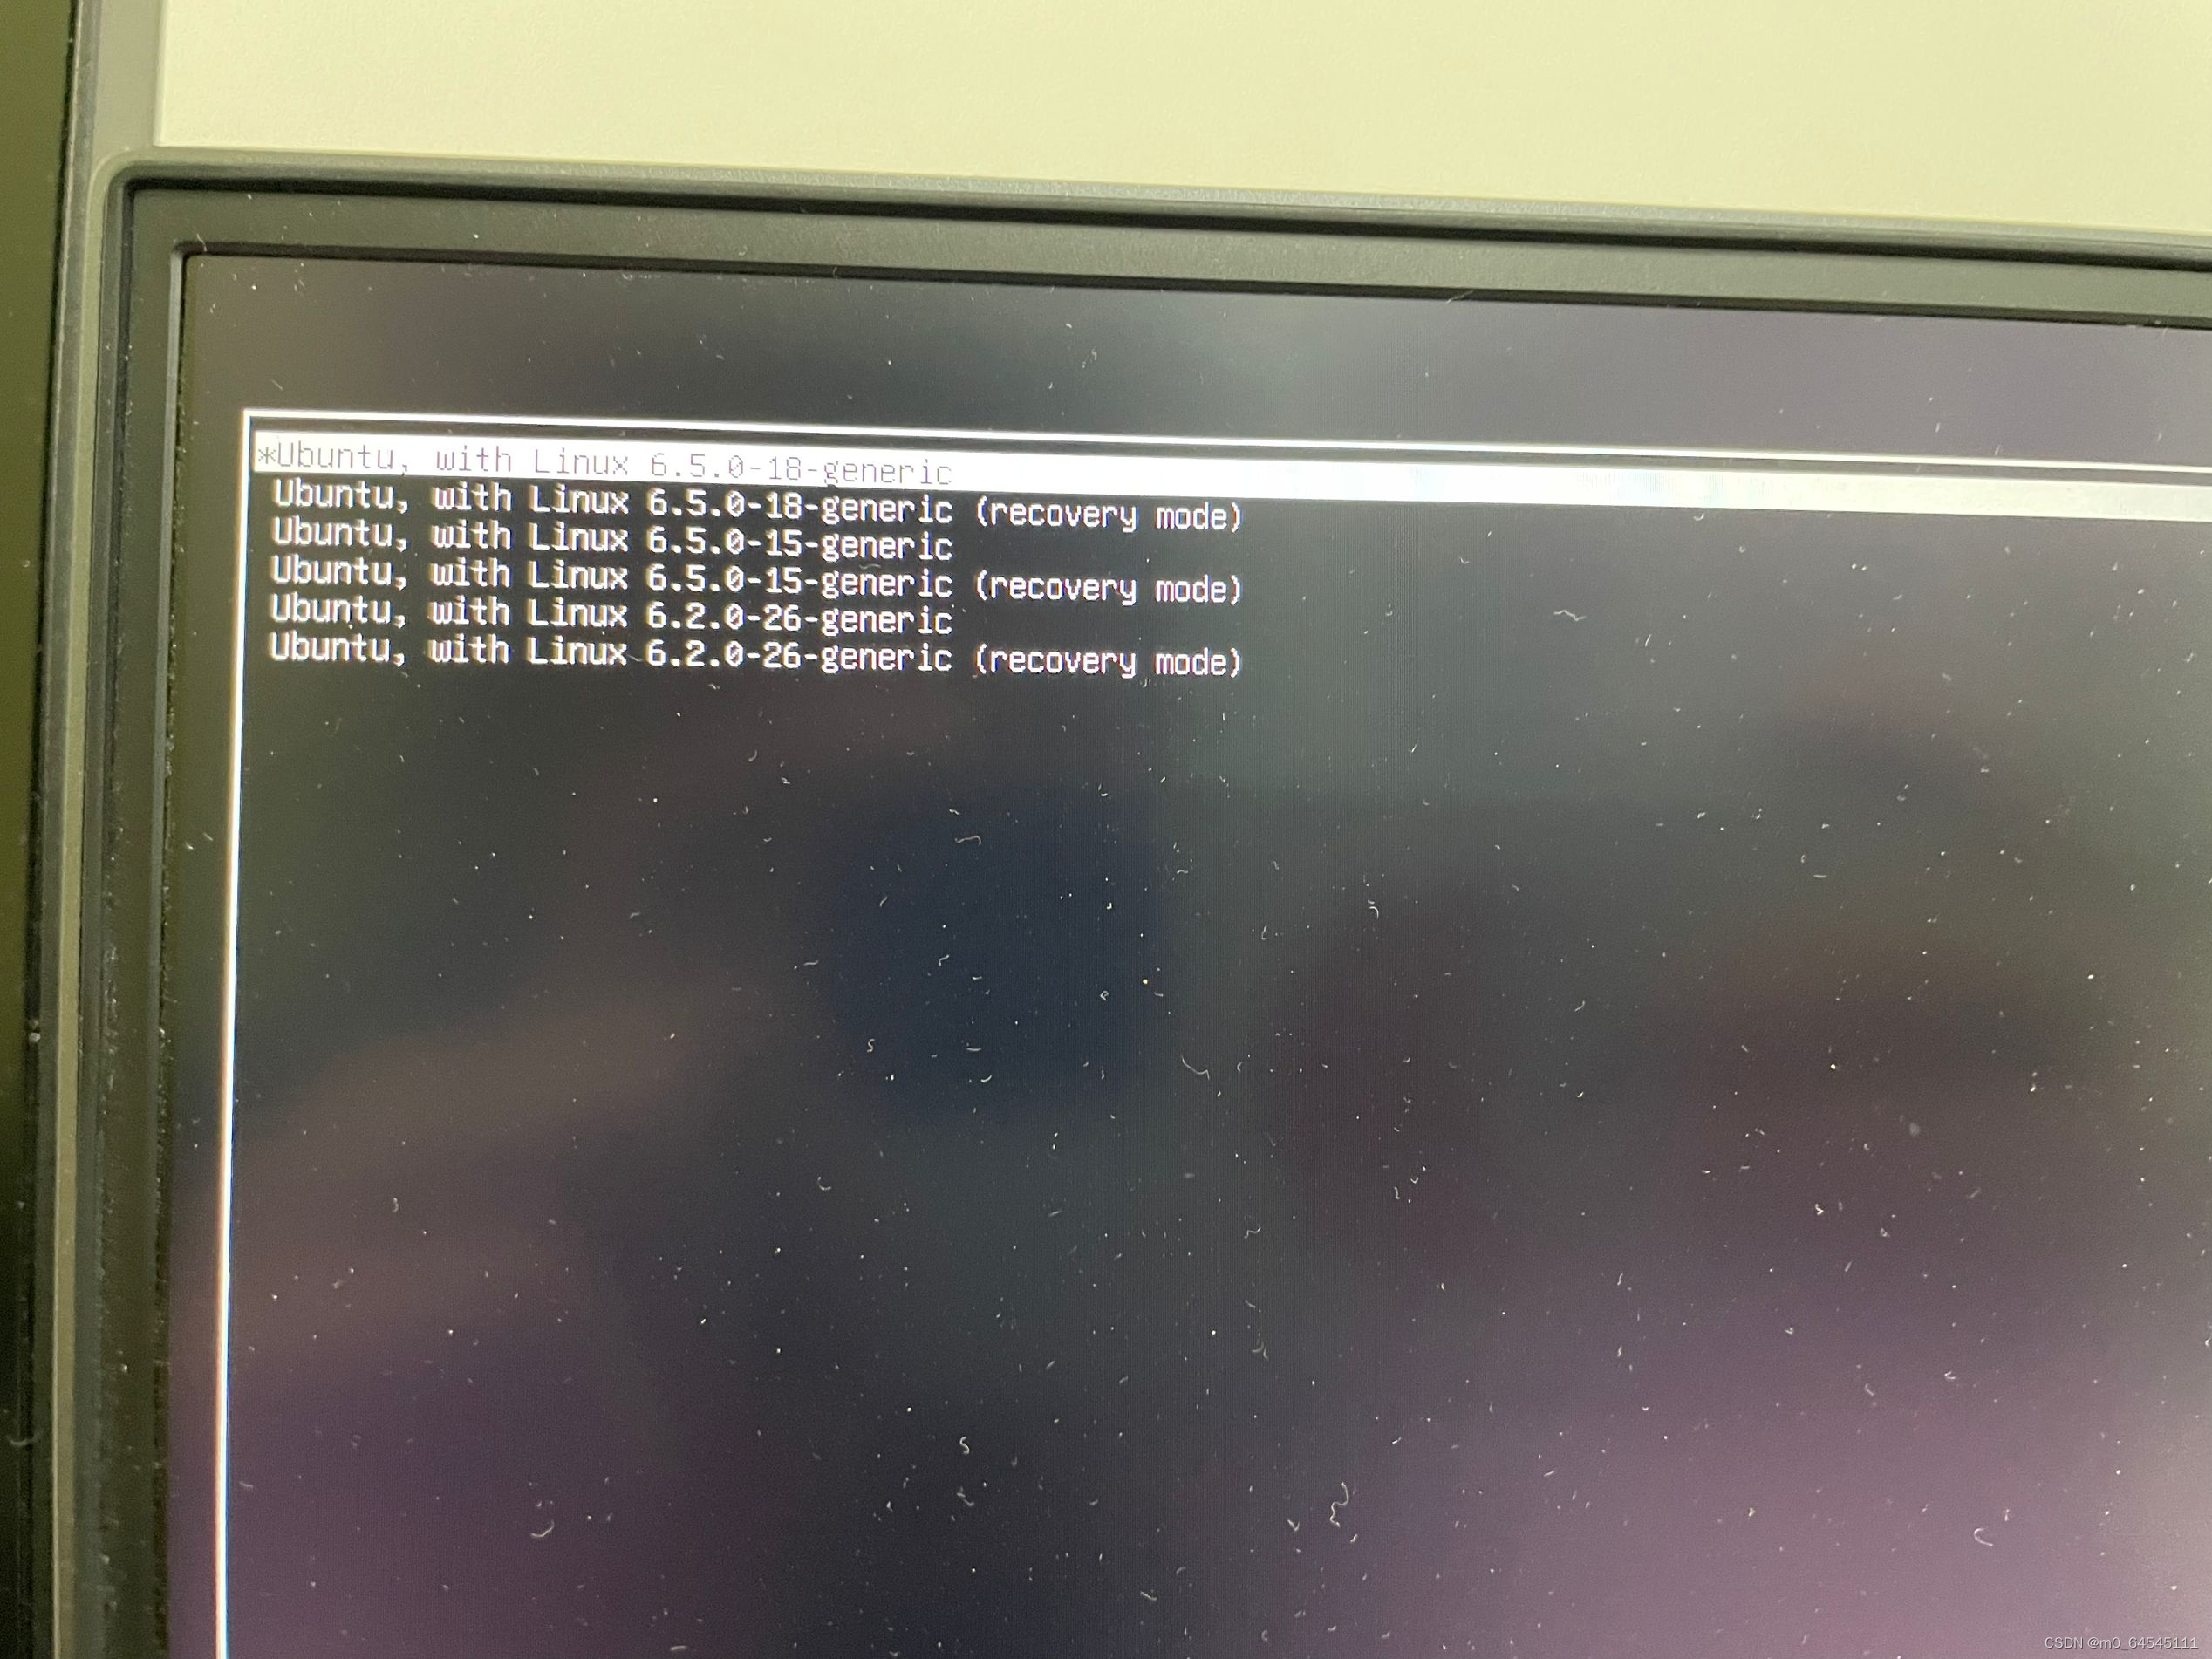
【万字详细教程】Linux to go——装在移动硬盘里的Linux系统(Ubuntu22.04)制作流程;一口气解决系统安装引导文件迁移显卡驱动安装等问题
Linux to go制作流程 0.写在前面 关于教程Why Linux to go?实际效果 1.准备工具2.制作步骤 下载系统镜像硬盘分区准备启动U盘安装系统重启完成驱动安装将系统启动引导程序迁移到移动硬盘上 3.可能出现的问题 3.1.U盘引导系统安装时出现崩溃3.2.不影响硬盘里本身已有…...

HCIA项目实践---OSPF的基本配置
9.5.12 OSPF的基本配置 (所搭环境如上图所示) A 先配置IP地址 (先进入路由器R1的0/0/0接口配置IP地址,再进入环回接口配置IP地址) (配置R2路由器的0/0/0和0/0/1以及环回接口的IP地址) (置R3路由器的0/0/0接…...

Vue 自动配置表单 el-switch等不常用组件覆盖默认值问题
有自动解析表单的vue组件如下,其原理是调用一个配置表单定义的接口,然后再调用获取表单配置的接口并将配置的数据覆盖表单的默认值。其中el-switch的配置值没有覆盖默认值,分析其原因。 主页面如下: <template> <div cla…...

零基础购买阿里云服务器,XShell连接云服务器
目录 1.环境搭建方式 2. 使用云服务器 3.使用终端软件登录到Linux 4.使用XShell登录主机 5.连接失败的原因: 下一篇更新:Linux的基础指令以及如何Linux的环境搭建 1.环境搭建方式 主要有四种: 1.直接安装在物理机上,虽然Linux有图形化…...

【系统架构设计师】虚拟机体系结构风格
目录 1. 说明2. 解释器体系结构风格3. 规则系统体系结构风格4. 例题4.1 例题1 1. 说明 1.p263。2.虚拟机体系结构风格的基本思想是人为构建一个运行环境,在这个环境之上,可以解析与运行自定义的一些语言,这样来增加架构的灵活性。3.虚拟机体…...

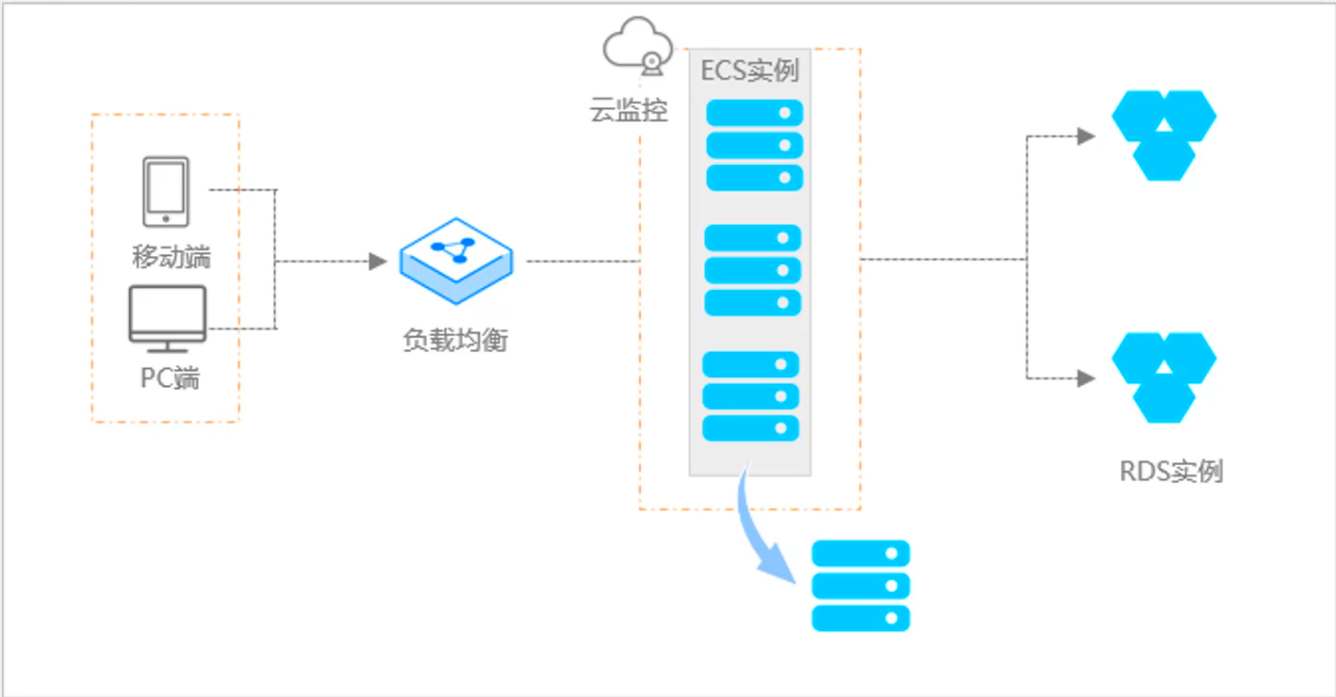
阿里云ACP云计算备考笔记 (5)——弹性伸缩
目录 第一章 概述 第二章 弹性伸缩简介 1、弹性伸缩 2、垂直伸缩 3、优势 4、应用场景 ① 无规律的业务量波动 ② 有规律的业务量波动 ③ 无明显业务量波动 ④ 混合型业务 ⑤ 消息通知 ⑥ 生命周期挂钩 ⑦ 自定义方式 ⑧ 滚的升级 5、使用限制 第三章 主要定义 …...

Admin.Net中的消息通信SignalR解释
定义集线器接口 IOnlineUserHub public interface IOnlineUserHub {/// 在线用户列表Task OnlineUserList(OnlineUserList context);/// 强制下线Task ForceOffline(object context);/// 发布站内消息Task PublicNotice(SysNotice context);/// 接收消息Task ReceiveMessage(…...

跨链模式:多链互操作架构与性能扩展方案
跨链模式:多链互操作架构与性能扩展方案 ——构建下一代区块链互联网的技术基石 一、跨链架构的核心范式演进 1. 分层协议栈:模块化解耦设计 现代跨链系统采用分层协议栈实现灵活扩展(H2Cross架构): 适配层…...

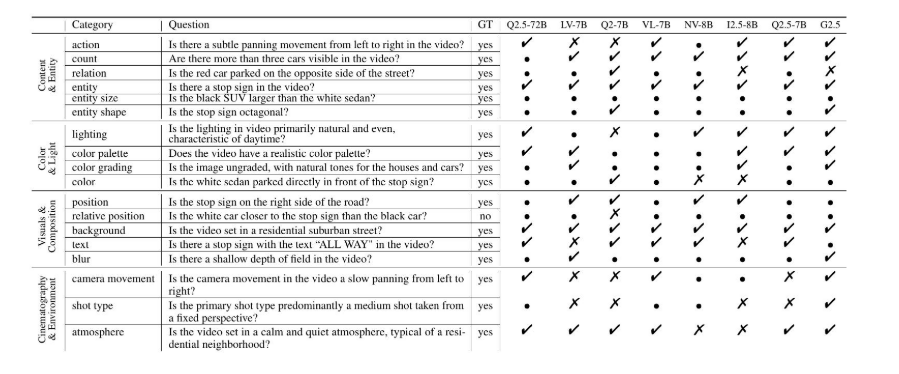
视频字幕质量评估的大规模细粒度基准
大家读完觉得有帮助记得关注和点赞!!! 摘要 视频字幕在文本到视频生成任务中起着至关重要的作用,因为它们的质量直接影响所生成视频的语义连贯性和视觉保真度。尽管大型视觉-语言模型(VLMs)在字幕生成方面…...

Spring Boot面试题精选汇总
🤟致敬读者 🟩感谢阅读🟦笑口常开🟪生日快乐⬛早点睡觉 📘博主相关 🟧博主信息🟨博客首页🟫专栏推荐🟥活动信息 文章目录 Spring Boot面试题精选汇总⚙️ **一、核心概…...

HTML前端开发:JavaScript 常用事件详解
作为前端开发的核心,JavaScript 事件是用户与网页交互的基础。以下是常见事件的详细说明和用法示例: 1. onclick - 点击事件 当元素被单击时触发(左键点击) button.onclick function() {alert("按钮被点击了!&…...

SpringTask-03.入门案例
一.入门案例 启动类: package com.sky;import lombok.extern.slf4j.Slf4j; import org.springframework.boot.SpringApplication; import org.springframework.boot.autoconfigure.SpringBootApplication; import org.springframework.cache.annotation.EnableCach…...

聊一聊接口测试的意义有哪些?
目录 一、隔离性 & 早期测试 二、保障系统集成质量 三、验证业务逻辑的核心层 四、提升测试效率与覆盖度 五、系统稳定性的守护者 六、驱动团队协作与契约管理 七、性能与扩展性的前置评估 八、持续交付的核心支撑 接口测试的意义可以从四个维度展开,首…...

Java编程之桥接模式
定义 桥接模式(Bridge Pattern)属于结构型设计模式,它的核心意图是将抽象部分与实现部分分离,使它们可以独立地变化。这种模式通过组合关系来替代继承关系,从而降低了抽象和实现这两个可变维度之间的耦合度。 用例子…...

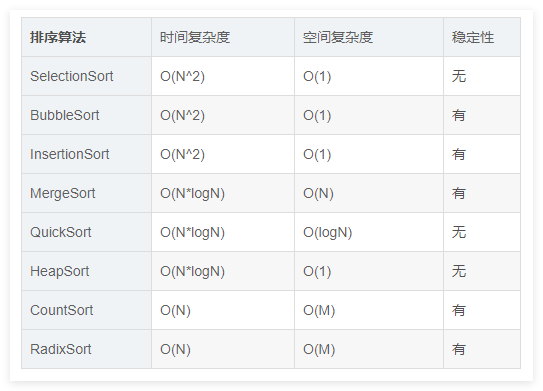
排序算法总结(C++)
目录 一、稳定性二、排序算法选择、冒泡、插入排序归并排序随机快速排序堆排序基数排序计数排序 三、总结 一、稳定性 排序算法的稳定性是指:同样大小的样本 **(同样大小的数据)**在排序之后不会改变原始的相对次序。 稳定性对基础类型对象…...
