Spring Boot项目接收前端参数的11种方式

大家好,我是。在前后端项目交互中,前端传递的数据可以通过HTTP请求发送到后端, 后端在Spring Boot中如何接收各种复杂的前端数据呢?这篇文章总结了11种在Spring Boot中接收前端数据的方式。
1 搭建项目
1.通过Spring Initializr选项创建一个项目名称为【sb_receive_param】的SpringBoot项目。

2.给项目添加Spring Web依赖。

3.在com.cy.sb_receive_param.pojo包下创建User实体类。
package com.cy.sb_receive_param.pojo;
import lombok.AllArgsConstructor;
import lombok.Data;
import lombok.NoArgsConstructor;
import java.io.Serializable;@Data
@NoArgsConstructor
@AllArgsConstructor
public class User implements Serializable {private Integer id;private String username;private String password;private Cat cat;private List<Course> courses;
}
4.在com.cy.sb_receive_param.controller包下创建UserController类。
package com.cy.sb_receive_param.controller;
import org.springframework.web.bind.annotation.*;@RequestMapping("users")
@RestController
public class UserController {}
5.解决在前后端分离项目中的跨域问题。通过实现WebMvcConfigurer接口,并重写addCorsMappings(CorsRegistry registry)方法来实现。
package com.cy.sb_receive_param.config;
import org.springframework.context.annotation.Configuration;
import org.springframework.web.servlet.config.annotation.CorsRegistry;
import org.springframework.web.servlet.config.annotation.WebMvcConfigurer;@Configuration
public class CrossOriginConfig implements WebMvcConfigurer {/*** addMapping("/**"):配置可以被跨域的路径,可以任意配置,可以具体到直接请求路径* allowedOrigins("*"):允许所有的请求域名访问我们的跨域资源,可以固定单条或者多条内容,如"http://www.yx.com",只有该域名可以访问我们的跨域资源* allowedHeaders("*"):允许所有的请求header访问,可以自定义设置任意请求头信息* allowedMethods():允许所有的请求方法访问该跨域资源服务器,如GET、POST、DELETE、PUT、OPTIONS、HEAD等* maxAge(3600):配置客户端可以缓存pre-flight请求的响应的时间(秒)。默认设置为1800秒(30分钟)*/@Overridepublic void addCorsMappings(CorsRegistry registry) {registry.addMapping("/**").allowedOrigins("*").allowedHeaders("*").allowedMethods("GET", "POST", "DELETE", "PUT", "OPTIONS", "HEAD").maxAge(3600);}
}
2 Spring Boot接收前端参数方式
2.1 传非JSON数据
2.1.1 注解介绍
@RequestParam主要用于在Spring MVC后台控制层获取参数,它有三个常用参数。
参数名
描述
defaultValue
表示设置默认值
required
表示该参数是否必传
value
值表示接收传入的参数的key
@PathVariable用于将请求URL中的模板变量映射到功能处理方法的参数上,即取出URL模板中的变量作为参数。
2.1.2 案例演示
1.方式一
1.在UserController类中添加add1()请求处理方法。前端请求参数的key需和后端控制层处理请求的方法参数名称一致。
@RequestMapping("add1")
public void add1(String username, String password) {System.out.println("username=" + username + ", password=" + password);
}
2.使用ApiPost工具测试(GET和POST请求都支持)。
localhost:8080/users/add1?username=tom&password=123456
3.创建param01.html页面,通过Axios发送请求。
<!DOCTYPE html>
<html><head><meta charset="utf-8" /><title>前后端参数传递</title><script src="https://unpkg.com/vue@next"></script><script src="https://unpkg.com/axios/dist/axios.min.js"></script></head><body><div id="app"></div><script>const app = {data() {return {username: '王小虎',password: '123456'}},mounted() {axios.get('http://localhost:8888/users/add1', {params: {username: this.username,password: this.password}}).then(response => {console.log('success', response.data);}).catch(error => {console.log('fail', error.data);});}}Vue.createApp(app).mount('#app')</script></body>
</html>
2.方式二
1.在UserController类中添加add2()请求处理方法。如果前端请求参数的key与后端控制层处理请求的方法参数名称不一致,使用@RequestParam注解来解决。
@RequestMapping("add2")
public void add2(@RequestParam("name") String username, @RequestParam("pwd") String password) {System.out.println("username=" + username + ", password=" + password);
}
2.使用ApiPost工具测试(GET和POST请求都支持)。
localhost:8080/users/add2?name=tom&pwd=123456
3.创建param02.html页面,通过Axios发送请求。
<!DOCTYPE html>
<html><head><meta charset="utf-8" /><title>前后端参数传递</title><script src="https://unpkg.com/vue@next"></script><script src="https://unpkg.com/axios/dist/axios.min.js"></script></head><body><div id="app"></div><script>const app = {data() {return {username: '张小三',password: '654321'}},mounted() {axios.get('http://localhost:8888/users/add2', {params: {name: this.username,pwd: this.password}}).then(response => {console.log('success', response.data);}).catch(error => {console.log('fail', error.data);});}}Vue.createApp(app).mount('#app')</script></body>
</html>
3.接收前端传数组参数
1.在UserController类中添加delete1()请求处理方法。
@DeleteMapping("batch_delete1")
public void delete1(@RequestParam(name = "ids") List<Integer> ids) {for (Integer id : ids) {System.out.println(id);}
}
2.使用ApiPost工具测试,在【Query】选项下添加ids参数,参数值设置为1,3,5。

3.使用ApiPost工具测试,在【Query】选项下添加ids参数,将参数的值单独一个个进行添加。

4.创建param03.html页面,通过Axios发送请求。
<!DOCTYPE html>
<html><head><meta charset="utf-8" /><title>前后端参数传递</title><script src="https://unpkg.com/vue@next"></script><script src="https://unpkg.com/axios/dist/axios.min.js"></script></head><body><div id="app"></div><script>const app = {data() {return {ids: [1, 3, 5]}},mounted() {axios.delete('http://localhost:8888/users/batch_delete1', {params: {ids: this.ids.join(',')}}).then(response => {console.log('success', response.data);}).catch(error => {console.log('fail', error.data);});}}Vue.createApp(app).mount('#app')</script></body>
</html>
4.方式四
1.在UserController类中添加add3()请求处理方法。前端请求参数的key需和后端控制层处理请求方法的参数pojo实体类的属性名称一致。
@RequestMapping("add3")
public void add3(User user) {System.out.println(user);
}
2.使用ApiPost工具测试(GET和POST请求都支持)。
localhost:8080/users/add3id=1&username=tom&password=123
3.创建param04.html页面,通过Axios发送请求。
<!DOCTYPE html>
<html><head><meta charset="utf-8" /><title>前后端参数传递</title><script src="https://unpkg.com/vue@next"></script><script src="https://unpkg.com/axios/dist/axios.min.js"></script></head><body><div id="app"></div><script>const app = {data() {return {id: 1,username: '王小明',password: '123456'}},mounted() {axios.get('http://localhost:8888/users/add3', {params: {id: this.id,username: this.username,password: this.password}}).then(response => {console.log('success', response.data);}).catch(error => {console.log('fail', error.data);});}}Vue.createApp(app).mount('#app')</script></body>
</html>
5.方式五
1.在UserController类中添加add4()请求处理方法。使用@PathVariable注解将请求URL中的模板变量映射到功能处理方法的参数上,如果模板变量名称和方法的参数名称不同需要在@PathVariable注解上显示的指定映射关系。
@RequestMapping("add4/{username}/{pwd}")
public void add4(@PathVariable String username, @PathVariable("pwd") String password) {System.out.println("username=" + username + ", password=" + password);
}
2.使用ApiPost工具测试(GET和POST请求都支持)。
localhost:8080/users/add4/tom/123456
3.创建param05.html页面,通过Axios发送请求。
<!DOCTYPE html>
<html><head><meta charset="utf-8" /><title>前后端参数传递</title><script src="https://unpkg.com/vue@next"></script><script src="https://unpkg.com/axios/dist/axios.min.js"></script></head><body><div id="app"></div><script>const app = {data() {return {username: '',password: '123456'}},mounted() {axios.post(`http://localhost:8888/users/add4/${this.username}/${this.password}`).then(response => {console.log('success', response.data);}).catch(error => {console.log('fail', error.data);});}}Vue.createApp(app).mount('#app')</script></body>
</html>
6.方式六
1.在UserController类中添加add5()请求处理方法。通过HttpServletRequest对象获取数据,前端请求参数的key需和getParameter(String name)方法传递的参数名称一致。
@RequestMapping("add5")
public void add5(HttpServletRequest request) {String username = request.getParameter("username");String password = request.getParameter("password");System.out.println("username=" + username + ", password=" + password);
}
2.使用ApiPost工具测试(GET和POST请求都支持)。
localhost:8080/users/add5username=tom&password=123
3.创建param06.html页面,通过Axios发送请求。
<!DOCTYPE html>
<html><head><meta charset="utf-8" /><title>前后端参数传递</title><script src="https://unpkg.com/vue@next"></script><script src="https://unpkg.com/axios/dist/axios.min.js"></script></head><body><div id="app"></div><script>const app = {data() {return {username: '',password: '123456'}},mounted() {axios.post('http://localhost:8888/users/add5', null, {params: {username: this.username,password: this.password}}).then(response => {console.log('success', response.data);}).catch(error => {console.log('fail', error.data);});}}Vue.createApp(app).mount('#app')</script></body>
</html>
2.2 传JSON数据
2.2.1 注解介绍
@RequestBody该注解会把接收到的参数转为JSON格式。如果前端通过application/json类型提交JSON格式的数据给后端控制层处理请求的方法,方法的参数必须使用@RequestBody注解进行修饰,才能接收来自前端提交的JSON数据。
2.2.2 案例演示
1.接收前端传数组参数
1.在UserController类中添加delete2()请求处理方法。
@DeleteMapping("batch_delete2")
public void delete2(@RequestBody ArrayList<Integer> ids) {for (Integer id : ids) {System.out.println(id);}
}
2.使用ApiPost工具测试,在【Body】选项选项下发送JSON格式数据[1, 3, 5]给后台。

3.创建param07.html页面,通过Axios发送请求。
<!DOCTYPE html>
<html><head><meta charset="utf-8" /><title>前后端参数传递</title><script src="https://unpkg.com/vue@next"></script><script src="https://unpkg.com/axios/dist/axios.min.js"></script></head><body><div id="app"></div><script>const app = {data() {return {ids: [1, 3, 5]}},mounted() {axios.post('http://localhost:8888/users/batch_delete2', this.ids).then(response => {console.log('success', response.data);}).catch(error => {console.log('fail', error.data);});}}Vue.createApp(app).mount('#app')</script></body>
</html>
2.单个实体接收参数
1.在UserController类中添加add6()请求处理方法。
@RequestMapping("add6")
public User add6(@RequestBody User user) {System.out.println(user);return user;
}
2.使用ApiPost工具测试,需将提交的数据类型设置为application/json格式(GET和POST请求都支持)。
{"id": 1,"username": "tom","password": "123456"
}
3.创建param08.html页面,通过Axios发送请求。
<!DOCTYPE html>
<html><head><meta charset="utf-8" /><title>前后端参数传递</title><script src="https://unpkg.com/vue@next"></script><script src="https://unpkg.com/axios/dist/axios.min.js"></script></head><body><div id="app"></div><script>const app = {data() {return {user: {username: '',password: '123456'}}},mounted() {axios.post('http://localhost:8888/users/add6', this.user).then(response => {console.log('success', response.data);}).catch(error => {console.log('fail', error.data);});}}Vue.createApp(app).mount('#app')</script></body>
</html>
3.实体嵌套实体接收参数
1.在pojo包下创建Cat实体类。
package com.cy.sb_receive_param.pojo;
import lombok.AllArgsConstructor;
import lombok.Data;
import lombok.NoArgsConstructor;@Data
@NoArgsConstructor
@AllArgsConstructor
public class Cat {private Integer id;private String breed;private String name;
}
2.在pojo包下的User实体类中声明Cat类型的属性。
package com.cy.sb_receive_param.pojo;
import lombok.Data;
import lombok.ToString;@Data
@ToString
public class User {private Integer id;private String username;private String password;private Cat cat;
}
3.在UserController类中添加add7()请求处理方法。
@RequestMapping("add7")
public User add7(@RequestBody User user) {System.out.println(user);return user;
}
4.使用ApiPost工具测试,需将提交的数据类型设置为application/json格式(GET和POST请求都支持)。
{"id": 1,"username": "","password": "123456","cat": {"id": 1,"breed": "蓝白","name": "花花"}
}
5.创建param09.html页面,通过Axios发送请求。
<!DOCTYPE html>
<html><head><meta charset="utf-8" /><title>前后端参数传递</title><script src="https://unpkg.com/vue@next"></script><script src="https://unpkg.com/axios/dist/axios.min.js"></script></head><body><div id="app"></div><script>const app = {data() {return {user: {id: 1,username: '',password: '123456',cat: {id: 1,breed: '蓝白',name: '花花'}}}},mounted() {axios.post('http://localhost:8888/users/add7', this.user).then(response => {console.log('success', response.data);}).catch(error => {console.log('fail', error.data);});}}Vue.createApp(app).mount('#app')</script></body>
</html>
4.实体嵌套List集合接收参数
1.在pojo包下创建Course实体类。
package com.cy.sb_receive_param.pojo;
import lombok.AllArgsConstructor;
import lombok.Data;
import lombok.NoArgsConstructor;@Data
@NoArgsConstructor
@AllArgsConstructor
public class Course {private Integer id;private String courseName;private String lecturer;
}
2.在pojo包下的User实体类中声明List<Course>类型的属性。
package com.cy.sb_receive_param.pojo;
import lombok.Data;
import lombok.ToString;
import java.util.List;@Data
@ToString
public class User {private Integer id;private String username;private String password;private List<Course> courses;
}
3.在UserController类中添加add8()请求处理方法。
@RequestMapping("add8")
public User add8(@RequestBody User user) {System.out.println(user);return user;
}
4.使用ApiPost工具测试,需将提交的数据类型设置为application/json格式(GET和POST请求都支持)。
{"id": 1,"username": "tom","password": "123456","courses": [{"id": 1,"courseName": "Java","lecturer": "老师"},{"id": 2,"courseName": "Python","lecturer": "李小红老师"}]
}
5.创建param10.html页面,通过Axios发送请求。
<!DOCTYPE html>
<html><head><meta charset="utf-8" /><title>前后端参数传递</title><script src="https://unpkg.com/vue@next"></script><script src="https://unpkg.com/axios/dist/axios.min.js"></script></head><body><div id="app"></div><script>const app = {data() {return {user: {id: 1,username: 'tom',password: '123456',cat: {id: 1,breed: '蓝白',name: '花花'},courses: [{id: 1,courseName: "Java",lecturer: "老师"},{id: 2,courseName: "Python",lecturer: "张晓东老师"}]}}},mounted() {axios.post('http://localhost:8888/users/add8', this.user).then(response => {console.log('success', response.data);}).catch(error => {console.log('fail', error.data);});}}Vue.createApp(app).mount('#app')</script></body>
</html>
5.Map集合接收参数
1.在UserController类中添加add9()请求处理方法。
@RequestMapping("add9")
public Map<String, Object> add9(@RequestBody Map<String, Object> map) {String username = (String) map.get("username");System.out.println("username : " + username);Map<String, Object> catMap = (Map<String, Object>) map.get("cat");Set<Map.Entry<String, Object>> catSet = catMap.entrySet();for (Map.Entry<String, Object> entry : catSet) {String key = entry.getKey();Object value = entry.getValue();System.out.println(key + " : " + value);}List<Map<String, Object>> courseMapList = (List<Map<String, Object>>) map.get("courses");for (Map<String, Object> courseMap : courseMapList) {Set<Map.Entry<String, Object>> courseSet = courseMap.entrySet();for (Map.Entry<String, Object> entry : courseSet) {String key = entry.getKey();Object value = entry.getValue();System.out.println(key + " : " + value);}}return map;
}
2.使用ApiPost工具测试,需将提交的数据类型设置为application/json格式(GET和POST请求都支持)。
{"id": 1,"username": "tom","password": "123456","courses": [{"id": 1,"courseName": "Java","lecturer": "老师"},{"id": 2,"courseName": "Python","lecturer": "李小红老师"}]
}
3.创建param11.html页面,通过Axios发送请求。
<!DOCTYPE html>
<html><head><meta charset="utf-8" /><title>前后端参数传递</title><script src="https://unpkg.com/vue@next"></script><script src="https://unpkg.com/axios/dist/axios.min.js"></script></head><body><div id="app"></div><script>const app = {data() {return {user: {id: 1,username: 'tom',password: '123456',cat: {id: 1,breed: '蓝白',name: '花花'},courses: [{id: 1,courseName: "Java",lecturer: "老师"},{id: 2,courseName: "Python",lecturer: "张晓东老师"}]}}},mounted() {axios.post('http://localhost:8888/users/add9', this.user).then(response => {console.log('success', response.data);}).catch(error => {console.log('fail', error.data);});}}Vue.createApp(app).mount('#app')</script></body>
</html>
3 总结
本文介绍了在Spring Boot项目中接收前端数据的多种方式。通过创建Spring Boot项目、配置Web依赖和跨域问题,展示了如何使用@RequestParam、@PathVariable、@RequestBody等注解接收不同类型的参数,包括基本类型、数组、复杂对象及嵌套结构。通过实例演示了如何在Controller中处理GET、POST等请求,并通过前端页面发送请求验证后端接收逻辑。
相关文章:

Spring Boot项目接收前端参数的11种方式
大家好,我是。在前后端项目交互中,前端传递的数据可以通过HTTP请求发送到后端, 后端在Spring Boot中如何接收各种复杂的前端数据呢?这篇文章总结了11种在Spring Boot中接收前端数据的方式。 1 搭建项目 1.通过Spring Initializr…...
)
Springboot项目:使用MockMvc测试get和post接口(含单个和多个请求参数场景)
一、引入MockMvc依赖 使用MockMvc,必须要引入依赖 <dependency><groupId>org.springframework.boot</groupId><artifactId>spring-boot-starter-test</artifactId><scope>test</scope></dependency>二、具体演示…...

OpenAI ChatGPT在心理治疗领域展现超凡同理心,通过图灵测试挑战人类专家
近期,一项关于OpenAI ChatGPT在心理治疗领域的研究更是引起了广泛关注。据报道,ChatGPT已经成功通过了治疗师领域的图灵测试,其表现甚至在某些方面超越了人类治疗师,尤其是在展现同理心方面,这一发现无疑为AI在心理健康…...

【HBase】HBaseJMX 接口监控信息实现钉钉告警
目录 一、JMX 简介 二、JMX监控信息钉钉告警实现 一、JMX 简介 官网:Apache HBase ™ Reference Guide JMX (Java管理扩展)提供了内置的工具,使您能够监视和管理Java VM。要启用远程系统的监视和管理,需要在启动Java…...

25旅游管理研究生复试面试问题汇总 旅游管理专业知识问题很全! 旅游管理复试全流程攻略 旅游管理考研复试真题汇总
旅游管理复试很难?! 别怕!经验超丰富的老学姐来给你们出谋划策啦! 最近是不是被旅游管理考研复试折磨得够呛?莫慌!我这有着丰富复试指导经验的老学姐来帮你们排雷,助力大家顺利上岸!…...

深入解析C++26 Execution Domain:设计原理与实战应用
一、Domain设计目标与核心价值 Domain是C26执行模型的策略载体,其核心解决两个问题: 执行策略泛化:将线程池、CUDA流等异构调度逻辑抽象为统一接口策略组合安全:通过类型隔离避免不同执行域的策略污染 // Domain类型定义示例&a…...

Linux命令基础
【Linux路径写法】 相对路径与绝对路径: 绝对路径:以根目录为起点,描述路径的一种写法,路径描述以 / 开头 相对路径:以当前目录为起点,描述路径的一种写法,路径描述无需以/开头 特殊路径符&…...
(元编程?))
什么是超越编程(逾编程)(元编程?)
超越编程(逾编程)(元编程?)(meta-programming) 目录 1. meta- 的词源 2. 逾编程(meta-programming) 的直实含义 2.1 定义 2.2 说明 3. 翻译成“元编程”应该是一种错误 1. meta- 的词源 这是一个源自希腊语的构词元素,其有三种含义ÿ…...

netcore libreoffice word转pdf中文乱码
一、效果 解决: cd /usr/share/fonts/ mkdir zhFont cd zhFont #windows系统C:\Windows\Fonts 中复制/usr/share/fonts/zhFont sudo apt update sudo apt install xfonts-utils mkfontscale mkfontdir #刷新字体缓存 fc-cache -fv #查看已安装的字体列表 fc-list :…...

【练习】【回溯:组合:一个集合 元素可重复】力扣 39. 组合总和
题目 组合总和 给你一个 无重复元素 的整数数组 candidates 和一个目标整数 target ,找出 candidates 中可以使数字和为目标数 target 的 所有 不同组合 ,并以列表形式返回。你可以按 任意顺序 返回这些组合。 candidates 中的 同一个 数字可以 无限制重…...

Mac 清理缓存,提高内存空间
步骤 1.打开【访达】 2.菜单栏第五个功能【前往】,点击【个人】 3.【command shift J】显示所有文件,打开【资源库】 4.删除【Containers】和【Caches】文件 Containers 文件夹:用于存储每个应用程序的沙盒数据,确保应用程序…...

数据结构——二叉树经典习题讲解
各位看官早安午安晚安呀 如果您觉得这篇文章对您有帮助的话 欢迎您一键三连,小编尽全力做到更好 欢迎您分享给更多人哦 大家好,我们今天来学习java数据结构的二叉树 递归很重要的一些注意事项: 1:递归你能不能掌握在于࿱…...

神经网络八股(三)
1.什么是梯度消失和梯度爆炸 梯度消失是指梯度在反向传播的过程中逐渐变小,最终趋近于零,这会导致靠前层的神经网络层权重参数更新缓慢,甚至不更新,学习不到有用的特征。 梯度爆炸是指梯度在方向传播过程中逐渐变大,…...

堆、优先队列、堆排序
堆: 定义: 必须是一个完全二叉树(完全二叉树:完全二叉树只允许最后一行不为满,且最后一行必须从左往右排序,最后一行元素之间不可以有间隔) 堆序性: 大根堆:每个父节点…...

vue 学习-vite api.js
/** 整机管理 * */ // 整机分类 列表 export const wholeMachineServersType params > ajaxGet({url: wholeMachine/serverstype/,params}) // 整机分类 新增 export const wholeMachineServersTypeAdd params > ajaxPost({url: wholeMachine/serverstype/,params}) /…...

java练习(35)
ps:题目来自力扣 整数反转 给你一个 32 位的有符号整数 x ,返回将 x 中的数字部分反转后的结果。 如果反转后整数超过 32 位的有符号整数的范围 [−231, 231 − 1] ,就返回 0。 假设环境不允许存储 64 位整数(有符号或无符号)…...

PW_Balance
目录 1、 PW_Balance 1.1、 getDocumentsTypeID 1.2、 getShouldAmount 1.3、 setOptimalAmount 1.4、 setRemark PW_Balance package com.gx.pojo; public class PW_Balance { private Integer BalanceID; private Integer PaymentID; private Integer ReceptionID…...

【Linux-网络】HTTP的清风与HTTPS的密语
🎬 个人主页:谁在夜里看海. 📖 个人专栏:《C系列》《Linux系列》《算法系列》 ⛰️ 道阻且长,行则将至 目录 📚 引言 📚 一、HTTP 📖 1.概述 📖 2.URL ǵ…...

【前端框架】vue2和vue3的区别详细介绍
Vue 3 作为 Vue 2 的迭代版本,在性能、语法、架构设计等多个维度均有显著的变革与优化。以下详细剖析二者的区别: 响应式系统 Vue 2 实现原理:基于 Object.defineProperty() 方法实现响应式。当一个 Vue 实例创建时,Vue 会遍历…...

CMake管理依赖实战:多仓库的无缝集成
随着软件复杂度的增加,单个项目可能需要依赖多个外部库或模块。这些依赖项可能是来自不同的代码仓库,如ATest和BTest。为了实现高效的依赖管理,CMake提供了多种方式来处理这种多仓库的情况。下面我们将详细介绍几种常见的方法,并通…...
: K8s 核心概念白话解读(上):Pod 和 Deployment 究竟是什么?)
云原生核心技术 (7/12): K8s 核心概念白话解读(上):Pod 和 Deployment 究竟是什么?
大家好,欢迎来到《云原生核心技术》系列的第七篇! 在上一篇,我们成功地使用 Minikube 或 kind 在自己的电脑上搭建起了一个迷你但功能完备的 Kubernetes 集群。现在,我们就像一个拥有了一块崭新数字土地的农场主,是时…...

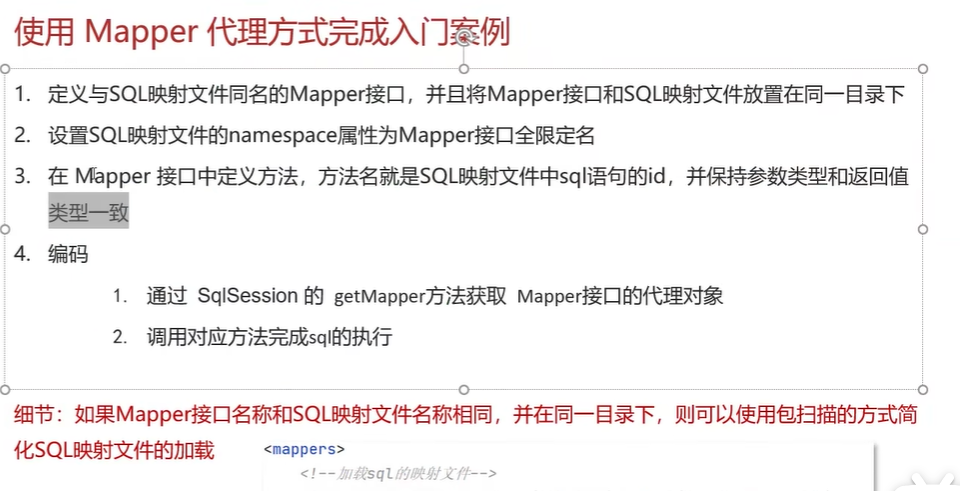
黑马Mybatis
Mybatis 表现层:页面展示 业务层:逻辑处理 持久层:持久数据化保存 在这里插入图片描述 Mybatis快速入门 
大型活动交通拥堵治理的视觉算法应用
大型活动下智慧交通的视觉分析应用 一、背景与挑战 大型活动(如演唱会、马拉松赛事、高考中考等)期间,城市交通面临瞬时人流车流激增、传统摄像头模糊、交通拥堵识别滞后等问题。以演唱会为例,暖城商圈曾因观众集中离场导致周边…...

学习STC51单片机31(芯片为STC89C52RCRC)OLED显示屏1
每日一言 生活的美好,总是藏在那些你咬牙坚持的日子里。 硬件:OLED 以后要用到OLED的时候找到这个文件 OLED的设备地址 SSD1306"SSD" 是品牌缩写,"1306" 是产品编号。 驱动 OLED 屏幕的 IIC 总线数据传输格式 示意图 …...

【AI学习】三、AI算法中的向量
在人工智能(AI)算法中,向量(Vector)是一种将现实世界中的数据(如图像、文本、音频等)转化为计算机可处理的数值型特征表示的工具。它是连接人类认知(如语义、视觉特征)与…...
的原因分类及对应排查方案)
JVM暂停(Stop-The-World,STW)的原因分类及对应排查方案
JVM暂停(Stop-The-World,STW)的完整原因分类及对应排查方案,结合JVM运行机制和常见故障场景整理而成: 一、GC相关暂停 1. 安全点(Safepoint)阻塞 现象:JVM暂停但无GC日志,日志显示No GCs detected。原因:JVM等待所有线程进入安全点(如…...

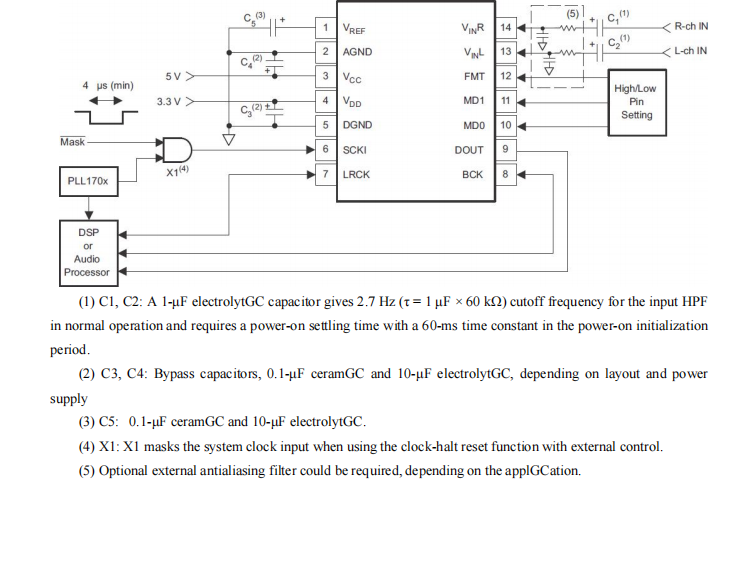
GC1808高性能24位立体声音频ADC芯片解析
1. 芯片概述 GC1808是一款24位立体声音频模数转换器(ADC),支持8kHz~96kHz采样率,集成Δ-Σ调制器、数字抗混叠滤波器和高通滤波器,适用于高保真音频采集场景。 2. 核心特性 高精度:24位分辨率,…...

Java 二维码
Java 二维码 **技术:**谷歌 ZXing 实现 首先添加依赖 <!-- 二维码依赖 --><dependency><groupId>com.google.zxing</groupId><artifactId>core</artifactId><version>3.5.1</version></dependency><de…...

React---day11
14.4 react-redux第三方库 提供connect、thunk之类的函数 以获取一个banner数据为例子 store: 我们在使用异步的时候理应是要使用中间件的,但是configureStore 已经自动集成了 redux-thunk,注意action里面要返回函数 import { configureS…...

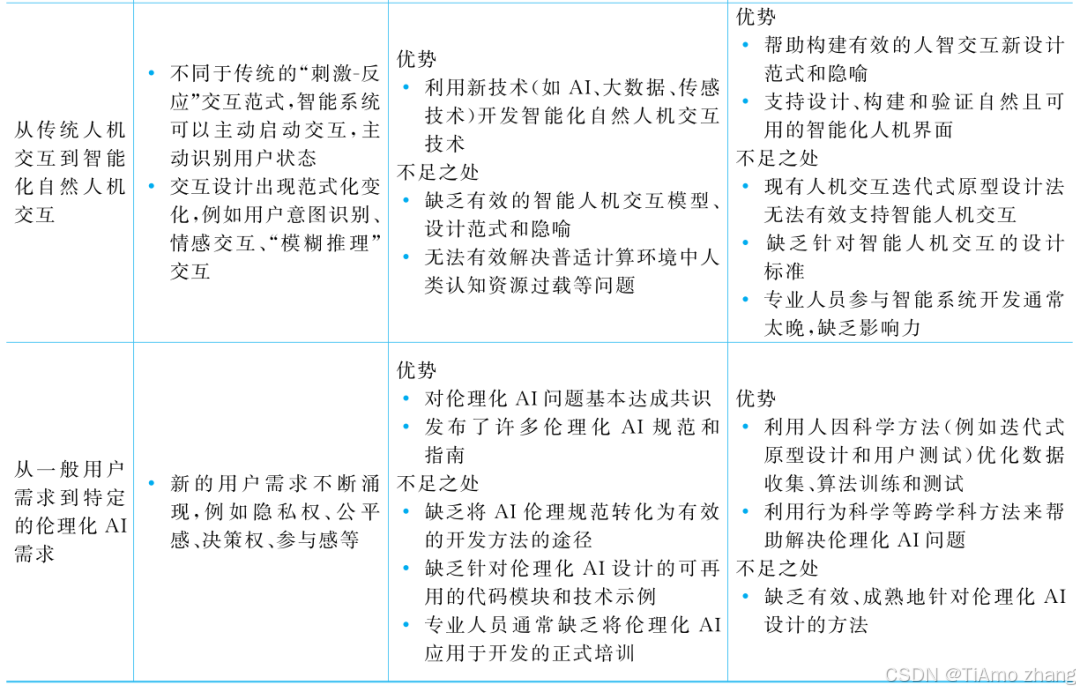
人机融合智能 | “人智交互”跨学科新领域
本文系统地提出基于“以人为中心AI(HCAI)”理念的人-人工智能交互(人智交互)这一跨学科新领域及框架,定义人智交互领域的理念、基本理论和关键问题、方法、开发流程和参与团队等,阐述提出人智交互新领域的意义。然后,提出人智交互研究的三种新范式取向以及它们的意义。最后,总结…...
