K8S部署及常见问题处理
目录
k8s kubeadm 一键自动化,安装k8s集群,安装所有运行需要的组件
一、环境初始化(三台机器都需要执行)
主机名、节点ip、部署组件
1、配置hosts(主节点master和业务节点node都需要配置)文件内容
2、配置主节点master和业务节点node中的hostname
3、配置网络后查看网络是否能通
4、设置安全开放端口
5、设置iptables(初始化防火墙)(可以写成脚本)
6、关闭swap
7、配置yum源(阿里云源)(可以写成脚本)
8、ntp配置(同步网络)(可以写成脚本)
9、修改linux内核参数,开启数据包转发功能
10、安装docker基础环境(安装docker 脚本)
11、安装k8s的初始化工具kubeadm命令 (所有节点执行)
12、所有机器执行
13、k8s安装完毕之后,设置所有节点的kubelet开机启动运行,该工具用于建立起K8S集群,master,node之间的联系
15、先保留所有节点的应用 端口状态,之后可以看k8s跑起来之后,占用了哪些端口,知道哪些程序运行了
二、初始化k8s-master 主节点(只在主节点执行)
1、执行kubeadm init初始化,加入参数如下:
2、在master主节点需要执行:
3、将node节点加入到master集群
4、查看6443端口
三、配置k8s命令补全
四、 部署网络插件
1.下载网络插件,配置文件 ,yam1以及配置文件
2.在k8s主节点上,应用这个yam1,基于yam1,创建具体的pod过程
3.如果需要修改pod运行网络,要改配置文件(此路径为下载下来的flannel 解压下来的flannel路径下的 kube-flannel.yml)
3.1.需要修改的第一处Network
3.2.需要修改的第二处
3.3、报错处理
3.4、查看当前master容器中是否已经运行了flannel
3.5、运行kubectl get nodes -owide
五、部署pod
5、创建空间,创建pod,部署pod
六、将删除原来的node重新添加到master控制器集群
1、查看需要加入master集群的命令
2、使用kubeadm reset 将需要添加的node 重置。
3、重新添加node节点到master
七、常见问题及处理
1、问题一:创建pod 出现了状态为0
1.1 解决方法:
1.1、处理方法一
1.1.1、在master和node上都创建subnet.env这个文件
1.2、处理方法二
1.3、处理方法三
1.4、处理方法四
1.4.1、查看开启scheduler, control-manager的10251,10252端口是否正常
k8s kubeadm 一键自动化,安装k8s集群,安装所有运行需要的组件
k8s-master 192.168.150.112 etcd, kube-apiserver, kube-controller-manager, kubectl,kubeadm, kubelet, kube-proxy, flannel
k8s-node1 192.168.150.113 kubectl, kubelet, kube-proxy, flannel,docker
k8s-node2 192.168.150.114 kubectl, kubelet, kube-proxy, flannel,docker
确保三台机器的跨节点容器互相通信,装网络插件flannel
K8S部署步骤如下:
一、环境初始化(三台机器都需要执行)
主机名、节点ip、部署组件
1、配置hosts(主节点master和业务节点node都需要配置)文件内容
cat >>/etc/hosts <<EOF
192.168.150.112 master01
192.168.150.113 node01
192.168.150.114 node02
EOF
2、配置主节点master和业务节点node中的hostname
每个节点都需要单独配置如下
| 节点 | master01 | node01 | node02 |
| 路径 | vi /etc/hostname | vi /etc/hostname | vi /etc/hostname |
| 内容 | master01 | node01 | node02 |
3、配置网络后查看网络是否能通
ping -c 2 k8s-master-10
ping -c 2 k8s-node-11
ping -c 2 k8s-node-12
4、设置安全开放端口
如果是ESC机器需要开放端口,如果是虚拟机部署不需要开放端口,虚拟机默认已经打开;
5、设置iptables(初始化防火墙)(可以写成脚本)
systemctl stop firewalld NetworkManagersystemctl disable firewalld NetworkManagersed -ri  's#(SELINUX=).*#\disabled#' /etc/selinux/configsetenforce 0systemctl disable firewalld 8& systemctl stop firewalldgetenforce  0
iptables -F
iptables -X
iptables -Z
iptables -P FORWARD ACCEPT
6、关闭swap
k8s默认禁用swap功能
swapoff -a防止开机自动挂载 swap 分区
sed -i '/swap/ s/^\(.*\)$/#\1/g' /etc/fstab7、配置yum源(阿里云源)(可以写成脚本)
curl -o /etc/yum.repos.d/CentOS-Base.repo https://mirrors.aliyun.com/repo/Centos-7.repocurl -o /etc/yum.repos.d/epel.repo http://mirrors.aliyun.com/repo/epel-7.reposed -i '/aliyuncs/d' /etc/yum.repos.d/*.repoyum clean all && yum makecache fast8、ntp配置(同步网络)(可以写成脚本)
yum install chrony -ysystemctl start chronyd
systemctl enable chronyddatehwclock -w
9、修改linux内核参数,开启数据包转发功能
##容器夸主机通通信,底层是走的iptables,内核级别的数据包转发
cat <<EOF> /etc/sysctl.d/k8s.conf
net.bridge.bridge-nf-call-ip6tables=1
net.bridge.bridge-nf-call-iptables =1
net.ipv4.ip_forward=1
vm.max_map_count=262144
EOFmodprobe br_netfilter
##加载读取内核参数配置文件
sysctl -p /etc/sysctl.d/k8s.conf
10、安装docker基础环境(安装docker 脚本)
yum remove docker docker-common docker-selinux docker-engine -y
curl -o /etc/yum.repos.d/docker-ce.repo https://mirrors.aliyun.com/docker-ce/linux/centos/docker-ce.repo
yum makecache fast
yum list docker-ce --showduplicates
yum install docker-ce-19.03.15 docker-ce-cli-19.03.15 -y
##配置docker加速器、以及crgoup驱动,改为k8s官方推荐的systemd,否则初始化时会有报错。
mkdir -p /etc/docker
cat > /etc/docker/daemon.json <<'EOF'
{"exec-opts": ["native.cgroupdriver=systemd"],"log-driver": "json-file","log-opts": {"max-size": "100m"},"storage-driver": "overlay2"
}
EOF#启动
systemctl start docker 8& systemctl enable docker
docker version
11、安装k8s的初始化工具kubeadm命令 (所有节点执行)
#安装k8s集群环境初始化的工具 kubelet-1.19.3 # 组件,增制改查pod再具体机器上,pod可以运行主节点上,node节点上 kubeadm-1.19.3 # k8s版本 1.19.3 ,自动拉去k8s基础组件镜像的一个工具 kubect1-1.19.3 # 管理I 维护k8s客户端换,和服务端交互的一个命令行工具kubect1-1.19.3
12、所有机器执行
##设置阿里云源,安装kubadm工具(脚本)
curl -o /etc/yum.repos.d/Centos-7.repo http://mirrors,aliyun.com/repo/Centos-7.repo
curl -o /etc/yum.repos.d/docker-ce.repo http://mirrors.aliyun.com/docker-ce/linux/centos/docker-ce.repocat <<EOF > /etc/yum.repos.d/kubernetes.repo
[kubernetes]
name=Kubernetes
baseurl=http://mirrors.aliyun.com/kubernetes/yum/repos/kubernetes-el7-x86_64
enabled=1
gpgcheck=0
repo_gpgcheck=0
gpgkey=http://mirrors.aliyun.com/kubernetes/yum/doc/yum-key.gpg
http://mirrors.aliyun.com/kubernetes/yum/doc/rpm-package-key.gpg
EOFyum clean all && yum makecache
##yum list kubeadm --showduplicates   列出阿里云有哪些K8S版本;
##安装的kubeadm版本,就是决定了,拉去什么版本的k8s集群版本的# 安装指定版本 kubeadm-1.19.3镜像,
yum install kubelet-1.19.3 kubeadm-1.19.3  kubectl-1.19.3 ipvsadm  -y
13、k8s安装完毕之后,设置所有节点的kubelet开机启动运行,该工具用于建立起K8S集群,master,node之间的联系
##查看kubeadm 版本,初始化k8s版本信息v1.19.3
kubeadm version[root@k8s-master-10 ~]#kubeadm version
kubeadm version: &version.InfofMajor:"1", Minor:"19" Gitversion:"v1.19.3"GitCommit;"1e11e4a2108024935ecfcb2912226cedeafd99df",GitTreeState:"clean"BuildDate:“2020-16-14T12:47:53Z",Go
##设置kubelet开机启动
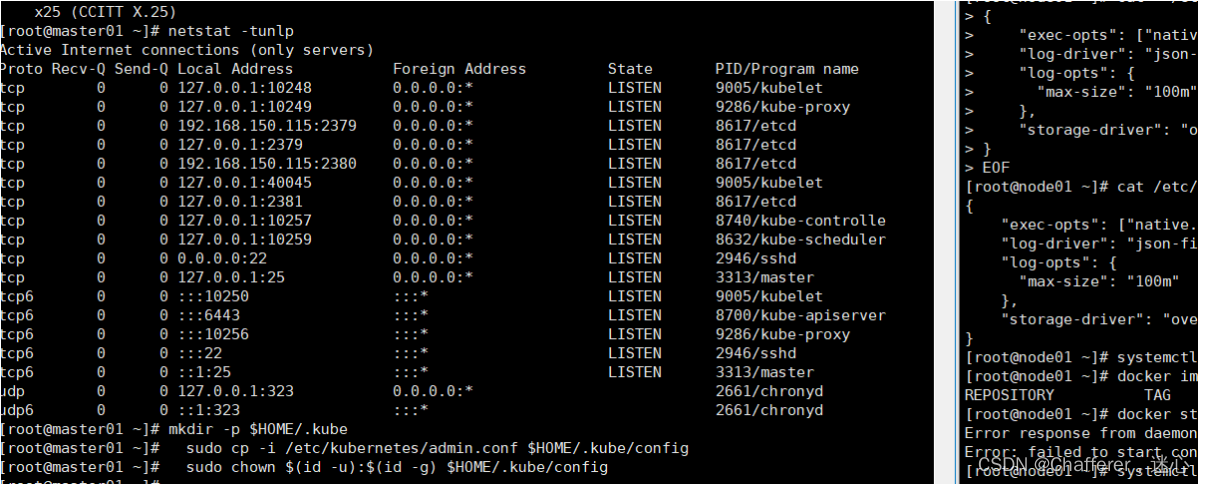
systemctl enable kubeletsystemctl enable docker15、先保留所有节点的应用 端口状态,之后可以看k8s跑起来之后,占用了哪些端口,知道哪些程序运行了
netstat -tunlp三台机器(master,弄得,)初始化结束!!!
二、初始化k8s-master 主节点(只在主节点执行)
1、执行kubeadm init初始化,加入参数如下:
kubeadm init  \
--apiserver-advertise-address=192.168.150.115  \
--image-repository registry.aliyuncs.com/google_containers \
--kubernetes-version v1.19.3  \
--service-cidr=10.96.0.0/12 \
--pod-network-cidr=10.244.0.0/16 \
--ignore-preflight-errors=swap
##--service-dns-domain= cluster.local \# service-cidr和pod-network-cidr需要和其他机器IP不冲突皆可
##注:
##执行报错需要打开/usr/lib/systemd/system/docker.service,将代码Environment="NO_PROXY=127.0.0.1/8, 127.0.0.1/16" 放在[Service] Type=notify的后面,然后重启daemon和docker,然后重启
sudo systemctl daemon-reloadsudo systemctl restart dockersudo systemctl restart kubelet执行成功如下图:

执行成功后需要将上图中标记的信息记录下来,下面在部署node节点上执行;
mkdir -p $HOME/.kubesudo cp -i /etc/kubernetes/admin.conf $HOME/.kube/configsudo chown $(id -u):$(id -g) $HOME/.kube/config kubeadm join 192.168.150.115:6443 --token nn1lsp.kpy2mprlsaqg1x81 \--discovery-token-ca-cert-hash sha256:a4c00296ddb1ee6640e0a6b106d4977f14301d12c1e05cc44cc81fb5042248a8
2、在master主节点需要执行:
mkdir -p $HOME/.kubesudo cp -i /etc/kubernetes/admin.conf $HOME/.kube/configsudo chown $(id -u):$(id -g) $HOME/.kube/config
##在master节点查看集群信息
kubectl get nodes -owide[root@master01 etc]# kubectl get nodes -owide NAME STATUS ROLES AGE VERSION INTERNAL-IP EXTERNAL-IP OS-IMAGE KERNEL-VERSION CONTAINER-RUNTIME master01 Ready master 57m v1.19.3 192.168.150.115 <none> CentOS Linux 7 (Core) 3.10.0-957.el7.x86_64 docker://19.3.15
3、将node节点加入到master集群
在两台node节点运行如下命令:

kubeadm join 192.168.150.115:6443 --token nn1lsp.kpy2mprlsaqg1x81 \--discovery-token-ca-cert-hash sha256:a4c00296ddb1ee6640e0a6b106d4977f14301d12c1e05cc44cc81fb5042248a8
[root@node01 hlw]# kubeadm join 192.168.150.115:6443 --token nn1lsp.kpy2mprlsaqg1x81 \ > --discovery-token-ca-cert-hash sha256:a4c00296ddb1ee6640e0a6b106d4977f14301d12c1e05cc44cc81fb5042248a8 [preflight] Running pre-flight checks [preflight] Reading configuration from the cluster... [preflight] FYI: You can look at this config file with 'kubectl -n kube-system get cm kubeadm-config -oyaml' [kubelet-start] Writing kubelet configuration to file "/var/lib/kubelet/config.yaml" [kubelet-start] Writing kubelet environment file with flags to file "/var/lib/kubelet/kubeadm-flags.env" [kubelet-start] Starting the kubelet [kubelet-start] Waiting for the kubelet to perform the TLS Bootstrap... This node has joined the cluster: * Certificate signing request was sent to apiserver and a response was received. * The Kubelet was informed of the new secure connection details. Run 'kubectl get nodes' on the control-plane to see this node join the cluster.
##在master节点查看集群信息
kubectl get nodes -owide[root@master01 etc]# kubectl get nodes -owide NAME STATUS ROLES AGE VERSION INTERNAL-IP EXTERNAL-IP OS-IMAGE KERNEL-VERSION CONTAINER-RUNTIME master01 Ready master 71m v1.19.3 192.168.150.115 <none> CentOS Linux 7 (Core) 3.10.0-957.el7.x86_64 docker://19.3.15 node01 Ready <none> 95s v1.19.3 192.168.150.113 <none> CentOS Linux 7 (Core) 3.10.0-957.el7.x86_64 docker://19.3.15 node02 Ready <none> 90s v1.19.3 192.168.150.114 <none> CentOS Linux 7 (Core) 3.10.0-1160.83.1.el7.x86_64 docker://19.3.15
4、查看6443端口

##安装过程解析:
执行如下命令参数:
kubeadm init  \
--apiserver-advertise-address=192.168.150.115  \
--image-repository registry.aliyuncs.com/google_containers \
--kubernetes-version v1.19.3  \
--service-cidr=10.96.0.0/12 \
--pod-network-cidr=10.244.0.0/16 \
--ignore-preflight-errors=swap [root@master01 ~]# kubeadm init  \
> --apiserver-advertise-address=192.168.150.115  \
> --image-repository registry.aliyuncs.com/google_containers \
> --kubernetes-version v1.19.3  \
> --service-cidr=10.96.0.0/12 \
> --pod-network-cidr=10.244.0.0/16 \
> ##--service-dns-domain= cluster.local \
W0426 10:56:12.149482    7418 configset.go:348] WARNING: kubeadm cannot validate component configs for API groups [kubelet.config.k8s.io kubeproxy.config.k8s.io]
[init] Using Kubernetes version: v1.19.3
[preflight] Running pre-flight checks
[preflight] Pulling images required for setting up a Kubernetes cluster
[preflight] This might take a minute or two, depending on the speed of your internet connection
[preflight] You can also perform this action in beforehand using 'kubeadm config images pull'[certs] Using certificateDir folder "/etc/kubernetes/pki"
[certs] Generating "ca" certificate and key
[certs] Generating "apiserver" certificate and key
[certs] apiserver serving cert is signed for DNS names [kubernetes kubernetes.default kubernetes.default.svc kubernetes.default.svc.cluster.local master01] and IPs [10.96.0.1 192.168.150.115]
[certs] Generating "apiserver-kubelet-client" certificate and key
[certs] Generating "front-proxy-ca" certificate and key
[certs] Generating "front-proxy-client" certificate and key
[certs] Generating "etcd/ca" certificate and key
[certs] Generating "etcd/server" certificate and key
[certs] etcd/server serving cert is signed for DNS names [localhost master01] and IPs [192.168.150.115 127.0.0.1 ::1]
[certs] Generating "etcd/peer" certificate and key
[certs] etcd/peer serving cert is signed for DNS names [localhost master01] and IPs [192.168.150.115 127.0.0.1 ::1]
[certs] Generating "etcd/healthcheck-client" certificate and key
[certs] Generating "apiserver-etcd-client" certificate and key
[certs] Generating "sa" key and public key
[kubeconfig] Using kubeconfig folder "/etc/kubernetes"
[kubeconfig] Writing "admin.conf" kubeconfig file
[kubeconfig] Writing "kubelet.conf" kubeconfig file
[kubeconfig] Writing "controller-manager.conf" kubeconfig file
[kubeconfig] Writing "scheduler.conf" kubeconfig file
[kubelet-start] Writing kubelet environment file with flags to file "/var/lib/kubelet/kubeadm-flags.env"
[kubelet-start] Writing kubelet configuration to file "/var/lib/kubelet/config.yaml"
[kubelet-start] Starting the kubelet
[control-plane] Using manifest folder "/etc/kubernetes/manifests"
[control-plane] Creating static Pod manifest for "kube-apiserver"
[control-plane] Creating static Pod manifest for "kube-controller-manager"
[control-plane] Creating static Pod manifest for "kube-scheduler"
[etcd] Creating static Pod manifest for local etcd in "/etc/kubernetes/manifests"
[wait-control-plane] Waiting for the kubelet to boot up the control plane as static Pods from directory "/etc/kubernetes/manifests". This can take up to 4m0s
[apiclient] All control plane components are healthy after 18.513092 seconds
[upload-config] Storing the configuration used in ConfigMap "kubeadm-config" in the "kube-system" Namespace
[kubelet] Creating a ConfigMap "kubelet-config-1.19" in namespace kube-system with the configuration for the kubelets in the cluster
[upload-certs] Skipping phase. Please see --upload-certs
[mark-control-plane] Marking the node master01 as control-plane by adding the label "node-role.kubernetes.io/master=''"
[mark-control-plane] Marking the node master01 as control-plane by adding the taints [node-role.kubernetes.io/master:NoSchedule]
[bootstrap-token] Using token: nn1lsp.kpy2mprlsaqg1x81
[bootstrap-token] Configuring bootstrap tokens, cluster-info ConfigMap, RBAC Roles
[bootstrap-token] configured RBAC rules to allow Node Bootstrap tokens to get nodes
[bootstrap-token] configured RBAC rules to allow Node Bootstrap tokens to post CSRs in order for nodes to get long term certificate credentials
[bootstrap-token] configured RBAC rules to allow the csrapprover controller automatically approve CSRs from a Node Bootstrap Token
[bootstrap-token] configured RBAC rules to allow certificate rotation for all node client certificates in the cluster
[bootstrap-token] Creating the "cluster-info" ConfigMap in the "kube-public" namespace
[kubelet-finalize] Updating "/etc/kubernetes/kubelet.conf" to point to a rotatable kubelet client certificate and key
[addons] Applied essential addon: CoreDNS
[addons] Applied essential addon: kube-proxy##Kubernetes控制平面初始化成功!
Your Kubernetes control-plane has initialized successfully!##要开始使用您的集群,您需要以普通用户运行以下命令:
To start using your cluster, you need to run the following as a regular user:mkdir -p $HOME/.kubesudo cp -i /etc/kubernetes/admin.conf $HOME/.kube/configsudo chown $(id -u):$(id -g) $HOME/.kube/config##现在应该将一个pod网络部署到集群。 pod分布再多个机器上,pod互相之间链接部署,集群网络,选用flannel网络播件
安装,使用即可。
运行“kubectl apply -f [podnetwork]”。Yaml”,其中一个选项列在:
https://kubernetes.io/docs/concepts/cluster-administration/addons/You should now deploy a pod network to the cluster.
Run "kubectl apply -f [podnetwork].yaml" with one of the options listed at:https://kubernetes.io/docs/concepts/cluster-administration/addons/##然后你可以通过在每个工作节点上运行以下命令来加入任意数量的工作节点:
Then you can join any number of worker nodes by running the following on each as root:kubeadm join 192.168.150.115:6443 --token nn1lsp.kpy2mprlsaqg1x81 \--discovery-token-ca-cert-hash sha256:a4c00296ddb1ee6640e0a6b106d4977f14301d12c1e05cc44cc81fb5042248a8
[root@master01 ~]#
##kubeadm 参数详解: kubeadm init \ --apiserver-advertise-address=192.168.150.112 \ # api-server运行在k8s-master的ip --image-repository registry.aliyuncs.com/google_containers \ # 拉去k8s镜像,从阿里云上获取,否则默认是国外的k8s镜像地址,下载不了 --kubernetes-version v1.19.3 \ # 和kubeadm保持一致 --service-cidr-10.1.0.8/16 \ # k8s服务发现网段设置,service网段 --pod-network-cidr=10.2.0.0/16 # 设置pod创建后,的运行网段地址 --service-dns-domain=cluster.local \ # k8s服务发现网段设置,service资源的域名后缀 --ignore-preflight-errors=swap \ # 忽略swap报错 --ignore-preflight-errors=NumCPU #忽略cpu数量报错
三、配置k8s命令补全
##k8s命令太多,务必要配置补全
操作节点: k8s-master
yum install bash-completion -y
source /usr/share/bash-completion/bash_completion
source <(kubectl completion bash)
echo "source <(kubectl corpletion bash)">> ~/.bashrcyum install bash-completion -y
kubectl completion bash >/etc/bash_completion.d/kubectl
echo 'source <(kubectl completion bash)' >>~/.bashrc yum install bash-completion -y
echo 'source <(kubectl completion bash)' >>~/.bashrc
kubectl completion bash >/etc/bash_completion.d/kubectl
四、 部署网络插件
1.下载网络插件,配置文件 ,yam1以及配置文件
git clone --depth 1 GitHub - flannel-io/flannel: flannel is a network fabric for containers, designed for Kubernetes GitHub - flannel-io/flannel: flannel is a network fabric for containers, designed for Kubernetes
2.在k8s主节点上,应用这个yam1,基于yam1,创建具体的pod过程
3.如果需要修改pod运行网络,要改配置文件(此路径为下载下来的flannel 解压下来的flannel路径下的 kube-flannel.yml)
cd /usr/local/hlw/flannel-master/Documentation3.1.需要修改的第一处Network
##查看kube-flannel.yml 中的“Network”配置是否和kubeadm init 中的--pod-network-cidr=10.244.0.0/16 地址保持一致;
grep "Network" -A 5 kube-flannel.yml[root@master01 Documentation]# grep "Network" -A 5 kube-flannel.yml "Network": "10.244.0.0/16","Backend": {"Type": "vxlan"}}
---
--hostNetwork: truepriorityClassName: system-node-criticaltolerations:- operator: Existseffect: NoScheduleserviceAccountName: flannel
##如果不一样就需要修改"Network"配置
vi /usr/local/hlw/flannel-master/Documentation/kube-flannel.yml##在kube-flannel.yml里面找到Network (使用命令/Network)
  net-conf.json: |{"Network": "10.244.0.0/16","Backend": {"Type": "vxlan"}}
##"Network": "10.244.0.0/16", 中的配置和kubeadm init 中的--pod-network-cidr=10.244.0.0/16 地址保持一致;
3.2.需要修改的第二处
##如果机器存在多网卡的话,指定内网物理网卡的名称,默认不指定的话会找第一块网卡
cd /usr/local/hlw/flannel-master/Documentation##在kube-flannel.yml中找到containers 添加- --iface:enp0s3 (enp0s3是提供对外访问的网卡名称)
vi kube-flannel.yml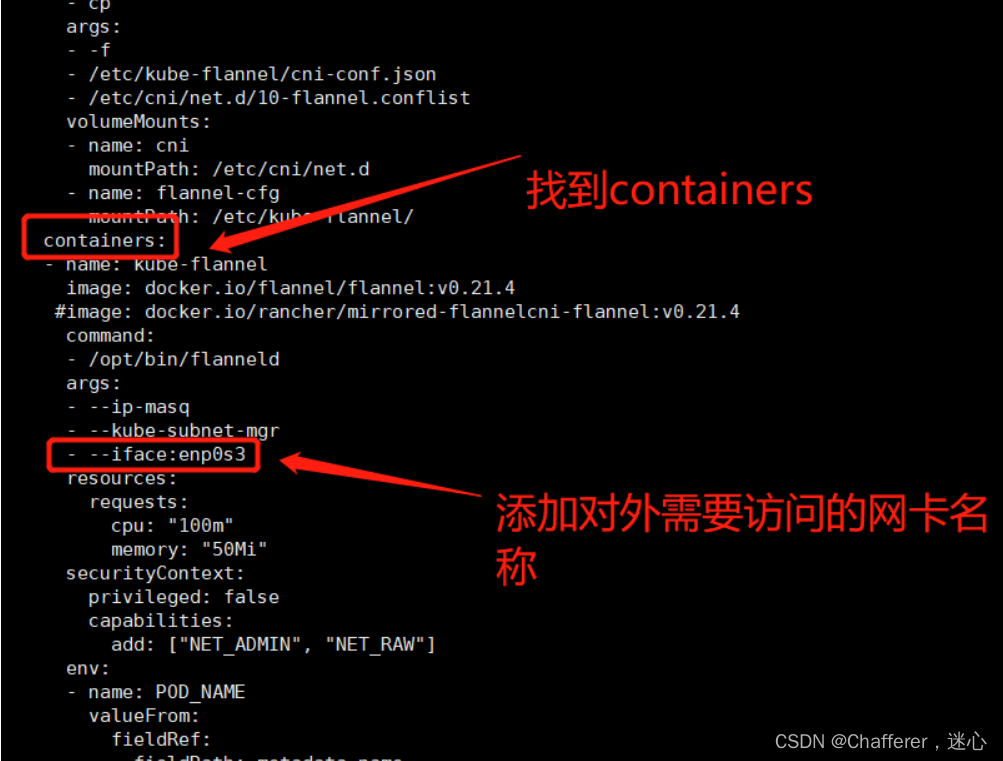
基于kubect1命令,应用这个ym1文件,读取,以及创建pod资源
kubectl create -f kube-flannel.yml[root@master01 Documentation]# kubectl create -f ./kube-flannel.yml namespace/kube-flannel created clusterrole.rbac.authorization.k8s.io/flannel created clusterrolebinding.rbac.authorization.k8s.io/flannel created serviceaccount/flannel created configmap/kube-flannel-cfg created daemonset.apps/kube-flannel-ds created
3.3、报错处理
报错内容:
Error from server (AlreadyExists): error when creating "kube-flannel.yml": namespaces "kube-flannel" already exists
Error from server (AlreadyExists): error when creating "kube-flannel.yml": clusterroles.rbac.authorization.k8s.io "flannel" already exists
Error from server (AlreadyExists): error when creating "kube-flannel.yml": clusterrolebindings.rbac.authorization.k8s.io "flannel" already exists
Error from server (AlreadyExists): error when creating "kube-flannel.yml": serviceaccounts "flannel" already exists
Error from server (AlreadyExists): error when creating "kube-flannel.yml": configmaps "kube-flannel-cfg" already exists
error parsing kube-flannel.yml: error converting YAML to JSON: yaml: line 71: found a tab character that violates indentation
##kube-flannel已经存在,处理方法:
需要先删除
kubectl delete -f kube-flannel.yml在创建
kubectl create -f kube-flannel.yml如果以上错误还是未能解决,需要删除解压下来的文件,重新解压,重新配置即可!
3.4、查看当前master容器中是否已经运行了flannel
docker ps | grep flannel[root@master01 Documentation]# docker ps | grep flannel 76418b295e4c registry.aliyuncs.com/google_containers/pause:3.2 "/pause" 11 minutes ago Up 11 minutes k8s_POD_kube-flannel-ds-2wjmr_kube-flannel_f5f78677-52aa-457a-89cc-ef1320dc3e97_0
3.5、运行kubectl get nodes -owide
kubectl get nodes -owide[root@master01 Documentation]# kubectl get nodes -owide NAME STATUS ROLES AGE VERSION INTERNAL-IP EXTERNAL-IP OS-IMAGE KERNEL-VERSION CONTAINER-RUNTIME master01 Ready master 23h v1.19.3 192.168.150.115 <none> CentOS Linux 7 (Core) 3.10.0-957.el7.x86_64 docker://19.3.15 node01 Ready <none> 21h v1.19.3 192.168.150.113 <none> CentOS Linux 7 (Core) 3.10.0-957.el7.x86_64 docker://19.3.15 node02 Ready <none> 21h v1.19.3 192.168.150.114 <none> CentOS Linux 7 (Core) 3.10.0-1160.83.1.el7.x86_64 docker://19.3.15
三个节点集群通信完成,可以POD部署!!!
五、部署pod
5、创建空间,创建pod,部署pod
##创建空间
kubectl create –f xxx.yaml##创建pod
kubectl run list-nginx002 --image=nginx:1.14.1##查看创建pod 详情
kubectl get pods -owide[root@master01 flannel-master]# kubectl run list-nginx002 --image=nginx:11.14.0 pod/list-nginx002 created [root@master01 flannel-master]# kubectl get pods [root@master01 flannel-master]# kubectl get pods -owide NAME READY STATUS RESTARTS AGE IP NODE NOMINATED NODE READINESS GATES list-nginx002 1/1 ContainerCreating 0 39s <none> node02 <none> <none>
创建完成后可以看到创建pod后状态(kubectl get pods -owide)是否出现了READY 0/1 STATUS ContainerCreating 没有启动起来
六、将删除原来的node重新添加到master控制器集群
1、查看需要加入master集群的命令
kubeadm token create --print-join-command[root@master01 Documentation]# kubeadm token create --print-join-command
W0505 16:32:38.868062 12052 common.go:148] WARNING: could not obtain a bind address for the API Server: no default routes found in "/proc/net/route" or "/proc/net/ipv6_route"; using: 0.0.0.0
W0505 16:32:39.215877 12052 configset.go:348] WARNING: kubeadm cannot validate component configs for API groups [kubelet.config.k8s.io kubeproxy.config.k8s.io]
kubeadm join 192.168.150.115:6443 --token 46zqy7.kym6l19og9bcotz8 --discovery-token-ca-cert-hash sha256:b4c66aeb4ff0c65f5180fca24a144e18392921f68cf5b10c18be3e02733e7fdf
[root@master01 Documentation]#
[root@master01 Documentation]#
2、使用kubeadm reset 将需要添加的node 重置。
kubeadm reset[root@node02 ~]# kubeadm reset
[reset] WARNING: Changes made to this host by 'kubeadm init' or 'kubeadm join' will be reverted.
[reset] Are you sure you want to proceed? [y/N]: y
[preflight] Running pre-flight checks
W0505 16:39:42.283093 22034 removeetcdmember.go:79] [reset] No kubeadm config, using etcd pod spec to get data directory
[reset] No etcd config found. Assuming external etcd
[reset] Please, manually reset etcd to prevent further issues
[reset] Stopping the kubelet service
[reset] Unmounting mounted directories in "/var/lib/kubelet"
[reset] Deleting contents of config directories: [/etc/kubernetes/manifests /etc/kubernetes/pki]
[reset] Deleting files: [/etc/kubernetes/admin.conf /etc/kubernetes/kubelet.conf /etc/kubernetes/bootstrap-kubelet.conf /etc/kubernetes/controller-manager.conf /etc/kubernetes/scheduler.conf]
[reset] Deleting contents of stateful directories: [/var/lib/kubelet /var/lib/dockershim /var/run/kubernetes /var/lib/cni]
The reset process does not clean CNI configuration. To do so, you must remove /etc/cni/net.d
The reset process does not reset or clean up iptables rules or IPVS tables.
If you wish to reset iptables, you must do so manually by using the "iptables" command.
If your cluster was setup to utilize IPVS, run ipvsadm --clear (or similar)
to reset your system's IPVS tables.
The reset process does not clean your kubeconfig files and you must remove them manually.
Please, check the contents of the $HOME/.kube/config file.
3、重新添加node节点到master
需要将在master上查询到的命令在新的node节点上执行
命令:kubeadm join 192.168.150.115:6443 --token 46zqy7.kym6l19og9bcotz8 --discovery-token-ca-cert-hash sha256:b4c66aeb4ff0c65f5180fca24a144e18392921f68cf5b10c18be3e02733e7fdf
[root@node02 ~]# kubeadm join 192.168.150.115:6443 --token 46zqy7.kym6l19og9bcotz8 --discovery-token-ca-cert-hash sha256:b4c66aeb4ff0c65f5180fca24a144e18392921f68cf5b10c18be3e02733e7fdf
[preflight] Running pre-flight checks
[preflight] Reading configuration from the cluster...
[preflight] FYI: You can look at this config file with 'kubectl -n kube-system get cm kubeadm-config -oyaml'
[kubelet-start] Writing kubelet configuration to file "/var/lib/kubelet/config.yaml"
[kubelet-start] Writing kubelet environment file with flags to file "/var/lib/kubelet/kubeadm-flags.env"
[kubelet-start] Starting the kubelet
[kubelet-start] Waiting for the kubelet to perform the TLS Bootstrap...
This node has joined the cluster:
* Certificate signing request was sent to apiserver and a response was received.
* The Kubelet was informed of the new secure connection details.
Run 'kubectl get nodes' on the control-plane to see this node join the cluster.
4、在master上查询是否添加成功
kubectl get node -owide[root@master01 Documentation]# kubectl get node -owide
NAME STATUS ROLES AGE VERSION INTERNAL-IP EXTERNAL-IP OS-IMAGE KERNEL-VERSION CONTAINER-RUNTIME
master01 Ready master 7d6h v1.19.3 192.168.150.115 <none> CentOS Linux 7 (Core) 3.10.0-957.el7.x86_64 docker://19.3.15
node01 Ready <none> 7d5h v1.19.3 192.168.150.113 <none> CentOS Linux 7 (Core) 3.10.0-957.el7.x86_64 docker://19.3.15
node02 Ready <none> 11m v1.19.3 192.168.150.114 <none> CentOS Linux 7 (Core) 3.10.0-1160.83.1.el7.x86_64 docker://19.3.15
七、常见问题及处理
1、问题一:创建pod 出现了状态为0
##查看pod创建后的详情
kubectl describe pod linux-nginx1140 得知:在初始化主节点(master)没有给集群的pod指定内网网段的缘故。(在目录:二、初始化k8s-master 主节点(只在主节点执行) )
错误信息:failed: open /run/flannel/subnet.env: no such file or directory
Successfully assigned default/linux-nginx1140 to node02Warning FailedCreatePodSandBox 7m18s kubelet Failed to create pod sandbox: rpc error: code = Unknown desc = failed to set up sandbox container "24b119c612b20314ba1c5dcdd292c1239be21c2d94619b7af7118e6b57817e40" network for pod "linux-nginx1140": networkPlugin cni failed to set up pod "linux-nginx1140_default" network: loadFlannelSubnetEnv failed: open /run/flannel/subnet.env: no such file or directory

1.1 解决方法:
可以查看gitgode得到答案Documentation/configuration.md · master · mirrors / flannel-io / flannel · GitCode
If everything works as expected, flanneld should generate a /run/flannel/subnet.env file with IPV6 subnet and network. For example(如果一切正常,flanneld应该生成一个/run/flannel/子网。带IPV6子网和网络的env文件。例如):
FLANNEL_NETWORK=10.42.0.0/16
FLANNEL_SUBNET=10.42.0.1/24
FLANNEL_IPV6_NETWORK=2001:cafe:42::/56
FLANNEL_IPV6_SUBNET=2001:cafe:42::1/64
FLANNEL_MTU=1450
FLANNEL_IPMASQ=true
1.1、处理方法一
1.1.1、在master和node上都创建subnet.env这个文件
查看是否有 /run/flannel/subnet.env 这个文件,master 上是存在的,也有内容:
FLANNEL_NETWORK=10.244.0.0/16
FLANNEL_SUBNET=10.244.0.1/24
FLANNEL_MTU=1450
FLANNEL_IPMASQ=true
各个 node节点上没有此文件,创建目录,新建文件,拷贝文件内容,然后重新创建 pod,正常了。
1.2、处理方法二
重新部署k8s-master 和k8s-node节点
kubeadm reset重新执行目录二,执行完成后在去部署pod ;
1.3、处理方法三
如果启动pod还是出现错误请查看是否开启scheduler, control-manager的10251,10252端口;
这两个pod的非安全端口没有开启,健康检查时报错,但是由于本身服务是正常的,只是健康检查的端口没启,所以不影响正常使用。
可以通过命令:
kubectl get cs -owide[root@master01 ~]# kubectl get cs -owide Warning: v1 ComponentStatus is deprecated in v1.19+ NAME STATUS MESSAGE ERROR scheduler Unhealthy Get "http://127.0.0.1:10251/healthz": dial tcp 127.0.0.1:10251: connect: connection refused controller-manager Unhealthy Get "http://127.0.0.1:10252/healthz": dial tcp 127.0.0.1:10252: connect: connection refused
1.4、处理方法四
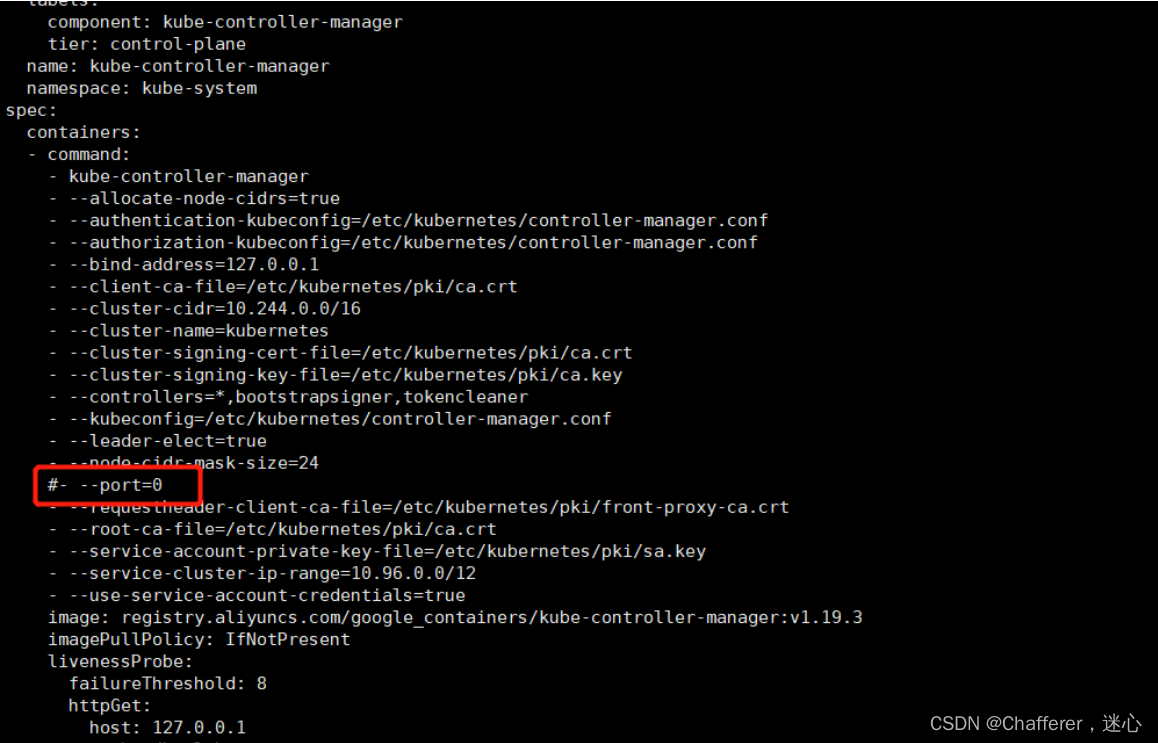
如果启动pod还是出现错误请修改以下配置文件:静态pod的路径:/etc/kubernetes/manifests
-
vi kube-scheduler.yaml,把port=0那行注释
-
vi kube-controller-manager.yaml,把port=0那行注释
1.4.1、查看开启scheduler, control-manager的10251,10252端口是否正常
netstat -tulpn [root@master01 manifests]# netstat -tulpn Active Internet connections (only servers) Proto Recv-Q Send-Q Local Address Foreign Address State PID/Program name tcp 0 0 127.0.0.1:10248 0.0.0.0:* LISTEN 2952/kubelet tcp 0 0 127.0.0.1:10249 0.0.0.0:* LISTEN 13288/kube-proxy tcp 0 0 192.168.150.115:2379 0.0.0.0:* LISTEN 8704/etcd tcp 0 0 127.0.0.1:2379 0.0.0.0:* LISTEN 8704/etcd tcp 0 0 192.168.150.115:2380 0.0.0.0:* LISTEN 8704/etcd tcp 0 0 127.0.0.1:2381 0.0.0.0:* LISTEN 8704/etcd tcp 0 0 127.0.0.1:10257 0.0.0.0:* LISTEN 13484/kube-controll tcp 0 0 127.0.0.1:10259 0.0.0.0:* LISTEN 7716/kube-scheduler tcp 0 0 0.0.0.0:22 0.0.0.0:* LISTEN 2947/sshd tcp 0 0 127.0.0.1:25 0.0.0.0:* LISTEN 3208/master tcp 0 0 127.0.0.1:33542 0.0.0.0:* LISTEN 2952/kubelet tcp6 0 0 :::10250 :::* LISTEN 2952/kubelet tcp6 0 0 :::10251 :::* LISTEN 7716/kube-scheduler tcp6 0 0 :::6443 :::* LISTEN 8729/kube-apiserver tcp6 0 0 :::10252 :::* LISTEN 13484/kube-controll tcp6 0 0 :::10256 :::* LISTEN 13288/kube-proxy tcp6 0 0 :::22 :::* LISTEN 2947/sshd tcp6 0 0 ::1:25 :::* LISTEN 3208/master udp 0 0 127.0.0.1:323 0.0.0.0:* 2700/chronyd udp6 0 0 ::1:323 :::* 2700/chronyd
重新检查
[root@master01 manifests]# kubectl get cs
Warning: v1 ComponentStatus is deprecated in v1.19+
NAME                 STATUS    MESSAGE             ERROR
controller-manager   Healthy   ok
scheduler            Healthy   ok
etcd-0               Healthy   {"health":"true"}
相关文章:
K8S部署及常见问题处理
目录 k8s kubeadm 一键自动化,安装k8s集群,安装所有运行需要的组件 一、环境初始化(三台机器都需要执行) 主机名、节点ip、部署组件 1、配置hosts(主节点master和业务节点node都需要配置)文件内容 2、…...
通过Robotstudio修改机器人程序的具体方法和步骤
通过Robotstudio修改机器人程序的具体方法和步骤 基本步骤可参考以下内容: 用网线连接机器人和电脑,机器人一侧要插入LAN2口;机器人和电脑的IP地址要在同一个网段内;请求写入权限;修改程序—编译—应用;加载修改后的程序到机器人;保存Robotstudio程序到电脑端;只能修改…...

第40讲:Python for-in循环语句使用索引遍历序列
文章目录 方法一:遍历的是序列的元素方法二:遍历的是序列的索引方法三:while循环遍历实现方法四:调用内置函数enumerate实现1.什么是enumerate函数2.调用内置函数enumerate实现索引遍历序列 如果在遍历序列的过程中,需…...

如何用Jmeter压测Netty的Echo服务之自定义Jmeter的Java Sampler
前言 如果想要压测一些三方组件,比如MQ,redis什么的,jmeter本身是不支持的。 本文以开发一个压测netty的echo示例,说明如何自定义jmeter的sampler。 开发 本文以idea示例, 新建工程 打开idea新建一个空的maven工程…...

GPT3.5之运用之检查模型是否满足条件
策略三:要求模型检查是否满足条件* 如果任务做出的假设不一定满足,我们可以告诉模型先检查这些假设,如果不满足,指示并停止执行。你还可以考虑潜在的边缘情况以及模型应该如何处理它们,以避免意外的错误或结果。 在如…...

【TCP为什么需要粘包和拆包】
如今,大半个互联网都建立在 TCP 协议之上,我们使用的 HTTP 协议、消息队列、存储、缓存,都需要用到 TCP 协议——这是因为 TCP 协议提供了可靠性。简单来说,可靠性就是让数据无损送达。但若是考虑到成本,就会变得非常复…...

Python | 人脸识别系统 — 姿态检测
本博客为人脸识别系统的姿态检测代码解释 人脸识别系统博客汇总:人脸识别系统-博客索引 项目GitHub地址:Su-Face-Recognition: A face recognition for user logining 注意:阅读本博客前请先参考以下博客 工具安装、环境配置:人脸…...

为什么说网络安全行业是IT行业最后的红利?
前言 2023年网络安全行业的前景看起来非常乐观。根据当前的趋势和发展,一些趋势和发展可能对2023年网络安全行业产生影响: 5G技术的广泛应用:5G技术的普及将会使互联网的速度更快,同时也将带来更多的网络威胁和安全挑战。网络安全…...
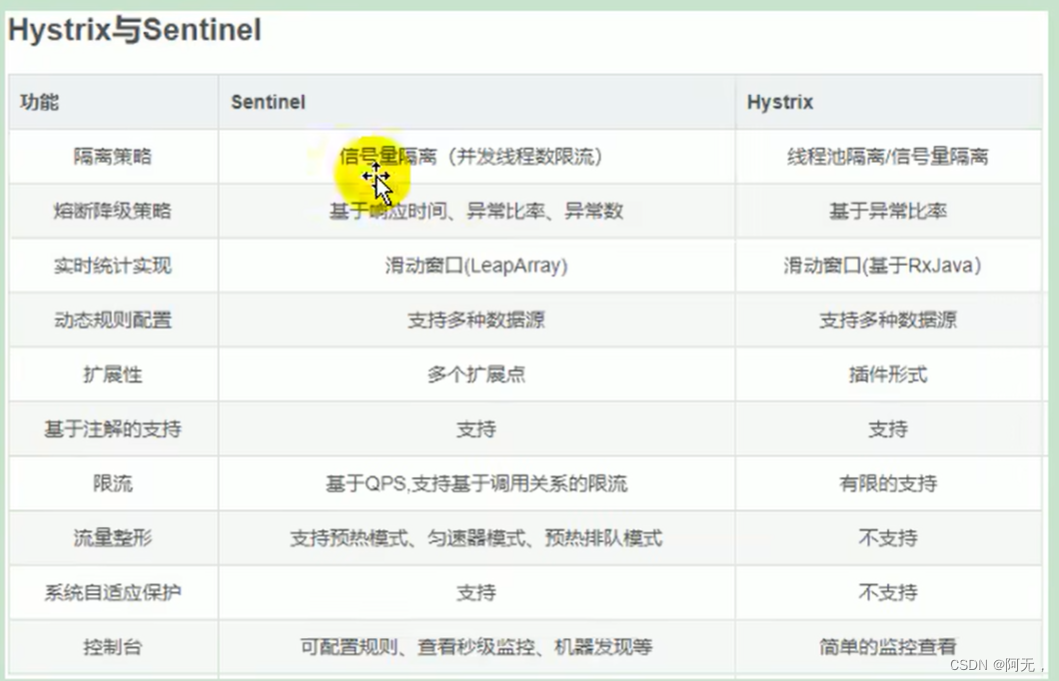
谷粒商城二十四Sentinel限流熔断降级
我们在秒杀服务加的以上所有手段都是为了快,除了快之外,我们还需要保证稳定。 我们即使再快也会有一个极限值,现在假设单机下每秒处理一万个单,这已经是超高的处理能力了,秒杀服务上了五台服务器,有三台掉…...

STM32-HAL-SPI-W25Q128FV简单读写测试(2)
文章目录 一、Flash的基本读写操作1.1 向芯片中的某个地址(addr:0x02)连续写入不定长的数据并读取代码示例读写流程分析函数分析 1.2 向芯片中的某个地址(addr:0x00)写入一个数值代码示例:读写流程分析 具体的配置接上…...
网易一面:如何设计线程池?请手写一个简单线程池?
说在前面 在40岁老架构师 尼恩的读者社区(50)中,最近有小伙伴拿到了一线互联网企业如极兔、有赞、希音、百度、网易的面试资格,遇到了几个很重要的面试题: 如何设计线程池? 与之类似的、其他小伙伴遇到过的问题还有: …...
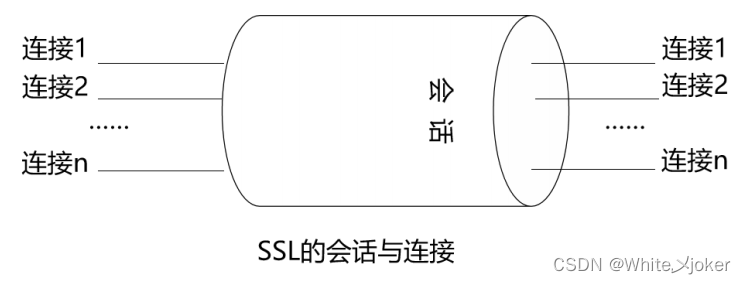
网络安全之密码学
目录 密码学 定义 密码的分类 对称加密 非对称加密 对称算法与非对称算法的优缺点 最佳解决办法 --- 用非对称加密算法加密对称加密算法的密钥 非对称加密如何解决对称加密的困境 密钥传输风险 密码管理难 常见算法 对称算法 非对称算法 完整性与身份认证最佳解决…...

第14章 项目采购管理
文章目录 采购管理包括如下几个过程14.2 编制采购计划 462编制采购计划的输出1)采购管理计划2)采购工作说明书3)采购文件 14.2.3 工作说明书(SOW) 14.3 实施采购 47414.3.2 实施采购的方法和技术 476(1&…...

Vite+Vue下的多页面入口配置
我发现多页面入口配置在网上的资料比较乱,今天正好结合我们的开源API分析工具项目(APIcat)更新情况总结一下。 更新vite.config.js 主要配置的更新是在vite.config.js里面要增加build里的rollupOptions,因为vite底层使用了rollu…...

ChatGPT背后的打工人:你不干,有的是AI干
AI“出圈” 如今,数字技术发展速度惊人,AI提高了社会生产效率,更真切地冲击到原有的生产秩序。 年初AI技术的爆发,让国内看到了进一步降本增效的希望。 国内多家互联网企业相继推出类ChatGPT产品,复旦大学邱锡鹏教授…...
【Access】Access:SQL 语句汇总
目录 一、SQL 的功能 二、考试重点 三、关系的定义 (1)新建关系 (2)删除关系 四、SQL 的「数据查询」功能 (1)基本结构 ① Select 语句的基本结构 ② Select 子句 ③ Where 子句 ④ 空值的处…...
【小样本分割 2022 ECCV】SSP
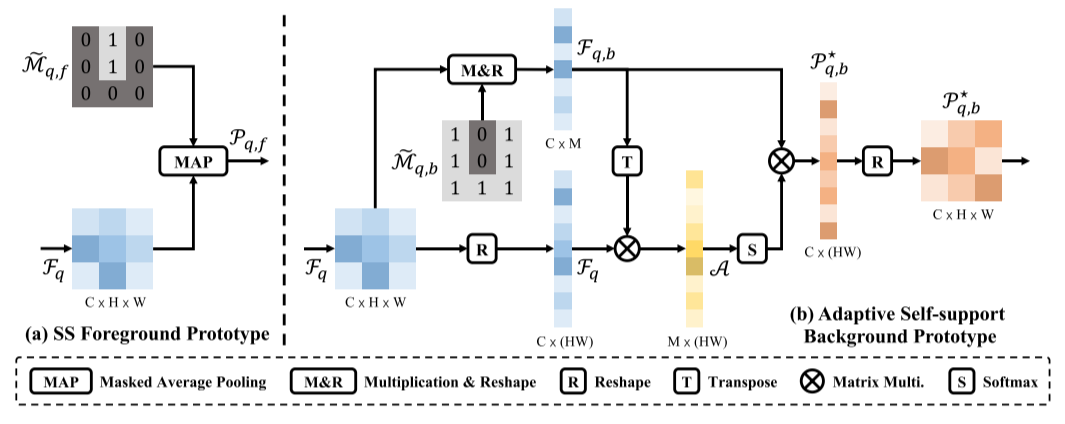
文章目录 【小样本分割 2022 ECCV】SSP摘要1. 介绍2. 相关工作3. 自支持小样本语义分割3.1 动机3.2 自支持原型-SSM3.3 自适应自支持背景原型-ASBP3.4 自支持匹配-SSL 3. 代码 【小样本分割 2022 ECCV】SSP 论文题目:Self-Support Few-Shot Semantic Segmentation 中…...

Friendlycore增加inodes数量
背景:为Nanopim1安装了core系统,tf卡大小64G,安装后正常扩展到了整个tf卡,但是在安装hass的docker显示磁盘空间不够,最终发现是inode被用完了。其inode只有960K,但是16G卡树莓派系统的inodes都是其两倍。 一…...
和(ntheorm)的区别)
Latex 定理和证明类环境(amsthm)和(ntheorm)的区别
最近在写毕业论文,出现了一些定理和证明的环境的问题,问题出现在对两个包的理解程度不够的问题上: \RequirePackage{ntheorem} 1、\newtheorem*{proof}{\hspace{2em}证:} 这个是让证明失去计数原则,该命令不能用于 amsthm 2…...

Yolov8改进---注意力全家桶,小目标涨点
💡💡💡💡💡💡💡💡💡💡注意力全家桶💡💡💡💡💡💡💡💡💡💡💡 基于Yolov8的注意力机制研究,提升小目标、遮挡物、难样本等检测性能...

本地化部署AI做表格工具评测:数以轻舟Agent技术架构与落地实践
一、产品定位与核心架构数以轻舟Agent是一款面向Excel数据处理场景的垂直型AI智能体,由北京乾策数智科技有限公司开发,2025年12月推出首款产品,2026年5月正式上线本地化部署版本。产品核心定位并非通用AI助手,而是聚焦"AI做表…...

企业级无人机安全测试平台:构建可扩展的GPS欺骗与Wi-Fi渗透架构
企业级无人机安全测试平台:构建可扩展的GPS欺骗与Wi-Fi渗透架构 【免费下载链接】Drone-Hacking-Tool Drone Hacking Tool is a GUI tool that works with a USB Wifi adapter and HackRF One for hacking drones. 项目地址: https://gitcode.com/gh_mirrors/dr/D…...
:创建技能)
OpenClaw从入门到应用——工具(Tools):创建技能
通过OpenClaw实现副业收入:《OpenClaw赚钱实录:从“养龙虾“到可持续变现的实践指南》 简介 OpenClaw 被设计为易于扩展。“技能”是向你的助手添加新能力的主要方式。 什么是技能? 一个技能是一个目录,其中包含一个 SKILL.md…...

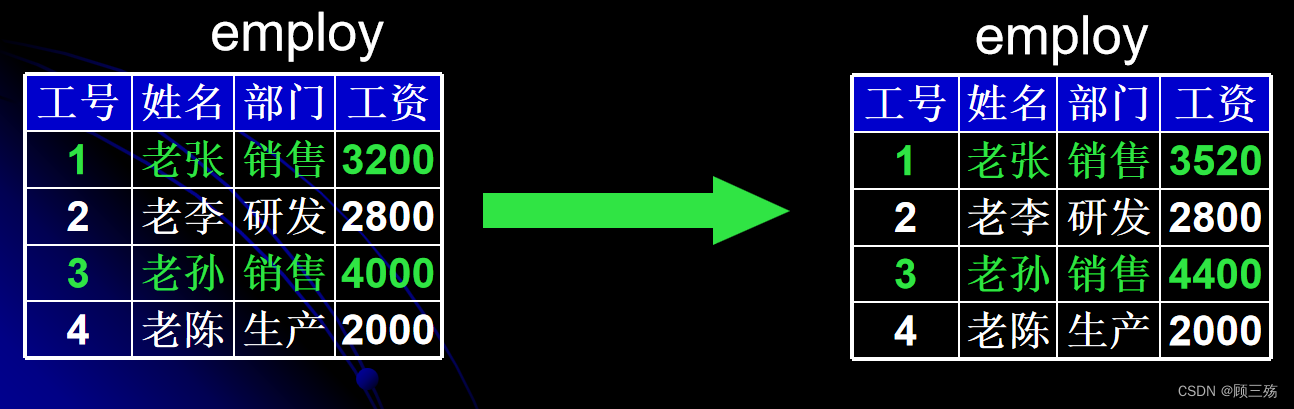
PostgreSQL数据清洗实战:用string_agg合并地址字段,我这样整理混乱的客户信息
PostgreSQL数据清洗实战:用string_agg合并地址字段,我这样整理混乱的客户信息 客户信息表中的地址字段分散是个常见痛点。想象一下:同一客户的"省"、"市"、"详细地址"分散在不同行,导出Excel时地址…...

产品工程外包战略转型:从成本控制到价值共创
1. 产品工程外包的价值重构:从成本驱动到战略协同十五年前我刚入行IT咨询时,客户开口闭口都是"能省多少钱"。如今在硅谷参与过数十个跨国产品外包项目后,我深刻意识到:把PEO(产品工程外包)单纯看…...

AI架构绘图副驾驶:用自然语言生成专业Excalidraw架构图
1. 项目概述与核心价值 如果你和我一样,每天都要面对陌生的、动辄几十个微服务的复杂代码库,或者需要向团队解释一个新系统的设计,那你一定理解那种“认知过载”的痛苦。在脑海里构建整个系统的架构图,试图理清服务间的调用关系和…...

收藏!小白也能入局:2026年高薪AI大模型应用开发工程师详解
2026年AI行业重心转向大模型应用开发,AI岗位数量激增,成为企业刚需。AI大模型应用开发工程师通过二次开发,将现成大模型转化为实用产品,如智能客服、知识库问答等。该岗位薪资高、需求旺,技能门槛相对较低,…...

从概念验证到生产环境:Keep开源告警管理平台的5步完整实战部署指南
从概念验证到生产环境:Keep开源告警管理平台的5步完整实战部署指南 【免费下载链接】keep The open-source AIOps and alert management platform 项目地址: https://gitcode.com/GitHub_Trending/kee/keep 在当今复杂的云原生环境中,告警管理已成…...

iOS激活锁终极绕过指南:开源工具applera1n的完整解决方案
iOS激活锁终极绕过指南:开源工具applera1n的完整解决方案 【免费下载链接】applera1n icloud bypass for ios 15-16 项目地址: https://gitcode.com/gh_mirrors/ap/applera1n 面对iOS设备激活锁的困扰,你是否曾为无法使用二手iPhone而烦恼&#x…...

QMCDecode终极指南:如何快速解锁QQ音乐加密文件实现跨设备播放
QMCDecode终极指南:如何快速解锁QQ音乐加密文件实现跨设备播放 【免费下载链接】QMCDecode QQ音乐QMC格式转换为普通格式(qmcflac转flac,qmc0,qmc3转mp3, mflac,mflac0等转flac),仅支持macOS,可自动识别到QQ音乐下载目录ÿ…...