QT实现固高运动控制卡示波器
目录
一、固高示波器
二、基于QCustomPlot实现示波器
三、完整源码
一、固高示波器
固高运动控制卡自带的软件有一个示波器功能,可以实时显示速度的波形,可辅助分析电机的运行状态。但是我们基于sdk开发了自己的软件,无法再使用该功能,原因是2个软件不能同时与控制卡通信,故此需要我们自己再开发一个示波器。
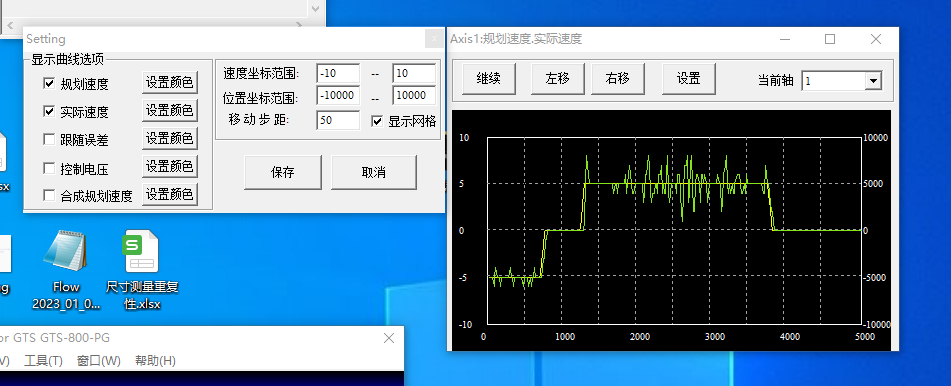
固高示波器功能展示,功能包括多条曲线的显示、继续/暂停、左移、右移、设置、轴选择等。
二、基于QCustomPlot实现示波器
GCustomPlot简介与使用看官网就可以了
简介, Qt Plotting Widget QCustomPlot - Introduction
下载, Qt Plotting Widget QCustomPlot - Download
需要注意的是需要在pro文件中加入printsuppot模块,源码中使用该模块做pdf打印功能
QT += printsupport参考固高的功能实现速度示波器效果如下

QCustomPlot初始化设置
m_customPlot = new QCustomPlot(this);m_customPlot->setObjectName(QLatin1String("customPlot"));ui->vlyPlot->addWidget(m_customPlot);m_customPlot->setBackground(QBrush(QColor("#474848")));m_customPlot->setInteractions(QCP::iRangeDrag | QCP::iRangeZoom |QCP::iSelectPlottables); /* 可拖拽+可滚轮缩放 */m_customPlot->legend->setVisible(true);添加两条曲线图,addGraph
m_customPlot->addGraph();m_customPlot->graph(0)->setPen(QPen(Qt::green, 3));m_customPlot->graph(0)->setName(QStringLiteral("实际速度"));m_customPlot->addGraph();m_customPlot->graph(1)->setPen(QPen(Qt::yellow, 3));m_customPlot->graph(1)->setName(QStringLiteral("规划速度"));左右移动,通过设置X轴的范围来改变,再使用replot函数更新视图
m_customPlot->xAxis->setRange(m_customPlot->xAxis->range().lower - ui->spbStep->value(),m_customPlot->xAxis->range().upper - ui->spbStep->value());m_customPlot->replot();网格线显示与隐藏
m_customPlot->xAxis->grid()->setVisible(checked);m_customPlot->yAxis->grid()->setVisible(checked);m_customPlot->replot();添加数据,示波器有向左自动滚动的效果,也是通过设置范围来实现
void OscilloscopeFrame::addData(double key, double actVel, double prfVel)
{m_customPlot->graph(0)->addData(key, actVel);m_customPlot->graph(1)->addData(key, prfVel);m_customPlot->xAxis->rescale();m_customPlot->graph(0)->rescaleValueAxis(false, true);m_customPlot->graph(1)->rescaleValueAxis(false, true);m_customPlot->xAxis->setRange(m_customPlot->xAxis->range().upper,m_fixedLength, Qt::AlignRight);m_customPlot->replot(QCustomPlot::rpQueuedReplot);  /* 实现重绘 */
}
实时显示数据,通过定时器实现
m_timer = new QTimer();connect(m_timer, &QTimer::timeout, updateData);m_timer->start(OSCILLOSCOPE_UPDATE_MSEC);鼠标放在曲线上显示当前值,关联鼠标移动信号,映射坐标pixelToCoord
connect(m_customPlot, SIGNAL(mouseMove(QMouseEvent *)), this,SLOT(plotMouseMoveEvent(QMouseEvent *)));void OscilloscopeFrame::plotMouseMoveEvent(QMouseEvent *event)
{if ( Qt::ControlModifier == event->modifiers()){int x_pos = event->pos().x();int x_val = m_customPlot->xAxis->pixelToCoord(x_pos);float y = m_customPlot->graph(0)->data()->at(x_val)->value;QString strToolTip = QString("%1,%2").arg(x_val).arg(y);QToolTip::showText(cursor().pos(), strToolTip, m_customPlot);}
}三、完整源码
OscilloscopeFrame.h
#ifndef OSCILLOSCOPEFRAME_H
#define OSCILLOSCOPEFRAME_H#include <QFrame>
#include "oscilloscopelib_global.h"namespace Ui
{class OscilloscopeFrame;
}class QCustomPlot;class AbstractRobot;class OSCILLOSCOPELIBSHARED_EXPORT OscilloscopeFrame : public QFrame
{Q_OBJECTpublic:explicit OscilloscopeFrame(QWidget *parent = 0);~OscilloscopeFrame();void setFixedLength(double length);void addData(double key, double actVel, double prfVel);void installController(AbstractRobot *controller);private slots:void plotMouseMoveEvent(QMouseEvent *event);private:Ui::OscilloscopeFrame *ui;QCustomPlot *m_customPlot = nullptr;QTimer *m_timer = nullptr;double m_fixedLength;AbstractRobot *m_controller = nullptr;double m_actPos = 0;double m_count = 0;
};#endif // OSCILLOSCOPEFRAME_H
OscilloscopeFrame.cpp
#include "OscilloscopeFrame.h"
#include "qcustomplot.h"
#include "ui_OscilloscopeFrame.h"
#include <QtMath>
#include <QDebug>
#include <device/AbstractRobot.h>#define OSCILLOSCOPE_UPDATE_MSEC  60OscilloscopeFrame::OscilloscopeFrame(QWidget *parent) :QFrame(parent),ui(new Ui::OscilloscopeFrame)
{ui->setupUi(this);ui->spbStep->setValue(1);for(int i = 1; i <= 8; ++i){ui->cmbAxisId->addItem(QString::number(i));}m_customPlot = new QCustomPlot(this);m_customPlot->setObjectName(QLatin1String("customPlot"));ui->vlyPlot->addWidget(m_customPlot);m_customPlot->setBackground(QBrush(QColor("#474848")));m_customPlot->setInteractions(QCP::iRangeDrag | QCP::iRangeZoom |QCP::iSelectPlottables);  /* 可拖拽+可滚轮缩放 */m_customPlot->legend->setVisible(true);m_customPlot->addGraph();m_customPlot->graph(0)->setPen(QPen(Qt::green, 3));m_customPlot->graph(0)->setName(QStringLiteral("实际速度"));m_customPlot->addGraph();m_customPlot->graph(1)->setPen(QPen(Qt::yellow, 3));m_customPlot->graph(1)->setName(QStringLiteral("规划速度"));m_customPlot->axisRect()->setupFullAxesBox();m_customPlot->yAxis->setRange(0, 3.3);ui->btnPause2Continue->setCheckable(true);setFixedLength(100);/* 暂停/继续 */connect(ui->btnPause2Continue, &QPushButton::clicked, this, [ = ](){if(!m_timer){return;}bool isCheckable = ui->btnPause2Continue->isCheckable();if(isCheckable){m_timer->stop();ui->btnPause2Continue->setText(QStringLiteral("继续"));}else{m_timer->start(OSCILLOSCOPE_UPDATE_MSEC);ui->btnPause2Continue->setText(QStringLiteral("暂停"));}ui->btnPause2Continue->setCheckable(!isCheckable);});/* 左移 */connect(ui->btnLeftMove, &QPushButton::clicked, this, [ = ](){m_customPlot->xAxis->setRange(m_customPlot->xAxis->range().lower - ui->spbStep->value(),m_customPlot->xAxis->range().upper - ui->spbStep->value());m_customPlot->replot();});/* 右移 */connect(ui->btnRightMove, &QPushButton::clicked, this, [ = ](){m_customPlot->xAxis->setRange(m_customPlot->xAxis->range().lower  + ui->spbStep->value(),m_customPlot->xAxis->range().upper  + ui->spbStep->value());m_customPlot->replot();});/* 显示表格 */connect(ui->chkGrid, &QCheckBox::toggled, this, [ = ](bool checked){m_customPlot->xAxis->grid()->setVisible(checked);m_customPlot->yAxis->grid()->setVisible(checked);m_customPlot->replot();});auto updateData = [ & ](){if(m_controller){int axis = ui->cmbAxisId->currentText().toInt();T_AxisStatus status;int ec = m_controller->readAxisStatus(axis, &status);if(0 == ec){ui->lblActVel->setText(QString::number(status.dEncVel));ui->lblPrfVel->setText(QString::number(status.dPrfVel));ui->lblActPos->setText(QString::number(status.dEncPos));ui->lblPrfPos->setText(QString::number(status.dPrfPos));if(m_actPos != status.dEncPos){m_actPos = status.dEncPos;addData(m_count, status.dEncVel, status.dPrfVel);m_count ++;}}else{ui->lblActVel->setText("error " + QString::number(ec));ui->lblPrfVel->setText("error " + QString::number(ec));ui->lblActPos->setText("error " + QString::number(ec));ui->lblPrfPos->setText("error " + QString::number(ec));}}};m_timer = new QTimer();connect(m_timer, &QTimer::timeout, updateData);m_timer->start(OSCILLOSCOPE_UPDATE_MSEC);connect(m_customPlot, SIGNAL(mouseMove(QMouseEvent *)), this,SLOT(plotMouseMoveEvent(QMouseEvent *)));for(int i = 0; i < 500; i++){double x = qDegreesToRadians((double)i);addData(i, sin(x), cos(x));}
}OscilloscopeFrame::~OscilloscopeFrame()
{m_timer->stop();delete m_timer;m_timer = nullptr;delete ui;
}void OscilloscopeFrame::setFixedLength(double length)
{/* 显示固定长度 */m_fixedLength = length;
}void OscilloscopeFrame::addData(double key, double actVel, double prfVel)
{m_customPlot->graph(0)->addData(key, actVel);m_customPlot->graph(1)->addData(key, prfVel);m_customPlot->xAxis->rescale();m_customPlot->graph(0)->rescaleValueAxis(false, true);m_customPlot->graph(1)->rescaleValueAxis(false, true);m_customPlot->xAxis->setRange(m_customPlot->xAxis->range().upper,m_fixedLength, Qt::AlignRight);m_customPlot->replot(QCustomPlot::rpQueuedReplot);  /* 实现重绘 */
}void OscilloscopeFrame::installController(AbstractRobot *controller)
{m_controller = controller;
}void OscilloscopeFrame::plotMouseMoveEvent(QMouseEvent *event)
{if ( Qt::ControlModifier == event->modifiers()){int x_pos = event->pos().x();int x_val = m_customPlot->xAxis->pixelToCoord(x_pos);float y = m_customPlot->graph(0)->data()->at(x_val)->value;QString strToolTip = QString("%1,%2").arg(x_val).arg(y);QToolTip::showText(cursor().pos(), strToolTip, m_customPlot);}
}
相关文章:
QT实现固高运动控制卡示波器
目录 一、固高示波器 二、基于QCustomPlot实现示波器 三、完整源码 一、固高示波器 固高运动控制卡自带的软件有一个示波器功能,可以实时显示速度的波形,可辅助分析电机的运行状态。但是我们基于sdk开发了自己的软件,无法再使用该功能&…...

洛谷P1157详解(两种解法,一看就会)
一、问题引出 组合的输出 题目描述 排列与组合是常用的数学方法,其中组合就是从 n n n 个元素中抽出 r r r 个元素(不分顺序且 r ≤ n r \le n r≤n),我们可以简单地将 n n n 个元素理解为自然数 1 , 2 , … , n 1,2,\dot…...

JavaScript异步编程和回调
目录 1、编程语言中的异步 2、JavaScript 3、回调 3.1在回调中处理错误 3.2回调的问题 3.2回调的替代方案 1、编程语言中的异步 默认情况下,JavaScript是同步的,并且是单线程…...

Qt开发笔记(Qt5.9.9下载安装环境搭建win10)
#1 Qt下载网站(国内、国外镜像) #2 Qt5.9.9安装选项 #3 配置系统环境变量 #4 创建测试项目 #1 Qt下载网站(国内、国外镜像) 官方下载地址(慢):http://download.qt.io/ 国内镜像网站 这里给大家…...
使用Plist编辑器——简单入门指南
本指南将介绍如何使用Plist编辑器。您将学习如何打开、编辑和保存plist文件,并了解plist文件的基本结构和用途。跟随这个简单的入门指南,您将掌握如何使用Plist编辑器轻松管理您的plist文件。 plist文件是一种常见的配置文件格式,用于存储应…...

Python常用的开发工具合集
Python是一种功能强大且易于学习的编程语言,被广泛应用于数据科学、机器学习、Web开发等领域。随着Python在各个领域的应用越来越广泛,越来越多的Python开发工具也涌现出来。但是,对于新手来说,选择一款合适的Python开发工具可…...

机器学习之线性回归
往期目录 python在线性规划中的应用 文章目录 一、线性回归算法概述1.1 什么是线性回归?1.2 线性回归算法原理1.3 线性回归的应用场景 二、线性回归算法Python实现2.1 导入必要的库2.2 随机生成数据集2.3 拟合模型2.4 预测结果2.5 结果可视化 三、完整代码 线性回归…...

中国系统正式发声!所有用户永久免费,网友:再见了,CentOS!
点关注公众号,回复“1024”获取2TB学习资源! 如果说:没有操作系统会怎么样? 对于个PC来说,无论是台式机、笔记本、平板等等,一切都变的一无是处,这些硬件对我们来说,和一堆废铁没什么…...

Oracle数据库坏块类故障
正常的数据块有其特有的固定格式,如果某数据块内部出现了混乱而导致Oracle无法读取,则可称其为坏块。数据库坏块的影响范围可大可小,严重时会导致数据库无法打开。当数据库出现坏块时,一般出现ORA-01578错误、ORA-10632错误或者OR…...

andorid之摄像头驱动流程--MTK平台
camera成像原理: 景物通过镜头生产光学图像投射到sensor表面上,然后转为模拟电信号,经过数模变成数字图像信号,在经过DSP加工出来,然后在通过IO接口传输到CPU处理。 由于摄像头满足总线、驱动、设备模型,…...

Android9.0 iptables用INetd实现屏蔽ip黑名单的实现
1.前言 在9.0的系统rom定制化开发中,在system中netd网络这块的产品需要中,会要求设置屏蔽ip地址之内的功能,liunx中iptables命令也是比较重要的,接下来就来在INetd这块实现屏蔽ip黑名单的的相关功能,就是在app中只能屏蔽某个网址,就是除了这个网址,其他的都能上网,最后…...

介绍一下json
目录 介绍一下json Elasticsearch7.6学习指南 介绍一下json JSON(JavaScript Object Notation)是一种轻量级的数据交换格式,它以易于阅读和编写的文本形式表示结构化数据。JSON最初是由Douglas Crockford在2001年提出的,它在we…...

DI依赖注入环境
1.构造器注入 上一章节已经说过了: <?xml version"1.0" encoding"UTF-8"?> <beans xmlns"http://www.springframework.org/schema/beans"xmlns:xsi"http://www.w3.org/2001/XMLSchema-instance"xsi:schemaLoca…...

《程序员面试金典(第6版)》面试题 16.18. 模式匹配(暴力破解 + 剪枝)
题目描述 你有两个字符串,即pattern和value。 pattern字符串由字母"a"和"b"组成,用于描述字符串中的模式。 例如,字符串"catcatgocatgo"匹配模式"aabab"(其中"cat"是"a&q…...
一天吃透SpringCloud面试八股文
1、什么是Spring Cloud ? Spring cloud 流应用程序启动器是基于 Spring Boot 的 Spring 集成应用程序,提供与外部系统的集成。Spring cloud Task,一个生命周期短暂的微服务框架,用于快速构建执行有限数据处理的应用程序。 Sprin…...

java生成图片缩略图
目录 前言一、使用Base64编码方式1、基本方法2、压缩本地图片保存到本地3、压缩网络图片到图片服务器 二、使用thumbnailator工具方式1、导入依赖2、压缩本地图片保存到本地 前言 下面介绍了两种获取图片缩略图的方式,全都不是一次性压缩,如果没有达到设…...
《统计学习方法》——隐马尔可夫模型(下)
学习算法 HMM的学习,在有观测序列的情况下,根据训练数据是否包含状态序列,可以分别由监督学习算法和无监督学习算法实现。 监督学习算法 监督学习算法就比较简单,基于已有的数据利用极大似然估计法来估计隐马尔可夫模型的参数。…...

Liunx top 命令详解
文章目录 top补充说明语法选项top交互命令实例 top 显示或管理执行中的程序 补充说明 top命令 可以实时动态地查看系统的整体运行情况,是一个综合了多方信息监测系统性能和运行信息的实用工具。通过top命令所提供的互动式界面,用热键可以管理。 语法…...

基于 SpringBoot 的医院固定资产系统
本文将介绍基于 SpringBoot 技术的医院固定资产系统的设计和实现。医院固定资产管理是医疗机构管理工作的重要组成部分,它对医院的正常运营和管理具有重要的意义。本系统的设计和实现将有助于医疗机构更好地管理和维护其固定资产。 1. 系统需求分析 医院固定资产管…...

【企业信息化】第2集 免费开源ERP: Odoo 16 销售管理系统
文章目录 前言一、概览二、使用功能1.通过清晰报价提高销售效率2.创建专业报价单3.管理订单及合同4.简化沟通5.维护产品&价格6.直观的报告7.集成 三、总结 前言 世界排名第一的免费开源ERP: Odoo 16 销售管理系统。通过Odoo Sign应用程序和在线支付,发送报价。…...

FoxMagiskModuleManager:重新定义Magisk模块管理体验
FoxMagiskModuleManager:重新定义Magisk模块管理体验 【免费下载链接】FoxMagiskModuleManager A module manager for Magisk because the official app dropped support for it 项目地址: https://gitcode.com/gh_mirrors/fo/FoxMagiskModuleManager FoxMag…...

左摆动杠杆的加工工艺规程及铣宽度8mm槽夹具设计
左摆动杠杆作为机械传动系统中的关键零件,其加工质量直接影响设备运行的稳定性。制定科学的加工工艺规程,需从材料特性、结构特征及加工精度三方面综合考量。通常选用高强度合金钢作为毛坯,经锻造消除内部缺陷后,通过粗车、精车完…...

YOLO12开源大模型部署一文详解:Conda环境+PyTorch 2.5+CUDA 12.4全适配
YOLO12开源大模型部署一文详解:Conda环境PyTorch 2.5CUDA 12.4全适配 1. 引言:为什么选择YOLO12? 如果你正在寻找一个既快速又准确的目标检测模型,YOLO12绝对值得你的关注。作为Ultralytics在2025年推出的最新版本,Y…...

ANIMATEDIFF PRO广告制作:智能模板批量生成技术
ANIMATEDIFF PRO广告制作:智能模板批量生成技术 电商大促期间,广告视频制作需求激增,传统制作方式难以应对海量内容需求。ANIMATEDIFF PRO通过智能模板技术,让广告视频制作效率提升10倍以上。 1. 智能广告制作的新突破 电商大促期…...

BN层在PyTorch中的实战:为什么Conv+BN+ReLU是黄金组合?
BN层在PyTorch中的实战:为什么ConvBNReLU是黄金组合? 当你在PyTorch中构建卷积神经网络时,是否经常看到这样的代码片段? self.conv nn.Conv2d(in_channels, out_channels, kernel_size) self.bn nn.BatchNorm2d(out_channels) s…...

第9章 函数-9.7 函数嵌套
Python支持函数嵌套,函数嵌套指的是在当前函数内再创建另外一个函数。函数在进行嵌套之后,需要注意4点,一是内层函数可以访问外层函数中的所有变量,但不能修改外层函数中该变量的值;二是外层函数可以访问内层函数中的全…...

7个实用技巧:用Cucumber Ruby构建高效测试框架的完整指南
7个实用技巧:用Cucumber Ruby构建高效测试框架的完整指南 【免费下载链接】cucumber-ruby Cucumber for Ruby. Its amazing! 项目地址: https://gitcode.com/gh_mirrors/cu/cucumber-ruby Cucumber Ruby是一个强大的行为驱动开发(BDD)…...

AUV增量PID轨迹跟踪与USV路径跟随的MATLAB仿真
AUV 增量PID轨迹跟踪 水下机器人无人船无人艇 USV路径跟随 MATLAB仿真AUV 圆轨迹跟踪增量 PID 控制系统——功能说明书(基于 MATLAB 仿真框架)一、系统定位本仿真包为“Infante”型 AUV 提供一套可即插即用的圆轨迹跟踪解决方案。核心算法采用“增量式…...

执行报错时如何利用分析数据库慢查询排查_SQL语法纠错技巧
%开头的LIKE无法走索引,导致全表扫描;应改用LIKE abc%、函数索引、全文索引或ES;列名错误多因大小写、反引号缺失或别名作用域问题;GROUP BY报错源于ONLY_FULL_GROUP_BY模式,需合规改写SQL。MySQL 慢查询日志里看到 SE…...

**雾计算中的边缘智能:基于Python的轻量级任务调度系统设计与实现**
雾计算中的边缘智能:基于Python的轻量级任务调度系统设计与实现 在物联网(IoT)飞速发展的今天,传统云计算模式已难以满足低延迟、高带宽和实时响应的需求。**雾计算(Fog Computing)**作为云与终端设备之间的…...