vue实现用户动态权限登录
一、使用vue+elementUI搭登录框架,主要就是1、2、3、4

配置:
①vue.config.js
'use strict'
const path = require('path')function resolve(dir) {return path.join(__dirname, dir)
}// All configuration item explanations can be find in https://cli.vuejs.org/config/
module.exports = {publicPath: '/',outputDir: 'dist',assetsDir: 'static',lintOnSave: false, // 是否校验语法productionSourceMap: false,devServer: {port: 8888,open: true,},configureWebpack: {resolve: {alias: {'@': resolve('src')}}}
}
②main.js
import Vue from "vue"
import App from "./App.vue"
import router from "./router"
import store from "./store"
import ElementUI from "element-ui"
import 'element-ui/lib/theme-chalk/index.css'
import "./router/router-config"  // 路由守卫,做动态路由的地方Vue.config.productionTip = false
Vue.use(ElementUI)new Vue({router,store,render: (h) => h(App),
}).$mount("#app")
二、代码部分
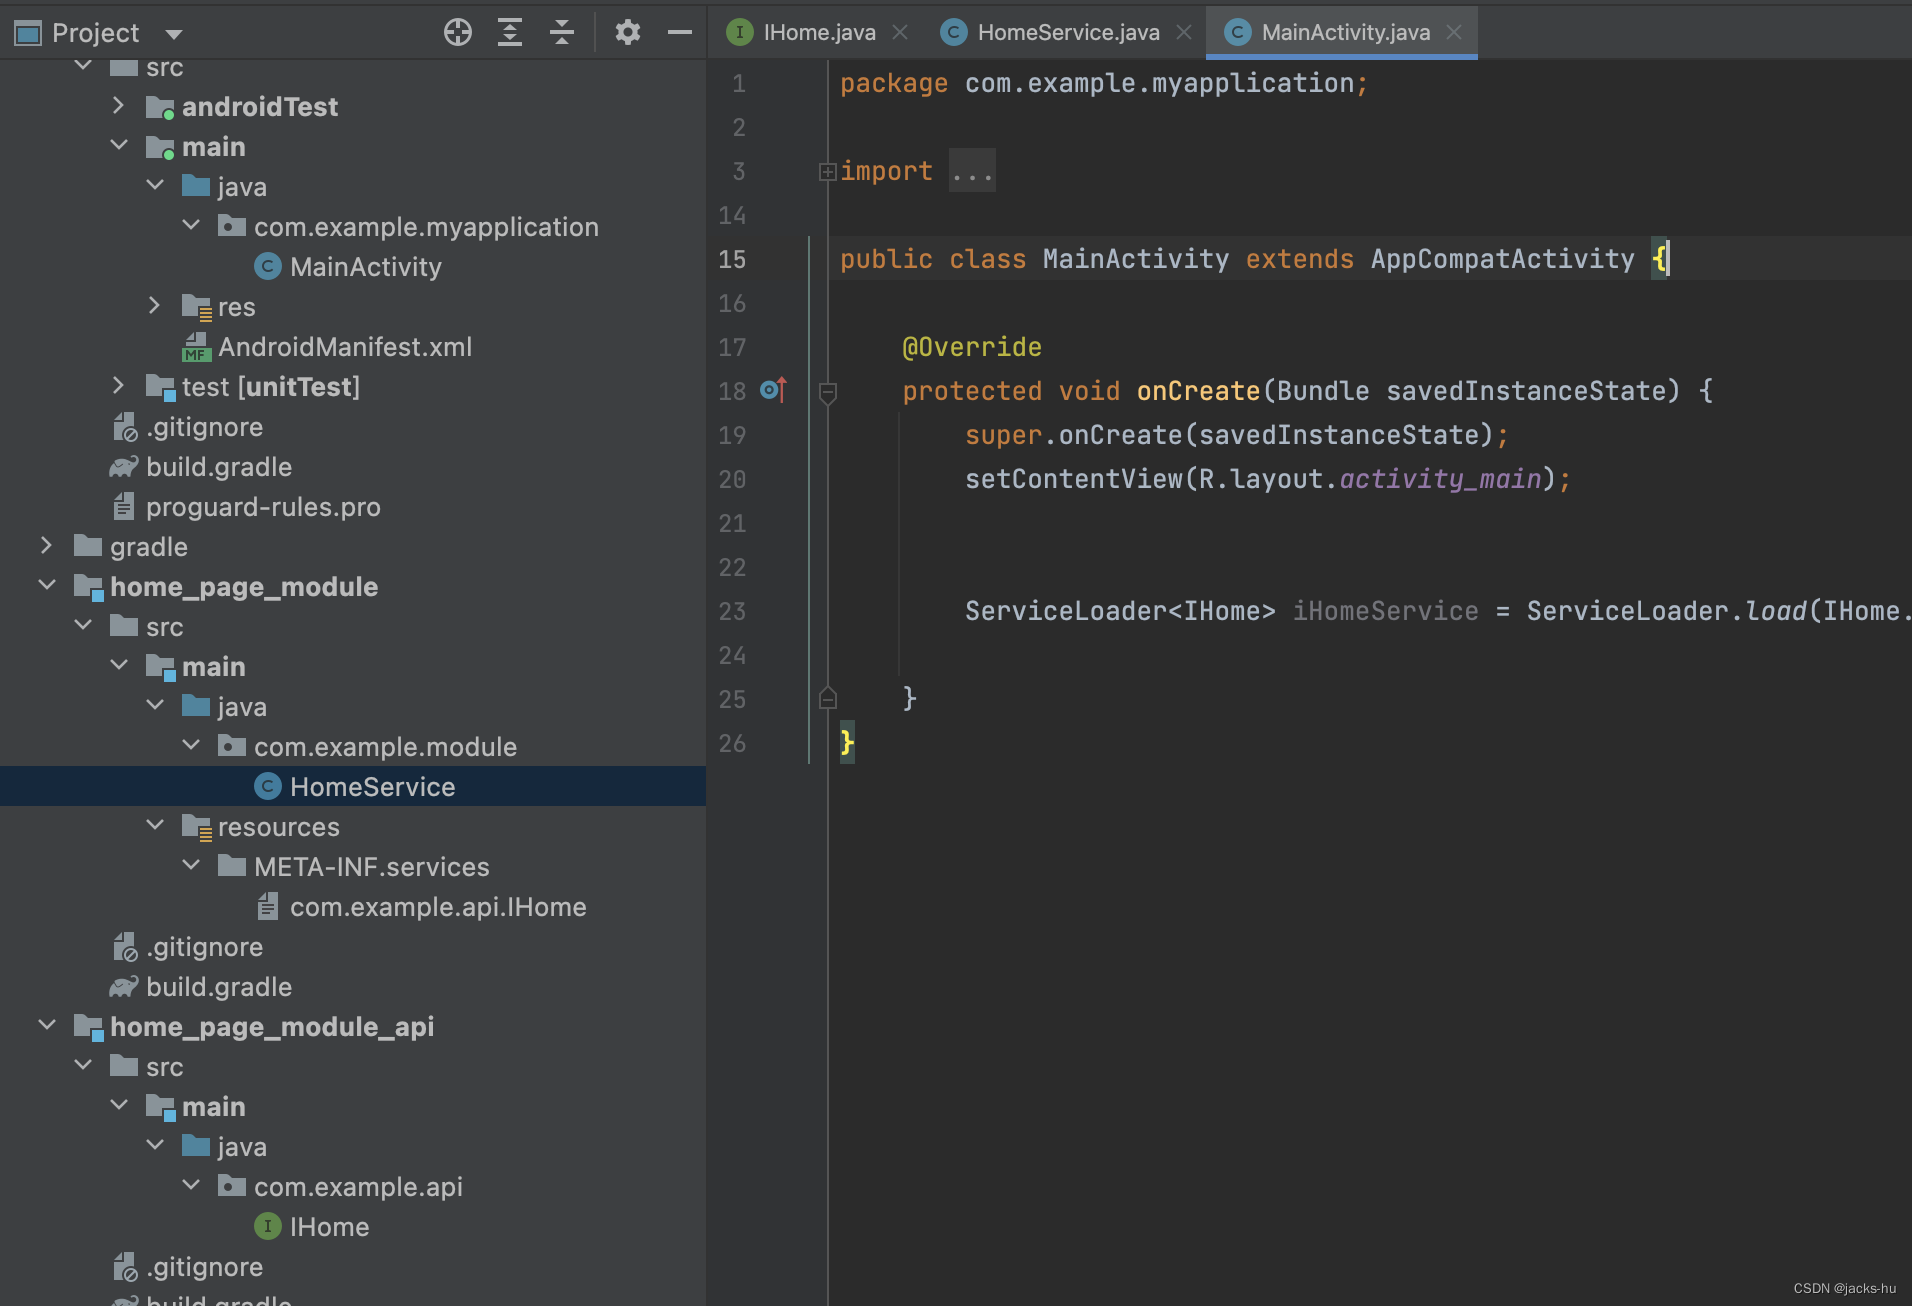
- layout目录:
- layout/index.vue
<template><el-container><el-header><header-temp></header-temp></el-header><el-container><el-aside width="200px"><sidebar class="sidebar-container"></sidebar></el-aside><el-main><app-main></app-main></el-main></el-container></el-container>
</template>
<script>
import AppMain  from './appMain'      // 页面布局的右侧区域
import sidebar  from './sideBar'      // 页面布局的左侧菜单
import headerTemp from "./headerTemp" // 页面布局的header菜单
export default {name: 'layout',components: { sidebar, AppMain, headerTemp }
}
</script>
<style>
.el-header{padding: 0!important;margin-left: 180px;}
</style>
①appMain/index.vue
<template><section class="app-main"><transition name="fade" mode="out-in"><router-view></router-view></transition></section>
</template><script>
export default { name: 'AppMain' }
</script>
②headerTemp/index.vue
<template><div class="header-temp-container"><div class="userInfo"><el-image :src="userInfo.avatar" class="eImage"></el-image><el-dropdown @command="handleLogout"><div class="detail user-link"><span>{{ userInfo.name }}</span><span>{{ userInfo.desc }}</span><i class="el-icon--right"></i></div><template #dropdown><el-dropdown-menu><el-dropdown-item command="logout">退出</el-dropdown-item></el-dropdown-menu></template></el-dropdown></div></div>
</template>
<script>
import { Message } from "element-ui"
export default {name: "header-temp-container",data() {return {userInfo: JSON.parse(window.localStorage.getItem("userInfo"))}},methods: {// 退出登录handleLogout(key) {if(key == "logout") {window.localStorage.removeItem("userInfo")Message({ type: 'success', message: "退出登录", showClose: true, duration: 3000 })this.$router.replace({ path: "/login" })location.reload()}}}
}
</script>
<style scoped>
.header-temp-container{border-bottom: 1px solid #ddd; width: 100%;height: 60px;}
.userInfo{display: flex;flex-direction: row;align-items: center;justify-content: flex-end;height: 100%;margin-right: 20px;}
.eImage{width: 40px;height: 40px;border-radius: 50%;margin-right: 10px;}
.detail{display: flex;flex-direction: column;align-items: flex-start;justify-content: space-around;}
</style>
③sideBar/index.vue
<template><el-menumode="vertical"unique-opened:default-active="$route.path"background-color="#304156"text-color="#fff"active-text-color="#409EFF"><sidebar-item :routes="routes"></sidebar-item></el-menu>
</template><script>
import sidebarItem from "./sidebarItem";export default {components: { sidebarItem },computed: {routes() {return this.$router.options.routes;},},
};
</script>
<style scoped>
.sidebar-container {transition: width 0.28s;width: 180px !important;height: 100%;position: fixed;top: 0;bottom: 0;left: 0;z-index: 1001;
}
.sidebar-container a {display: inline-block;width: 100%;
}
.sidebar-container .svg-icon {margin-right: 16px;
}
.sidebar-container .el-menu {border: none;width: 100%;
}
</style>
<style>
a{text-decoration: none;}
</style>
④sideBar/sidebarItem.vue
<template><div class="menu-wrapper"><template v-for="item in routes" v-if="!item.hidden && item.children"><router-linkv-if="item.children.length === 1 &&!item.children[0].children &&!item.alwaysShow":to="item.children[0].path":key="item.children[0].name"><el-menu-item:index="item.children[0].path":class="{ 'submenu-title-noDropdown': !isNest }"><span v-if="item.children[0].meta && item.children[0].meta.title">{{item.children[0].meta.title}}</span></el-menu-item></router-link><el-submenu v-else :index="item.name || item.path" :key="item.name"><template slot="title"><span v-if="item.meta && item.meta.title">{{ item.meta.title }}</span></template><template v-for="child in item.children" v-if="!child.hidden"><sidebar-item:is-nest="true"class="nest-menu"v-if="child.children && child.children.length > 0":routes="[child]":key="child.path"></sidebar-item><router-link v-else :to="child.path" :key="child.name"><el-menu-item :index="child.path"><span v-if="child.meta && child.meta.title">{{child.meta.title}}</span></el-menu-item></router-link></template></el-submenu></template></div>
</template>
<script>
export default {name: "sidebarItem",props: {routes: { type: Array },isNest: {type: Boolean,default: false,},},
};
</script>
<style scoped>
.nest-menu .el-submenu > .el-submenu__title,
.el-submenu .el-menu-item {min-width: 180px !important;background-color: #1f2d3d !important;
}
.nest-menu .el-submenu > .el-submenu__title,
.el-submenu .el-menu-item :hover {background-color: #001528 !important;
}
.el-menu--collapse .el-menu .el-submenu {min-width: 180px !important;
}
</style>
- 路由配置
①router/index.js
import Vue from "vue"
import VueRouter from "vue-router"
const originalPush = VueRouter.prototype.push
VueRouter.prototype.push = function push(location, onResolve, onReject) {
if (onResolve || onReject) return originalPush.call(this, location, onResolve, onReject)return originalPush.call(this, location).catch(err => err)
}
Vue.use(VueRouter)
const routes = [{ name: "login", path: "/login", meta: { title: "login" },component: () => import("../views/login/index"), hidden: true }
]
const router = new VueRouter({ routes })
export default router
②router/router-config.js
import router from "./index"
import Layout from "../layout/index"
import NProgress from 'nprogress' // progress barNProgress.configure({ showSpinner: false }) // NProgress Configurationconst filterRoutes = ["/login"]   // 需要过滤掉的路由
router.beforeEach((to, from, next) => {// start progress barNProgress.start()// 获取路由 meta 中的title,并设置给页面标题document.title = "动态路由(" + to.meta.title + ")"// 判断路由指向是否在需要过滤的路由地址数组里// 如果在,则直接跳进页面,无需判断if(filterRoutes.indexOf(to.path) !== -1) {next()return false}if(router.options.routes.length == 1) {// 获取token和原始路由数组const userInfo = JSON.parse(window.localStorage.getItem('userInfo')) ?? ""// 当token和原始路由都存在的时候if(userInfo.token && userInfo.routes) {onFilterRoutes(to, next, userInfo.routes)  // 执行路由过滤和跳转}else {next({ path: "/login", replace: true })}} else next()
})router.afterEach(() => {// finish progress barNProgress.done()
})// 路由拼接
function loadView(view) {return () => import(`@/views/${ view }`)
}// 路由过滤和跳转
async function onFilterRoutes(to, next, e) {const routes = await filterASyncRoutes(e)    // 路由过滤routes.sort((a, b) => a['id'] - b['id'])routes.forEach(item => {router.options.routes.push(item)router.addRoute(item)})next({ ...to, replace: true })
}// 路由过滤   遍历路由 转换为组件对象和路径
function filterASyncRoutes(data) {const routes = data.filter(item => {if(item["component"] === "Layout") item.component = Layoutelse item["component"] = loadView(item["component"])// 路由递归,转换组件对象和路径if(item["children"] && item["children"].length > 0) item["children"] = filterASyncRoutes(item.children)return true})return routes
}
- 登录(views/login/index.vue)
<template><div class="login-wrapper"><div class="modal"><el-form :model="user" status-icon :rules="rules" ref="userForm"><div class="title">动态路由</div><el-form-item prop="username"><el-input type="text" prefix-icon="el-icon-user" placeholder="请输入用户名" v-model="user.username" /></el-form-item><el-form-item prop="password"><el-input type="password" prefix-icon="el-icon-view" placeholder="请输入密码" v-model="user.password" /></el-form-item><el-form-item><el-button type="primary" class="btn-login" @click="login">登录</el-button></el-form-item><div class="toast"><span>管理员账号:admin </span><span>密码:654321</span></div><div class="toast"><span>普通人员账号:people</span><span>密码:123456</span></div></el-form></div></div>
</template>
<script>
import dynamicUser from "../../mock"
import { Message } from "element-ui"export default {name: 'login',data() {return {user: {username: "",password: ""},rules: {username: [{ required: true, message: '请输入用户名', trigger: 'blur' }],password: [{ required: true, message: '请输入密码', trigger: 'blur' }]}}},methods: {login() {this.$refs.userForm.validate(( valid ) => {if(valid) {let flag = !1window.localStorage.removeItem("userInfo")dynamicUser.forEach(item => {if(item["username"] == this.user['username'] && item["password"] == this.user['password']) {flag = !0Message({ type: 'success', message: "登录成功", showClose: true, duration: 3000 })window.localStorage.setItem("userInfo", JSON.stringify(item))this.$router.replace({ path: "/" })}})if(!flag) Message({ type: 'warning', message: "账号密码错误,请重试!", showClose: true, duration: 3000 })} else return false})}}
}
</script>
<style scoped>
.login-wrapper {display: flex;flex-direction: row;align-items: center;justify-content: center;background-color: #fff;width: 100vw;height: 100vh;
}
.modal {width: 360px;height: 380px;box-shadow: 0 0 10px 5px #ddd;padding: 50px;border-radius: 5px;
}
.title {width: 100%;text-align: center;line-height: 1.5;font-size: 50px;margin-bottom: 30px;
}
.btn-login {width: 100%;
}
.toast{width: 100%;display: flex;flex-direction: row;align-items: center;justify-content: space-between;height: 50px;
}
</style>
- 动态返回路由
使用mock.js造了一条路由,后端返回格式类似于下列这种样式:
const dynamicUser = [{name: "管理员",avatar: "https://sf3-ttcdn-tos.pstatp.com/img/user-avatar/ccb565eca95535ab2caac9f6129b8b7a~300x300.image",desc: "管理员 - admin",username: "admin",password: "654321",token: "rtVrM4PhiFK8PNopqWuSjsc1n02oKc3f",routes: [{ id: 1, name: "/", path: "/", component: "Layout", redirect: "/index", hidden: false, children: [{ name: "index", path: "/index", meta: { title: "index" }, component: "index/index" },]},{ id: 2, name: "/form", path: "/form", component: "Layout", redirect: "/form/index", hidden: false, children: [{ name: "/form/index", path: "/form/index", meta: { title: "form" }, component: "form/index" }]},{ id: 3, name: "/example", path: "/example", component: "Layout", redirect: "/example/tree", meta: { title: "example" }, hidden: false, children: [{ name: "/tree", path: "/example/tree", meta: { title: "tree" }, component: "tree/index" },{ name: "/copy", path: "/example/copy", meta: { title: "copy" }, component: "tree/copy" }] },{ id: 4, name: "/table", path: "/table", component: "Layout", redirect: "/table/index", hidden: false, children: [{ name: "/table/index", path: "/table/index", meta: { title: "table" }, component: "table/index" }] },{ id: 5, name: "/admin", path: "/admin", component: "Layout", redirect: "/admin/index", hidden: false, children: [{ name: "/admin/index", path: "/admin/index", meta: { title: "admin" }, component: "admin/index" }] },{ id: 6, name: "/people", path: "/people", component: "Layout", redirect: "/people/index", hidden: false, children: [{ name: "/people/index", path: "/people/index", meta: { title: "people" }, component: "people/index" }] }]},{name: "普通用户",avatar: "https://img0.baidu.com/it/u=2097980764,1024880469&fm=253&fmt=auto&app=138&f=JPEG?w=300&h=300",desc: "普通用户 - people",username: "people",password: "123456",token: "4es8eyDwznXrCX3b3439EmTFnIkrBYWh",routes: [{ id: 1, name: "/", path: "/", component: "Layout", redirect: "/index", hidden: false, children: [{ name: "index", path: "/index", meta: { title: "index" }, component: "index/index" },]},{ id: 2, name: "/form", path: "/form", component: "Layout", redirect: "/form/index", hidden: false, children: [{ name: "/form/index", path: "/form/index", meta: { title: "form" }, component: "form/index" }]},{ id: 6, name: "/people", path: "/people", component: "Layout", redirect: "/people/index", hidden: false, children: [{ name: "/people/index", path: "/people/index", meta: { title: "people" }, component: "people/index" }] }]}
]export default dynamicUser
相关文章:
vue实现用户动态权限登录
一、使用vueelementUI搭登录框架,主要就是1、2、3、4 配置: ①vue.config.js use strict const path require(path)function resolve(dir) {return path.join(__dirname, dir) }// All configuration item explanations can be find in https://cli.v…...

ONNX模型修改为自定义节点
参考一 首先,需要将ONNX模型中的节点修改为自定义节点。要实现这一点,您需要了解自定义节点的定义和如何在ONNX中使用它们。ONNX定义了一个自定义运算符的接口,您可以使用该接口定义自己的运算符,并将其编译为ONNX模型可以识别的…...

内存对齐原则
struct (1)结构体第一个数据成员放在offset为0的地方,后面每个成员相对于结构体首地址的偏移量(offset)都是成员大小(该变量类型所占字节)的整数倍,如有需要编译器会在成员之间加上填…...
Java SPI 一 之SPI(Service Provider Interface)进阶 AutoService
一、SPI(Service Provider Interface) 1.1 介绍 SPI(Service Provider Interface),是JDK内置的一种 服务提供发现机制(为某个接口寻找服务实现的机制),可以用来启用框架扩展和替换组件,其…...

C++ list类成员函数介绍
目录 🤔list模板介绍: 🤔特点: 🤔list内存结构图解: 🤔 list的成员函数: 😊list构造函数: 🔍代码示例: 🔍运行结果&…...

【服务器】本地搭建PHP简单Imagewheel私人云图床
文章目录 1.前言2. Imagewheel网站搭建2.1. Imagewheel下载和安装2.2. Imagewheel网页测试2.3.cpolar的安装和注册 3.本地网页发布3.1.Cpolar临时数据隧道3.2.Cpolar稳定隧道(云端设置)3.3.Cpolar稳定隧道(本地设置) 4.公网访问测…...

第四十二回:DateRangePickerDialog Widget
文章目录 概念介绍使用方法示例代码 我们在上一章回中介绍了DatePickerDialog Widget相关的内容,本章回中将介绍 DateRangePickerDialog Widget.闲话休提,让我们一起Talk Flutter吧。 概念介绍 我们在这里说的DateRangePickerDialog是一种弹出窗口,只不…...
【C++系列P3】‘类与对象‘-三部曲——[基础知识](1/3)
前言 大家好吖,欢迎来到 YY 滴 C系列 ,热烈欢迎! 【 类与对象-三部曲】的大纲主要内容如下: 如标题所示,本章是【 类与对象-三部曲】三章中的第一章节——基础知识章节,主要内容如下: 目录 一.…...

Android UEvent事件分析之Kernel上报电量
kernel-4.4\drivers\power\power_supply_core.c 当电量信息需要更新的时候,kernel会调用power_supply_changed_work这个工作队列,使用kobject_uevent函数往上发送uevent事件,action是KOBJ_CHANGE; static void power_supply_changed_work(struct work_struct *work) {uns…...

C++ vector模板和deque的简单应用
目录 🤔vector模板和deque的简单介绍: 🤔vector和deque的主要不同之处: 🤔今天我们用vector模板和deque模板实现以下简单的功能: 代码实现: 🤔讲解: 🤔vector模板和d…...

声明式事务控制
声明式事务控制 编程式事务控制相关对象 PlatformTransactionManager PlatformTransactionManager接口是spring的事务管理器,它里面提供了常用的操作事务的方法 方法说明TransactionStatus getTransaction(TransactionDefaultion defination)获取事务的状态信息…...
cisp pte模拟题
1.信息搜集 本题共三个key 端口 1433 27689 存活ip 192.168.85.137 2.访问网站27689进行信息搜集 一个登录框,sql注入失败,暴力破解失败 扫描目录 发现三个文件robots.txt ,web.config 除了robots.txt,其他都访问不了 访问robots.txt,发现一个file参数…...

Docker容器 和 Kubernetes容器集群管理系统
一、快速了解Docker 1. 什么是Docker的定义 Docker 是一个开源的应用容器引擎,基于Go语言并遵从 Apache2.0 协议开源。Docker 可以让开发者打包他们的应用以及依赖包到一个轻量级、可移植的容器中,然后发布到任何流行的 Linux 机器上,也可以…...

港联证券|资金疯狂涌入AI,这一板块涨幅超90%!万亿巨头继续狂飙
国内外资金继续加码AI概念股。 当前,国内政策层面对于通用人工智能和算力中心的创新发展扶持政策不断推出,资本市场对于AI(人工智能)热情不断升温。在AI下游应用中,游戏板块成为最被看好的投资标的,资金流入…...
短视频矩阵系统源码-开源开发php语言搭建
短视频矩阵系统源码---------- php源码是什么? PHP源码指的就是PHP源代码,源代码是用特定编程语言编写的人类可读文本,源代码的目标是为可以转换为机器语言的计算机设置准确的规则和规范。因此,源代码是程序和网站的基础。 PHP…...

PFEA112-20 3BSE050091R20 张力控制器
您的张力测量系统包括: 张力电子PFEA111或PFEA112–PFEA111是一款经济高效的紧凑型用户友好型张力电子产品,提供 来自两个称重传感器的精确可靠的快速模拟SUM信号,用于控制 和/或监测。显示器可以显示SUM、单个A&B和差异信号小尺寸和DIN导…...

Java springboot+vue生成报纸排版页面的新闻官网
实现方案,可以作为您开始开发的参考: 后端: 使用Spring Boot框架构建Java Web应用;使用MyBatis Plus进行ORM映射,管理MySQL数据库;按照需求定义新闻数据表、类别数据表和用户数据表,使用默认的…...

Terra-Luna归零一年后:信任重建、加密未来路在何方?
本月既是Terra-Luna归零的一周年,也是FTX崩溃的第六个月,而这两个事件分别代表着2022年加密市场连环爆的开始与高潮,引发了加密行业15年历史上最可怕的生存危机。 尽管今年市场行情有所回暖,比特币开年至今涨幅70%,以太…...

Android 12.0 手动安装Persistent app失败的解决方案
1.概述 在12.0的系统产品开发中,对于一些安装app的失败问题,需要看日志 和抛出异常来判断问题所在,在最近的一些app安装失败抛出了关于Presistent app安装失败的问题,就需要从PMS安装的过程中看异常抛出的原因解决问题所在 2.手动安装Persistent app失败的解决方案的核心类…...

Unity3D安装:从命令行安装 Unity
推荐:将 NSDT场景编辑器 加入你的3D工具链 3D工具集: NSDT简石数字孪生 从命令行安装 Unity 如果要在组织中自动部署 Unity,可以从命令行安装 Editor 和其他组件。这些组件是普通的安装程序可执行程序和软件包,可以给用来自动部署…...
到底在‘看’什么?)
从社交关系到分子结构:图解GCN(图卷积网络)到底在‘看’什么?
从社交关系到分子结构:图解GCN(图卷积网络)到底在‘看’什么?想象一下,你刚搬到一个新社区,想快速了解周围的邻居。最直接的方式是什么?不是挨家挨户敲门,而是通过社区活动认识几位关…...

WPF虚拟桌宠组件:可嵌入、高性能、工程化UI生命体
1. 这不是“桌面宠物”,而是一个可嵌入的WPF UI组件化生命体你可能在Windows XP时代见过那只晃着尾巴、偶尔打哈欠的3D小猫,也可能在Win10系统托盘里点开过一个会眨眼的像素狐狸——但那些是独立进程、是系统级小工具、是“看一眼就关掉”的轻量娱乐。而…...
)
毕业设计 yolov11骨折检测医疗辅助系统(源码+论文)
文章目录 0 前言1 项目运行效果2 课题背景2.1 研究背景2.2 国内外研究现状2.3 研究意义 3 设计框架(骨折检测系统设计框架说明)3.1. 系统架构图3.2. 技术选型3.2.1 核心组件3.2.2 辅助工具 3.3. 核心模块设计3.3.1 YOLO模型训练模块训练流程图关键伪代码…...

基于MAX78000的医疗紧急呼叫系统:边缘AI与低功耗设计实战
1. 项目概述与核心价值大家好,我是Victor Hugo,一名电子工程师。今天我想和大家分享一个我最近完成并参与设计竞赛的项目:一个基于MAX78000 FTHR开发板的医疗紧急呼叫辅助系统。这个项目的核心,不是从零开始造一个新轮子ÿ…...

yuzu模拟器完整指南:在电脑上畅玩Switch游戏的终极解决方案
yuzu模拟器完整指南:在电脑上畅玩Switch游戏的终极解决方案 【免费下载链接】yuzu 任天堂 Switch 模拟器 项目地址: https://gitcode.com/GitHub_Trending/yu/yuzu 想在电脑上体验任天堂Switch游戏的魅力吗?yuzu模拟器正是你寻找的完美答案。作为…...

超低功耗电池电压监控电路设计:从LM324到LPV324的硬件方案优化
1. 项目概述与核心需求解析在捣鼓各种电池供电的电子设备时,无论是自己做的无线传感器节点、便携式小工具,还是给孩子改装的玩具,有一个问题总是绕不开:你怎么知道电池快没电了?总不能每次都等到设备彻底罢工ÿ…...

3步零基础掌握星露谷物语SMAPI模组加载器:高效管理你的模组世界
3步零基础掌握星露谷物语SMAPI模组加载器:高效管理你的模组世界 【免费下载链接】SMAPI The modding API for Stardew Valley. 项目地址: https://gitcode.com/gh_mirrors/smap/SMAPI SMAPI(Stardew Valley Modding API)是星露谷物语官…...

基于BLE模块的低功耗无线遥控器设计与实现
1. 项目概述:基于BLE模块的无线遥控器设计与实现几年前,我在捣鼓智能家居时,一直想找一个低功耗、响应快、又能自己完全掌控的无线遥控方案。市面上的成品要么协议封闭,要么功耗感人,要么延迟高得让人着急。后来&#…...

3步免费解锁Cursor Pro:告别设备限制,永久享受AI编程助手高级功能
3步免费解锁Cursor Pro:告别设备限制,永久享受AI编程助手高级功能 【免费下载链接】cursor-free-vip [Support 0.45](Multi Language 多语言)自动注册 Cursor Ai ,自动重置机器ID , 免费升级使用Pro 功能: …...

基于Matter与Thread协议实现本地化智能电表数据采集与家居集成
1. 项目概述:将传统电表接入智能家居的“最后一公里”家里那个不起眼的电表,每个月只在抄表员来或者收到账单时才会被想起。但你知道吗?在法国,以及许多其他采用类似标准的地区,这个默默无闻的“铁盒子”其实一直在实时…...