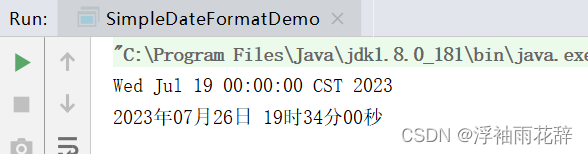
TRT4-trt-integrate - 3 使用onnxruntime进行onnx的模型推理过程
前言:
- onnx是microsoft开发的一个中间格式,而onnxruntime简称ort是microsoft为onnx开发的推理引擎。
- 允许使用onnx作为输入进行直接推理得到结果。
py接口的推理过程:
main函数:
if __name__ == "__main__":session = onnxruntime.InferenceSession("workspace/yolov5s.onnx", providers=["CPUExecutionProvider"])#建立一个InferenceSession,塞进去的是onnx的路径实际运算image = cv2.imread("workspace/car.jpg")image_input, M, IM = preprocess(image)pred = session.run(["output"], {"images": image_input})[0]boxes = post_process(pred, IM)for obj in boxes:left, top, right, bottom = map(int, obj[:4])confidence = obj[4]label = int(obj[6])cv2.rectangle(image, (left, top), (right, bottom), (0, 255, 0), 2)cv2.putText(image, f"{label}: {confidence:.2f}", (left, top+20), 0, 1, (0, 0, 255), 2, 16)cv2.imwrite("workspace/python-ort.jpg", image)session = onnxruntime.InferenceSession("workspace/yolov5s.onnx", providers=["CPUExecutionProvider"])建立一个InferenceSession,塞进去的是onnx的路径,实际运算的后端选用的是CPU
也可以选用cuda等等
image = cv2.imread("workspace/car.jpg")image_input, M, IM = preprocess(image)之后就是预处理
pred = session.run(["output"], {"images": image_input})[0]boxes = post_process(pred, IM)session.run就是运行的inference过程
输入第一个是output的name,决定了哪几个节点作为输出,就将这个名字传递给他
第二个是input的dict,这个意思就是如果有好多个输入,那应该是将名字与输入进行一一对应,比如"input1 ":input1 , "input2":input2....
那么在这里output就是一个输出的list,然后我们取第0项
就是这个样子。


预处理:
def preprocess(image, input_w=640, input_h=640):scale = min(input_h / image.shape[0], input_w / image.shape[1])ox = (-scale * image.shape[1] + input_w + scale - 1) * 0.5oy = (-scale * image.shape[0] + input_h + scale - 1) * 0.5M = np.array([[scale, 0, ox],[0, scale, oy]], dtype=np.float32)IM = cv2.invertAffineTransform(M)image_prep = cv2.warpAffine(image, M, (input_w, input_h), flags=cv2.INTER_LINEAR, borderMode=cv2.BORDER_CONSTANT, borderValue=(114, 114, 114))image_prep = (image_prep[..., ::-1] / 255.0).astype(np.float32)image_prep = image_prep.transpose(2, 0, 1)[None]return image_prep, M, IM
后处理:
def nms(boxes, threshold=0.5):keep = []remove_flags = [False] * len(boxes)for i in range(len(boxes)):if remove_flags[i]:continueib = boxes[i]keep.append(ib)for j in range(len(boxes)):if remove_flags[j]:continuejb = boxes[j]# class mismatch or image_id mismatchif ib[6] != jb[6] or ib[5] != jb[5]:continuecleft, ctop = max(ib[:2], jb[:2])#例子:#将 ib 的前两个元素 [2, 3] 与 jb 的前两个元素 [4, 1] 进行比较,并取其中较大的值。所以结果是 [4, 3]。cright, cbottom = min(ib[2:4], jb[2:4])cross = max(0, cright - cleft) * max(0, cbottom - ctop)union = max(0, ib[2] - ib[0]) * max(0, ib[3] - ib[1]) + max(0, jb[2] - jb[0]) * max(0, jb[3] - jb[1]) - crossiou = cross / unionif iou >= threshold:remove_flags[j] = Truereturn keepdef post_process(pred, IM, threshold=0.25):# b, n, 85boxes = []for image_id, box_id in zip(*np.where(pred[..., 4] >= threshold)):item = pred[image_id, box_id]cx, cy, w, h, objness = item[:5]label = item[5:].argmax()confidence = item[5 + label] * objnessif confidence < threshold:continueboxes.append([cx - w * 0.5, cy - h * 0.5, cx + w * 0.5, cy + h * 0.5, confidence, image_id, label])boxes = np.array(boxes)lr = boxes[:, [0, 2]]tb = boxes[:, [1, 3]]boxes[:, [0, 2]] = lr * IM[0, 0] + IM[0, 2]boxes[:, [1, 3]] = tb * IM[1, 1] + IM[1, 2]# left, top, right, bottom, confidence, image_id, labelboxes = sorted(boxes.tolist(), key=lambda x:x[4], reverse=True)return nms(boxes)我们可以发现,真正的onnxruntime只有两行,一个onnxruntime.InferenceSession,一个run就结束了。其余的都是和之前一样的,这是非常好用便捷的,所以如果有模型需要作测试,是非常推荐用onnxruntime的
CPP接口推理过程:
Inference:
在main函数中只有一个inference
int main(){inference();return 0;
}
所以我们直接来到inference的解读中
 auto engine_data = load_file("yolov5s.onnx");
//读onnx文件Ort::Env env(ORT_LOGGING_LEVEL_INFO, "onnx");
//设置打印的日志级别    Ort::SessionOptions session_options;
//定义sessionoptions 类似于python中的    session =     onnxruntime.InferenceSession("workspace/yolov5s.onnx", providers=["CPUExecutionProvider"])auto mem = Ort::MemoryInfo::CreateCpu(OrtArenaAllocator, OrtMemTypeDefault);
//设置MemoryInfosession_options.SetIntraOpNumThreads(1);session_options.SetGraphOptimizationLevel(GraphOptimizationLevel::ORT_ENABLE_EXTENDED);
//启动一些扩展
Ort::Session session(env, "yolov5s.onnx", session_options);//创建session,将选项传进去auto output_dims = session.GetOutputTypeInfo(0).GetTensorTypeAndShapeInfo().GetShape();//获取output的shapeconst char *input_names[] = {"images"}, *output_names[] = {"output"};int input_batch = 1;int input_channel = 3;int input_height = 640;int input_width = 640;int64_t input_shape[] = {input_batch, input_channel, input_height, input_width};int input_numel = input_batch * input_channel * input_height * input_width;float* input_data_host = new float[input_numel];auto input_tensor = Ort::Value::CreateTensor(mem, input_data_host, input_numel, input_shape, 4);//创建一个Tensor,引用input_data_host中的数据
预处理:
///// letter boxauto image = cv::imread("car.jpg");float scale_x = input_width / (float)image.cols;float scale_y = input_height / (float)image.rows;float scale = std::min(scale_x, scale_y);float i2d[6], d2i[6];i2d[0] = scale; i2d[1] = 0; i2d[2] = (-scale * image.cols + input_width + scale - 1) * 0.5;i2d[3] = 0; i2d[4] = scale; i2d[5] = (-scale * image.rows + input_height + scale - 1) * 0.5;cv::Mat m2x3_i2d(2, 3, CV_32F, i2d);cv::Mat m2x3_d2i(2, 3, CV_32F, d2i);cv::invertAffineTransform(m2x3_i2d, m2x3_d2i);cv::Mat input_image(input_height, input_width, CV_8UC3);cv::warpAffine(image, input_image, m2x3_i2d, input_image.size(), cv::INTER_LINEAR, cv::BORDER_CONSTANT, cv::Scalar::all(114));cv::imwrite("input-image.jpg", input_image);int image_area = input_image.cols * input_image.rows;unsigned char* pimage = input_image.data;float* phost_b = input_data_host + image_area * 0;float* phost_g = input_data_host + image_area * 1;float* phost_r = input_data_host + image_area * 2;for(int i = 0; i < image_area; ++i, pimage += 3){// 注意这里的顺序rgb调换了*phost_r++ = pimage[0] / 255.0f;*phost_g++ = pimage[1] / 255.0f;*phost_b++ = pimage[2] / 255.0f;}///
制作输出矩阵并运行:
    // 3x3输入,对应3x3输出int output_numbox = output_dims[1];int output_numprob = output_dims[2];int num_classes = output_numprob - 5;int output_numel = input_batch * output_numbox * output_numprob;float* output_data_host = new float[output_numel];int64_t output_shape[] = {input_batch, output_numbox, output_numprob};auto output_tensor = Ort::Value::CreateTensor(mem, output_data_host, output_numel, output_shape, 3);Ort::RunOptions options;session.Run(options, (const char* const*)input_names, &input_tensor, 1, (const char* const*)output_names, &output_tensor, 1);
//指定输入输出的name,tensor和个数,传入tensor进行推理
后处理:
 // decode boxvector<vector<float>> bboxes;float confidence_threshold = 0.25;float nms_threshold = 0.5;for(int i = 0; i < output_numbox; ++i){float* ptr = output_data_host + i * output_numprob;float objness = ptr[4];if(objness < confidence_threshold)continue;float* pclass = ptr + 5;int label     = std::max_element(pclass, pclass + num_classes) - pclass;float prob    = pclass[label];float confidence = prob * objness;if(confidence < confidence_threshold)continue;float cx     = ptr[0];float cy     = ptr[1];float width  = ptr[2];float height = ptr[3];float left   = cx - width * 0.5;float top    = cy - height * 0.5;float right  = cx + width * 0.5;float bottom = cy + height * 0.5;float image_base_left   = d2i[0] * left   + d2i[2];float image_base_right  = d2i[0] * right  + d2i[2];float image_base_top    = d2i[0] * top    + d2i[5];float image_base_bottom = d2i[0] * bottom + d2i[5];bboxes.push_back({image_base_left, image_base_top, image_base_right, image_base_bottom, (float)label, confidence});}printf("decoded bboxes.size = %d\n", bboxes.size());// nmsstd::sort(bboxes.begin(), bboxes.end(), [](vector<float>& a, vector<float>& b){return a[5] > b[5];});std::vector<bool> remove_flags(bboxes.size());std::vector<vector<float>> box_result;box_result.reserve(bboxes.size());auto iou = [](const vector<float>& a, const vector<float>& b){float cross_left   = std::max(a[0], b[0]);float cross_top    = std::max(a[1], b[1]);float cross_right  = std::min(a[2], b[2]);float cross_bottom = std::min(a[3], b[3]);float cross_area = std::max(0.0f, cross_right - cross_left) * std::max(0.0f, cross_bottom - cross_top);float union_area = std::max(0.0f, a[2] - a[0]) * std::max(0.0f, a[3] - a[1]) + std::max(0.0f, b[2] - b[0]) * std::max(0.0f, b[3] - b[1]) - cross_area;if(cross_area == 0 || union_area == 0) return 0.0f;return cross_area / union_area;};for(int i = 0; i < bboxes.size(); ++i){if(remove_flags[i]) continue;auto& ibox = bboxes[i];box_result.emplace_back(ibox);for(int j = i + 1; j < bboxes.size(); ++j){if(remove_flags[j]) continue;auto& jbox = bboxes[j];if(ibox[4] == jbox[4]){// class matchedif(iou(ibox, jbox) >= nms_threshold)remove_flags[j] = true;}}}printf("box_result.size = %d\n", box_result.size());for(int i = 0; i < box_result.size(); ++i){auto& ibox = box_result[i];float left = ibox[0];float top = ibox[1];float right = ibox[2];float bottom = ibox[3];int class_label = ibox[4];float confidence = ibox[5];cv::Scalar color;tie(color[0], color[1], color[2]) = random_color(class_label);cv::rectangle(image, cv::Point(left, top), cv::Point(right, bottom), color, 3);auto name      = cocolabels[class_label];auto caption   = cv::format("%s %.2f", name, confidence);int text_width = cv::getTextSize(caption, 0, 1, 2, nullptr).width + 10;cv::rectangle(image, cv::Point(left-3, top-33), cv::Point(left + text_width, top), color, -1);cv::putText(image, caption, cv::Point(left, top-5), 0, 1, cv::Scalar::all(0), 2, 16);}cv::imwrite("image-draw.jpg", image);delete[] input_data_host;delete[] output_data_host;
}
小结:
可以看到,这个与我们之前yolov5后处理没什么太大的区别,关键只在于对于output_tensor和output作关联,input_tensor和input作关联。
相关文章:

TRT4-trt-integrate - 3 使用onnxruntime进行onnx的模型推理过程
前言: onnx是microsoft开发的一个中间格式,而onnxruntime简称ort是microsoft为onnx开发的推理引擎。允许使用onnx作为输入进行直接推理得到结果。 py接口的推理过程: main函数: if __name__ "__main__":session onn…...
)
layui+drogon完成文件上传(简例)
layui界面加入按钮、文本框、进度条: <div class"layui-row"><button type"button" class"layui-btn" id"file_upload_control">文件上传</button><input type"file" id"files_input…...

高精度地图服务引擎项目
技术栈:使用vue3TypeScriptElement PlusPiniaaxios 项目描述:高精度地图服务引擎项目,提供轻量化处理3D瓦片切片分布式处理分发服务的一站式解决方案 工作内容:1、项目60%已上的页面开发 2、部分模块的功能实现, 3、封…...
PyTorch使用Transformer进行机器翻译
文章目录 简介数据集环境要求实验代码实验结果参考来源 简介 本文使用PyTorch自带的transformer层进行机器翻译:从德语翻译为英语。从零开始实现Transformer请参阅PyTorch从零开始实现Transformer,以便于获得对Transfomer更深的理解。 数据集 Multi30…...

LoadRunner使用教程
1. LoadRunner简介 LoadRunner是一款广泛使用的性能测试工具 可以对各种应用程序进行性能测试,包括Web应用程序、移动应用程序、企业级应用程序等。它提供了一个综合的性能测试解决方案,包括测试计划设计、脚本录制、测试执行、结果分析和报告生成等功…...
Zia和ChatGPT如何协同工作?
有没有集成ChatGPT的CRM系统推荐?Zoho CRM已经正式与ChatGPT集成。下面我们将从使用场景、使用价值和使用范围等方面切入讲述CRMAI的应用和作用。 Zia和ChatGPT如何协同工作? Zia和ChatGPT是不同的人工智能模型,在CRM中呈现出共生的关系。 …...

【位操作】——获取整数变量最低位为 1 的位置
获取整数变量最低位为 1 的位置 #define BIT_LOW_BIT(y) (((y)&BIT(0)) ? 0 : (((y)&BIT(1)) ? 1 : (((y)&BIT(2)) ? 2 : (((y)&BIT(3)) ? 3 : \(((y)&BIT(4)) ? 4 : (((y)&BIT(5)) ? 5 : (((y)&BIT(6)) ? 6 : (((y)&…...

gtest测试用例注册及自动化调度机制源代码流程分析
gtest的入门参见: 玩转Google开源C单元测试框架Google Test系列(gtest) gtest源码分析流程参见: gtest流程解析 测试用例注册流程分析要点:TEST_F宏替换、C静态成员的动态初始化。 自动化调度流程分析要点:UnitTest、UnitTestIm…...

IOS自动化测试环境搭建教程
目录 一、前言 二、环境依赖 1、环境依赖项 2、环境需求与支持 三、环境配置 1、xcode安装 2、Git安装 3、Homebrew安装(用brew来安装依赖) 4、npm和nodejs安装 5、libimobiledevice安装 6、idevicesinstaller安装 7、ios-deploy安装 8、Ca…...
常用API学习08(Java)
格式化 格式化指的是将数据按照指定的规则转化为指定的形式 。 那么为什么需要格式化?格式化有什么用? 以数字类为例,假设有一个比分牌,在无人得分的时候我们希望以:“00:00”的形式存在,那么…...
:什么是装饰器(decorators)?如何在 TypeScript 中使用它们?)
面试题-TS(八):什么是装饰器(decorators)?如何在 TypeScript 中使用它们?
面试题-TS(八):什么是装饰器(decorators)?如何在 TypeScript 中使用它们? 在TypeScript中,装饰器(Decorators)是一种用于增强代码功能的特殊类型声明。装饰器提供了一种在类、方法、…...
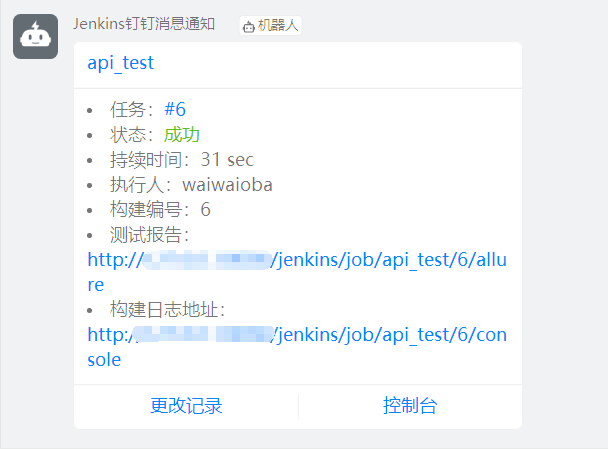
Jenkins 还可以支持钉钉消息通知?一个插件带你搞定!
Jenkins 作为最流行的开源持续集成平台,其强大的拓展功能一直备受测试人员及开发人员的青睐。大家都知道我们可以在 Jenkins 中安装 Email 插件支持构建之后通过邮件将结果及时通知到相关人员。 但其实 Jenkins 还可以支持钉钉消息通知,其主要通过 Ding…...

7.ES使用
ES多条件查询 and , or这种的 ES模糊查询 like这种的 {"wildcard": {"title.keyword": {"value": "*宣讲*"}}}说明: title是要匹配的关键字段名称keyword是属性,表示匹配的是关键字信息,如果不用.ke…...

Web安全基础
1、HTML基础 什么是 HTML HTML 是用来描述网页的一种语言。 HTML 指的是超文本标记语言 (Hyper Text Markup Language) HTML 不是一种编程语言,而是一种标记语言 (Markup language) 标记语言是一套标记标签 (Markup tag) HTML 使用标记标签来描述网页 总的来说&…...

jQueryAPI
文章目录 1.jQuery 选择器1.1 jQuery 基础选择器1.2 jQuery 层级选择器1.3 隐式迭代1.4 jQuery 筛选选择器1.5 jQuery 筛选方法1.6 jQuery 里面的排他思想1.7 链式编程 2.jQuery 样式操作2.1 操作 css 方法2.2 设置类样式方法2.3 类操作与className区别 3.jQuery 效果3.1 显示隐…...
如何将路径字符串数组(string[])转成树结构(treeNode[])?
原文链接:如何将路径字符串数组(string[])转成树结构(treeNode[])? 需求 这里的UI使用的是Element-Plus。 将一个路径字符串数组(当然也可能是其他目标字符串数组),渲染成树。 /*source:/a/b/c/d/e/a/b/e/f/g/a/b/h/a…...
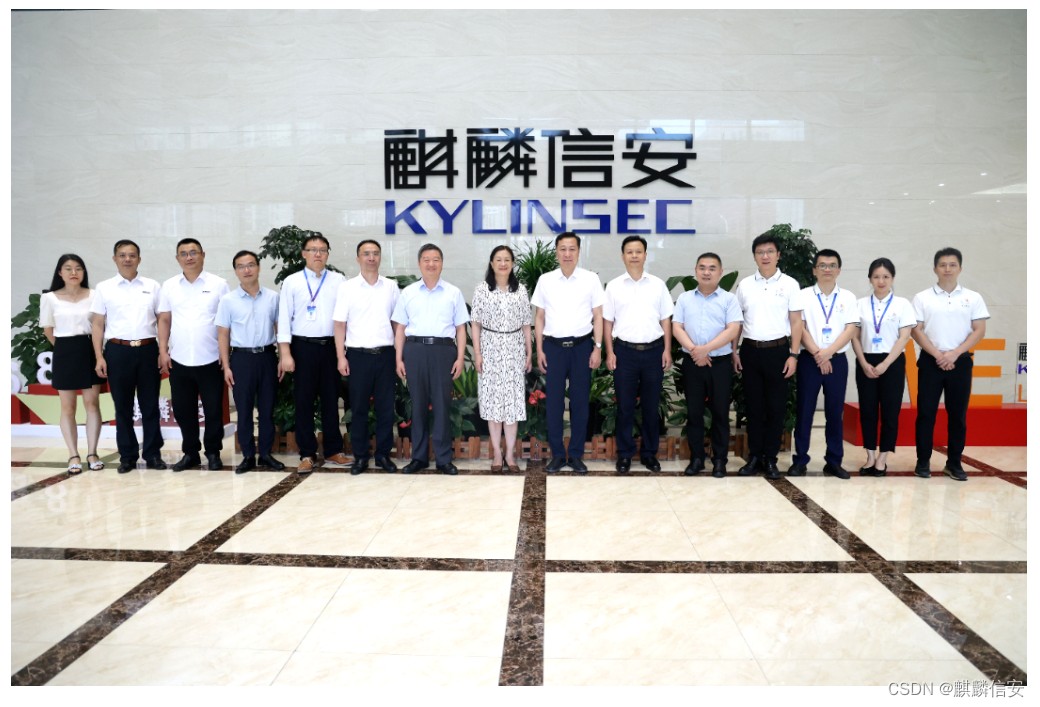
中国工程院院士陈晓红一行莅临麒麟信安调研
7月20日下午,中国工程院院士、湘江实验室主任、湖南工商大学党委书记陈晓红,湘江实验室副主任、湖南工商大学副校长刘国权,湘江实验室副主任、湖南工商大学党委组织部统战部常务副部长胡春华等领导一行莅临麒麟信安调研。麒麟信安董事长杨涛&…...

解决Linux环境下启动idea服务,由于权限问题无法正常启动问题
问题: 在Linux环境下启动idea服务,一直提示: invalid registry store file /app/appuser/.dmf/dubbo,cause:failed to create directory /app/appuser! 原因:文件夹中没有操作权限。 解决: (1࿰…...
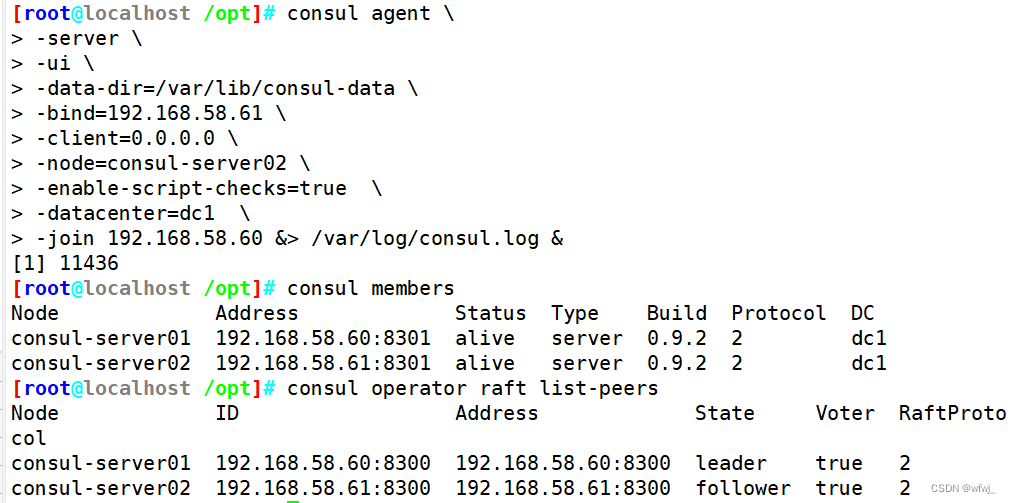
Linux6.16 Docker consul的容器服务更新与发现
文章目录 计算机系统5G云计算第四章 LINUX Docker consul的容器服务更新与发现一、consul 概述1.什么是服务注册与发现2.什么是consul 二、consul 部署1.consul服务器2.registrator服务器3.consul-template4.consul 多节点 计算机系统 5G云计算 第四章 LINUX Docker consul的…...
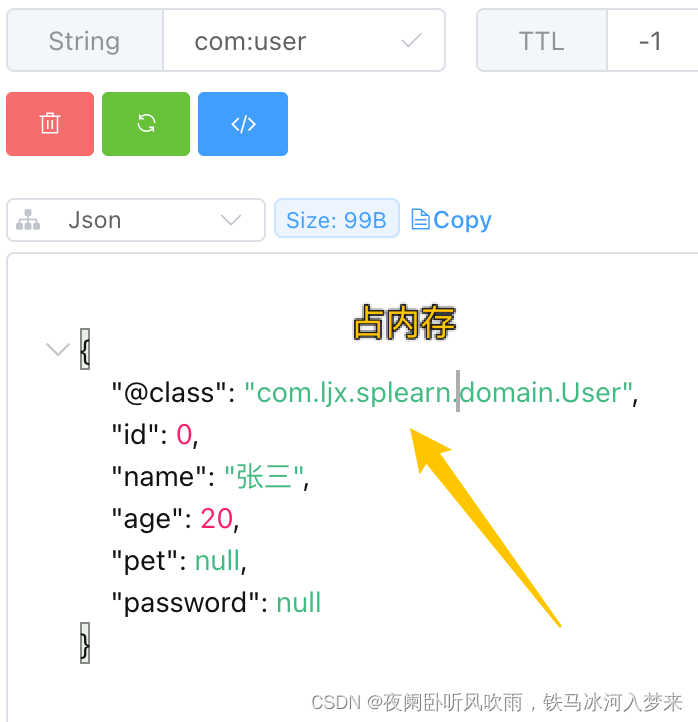
Redis学习2--使用java操作Redis
1、java操作Redis库的比较 Redis有各种语言的客户端可以来操作redis数据库,其中java语言主要有Jedis与lettuce ,Spring Data Redis封装了上边两个客户端,优缺点如下: 2、使用Jedis操作Redis Jedis使用的基本步骤: 引…...

DeepSeek代码质量评估实战手册:7步完成从混沌到可度量的质变跃迁
更多请点击: https://kaifayun.com 第一章:DeepSeek代码质量评估的底层逻辑与核心价值 DeepSeek代码质量评估并非简单地统计行数或检测语法错误,而是基于多维语义理解构建的推理系统。其底层逻辑融合了静态分析、符号执行与大语言模型生成式…...

HFSS仿真结果怎么看?以T型波导为例,读懂S参数与电场动态图
HFSS仿真结果深度解析:从S参数到电场动态图的实战指南当你第一次在HFSS中完成T型波导仿真后,面对满屏的曲线和彩色云图,是否感到既兴奋又困惑?那些起伏的S参数曲线究竟告诉你什么信息?电场图中跳跃的颜色又代表怎样的物…...

SSH工具对比:新手用户和熟练运维,选型逻辑有什么不同
结论 新手用户和熟练运维在选择 SSH 工具时,关注点往往完全不同。 新手更在意的是:能不能顺利连接、界面是否直观、文件和配置是否容易找到、网站出问题时能不能快速定位。 而熟练运维更在意的是:连接效率、命令自由度、多服务器管理能力、原…...

对比 Token Plan 与按量计费在 Taotoken 平台上的成本体感差异
🚀 告别海外账号与网络限制!稳定直连全球优质大模型,限时半价接入中。 👉 点击领取海量免费额度 对比 Token Plan 与按量计费在 Taotoken 平台上的成本体感差异 对于个人开发者或项目管理者而言,在接入大模型服务时&a…...

AI圈神秘领袖Ilya一幅画引爆全网,OpenAI三件大事暗示AGI时代将至?
AI圈神秘精神领袖Ilya在Instagram上传一幅画引发疯狂解读,与此同时,OpenAI连续公布数学成果、升级Codex、筹备IPO,释放AGI到来的强烈信号。Ilya画作引猜测Ilya上传的画中,罗丹的「思考者」踩在芯片Die Shot上,右下角签…...

为什么鸿蒙 App 最终都会走向状态驱动?
子玥酱 (掘金 / 知乎 / CSDN / 简书 同名) 大家好,我是 子玥酱,一名长期深耕在一线的前端程序媛 👩💻。曾就职于多家知名互联网大厂,目前在某国企负责前端软件研发相关工作,主要聚…...
)
Unity事件系统实战:用事件驱动重构你的金币拾取逻辑(告别硬编码)
Unity事件系统实战:用事件驱动重构你的金币拾取逻辑(告别硬编码)在游戏开发中,我们经常会遇到这样的场景:玩家拾取金币后,需要更新UI、播放音效、解锁成就、保存数据……如果把这些逻辑全部写在金币拾取的代…...

基于PIC32的嵌入式MIDI合成器:从波表合成到硬件实现
1. 项目概述:一个基于嵌入式微控制器的MIDI声音合成器如果你对电子音乐制作、嵌入式开发,或者DIY硬件合成器感兴趣,那么“REMI Synth”这个项目绝对值得你花时间深入了解。它本质上是一个数字单音MIDI控制的声音合成器,核心是一块…...

百度深度学习研究院的“叛将“,带着一颗芯片改变了中国智能驾驶——地平线余凯,从ImageNet冠军到征程出货1000万
大家好,我是写代码的篮球球痴。这篇文章跟我自己有点关系——我开的是理想汽车。理想的智驾系统 AD Pro,搭载的就是地平线征程 5 芯片。2026 年 1 月理想 AD Pro 4.0 推送,基于单颗征程 6M 实现了城市 NOA——这是行业里第一个用单颗 128TOPS…...

掌握Umi-OCR:5分钟上手开源免费离线文字识别工具
掌握Umi-OCR:5分钟上手开源免费离线文字识别工具 【免费下载链接】Umi-OCR OCR software, free and offline. 开源、免费的离线OCR软件。支持截屏/批量导入图片,PDF文档识别,排除水印/页眉页脚,扫描/生成二维码。内置多国语言库。…...