13、ffmpeg使用nvidia显卡对OAK深度相机进行解码和编码
基本思想:简单使用nvidia的硬件解码进行oak相机的编码和解码学习
一、在本机rtx3060配置好显卡驱动和cuda之后进行下面操作50、ubuntu18.04&20.04+CUDA11.1+cudnn11.3+TensorRT7.2/8.6+Deepsteam5.1+vulkan环境搭建和YOLO5部署_ubuntu18.04安装vulkan_sxj731533730的博客-CSDN博客
二、配置环境和编译库
ubuntu@ubuntu:~$ sudo apt-get install libtool automake autoconf nasm yasm
ubuntu@ubuntu:~$ sudo apt-get install libx264-dev
ubuntu@ubuntu:~$ sudo apt-get install libx265-dev
ubuntu@ubuntu:~$ sudo apt-get install libmp3lame-dev
ubuntu@ubuntu:~$ sudo apt-get install libvpx-dev
ubuntu@ubuntu:~$ sudo apt-get install libfaac-devubuntu@ubuntu:~$ git clone https://git.videolan.org/git/ffmpeg/nv-codec-headers.git
ubuntu@ubuntu:~$ cd nv-codec-headers
ubuntu@ubuntu:~$ make
ubuntu@ubuntu:~$ sudo make installubuntu@ubuntu:~$ git clone https://github.com/FFmpeg/FFmpeg
ubuntu@ubuntu:~$ cd FFmpeg/
ubuntu@ubuntu:~$ mkdir build
ubuntu@ubuntu:~$ cd build/ubuntu@ubuntu:~/FFmpeg$./configure  --prefix=/usr/local --enable-gpl --enable-nonfree --enable-libfreetype --enable-libmp3lame --enable-libvpx --enable-libx264 --enable-libx265 --enable-gpl --enable-version3 --enable-nonfree --enable-shared --enable-ffmpeg --enable-ffplay --enable-ffprobe --enable-libx264 --enable-nvenc --enable-cuda --enable-cuvid --enable-libnpp --extra-cflags=-I/usr/local/cuda/include --extra-ldflags=-L/usr/local/cuda/lib64
ubuntu@ubuntu:~/FFmpeg$ sudo ldconfig
ubuntu@ubuntu:~$
三、使用oak相机进行h264解码测试
cmakelists.txt
cmake_minimum_required(VERSION 3.16)
project(depthai)
set(CMAKE_CXX_STANDARD 11)
find_package(OpenCV REQUIRED)
#message(STATUS ${OpenCV_INCLUDE_DIRS})
#添加头文件
include_directories(${OpenCV_INCLUDE_DIRS})
include_directories(${CMAKE_SOURCE_DIR}/utility)
#链接Opencv库
find_package(depthai CONFIG REQUIRED)
add_executable(depthai main.cpp utility/utility.cpp)
target_link_libraries(depthai ${OpenCV_LIBS}  depthai::opencv -lavformat -lavcodec -lswscale -lavutil -lz)
main.cpp
#include <stdio.h>
#include <string>
#include <iostream>
#include <opencv2/core/core.hpp>
#include <opencv2/highgui/highgui.hpp>
#include <opencv2/imgproc/imgproc.hpp>extern "C"
{
#include <libavformat/avformat.h>
#include <libavcodec/avcodec.h>
#include <libavutil/imgutils.h>
#include <libswscale/swscale.h>
}#include "utility.hpp"#include "depthai/depthai.hpp"using namespace std::chrono;int main(int argc, char **argv) {dai::Pipeline pipeline;//定义auto cam = pipeline.create<dai::node::ColorCamera>();cam->setBoardSocket(dai::CameraBoardSocket::RGB);cam->setResolution(dai::ColorCameraProperties::SensorResolution::THE_1080_P);cam->setVideoSize(1920, 1080);auto Encoder = pipeline.create<dai::node::VideoEncoder>();Encoder->setDefaultProfilePreset(cam->getVideoSize(), cam->getFps(),dai::VideoEncoderProperties::Profile::H264_MAIN);cam->video.link(Encoder->input);cam->setFps(60);//定义输出auto xlinkoutpreviewOut = pipeline.create<dai::node::XLinkOut>();xlinkoutpreviewOut->setStreamName("out");Encoder->bitstream.link(xlinkoutpreviewOut->input);//结构推送相机dai::Device device(pipeline);//取帧显示auto outqueue = device.getOutputQueue("out", cam->getFps(), false);//maxsize 代表缓冲数据// auto videoFile = std::ofstream("video.h265", std::ios::binary);int width = 1920;int height = 1080;//const AVCodec *pCodec = avcodec_find_decoder(AV_CODEC_ID_H264);const AVCodec *pCodec = avcodec_find_decoder_by_name("h264_cuvid");AVCodecContext *pCodecCtx = avcodec_alloc_context3(pCodec);AVDictionary* decoderOptions = nullptr;av_dict_set(&decoderOptions, "threads", "auto", 0);av_dict_set(&decoderOptions, "gpu", "cuda", 0);int ret = avcodec_open2(pCodecCtx, pCodec, &decoderOptions);if (ret < 0) {//打开解码器printf("Could not open codec.\n");return -1;}if (pCodecCtx != nullptr) {// 打印解码器支持的格式printf("Supported Formats:\n");const AVPixelFormat *pixFmt = pCodec->pix_fmts;while (*pixFmt != AV_PIX_FMT_NONE) {printf("- %s\n", av_get_pix_fmt_name(*pixFmt));pixFmt++;}}AVFrame *picture = av_frame_alloc();picture->width = width;picture->height = height;picture->format = AV_PIX_FMT_NV12;ret = av_frame_get_buffer(picture, 1);if (ret < 0) {printf("av_frame_get_buffer error\n");return -1;}AVFrame *pFrame = av_frame_alloc();pFrame->width = width;pFrame->height = height;pFrame->format = AV_PIX_FMT_NV12;ret = av_frame_get_buffer(pFrame, 1);if (ret < 0) {printf("av_frame_get_buffer error\n");return -1;}AVFrame *pFrameRGB = av_frame_alloc();pFrameRGB->width = width;pFrameRGB->height = height;pFrameRGB->format = AV_PIX_FMT_RGB24;ret = av_frame_get_buffer(pFrameRGB, 1);if (ret < 0) {printf("av_frame_get_buffer error\n");return -1;}int picture_size = av_image_get_buffer_size(AV_PIX_FMT_NV12, width, height,1);//计算这个格式的图片,需要多少字节来存储uint8_t *out_buff = (uint8_t *) av_malloc(picture_size * sizeof(uint8_t));av_image_fill_arrays(picture->data, picture->linesize, out_buff, AV_PIX_FMT_NV12, width,height, 1);//这个函数 是缓存转换格式,可以不用 以为上面已经设置了AV_PIX_FMT_YUV420PSwsContext *img_convert_ctx = sws_getContext(width, height, AV_PIX_FMT_NV12,width, height, AV_PIX_FMT_RGB24, 4,NULL, NULL, NULL);AVPacket *packet = av_packet_alloc();auto startTime = steady_clock::now();int counter = 0;float fps = 0;while (true) {auto h265Packet = outqueue->get<dai::ImgFrame>();//videoFile.write((char *) (h265Packet->getData().data()), h265Packet->getData().size());packet->data = (uint8_t *) h265Packet->getData().data(); //这里填入一个指向完整H264数据帧的指针packet->size = h265Packet->getData().size(); //这个填入H265 数据帧的大小packet->stream_index = 0;ret = avcodec_send_packet(pCodecCtx, packet);if (ret < 0) {printf("avcodec_send_packet \n");continue;}av_packet_unref(packet);int got_picture = avcodec_receive_frame(pCodecCtx, pFrame);av_frame_is_writable(pFrame);if (got_picture < 0) {printf("avcodec_receive_frame \n");continue;}sws_scale(img_convert_ctx, pFrame->data, pFrame->linesize, 0,height,pFrameRGB->data, pFrameRGB->linesize);cv::Mat mRGB(cv::Size(width, height), CV_8UC3);mRGB.data = (unsigned char *) pFrameRGB->data[0];cv::Mat mBGR;cv::cvtColor(mRGB, mBGR, cv::COLOR_RGB2BGR);counter++;auto currentTime = steady_clock::now();auto elapsed = duration_cast<duration<float>>(currentTime - startTime);if (elapsed > seconds(1)) {fps = counter / elapsed.count();counter = 0;startTime = currentTime;}std::stringstream fpsStr;fpsStr << "NN fps: " << std::fixed << std::setprecision(2) << fps;printf("fps %f\n",fps);cv::putText(mBGR, fpsStr.str(), cv::Point(32, 24), cv::FONT_HERSHEY_TRIPLEX, 0.4,cv::Scalar(0, 255, 0));cv::imshow("demo", mBGR);cv::waitKey(1);}return 0;
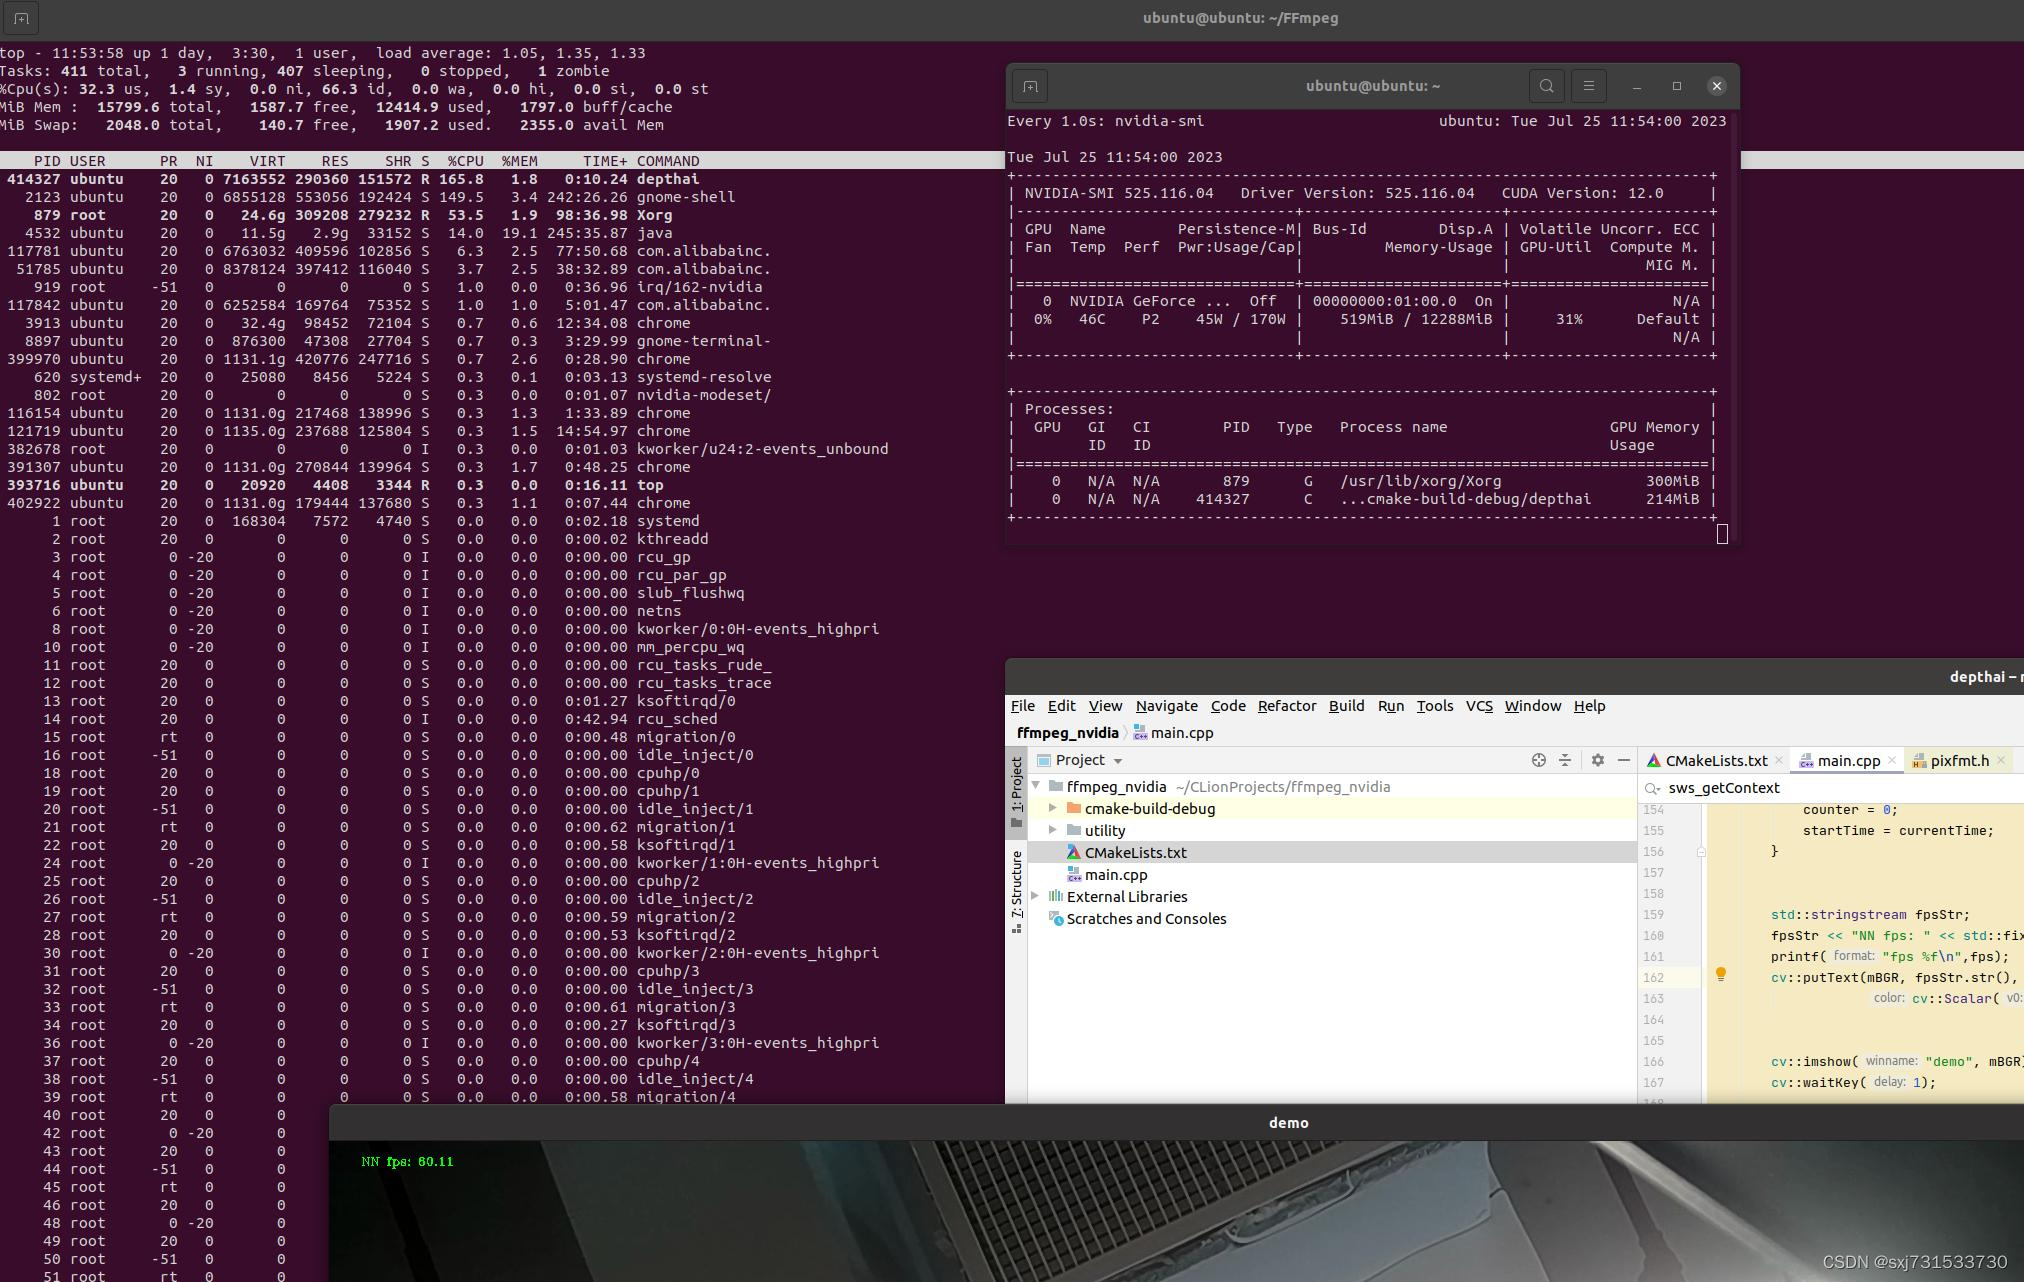
}测试结果
四、使用oak进行解码测试
cmakelists.txt
cmake_minimum_required(VERSION 3.16)
project(depthai)
set(CMAKE_CXX_STANDARD 11)
find_package(OpenCV REQUIRED)
#message(STATUS ${OpenCV_INCLUDE_DIRS})
#添加头文件
include_directories(${OpenCV_INCLUDE_DIRS})
include_directories(${CMAKE_SOURCE_DIR}/utility)
#链接Opencv库
find_package(depthai CONFIG REQUIRED)
add_executable(depthai main.cpp utility/utility.cpp)
target_link_libraries(depthai ${OpenCV_LIBS}  depthai::opencv -lavformat -lavcodec -lswscale -lavutil -lz)
main.cpp
#include <iostream>
#include <stdio.h>
#include <string>
#include <iostream>
#include <opencv2/core/core.hpp>
#include <opencv2/highgui/highgui.hpp>
#include <opencv2/imgproc/imgproc.hpp>extern "C"
{
#include <libavformat/avformat.h>
#include <libavcodec/avcodec.h>
#include <libavutil/imgutils.h>
#include <libswscale/swscale.h>
}#include "fstream"#include "utility.hpp"#include "depthai/depthai.hpp"using namespace std;int main() {int WIDTH = 1920;int HEIGHT = 1080;AVPacket pack;int vpts = 0;uint8_t *in_data[AV_NUM_DATA_POINTERS] = {0};SwsContext *sws_context =NULL;// AVCodecContext *codec_context = nullptr;int in_size[AV_NUM_DATA_POINTERS] = {0};std::ofstream videoFile;// 2.初始化格式转换上下文int fps = 25;sws_context = sws_getCachedContext(sws_context,WIDTH, HEIGHT, AV_PIX_FMT_BGR24,    // 源格式WIDTH, HEIGHT, AV_PIX_FMT_YUV420P,  // 目标格式SWS_BICUBIC,    // 尺寸变化使用算法0, 0, 0);if (NULL == sws_context) {cout << "sws_getCachedContext error" << endl;return -1;}// 3.初始化输出的数据结构AVFrame *yuv = av_frame_alloc();yuv->format = AV_PIX_FMT_YUV420P;yuv->width = WIDTH;yuv->height = HEIGHT;yuv->pts = 0;// 分配yuv空间int ret_code = av_frame_get_buffer(yuv, 32);if (0 != ret_code) {cout << "  yuv init fail" << endl;return -1;}// 4.初始化编码上下文// 4.1找到编码器// const AVCodec *codec = avcodec_find_encoder(AV_CODEC_ID_H264);const AVCodec *codec = avcodec_find_encoder_by_name("h264_nvenc");//nvenc nvenc_h264 h264_nvenc// const AVCodec * codec = avcodec_find_encoder_by_name("nvenc");if (NULL == codec) {cout << "Can't find h264 encoder." << endl;return -1;}// 4.2创建编码器上下文AVCodecContext *codec_context = avcodec_alloc_context3(codec);if (NULL == codec_context) {cout << "avcodec_alloc_context3 failed." << endl;return -1;}// 4.3配置编码器参数// vc->flags           |= AV_CODEC_FLAG_GLOBAL_HEADER;codec_context->codec_id = codec->id;codec_context->thread_count = 16;// 压缩后每秒视频的bit流 5Mcodec_context->bit_rate = 5 * 1024 * 1024;codec_context->width = WIDTH;codec_context->height = HEIGHT;codec_context->time_base = {1, fps};codec_context->framerate = {fps, 1};// 画面组的大小,多少帧一个关键帧codec_context->gop_size = 50;codec_context->max_b_frames = 0;codec_context->pix_fmt = AV_PIX_FMT_YUV420P;codec_context->qmin = 10;codec_context->qmax = 51;AVDictionary *codec_options = nullptr;//(baseline | high | high10 | high422 | high444 | main)
//    av_dict_set(&codec_options, "profile", "baseline", 0);
//    av_dict_set(&codec_options, "preset", "superfast", 0);
//    av_dict_set(&codec_options, "tune", "zerolatency", 0);AVDictionary* decoderOptions = nullptr;av_dict_set(&decoderOptions, "threads", "auto", 0);av_dict_set(&decoderOptions, "gpu", "cuda", 0);//
//    if (codec->id == AV_CODEC_ID_H264) {
//        av_dict_set(&codec_options, "preset", "medium", 0);
//        av_dict_set(&codec_options, "tune", "zerolatency", 0);
//        av_dict_set(&codec_options, "rc", "cbr", 0);
//    }// 4.4打开编码器上下文ret_code = avcodec_open2(codec_context, codec, &codec_options);if (0 != ret_code) {return -1;}videoFile = std::ofstream("video.h264", std::ios::binary);dai::Pipeline pipeline;//定义左相机auto mono = pipeline.create<dai::node::ColorCamera>();mono->setBoardSocket(dai::CameraBoardSocket::RGB);//定义输出auto xlinkOut = pipeline.create<dai::node::XLinkOut>();xlinkOut->setStreamName("rgb");//相机和输出链接mono->video.link(xlinkOut->input);;//结构推送相机dai::Device device(pipeline);//取帧显示auto queue = device.getOutputQueue("rgb", 1);//maxsize 代表缓冲数据while (1) {auto image = queue->get<dai::ImgFrame>();auto frame = image->getCvFrame();memset(&pack, 0, sizeof(pack));in_data[0] = frame.data;// 一行(宽)数据的字节数in_size[0] = frame.cols * frame.elemSize();int h = sws_scale(sws_context, in_data, in_size, 0, frame.rows,yuv->data, yuv->linesize);if (h <= 0) { return -1; }// h264编码yuv->pts = vpts;vpts++;int ret_code = avcodec_send_frame(codec_context, yuv);if (0 != ret_code) { return -1; }ret_code = avcodec_receive_packet(codec_context, &pack);if (0 != ret_code || pack.buf != nullptr) {//cout << "avcodec_receive_packet." << endl;} else {cout << "avcodec_receive_packet contiune." << endl;return -1;}//写入文件videoFile.write((char *) (pack.data), pack.size);}return 0;
}
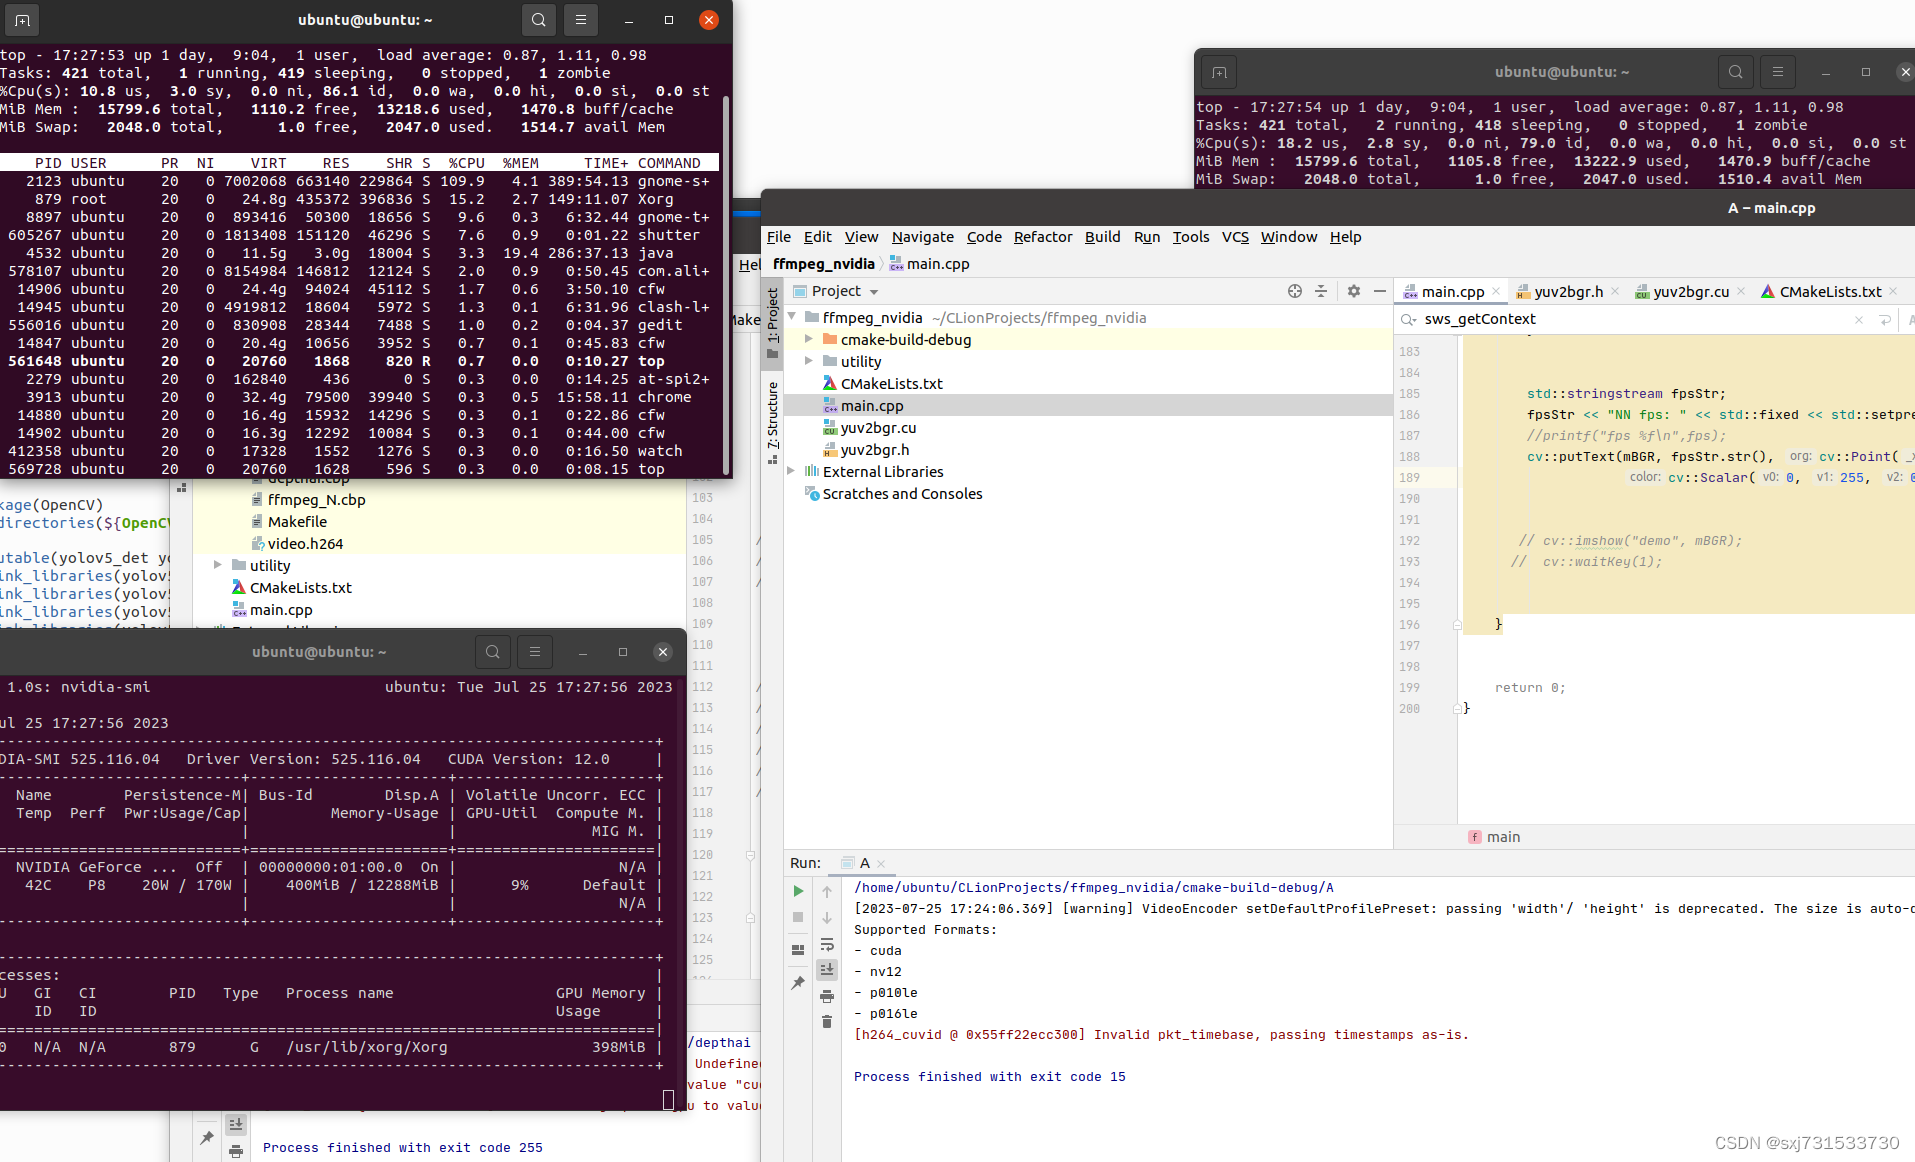
使用ffplay 播放h264文件,感觉有问题,cpu占比还是比较高,待研究手册
五、使用nvidia进行转码 ,需要opencv进行cuda编译26、ubuntu环境下编译OPENCV的NVCODEC SDK版本进行硬件解码视频和播放测试_sxj731533730的博客-CSDN博客
cmakelist.txt
cmake_minimum_required(VERSION 3.16)
project(A)
set(CMAKE_CXX_STANDARD 11)
find_package(OpenCV REQUIRED)
#message(STATUS ${OpenCV_INCLUDE_DIRS})
#添加头文件
if(WIN32)enable_language(CUDA)
endif(WIN32)# include and link dirs of cuda and tensorrt, you need adapt them if yours are different
# cuda
include_directories(/usr/local/cuda/include)
link_directories(/usr/local/cuda/lib64)
include_directories(${OpenCV_INCLUDE_DIRS})
include_directories(${CMAKE_SOURCE_DIR}/utility)
include_directories(${CMAKE_SOURCE_DIR})
#链接Opencv库
find_package(depthai CONFIG REQUIRED)cuda_add_executable(A main.cpp utility/utility.cpp yuv2bgr.cu)
target_link_libraries(A ${OpenCV_LIBS}  depthai::opencv -lavformat -lavcodec -lswscale -lavutil -lz)
target_link_libraries(A nvinfer)
target_link_libraries(A nvonnxparser)
target_link_libraries(A cudart)
target_link_libraries(A nvinfer_plugin)
main.cpp
#include <stdio.h>
#include <string>
#include <iostream>
#include <opencv2/core/core.hpp>
#include <opencv2/highgui/highgui.hpp>
#include <opencv2/imgproc/imgproc.hpp>extern "C"
{
#include <libavformat/avformat.h>
#include <libavcodec/avcodec.h>
#include <libavutil/imgutils.h>
#include <libswscale/swscale.h>
}#include <cuda_runtime.h>
#include "utility.hpp"
#include "yuv2bgr.h"
#include "depthai/depthai.hpp"using namespace std::chrono;int main(int argc, char **argv) {dai::Pipeline pipeline;//定义auto cam = pipeline.create<dai::node::ColorCamera>();cam->setBoardSocket(dai::CameraBoardSocket::RGB);cam->setResolution(dai::ColorCameraProperties::SensorResolution::THE_1080_P);cam->setVideoSize(1920, 1080);auto Encoder = pipeline.create<dai::node::VideoEncoder>();Encoder->setDefaultProfilePreset(cam->getVideoSize(), cam->getFps(),dai::VideoEncoderProperties::Profile::H264_MAIN);cam->video.link(Encoder->input);cam->setFps(60);//定义输出auto xlinkoutpreviewOut = pipeline.create<dai::node::XLinkOut>();xlinkoutpreviewOut->setStreamName("out");Encoder->bitstream.link(xlinkoutpreviewOut->input);//结构推送相机dai::Device device(pipeline);//取帧显示auto outqueue = device.getOutputQueue("out", cam->getFps(), false);//maxsize 代表缓冲数据// auto videoFile = std::ofstream("video.h265", std::ios::binary);int width = 1920;int height = 1080;//const AVCodec *pCodec = avcodec_find_decoder(AV_CODEC_ID_H264);const AVCodec *pCodec = avcodec_find_decoder_by_name("h264_cuvid");AVCodecContext *pCodecCtx = avcodec_alloc_context3(pCodec);AVDictionary* decoderOptions = nullptr;av_dict_set(&decoderOptions, "threads", "auto", 0);av_dict_set(&decoderOptions, "gpu", "cuda", 0);int ret = avcodec_open2(pCodecCtx, pCodec, &decoderOptions);if (ret < 0) {//打开解码器printf("Could not open codec.\n");return -1;}if (pCodecCtx != nullptr) {// 打印解码器支持的格式printf("Supported Formats:\n");const AVPixelFormat *pixFmt = pCodec->pix_fmts;while (*pixFmt != AV_PIX_FMT_NONE) {printf("- %s\n", av_get_pix_fmt_name(*pixFmt));pixFmt++;}}AVFrame *picture = av_frame_alloc();picture->width = width;picture->height = height;picture->format = AV_PIX_FMT_NV12;ret = av_frame_get_buffer(picture, 1);if (ret < 0) {printf("av_frame_get_buffer error\n");return -1;}AVFrame *pFrame = av_frame_alloc();pFrame->width = width;pFrame->height = height;pFrame->format = AV_PIX_FMT_NV12;ret = av_frame_get_buffer(pFrame, 1);if (ret < 0) {printf("av_frame_get_buffer error\n");return -1;}AVFrame *pFrameRGB = av_frame_alloc();pFrameRGB->width = width;pFrameRGB->height = height;pFrameRGB->format = AV_PIX_FMT_RGB24;ret = av_frame_get_buffer(pFrameRGB, 1);if (ret < 0) {printf("av_frame_get_buffer error\n");return -1;}int picture_size = av_image_get_buffer_size(AV_PIX_FMT_NV12, width, height,1);//计算这个格式的图片,需要多少字节来存储uint8_t *out_buff = (uint8_t *) av_malloc(picture_size * sizeof(uint8_t));av_image_fill_arrays(picture->data, picture->linesize, out_buff, AV_PIX_FMT_NV12, width,height, 1);//这个函数 是缓存转换格式,可以不用 以为上面已经设置了AV_PIX_FMT_YUV420PSwsContext *img_convert_ctx = sws_getContext(width, height, AV_PIX_FMT_NV12,width, height, AV_PIX_FMT_RGB24, 4,NULL, NULL, NULL);AVPacket *packet = av_packet_alloc();auto startTime = steady_clock::now();int counter = 0;float fps = 0;bool is_first_frame=false;int bufsize0, bufsize1, resolution;cv::cuda::GpuMat reqMat,resMat;while (true) {auto h265Packet = outqueue->get<dai::ImgFrame>();//videoFile.write((char *) (h265Packet->getData().data()), h265Packet->getData().size());packet->data = (uint8_t *) h265Packet->getData().data();    //这里填入一个指向完整H264数据帧的指针packet->size = h265Packet->getData().size();        //这个填入H265 数据帧的大小packet->stream_index = 0;ret = avcodec_send_packet(pCodecCtx, packet);if (ret < 0) {// printf("avcodec_send_packet \n");continue;}av_packet_unref(packet);int got_picture = avcodec_receive_frame(pCodecCtx, pFrame);av_frame_is_writable(pFrame);if (got_picture < 0) {// printf("avcodec_receive_frame \n");continue;}if (!is_first_frame) {bufsize0 = pFrame->height * pFrame->linesize[0];bufsize1 = pFrame->height * pFrame->linesize[1] / 2;resolution = pFrame->height * pFrame->width;//硬解码reqMat.create(pFrame->height, pFrame->width, CV_8UC3);resMat.create(pFrame->height, pFrame->width, CV_8UC3);resMat.step = pFrameRGB->linesize[0];is_first_frame = true;}cudaMemcpy(reqMat.data, pFrame->data[0], bufsize0,  cudaMemcpyHostToDevice);cudaMemcpy(reqMat.data + bufsize0, pFrame->data[1], bufsize1, cudaMemcpyHostToDevice);cvtColor(reqMat.data, resMat.data, resolution, pFrame->height, pFrame->width, pFrame->linesize[0]);//        sws_scale(img_convert_ctx, pFrame->data, pFrame->linesize, 0,
//                  height,
//                  pFrameRGB->data, pFrameRGB->linesize);cv::Mat mBGR(width, height, CV_8UC3);resMat.download(mBGR);//        cv::Mat mRGB(cv::Size(width, height), CV_8UC3);
//        mRGB.data = (unsigned char *) pFrameRGB->data[0];
//        cv::Mat mBGR;
//        cv::cvtColor(mRGB, mBGR, cv::COLOR_RGB2BGR);counter++;auto currentTime = steady_clock::now();auto elapsed = duration_cast<duration<float>>(currentTime - startTime);if (elapsed > seconds(1)) {fps = counter / elapsed.count();counter = 0;startTime = currentTime;}std::stringstream fpsStr;fpsStr << "NN fps: " << std::fixed << std::setprecision(2) << fps;//printf("fps %f\n",fps);cv::putText(mBGR, fpsStr.str(), cv::Point(32, 24), cv::FONT_HERSHEY_TRIPLEX, 0.4,cv::Scalar(0, 255, 0));cv::imshow("demo", mBGR);cv::waitKey(1);}return 0;
}
yuv2bgr.h :摘自https://github.com/chinahbcq/ffmpeg_hw_decode.git
/**  *  Copyright (c) 2017 LGPL, Inc. All Rights Reserved*  @author Chen Qian (chinahbcq@qq.com)*  @date 2017.04.22 14:32:02*  @brief gpu颜色空间转换*/
#ifdef __cplusplus
extern "C"{
#endifint cvtColor(unsigned char *d_req,unsigned char *d_res,int resolution,int height, int width, int linesize);#ifdef __cplusplus
}
#endif
yuv2bgr.cu :摘自https://github.com/chinahbcq/ffmpeg_hw_decode.git
/**  *  Copyright (c) 2017 LGPL, Inc. All Rights Reserved*  @author Chen Qian (chinahbcq@qq.com)*  @date 2017.04.22 14:32:13*  @brief gpu颜色空间转换*/
#include <stdio.h>
// For the CUDA runtime routines (prefixed with "cuda_")
#include <cuda_runtime.h>
#include <cuda_profiler_api.h>
#include <curand.h>
#include "yuv2bgr.h"__global__ void
cvtNV12_BGR(unsigned char *A, unsigned char *B, const int height,const int width,const int linesize)
{int IDX = blockDim.x * blockIdx.x + threadIdx.x;long len = width * height;if (IDX < len) {int j = IDX % width;int i = (IDX - j) / width;int bgr[3];int yIdx, uvIdx, idx;int y,u,v;yIdx = i * linesize + j;uvIdx = linesize * height + (i / 2) * linesize + j - j % 2;y = A[yIdx];u = A[uvIdx];v = A[uvIdx + 1];bgr[0] = y + 1.772 * (u-128);bgr[1] = y - 0.34414 * (u -128) - 0.71414 * (v-128);bgr[2] = y + 1.402 * (v - 128); for (int k = 0; k < 3; k++) {idx = (i * width + j) * 3 + k;if (bgr[k] >=0 && bgr[k] < 255) {B[idx] = bgr[k];} else {B[idx] = bgr[k] < 0 ? 0 : 255;}	}	}
}int cvtColor(unsigned char *d_req,unsigned char *d_res,int resolution,int height,int width,int linesize) {int threadsPerBlock = 256;int blocksPerGrid =(resolution + threadsPerBlock - 1) / threadsPerBlock;cvtNV12_BGR<<<blocksPerGrid, threadsPerBlock>>>(d_req, d_res, height, width, linesize);return 0;
}
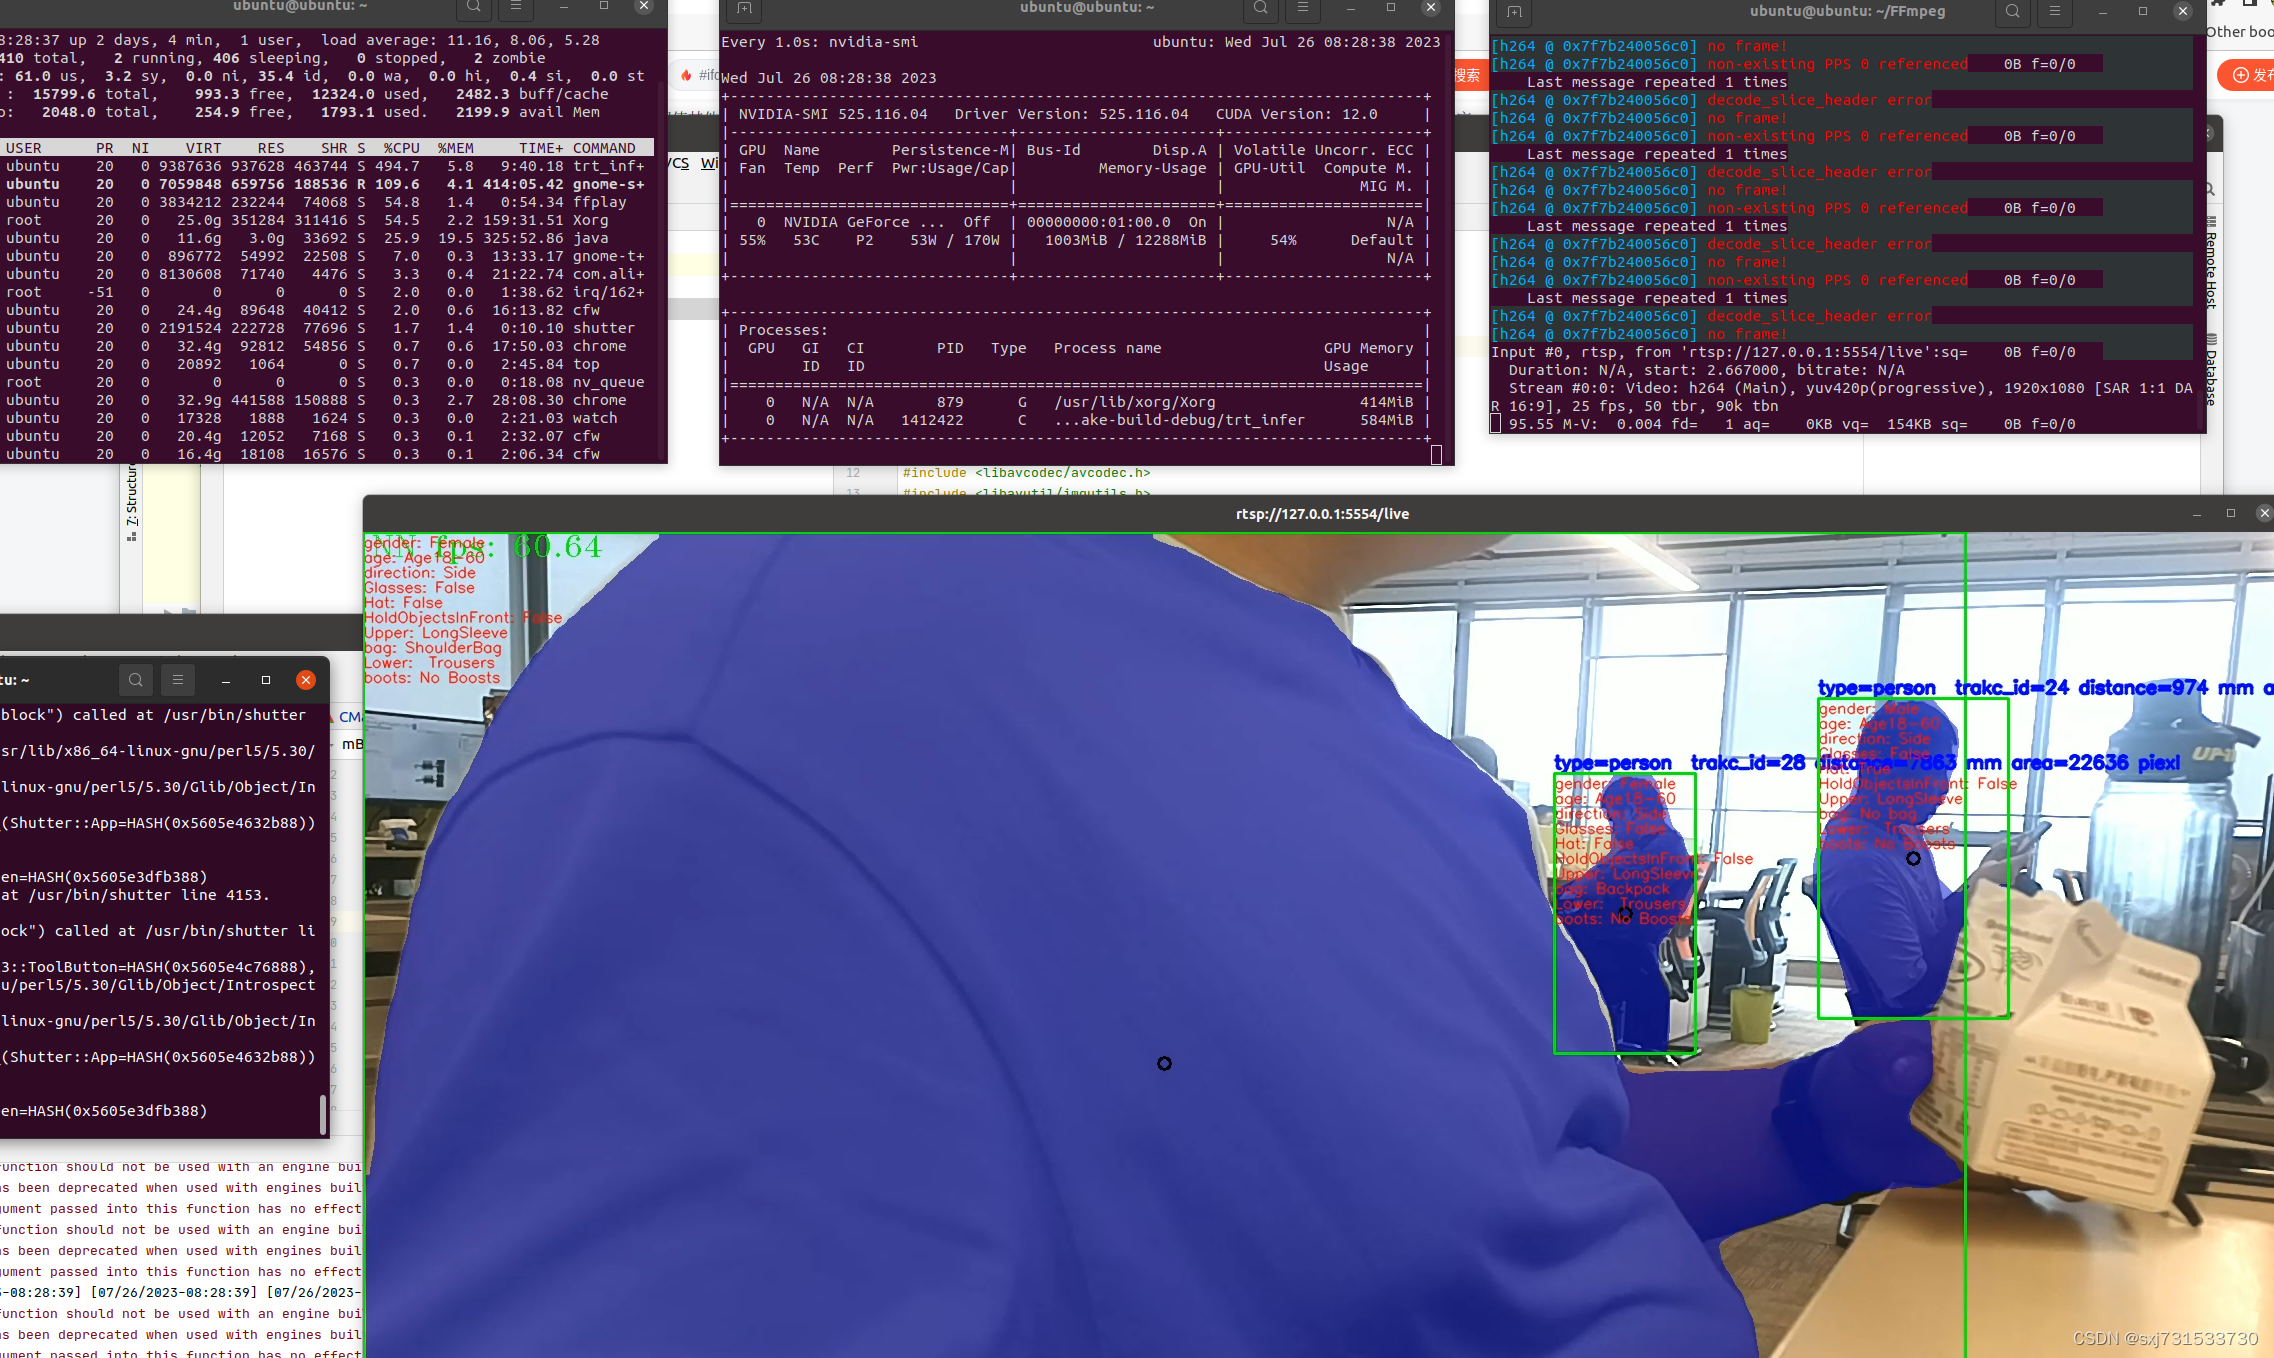
测试效果图,但是cpu还是占比比较高,还是待调查

关掉cv::show显示这个函数就瞬间降低了cpu的使用率-100%,mmp
结合实际项目实时推流画面,因为追踪使用纯cpu,耗cpu使用率
参考:https://github.com/chinahbcq/ffmpeg_hw_decode.git
另一位佬给的参考链接,没开始看:GitHub - shouxieai/hard_decode_trt: Yolov5 inference on NVDec hardware decoder
相关文章:
13、ffmpeg使用nvidia显卡对OAK深度相机进行解码和编码
基本思想:简单使用nvidia的硬件解码进行oak相机的编码和解码学习 一、在本机rtx3060配置好显卡驱动和cuda之后进行下面操作50、ubuntu18.04&20.04CUDA11.1cudnn11.3TensorRT7.2/8.6Deepsteam5.1vulkan环境搭建和YOLO5部署_ubuntu18.04安装vulkan_sxj731533730的…...

自动化测试如何做?搭建接口自动化框架从0到1实战(超细)
目录:导读 前言一、Python编程入门到精通二、接口自动化项目实战三、Web自动化项目实战四、App自动化项目实战五、一线大厂简历六、测试开发DevOps体系七、常用自动化测试工具八、JMeter性能测试九、总结(尾部小惊喜) 前言 传统软件测试行业…...
安装Python之后 安装库报错 There was an error checking the latest version of pip.
报错代码 & 图片如下 Looking in indexes: https://pypi.tuna.tsicmdnghua.edu.cn/simple WARNING: Retrying (Retry(total4, connectNone, readNone, redirectNone, statusNone)) after connection broken by NewConnectionError(<pip._vendor.urllib3.connection.HT…...

"科技与狠活"企业级无代码开发MES系统,一周实现数字化
随着科技的不断发展,企业级无代码开发平台成为了一种新型的解决方案,能够有效降低软件开发门槛,提升开发效率。在制造业领域,MES系统(Manufacturing Execution System)作为一种关键的生产管理工具ÿ…...

超实用的品牌软文推广方案分享,纯干货
品牌软文推广对于企业来说是一项关键且重要的战略,如何通过软文推广提高品牌的知名度、美誉度和影响力,成为了许多企业关注的问题。本文伯乐网络传媒将从多个角度深度探讨品牌软文推广方案,为企业提供一些有价值的参考。 一、确定品牌软文推广…...
8大工具)
网络安全(黑客)8大工具
1.Nmap 它是网络管理员 必用的软件之一,以及用以评估网络系统安全。正如大多数被用于网络安全的工具,nmap 也是不少黑客及骇客(又称脚本小子 )爱用的工具 。系统管理员可以利用nmap来探测工作环境中未经批准使用的服务器ÿ…...

重启Linux服务器 Oracle 数据库步骤
在一次重启数据库的时候,没有正确按照步骤重启数据库,导致服务器重启。 正确步骤及详解: (1) su - oracle 打开Xshell,连接到数据库所在的linux机器。若用户为root,请输入命令“su - oracle”并回车,若要…...

kaggle新赛:Bengali.AI 语音识别大赛赛题解析
赛题名称:Bengali.AI Speech Recognition 赛题链接:https://www.kaggle.com/competitions/bengaliai-speech 赛题背景 竞赛主办方 Bengali.AI 致力于加速孟加拉语(当地称为孟加拉语)的语言技术研究。Bengali.AI 通过社区驱动的…...
)
解放Linux内存:释放缓存(linux释放缓存)
随着软件越来越复杂,内存变得越来越宝贵。尤其是在Linux系统上,内存管理策略十分重要。它不仅可以帮助系统保持高效运行,而且也能够让程序有更多的空间来运行,避免系统出现假死和其他性能问题。 在Linux系统中,释放缓…...
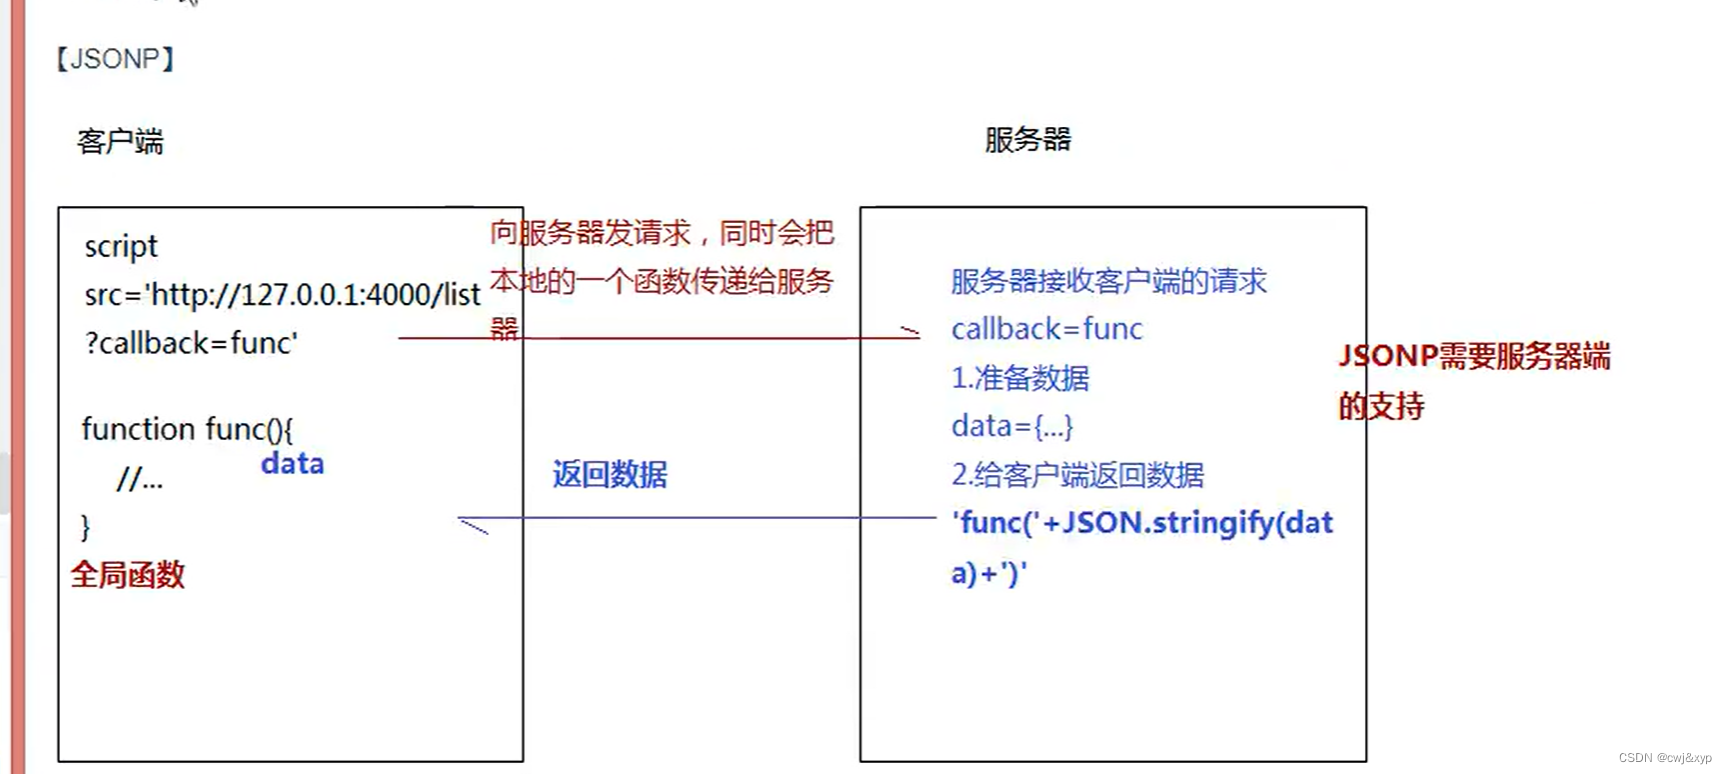
前端跨域解决方案
跨域 同源指的是两个URL的协议、域名、端口号一致,反之则是跨域。 出现跨域的根本原因:浏览器的同源策略不允许非同源的URL之间进行资源的交互。 同源策略限制为以下几种行为: Cookie、LocalStorage和IndexDB无法获取。DOM和JS对象无法获得…...

脚手架(vue-cli)的安装详细教程
首先要下载node.js 下载 | Node.js 中文网 (nodejs.cn)https://nodejs.cn/download/ 大家根据自己的系统来选择哪个,我是Windows系统,所以选择红色箭头所指的安装包去安装!!! 接下来双击安装!!…...

yolov5 onnx模型 转为 rknn模型
1、转换为rknn模型环境搭建 onnx模型需要转换为rknn模型才能在rv1126开发板上运行,所以需要先搭建转换环境 模型转换工具 模型转换相关文件下载: 网盘下载链接:百度网盘 请输入提取码 提取码:teuc 将其移动到虚拟机中…...

Mybatis-Flex
一、Mybatis-Flex是什么? Mybatis-Flex 是一个优雅的 Mybatis 增强框架,它非常轻量、同时拥有极高的性能与灵活性。我们可以轻松的使用 Mybaits-Flex 链接任何数据库,其内置的 QueryWrapper^亮点 帮助我们极大的减少了 SQL 编写的工作的同时…...
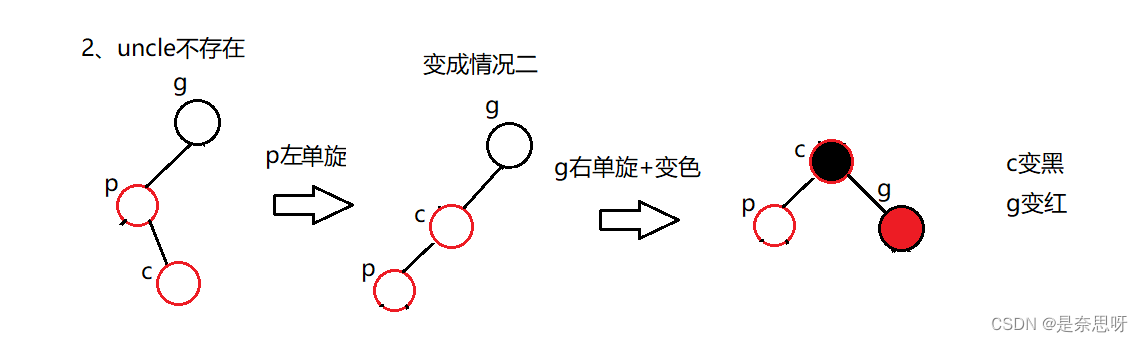
C++ | 红黑树以及map与set的封装
目录 前言 一、红黑树 1、红黑树的基本概念 2、红黑树相关特性 3、红黑树结点的定义 4、红黑树的查找 5、红黑树的插入 6、二叉树的拷贝构造与析构 7、红黑树的检测 8、红黑树总结 二、map与set的封装 1、红黑树的结点 2、红黑树迭代器 3、set的封装 4、map的封…...
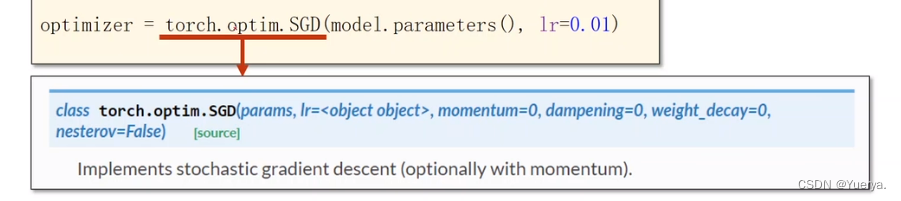
逻辑斯特回归
*分类是离散的,回归是连续的 下载数据集 trainTrue:下载训练集 逻辑斯蒂函数保证输出值在0-1之间 能够把实数值映射到0-1之间 导函数类似正态分布 其他饱和函数sigmoid functions 循环神经网络经常使用tanh函数 与线性回归区别 塞戈马无参数&#x…...

OpenCV 算法解析
opencv大坑之BGR opencv对于读进来的图片的通道排列是BGR,而不是主流的RGB!谨记! #opencv读入的矩阵是BGR,如果想转为RGB,可以这么转 img4 cv2.imread(1.jpg) img4 cv2.cvtColor(img4,cv2.COLOR_BGR2RGB) OpenCV 常见…...

springboot创建并配置环境(一) - 创建环境
文章目录 一、介绍二、启动环境Environment的分析三、进入源码四、创建环境1. 如何确定应用类型2. 测试 一、介绍 在springboot的启动流程中,启动环境Environment是可以说是除了应用上下文ApplicationContext之外最重要的一个组件了,而且启动环境为应用…...

2023JAVA 架构师面试 130 题含答案:JVM+spring+ 分布式 + 并发编程》...
此文包含 Java 面试的各个方面,史上最全,苦心整理最全 Java 面试题目整理包括基JVM算法数据库优化算法数据结构分布式并发编程缓存等,使用层面广,知识量大,涉及你的知识盲点。要想在面试者中出类拔萃就要比人付出更多的…...
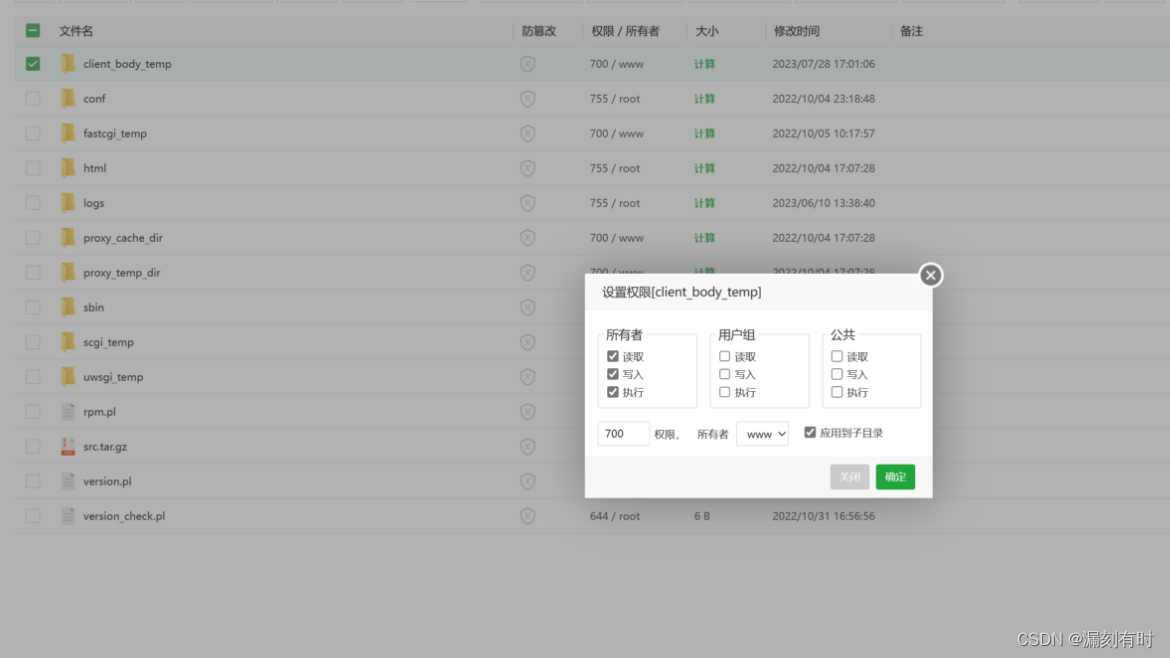
layui手机端上传文件时返回404 Not Found的解决方案(client_body_temp权限设置)
关于 1.client_body_temp的作用 client_body_temp是一个指令指定保存客户端请求体临时文件的目录路径,以及是否进行缓存的配置指令。 在Web服务器中,当客户端向服务器发送请求时,请求体中包含了请求的主体部分,比如表单数据、上…...

网络编程知识
网络编程知识 一.网络七层模型 OSI模型: OSI 模型(Open System Interconnection model)是一个由国际标准化组织􏰁提出的概念模型,试图提供一个使各种不同的计算机和网络在世界范围内实现互联的标准框架。它将计算机网络体系结构划分为七层…...

VOOHU 沃虎电子 千兆PoE+集成式RJ45连接器 SYT411Q199DB2A1DP 内置网络变压器 支持720mA供电 适用于PoE交换机与无线AP
苏州沃虎电子科技有限公司(品牌:VOOHU)供应的 SYT411Q199DB2A1DP 是一款高性能千兆集成式RJ45连接器,内置符合IEEE 802.3at标准的网络变压器,支持PoE(高达720mA)供电。该产品采用90侧插DIP封装&…...

生物信息学避坑指南:你的热图聚类总乱?可能是数据标准化和样品注释没做对
生物信息学避坑指南:热图聚类混乱的根源与系统性解决方案 热图(Heatmap)作为生物信息学中最常用的数据可视化工具之一,广泛应用于基因表达分析、代谢组学、微生物组学等领域。然而,许多初学者在使用热图进行样品聚类时…...

GME-Qwen2-VL-2B实战:手把手教你构建个人多模态知识库
GME-Qwen2-VL-2B实战:手把手教你构建个人多模态知识库 1. 为什么需要多模态知识库? 在日常工作和生活中,我们积累了大量不同类型的数据——文档、图片、截图、笔记等。传统知识管理工具往往只能处理单一类型的数据,要么是纯文本…...

npm install 背后的依赖管理机制:为什么你的node_modules这么大?
npm install 背后的依赖管理机制:为什么你的node_modules这么大? 每次运行 npm install 后,看着飞速增长的 node_modules 文件夹,你是否曾好奇过这个"黑洞"究竟是如何形成的?今天我们就来揭开Node.js依赖管理…...

英飞凌Aurix2G TC3XX 中断路由与DMA联动实战解析
1. 中断与DMA联动的核心价值 第一次接触英飞凌Aurix2G TC3XX的中断路由功能时,我像发现新大陆一样兴奋。传统嵌入式开发中,ADC采样完成→CPU读取数据→存入内存的流程就像用勺子一勺一勺地运水,而中断触发DMA的机制则像接上了自来水管——数据…...
)
MIT6.S081 Lab11实战:手把手教你实现E1000网卡驱动的关键函数(附避坑指南)
MIT6.S081 Lab11实战:从零实现E1000网卡驱动的核心逻辑 在操作系统开发领域,网络驱动是连接内核与物理世界的关键桥梁。MIT6.S081课程的Lab11将带领我们深入xv6内核,亲手实现Intel E1000网卡驱动的核心功能。这个实验不仅考验我们对DMA、环形…...

微带贴片天线基础计算
2GHz微带阵列天线,HFSS仿真模型,介质板为FR4,增益4.5dBi,驻波小于1.5。最近在捣鼓2GHz频段的微带阵列天线设计,用HFSS建模仿真时遇到不少有意思的问题。FR4板材这玩意儿看着普通,实际用在天线设计里真得小心…...

OpenClaw可视化监控:百川2-13B-4bits任务执行状态的实时仪表盘搭建
OpenClaw可视化监控:百川2-13B-4bits任务执行状态的实时仪表盘搭建 1. 为什么需要可视化监控? 去年冬天,我部署了一个基于OpenClaw的自动化写作助手,对接本地运行的百川2-13B-4bits模型。最初几周运行良好,直到某天早…...

League-Toolkit:英雄联盟智能工具集如何解决游戏决策与操作痛点并提升玩家体验
League-Toolkit:英雄联盟智能工具集如何解决游戏决策与操作痛点并提升玩家体验 【免费下载链接】League-Toolkit 兴趣使然的、简单易用的英雄联盟工具集。支持战绩查询、自动秒选等功能。基于 LCU API。 项目地址: https://gitcode.com/gh_mirrors/le/League-Tool…...

[FLAC无损下载]音乐爱好者与创作者的高效资源获取方案
[FLAC无损下载]音乐爱好者与创作者的高效资源获取方案 【免费下载链接】NeteaseCloudMusicFlac 根据网易云音乐的歌单, 下载flac无损音乐到本地.。 项目地址: https://gitcode.com/gh_mirrors/nete/NeteaseCloudMusicFlac 在数字音乐产业快速发展的今天,无损…...