slam建图与定位_cartographer代码阅读(7)后端约束构建
1.cartographer里的节点:当扫描匹配结束后,有新的一帧scan加入到submap中,这个扫描匹配的结果就叫做节点
global_trajectory_builder.cc
// 将匹配后的结果 当做节点 加入到位姿图中auto node_id = pose_graph_->AddNode(matching_result->insertion_result->constant_data, trajectory_id_,matching_result->insertion_result->insertion_submaps);
2.子图内约束,子图的原点坐标与节点间的约束pose_graph_2d.cc
// 遍历2个子图, 将节点加入子图的节点列表中, 计算子图原点与及节点间的约束(子图内约束)for (size_t i = 0; i < insertion_submaps.size(); ++i) {const SubmapId submap_id = submap_ids[i];// Even if this was the last node added to 'submap_id', the submap will// only be marked as finished in 'data_.submap_data' further below.CHECK(data_.submap_data.at(submap_id).state ==SubmapState::kNoConstraintSearch);// 将node_id放到子图保存的node_ids的set中data_.submap_data.at(submap_id).node_ids.emplace(node_id);// 计算 子图原点 指向 node坐标 间的坐标变换(子图内约束)const transform::Rigid2d constraint_transform =constraints::ComputeSubmapPose(*insertion_submaps[i]).inverse() *local_pose_2d;// 新生成的 子图内约束 放入容器中data_.constraints.push_back(Constraint{submap_id,node_id,{transform::Embed3D(constraint_transform),options_.matcher_translation_weight(),options_.matcher_rotation_weight()},Constraint::INTRA_SUBMAP}); // 子图内约束} // end for
3.回环检测:当前的节点与所有已经完成的子图进行约束的计算pose_graph_2d.cc
// Step: 当前节点与所有已经完成的子图进行约束的计算---实际上就是回环检测for (const auto& submap_id : finished_submap_ids) {// 计算旧的submap和新的节点间的约束ComputeConstraint(node_id, submap_id);}
4.回环检测(子图间约束):计算所有节点与刚完成子图的约束pose_graph_2d.cc
// Step: 计算所有节点与刚完成子图间的约束---实际上就是回环检测if (newly_finished_submap) {const SubmapId newly_finished_submap_id = submap_ids.front();// We have a new completed submap, so we look into adding constraints for// old nodes.for (const auto& node_id_data : optimization_problem_->node_data()) {const NodeId& node_id = node_id_data.id;// 刚结束的子图内部的节点, 不再与这个子图进行约束的计算if (newly_finished_submap_node_ids.count(node_id) == 0) {// 计算新的submap和旧的节点间的约束ComputeConstraint(node_id, newly_finished_submap_id);}}}
5.全局搜索和局部搜索pose_graph_2d.cc
节点和子图时间差小于阈值或者是同一条轨迹 进行局部搜索;
节点和子图时间间隔间隔了一段时间间隔并且不属于同一条轨迹 全局搜索 纯定位模式;
		/*** @brief 进行子图间约束计算, 也可以说成是回环检测* * @param[in] node_id 节点的id* @param[in] submap_id submap的id*/
void PoseGraph2D::ComputeConstraint(const NodeId& node_id,const SubmapId& submap_id) {bool maybe_add_local_constraint = false;bool maybe_add_global_constraint = false;const TrajectoryNode::Data* constant_data;const Submap2D* submap;{absl::MutexLock locker(&mutex_);CHECK(data_.submap_data.at(submap_id).state == SubmapState::kFinished);// 如果是未完成状态的地图不进行约束计算if (!data_.submap_data.at(submap_id).submap->insertion_finished()) {// Uplink server only receives grids when they are finished, so skip// constraint search before that.return;}// 获取该 node 和该 submap 中的 node 中较新的时间const common::Time node_time = GetLatestNodeTime(node_id, submap_id);// 两个轨迹的最后连接时间const common::Time last_connection_time =data_.trajectory_connectivity_state.LastConnectionTime(node_id.trajectory_id, submap_id.trajectory_id);// 如果节点和子图属于同一轨迹, 或者时间小于阈值
// 则只需进行 局部搜索窗口 的约束计算(对局部子图进行回环检测)
if (node_id.trajectory_id == submap_id.trajectory_id ||node_time <last_connection_time +common::FromSeconds(options_.global_constraint_search_after_n_seconds())) {// If the node and the submap belong to the same trajectory or if there// has been a recent global constraint that ties that node's trajectory to// the submap's trajectory, it suffices to do a match constrained to a// local search window.maybe_add_local_constraint = true;
}
// 如果节点与子图不属于同一条轨迹 并且 间隔了一段时间, 同时采样器为true
// 才进行 全局搜索窗口 的约束计算(对整体子图进行回环检测)
else if (global_localization_samplers_[node_id.trajectory_id]->Pulse()) {maybe_add_global_constraint = true;
}// 获取节点信息数据与地图数据
constant_data = data_.trajectory_nodes.at(node_id).constant_data.get();
submap = static_cast<const Submap2D*>(data_.submap_data.at(submap_id).submap.get());} // end {}
6.创建多分辨率地图constraint_builder_2d.cc
	// 为每个子图新建一个匹配器
const ConstraintBuilder2D::SubmapScanMatcher*
ConstraintBuilder2D::DispatchScanMatcherConstruction(const SubmapId& submap_id,const Grid2D* const grid) {CHECK(grid);// 如果匹配器里已经存在, 则直接返回对应id的匹配器if (submap_scan_matchers_.count(submap_id) != 0) {return &submap_scan_matchers_.at(submap_id);}// submap_scan_matchers_新增加一个 keyauto& submap_scan_matcher = submap_scan_matchers_[submap_id];kNumSubmapScanMatchersMetric->Set(submap_scan_matchers_.size());// 保存栅格地图的指针submap_scan_matcher.grid = grid;auto& scan_matcher_options = options_.fast_correlative_scan_matcher_options();auto scan_matcher_task = absl::make_unique<common::Task>();// 生成一个将初始化匹配器的任务, 初始化时会计算多分辨率地图, 比较耗时scan_matcher_task->SetWorkItem([&submap_scan_matcher, &scan_matcher_options]() {// 进行匹配器的初始化, 与多分辨率地图的创建submap_scan_matcher.fast_correlative_scan_matcher =absl::make_unique<scan_matching::FastCorrelativeScanMatcher2D>(*submap_scan_matcher.grid, scan_matcher_options);});// 将初始化匹配器的任务放入线程池中, 并且将任务的智能指针保存起来submap_scan_matcher.creation_task_handle =thread_pool_->Schedule(std::move(scan_matcher_task));return &submap_scan_matchers_.at(submap_id);
}
7.基于分支定界进行粗匹配,使用ceres进行精匹配constraint_builder_2d.cc
/*** @brief 计算节点和子图之间的一个约束(回环检测)*        用基于分支定界算法的匹配器进行粗匹配,然后用ceres进行精匹配* * @param[in] submap_id submap的id* @param[in] submap 地图数据* @param[in] node_id 节点id* @param[in] match_full_submap 是局部匹配还是全子图匹配* @param[in] constant_data 节点数据* @param[in] initial_relative_pose 约束的初值* @param[in] submap_scan_matcher 匹配器* @param[out] constraint 计算出的约束*/
void ConstraintBuilder2D::ComputeConstraint(const SubmapId& submap_id, const Submap2D* const submap,const NodeId& node_id, bool match_full_submap,const TrajectoryNode::Data* const constant_data,const transform::Rigid2d& initial_relative_pose,const SubmapScanMatcher& submap_scan_matcher,std::unique_ptr<ConstraintBuilder2D::Constraint>* constraint) {CHECK(submap_scan_matcher.fast_correlative_scan_matcher);// Step:1 得到节点在local frame下的坐标const transform::Rigid2d initial_pose =ComputeSubmapPose(*submap) * initial_relative_pose;// The 'constraint_transform' (submap i <- node j) is computed from:// - a 'filtered_gravity_aligned_point_cloud' in node j,// - the initial guess 'initial_pose' for (map <- node j),// - the result 'pose_estimate' of Match() (map <- node j).// - the ComputeSubmapPose() (map <- submap i)float score = 0.;transform::Rigid2d pose_estimate = transform::Rigid2d::Identity();// Compute 'pose_estimate' in three stages:// 1. Fast estimate using the fast correlative scan matcher.// 2. Prune if the score is too low.// 3. Refine.// param: global_localization_min_score 对整体子图进行回环检测时的最低分数阈值// param: min_score 对局部子图进行回环检测时的最低分数阈值// Step:2 使用基于分支定界算法的匹配器进行粗匹配if (match_full_submap) {// 节点与全地图进行匹配kGlobalConstraintsSearchedMetric->Increment();if (submap_scan_matcher.fast_correlative_scan_matcher->MatchFullSubmap(constant_data->filtered_gravity_aligned_point_cloud,options_.global_localization_min_score(), &score, &pose_estimate)) {CHECK_GT(score, options_.global_localization_min_score());CHECK_GE(node_id.trajectory_id, 0);CHECK_GE(submap_id.trajectory_id, 0);kGlobalConstraintsFoundMetric->Increment();kGlobalConstraintScoresMetric->Observe(score);} else {// 计算失败了就退出return;}} else {// 节点与局部地图进行匹配kConstraintsSearchedMetric->Increment();if (submap_scan_matcher.fast_correlative_scan_matcher->Match(initial_pose, constant_data->filtered_gravity_aligned_point_cloud,options_.min_score(), &score, &pose_estimate)) {// We've reported a successful local match.CHECK_GT(score, options_.min_score());kConstraintsFoundMetric->Increment();kConstraintScoresMetric->Observe(score);} else {return;}}{absl::MutexLock locker(&mutex_);score_histogram_.Add(score);}// Use the CSM estimate as both the initial and previous pose. This has the// effect that, in the absence of better information, we prefer the original// CSM estimate.// Step:3 使用ceres进行精匹配, 就是前端扫描匹配使用的函数ceres::Solver::Summary unused_summary;ceres_scan_matcher_.Match(pose_estimate.translation(), pose_estimate,constant_data->filtered_gravity_aligned_point_cloud,*submap_scan_matcher.grid, &pose_estimate,&unused_summary);// Step:4 获取节点到submap坐标系原点间的坐标变换// pose_estimate 是 节点在 loacl frame 下的坐标const transform::Rigid2d constraint_transform =ComputeSubmapPose(*submap).inverse() * pose_estimate;// Step:5 返回计算后的约束constraint->reset(new Constraint{submap_id,node_id,{transform::Embed3D(constraint_transform),options_.loop_closure_translation_weight(),options_.loop_closure_rotation_weight()},Constraint::INTER_SUBMAP});// log相关if (options_.log_matches()) {std::ostringstream info;info << "Node " << node_id << " with "<< constant_data->filtered_gravity_aligned_point_cloud.size()<< " points on submap " << submap_id << std::fixed;if (match_full_submap) {info << " matches";} else {const transform::Rigid2d difference =initial_pose.inverse() * pose_estimate;info << " differs by translation " << std::setprecision(2) // c++11: std::setprecision(2) 保留2个小数点<< difference.translation().norm() << " rotation "<< std::setprecision(3) << std::abs(difference.normalized_angle());}info << " with score " << std::setprecision(1) << 100. * score << "%.";LOG(INFO) << info.str();}
}
总结:
1.子图内约束包含:当前节点与当前子图原点的约束和当前节点和所有已经完成子图的约束,目的是为了构建局部地图
2.子图间的约束:当前完成子图与所有节点的约束 ,目的是为了构建全局地图
3.全局搜索窗与局部搜索窗的区别 局部搜索窗有距离范围限制
相关文章:
后端约束构建)
slam建图与定位_cartographer代码阅读(7)后端约束构建
1.cartographer里的节点:当扫描匹配结束后,有新的一帧scan加入到submap中,这个扫描匹配的结果就叫做节点 global_trajectory_builder.cc // 将匹配后的结果 当做节点 加入到位姿图中auto node_id pose_graph_->AddNode(matching_result->insertio…...

Android usb 配件模式通信示例
当使用 Android 设备作为 USB 配件时,可以使用 Android 提供的 USB Accessory API 来进行 USB 通信。以下是一个简单的 Android USB 配件模式的通信例子。在本例中,我们将接收连接到 Android 设备的 USB 主机发送的数据并向 USB 主机发送响应。 首先&am…...
【Hive实战】Hive的压缩池与锁
文章目录 Hive的压缩池池的分配策略自动分配手动分配隐式分配 池的等待超时Labeled worker pools 标记的工作线程(自定义线程池)Default pool 默认池Worker allocation 工作线程的分配 锁Turn Off ConcurrencyDebuggingConfigurationhive.support.concur…...

【VUE】使用elementUI tree组件根据所选id自动回显
需求如下: 1.点击父级节点 将父级节点下children中所有id放入数组 2.点击父级下的子节点 将点击的子节点放入数组 3.取消选择父节点,将放入数组的所有子节点id删除 4.根据选择的子节点数组,匹配他所属的父节点 <el-tree:data"tre…...
RocketMQ, Dashboard, 控制台安装
文章说明 本文主要说明RocketMQ的控制台(Dashboard)的安装过程。工作中一直用的是别人装好的,这次终于自己亲手装了一遍。 由于每次都要启动三个应用,比较烦,于是我写了一键启动脚本,分享给大家。这个脚本…...

chrome解决http自动跳转https问题
1.地址栏输入: chrome://net-internals/#hsts 2.找到底部Delete domain security policies一栏,输入想处理的域名,点击delete。 3.再次访问http域名不再自动跳转https了。...

FastGithub 下载
Releases dotnetcore/FastGithub GitHub 无需安装,双击UI程序即可运行。...

TSINGSEE青犀视频安防监控管理平台EasyNVR如何配置鉴权?
视频监控汇聚平台EasyNVR是基于RTSP/Onvif协议的视频平台,可支持将接入的视频流进行全平台、全终端的分发,分发的视频流包括RTSP、RTMP、HTTP-FLV、WS-FLV、HLS、WebRTC等格式。为了满足用户的集成与二次开发需求,我们也提供了丰富的API接口供…...
unittest 数据驱动DDT应用
前言 一般进行接口测试时,每个接口的传参都不止一种情况,一般会考虑正向、逆向等多种组合。所以在测试一个接口时通常会编写多条case,而这些case除了传参不同外,其实并没什么区别。 这个时候就可以利用ddt来管理测试数据…...

素数个数——数论
题目描述 求 1,2,⋯,N 中素数的个数。 输入格式 一行一个整数 N。 输出格式 一行一个整数,表示素数的个数。 样例 #1 样例输入 #1 10样例输出 #1 4提示 对于 100% 的数据,1≤1081≤N≤108。 本题时间限制在2秒以内。 因为题目时间限制是2秒,所…...
express编写一个简单的get接口
/01编写get接口.jsconst express require(express) const app express()// 创建路由 const useRouter require(./router/user.js) // 注册路由 app.use(/api,useRouter)app.listen(8080, (req, res) > {console.log(8080监听) }) ./02编写post接口 // 注意:如…...

【力扣刷题C++】环形链表
来源:力扣(LeetCode) 链接:https://leetcode.cn/problems/linked-list-cycle 著作权归领扣网络所有。商业转载请联系官方授权,非商业转载请注明出处。 【题目】给你一个链表的头节点 head ,判断链表中是否有…...
如何用Python统计CSDN质量分
文章目录 CSDN质量分查询selenium爬取博客地址单篇测试批量查询分析 CSDN质量分查询 CSDN对博客有一套分数评价标准,其查询入口在这里:质量分查询,效果大致如下 如果质量分太低,就会在博文的标题下面出现黄底黄字: 这…...
gin框架内容(三)--中间件
gin框架内容(三)--中间件 Gin框架允许开发者在处理请求的过程中,加入用户自己的函数。这个函数就叫中间件,中间件适合处理一些公共的业务逻辑,比如登录认证、权限校验、数据分页、记录日志、耗时统计等 即比如&#x…...

如何在工作中利用Prompt高效使用ChatGPT
导读 AI 不是来替代你的,是来帮助你更好工作。用better prompt使用chatgpt,替换搜索引擎,让你了解如何在工作中利用Prompt高效使用ChatGPT。 01背景 现在 GPT 已经开启了人工智能狂潮,不过是IT圈,还是金融圈。 一开…...

uniapp-小程序button分享传参,当好友通过分享点开该页面时,进行一些判断……
一、需求描述: 该小程序中,点击圈子列表页面—>进入圈子详情页面,在圈子详情页面点击button分享按钮后,发送给好友。当好友通过分享点开该页面时: 1.先判断是否登录,如果没有,先去登录&#…...
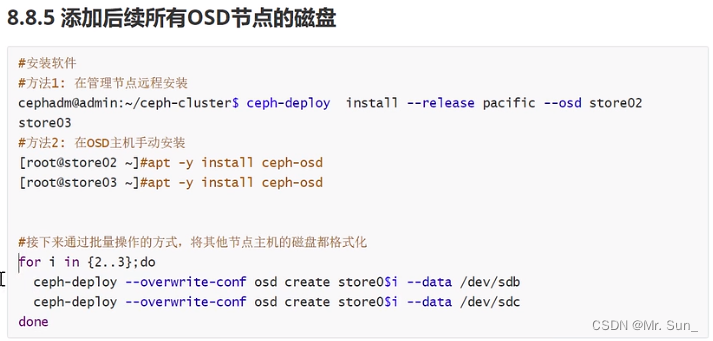
Ceph部署方法介绍
Ceph部署方法介绍 Installing Ceph — Ceph Documentation Ceph环境规划 admin是一个部署节点...
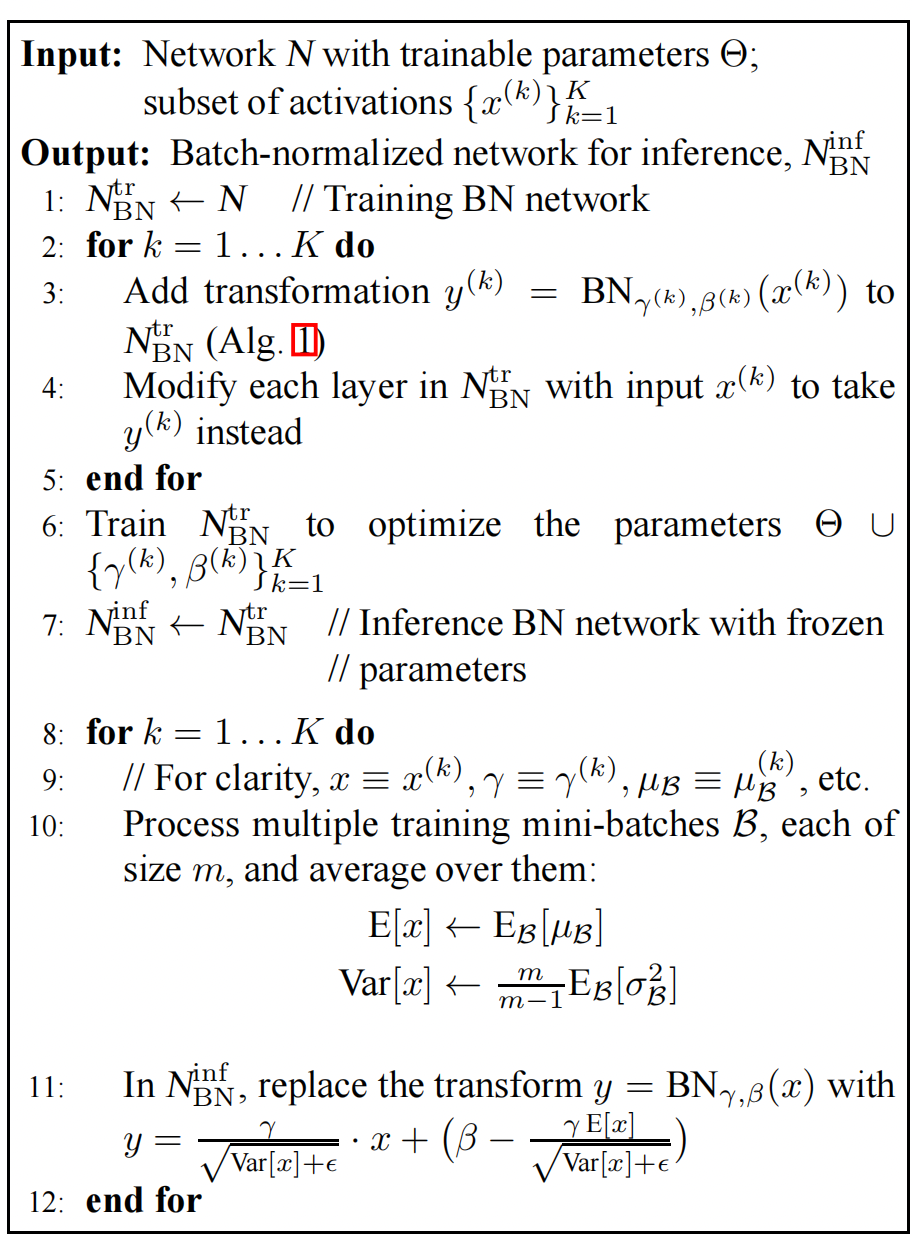
GoogleLeNet V2 V3 —— Batch Normalization
文章目录 Batch Normalizationinternal covariate shift激活层的作用BN执行的位置数据白化网络中的BN层训练过程 BN的实验效果MNIST与GoogleLeNet V1比较 GoogleLeNet出来之后,Google在这个基础上又演进了几个版本,一般来说是说有4个版本,之前…...
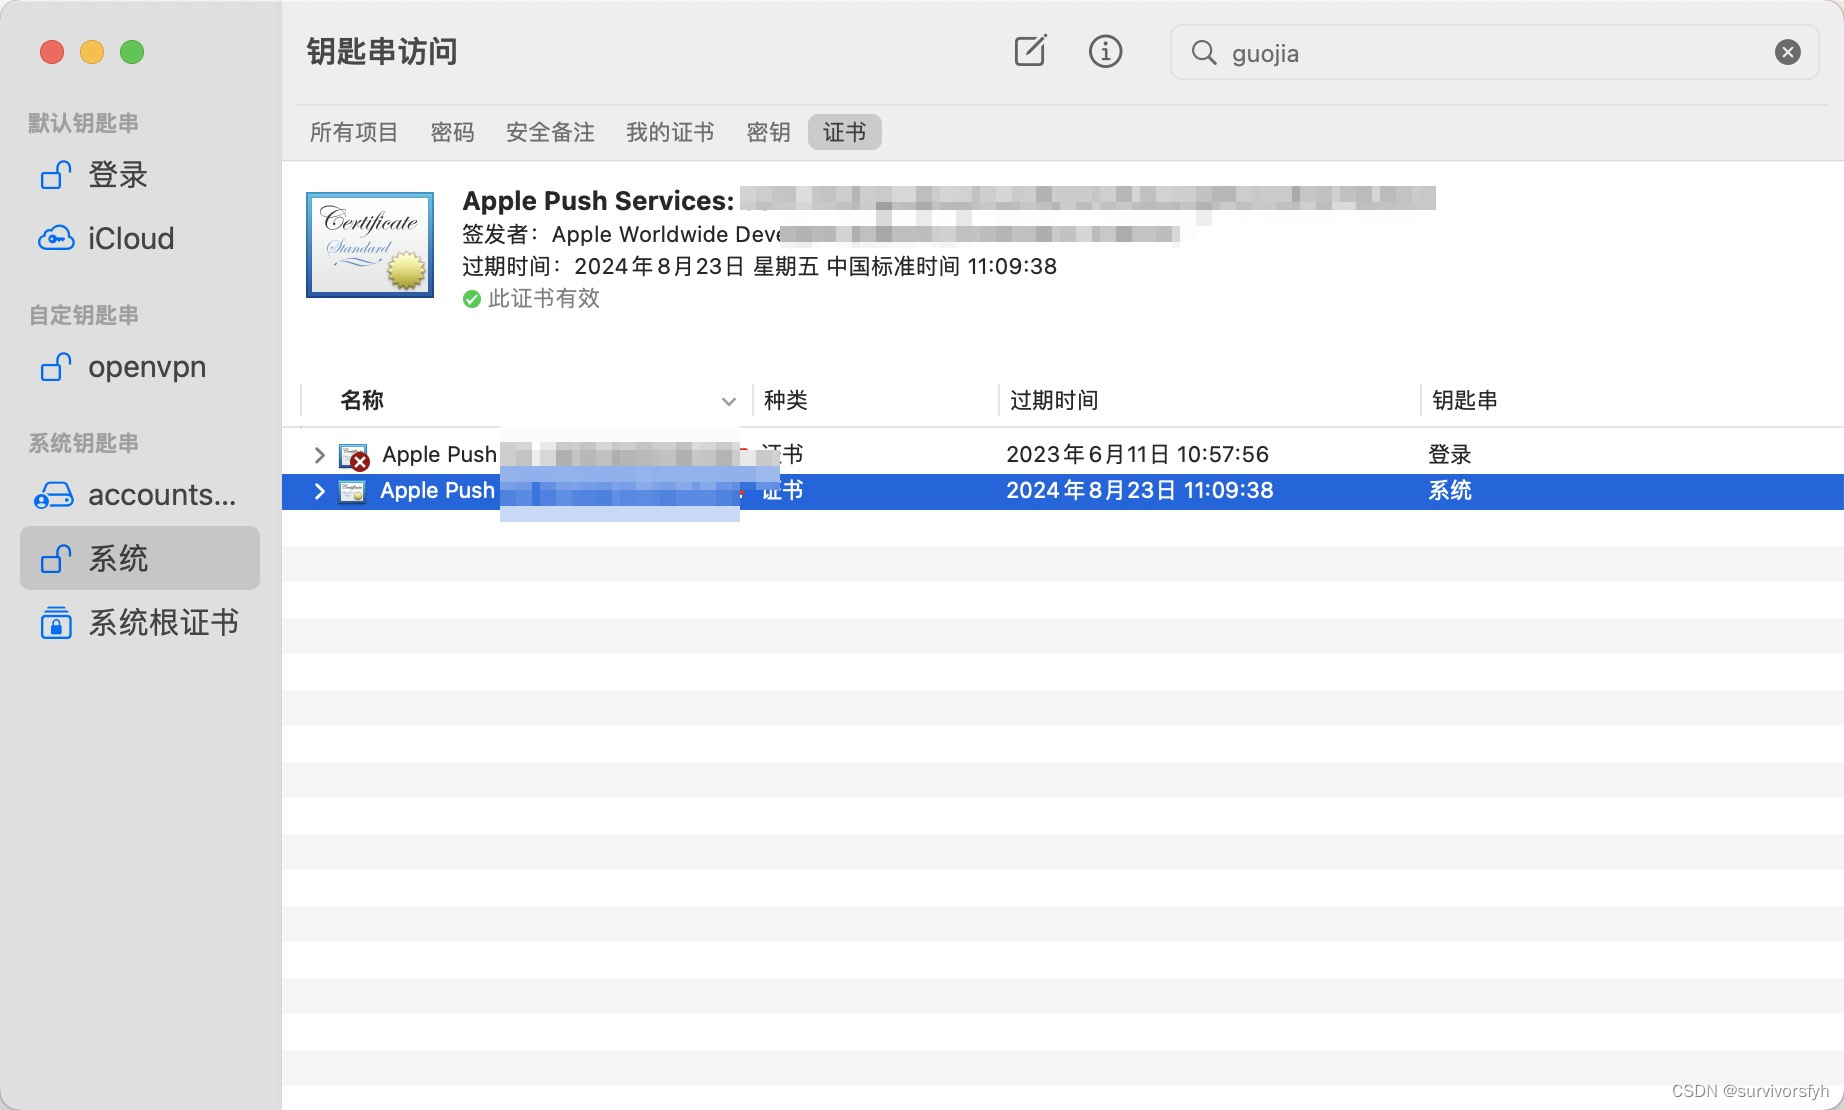
Mac 系统钥匙串证书不受信任
Mac 系统钥匙串证书不受信任 解决办法 通过尝试安装 Apple PKI 的 Worldwide Developer Relations - G4 (Expiring 12/10/2030 00:00:00 UTC) 解决该异常问题 以上便是此次分享的全部内容,希望能对大家有所帮助!...
一个企业级的文件上传组件应该是什么样的
目录 1.最简单的文件上传 2.拖拽粘贴样式优化 3.断点续传秒传进度条 文件切片 计算hash 断点续传秒传(前端) 断点续传秒传(后端) 进度条 4.抽样hash和webWorker 抽样hash(md5) webWorker 时间切片 5.文件类型判断 通过文件头判断文件类型 6.异步并发数控制(重要…...

QueryExcel:解放双手的Excel批量查询神器,告别Ctrl+F的繁琐时代
QueryExcel:解放双手的Excel批量查询神器,告别CtrlF的繁琐时代 【免费下载链接】QueryExcel 多Excel文件内容查询工具。 项目地址: https://gitcode.com/gh_mirrors/qu/QueryExcel 在日常工作中,你是否也曾被海量Excel文件中的数据查找…...

FastDDS XML配置实战:从HelloWorld到可配置QoS的完整迁移指南
FastDDS XML配置实战:从硬编码到灵活部署的工程化演进 在分布式系统开发中,数据分发服务(DDS)因其高效的实时通信能力被广泛应用于工业物联网、自动驾驶等领域。作为DDS规范的实现之一,FastDDS凭借其出色的性能和灵活性赢得了开发者青睐。本…...

SPIRAN ART SUMMONER图像生成前端展示效果优化技巧
SPIRAN ART SUMMONER图像生成前端展示效果优化技巧 1. 引言 你有没有遇到过这种情况:用SPIRAN ART SUMMONER生成了超棒的图片,但在网站上展示时却加载缓慢,用户还没看到效果就流失了?或者图片显示不完整,影响了整体的…...

解锁浏览器潜能:用户脚本实用指南
解锁浏览器潜能:用户脚本实用指南 【免费下载链接】greasyfork An online repository of user scripts. 项目地址: https://gitcode.com/gh_mirrors/gr/greasyfork 你是否常常觉得浏览器功能不够用?想让网页自动完成重复操作?希望个性…...

Ubuntu 22.04 改IP重启失效?别急,可能是OVS的ovsdb-server在捣鬼
Ubuntu 22.04网络配置失效:当OVS与netplan的隐秘博弈 在虚拟化技术大行其道的今天,Open vSwitch(OVS)作为开源虚拟交换机的标杆,已经成为众多云计算平台和容器网络的核心组件。然而,当它遇上Ubuntu 22.04默…...

突发!国行苹果 AI 凌晨偷跑又紧急下线
3 月 31 日凌晨,大量升级 iOS 26.4 的国行 iPhone 16 及后续机型用户,突然发现设置里 “Siri” 变成 “Apple 智能与 Siri”,可下载 9.5GB 本地 AI 模型,解锁实时翻译、视觉智能、照片消除等全套功能。不过这场“惊喜”仅持续了数…...

别再到处找转换工具了!用Audacity把WAV无损转成MP3,保姆级图文教程
音频处理新手指南:Audacity无损转换WAV到MP3的完整方案 你是否曾经下载了一段高质量录音,却发现文件体积大得惊人,根本无法通过邮件发送?或者尝试上传播客内容时,平台总是提示"文件格式不支持"?这…...

Google 地图事件:探索、挑战与未来展望
Google 地图事件:探索、挑战与未来展望 引言 Google 地图作为全球最受欢迎的地图服务之一,自2005年推出以来,已经深入到人们生活的方方面面。然而,在这段时间里,Google 地图也经历了一系列事件,包括技术挑战、政策争议以及市场竞争等。本文将围绕这些事件,对 Google 地…...

Phi-4-mini-reasoning案例分享:用逻辑题测试模型对‘必要条件’的理解深度
Phi-4-mini-reasoning案例分享:用逻辑题测试模型对必要条件的理解深度 1. 模型能力定位 Phi-4-mini-reasoning是专为推理任务优化的文本生成模型,其核心优势在于处理需要多步逻辑推导的问题。与通用对话模型不同,它更擅长处理以下类型任务&…...

Axelspace 太空公司牵头联合体入选日本太空战略基金项目 “提升下一代地球观测卫星能力技术”
—— 通过卫星星座与航空器开展特定排放源二氧化碳排放与吸收监测,打造气候解决方案,开拓全新市场机遇 Axelspace 太空公司、明星电气株式会社、全日空控股株式会社及 JIJ 株式会社联合宣布,各方共同申报的技术研发项目成功入选日本宇宙航空…...