数据实时同步:inotify + rsync 实现数据实时同步
1 数据实时同步
在生产环境中,某些场景下,要将数据或文件进行实时同步,保证数据更新后其它节点能立即获得最新的数据。
数据同步的两种方式
PULL:拉,使用定时任务的方式配合同步命令或脚本等,从指定服务器上将数据同步到本地,一般是周期性定时同步
PUSH:推,如果当前机器上的数据或文件发生更新了,立即推送到指定的节点上,可以做到实时同步
1.1 实时同步的实现方式
-
inotify + rsync
-
sersync
1.2 inotify + rsync 实现数据实时同步
实现原理
利用内核中的 inotify 监控指定目录,当目录中的文件或数据发生变化时,立即调用 rsync 服务将数据推送到远程主机上。
1.2.1 inotify 服务
inotify 是一个内核用于通知用户空间程序文件系统变化的机制,在监听到文件系统发生变化后,会向相应的应用程序发送事件,如文件增加,修改,删除等事件发生后可以立即让用户空间知道。
https://github.com/rvoicilas/inotify-tools #项目地址inotify 是内核中的功能,在2.6.13版本的内核开始都默认存在。
[root@ubuntu ~]# grep -i inotify /boot/config-5.15.0-76-genericCONFIG_INOTIFY_USER=y[root@rocky ~]# grep -i inotify /boot/config-4.18.0-372.9.1.el8.x86_64CONFIG_INOTIFY_USER=y
inotify 内核参数
[root@ubuntu ~]# ls -l /proc/sys/fs/inotifytotal 0-rw-r--r-- 1 root root 0 Jul 11 09:46 max_queued_events-rw-r--r-- 1 root root 0 Jul 11 09:46 max_user_instances-rw-r--r-- 1 root root 0 Jul 11 09:46 max_user_watches#inotify 事件队列最大长度,如值太小会出现 Event Queue Overflow 错误,默认 16384,生产环境建议调大,比如 327679[root@ubuntu ~]# cat /proc/sys/fs/inotify/max_queued_events16384#每个用户创建inotify实例最大值,默认值 128[root@ubuntu ~]# cat /proc/sys/fs/inotify/max_user_instances128#每个inotify实例可以监视的文件的总数量[root@ubuntu ~]# cat /proc/sys/fs/inotify/max_user_watches14165#一个用户可以最多开128个inotify实例,每个实例最多可以监控14165个文件
内核参数如果需要修改,可以配置文件
[root@ubuntu ~]# cat /etc/sysctl.conffs.inotify.max_queued_events=66666fs.inotify.max_user_instances=256fs.inotify.max_user_watches=100000[root@ubuntu ~]# sysctl -pfs.inotify.max_queued_events = 66666fs.inotify.max_user_instances = 256fs.inotify.max_user_watches = 100000
安装软件
inotify 是内核中的功能模块,只能通过调用API接口的形式使用其功能,我们可以通过相关软件来对其进行操作,能实现内核中 inotify 调用的软件主要有以下几个:
inotify-tools,sersync,lrsyncd
#centos系列中该软件来自于 epel 源[root@ubuntu ~]# apt install inotify-tools#主要工具/usr/bin/fsnotifywait #fsnotify监控工具,fsnotify 是 inotify 的新版本/usr/bin/fsnotifywatch #fsnotify统计工具/usr/bin/inotifywait #实时监控指定目录的所有事件,在被监控的文件或目录上等待特定事件发生(open,close,write...)/usr/bin/inotifywatch #收集被监控的文件系统使用的统计数据,指文件系统事件发生的次数统计
命令格式
inotifywait [ options ] file1 [ file2 ] [ file3 ] [ ... ]#常用选项-h|--help #显示帮助@<file> #排除指定文件--exclude <pattern> #不监控指定的文件或目录,正则匹配--excludei <pattern> #不监控指定的文件或目录,正则匹配,不区分大小写--include <pattern> #仅监控指定的文件或目录,正则匹配--includei <pattern> #仅监控指定的文件或目录,正则匹配,不区分大小写-m|--monitor #始终保持监听,直到超时-d|--daemon #以守护进程方式执行,配合-o使用-P|--no-dereference #不跟随软链接-r|--recursive #对目录递归监控,即监控目录内所有内容--fromfile <file> #从文件中读取要监控的内容-o|--outfile <file> #将执行结果输出到指定文件-s|--syslog #错误输出到syslog,而不是标准错误输出-q|--quiet #简短输出,仅输出事件信息-qq #禁用输出--format <fmt> #指定输出格式--no-newline #不换行输出,配合--format字段--timefmt <fmt> #指定时间输出格式-c|--csv #以CSV格式输出-t|--timeout <seconds> #指定超时时长,值为0则永远不超时-e|--event <event1> #只监听指定事件,默认监听所有事件# --format 选项可用字段%T #输出时间格式中定义的时间格式信息,通过 --timefmt option 语法格式指定时间信息%w #事件出现时,监控文件或目录的名称信息,相当于dirname%f #事件出现时,将显示监控目录下触发事件的文件或目录信息,否则为空,相当于basename%e #显示发生的事件信息,不同的事件默认用逗号分隔%Xe #显示发生的事件信息,不同的事件指定用X进行分隔# --timefmt 选项可用字段%Y #年份信息,包含世纪信息%y #年份信息,不包括世纪信息%m #显示月份,范围 01-12%d #每月的第几天,范围是 01-31%H #小时信息,使用 24小时制,范围 00-23%M #分钟,范围 00-59%S #秒,范例 0-60# -e 选项可以指定的事件access #文件或目录内容被读取modify #内容发生变化attrib #属性发生变化close_write #写入模式打开后关闭close_nowrite #只读打开后关闭close #关闭事件,无关模式open #打开事件,无关模式moved_to #文件或目录被移动到监控的目录中moved_from #文件或目录从监控的目录中被移动move #文件或目录不管移动到或是移出监控目录都触发事件move_self #被移动之后同名文件不再被监控create #创建文件或目录delete #文件或目录被删除delete_self #被删除之后同名文件不再被监控unmount #取消挂载
只监控一个事件
[root@ubuntu ~]# tree /data//data/├── dir1└── dir22 directories, 0 files#开始监控[root@ubuntu ~]# inotifywait /data/Setting up watches.Watches established.#在另一个终端中执行[root@ubuntu ~]# ls /data/dir1 dir2#提示 open事件并退出[root@ubuntu ~]# inotifywait /data/Setting up watches.Watches established./data/ OPEN,ISDIR
持续监控
[root@ubuntu ~]# inotifywait -m /data/Setting up watches.Watches established.#另一个终端操作[root@ubuntu ~]# ls /datadir1 dir2[root@ubuntu ~]# ls /data/dir1[root@ubuntu ~]# touch /data/test.txt#查看监控,一条命令可能有多个事件[root@ubuntu ~]# inotifywait -m /data/Setting up watches.Watches established./data/ OPEN,ISDIR/data/ ACCESS,ISDIR/data/ ACCESS,ISDIR/data/ CLOSE_NOWRITE,CLOSE,ISDIR/data/ OPEN,ISDIR dir1/data/ ACCESS,ISDIR dir1/data/ ACCESS,ISDIR dir1/data/ CLOSE_NOWRITE,CLOSE,ISDIR dir1/data/ CREATE test.txt/data/ OPEN test.txt/data/ ATTRIB test.txt/data/ CLOSE_WRITE,CLOSE test.txt
递归监控
[root@ubuntu ~]# ls /data/dir1/[root@ubuntu ~]# touch /data/dir1/test.txt[root@ubuntu ~]# rm -f /data/dir1/test.txt#无法监控 touch 和 rm[root@ubuntu ~]# inotifywait -m /data/Setting up watches.Watches established./data/ OPEN,ISDIR dir1/data/ ACCESS,ISDIR dir1/data/ CLOSE_NOWRITE,CLOSE,ISDIR dir1[root@ubuntu ~]# ls /data/dir1/[root@ubuntu ~]# touch /data/dir1/test.txt[root@ubuntu ~]# rm -f /data/dir1/test.txt#递归监控[root@ubuntu ~]# inotifywait -m -r /data/Setting up watches. Beware: since -r was given, this may take a while!Watches established./data/ OPEN,ISDIR dir1/data/dir1/ OPEN,ISDIR/data/ ACCESS,ISDIR dir1/data/dir1/ ACCESS,ISDIR/data/ ACCESS,ISDIR dir1/data/dir1/ ACCESS,ISDIR/data/ CLOSE_NOWRITE,CLOSE,ISDIR dir1/data/dir1/ CLOSE_NOWRITE,CLOSE,ISDIR/data/dir1/ CREATE test.txt/data/dir1/ OPEN test.txt/data/dir1/ ATTRIB test.txt/data/dir1/ CLOSE_WRITE,CLOSE test.txt/data/dir1/ DELETE test.txt
将结果输出到文件
[root@ubuntu ~]# inotifywait -m -r /data/ -o inotify.txtSetting up watches. Beware: since -r was given, this may take a while!Watches established.[root@ubuntu ~]# ls /data/dir1 dir2 test.txt#查看结果文件[root@ubuntu ~]# cat inotify.txt/data/ OPEN,ISDIR/data/ ACCESS,ISDIR/data/ CLOSE_NOWRITE,CLOSE,ISDIR
从文件中读取要监控的内容
[root@ubuntu ~]# cat a.txt/data/[root@ubuntu ~]# inotifywait -rm --fromfile a.txtSetting up watches. Beware: since -r was given, this may take a while!Watches established.
后台守护执行,并指定输出格式
[root@ubuntu ~]# inotifywait -drq /data/ -o inotify.log --timefmt "%Y-%m-%d %H:%M:%S" --format "%T %w %f event: %e"[root@ubuntu ~]# cat inotify.log2025-01-12 14:45:53 /data/ event: OPEN,ISDIR2025-01-12 14:45:53 /data/ event: ACCESS,ISDIR2025-01-12 14:45:53 /data/ event: CLOSE_NOWRITE,CLOSE,ISDIR
指定输出格式,且只记录特定事件
[root@ubuntu ~]# ls /data/dir1 dir2 test.txt[root@ubuntu ~]# touch /data/test.log[root@ubuntu ~]# touch /data/test.log[root@ubuntu ~]# rm -f /data/test.log[root@ubuntu ~]# inotifywait -mrq /data/ --timefmt "%F %H:%M:%S" --format "%T%w%f event:%;e" -e create,delete,moved_to,close_write,attrib2025-01-12 14:58:03 /data/test.log event:CREATE2025-01-12 14:58:03 /data/test.log event:ATTRIB2025-01-12 14:58:03 /data/test.log event:CLOSE_WRITE;CLOSE2025-01-12 14:58:06 /data/test.log event:ATTRIB2025-01-12 14:58:06 /data/test.log event:CLOSE_WRITE;CLOSE2025-01-12 14:58:09 /data/test.log event:DELETE
1.2.2 rsync 服务
rsync 常用于作为 linux系统下的数据镜像备份工具,实现远程同步,支持本地复制,或者与其他SSH、rsync主机同步数据,支持增量备份,配合任务计划,rsync能实现定时或间隔同步,配合 inotify 或 sersync,可以实现触发式的实时数据同步。
http://rsync.samba.org/ #官方网站安装软件
[root@ubuntu ~]# apt install rsync命令格式
#Localrsync [OPTION]... SRC [SRC]... DEST #本地文件同步#Access via remote shellrsync [OPTION]... [USER@]HOST:SRC [DEST] #PULL 拉,将远程主机上的文件拉到本地rsync [OPTION]... SRC [SRC]... [USER@]HOST:DEST #PUSH 推,将本地文件推送到远程主机上#Access via rsync daemon:rsync [OPTION]... [USER@]HOST::SRC [DEST] #PULL 拉,将远程主机上的文件拉到本地rsync [OPTION]... rsync://[USER@]HOST[:PORT]/SRC [DEST] #PULL 拉,将远程主机上的文件拉到本地rsync [OPTION]... SRC [SRC]... [USER@]HOST::DEST #PUSH 推,将本地文件推送到远程主机上rsync [OPTION]... SRC [SRC]... rsync://[USER@]HOST[:PORT]/DEST #PUSH 推,将本地文件推送到远程主机上
rsync 有三种工作方式
-
本地文件系统上实现同步。命令行语法格式为上述 "Local" 段的格式
-
本地主机使用远程shell和远程主机通信。命令行语法格式为上述 "Access via remote shell" 段的格式,使用的用户名和密码是 Linux系统的用户名和密码
-
本地主机通过网络套接字连接远程主机上的 rsync daemon。命令行语法格式为上述 "Access via rsync daemon" 段的格式,使用的用户名和密码是 rsync 服务中配置的用户名和密码
前两者的本质是通过本地或远程shell,而第3种方式则是让远程主机上运行 rsyncd 服务,使其监听在一个端口上,等待客户端的连接,此种方式使用的 rsync 的专有协议。
常用选项
--verbose|-v #显示详细过程,最多可以 -vvvv--quiet|-q #不输出错误信息--archive|-a #归档模式,保留文件属性--recursive|-r #递归--backup|-b #如果目标文件存在,先做备份,默认备份后缀是 ~--backup-dir=DIR #指定备份目录--suffix=SUFFIX #指定备份后缀--update|-u #仅在源mtime比目标已存在文件的mtime新时才拷贝,该选项是接收端判断的,不会影响删除行为--links|-l #传输软链接文件,而不是传输其指向的文件--copy-links|-L #跟随软链接,传输其指向的目标文件或目录--perms|-p #保留权限(不包括特殊权限)--owner|-o #保持owner属性--group|-g #保持group属性-D #传输设备文件和特殊文件,同 --devices --specials--times|-t #保留mtime属性--dry-run|-n #测试模式,不实际传输,常合 -vvvv 配合查看细节--whole-file|-W #不使用增量传输,而使用全量传输,在网络带宽高于磁盘带宽时,该选项比增量传输更高效--rsh=COMMAND|-e #指定所要使用的远程shell程序,默认为ssh--existing #只更新远端已存在的文件,远端不存在的文件不传输。使用相对路径时如果上层目录不存在也不会传输--ignore-existing #只传输远程主机不存在的文件--remove-source-files #删除己传输成功的源文件--del #在传输中删除,同 --delete-during--delete #文件传输时,删除DEST中在SRC 中不存在的文件--delete-before #传输开始前先删除--delete-during #在传输过程中删除--delete-delay #在传输中确定要删除的文件,传输结束后删除--delete-after #传输结束后再删除--delete-excluded #删除远程主机上在此项中指定的文件--force #强制删除目录,哪怕不为空--max-delete=NUM #最多删除NUM个文件--max-size=SIZE #限制rsync传输的最大文件大小,可以使用单位后缀,可以写小数值--min-size=SIZE #限制rsync传输的最小文件大小。可用于禁止传输小文件或垃圾文件,可以写小数值--size-only #默认传输有变化的文件,默认检查文件大小变化和 mtime,此项表示只检查文件大小变化--compress|-z #压缩传输--exclude=PATTERN #用正则来指定排除规则来排除不需要传输的文件--exclude-from=FILE #从文件中读取不需要被传送的文件--include=PATTERN #用正则来指定要传输的文件--include-from=FILE #从文件中读取要传输的文件--port=PORT #连接daemon时使用的端口号,默认为873端口--human-readable|-h #以人类友好的格式显示相关信息--progress #显示进度条-P #显示进度条,同 --partial --progress--password-file=FILE #daemon模式时密码文件,读取密码非交互式操作 这不是远程shell认证的密码,而是rsync模块认证的密码--version|-V #显示版本信息--help|-h (*) #显示帮助信息
实现 rsync daemon 服务
主机清单
| IP | 角色 |
| 10.0.0.208 | rsync-server |
| 10.0.0.206 | rsync-client |
#服务端以守护进程运行[root@ubuntu ~]# systemctl enable --now rsync.service#启动失败,因为 /etc/rsyncd.conf 配置文件不存在[root@ubuntu ~]# systemctl status rsync.service#创建空配置文件[root@ubuntu ~]# touch /etc/rsyncd.conf#启动服务[root@ubuntu ~]# systemctl start rsync.service#查看服务状态,运行中[root@ubuntu ~]# systemctl status rsync#监听 873 端口[root@ubuntu ~]# ss -tunlp | grep rsync#客户端连接测试[root@ubuntu ~]# rsync rsync://10.0.0.208[root@ubuntu ~]# echo $?0
#修改服务端配置,指定共享目录[root@ubuntu ~]# cat /etc/rsyncd.conf[dir1]path=/data/dir1/read only=no#重启服务[root@ubuntu ~]# systemctl restart rsync.service#查看服务端目录[root@ubuntu ~]# tree /data//data/└── dir11 directory, 0 files#客户端再次测试,可以看到内容[root@ubuntu ~]# rsync rsync://10.0.0.208dir1#两种写法都可以, :: 表示走rsync协议[root@ubuntu ~]# rsync 10.0.0.208::dir1#传输文件到远程失败,此处的 root 是指rsync服务的用户,当前服务端并没有配置此信息,默认会被映射成 nobody[root@ubuntu ~]# rsync /etc/fstab root@10.0.0.208::dir1rsync: [receiver] mkstemp "/.fstab.tBlxU2" (in dir1) failed: Permission denied (13)rsync error: some files/attrs were not transferred (see previous errors) (code 23) at main.c(1338) [sender=3.2.7]#在服务端配置权限[root@ubuntu ~]# setfacl -m u:nobody:rwx /data/dir1/#客户端再次测试,上传成功,现在使用的是匿名连接[root@ubuntu ~]# rsync /etc/fstab root@10.0.0.208::dir1[root@ubuntu ~]# rsync /etc/issue tom@10.0.0.208::dir1 #tom 用户在服务端并不存在#服务端查看,属主属组都是 nobody[root@ubuntu ~]# ls -l /data/dir1/total 8-rw-r--r-- 1 nobody nogroup 771 Jul 12 00:02 fstab-rw-r--r-- 1 nobody nogroup 24 Jul 12 00:04 issue#指定映射账号,指定日志文件,指定远程连接用户名和密码,禁用匿名连接[root@ubuntu ~]# cat /etc/rsyncd.confuid=rootgid=rootmax connections=0log file=/var/log/rsyncd.logpid file=/var/run/rsyncd.pidlock file=/var/run/rsyncd.lock[dir1]path=/data/dir1/comment=rsync dir1read only=noauth users=rsyncersecrets file=/etc/rsyncd.pwd#密码文件[root@ubuntu ~]# cat /etc/rsyncd.pwd123456#重启服务[root@ubuntu ~]# systemctl restart rsync.service#客户端再次测试,匿名非匿名都报错[root@ubuntu ~]# rsync 10.0.0.208::dir1Password:@ERROR: auth failed on module dir1rsync error: error starting client-server protocol (code 5) at main.c(1863) [Receiver=3.2.7][root@ubuntu ~]# rsync rsyncer@10.0.0.208::dir1Password:@ERROR: auth failed on module dir1rsync error: error starting client-server protocol (code 5) at main.c(1863) [Receiver=3.2.7]#查看服务端日志,密码文件不能被所有人可读[root@ubuntu ~]# cat /var/log/rsyncd.log#修改密码文件权限[root@ubuntu ~]# chmod 600 /etc/rsyncd.pwd[root@ubuntu ~]# ll /etc/rsyncd.pwd-rw------- 1 root root 15 Jul 13 08:58 /etc/rsyncd.pwd#客户端再次测试[root@ubuntu ~]# rsync /etc/hosts rsyncer@10.0.0.208::dir1Password:[root@ubuntu ~]# rsync rsyncer@10.0.0.208::dir1Password:drwxrwxr-x 4,096 2023/07/13 09:23:12 .-rw-r--r-- 771 2023/07/12 00:02:15 fstab-rw-r--r-- 270 2023/07/13 09:23:12 hosts-rw-r--r-- 24 2023/07/12 00:04:37 issue#服务端查看,新文件属主属组发生了变化[root@ubuntu ~]# ls -lh /data/dir1/total 12K-rw-r--r-- 1 nobody nogroup 771 Jul 12 00:02 fstab-rw-r--r-- 1 root root 270 Jul 13 09:23 hosts-rw-r--r-- 1 nobody nogroup 24 Jul 12 00:04 issue
#查看客户端文件[root@ubuntu ~]# tree /data/www//data/www/├── dira│ └── os-release├── f1├── f2├── fstab└── issue1 directory, 5 files#查看服务端文件[root@ubuntu ~]# tree /data/dir1//data/dir1/├── fstab├── hosts└── issue0 directories, 3 files#将客户端密码保存在单独文件,实现非交互式连接[root@ubuntu ~]# echo "123456" > /etc/rsyncd.pwd[root@ubuntu ~]# chmod 600 /etc/rsyncd.pwd#客户端测试,保证服务端与客户端同步#--delete 选项,此次同步完成后,删除服务端不在此次同步中的文件#-a 保留属性#-v 显示过程#-z 压缩传输[root@ubuntu ~]# rsync -avz --delete --password-file=/etc/rsyncd.pwd /data/www/ rsyncer@10.0.0.208::dir1sending incremental file listdeleting hosts #删除了远程的 hosts 文件./f1f2fstabissuedira/dira/os-releasesent 1,169 bytes received 147 bytes 2,632.00 bytes/sec total size is 1,182 speedup is 0.90#再次查看服务端,与客户端保持一致了[root@ubuntu ~]# tree /data/dir1//data/dir1/├── dira│?? └── os-release├── f1├── f2├── fstab└── issue1 directory, 5 files
rsync 服务常用配置项
#查看配置示例[root@ubuntu ~]# cat /usr/share/doc/rsync/examples/rsyncd.conf# GLOBAL OPTIONS #全局配置部份motd file=/etc/motd #motd 文件路径log file=/var/log/rsyncd #日志文件pid file=/var/run/rsyncd.pid #PID 文件syslog facility=daemon #rsyslog 日志服务中的日志归类socket options= #socket 选项,具体见 man setsockopt[ftp] #客户端显示的名称comment = public archive #客户端列出该共享目录时的说明信息path = /var/www/pub #服务端具体目录use chroot = yes #更改映射目录的根目录max connections=10 #最大连接数,同时有多少客户端可以连接lock file = /var/lock/rsyncd #锁文件read only = yes #默认客户端只读访问list = yes #客户端是否可以列出服务端内容uid = nobody #默认将客户端上传的文件属主映射成 nobodygid = nogroup #默认将客户端上传的文件属组映射成 nobodyexclude = #指定排除项,在此处指定的内容在客户端无法显示exclude from = #从指定文件中读取排除项include = #指定显示项,配合 exclude,exclude from 使用include from = #同上auth users = #客户端用户名,启用此项表示禁用匿名连接secrets file = /etc/rsyncd.secrets #客户端用户名和密码对应文件strict modes = yes #严格检查权限,此选项用于 windows 系统上的 rsynchosts allow = #客户端白名单hosts deny = #客户端黑名单ignore errors = no #不忽略错误ignore nonreadable = yes #transfer logging = no #是否开启传输日志log format = %t: host %h (%a) %o %f (%l bytes). Total %b bytes. #默认日志格式timeout = 600 #超时时长refuse options = checksum dry-run #服务端拒绝客户端执行的命令列表dont compress = *.gz *.tgz *.zip *.z *.rpm *.deb *.iso *.bz2 *.tbz #不压缩指定文件#查看配置帮助[root@ubuntu ~]# man rsyncd.conf
1.2.3 inotify + rsync 实现数据实时同步
#客户端同步脚本[root@ubuntu data]# cat ./www_rsync.sh#!/bin/bashSRC='/data/www/'DEST='rsyncer@10.0.0.208::dir1'dpkg -V inotify-tools &>/dev/null || apt install inotify-tools -ydpkg -V rsync &>/dev/null || apt install rsync -y#不间断监控指定目录中的特定事件,当目录中有事件发生变化时,调用 rsync 命令进行同步inotifywait -mrq --exclude=".*\.swp" --timefmt '%Y-%m-%d %H:%M:%S' --format '%T %w %f' -e create,delete,moved_to,close_write,attrib ${SRC} | while read DATE TIME DIR FILE;doFILEPATH=${DIR}${FILE}rsync -az --delete --password-file=./www_rsync.pwd $SRC $DEST && echo "At ${TIME} on ${DATE}, file ${FILEPATH} was backup via rsync" >> ./www_rsync.logdone#查看客户端[root@ubuntu ~]# tree /data//data/├── www├── www_rsync.pwd└── www_rsync.sh1 directory, 2 files#测试,客户端运行脚本[root@ubuntu data]# ./www_rsync.sh#在另一个终端中创建文件[root@ubuntu ~]# touch /data/www/f1[root@ubuntu ~]# cp /etc/fstab /data/www/[root@ubuntu ~]# dd if=/dev/zero of=/data/www/test.img bs=1M count=1010+0 records in10+0 records out10485760 bytes (10 MB, 10 MiB) copied, 0.00923138 s, 1.1 GB/s[root@ubuntu ~]# mkdir -pv /data/www/dira/dirb/dircmkdir: created directory '/data/www/dira'mkdir: created directory '/data/www/dira/dirb'mkdir: created directory '/data/www/dira/dirb/dirc'#在服务湍查看[root@ubuntu ~]# tree /data/dir1//data/dir1/├── dira│ └── dirb│ └── dirc├── f1├── fstab└── test.img3 directories, 3 files#查看客户端日志,由于某些行为会触发多个事件,导致多次调用脚本,效率不高[root@ubuntu ~]# cat /data/www_rsync.logAt 03:14:53 on 2025-01-13, file /data/www/f1 was backup via rsyncAt 03:14:53 on 2025-01-13, file /data/www/f1 was backup via rsyncAt 03:14:53 on 2025-01-13, file /data/www/f1 was backup via rsyncAt 03:15:05 on 2025-01-13, file /data/www/fstab was backup via rsyncAt 03:15:05 on 2025-01-13, file /data/www/fstab was backup via rsyncAt 03:15:45 on 2025-01-13, file /data/www/test.img was backup via rsyncAt 03:15:45 on 2025-01-13, file /data/www/test.img was backup via rsyncAt 03:16:05 on 2025-01-13, file /data/www/dira was backup via rsync
1.3 sersync 实现数据实时同步
sersync 类似 于inotify,同样用于监控,但它克服了 inotify 的缺点,inotify 最大的不足是会产生重复事件,或者同一个目录下多个文件的操作会产生多个事件,例如,当监控目录中有5个文件时,删除目录时会产生6个监控事件,从而导致重复调用 rsync 命令。另外比如:vim 文件时,inotify 会监控到临时文件的事件,但这些事件相对于 rsync 来说是不应该被监控的。
sersync 特点
-
sersync是使用c++编写,而且对linux系统文件系统产生的临时文件和重复的文件操作进行过滤,所以在结合rsync同步的时候,节省了运行时耗和网络资源。因此更快。
-
sersync 配置很简单,其中提供了静态编译好的二进制文件和 xml 配置文件,直接使用即可
-
sersync 使用多线程进行同步,尤其在同步较大文件时,能够保证多个服务器实时保持同步状态
-
sersync 有出错处理机制,通过失败队列对出错的文件重新同步,如果仍旧失败,则按设定时长对同步失败的文件重新同步
-
sersync 不仅可以实现实时同步,另外还自带 crontab 功能,只需在 xml 配置文件中开启,即也可以 按要求隔一段时间整体同步一次,而无需再额外配置 crontab 功能
-
sersync 可以二次开发
https://code.google.com/archive/p/sersync/ #项目地址#下载[root@ubuntu ~]# wget https://storage.googleapis.com/google-code-archive-downloads/v2/code.google.com/sersync/sersync2.5.4_64bit_binary_stable_final.tar.gz#解压[root@ubuntu ~]# tar xf sersync2.5.4_64bit_binary_stable_final.tar.gz[root@ubuntu ~]# lsGNU-Linux-x86 sersync2.5.4_64bit_binary_stable_final.tar.gz snap[root@ubuntu ~]# ls GNU-Linux-x86/confxml.xml sersync2#移动[root@ubuntu ~]# mv GNU-Linux-x86/ /usr/local/sersync[root@ubuntu ~]# ls /usr/local/sersync/confxml.xml sersync2
配置文件说明
<?xml version="1.0" encoding="ISO-8859-1"?><head version="2.5"><host hostip="localhost" port="8008"></host><debug start="false"/> #是否开启调试模式<fileSystem xfs="false"/><filter start="false"> #不开启文件过滤功能,当为true时,下列文件不同步<exclude expression="(.*)\.svn"></exclude><exclude expression="(.*)\.gz"></exclude><exclude expression="^info/*"></exclude><exclude expression="^static/*"></exclude></filter><inotify> #具体监控的事件<delete start="true"/><createFolder start="true"/><createFile start="false"/><closeWrite start="true"/><moveFrom start="true"/><moveTo start="true"/><attrib start="false"/> #此处改为true,则文件属性发生变化,也会同步<modify start="false"/></inotify><sersync> #rsync命令的配置段<localpath watch="/opt/tongbu"> #需要同步的目录<remote ip="127.0.0.1" name="tongbu1"/> #远程主机地址和目录<!--<remote ip="192.168.8.39" name="tongbu"/>--><!--<remote ip="192.168.8.40" name="tongbu"/>--></localpath><rsync><commonParams params="-artuz"/> #指定rsync选项<auth start="false" users="root" passwordfile="/etc/rsync.pas"/>#修改为true,指定rsync用户名和密码文件<userDefinedPort start="false" port="874"/> #指定非标准端口<!-- port=874 --><timeout start="false" time="100"/><!-- timeout=100 --><ssh start="false"/> #默认远程rsync daemon运行,true为使用远程shell</rsync><failLog path="/tmp/rsync_fail_log.sh" timeToExecute="60"/>#错误重传及日志文件路径<!--default every 60mins execute once--><crontab start="false" schedule="600"><!--600mins-->#不开启crontab功能<crontabfilter start="false"> #不开启crontab定时传输的筛选功能<exclude expression="*.php"></exclude><exclude expression="info/*"></exclude></crontabfilter></crontab><plugin start="false" name="command"/></sersync>#以下不需要修改<plugin name="command"><param prefix="/bin/sh" suffix="" ignoreError="true"/> <!--prefix /opt/tongbu/mmm.sh suffix--><filter start="false"><include expression="(.*)\.php"/><include expression="(.*)\.sh"/></filter></plugin><plugin name="socket"><localpath watch="/opt/tongbu"><deshost ip="192.168.138.20" port="8009"/></localpath></plugin><plugin name="refreshCDN"><localpath watch="/data0/htdocs/cms.xoyo.com/site/"><cdninfo domainname="ccms.chinacache.com" port="80" username="xxxx" passwd="xxxx"/><sendurl base="http://pic.xoyo.com/cms"/><regexurl regex="false" match="cms.xoyo.com/site([/a-zA-Z0-9]*).xoyo.com/images"/></localpath></plugin></head>
sersync2 命令用法和参数
[root@ubuntu sersync]# ./sersync2 -hset the system paramexecute:echo 50000000 > /proc/sys/fs/inotify/max_user_watchesexecute:echo 327679 > /proc/sys/fs/inotify/max_queued_eventsparse the command param_______________________________________________________参数-d:启用守护进程模式参数-r:在监控前,将监控目录与远程主机用rsync命令推送一遍参数-n:指定开启守护线程的数量,默认为10个参数-o:指定配置文件,默认使用confxml.xml文件参数-m:单独启用其他模块,使用 -m refreshCDN 开启刷新CDN模块参数-m:单独启用其他模块,使用 -m socket 开启socket模块参数-m:单独启用其他模块,使用 -m http 开启http模块不加-m参数,则默认执行同步程序_________________________________________________
客户端测试
#服务端文件[root@ubuntu ~]# tree /data/dir1//data/dir1/└── f20 directories, 1 file#客户端文件[root@ubuntu ~]# tree /data/www/data/www└── f10 directories, 1 file[root@ubuntu ~]# cd /usr/local/sersync/[root@ubuntu sersync]# ./sersync2 -dro ./confxml.xml#查看服务端,己经和客户端保持一致了[root@ubuntu ~]# tree /data/dir1//data/dir1/└── f10 directories, 1 file#客户端测试[root@ubuntu ~]# mkdir -pv /data/www/dira/dirb/dircmkdir: created directory '/data/www/dira'mkdir: created directory '/data/www/dira/dirb'mkdir: created directory '/data/www/dira/dirb/dirc'[root@ubuntu ~]# cp /etc/fstab /data/www/[root@ubuntu ~]# dd if=/dev/zero of=/data/www/test.img bs=1M count=1010+0 records in10+0 records out10485760 bytes (10 MB, 10 MiB) copied, 0.00870068 s, 1.2 GB/s#服务端查看[root@ubuntu ~]# tree /data/dir1//data/dir1/├── dira│ └── dirb│ └── dirc├── f1├── fstab└── test.img3 directories, 3 files#客户端查看后台进程[root@ubuntu ~]# ps aux | grep rsyncroot 5249 0.0 0.0 116928 1624 ? Ssl 07:02 0:00 ./sersync2 -dro ./confxml.xmlroot 5307 0.0 0.1 6476 2324 pts/0 S+ 07:04 0:00 grep --color=auto rsync
相关文章:

数据实时同步:inotify + rsync 实现数据实时同步
1 数据实时同步 在生产环境中,某些场景下,要将数据或文件进行实时同步,保证数据更新后其它节点能立即获得最新的数据。 数据同步的两种方式 PULL:拉,使用定时任务的方式配合同步命令或脚本等,从指定服务…...

LeetCode 404.左叶子之和的迭代求解:栈结构与父节点定位的深度解析
一、题目解析:左叶子的定义与问题本质 题目描述 LeetCode 404. 左叶子之和要求计算二叉树中所有左叶子节点的值之和。左叶子的定义是:如果一个节点是其父节点的左子节点,并且它本身没有左右子节点,则称为左叶子。 关键要点 左…...
Unity-编辑器扩展
之前我们关于Unity的讨论都是针对于Unity底层的内容或者是代码层面的东西,这一次我们来专门研究Unity可视化的编辑器,在已有的基础上做一些扩展。 基本功能 首先我们来认识三个文件夹: Editor,Gizmos,Editor Defaul…...

【自用-python】生成准心居中exe程序,防止云电脑操作时候鼠标偏移
封装exe:: altf12是终端---我理解的就是最初始python的运行台 看where python(Windows的)看是在那个路径 再确保之前pip安装了pyinstaller 然后pyinstaller --onefile --noconsole --name 输出exe的文件名称 你的py文件名称.py…...

Lucide:一款精美的开源矢量图标库,前端图标新选择
名人说:博观而约取,厚积而薄发。——苏轼《稼说送张琥》 创作者:Code_流苏(CSDN)(一个喜欢古诗词和编程的Coder😊) 目录 一、前言:为何选择 Lucide?二、Lucide 是什么?1.…...

在Rocky Linux 8.10上安装Nginx
如果没有配置操作系统安装源,并且不连接网络,先配置安装源。 sudo dnf install nginx sudo systemctl enable nginx sudo systemctl start nginx systemctl status nginx curl http://ip [rootrocky810 work]# sudo dnf install nginx Last metadata …...
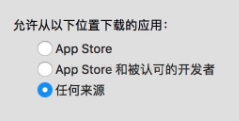
Mac如何允许安装任何来源软件?
打开系统偏好设置-安全性与隐私,点击右下角的解锁按钮,选择允许从任何来源。 如果没有这一选项,请到打开终端,输入命令行:sudo spctl --master-disable, 输入命令后回车,输入电脑的开机密码后回车。 返回“…...

YOLO学习笔记 | YOLO11对象检测,实例分割,姿态评估的TensorRT部署c++
以下是YOLOv11在TensorRT上部署的步骤指南,涵盖对象检测、实例分割和姿态评估: 1. 模型导出与转换 1.1 导出ONNX模型 import torch from models.experimental import attempt_loadmodel = attempt_load(yolov11s.pt, fuse=True) model.eval...

2025最新版Visual Studio Code for Mac安装使用指南
2025最新版Visual Studio Code for Mac安装使用指南 Installation and Application Guide to The Latest Version of Visual Studio Code in 2025 By JacksonML 1. 什么是Visual Studio Code? Visual Studio Code,通常被称为 VS Code,是由…...

机器学习第二十三讲:CNN → 用放大镜局部观察图片特征层层传递
机器学习第二十三讲:CNN → 用放大镜局部观察图片特征层层传递 资料取自《零基础学机器学习》。 查看总目录:学习大纲 关于DeepSeek本地部署指南可以看下我之前写的文章:DeepSeek R1本地与线上满血版部署:超详细手把手指南 CNN详…...

【嵙大o】C++作业合集
参考: C swap(交换)函数 指针/引用/C自带-CSDN博客 Problem IDTitleCPP指针CPP引用1107 Problem A编写函数:Swap (I) (Append Code)1158 Problem B整型数据的输出格式1163 Problem C时间:24小时制转12小时制1205…...

《算法笔记》11.8小节——动态规划专题->总结 问题 B: 拦截导弹
题目描述 某国为了防御敌国的导弹袭击,开发出一种导弹拦截系统。但是这种导弹拦截系统有一个缺陷:虽然它的第一发炮弹能够到达任意的高度,但是以后每一发炮弹都不能高于前一发的高度。某天,雷达捕捉到敌国的导弹来袭,…...

Flink 核心概念解析:流数据、并行处理与状态
一、流数据(Stream Data) 1. 有界流(Bounded Stream) 定义:有明确起始和结束时间的数据集合,数据量固定,处理逻辑通常是一次性计算所有数据。 典型场景: 历史交易数据统计…...

C++23 范围迭代器作为非范围算法的输入 (P2408R5)
文章目录 一、引言二、C23及范围迭代器的背景知识2.1 C23概述2.2 范围迭代器的概念 三、P2408R5提案的内容3.1 提案背景3.2 提案内容 四、范围迭代器作为非范围算法输入的优势4.1 代码简洁性4.2 提高开发效率4.3 更好的兼容性 五、具体的代码示例5.1 使用范围迭代器进行并行计算…...

PHP-FPM 调优配置建议
1、动态模式 pm dynamic; 最大子进程数(根据服务器内存调整) pm.max_children 100 //每个PHP-FPM进程大约占用30-50MB内存(ThinkPHP框架本身有一定内存开销)安全值:8GB内存 / 50MB ≈ 160,保守设置为100 ; 启动时创建的进程数&…...
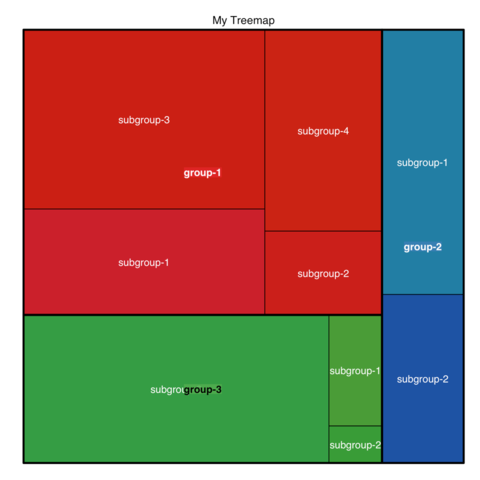
2025.05.20【Treemap】树图数据可视化技巧
Multi-level treemap How to build a treemap with group and subgroups. Customization Customize treemap labels, borders, color palette and more 文章目录 Multi-level treemapCustomization Treemap 数据可视化技巧什么是 TreemapTreemap 的应用场景如何在 R 中绘制 T…...

Elasticsearch 写入性能优化有哪些常见手段?
Elasticsearch 写入性能优化常见手段主要有以下 10 个方向,建议根据具体业务场景组合使用: 批量写入优化 使用_bulk API 批量提交文档建议每批次 5-15MB 数据量并发执行多个批量请求 索引配置调优 PUT /my_index {"settings": {"inde…...

CICD编译时遇到npm error code EINTEGRITY的问题
场景 CICD编译时抛出npm error code EINTEGRITY的错误 npm error code EINTEGRITY npm error sha512-PlhdFcillOINfeV7Ni6oF1TAEayyZBoZ8bcshTHqOYJYlrqzRK5hagpagky5o4HfCzzd1TRkXPMFq6cKk9rGmA integrity checksum failed when using sha512: wanted sha512-PlhdFcillOINfeV…...
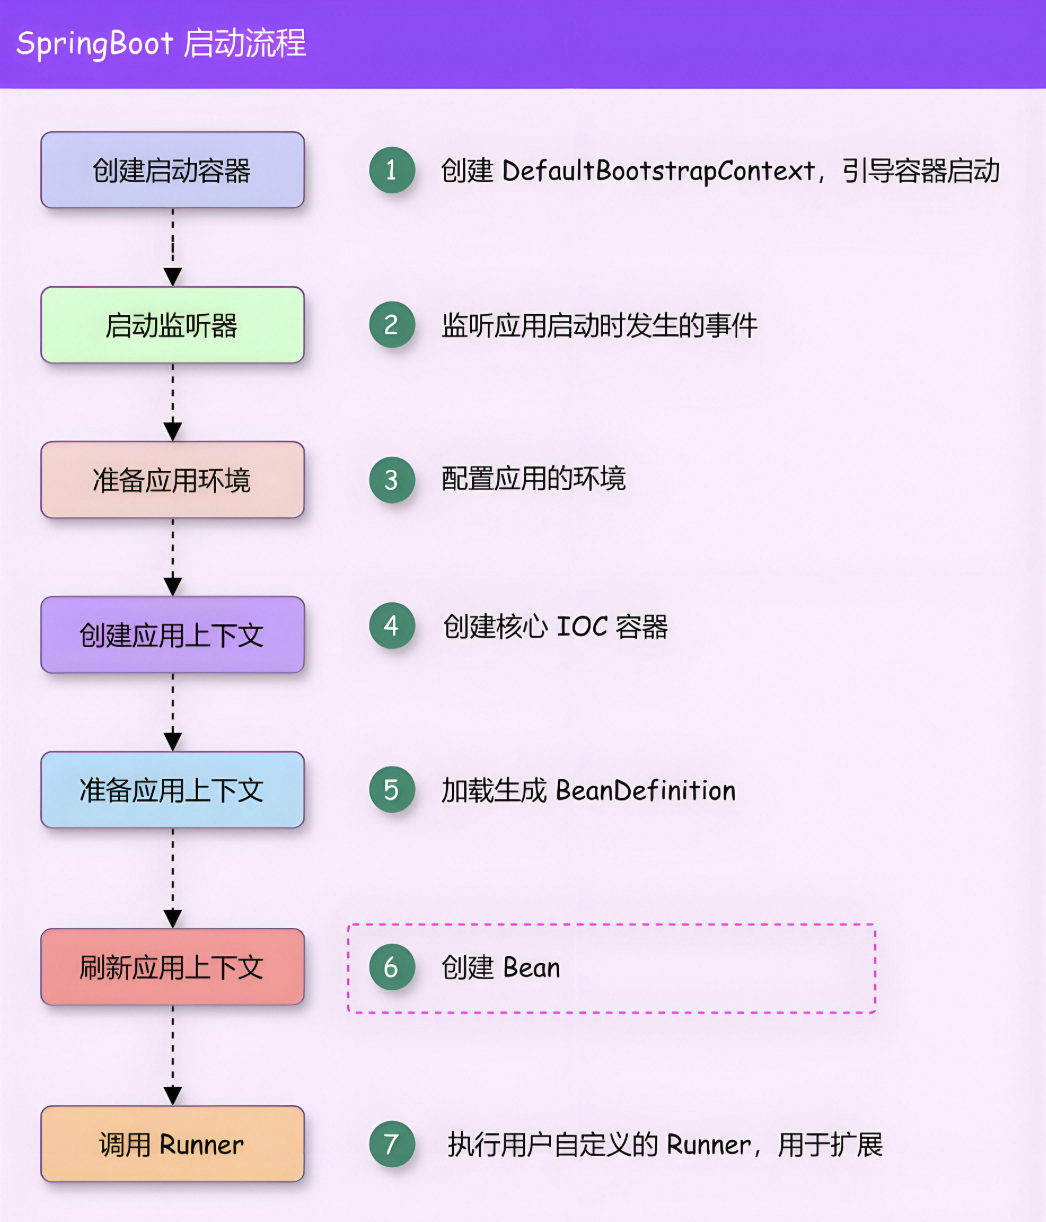
深入了解Springboot框架的启动流程
目录 1、介绍 2、执行流程 1、运行run方法 2、初始化SpringApplication对象 1、确定容器类型 3、加载所有的初始化器 4、加载Spring上下文监听器 5、设置程序运行的主类 3、进入run方法 1、开启计时器 2、Headless模式配置 3、获取并启用监听器 4、准备环境 1、设…...

DataWhale llm universe
搭建向量知识库 向量以及向量知识库 向量词与向量 词向量:是一种以单词为单位的将每个单词转化为实数向量的技术,这些实数可以被计算机更好的理解,如果是相近的理念或者相关的对象在向量空间中距离很近 词向量实际上将单词转化为固定的静态…...

LLaMA-Factory微调LLM-Research/Llama-3.2-3B-Instruct模型
1、GPU环境 nvidia-smi 2、pyhton环境安装 git clone https://github.com/hiyouga/LLaMA-Factory.git conda create -n llama_factory python3.10 conda activate llama_factory cd LLaMA-Factory pip install -e .[torch,metrics] 3、微调模型下载(LLM-Research/…...

DB-MongoDB-00002--Workload Generator for MongoDB
## DB-MongoDB-00002–Workload Generator for MongoDB 1、介绍 Workload Generator for MongoDB was designed to help MongoDB users effortlessly generate data and simulate workloads for both sharded and non-sharded clusters. The generated workloads include s…...

3.8.1 利用RDD实现词频统计
在本次实战中,我们通过Spark的RDD实现了词频统计功能。首先,准备了包含单词的文件并上传至HDFS。接着,采用交互式方式逐步完成词频统计,包括创建RDD、单词拆分、映射为二元组、按键归约以及排序等操作。此外,还通过创建…...
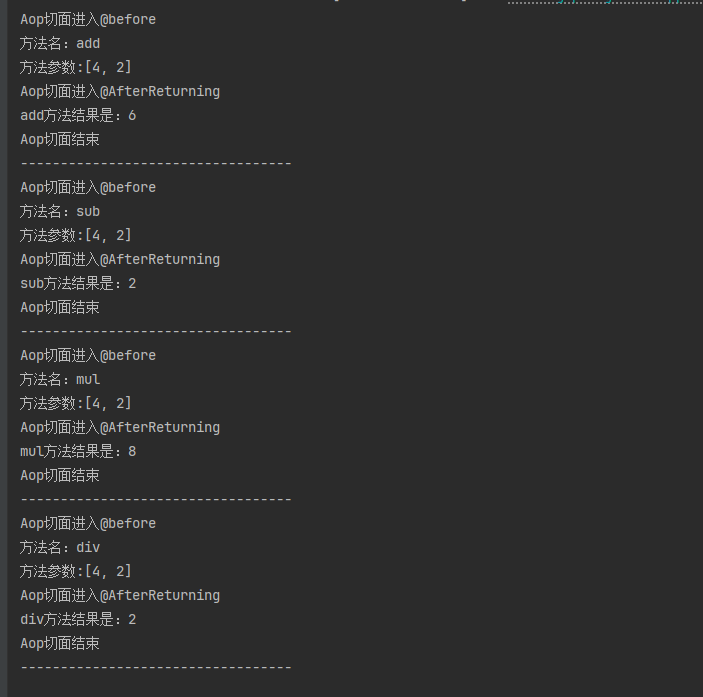
Spring Ioc和Aop,Aop的原理和实现案例,JoinPoint,@Aspect,@Before,@AfterReturning
DAY25.2 Java核心基础 Spring两大核心:Ioc和Aop IOC Ioc容器:装载bean的容器,自动创建bean 三种方式: 1、基于xml配置:通过在xml里面配置bean,然后通过反射机制创建bean,存入进Ioc容器中 …...
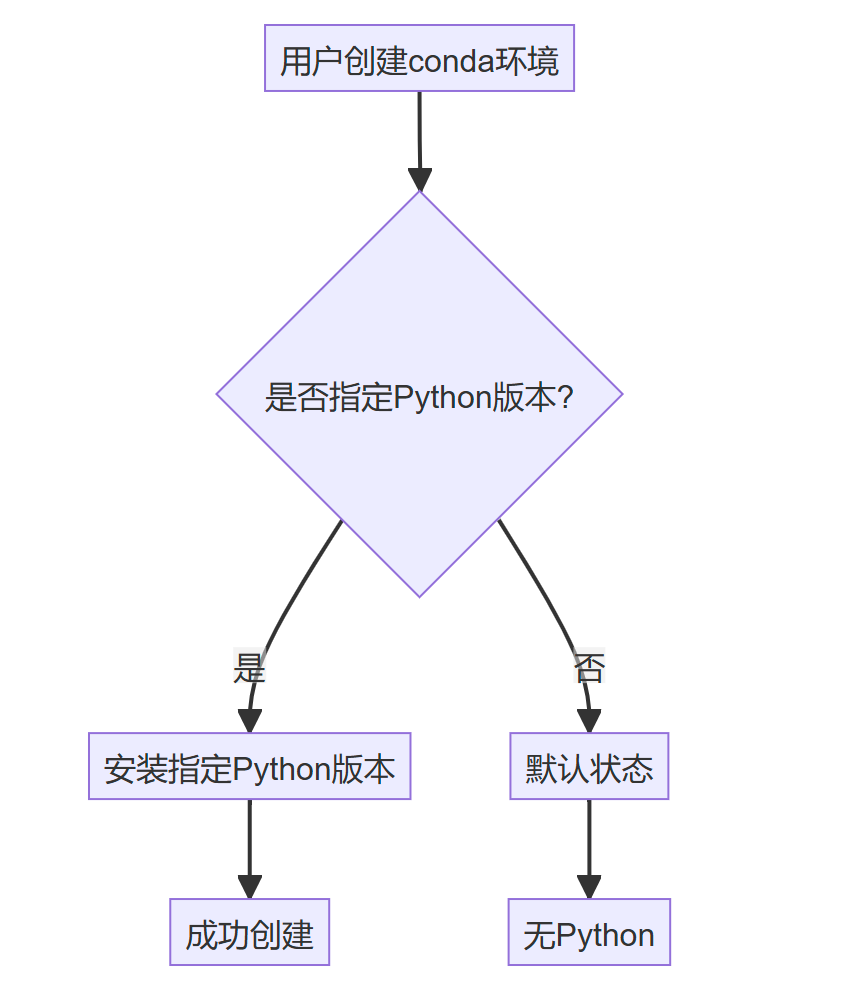
[解决conda创建新的虚拟环境没用python的问题]
问题复现 使用conda create -n env的时候,在对应的虚拟环境的文件里面找不到对应的python文件 为什么 首先,我们来看一下创建环境时的触发链路: 这表明当前环境中找不到Python可执行文件。 解决方法 所以很明显,我们需要指定…...

【优秀三方库研读】在 quill 开源库 LogMarcos.h 中知识点汇总及讲解
以下是LogMarcos.h中的主要知识点汇总及详细讲解: 大纲目录 编译时日志级别过滤预处理宏与条件编译可变参数处理技巧格式化字符串生成日志宏的分发机制线程本地存储(TLS)零成本抽象设计动态日志级别支持结构化日志标签日志频率限制机制1. 编译时日志级别过滤 核心宏:QUILL…...
openjdk17 c++源码垃圾回收之安全点阻塞状态线程在安全点同步中无需调用block函数的详细流程解析)
jvm安全点(五)openjdk17 c++源码垃圾回收之安全点阻塞状态线程在安全点同步中无需调用block函数的详细流程解析
关于阻塞状态线程在安全点同步中无需调用block函数的详细流程解析: 1. 安全点同步入口:SafepointSynchronize::begin() VM线程调用此函数启动安全点,核心步骤如下: 获取线程锁(Threads_lock):防…...

C++ 中的 **常变量** 与 **宏变量** 比较
🔍 C 中的 常变量 与 宏变量 比较 C 中定义不可修改值的方式主要有两种:常变量(const/constexpr) 和 宏变量(#define)。它们在机制、类型安全性、作用域和调试支持方面存在显著差异。 ✅ 1. 常变量&#x…...
【C++】控制台小游戏
移动:W向上,S上下,A向左,D向右 程序代码: #include <iostream> #include <conio.h> #include <windows.h> using namespace std;bool gameOver; const int width 20; const int height 17; int …...
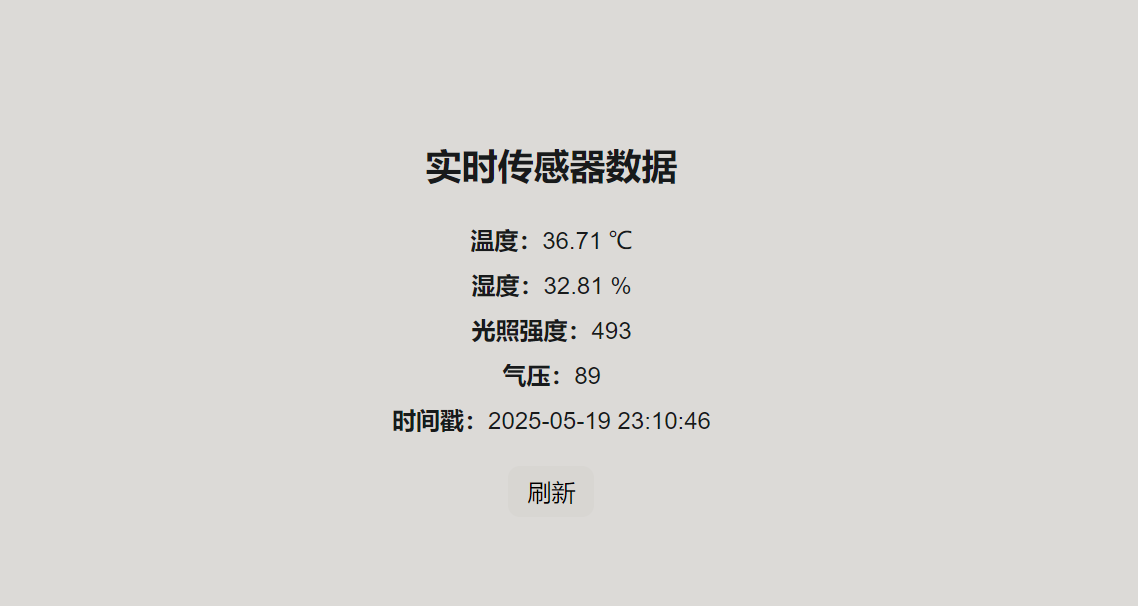
配合本专栏前端文章对应的后端文章——从模拟到展示:一步步搭建传感器数据交互系统
对应文章:进一步完善前端框架搭建及vue-konva依赖的使用(Vscode)-CSDN博客 目录 一、后端开发 1.模拟传感器数据 2.前端页面呈现数据后端互通 2.1更新模拟传感器数据程序(多次请求) 2.2🧩 功能目标 …...