Vue 核心技术与实战day07
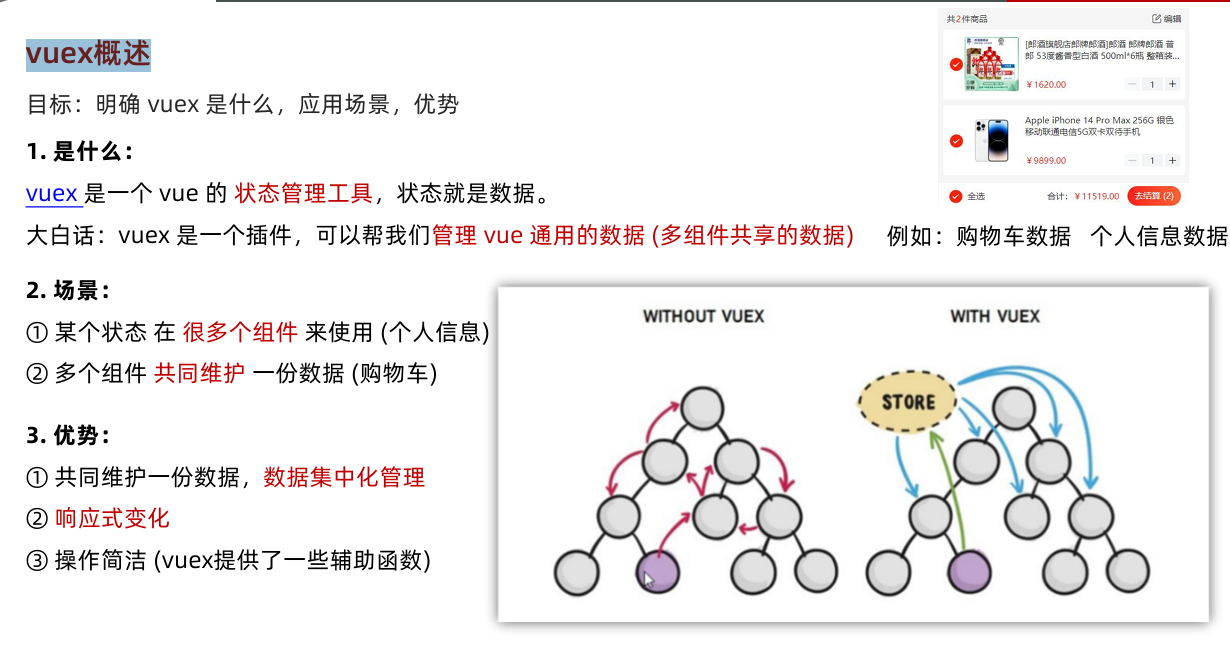
1. vuex概述
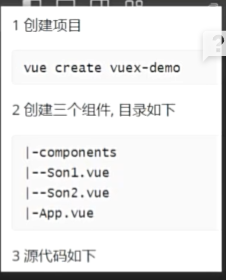
2. 构建 vuex [多组件数据共享] 环境
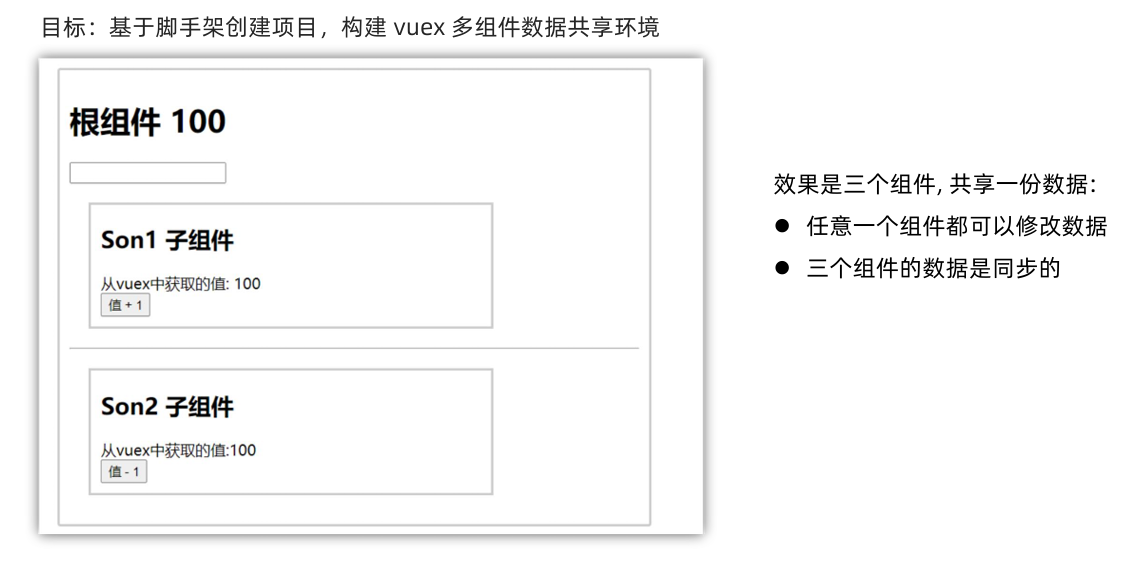
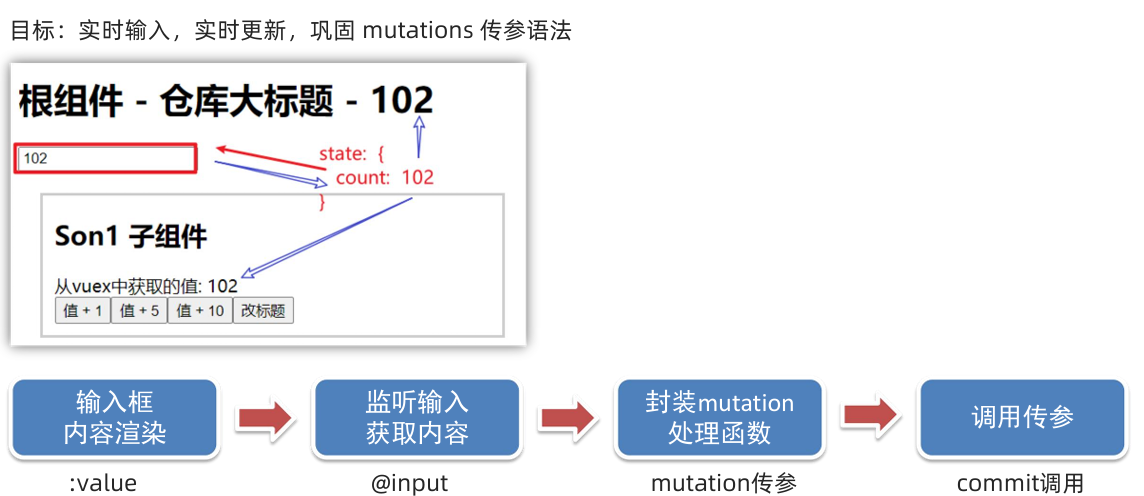
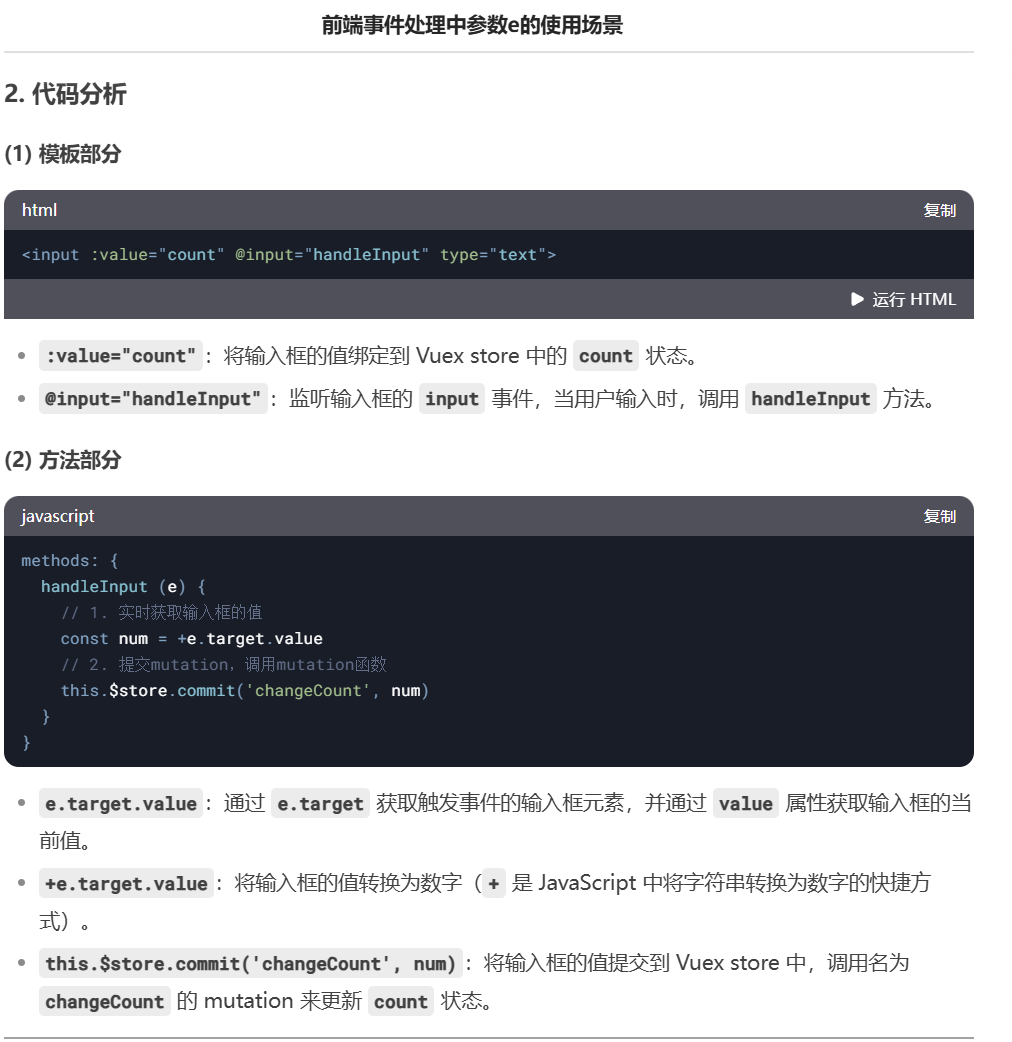
<template><div id="app"><h1>根组件- {{ title }}- {{ count }}</h1><input :value="count" @input="handleInput" type="text"><Son1></Son1><hr><Son2></Son2></div>
</template><script>
import Son1 from './components/Son1.vue'
import Son2 from './components/Son2.vue'
import { mapState } from 'vuex'
// console.log(mapState(['count', 'title']))export default {name: 'app',created () {// console.log(this.$router) // 没配console.log(this.$store.state.count)},computed: {...mapState(['count', 'title'])},data: function () {return {}},methods: {handleInput (e) {// 1. 实时获取输入框的值const num = +e.target.value// 2. 提交mutation,调用mutation函数this.$store.commit('changeCount', num)}},components: {Son1,Son2}
}
</script><style>
#app {width: 600px;margin: 20px auto;border: 3px solid #ccc;border-radius: 3px;padding: 10px;
}
</style>
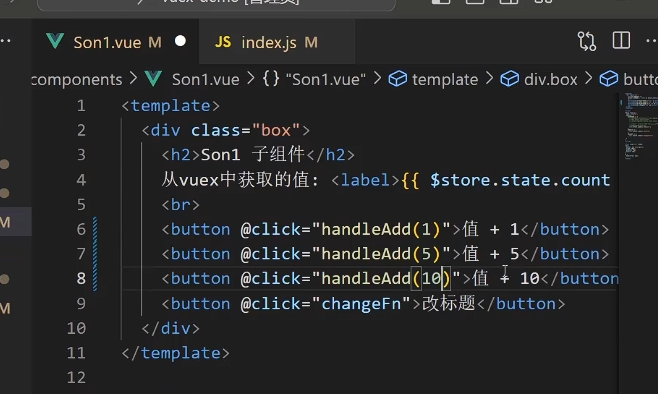
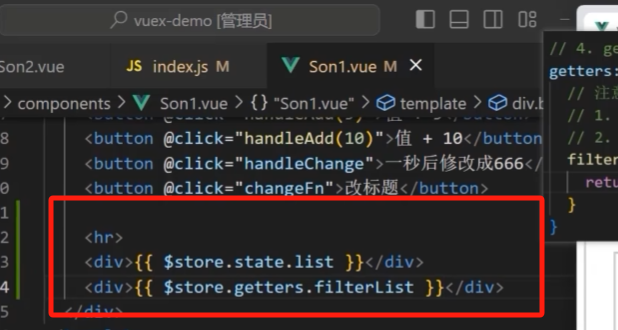
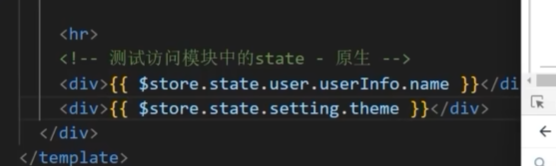
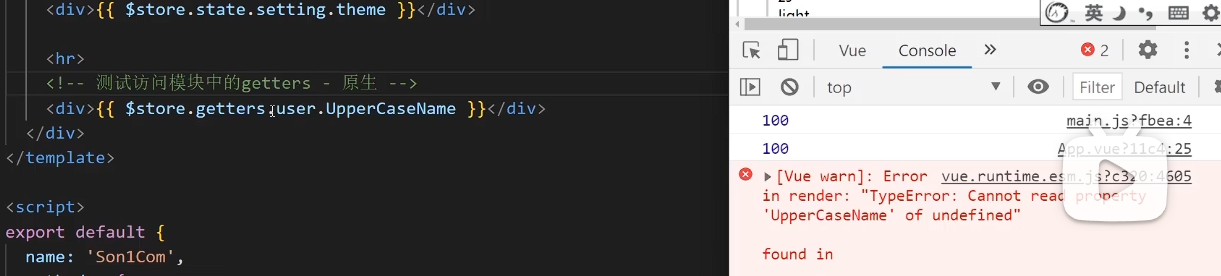
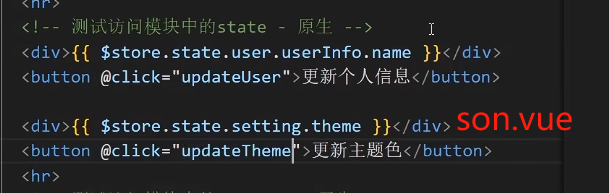
<template><div class="box"><h2>Son1 子组件</h2>从vuex中获取的值: <label>{{ $store.state.count }}</label><br><button @click="handleAdd(1)">值 + 1</button><button @click="handleAdd(5)">值 + 5</button><button @click="handleAdd(10)">值 + 10</button><button @click="handleChange">一秒后修改成666</button><button @click="changeFn">改标题</button><hr><!-- 计算属性getters --><div>{{ $store.state.list }}</div><div>{{ $store.getters.filterList }}</div><hr><!-- 测试访问模块中的state - 原生 --><div>{{ $store.state.user.userInfo.name }}</div><button @click="updateUser">更新个人信息</button><button @click="updateUser2">一秒后更新信息</button><div>{{ $store.state.setting.theme }}</div><button @click="updateTheme">更新主题色</button><hr><!-- 测试访问模块中的getters - 原生 --><div>{{ $store.getters['user/UpperCaseName'] }}</div></div>
</template><script>
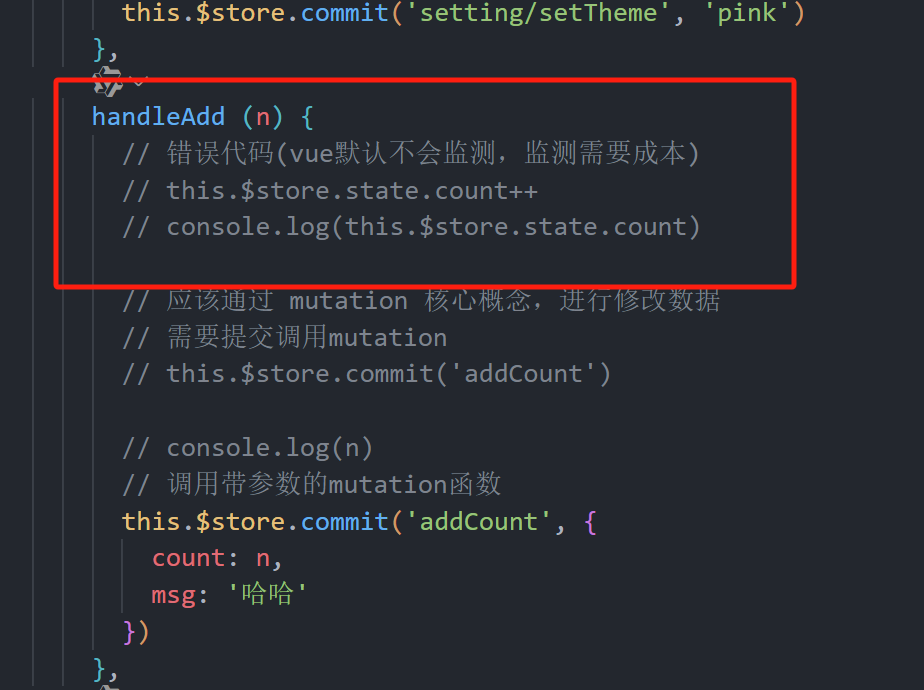
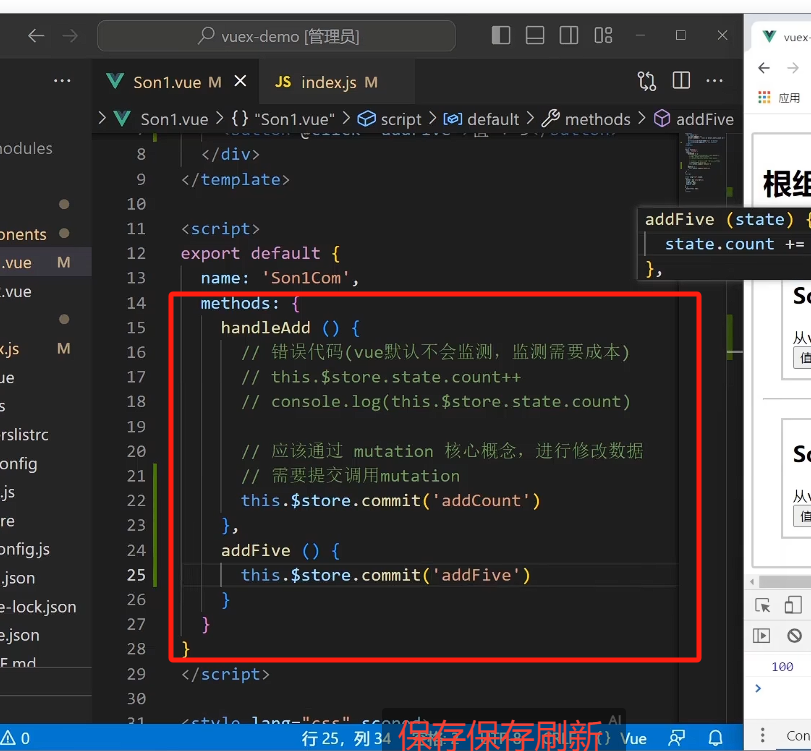
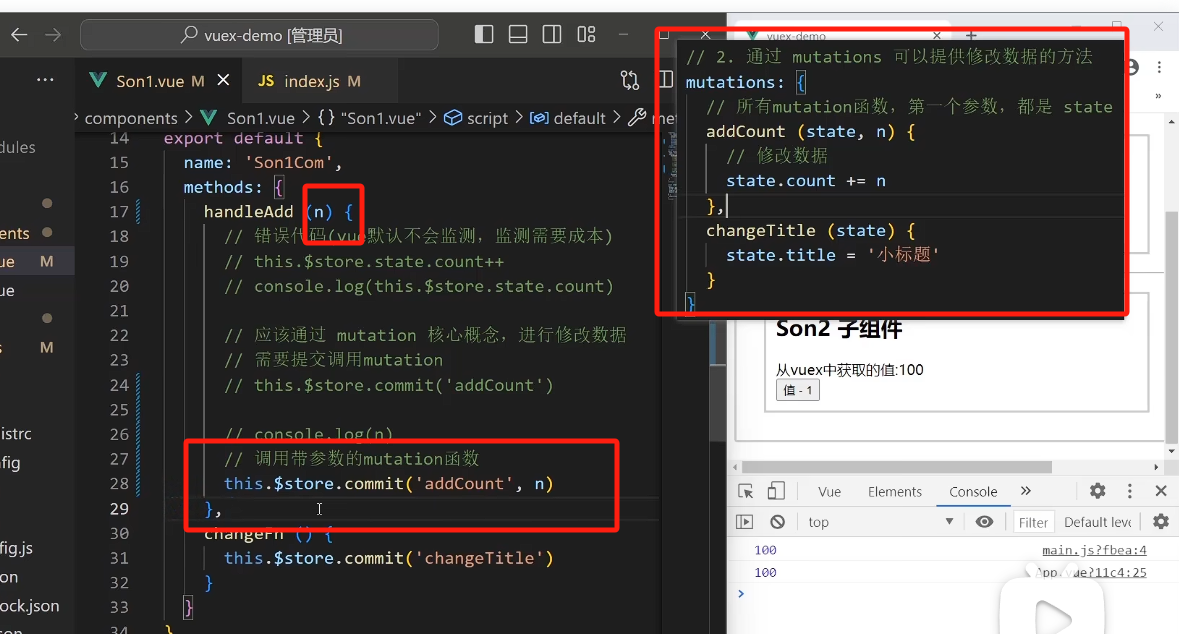
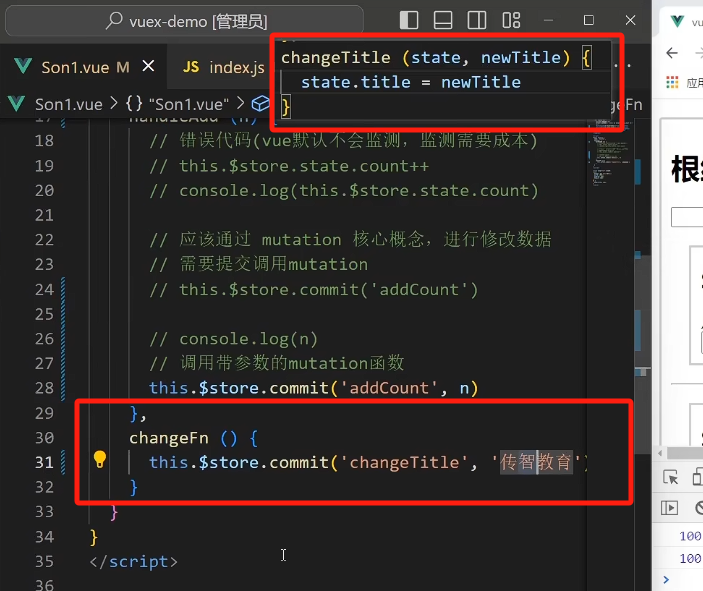
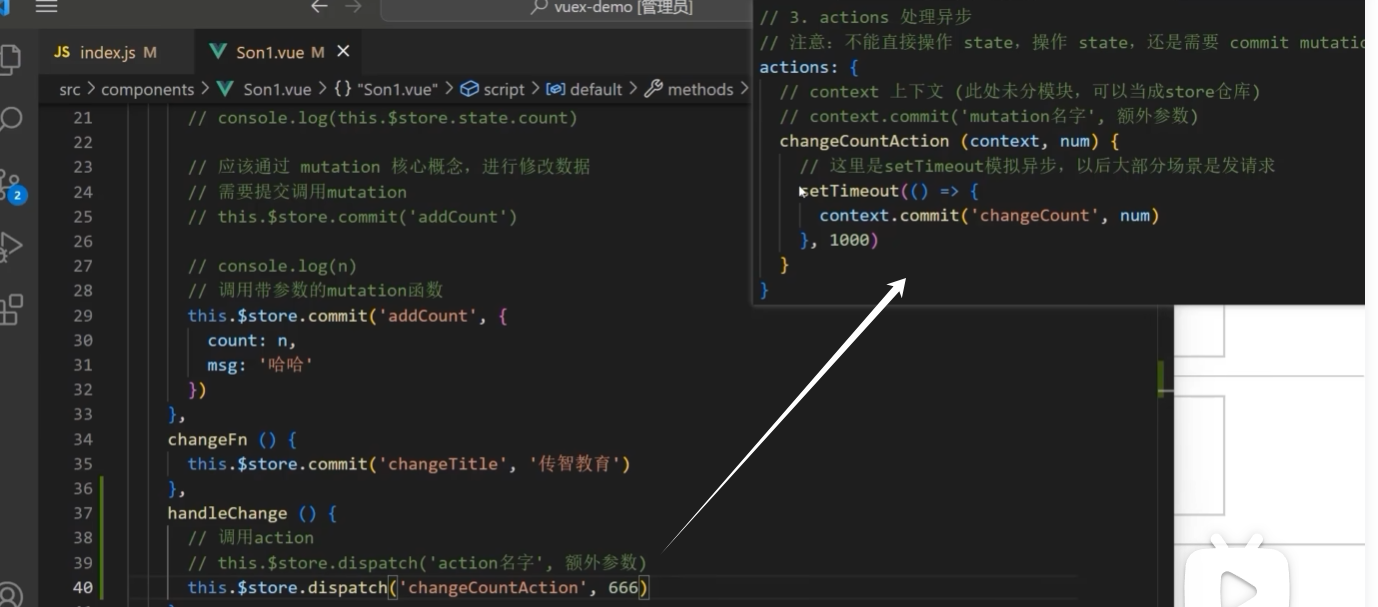
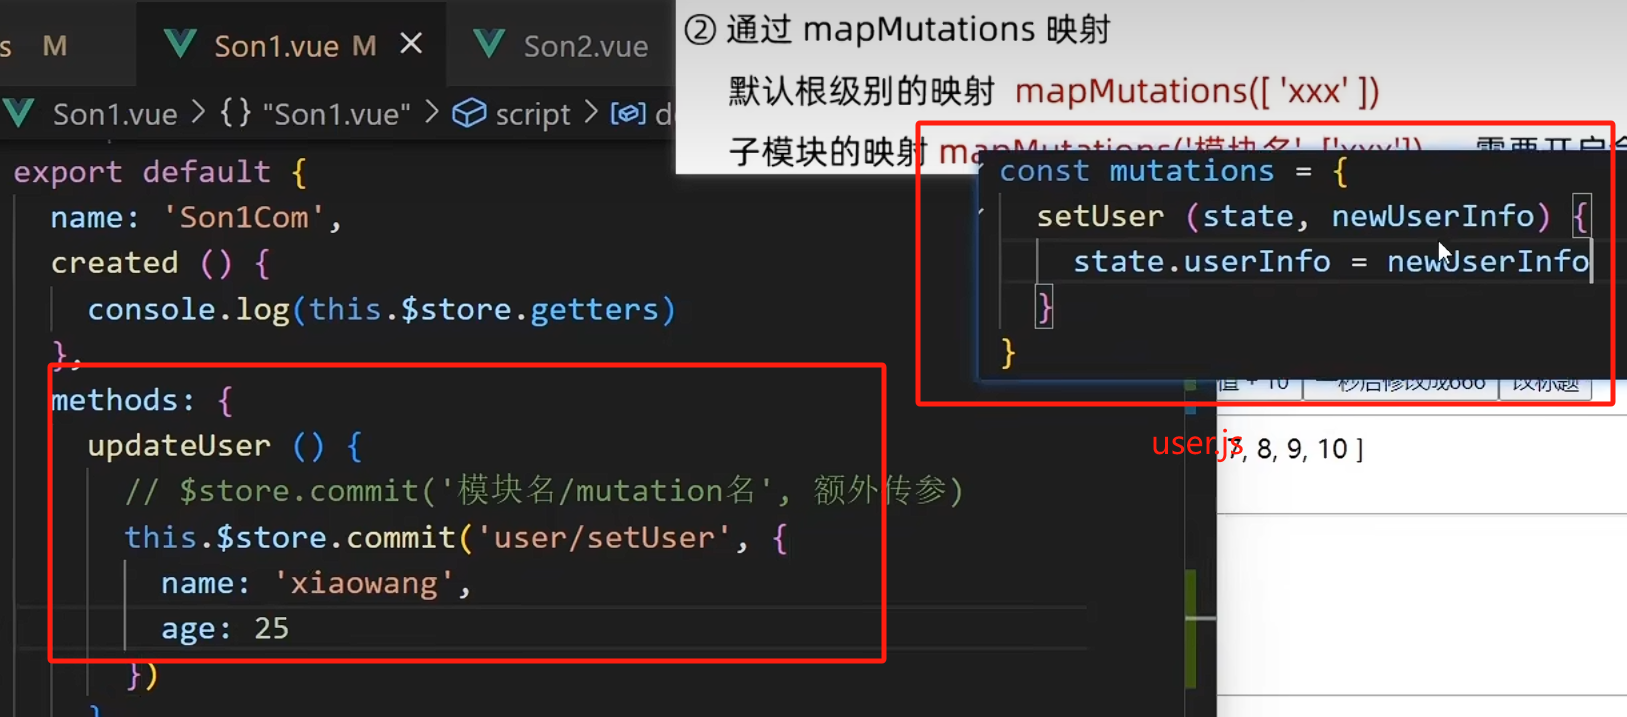
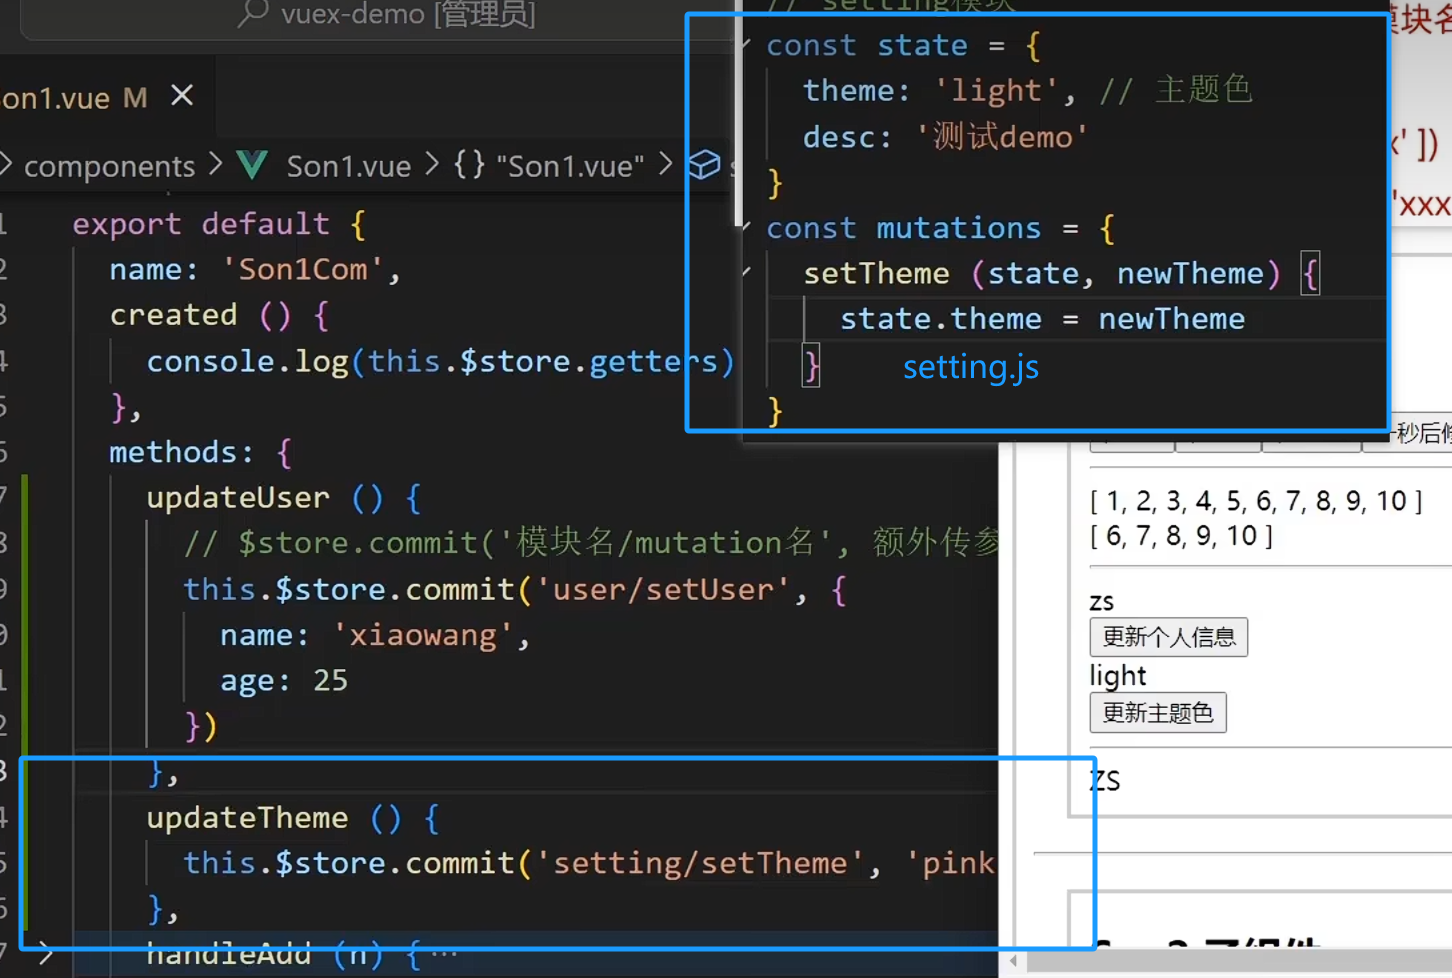
export default {name: 'Son1Com',created () {console.log(this.$store.getters)},methods: {updateUser () {// $store.commit('模块名/mutation名', 额外传参)this.$store.commit('user/setUser', {name: 'xiaowang',age: 25})},updateUser2 () {// 调用action dispatchthis.$store.dispatch('user/setUserSecond', {name: 'xiaohong',age: 28})},updateTheme () {this.$store.commit('setting/setTheme', 'pink')},handleAdd (n) {// 错误代码(vue默认不会监测,监测需要成本)// this.$store.state.count++// console.log(this.$store.state.count)// 应该通过 mutation 核心概念,进行修改数据// 需要提交调用mutation// this.$store.commit('addCount')// console.log(n)// 调用带参数的mutation函数this.$store.commit('addCount', {count: n,msg: '哈哈'})},changeFn () {this.$store.commit('changeTitle', '传智教育')},handleChange () {// 调用action// this.$store.dispatch('action名字', 额外参数)this.$store.dispatch('changeCountAction', 666)}}
}
</script><style lang="css" scoped>
.box{border: 3px solid #ccc;width: 400px;padding: 10px;margin: 20px;
}
h2 {margin-top: 10px;
}
</style>
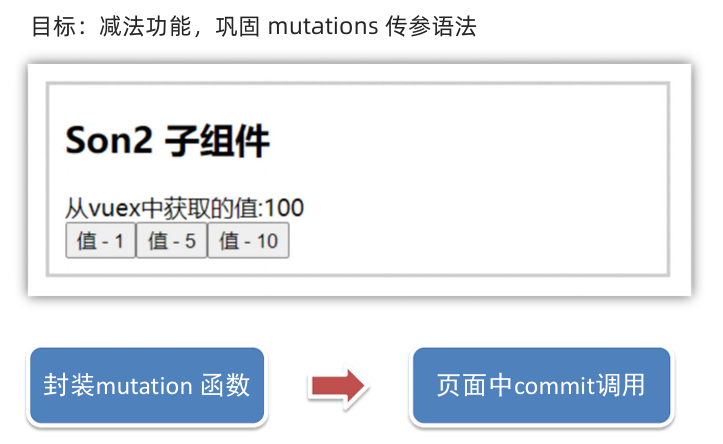
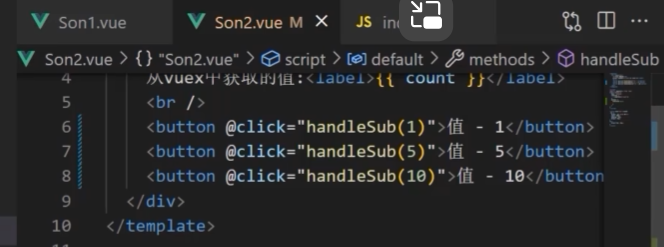
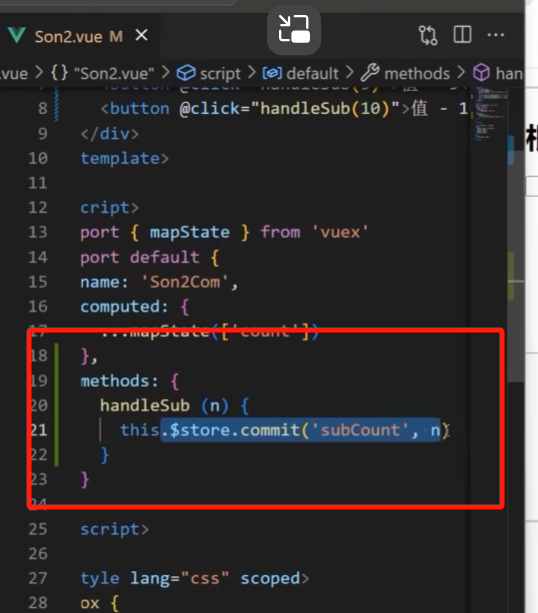
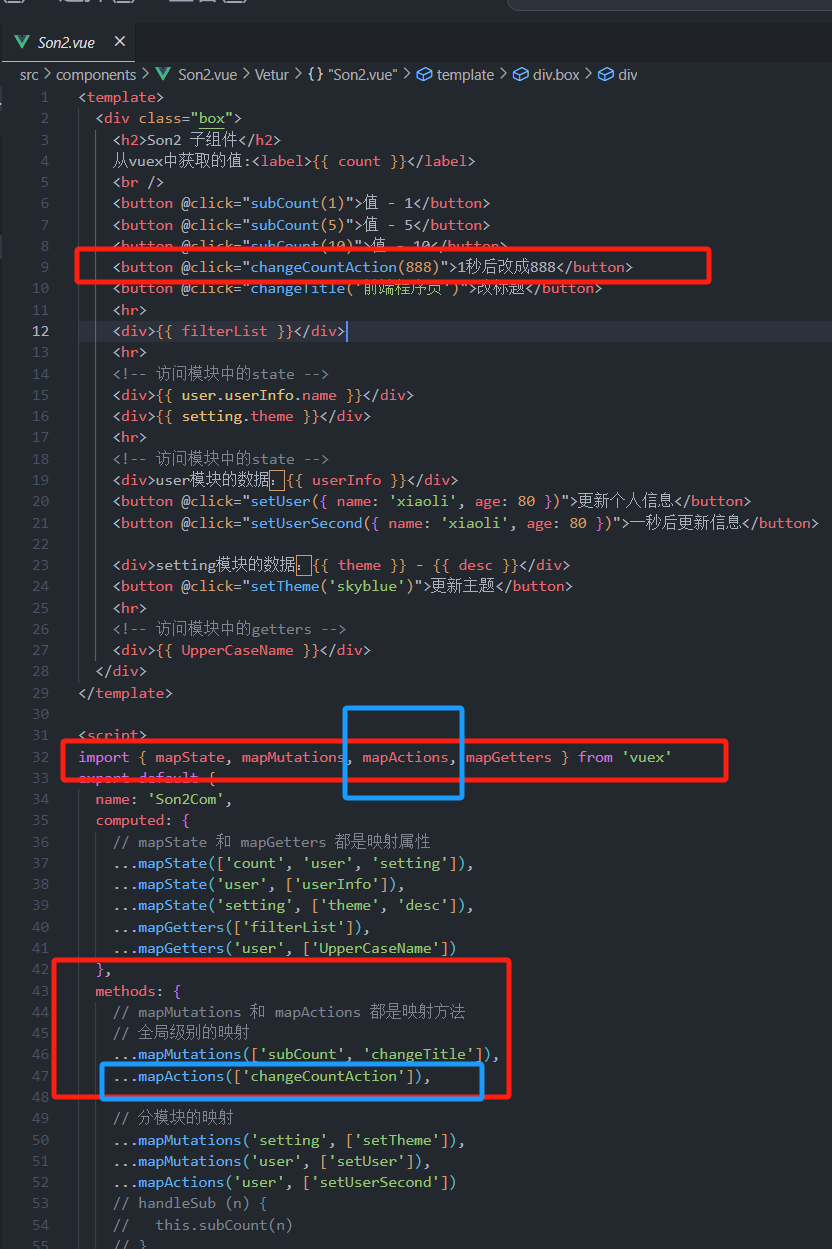
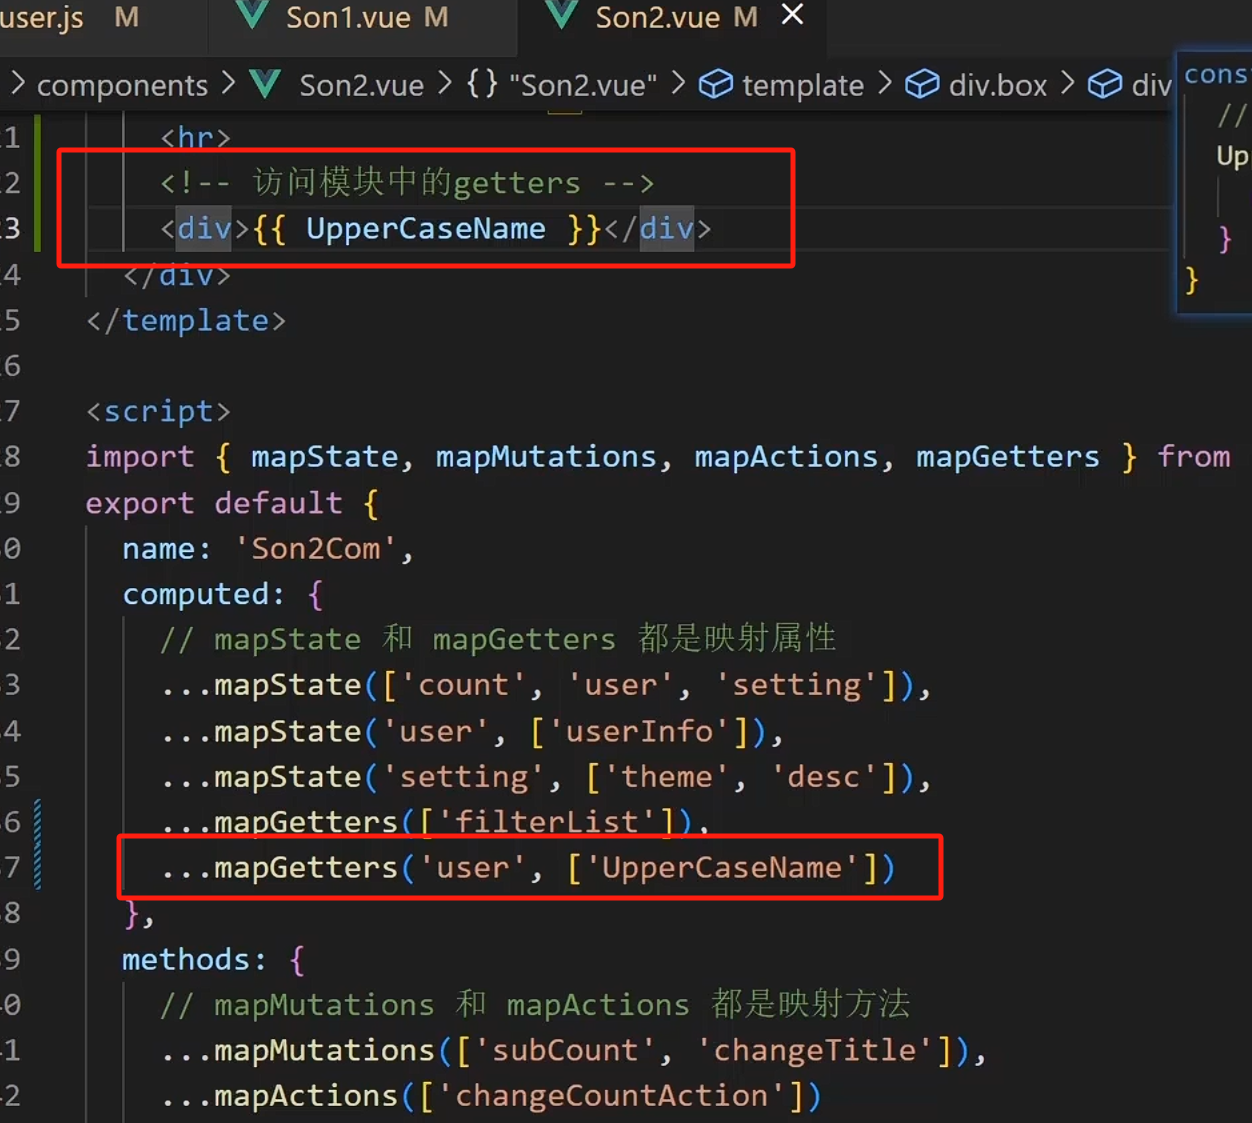
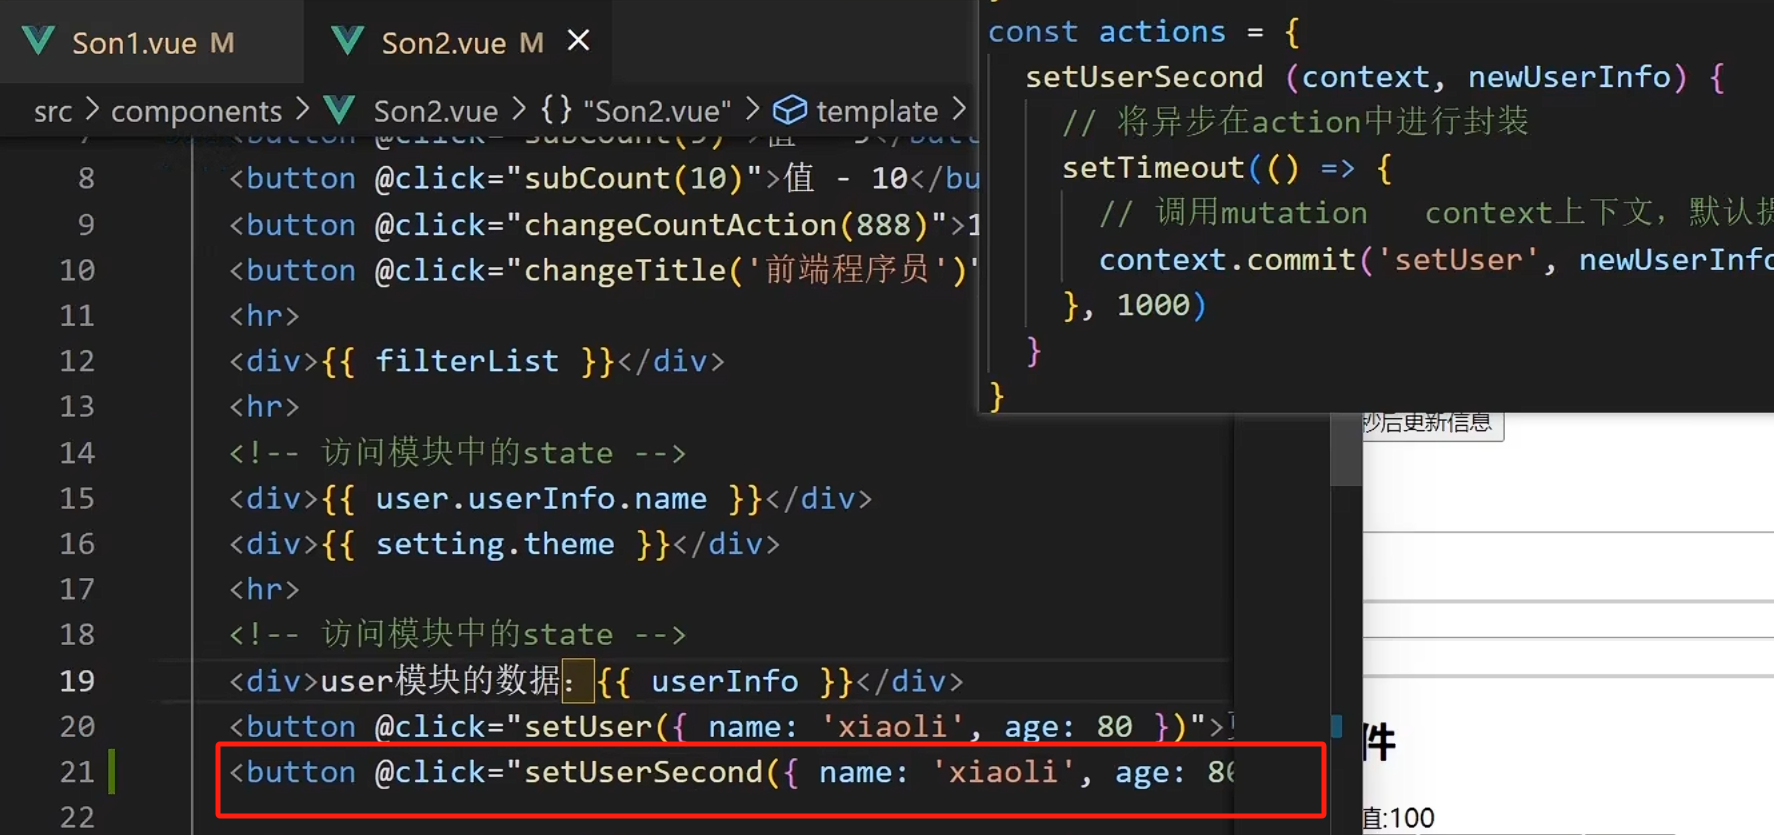
<template><div class="box"><h2>Son2 子组件</h2>从vuex中获取的值:<label>{{ count }}</label><br /><button @click="subCount(1)">值 - 1</button><button @click="subCount(5)">值 - 5</button><button @click="subCount(10)">值 - 10</button><button @click="changeCountAction(888)">1秒后改成888</button><button @click="changeTitle('前端程序员')">改标题</button><hr><div>{{ filterList }}</div><hr><!-- 访问模块中的state --><div>{{ user.userInfo.name }}</div><div>{{ setting.theme }}</div><hr><!-- 访问模块中的state --><div>user模块的数据:{{ userInfo }}</div><button @click="setUser({ name: 'xiaoli', age: 80 })">更新个人信息</button><button @click="setUserSecond({ name: 'xiaoli', age: 80 })">一秒后更新信息</button><div>setting模块的数据:{{ theme }} - {{ desc }}</div><button @click="setTheme('skyblue')">更新主题</button><hr><!-- 访问模块中的getters --><div>{{ UpperCaseName }}</div></div>
</template><script>
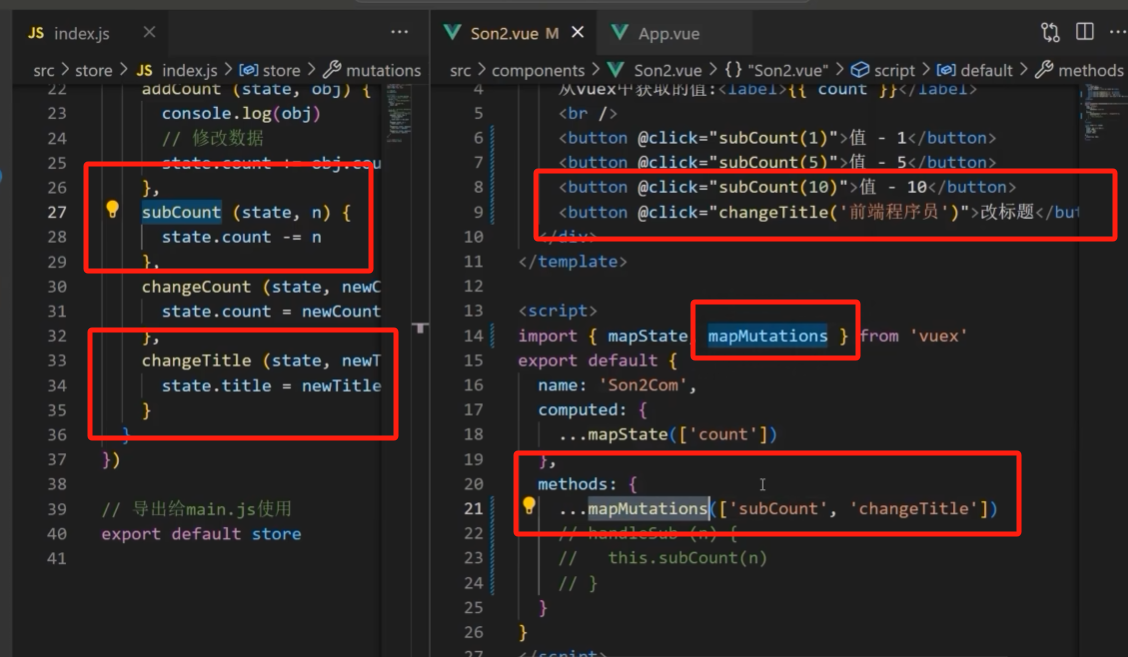
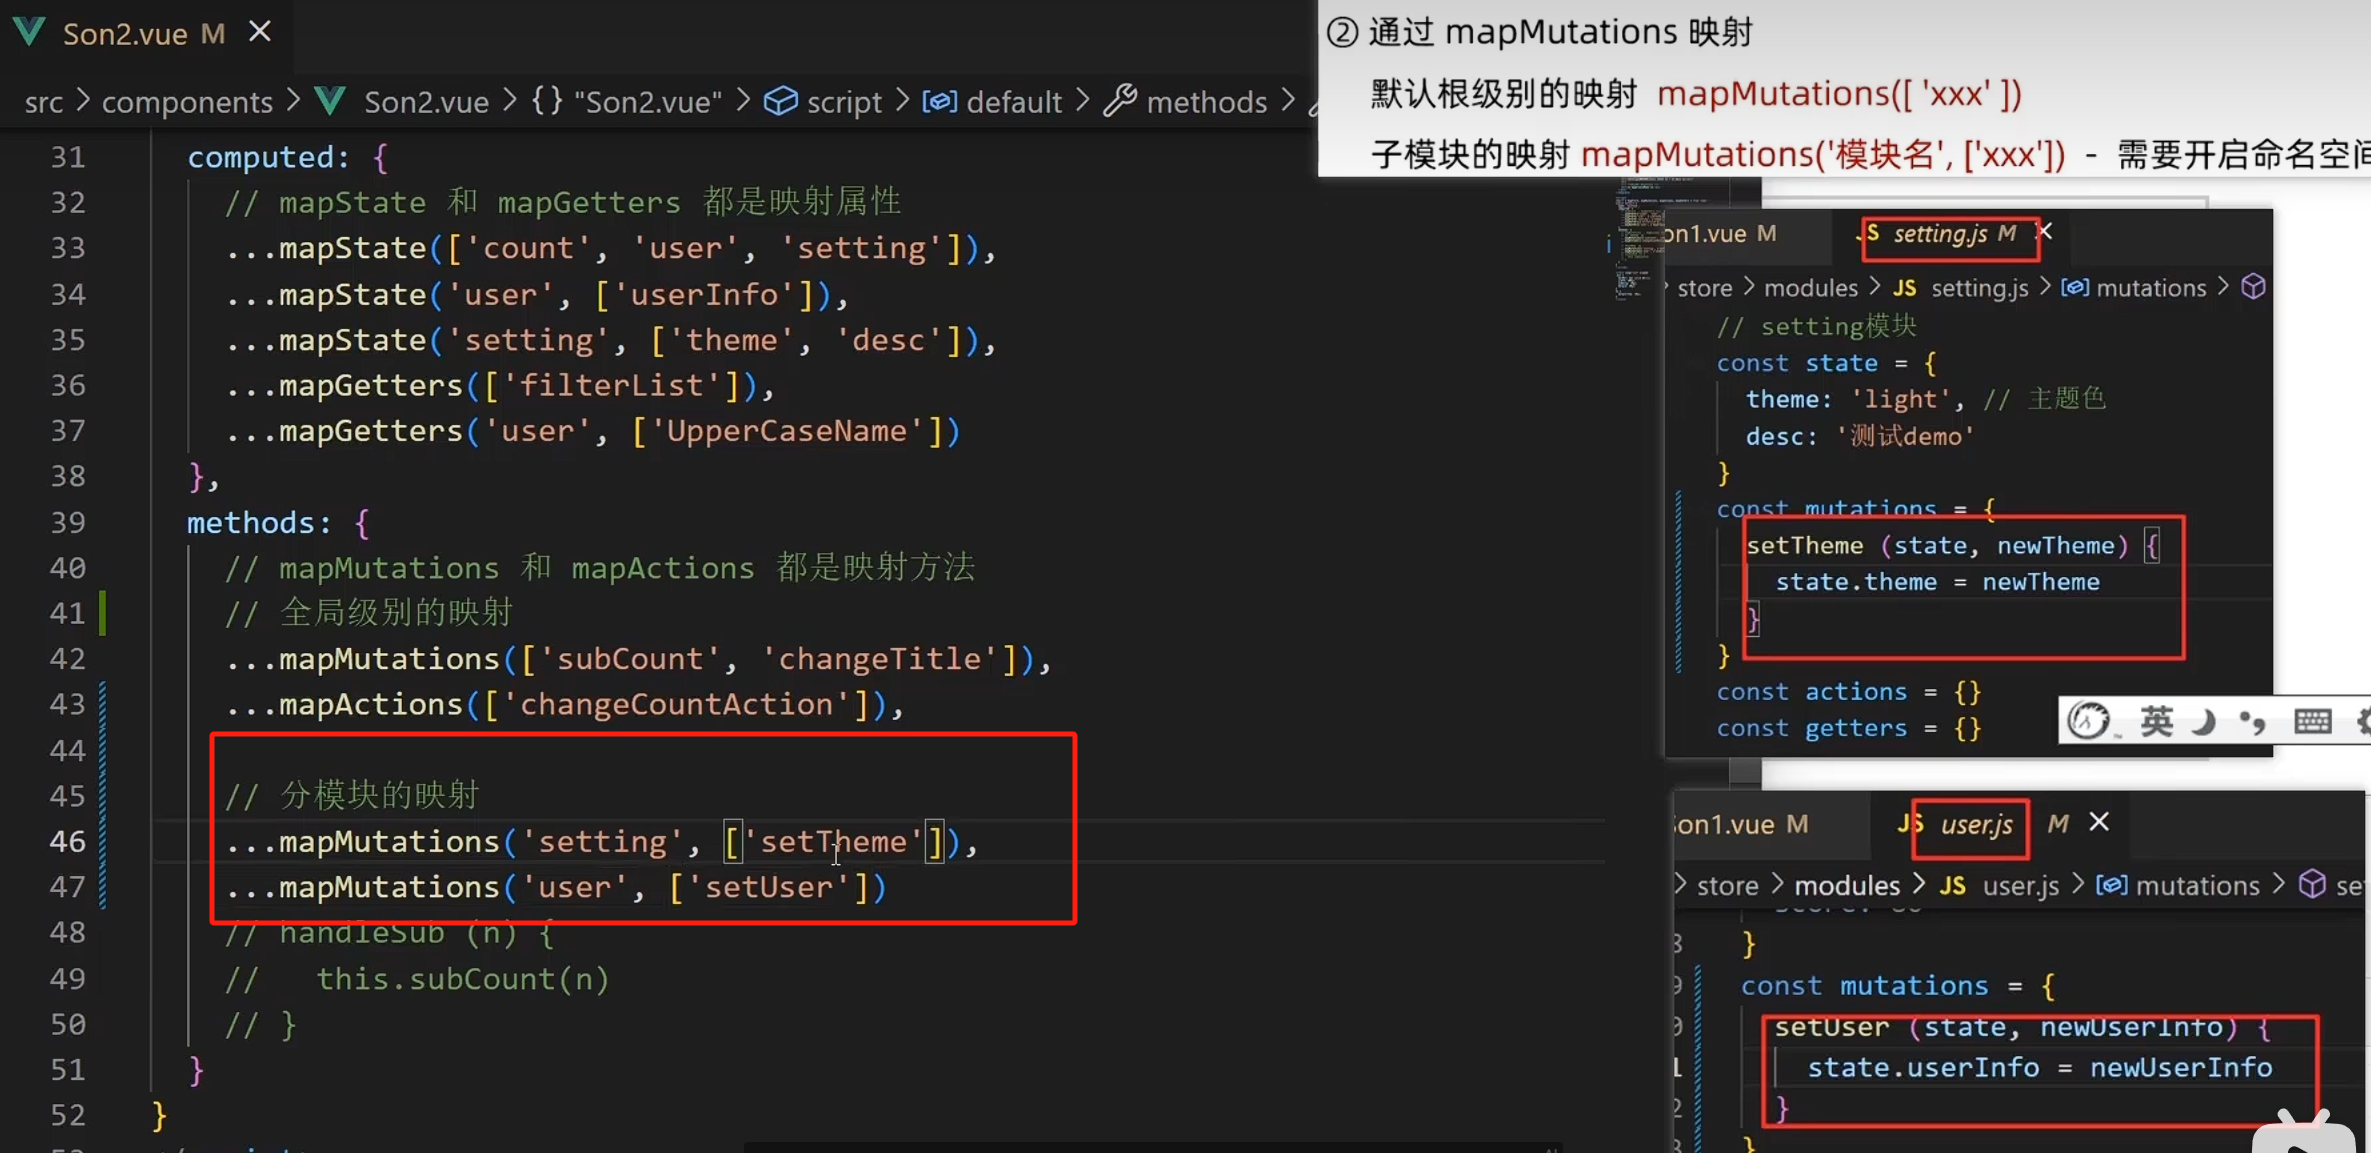
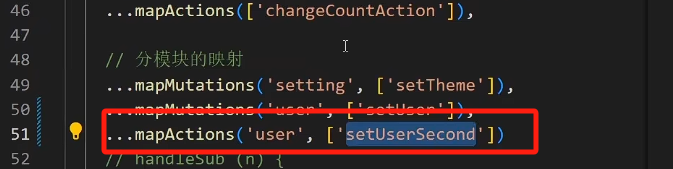
import { mapState, mapMutations, mapActions, mapGetters } from 'vuex'
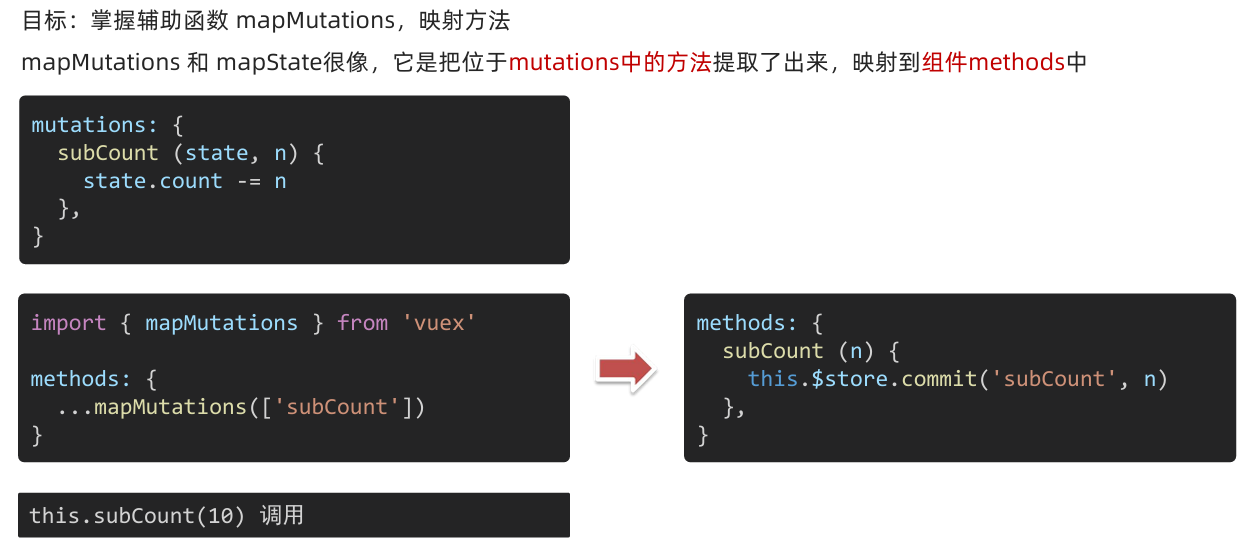
export default {name: 'Son2Com',computed: {// mapState 和 mapGetters 都是映射属性...mapState(['count', 'user', 'setting']),...mapState('user', ['userInfo']),...mapState('setting', ['theme', 'desc']),...mapGetters(['filterList']),...mapGetters('user', ['UpperCaseName'])},methods: {// mapMutations 和 mapActions 都是映射方法// 全局级别的映射...mapMutations(['subCount', 'changeTitle']),...mapActions(['changeCountAction']),// 分模块的映射...mapMutations('setting', ['setTheme']),...mapMutations('user', ['setUser']),...mapActions('user', ['setUserSecond'])// handleSub (n) {// this.subCount(n)// }}
}
</script><style lang="css" scoped>
.box {border: 3px solid #ccc;width: 400px;padding: 10px;margin: 20px;
}
h2 {margin-top: 10px;
}
</style>
3. 创建一个空仓库
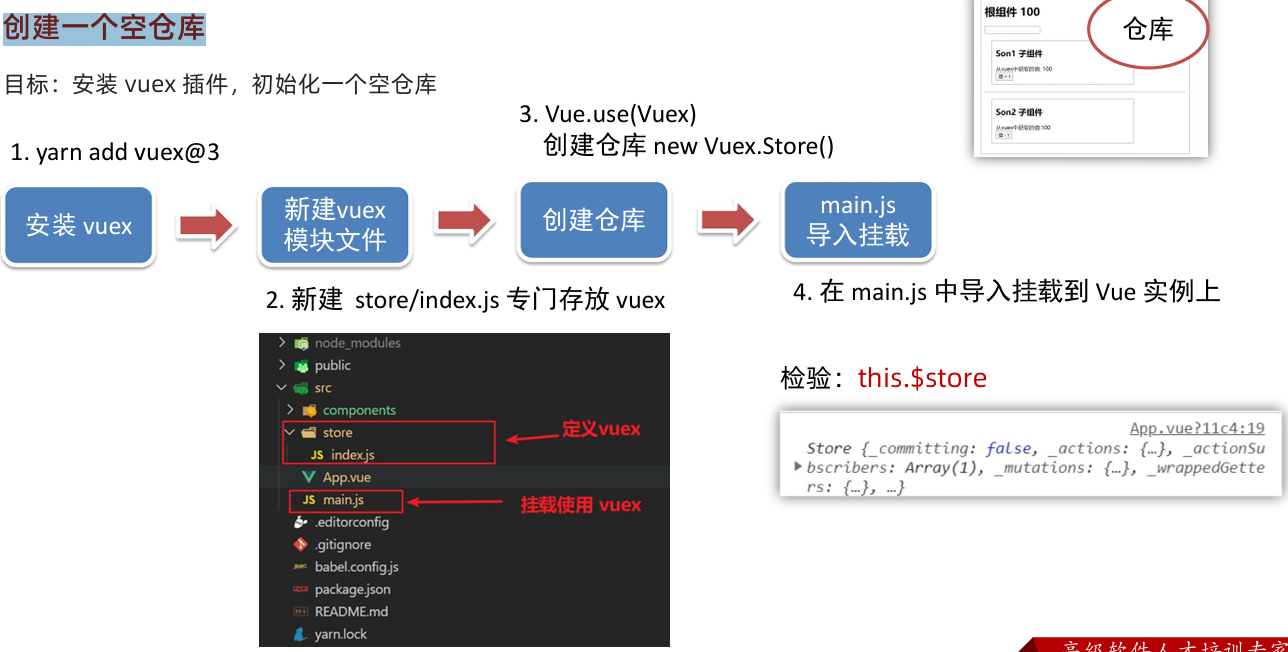
//这里面存放的就是vuex相关的核心代码import Vue from 'vue'import Vuex from 'vuex//插件安装Vue.use(Vuex)//创建仓库(空仓库)const store = new Vuex.Store()//到处给main.js使用export dafault store导入挂载:
import Vue from 'vue'
import App from './App.vue'
import store from '@/store/index'
console.log(store.state.count)Vue.config.productionTip = falsenew Vue({render: h => h(App),store
}).$mount('#app')
验证是否导入成功
<template><div id="app"><h1>根组件- {{ title }}- {{ count }}</h1><input :value="count" @input="handleInput" type="text"><Son1></Son1><hr><Son2></Son2></div>
</template><script>
import Son1 from './components/Son1.vue'
import Son2 from './components/Son2.vue'
import { mapState } from 'vuex'
// console.log(mapState(['count', 'title']))export default {name: 'app',created () {// console.log(this.$router) // 没配console.log(this.$store.state.count)},computed: {...mapState(['count', 'title'])},data: function () {return {}},methods: {handleInput (e) {// 1. 实时获取输入框的值const num = +e.target.value// 2. 提交mutation,调用mutation函数this.$store.commit('changeCount', num)}},components: {Son1,Son2}
}
</script><style>
#app {width: 600px;margin: 20px auto;border: 3px solid #ccc;border-radius: 3px;padding: 10px;
}
</style>
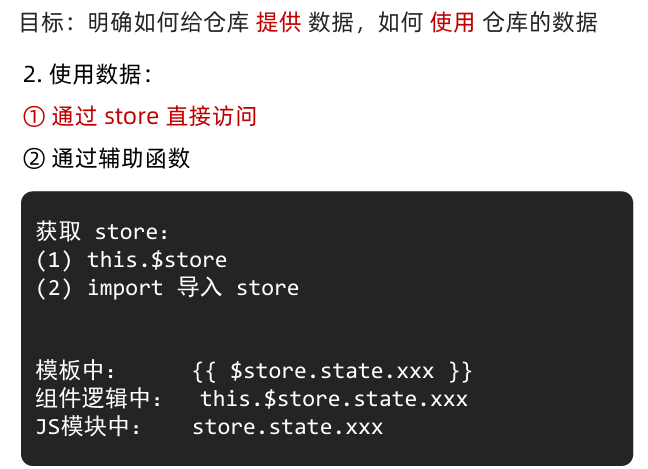
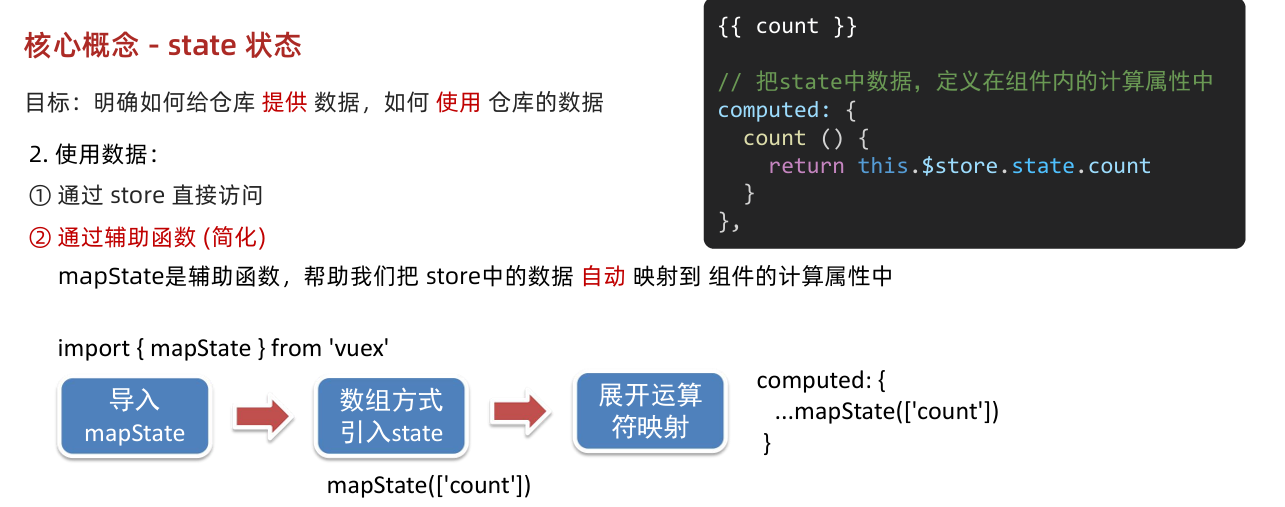
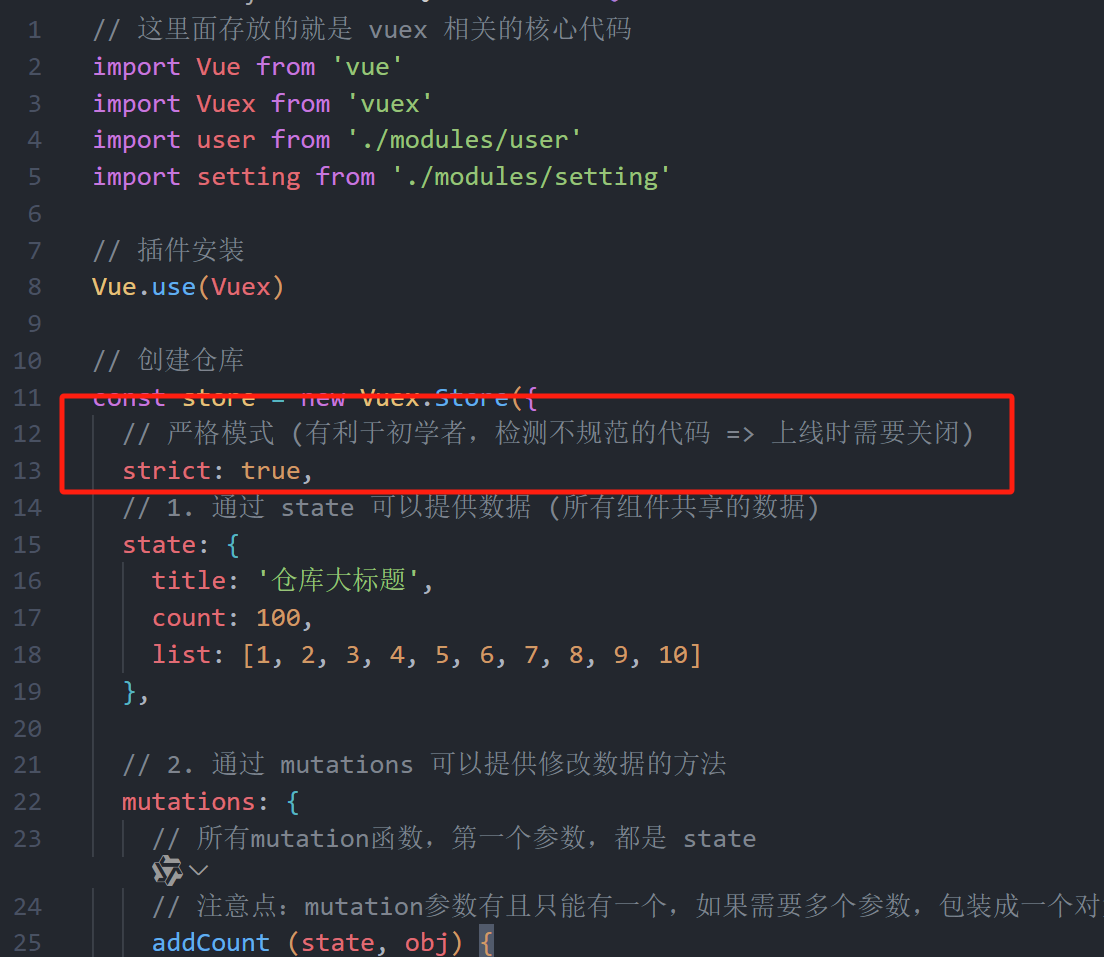
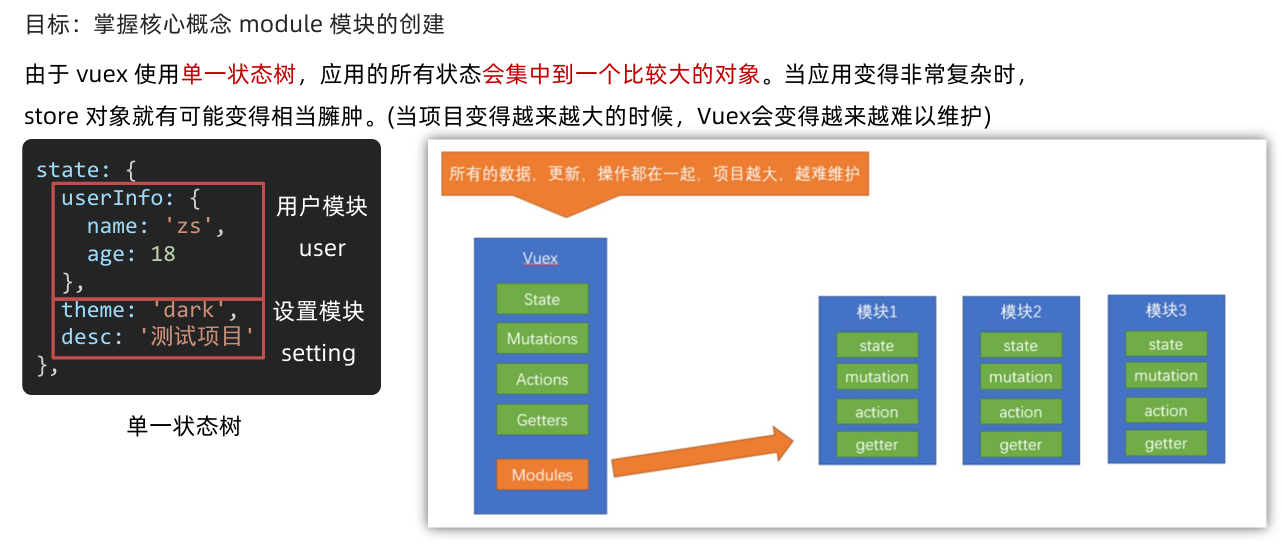
4. 核心概念 - state 状态
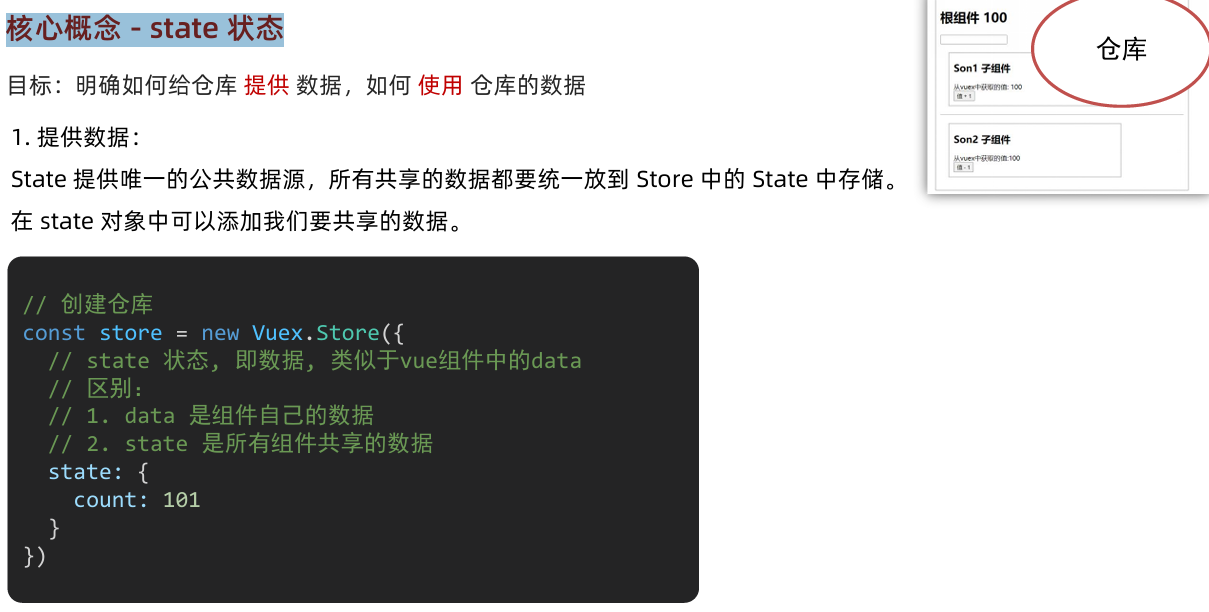
// 这里面存放的就是 vuex 相关的核心代码
import Vue from 'vue'
import Vuex from 'vuex'
import user from './modules/user'
import setting from './modules/setting'// 插件安装
Vue.use(Vuex)// 创建仓库
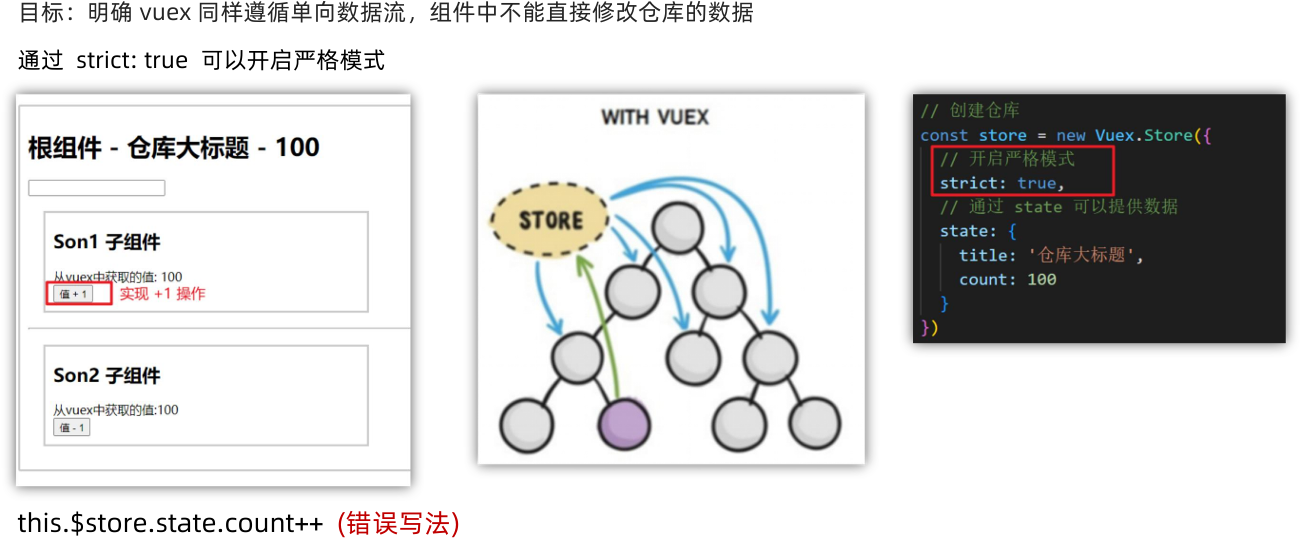
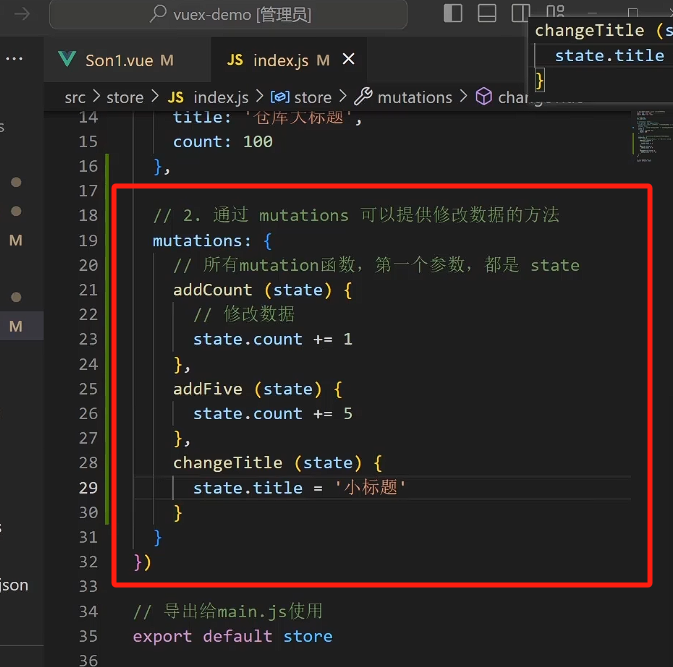
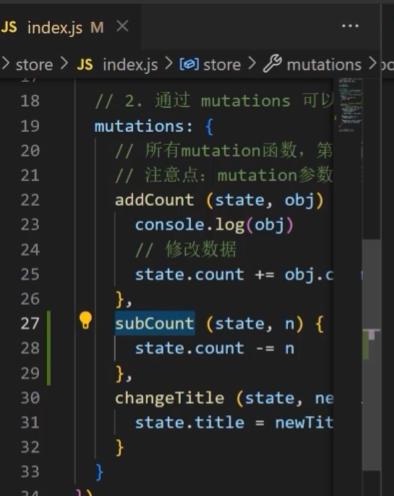
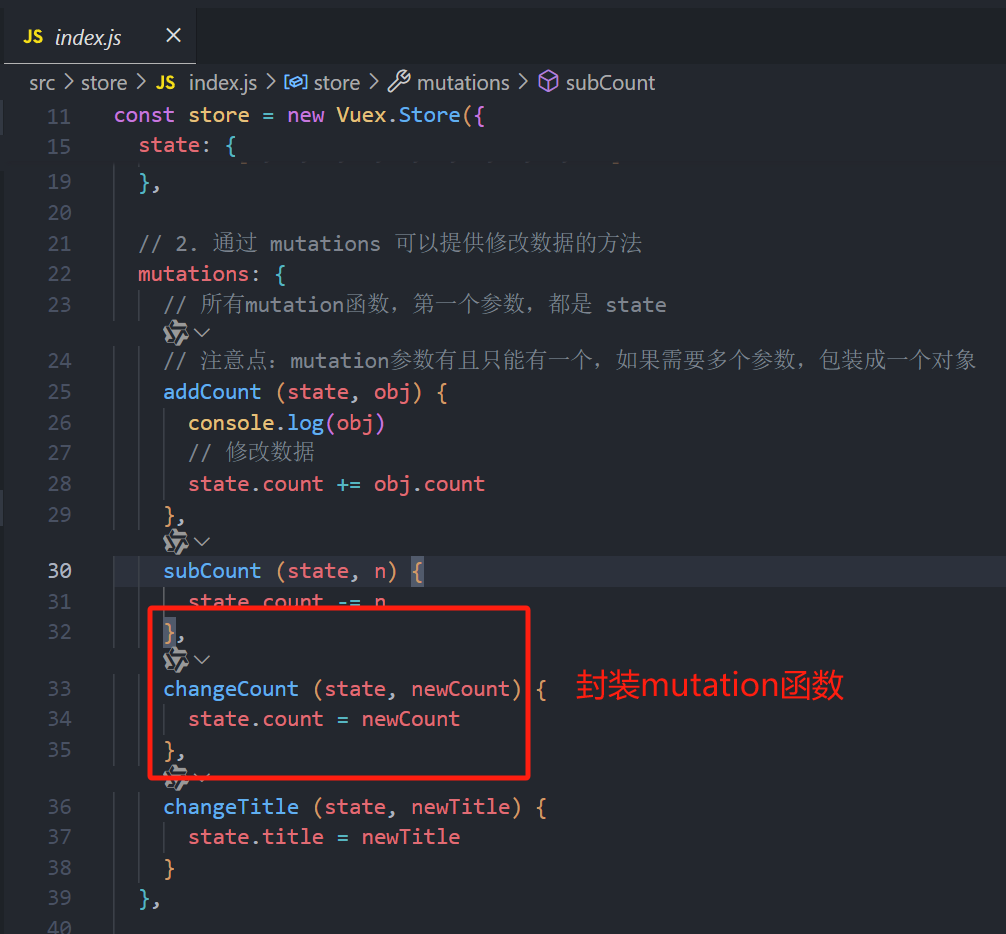
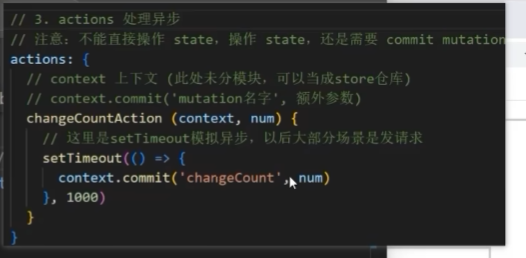
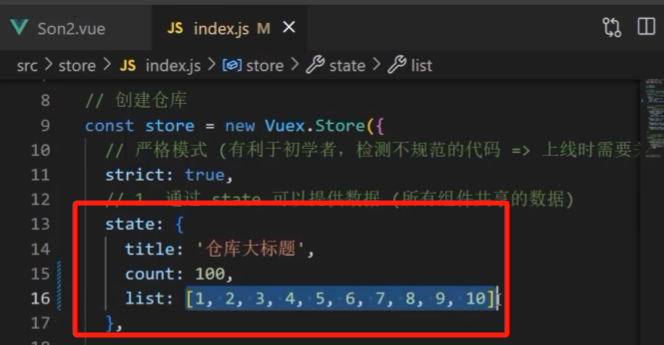
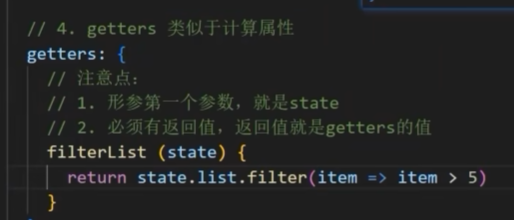
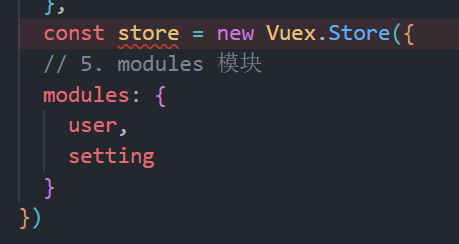
const store = new Vuex.Store({// 严格模式 (有利于初学者,检测不规范的代码 => 上线时需要关闭)strict: true,// 1. 通过 state 可以提供数据 (所有组件共享的数据)state: {title: '仓库大标题',count: 100,list: [1, 2, 3, 4, 5, 6, 7, 8, 9, 10]},// 2. 通过 mutations 可以提供修改数据的方法mutations: {// 所有mutation函数,第一个参数,都是 state// 注意点:mutation参数有且只能有一个,如果需要多个参数,包装成一个对象addCount (state, obj) {console.log(obj)// 修改数据state.count += obj.count},subCount (state, n) {state.count -= n},changeCount (state, newCount) {state.count = newCount},changeTitle (state, newTitle) {state.title = newTitle}},// 3. actions 处理异步// 注意:不能直接操作 state,操作 state,还是需要 commit mutationactions: {// context 上下文 (此处未分模块,可以当成store仓库)// context.commit('mutation名字', 额外参数)changeCountAction (context, num) {// 这里是setTimeout模拟异步,以后大部分场景是发请求setTimeout(() => {context.commit('changeCount', num)}, 1000)}},// 4. getters 类似于计算属性getters: {// 注意点:// 1. 形参第一个参数,就是state// 2. 必须有返回值,返回值就是getters的值filterList (state) {return state.list.filter(item => item > 5)}},// 5. modules 模块modules: {user,setting}
})// 导出给main.js使用
export default store
<template><div id="app"><h1>根组件- {{ $store.state.title }}- {{  $store.state.count }}</h1><input :value="count" @input="handleInput" type="text"><Son1></Son1><hr><Son2></Son2></div>
</template><script>
import Son1 from './components/Son1.vue'
import Son2 from './components/Son2.vue'
import { mapState } from 'vuex'
// console.log(mapState(['count', 'title']))export default {name: 'app',created () {// console.log(this.$router) // 没配console.log(this.$store.state.count)},computed: {...mapState(['count', 'title'])},data: function () {return {}},methods: {handleInput (e) {// 1. 实时获取输入框的值const num = +e.target.value// 2. 提交mutation,调用mutation函数this.$store.commit('changeCount', num)}},components: {Son1,Son2}
}
</script><style>
#app {width: 600px;margin: 20px auto;border: 3px solid #ccc;border-radius: 3px;padding: 10px;
}
</style>
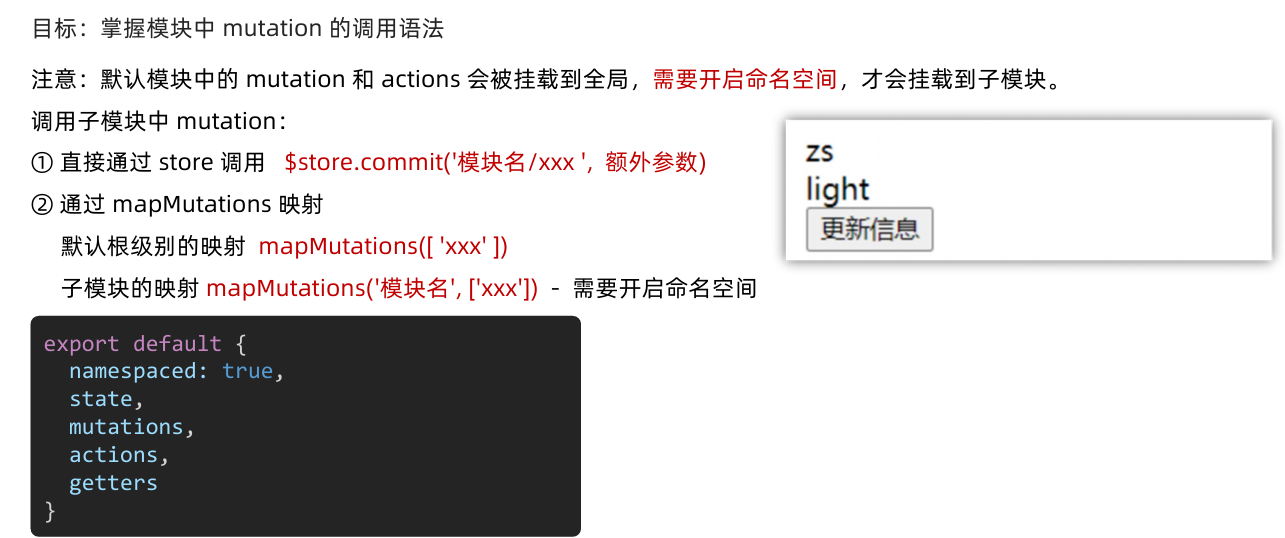
5. 核心概念 - mutations
第一:
第二:·

第三
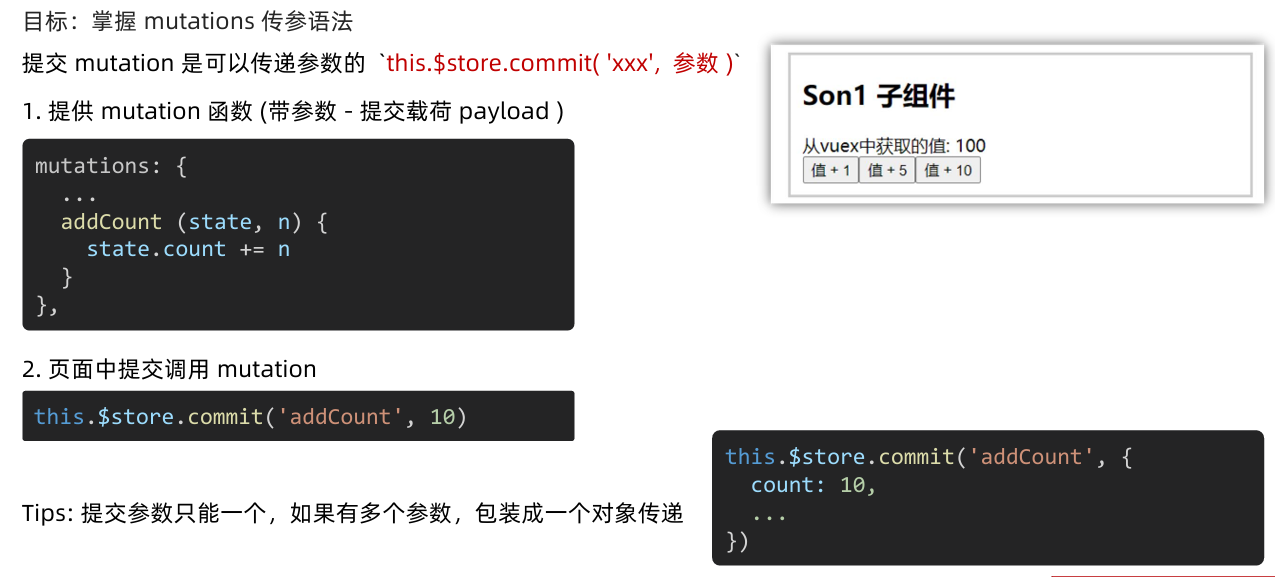
如果说要同时传递好几个参数,可以包装成一个对象

6. 核心概念 - mutations - 练习
练习1:
练习2:
<template><div id="app"><h1>根组件- {{ title }}- {{ count }}</h1>//1<input :value="count" @input="handleInput" type="text"><Son1></Son1><hr><Son2></Son2></div>
</template><script>
import Son1 from './components/Son1.vue'
import Son2 from './components/Son2.vue'
import { mapState } from 'vuex'
// console.log(mapState(['count', 'title']))export default {name: 'app',created () {// console.log(this.$router) // 没配console.log(this.$store.state.count)},computed: {...mapState(['count', 'title'])},data: function () {return {}},//2methods: {handleInput (e) {// 1. 实时获取输入框的值const num = +e.target.value//4// 2. 提交mutation,调用mutation函数this.$store.commit('changeCount', num)}},components: {Son1,Son2}
}
</script><style>
#app {width: 600px;margin: 20px auto;border: 3px solid #ccc;border-radius: 3px;padding: 10px;
}
</style>
7. 辅助函数 - mapMutations
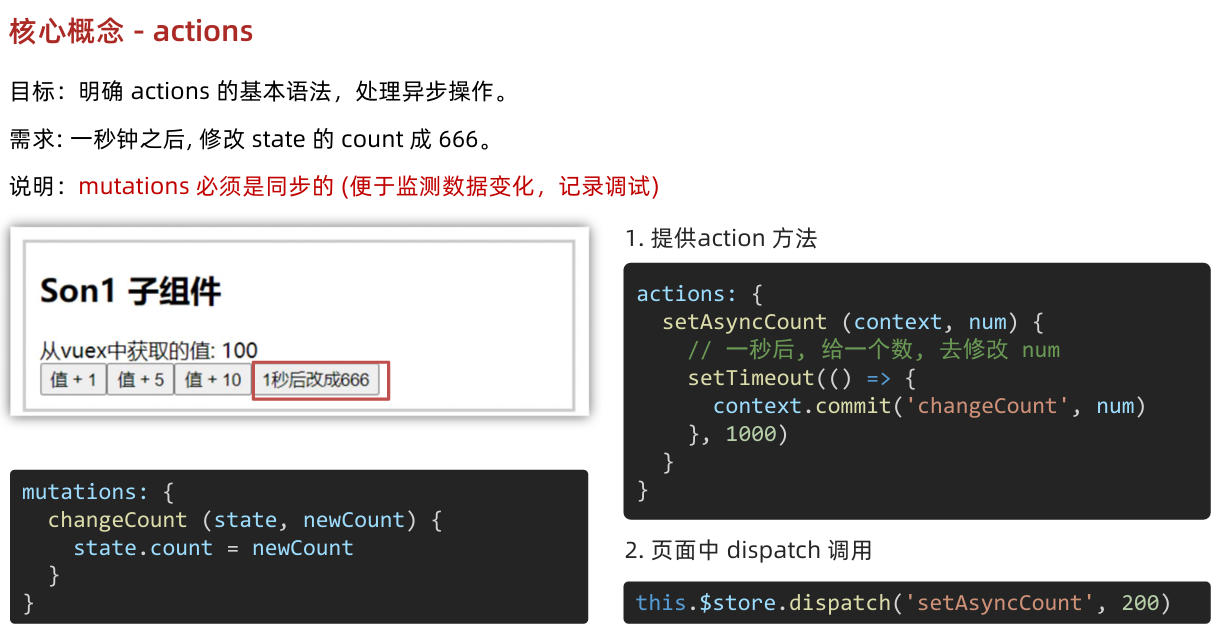
8. 核心概念 - actions

9. 辅助函数 - mapActions
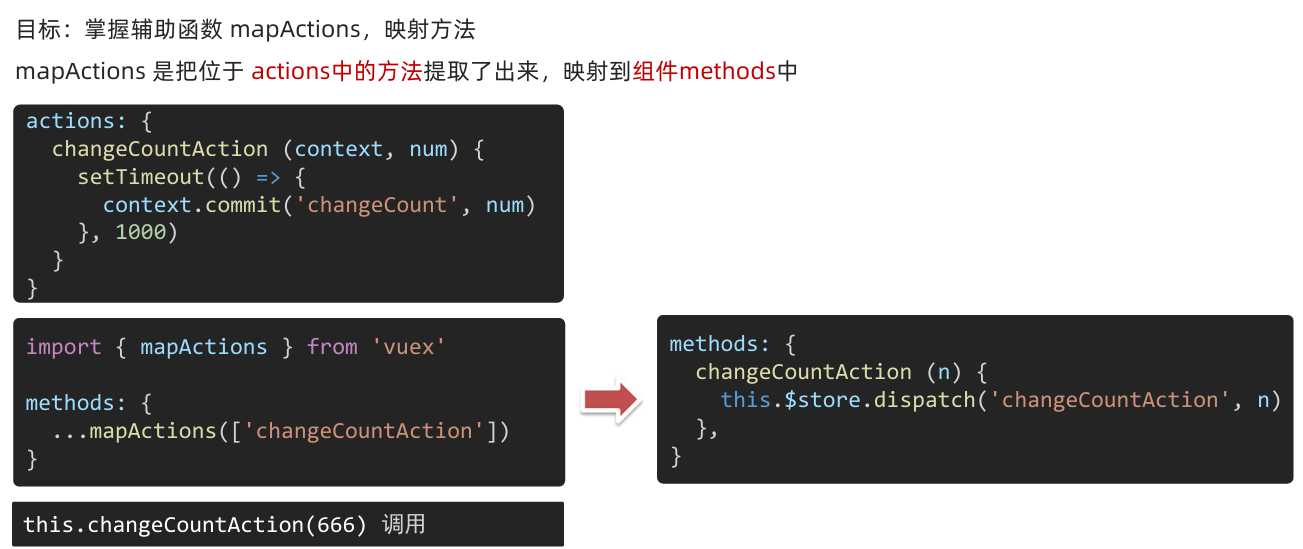
调用这个
10. 核心概念 - getters

<template><div class="box"><h2>Son2 子组件</h2>从vuex中获取的值:<label>{{ count }}</label><br /><button @click="subCount(1)">值 - 1</button><button @click="subCount(5)">值 - 5</button><button @click="subCount(10)">值 - 10</button><button @click="changeCountAction(888)">1秒后改成888</button><button @click="changeTitle('前端程序员')">改标题</button><hr><div>{{ filterList }}</div><hr><!-- 访问模块中的state --><div>{{ user.userInfo.name }}</div><div>{{ setting.theme }}</div><hr><!-- 访问模块中的state --><div>user模块的数据:{{ userInfo }}</div><button @click="setUser({ name: 'xiaoli', age: 80 })">更新个人信息</button><button @click="setUserSecond({ name: 'xiaoli', age: 80 })">一秒后更新信息</button><div>setting模块的数据:{{ theme }} - {{ desc }}</div><button @click="setTheme('skyblue')">更新主题</button><hr><!-- 访问模块中的getters --><div>{{ UpperCaseName }}</div></div>
</template><script>
import { mapState, mapMutations, mapActions, mapGetters } from 'vuex'
export default {name: 'Son2Com',computed: {// mapState 和 mapGetters 都是映射属性...mapState(['count', 'user', 'setting']),...mapState('user', ['userInfo']),...mapState('setting', ['theme', 'desc']),...mapGetters(['filterList']),...mapGetters('user', ['UpperCaseName'])},methods: {// mapMutations 和 mapActions 都是映射方法// 全局级别的映射...mapMutations(['subCount', 'changeTitle']),...mapActions(['changeCountAction']),// 分模块的映射...mapMutations('setting', ['setTheme']),...mapMutations('user', ['setUser']),...mapActions('user', ['setUserSecond'])// handleSub (n) {//   this.subCount(n)// }}
}
</script><style lang="css" scoped>
.box {border: 3px solid #ccc;width: 400px;padding: 10px;margin: 20px;
}
h2 {margin-top: 10px;
}
</style>
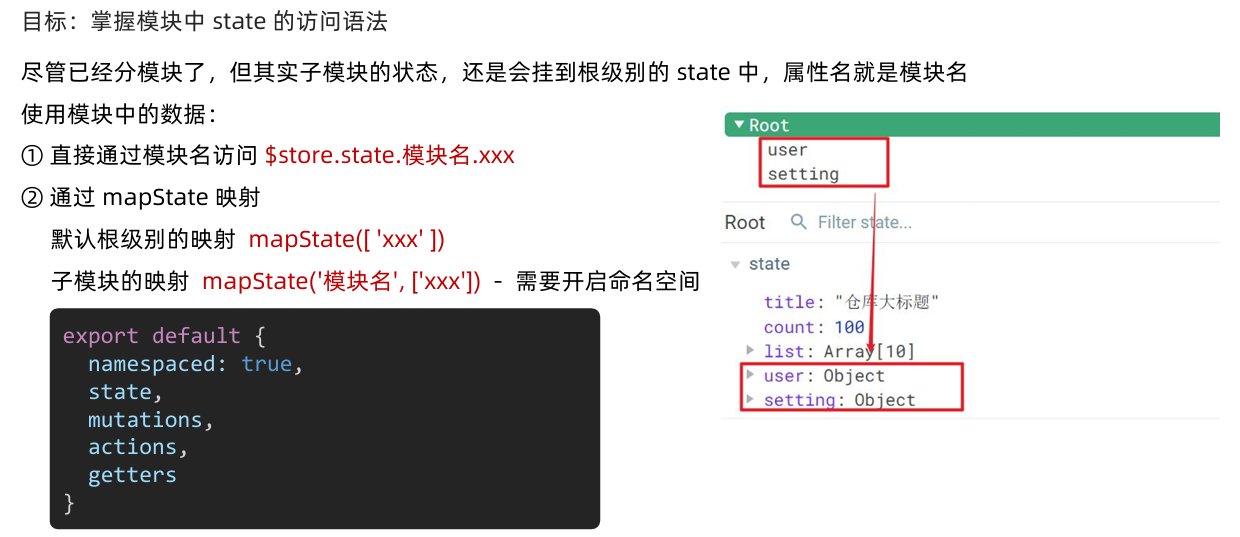
11. 核心概念 - 模块 module (进阶语法)
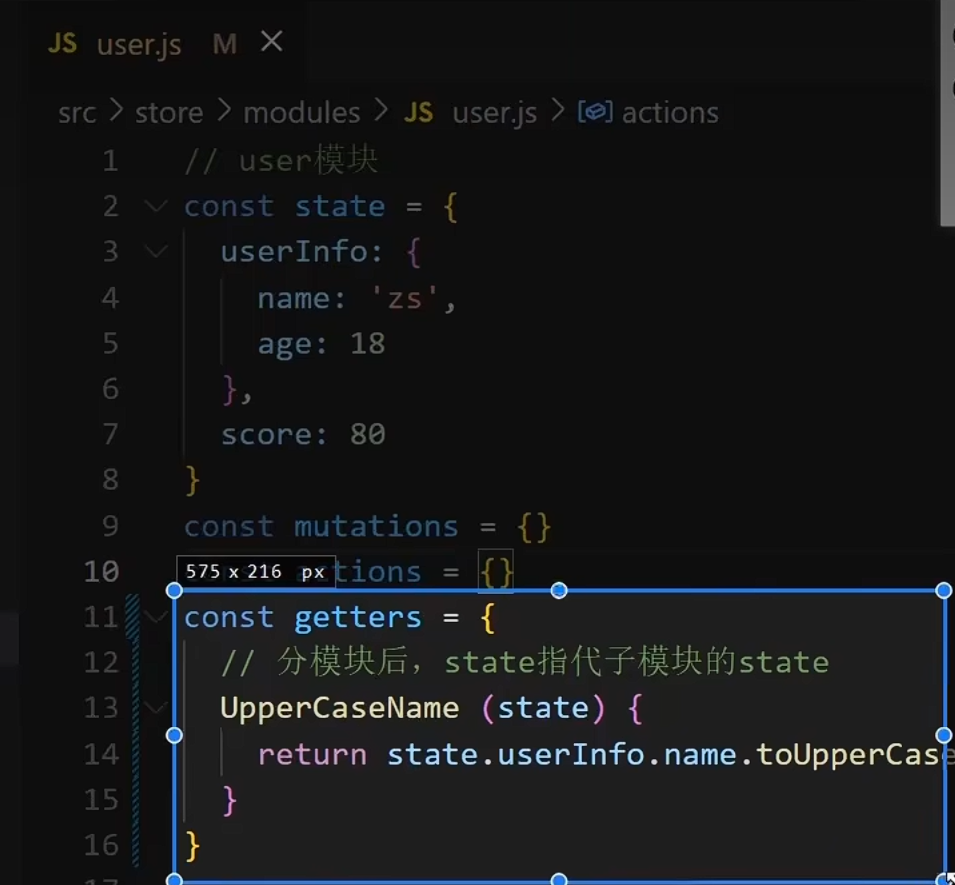
第一:
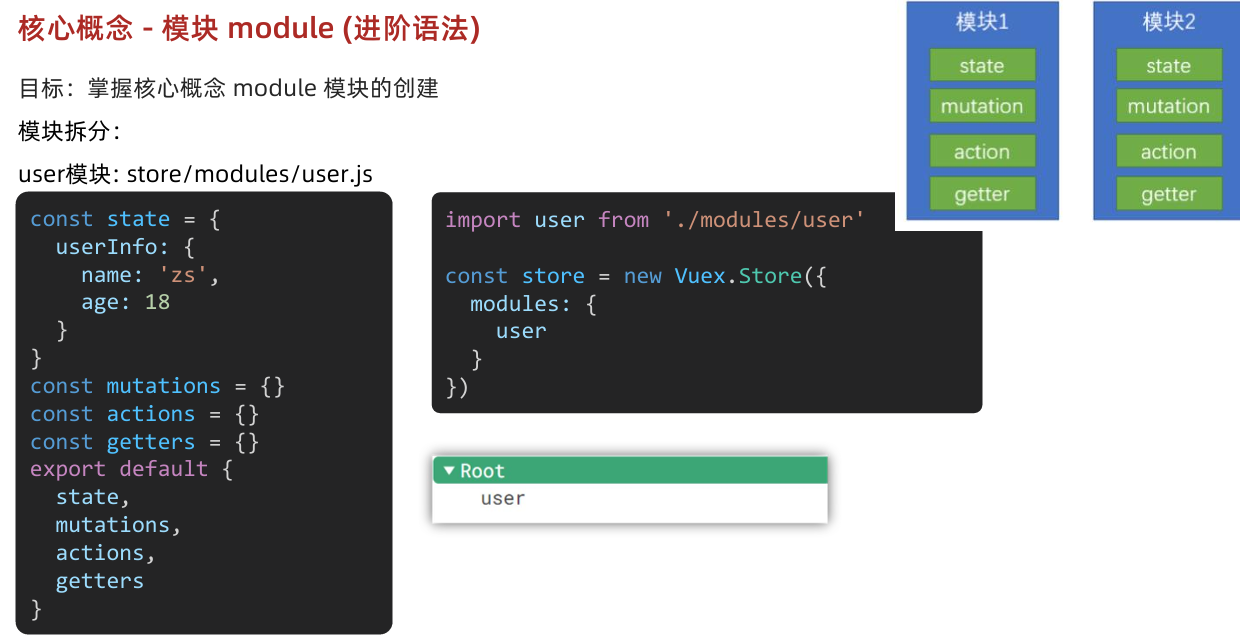
// user模块
const state = {userInfo: {name: 'zs',age: 18},score: 80
}
const mutations = {setUser (state, newUserInfo) {state.userInfo = newUserInfo}
}
const actions = {setUserSecond (context, newUserInfo) {// 将异步在action中进行封装setTimeout(() => {// 调用mutation   context上下文,默认提交的就是自己模块的action和mutationcontext.commit('setUser', newUserInfo)}, 1000)}
}
const getters = {// 分模块后,state指代子模块的stateUpperCaseName (state) {return state.userInfo.name.toUpperCase()}
}export default {namespaced: true,state,mutations,actions,getters
}
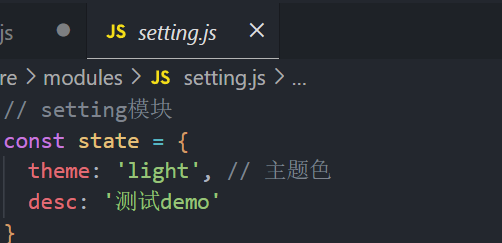
// setting模块
const state = {theme: 'light', // 主题色desc: '测试demo'
}
const mutations = {setTheme (state, newTheme) {state.theme = newTheme}
}
const actions = {}
const getters = {}export default {namespaced: true,state,mutations,actions,getters
}
第二:
法一:
法二:
第三
法一:

法2:
第四
法一:
法2:

第五
法一:
法二
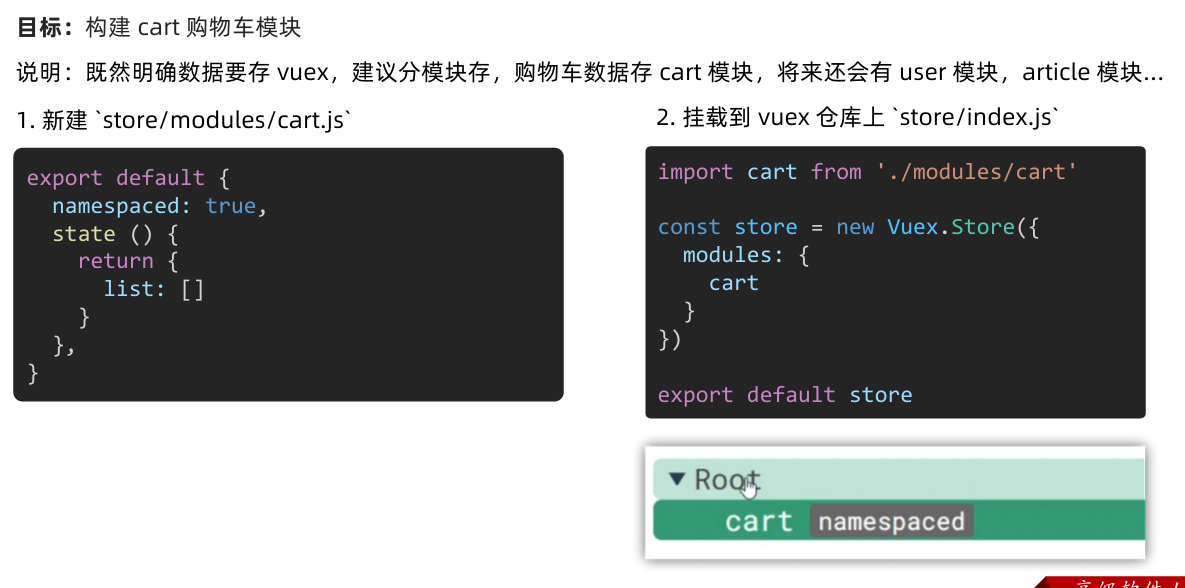
12. 综合案例 - 购物车
1.
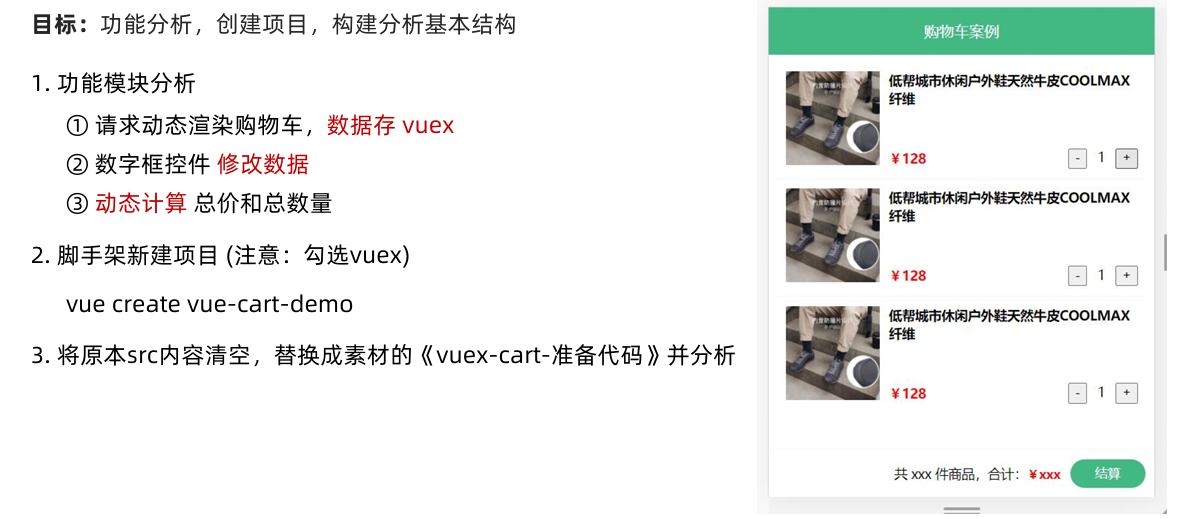
2
3
4
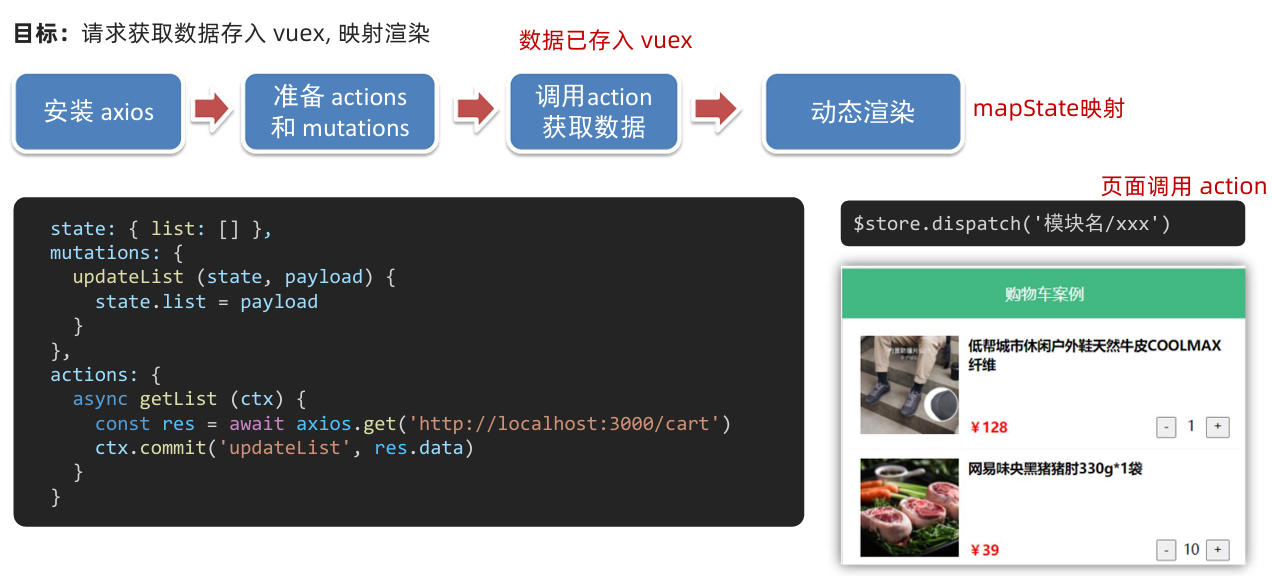
存储数据
渲染
<template><div class="app-container"><!-- Header 区域 --><cart-header></cart-header><!-- 商品 Item 项组件 --><cart-item v-for="item in list" :key="item.id" :item="item"></cart-item><!-- Foote 区域 --><cart-footer></cart-footer></div>
</template><script>
import CartHeader from '@/components/cart-header.vue'
import CartFooter from '@/components/cart-footer.vue'
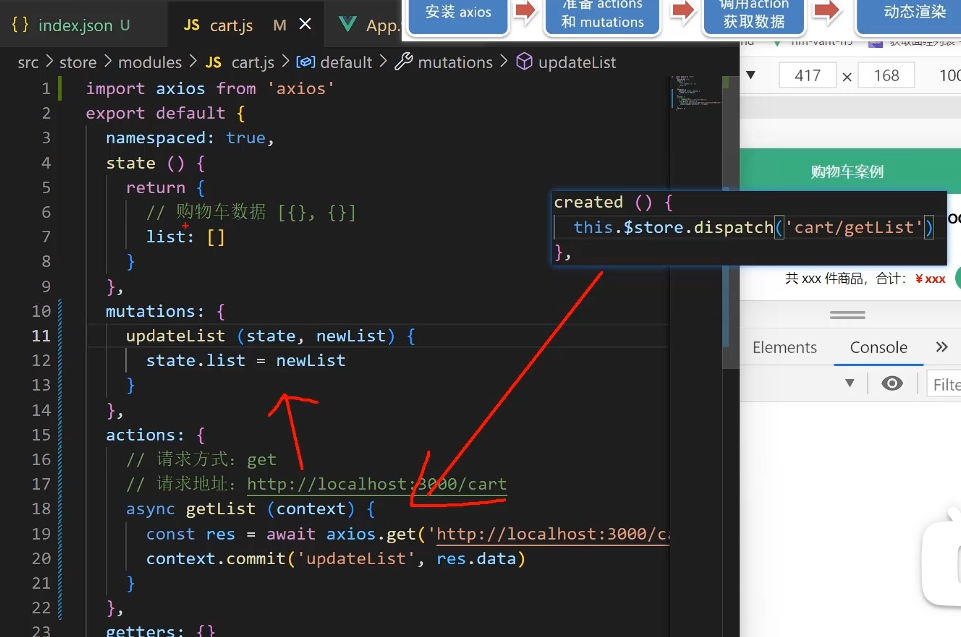
import CartItem from '@/components/cart-item.vue'import { mapState } from 'vuex'export default {name: 'App',created () {this.$store.dispatch('cart/getList')},computed: {...mapState('cart', ['list'])},components: {CartHeader,CartFooter,CartItem}
}
</script><style lang="less" scoped>
.app-container {padding: 50px 0;font-size: 14px;
}
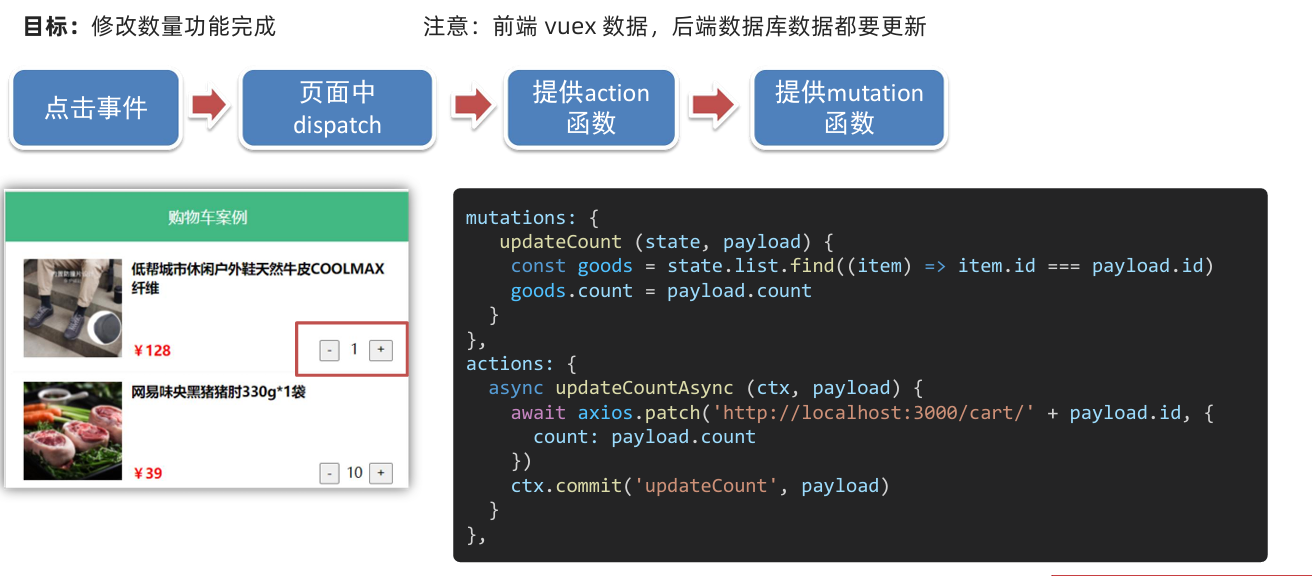
</style><template><div class="goods-container"><!-- 左侧图片区域 --><div class="left"><img :src="item.thumb" class="avatar" alt=""></div><!-- 右侧商品区域 --><div class="right"><!-- 标题 --><div class="title">{{ item.name }}</div><div class="info"><!-- 单价 --><span class="price">¥{{ item.price }}</span><div class="btns"><!-- 按钮区域 --><button class="btn btn-light" @click="btnClick(-1)">-</button><span class="count">{{ item.count }}</span><button class="btn btn-light" @click="btnClick(1)">+</button></div></div></div></div>
</template><script>
export default {name: 'CartItem',methods: {btnClick (step) {const newCount = this.item.count + stepconst id = this.item.idif (newCount < 1) returnthis.$store.dispatch('cart/updateCountAsync', {id,newCount})}},//直接接收props: {item: {type: Object,required: true}}
}
</script><style lang="less" scoped>
.goods-container {display: flex;padding: 10px;+ .goods-container {border-top: 1px solid #f8f8f8;}.left {.avatar {width: 100px;height: 100px;}margin-right: 10px;}.right {display: flex;flex-direction: column;justify-content: space-between;flex: 1;.title {font-weight: bold;}.info {display: flex;justify-content: space-between;align-items: center;.price {color: red;font-weight: bold;}.btns {.count {display: inline-block;width: 30px;text-align: center;}}}}
}.custom-control-label::before,
.custom-control-label::after {top: 3.6rem;
}
</style>
5
<template><div class="goods-container"><!-- 左侧图片区域 --><div class="left"><img :src="item.thumb" class="avatar" alt=""></div><!-- 右侧商品区域 --><div class="right"><!-- 标题 --><div class="title">{{ item.name }}</div><div class="info"><!-- 单价 --><span class="price">¥{{ item.price }}</span><div class="btns"><!-- 按钮区域 --><button class="btn btn-light" @click="btnClick(-1)">-</button><span class="count">{{ item.count }}</span><button class="btn btn-light" @click="btnClick(1)">+</button></div></div></div></div>
</template><script>
export default {name: 'CartItem',methods: {btnClick (step) {const newCount = this.item.count + stepconst id = this.item.idif (newCount < 1) return
//调用this.$store.dispatch('cart/updateCountAsync', {id,newCount})}},props: {item: {type: Object,required: true}}
}
</script><style lang="less" scoped>
.goods-container {display: flex;padding: 10px;+ .goods-container {border-top: 1px solid #f8f8f8;}.left {.avatar {width: 100px;height: 100px;}margin-right: 10px;}.right {display: flex;flex-direction: column;justify-content: space-between;flex: 1;.title {font-weight: bold;}.info {display: flex;justify-content: space-between;align-items: center;.price {color: red;font-weight: bold;}.btns {.count {display: inline-block;width: 30px;text-align: center;}}}}
}.custom-control-label::before,
.custom-control-label::after {top: 3.6rem;
}
</style>
import axios from 'axios'
export default {namespaced: true,state () {return {// 购物车数据 [{}, {}]list: []}},mutations: {updateList (state, newList) {state.list = newList},// obj: { id: xxx, newCount: xxx }updateCount (state, obj) {// 根据 id 找到对应的对象,更新count属性即可const goods = state.list.find(item => item.id === obj.id)goods.count = obj.newCount}},actions: {// 请求方式:get// 请求地址:http://localhost:3000/cartasync getList (context) {const res = await axios.get('http://localhost:3000/cart')context.commit('updateList', res.data)},// 请求方式:patch// 请求地址:http://localhost:3000/cart/:id值  表示修改的是哪个对象// 请求参数:// {//   name: '新值',  【可选】//   price: '新值', 【可选】//   count: '新值', 【可选】//   thumb: '新值'  【可选】// }async updateCountAsync (context, obj) {// 将修改更新同步到后台服务器await axios.patch(`http://localhost:3000/cart/${obj.id}`, {//count不能改count: obj.newCount})// 将修改更新同步到 vuexcontext.commit('updateCount', {id: obj.id,newCount: obj.newCount})}},getters: {// 商品总数量 累加counttotal (state) {return state.list.reduce((sum, item) => sum + item.count, 0)},// 商品总价格 累加count * pricetotalPrice (state) {return state.list.reduce((sum, item) => sum + item.count * item.price, 0)}}
}
6
相关文章:
Vue 核心技术与实战day07
1. vuex概述 2. 构建 vuex [多组件数据共享] 环境 <template><div id"app"><h1>根组件- {{ title }}- {{ count }}</h1><input :value"count" input"handleInput" type"text"><Son1></Son1>…...
的过程)
关于5090安装tensorrt(python api)的过程
前提条件 硬件5090 ubuntu24.04 cuda版本12.8 找到适配的tensorrt版本 Nvidia官网 完事了之后找到对应版本tar安装包 tar -xvzf tensorrt-你的安装包.tar 然后记得将路径加入到环境变量中 #在这里插入代码片 gedit ~/.bashrc # 添加 export PATH/PATH/To/TensorRT-你的按安…...

[蓝桥杯]分考场
题目描述 nn 个人参加某项特殊考试。 为了公平,要求任何两个认识的人不能分在同一个考场。 求是少需要分几个考场才能满足条件。 输入描述 输入格式: 第一行,一个整数 nn (1≤n≤1001≤n≤100),表示参加考试的人数。 第二行…...
CSS专题之层叠上下文
前言 石匠敲击石头的第 15 次 在平常开发的时候,有时候会遇到使用 z-index 调整元素层级没有效果的情况,究其原因还是因为对层叠上下文不太了解,看了网上很多前辈的文章,决定打算写一篇文章来梳理一下,如果哪里写的有问…...
Nginx基础篇(Nginx目录结构分析、Nginx的启用方式和停止方式、Nginx配置文件nginx.conf文件的结构、Nginx基础配置实战)
文章目录 1. Nginx目录结构分析1.1 conf目录1.2 html目录1.3 logs目录1.4 sbin目录 2. Nginx的启用方式和停止方式2.1 信号控制2.1.1 信号2.1.2 调用命令 2.2 命令行控制2.2.1 基础操作类2.2.2 配置测试类2.2.3 进程控制类2.2.4 路径与文件类2.2.5 高级配置类 3. Nginx配置文件…...
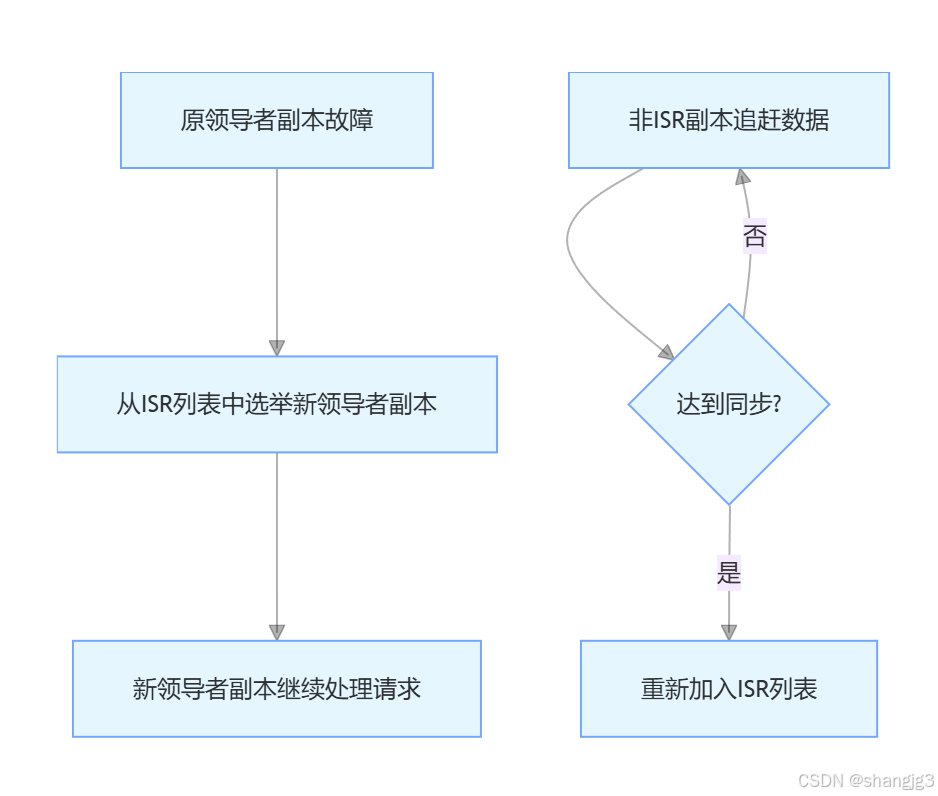
Kafka 的 ISR 机制深度解析:保障数据可靠性的核心防线
在 Kafka 的消息处理体系中,数据的可靠性和高可用性是至关重要的目标。而 ISR(In-Sync Replicas,同步副本)机制作为 Kafka 实现这一目标的关键技术,在消息复制、故障容错等方面发挥着核心作用。接下来,我们…...
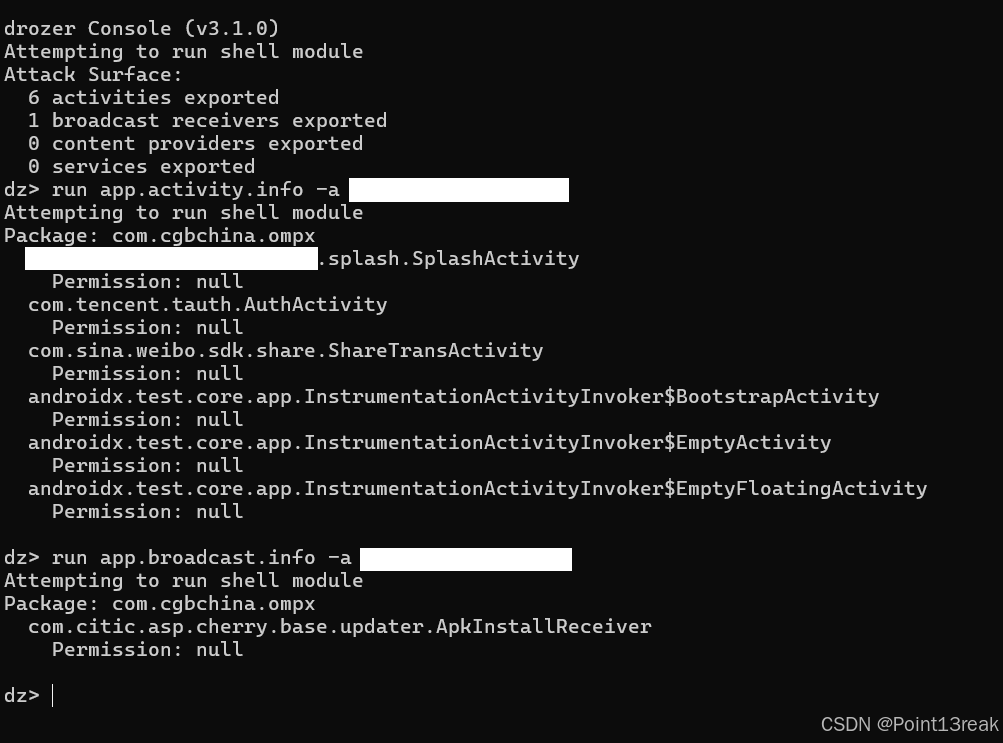
移动安全Android——客户端静态安全
一、反编译保护 测试工具 Jadx GitHub - skylot/jadx: Dex to Java decompiler PKID [下载]PKID-APP查壳工具-Android安全-看雪-安全社区|安全招聘|kanxue.com 测试流程 (1)通过Jadx对客户端APK文件进行反编译,观察是否进行代码混淆 &…...

LeetCode 1524. 和为奇数的子数组数目
好的!让我们详细解释 LeetCode 1524. 和为奇数的子数组数目 这道题的思路和解法。 题目: https://leetcode.cn/problems/number-of-sub-arrays-with-odd-sum/description/ 题目分析 问题描述: 给定一个整数数组 arr,返回其中和…...

Redis最佳实践——安全与稳定性保障之连接池管理详解
Redis 在电商应用的连接池管理全面详解 一、连接池核心原理与架构 1. 连接池工作模型 #mermaid-svg-G7I3ukCljlJZAXaA {font-family:"trebuchet ms",verdana,arial,sans-serif;font-size:16px;fill:#333;}#mermaid-svg-G7I3ukCljlJZAXaA .error-icon{fill:#552222;}…...
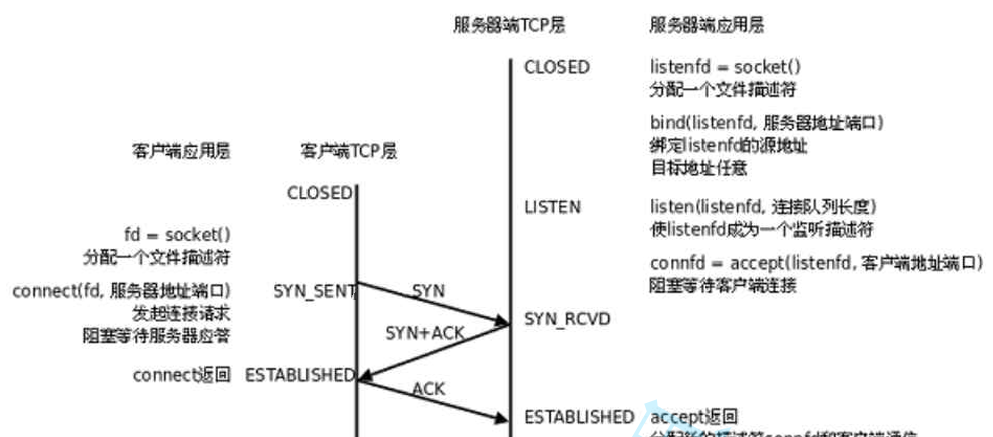
核心机制三:连接管理(三次握手)
核心机制一:确认应答 > 实现可靠传输的核心 接受方给发送方返回"应答报文"(ack) 1)发送方能够感知到对方是否收到 2)如果对方没有收到,发送方采取措施 序号按照字节编排 (连续递增) 确认序号按照收到数据的最后一个字节序号 1 核心机制二:超时重传 > 产生丢包…...

HarmonyOS DevEco Testing入门教程
一、DevEco Testing体系架构 分层测试框架 单元测试层:支持JS/TS/ArkTS语言的JUnit风格测试 UI测试层:基于XCTest框架扩展的视觉化测试工具 云测平台:集成华为云真机调试实验室 核心测试能力 分布式测试引擎:支持跨设备协同测…...
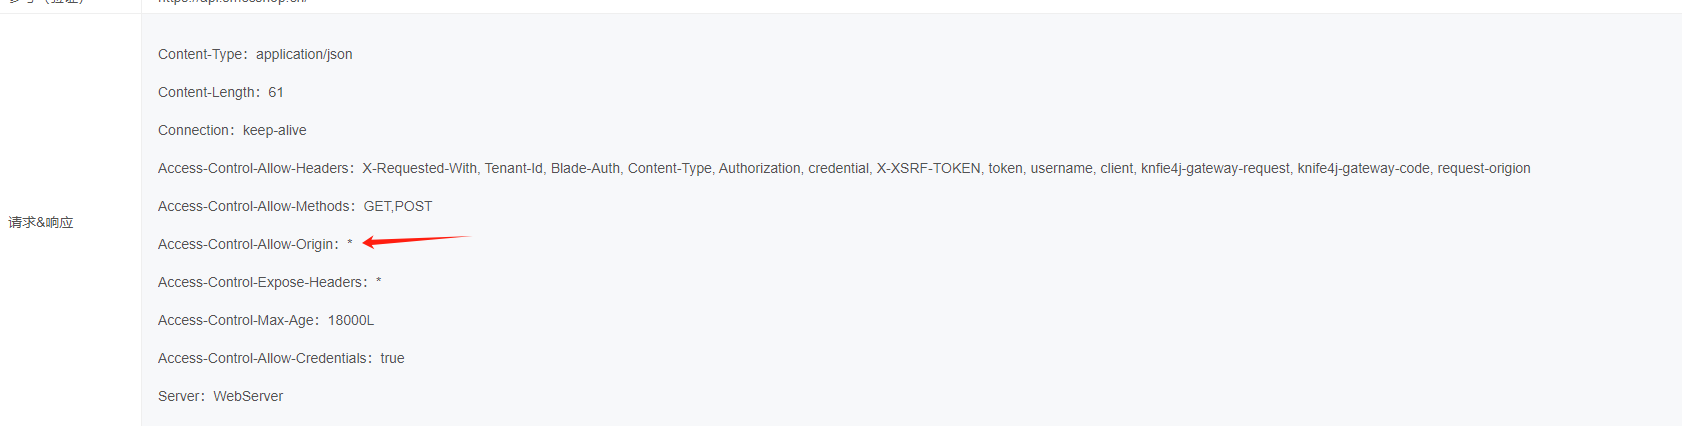
记录一次apisix上cros配置跨域失败的问题
安全要求不允许跨域请求,但是业务侧由于涉及多个域名,并且需要共享cookie,所以需要配置跨域。 在apisix上配置了cors如下。 结果安全漏扫还是识别到了跨域请求的漏洞。 调试了cors.lua的插件脚本,发现apisix上是如果不在allowOri…...

Spring Data Redis 实战指南
Spring Data Redis 核心特性 Spring Data Redis 是基于 Redis 的 NoSQL 内存数据结构存储解决方案,为 Spring 应用程序提供与 Redis 交互的高级抽象层。其核心架构设计体现了对现代应用需求的深度适配,主要技术特性可归纳为以下维度: 数据结构支持体系 作为多模型数据存储…...

服务器数据恢复—EMC存储raid5阵列故障导致上层应用崩了的数据恢复案例
服务器存储数据恢复环境: EMC某型号存储中有一组由8块硬盘组建的raid5磁盘阵列。 服务器存储故障: raid5阵列中有2块硬盘离线,存储不可用,上层应用崩了。 服务器存储数据恢复过程: 1、将存储中的所有硬盘编号后取出&a…...

如何保护网络免受零日漏洞攻击?
零日漏洞(Zero-Day Vulnerability)是指软件或系统中尚未被厂商发现或修补的安全漏洞。这个名称中的“零日”意味着,从漏洞被发现到厂商发布修复补丁的时间是零天,也就是说,黑客可以利用这个漏洞进行攻击,而…...
Python打卡训练营-Day13-不平衡数据的处理
浙大疏锦行 知识点: 不平衡数据集的处理策略:过采样、修改权重、修改阈值交叉验证代码 过采样 过采样一般包含2种做法:随机采样和SMOTE 过采样是把少的类别补充和多的类别一样多,欠采样是把多的类别减少和少的类别一样 一般都是缺…...
)
【专题】神经网络期末复习资料(题库)
神经网络期末复习资料(题库) 链接:https://blog.csdn.net/Pqf18064375973/article/details/148332887?sharetypeblogdetail&sharerId148332887&sharereferPC&sharesourcePqf18064375973&sharefrommp_from_link 【测试】 Th…...
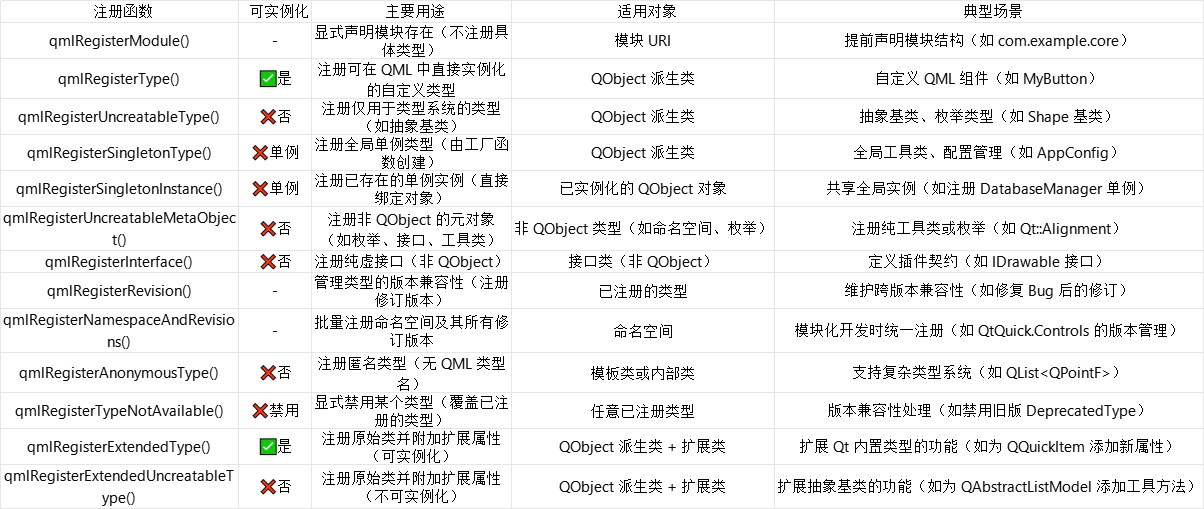
2.qml使用c++
目录 1.概述2.注册方式3. 分类①枚举类②工具类③数据类④资源类②视图类 1.概述 qml是用来干嘛的? 当然是提高UI开发效率的 为什么要混合C? 因为qml无法处理密集型数据逻辑 而加入c则兼顾了性能 达到11>2 总结就是 qml 开发UI, C 实现逻辑 而js的用…...
)
【数据结构】字符串操作整理(C++)
1. 字符串长度与容量 size() / length() 定义:返回字符串的当前长度(字符数)。用法: string s "hello"; cout << s.size(); // 输出:5提示:size() 和 length() 功能完全相同࿰…...

PostgreSQL的扩展 dblink
PostgreSQL的扩展 dblink dblink 是 PostgreSQL 的一个核心扩展,允许在当前数据库中访问其他 PostgreSQL 数据库的数据,实现跨数据库查询功能。 一、dblink 扩展安装与启用 1. 安装扩展 -- 使用超级用户安装 CREATE EXTENSION dblink;2. 验证安装 -…...
c++5月31日笔记
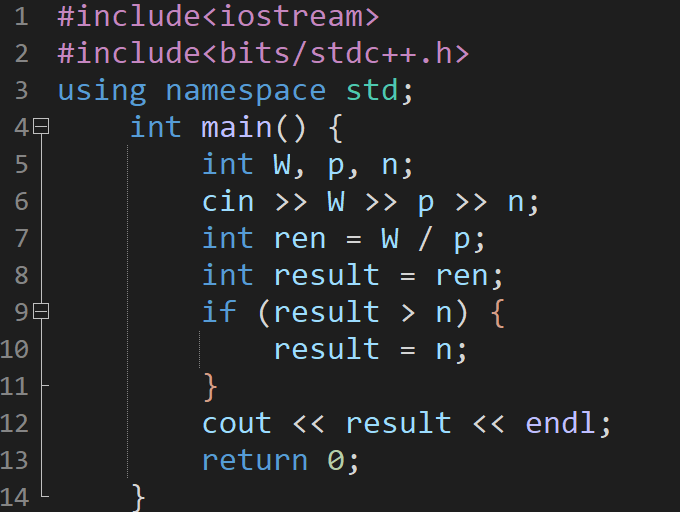
题目:水龙头 时间限制:C/C 语言 1000MS;其他语言 3000MS 内存限制:C/C 语言 65536KB;其他语言 589824KB 题目描述: 小明在 0 时刻(初始时刻)将一个空桶放置在漏水的水龙头下。已知桶…...
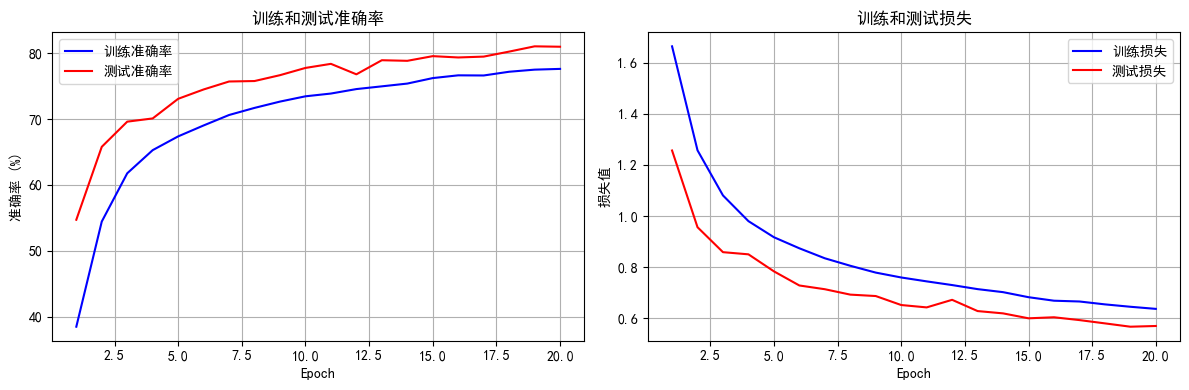
Python打卡训练营Day41
DAY 41 简单CNN 知识回顾 数据增强卷积神经网络定义的写法batch归一化:调整一个批次的分布,常用与图像数据特征图:只有卷积操作输出的才叫特征图调度器:直接修改基础学习率 卷积操作常见流程如下: 1. 输入 → 卷积层 →…...

【Java进阶】图像处理:从基础概念掌握实际操作
一、核心概念:BufferedImage - 图像的画布与数据载体 在Java图像处理的世界里,BufferedImage是当之无愧的核心。你可以将它想象成一块内存中的画布,所有的像素数据、颜色模型以及图像的宽度、高度等信息都存储在其中。 BufferedImage继承自…...

JAVA网络编程——socket套接字的介绍下(详细)
目录 前言 1.TCP 套接字编程 与 UDP 数据报套接字的区别 2.TCP流套接字编程 API 介绍 TCP回显式服务器 Scanner 的多种使用方式 PrintWriter 的多种使用方式 TCP客户端 3. TCP 服务器中引入多线程 结尾 前言 各位读者大家好,今天笔者继续更新socket套接字的下半部分…...

Apache SeaTunnel 引擎深度解析:原理、技术与高效实践
Apache SeaTunnel 作为新一代高性能分布式数据集成平台,其核心引擎设计融合了现代大数据处理架构的精髓。 Apache SeaTunnel引擎通过分布式架构革新、精细化资源控制及企业级可靠性设计,显著提升了数据集成管道的执行效率与运维体验。其模块化设计允许用…...

深入理解 Maven 循环依赖问题及其解决方案
在 Java 开发领域,Maven 作为主流构建工具极大简化了依赖管理和项目构建。然而**循环依赖(circular dependency)**问题仍是常见挑战,轻则导致构建失败,重则引发类加载异常和系统架构混乱。 本文将从根源分析循环依赖的…...

pytest中的元类思想与实战应用
在Python编程世界里,元类是一种强大而高级的特性,它能在类定义阶段深度定制类的创建与行为。而pytest作为热门的测试框架,虽然没有直接使用元类,但在设计机制上,却暗含了许多与元类思想相通的地方。接下来,…...

前端生成UUID
UUID(Universally Unique Identifier)是一种在分布式系统中广泛使用的标识符,具有全球唯一性。在前端开发中,生成可靠的UUID对于数据追踪、会话管理、缓存键生成等场景至关重要。接下来将深入探讨UUID的实现原理、前端生成方案及最佳实践。 一、UUID标准与版本 1. UUID结构…...

玩客云WS1608控制LED灯的颜色
玩客云WS1608控制LED灯的颜色 玩客云设备有个红、绿、蓝三色led灯,在刷入armbian系统以后,这个灯的颜色就会显示异常,往往是一直显示红色。 如果要自动动手调整led灯的颜色,控制命令如下(需要root用户执行࿰…...
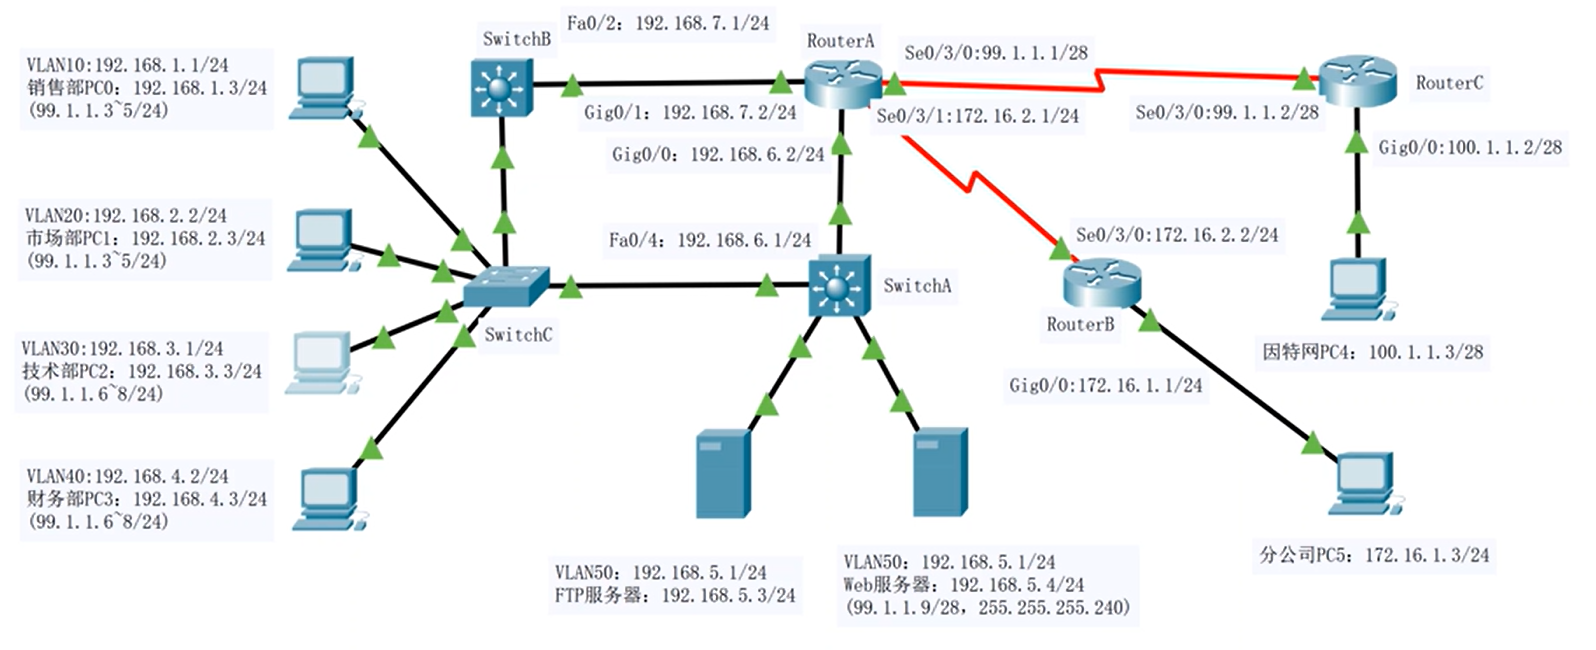
实验三 企业网络搭建及应用
实验三 企业网络搭建及应用 一、实验目的 1.掌握企业网络组建方法。 2.掌握企业网中常用网络技术配置方法。 二、实验描述 某企业设有销售部、市场部、技术部和财务部四个部门。公司内部网络使用二层交换机作为用户的接入设备。为了使网络更加稳定可靠,公司决定…...