【音视频】FFmpeg 硬件(NVDIA)编码H264
FFmpeg 与x264的关系
ffmpeg软编码是使⽤x264开源项⽬,也就是说ffmpeg软编码H264最终是调⽤了x264开源项⽬,所以我们要先理解ffmpeg和x264的调⽤关系,这⾥我们主要关注x264_init。对于x264的参数都在
ffmpeg\libavcodec \libx264.c
x264\common\base.c
-
ffmpeg中采⽤H264,H265标准编码时,可能需要设置profile、preset和tune。我们先分析这三个参数的意义。然后再继续分析码率、帧率等的设置。
-
ch264编码原理复杂,参数较多。很多编码为了实现框架以及⽅便调⽤者使⽤,都封装了⼏种现有的编码模型,只需要根据编码速度的要求和视频质量的要求选择模型,并修改部分视频参数即可编码,x264也不例外。我们只需要通过preset和tune即可设置选择现有的编码模型。
preset值简单释义
| preset值 | 释义 |
|---|---|
| ultrafast | 极快 |
| superfast | 超快 |
| veryfast | 非常快 |
| faster | 更快 |
| fast | 快 |
| medium | 中 |
| slow | 慢 |
| slower | 更慢 |
| veryslow | 非常慢 |
| placebo | 超慢 |
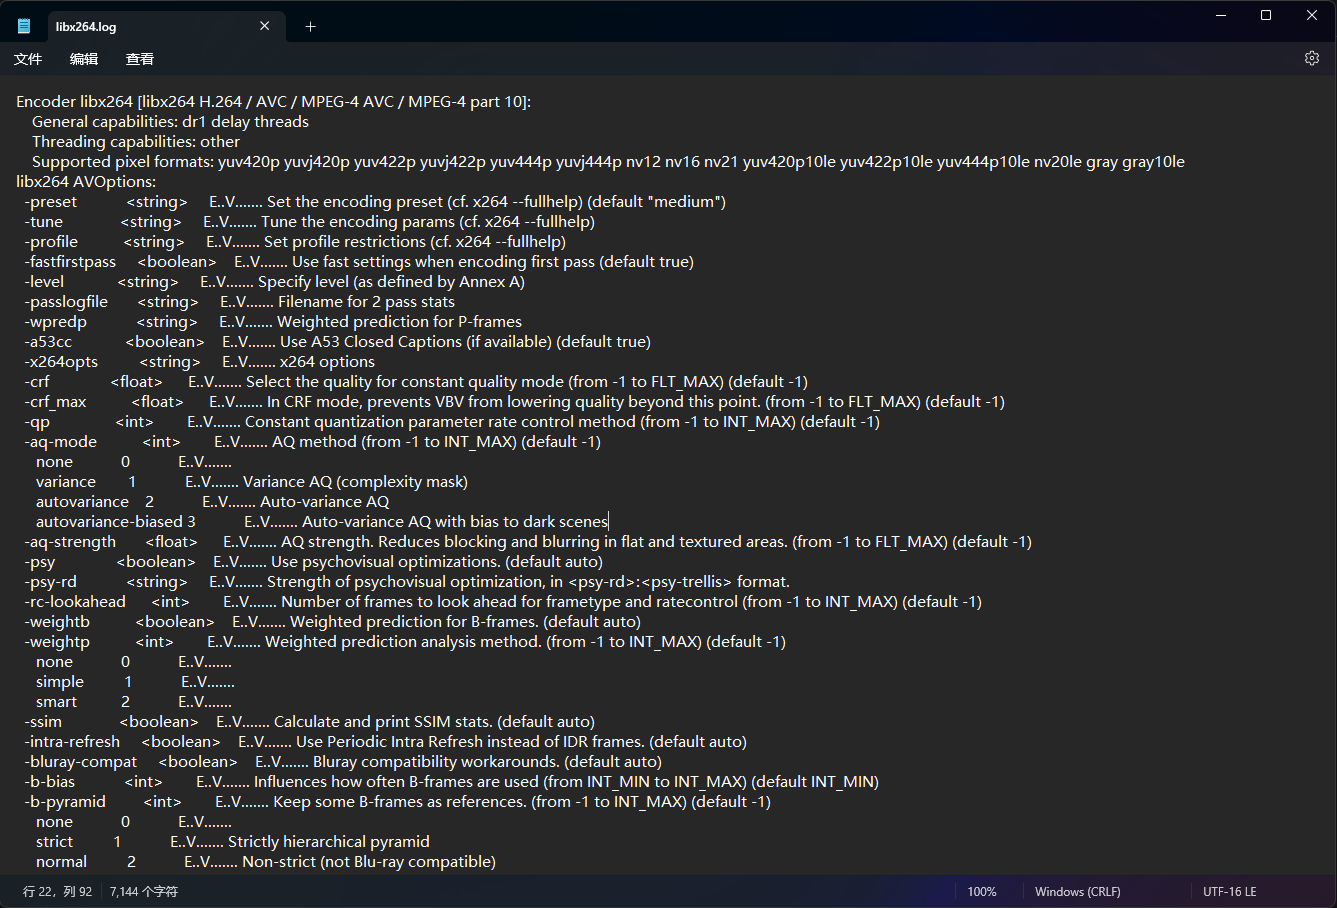
可以通过ffmpeg命令行来查询更多libx264的编码器设置
ffmpeg -h encoder="libx264" >libx264.log
preset质量分析
通常,⽐特率越⾼,编码所需的时间越多。下⾯图显示了同⼀1080p数据源通过设置不同preset的编码时间:
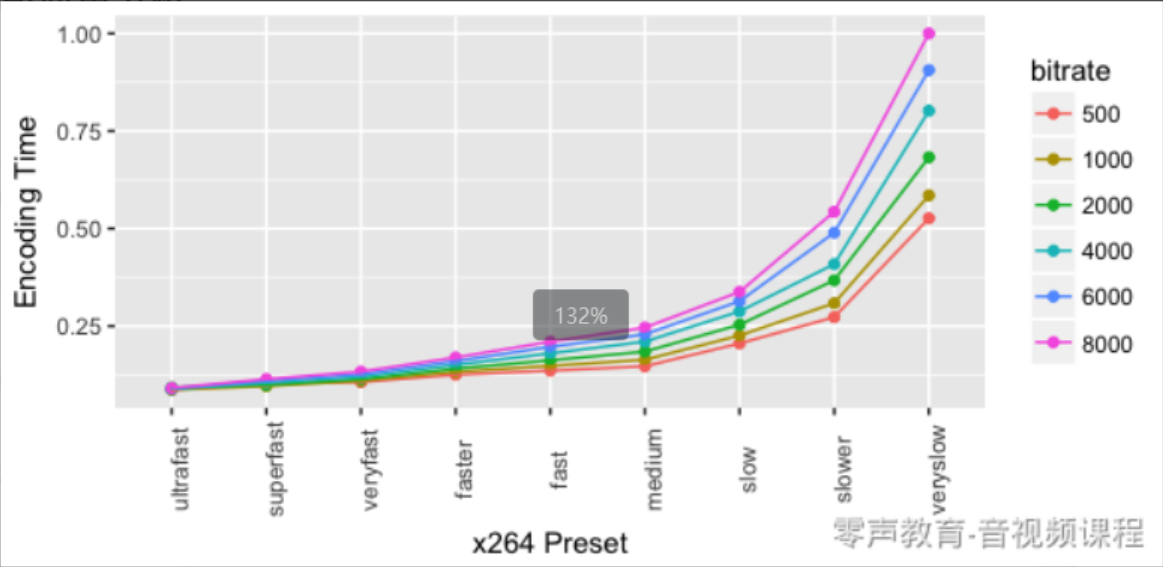
- 从中到慢,所需时间增加了约40%。 相反,变慢会导致所需时间增加⼤约100%(将花费两倍的时间)。
- 与中等速度相⽐,veryslow需要原始编码时间的280%,⽽质量较慢的速度只有很少的改进。
- 使⽤快速可节省⼤约10%的编码时间,快则可节省25%。 超快将节省55%的成本,但质量要低得多。
ffmpe的设置
ret = av_opt_set(enc_ctx->priv_data, "preset", "veryfast", 0);
- 在avcodec_open2调⽤后,最终调⽤ffmpeg的libx264.c的X264_init,然后调⽤x264开源项⽬的x264_param_default_preset函数。
preset对应的源码分析
- x264_param_default_preset通过x264_param_apply_preset设置编码参数。
static int x264_param_apply_preset( x264_param_t *param, const char *preset )
{char *end;int i = strtol( preset, &end, 10 );if( *end == 0 && i >= 0 && i < sizeof(x264_preset_names)/sizeof(*x264_preset_names)-1 )preset = x264_preset_names[i];if( !strcasecmp( preset, "ultrafast" ) ){param->i_frame_reference = 1;param->i_scenecut_threshold = 0;param->b_deblocking_filter = 0;param->b_cabac = 0;param->i_bframe = 0;param->analyse.intra = 0;param->analyse.inter = 0;param->analyse.b_transform_8x8 = 0;param->analyse.i_me_method = X264_ME_DIA;param->analyse.i_subpel_refine = 0;param->rc.i_aq_mode = 0;param->analyse.b_mixed_references = 0;param->analyse.i_trellis = 0;param->i_bframe_adaptive = X264_B_ADAPT_NONE;param->rc.b_mb_tree = 0;param->analyse.i_weighted_pred = X264_WEIGHTP_NONE;param->analyse.b_weighted_bipred = 0;param->rc.i_lookahead = 0;}else if( !strcasecmp( preset, "superfast" ) ){param->analyse.inter = X264_ANALYSE_I8x8|X264_ANALYSE_I4x4;param->analyse.i_me_method = X264_ME_DIA;param->analyse.i_subpel_refine = 1;param->i_frame_reference = 1;param->analyse.b_mixed_references = 0;param->analyse.i_trellis = 0;param->rc.b_mb_tree = 0;param->analyse.i_weighted_pred = X264_WEIGHTP_SIMPLE;param->rc.i_lookahead = 0;}else if( !strcasecmp( preset, "veryfast" ) ){param->analyse.i_me_method = X264_ME_HEX;param->analyse.i_subpel_refine = 2;param->i_frame_reference = 1;param->analyse.b_mixed_references = 0;param->analyse.i_trellis = 0;param->analyse.i_weighted_pred = X264_WEIGHTP_SIMPLE;param->rc.i_lookahead = 10;}else if( !strcasecmp( preset, "faster" ) ){param->analyse.b_mixed_references = 0;param->i_frame_reference = 2;param->analyse.i_subpel_refine = 4;param->analyse.i_weighted_pred = X264_WEIGHTP_SIMPLE;param->rc.i_lookahead = 20;}else if( !strcasecmp( preset, "fast" ) ){param->i_frame_reference = 2;param->analyse.i_subpel_refine = 6;param->analyse.i_weighted_pred = X264_WEIGHTP_SIMPLE;param->rc.i_lookahead = 30;}else if( !strcasecmp( preset, "medium" ) ){/* Default is medium*默认参考 set_param_default();*/}else if( !strcasecmp( preset, "slow" ) ){param->analyse.i_me_method = X264_ME_UMH;param->analyse.i_subpel_refine = 8;param->i_frame_reference = 5;param->i_bframe_adaptive = X264_B_ADAPT_TRELLIS;param->analyse.i_direct_mv_pred = X264_DIRECT_PRED_AUTO;param->rc.i_lookahead = 50;}else if( !strcasecmp( preset, "slower" ) ){param->analyse.i_me_method = X264_ME_UMH;param->analyse.i_subpel_refine = 9;param->i_frame_reference = 8;param->i_bframe_adaptive = X264_B_ADAPT_TRELLIS;param->analyse.i_direct_mv_pred = X264_DIRECT_PRED_AUTO;param->analyse.inter |= X264_ANALYSE_PSUB8x8;param->analyse.i_trellis = 2;param->rc.i_lookahead = 60;}else if( !strcasecmp( preset, "veryslow" ) ){param->analyse.i_me_method = X264_ME_UMH;param->analyse.i_subpel_refine = 10;param->analyse.i_me_range = 24;param->i_frame_reference = 16;param->i_bframe_adaptive = X264_B_ADAPT_TRELLIS;param->analyse.i_direct_mv_pred = X264_DIRECT_PRED_AUTO;param->analyse.inter |= X264_ANALYSE_PSUB8x8;param->analyse.i_trellis = 2;param->i_bframe = 8;param->rc.i_lookahead = 60;}else if( !strcasecmp( preset, "placebo" ) ){param->analyse.i_me_method = X264_ME_TESA;param->analyse.i_subpel_refine = 11;param->analyse.i_me_range = 24;param->i_frame_reference = 16;param->i_bframe_adaptive = X264_B_ADAPT_TRELLIS;param->analyse.i_direct_mv_pred = X264_DIRECT_PRED_AUTO;param->analyse.inter |= X264_ANALYSE_PSUB8x8;param->analyse.b_fast_pskip = 0;param->analyse.i_trellis = 2;param->i_bframe = 16;param->rc.i_lookahead = 60;}else{x264_log( NULL, X264_LOG_ERROR, "invalid preset '%s'\n", preset );return -1;}return 0;
}
从这⾥⼤体可以看出来:
- b帧数量降低编码速度;
- 参考帧越多编码速度越慢
- 运动估计算法越复杂,编码越耗时。
- 越slow的编码算法,使⽤的编码算法越复杂。
⽐如:选⽤ultrafast会关闭b帧,但是同等质量也会增⼤码率。veryfast 之后会启⽤各种保护质量的算法, 很⼤程度上降低编码速度。
ultrafast->veryslow:
- 编码复杂度增加;
- 编码质量增加;
- 编码时⻓增加;
- 编码cpu占⽐增肌;
也就是说,如果要通过降低码率但⼜要保证编码质量,则需要提⾼编码的复杂度,但会占⽤更多的cpu时
间。
tune
tune值简单释义
| tune值 | 释义 |
|---|---|
| film | 电影、真人类型 |
| animation | 动画 |
| grain | 需要保留大量的grain时用 |
| stillimage | 静态图像编码时使用 |
| psnr | 为提高psnr做了优化的参数 |
| ssim | 为提高ssim做了优化的参数 |
| fastdecode | 可以快速解码的参数 |
| zerolatency | 零延迟,用在需要非常低的延迟的情况下,比如电视电话会议的编码 |
主要配合视频类型和视觉优化的参数况。如果视频的内容符合其中⼀个可⽤的调整值⼜或者有其中需要,则可以使⽤此选项,否则建议不使⽤(如tune grain是为⾼⽐特率的编码⽽设计的)。
ffmpe的设置
ret = av_opt_set(enc_ctx->priv_data, "tune","zerolatency",0);
profile
H.264有四种画质级别,分别是baseline, extended, main, high:
| profile取值 | 含义 | 释义 |
|---|---|---|
| baseline | 基本画质 | 支持I/P 帧,只支持无交错(Progressive)和CAVLC |
| extended | 进阶画质 | 支持I/P/B/SP/SI 帧,只支持无交错(Progressive)和CAVLC(用的少) |
| main | 主流画质 | 提供I/P/B 帧,支持无交错(Progressive)和交错(Interlaced),也支持CAVLC 和CABAC 的支持 |
| high | 高级画质 | 在main Profile 的基础上增加了8x8内部预测、自定义量化、无损视频编码和更多的YUV 格式 |
Nvdia解码H264实现
前言
原代码使用的是nvdia进行解码,但是我的显卡是AMD的,因此不支持这个解码器,因此该代码转载别人写的代码,具体的测试结果仅供参考!
| 编码器 | 预设 | 编码时间 | 比特率 | 线程数 | 线程类型 |
|---|---|---|---|---|---|
| libx264 | ultrafast | 306ms | 1027.18kbps | 未指定 | 未指定 |
| h264_nvenc | ultrafast | 278ms | 906.10kbps | 未指定 | 未指定 |
| libx264 | superfast | 381ms | 1084.67kbps | 未指定 | 未指定 |
| h264_nvenc | superfast | 226ms | 906.10kbps | 未指定 | 未指定 |
| libx264 | faster | 800ms | 928.86kbps | 未指定 | 未指定 |
| h264_nvenc | faster | 219ms | 906.10kbps | 未指定 | 未指定 |
| h264_nvenc | fast | 223ms | 923.33kbps | 未指定 | 未指定 |
| libx264 | medium | 1075ms | 928.75kbps | 未指定 | 未指定 |
| h264_nvenc | medium | 279ms | 906.10kbps | 1 | 3 |
| libx264 | slow | 1852ms | 928.24kbps | 0 | 0 |
| h264_nvenc | slow | 456ms | 921.65kbps | 1 | 3 |
| libx264 | slower | 3017ms | 925.25kbps | 未指定 | 未指定 |
| h264_nvenc | slower | 276ms | 906.10kbps | 1 | 3 |
| libx264 | veryslow | 4748ms | 920.88kbps | 未指定 | 未指定 |
| h264_nvenc | veryslow | 289ms | 906.10kbps | 未指定 | 未指定 |
| libx264 | placebo | 17834ms | 923.30kbps | 未指定 | 未指定 |
| h264_nvenc | placebo | 282ms | 906.10kbps | 1 | 3 |
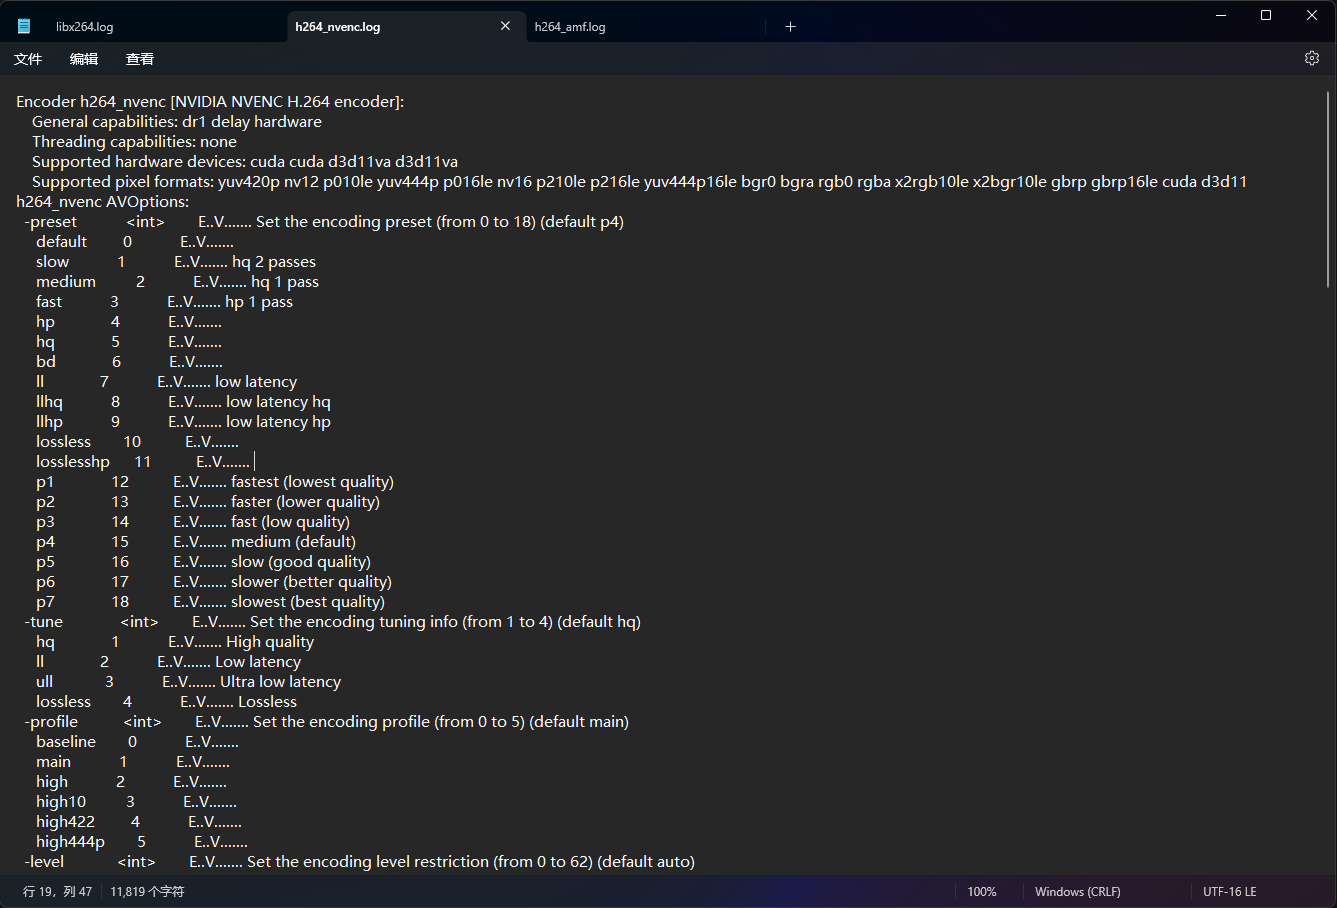
除了查看nvdia的SDK代码,还可以通过ffmpeg命令行查询对应解码器可用的参数设置
ffmpeg -h encoder="h264_nvenc" > h264_nvenc.log
实现流程
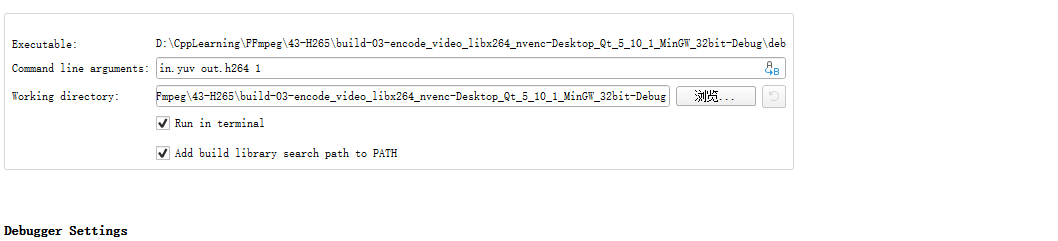
准备文件
- 在build路径下准备yuv文件

- 添加对应参数,读取yuv文件,编码为h264,
- 后面的1表示生成对应的h264文件,如果为0表示不生成
设置预设值
- 我们对比了libx264和h264_nvenc不同预设的编码时间
- 对于部分libx264的预设,h264_nvenc不支持,具体的预设还需要查询文档
ultrafast
sprintf(out_h264_file, "%s_%s_%s.h264",  argv[2], "ultrafast", "libx264");
video_encode_preset_test("libx264", in_yuv_file, out_h264_file, "ultrafast", write_enable);
sprintf(out_h264_file, "%s_%s_%s.h264",  argv[2], "ultrafast", "h264_nvenc");
video_encode_preset_test("h264_nvenc", in_yuv_file, out_h264_file, "ultrafast", write_enable); // nvenc不支持
superfast
sprintf(out_h264_file, "%s_%s_%s.h264",  argv[2], "superfast", "libx264");
video_encode_preset_test("libx264", in_yuv_file, out_h264_file, "superfast", write_enable);
sprintf(out_h264_file, "%s_%s_%s.h264",  argv[2], "superfast", "h264_nvenc");
video_encode_preset_test("h264_nvenc", in_yuv_file, out_h264_file, "superfast", write_enable);  // nvenc不支持
faster
sprintf(out_h264_file, "%s_%s_%s.h264",  argv[2], "faster", "libx264");
video_encode_preset_test("libx264", in_yuv_file, out_h264_file, "faster", write_enable);
sprintf(out_h264_file, "%s_%s_%s.h264",  argv[2], "faster", "h264_nvenc");
video_encode_preset_test("h264_nvenc", in_yuv_file, out_h264_file, "faster", write_enable);   // nvenc不支持
fast
printf("\n\n--fast--------\n");
sprintf(out_h264_file, "%s_%s_%s.h264",  argv[2], "fast", "libx264");
video_encode_preset_test("libx264", in_yuv_file, out_h264_file, "fast", write_enable);
sprintf(out_h264_file, "%s_%s_%s.h264",  argv[2], "fast", "h264_nvenc");
video_encode_preset_test("h264_nvenc", in_yuv_file, out_h264_file, "fast", write_enable);
medium
printf("\n\n--medium--------\n");
sprintf(out_h264_file, "%s_%s_%s.h264",  argv[2], "medium", "libx264");
video_encode_preset_test("libx264", in_yuv_file, out_h264_file, "medium", write_enable);
sprintf(out_h264_file, "%s_%s_%s.h264",  argv[2], "medium", "h264_nvenc");
video_encode_preset_test("h264_nvenc", in_yuv_file, out_h264_file, "medium", write_enable);
slow
printf("\n\n--slow--------\n");
sprintf(out_h264_file, "%s_%s_%s.h264",  argv[2], "slow", "libx264");
video_encode_preset_test("libx264", in_yuv_file, out_h264_file, "slow", write_enable);
sprintf(out_h264_file, "%s_%s_%s.h264",  argv[2], "slow", "h264_nvenc");
video_encode_preset_test("h264_nvenc", in_yuv_file, out_h264_file, "slow", write_enable);
slower
sprintf(out_h264_file, "%s_%s_%s.h264",  argv[2], "slower", "libx264");
video_encode_preset_test("libx264", in_yuv_file, out_h264_file, "slower", write_enable);
sprintf(out_h264_file, "%s_%s_%s.h264",  argv[2], "slower", "h264_nvenc");
video_encode_preset_test("h264_nvenc", in_yuv_file, out_h264_file, "slower", write_enable);   // nvenc不支持
veryslow
sprintf(out_h264_file, "%s_%s_%s.h264",  argv[2], "veryslow", "libx264");
video_encode_preset_test("libx264", in_yuv_file, out_h264_file, "veryslow", write_enable);
sprintf(out_h264_file, "%s_%s_%s.h264",  argv[2], "veryslow", "h264_nvenc");
video_encode_preset_test("h264_nvenc", in_yuv_file, out_h264_file, "veryslow", write_enable);  // nvenc不支持
placebo
sprintf(out_h264_file, "%s_%s_%s.h264",  argv[2], "placebo", "libx264");
video_encode_preset_test("libx264", in_yuv_file, out_h264_file, "placebo", write_enable);
sprintf(out_h264_file, "%s_%s_%s.h264",  argv[2], "placebo", "h264_nvenc");
video_encode_preset_test("h264_nvenc", in_yuv_file, out_h264_file, "placebo", write_enable);// nvenc不支持
video_encode_preset_test函数讲解
video_encode_preset_test函数主要是查找对应的编码器(libx264、h264_nvenc),然后将预设的参数对编码器进行设置- 其中视频设置为1280x720分辨率,帧率为25fps
/* 查找指定的编码器 */
codec = avcodec_find_encoder_by_name(codec_name);
if (!codec) {fprintf(stderr, "Codec '%s' not found\n", codec_name);exit(1);
}codec_ctx = avcodec_alloc_context3(codec);
if (!codec_ctx) {fprintf(stderr, "Could not allocate video codec context\n");exit(1);
}VideoConfgig *video_config = video_encode_new_default_config(codec_name, 1280, 720, 25);
video_config->preset = alloc_and_copy_string(preset);video_encode_config(video_config, codec_ctx);  // 设置ret = avcodec_open2(codec_ctx, codec,NULL);
if (ret < 0) {fprintf(stderr, "Could not open codec: %s\n", av_err2str(ret));exit(1);
}
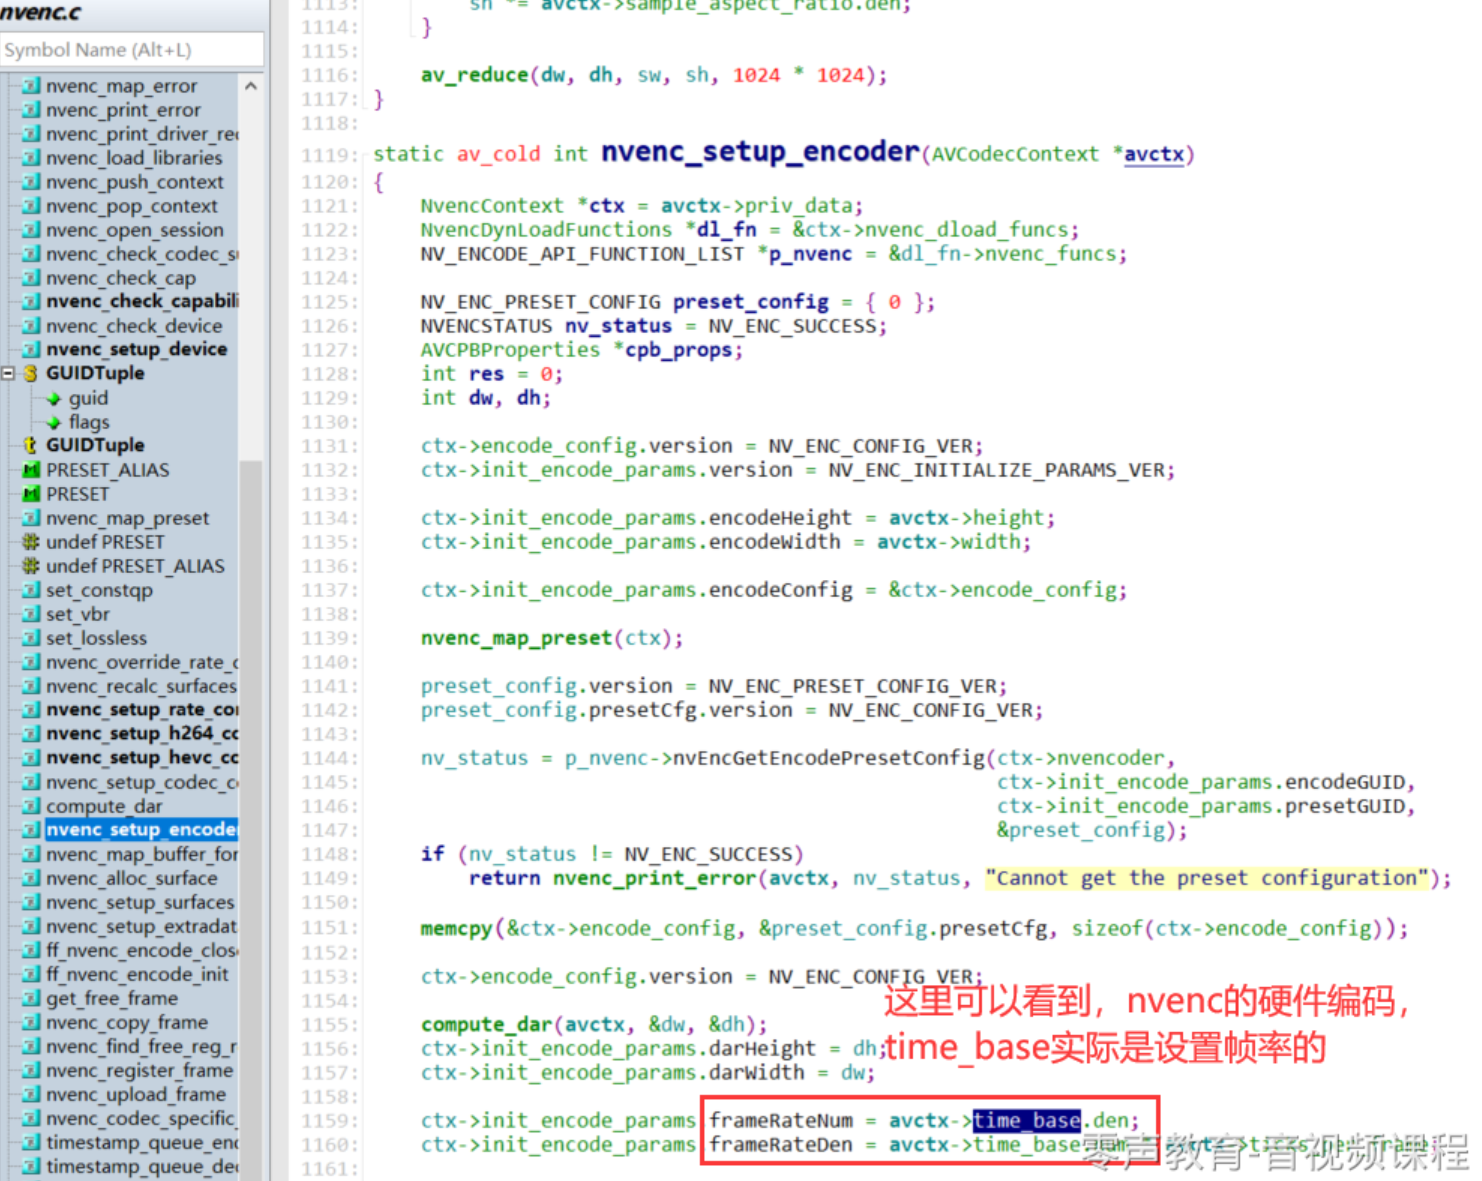
video_encode_new_default_config函数主要就是设置视频的参数,如分辨率,fps,时间基等- 上面说到,
nvenc的源码内部将时间基设置为视频的fps,因此这里的时间基设置为1/fps
VideoConfgig *video_encode_new_default_config(const char *codec_name, int width, int height, int fps)
{VideoConfgig *video_config = malloc(sizeof(VideoConfgig));if(!video_config){printf("malloc VideoConfgig failed\n");return NULL;}memset(video_config, 0, sizeof(VideoConfgig));video_config->gop_size = fps;video_config->width = width;video_config->height = height;if(strcmp(codec_name, "h264_nvenc") == 0)video_config->time_base = (AVRational){1, fps};   // 注意匹配, 为什么这个参数影响硬件编码呢?因为nvenc帧率设置实际是用的这个代码elsevideo_config->time_base = (AVRational){1, 1000};  // 其他的我们用timebase 1000为单位video_config->framerate = (AVRational){fps, 1};video_config->pix_fmt = AV_PIX_FMT_YUV420P;video_config->max_b_frames = 0;video_config->bit_rate = 1*1024*1024;// ffmpeg的单位就是bpsreturn video_config;
}
- 具体的
VideoConfigig结构体如下,主要是编码器和视频的一些参数配置
// H264编码设置的参数
// 宽高
// 帧率
// gop
// b帧数量
typedef struct video_config
{int width;  // 宽int height; // 高AVRational framerate; // 帧率int gop_size;  // I帧间隔int max_b_frames;enum AVPixelFormat pix_fmt; // 像素格式AVRational time_base; // timebasechar *preset;char *tune;char *profile;int64_t rc_max_rate;  // 最大码率int64_t rc_min_rate;  // 最低码率int rc_buffer_size; // decoder bitstream buffer sizeint qmin; // minimum quantizerint qmax; // maximum quantizerint flags; // AV_CODEC_FLAG_*.比如AV_CODEC_FLAG_GLOBAL_HEADERint64_t bit_rate;
}VideoConfgig;
- 打开输入文件,和输出文件,进行读入yuv和编码后写入H264
// 打开输入和输出文件
infile = fopen(in_yuv_file, "rb");
if (!infile) {fprintf(stderr, "Could not open %s\n", in_yuv_file);exit(1);
}
outfile = fopen(out_h264_file, "wb");
if (!outfile) {fprintf(stderr, "Could not open %s\n", out_h264_file);exit(1);
}
- 分配对应的
AVFrame和AVPacket内存
// 分配pkt和frame
pkt = av_packet_alloc();
if (!pkt) {fprintf(stderr, "Could not allocate video frame\n");exit(1);
}
frame = av_frame_alloc();
if (!frame) {fprintf(stderr, "Could not allocate video frame\n");exit(1);
}// 为frame分配buffer
frame->format = codec_ctx->pix_fmt;
frame->width  = codec_ctx->width;
frame->height = codec_ctx->height;
ret = av_frame_get_buffer(frame, 0);
if (ret < 0) {fprintf(stderr, "Could not allocate the video frame data\n");exit(1);
}
// 计算出每一帧的数据 像素格式 * 宽 * 高
// 1382400
int frame_bytes = av_image_get_buffer_size(frame->format, frame->width,frame->height, 1);
//    printf("frame_bytes %d\n", frame_bytes);
uint8_t *yuv_buf = (uint8_t *)malloc(frame_bytes);
if(!yuv_buf) {printf("yuv_buf malloc failed\n");return 1;
}
- 编码的pts,按照指定的时间基进行累加即可
- 因为
libx264和h264_nvenc的时间基不同,这里做了不同的处理 - 这里的软件编码和硬件编码的流程一样,不需要而外分配硬件上下文,但是软件解码和硬件解码的流程稍有不同
int64_t begin_time = get_time();        // 起始时间
int64_t all_begin_time = get_time();
int64_t all_end_time = all_begin_time;
int64_t cur_pts = 0;for (;;) {memset(yuv_buf, 0, frame_bytes);size_t read_bytes = fread(yuv_buf, 1, frame_bytes, infile);if(read_bytes <= 0) {
//            printf("read file finish\n");break;}frame_count++; // 帧数加一/* 确保该frame可写, 如果编码器内部保持了内存参考计数,则需要重新拷贝一个备份目的是新写入的数据和编码器保存的数据不能产生冲突*/ret = av_frame_make_writable(frame);if(ret != 0) {printf("av_frame_make_writable failed, ret = %d\n", ret);break;}int need_size = av_image_fill_arrays(frame->data, frame->linesize, yuv_buf,frame->format,frame->width, frame->height, 1);if(need_size != frame_bytes) {printf("av_image_fill_arrays failed, need_size:%d, frame_bytes:%d\n",need_size, frame_bytes);break;}if(strcmp(codec_name, "h264_nvenc") == 0)cur_pts += 1;  // 25/25elsecur_pts += 40; // 1000/25// 设置ptsframe->pts = cur_pts;       // 使用采样率作为pts的单位,具体换算成秒 pts*1/采样率begin_time = get_time();ret = encode(codec_ctx, frame, pkt, outfile, &bytes_count, write_enable);if(ret < 0) {printf("encode failed\n");break;}
}
冲刷编码器
- 编码的最后,需要传入NULL到编码器中,将编码器缓存的剩余帧刷出来
- 最后需要关闭对应的文件和释放对应申请的内存
/* 冲刷编码器 */
encode(codec_ctx, NULL, pkt, outfile, &bytes_count, write_enable);
all_end_time = get_time();
float bps = (bytes_count * 8.0) /(frame_count/25.0)/1024; // 按25帧每秒计算
printf("%s %s encode time:%lldms\n", codec_name, preset, all_end_time - all_begin_time);
printf("%s %s encode bps:%0.2fkbps\n", codec_name, preset, bps);
// 关闭文件
fclose(infile);
fclose(outfile);// 释放内存
if(yuv_buf) {free(yuv_buf);
}av_frame_free(&frame);
av_packet_free(&pkt);
avcodec_free_context(&codec_ctx);
if(video_config) {if(video_config->preset)free(video_config->preset);free(video_config);
}
完整代码
/**
* @projectName   08-09-encode_video_libx264_nvenc
* @brief         主要测试
*               (1)libx264对于不同preset的编码质量和编码耗时;
*               (2)h264_nvenc硬件编码不同preset的编码质量和编码耗时;
*               (3)libx264和h264_nvenc的编码耗时对比
* @author        Liao Qingfu
* @date          2020-04-16
*/
#include <stdio.h>
#include <stdlib.h>
#include <string.h>#include <libavcodec/avcodec.h>
#include <libavutil/time.h>
#include <libavutil/opt.h>
#include <libavutil/imgutils.h>/*
一定要注意编码器timebase的设置,它和码率的计算有对应的关系,因为他需要这个时间关系*/// H264编码设置的参数
// 宽高
// 帧率
// gop
// b帧数量
typedef struct video_config
{int width;  // 宽int height; // 高AVRational framerate; // 帧率int gop_size;  // I帧间隔int max_b_frames;enum AVPixelFormat pix_fmt; // 像素格式AVRational time_base; // timebasechar *preset;char *tune;char *profile;int64_t rc_max_rate;  // 最大码率int64_t rc_min_rate;  // 最低码率int rc_buffer_size; // decoder bitstream buffer sizeint qmin; // minimum quantizerint qmax; // maximum quantizerint flags; // AV_CODEC_FLAG_*.比如AV_CODEC_FLAG_GLOBAL_HEADERint64_t bit_rate;
}VideoConfgig;int64_t get_time()
{return av_gettime_relative() / 1000;  // 换算成毫秒
}
VideoConfgig *video_encode_new_default_config(const char *codec_name, int width, int height, int fps)
{VideoConfgig *video_config = malloc(sizeof(VideoConfgig));if(!video_config){printf("malloc VideoConfgig failed\n");return NULL;}memset(video_config, 0, sizeof(VideoConfgig));video_config->gop_size = fps;video_config->width = width;video_config->height = height;if(strcmp(codec_name, "h264_nvenc") == 0)video_config->time_base = (AVRational){1, fps};   // 注意匹配, 为什么这个参数影响硬件编码呢?因为nvenc帧率设置实际是用的这个代码elsevideo_config->time_base = (AVRational){1, 1000};  // 其他的我们用timebase 1000为单位video_config->framerate = (AVRational){fps, 1};video_config->pix_fmt = AV_PIX_FMT_YUV420P;video_config->max_b_frames = 0;video_config->bit_rate = 1*1024*1024;// ffmpeg的单位就是bpsreturn video_config;
}// 配置参数
static int video_encode_config(VideoConfgig *video_config, AVCodecContext *enc_ctx)
{int ret = 0;if(!video_config || !enc_ctx) {return -1;}/* 设置分辨率*/enc_ctx->width = video_config->width;enc_ctx->height = video_config->height;/* 设置time base */enc_ctx->time_base = video_config->time_base;enc_ctx->framerate = video_config->framerate;/* 设置I帧间隔* 如果frame->pict_type设置为AV_PICTURE_TYPE_I, 则忽略gop_size的设置,一直当做I帧进行编码*/enc_ctx->gop_size = video_config->gop_size;enc_ctx->max_b_frames = video_config->max_b_frames;enc_ctx->pix_fmt = video_config->pix_fmt;// refs 可以设置参考帧的最大数量,这里主要是对h264_nvenc, 单路设置的时候对其编码时间没有影响,单纯设置只是对sps pps影响
//    enc_ctx->refs = 1;//
#if 1// 相关的参数可以参考libx264.c的 AVOption options// ultrafast all encode time:2270ms// medium all encode time:5815ms// veryslow all encode time:19836msif(video_config->preset) {ret = av_opt_set(enc_ctx->priv_data, "preset", video_config->preset, 0);if(ret != 0) {printf("av_opt_set preset failed\n");}}
//    if(video_config->tune){ret = av_opt_set(enc_ctx->priv_data, "tune","zerolatency", 0); // 直播是才使用该设置if(ret != 0) {printf("av_opt_set tune failed\n");}}if(video_config->profile) {ret = av_opt_set(enc_ctx->priv_data, "profile", "main", 0); // 默认是highif(ret != 0) {printf("av_opt_set profile failed\n");}}#endif// 设置码率 enc_ctx->bit_rate = video_config->bit_rate;
//    enc_ctx->bit_rate_tolerance = enc_ctx->bit_rate*2; // 码率误差,允许的误差越大,视频越小return 0;
}static int encode(AVCodecContext *enc_ctx, AVFrame *frame, AVPacket *pkt,FILE *outfile, int *bytes_count, int write_enable)
{int ret;/* send the frame to the encoder *///    if(frame)
//        printf("Send frame %3"PRId64"\n", frame->pts);ret = avcodec_send_frame(enc_ctx, frame);if (ret < 0){fprintf(stderr, "Error sending a frame for encoding\n");return -1;}while (ret >= 0){ret = avcodec_receive_packet(enc_ctx, pkt);if (ret == AVERROR(EAGAIN) || ret == AVERROR_EOF) {return 0;} else if (ret < 0) {fprintf(stderr, "Error encoding audio frame\n");return -1;}
//        printf("pkt  pts:%3"PRId64", dts: %3"PRId64"\n",pkt->pts, pkt->dts);*bytes_count += pkt->size;if(write_enable)fwrite(pkt->data, 1, pkt->size, outfile);}return 0;
}char *alloc_and_copy_string(char *str)
{if(!str) {printf("str is null\n");return NULL;}char *alloc_str = malloc(strlen(str) + 1);strcpy(alloc_str, str);
}int video_encode_preset_test(const char *codec_name, char *in_yuv_file, char *out_h264_file, char *preset, int write_enable)
{FILE *infile = NULL;FILE *outfile = NULL;const AVCodec *codec = NULL;AVCodecContext *codec_ctx= NULL;AVFrame *frame = NULL;AVPacket *pkt = NULL;int ret = 0;int bytes_count = 0;int frame_count = 0;/* 查找指定的编码器 */codec = avcodec_find_encoder_by_name(codec_name);if (!codec) {fprintf(stderr, "Codec '%s' not found\n", codec_name);exit(1);}codec_ctx = avcodec_alloc_context3(codec);if (!codec_ctx) {fprintf(stderr, "Could not allocate video codec context\n");exit(1);}VideoConfgig *video_config = video_encode_new_default_config(codec_name, 1280, 720, 25);video_config->preset = alloc_and_copy_string(preset);video_encode_config(video_config, codec_ctx);  // 设置/* 将codec_ctx和codec进行绑定 */ret = avcodec_open2(codec_ctx, codec,NULL);if (ret < 0) {fprintf(stderr, "Could not open codec: %s\n", av_err2str(ret));exit(1);}printf("thread_count: %d, thread_type:%d\n", codec_ctx->thread_count, codec_ctx->thread_type);// 打开输入和输出文件infile = fopen(in_yuv_file, "rb");if (!infile) {fprintf(stderr, "Could not open %s\n", in_yuv_file);exit(1);}outfile = fopen(out_h264_file, "wb");if (!outfile) {fprintf(stderr, "Could not open %s\n", out_h264_file);exit(1);}// 分配pkt和framepkt = av_packet_alloc();if (!pkt) {fprintf(stderr, "Could not allocate video frame\n");exit(1);}frame = av_frame_alloc();if (!frame) {fprintf(stderr, "Could not allocate video frame\n");exit(1);}// 为frame分配bufferframe->format = codec_ctx->pix_fmt;frame->width  = codec_ctx->width;frame->height = codec_ctx->height;ret = av_frame_get_buffer(frame, 0);if (ret < 0) {fprintf(stderr, "Could not allocate the video frame data\n");exit(1);}// 计算出每一帧的数据 像素格式 * 宽 * 高// 1382400int frame_bytes = av_image_get_buffer_size(frame->format, frame->width,frame->height, 1);
//    printf("frame_bytes %d\n", frame_bytes);uint8_t *yuv_buf = (uint8_t *)malloc(frame_bytes);if(!yuv_buf) {printf("yuv_buf malloc failed\n");return 1;}int64_t begin_time = get_time();        // 起始时间int64_t all_begin_time = get_time();int64_t all_end_time = all_begin_time;int64_t cur_pts = 0;for (;;) {memset(yuv_buf, 0, frame_bytes);size_t read_bytes = fread(yuv_buf, 1, frame_bytes, infile);if(read_bytes <= 0) {
//            printf("read file finish\n");break;}frame_count++; // 帧数加一/* 确保该frame可写, 如果编码器内部保持了内存参考计数,则需要重新拷贝一个备份目的是新写入的数据和编码器保存的数据不能产生冲突*/ret = av_frame_make_writable(frame);if(ret != 0) {printf("av_frame_make_writable failed, ret = %d\n", ret);break;}int need_size = av_image_fill_arrays(frame->data, frame->linesize, yuv_buf,frame->format,frame->width, frame->height, 1);if(need_size != frame_bytes) {printf("av_image_fill_arrays failed, need_size:%d, frame_bytes:%d\n",need_size, frame_bytes);break;}if(strcmp(codec_name, "h264_nvenc") == 0)cur_pts += 1;  // 25/25elsecur_pts += 40; // 1000/25// 设置ptsframe->pts = cur_pts;       // 使用采样率作为pts的单位,具体换算成秒 pts*1/采样率begin_time = get_time();ret = encode(codec_ctx, frame, pkt, outfile, &bytes_count, write_enable);if(ret < 0) {printf("encode failed\n");break;}}/* 冲刷编码器 */encode(codec_ctx, NULL, pkt, outfile, &bytes_count, write_enable);all_end_time = get_time();float bps = (bytes_count * 8.0) /(frame_count/25.0)/1024; // 按25帧每秒计算printf("%s %s encode time:%lldms\n", codec_name, preset, all_end_time - all_begin_time);printf("%s %s encode bps:%0.2fkbps\n", codec_name, preset, bps);// 关闭文件fclose(infile);fclose(outfile);// 释放内存if(yuv_buf) {free(yuv_buf);}av_frame_free(&frame);av_packet_free(&pkt);avcodec_free_context(&codec_ctx);if(video_config) {if(video_config->preset)free(video_config->preset);free(video_config);}return 0;
}
/*** @brief 提取测试文件:ffmpeg -i big_buck_bunny_720p_10mb.mp4 -t 10 -r 25 -pix_fmt yuv420p 1280x720_25fps_10s.yuv*       输入参数,输入yuv文件的路径,比如 1280x720_25fps_10s.yuv 1280x720_25fps_10s 1* @param argc* @param argv* @return*/
int main(int argc, char **argv)
{char *in_yuv_file = NULL;char out_h264_file[128]={0};int write_enable = 1;if (argc < 4) {fprintf(stderr, "Usage: %s <input_file out_file write_enable>, argc:%d\n",argv[0], argc);return 0;}in_yuv_file = argv[1];      // 输入YUV文件if(argc >= 4) {write_enable = atoi(argv[3]);}//    const char *codec_name = "libx264";
//        const char *codec_name = "h264_nvenc";/* 测试每种preset的耗时ultrafastsuperfastveryfastfasterfastmediumslowslowerveryslowplacebo*/
#if 1sprintf(out_h264_file, "%s_%s_%s.h264",  argv[2], "ultrafast", "libx264");video_encode_preset_test("libx264", in_yuv_file, out_h264_file, "ultrafast", write_enable);sprintf(out_h264_file, "%s_%s_%s.h264",  argv[2], "ultrafast", "h264_nvenc");video_encode_preset_test("h264_nvenc", in_yuv_file, out_h264_file, "ultrafast", write_enable); // nvenc不支持sprintf(out_h264_file, "%s_%s_%s.h264",  argv[2], "superfast", "libx264");video_encode_preset_test("libx264", in_yuv_file, out_h264_file, "superfast", write_enable);sprintf(out_h264_file, "%s_%s_%s.h264",  argv[2], "superfast", "h264_nvenc");video_encode_preset_test("h264_nvenc", in_yuv_file, out_h264_file, "superfast", write_enable);  // nvenc不支持sprintf(out_h264_file, "%s_%s_%s.h264",  argv[2], "faster", "libx264");video_encode_preset_test("libx264", in_yuv_file, out_h264_file, "faster", write_enable);sprintf(out_h264_file, "%s_%s_%s.h264",  argv[2], "faster", "h264_nvenc");video_encode_preset_test("h264_nvenc", in_yuv_file, out_h264_file, "faster", write_enable);   // nvenc不支持printf("\n\n--fast--------\n");sprintf(out_h264_file, "%s_%s_%s.h264",  argv[2], "fast", "libx264");video_encode_preset_test("libx264", in_yuv_file, out_h264_file, "fast", write_enable);sprintf(out_h264_file, "%s_%s_%s.h264",  argv[2], "fast", "h264_nvenc");video_encode_preset_test("h264_nvenc", in_yuv_file, out_h264_file, "fast", write_enable);printf("\n\n--medium--------\n");sprintf(out_h264_file, "%s_%s_%s.h264",  argv[2], "medium", "libx264");video_encode_preset_test("libx264", in_yuv_file, out_h264_file, "medium", write_enable);sprintf(out_h264_file, "%s_%s_%s.h264",  argv[2], "medium", "h264_nvenc");video_encode_preset_test("h264_nvenc", in_yuv_file, out_h264_file, "medium", write_enable);printf("\n\n--slow--------\n");sprintf(out_h264_file, "%s_%s_%s.h264",  argv[2], "slow", "libx264");video_encode_preset_test("libx264", in_yuv_file, out_h264_file, "slow", write_enable);sprintf(out_h264_file, "%s_%s_%s.h264",  argv[2], "slow", "h264_nvenc");video_encode_preset_test("h264_nvenc", in_yuv_file, out_h264_file, "slow", write_enable);sprintf(out_h264_file, "%s_%s_%s.h264",  argv[2], "slower", "libx264");video_encode_preset_test("libx264", in_yuv_file, out_h264_file, "slower", write_enable);sprintf(out_h264_file, "%s_%s_%s.h264",  argv[2], "slower", "h264_nvenc");video_encode_preset_test("h264_nvenc", in_yuv_file, out_h264_file, "slower", write_enable);   // nvenc不支持sprintf(out_h264_file, "%s_%s_%s.h264",  argv[2], "veryslow", "libx264");video_encode_preset_test("libx264", in_yuv_file, out_h264_file, "veryslow", write_enable);sprintf(out_h264_file, "%s_%s_%s.h264",  argv[2], "veryslow", "h264_nvenc");video_encode_preset_test("h264_nvenc", in_yuv_file, out_h264_file, "veryslow", write_enable);  // nvenc不支持sprintf(out_h264_file, "%s_%s_%s.h264",  argv[2], "placebo", "libx264");video_encode_preset_test("libx264", in_yuv_file, out_h264_file, "placebo", write_enable);sprintf(out_h264_file, "%s_%s_%s.h264",  argv[2], "placebo", "h264_nvenc");video_encode_preset_test("h264_nvenc", in_yuv_file, out_h264_file, "placebo", write_enable);// nvenc不支持#endif
}#if 0
libx264 ultrafast encode time:306ms
libx264 ultrafast encode bps:1027.18kbpsh264_nvenc ultrafast encode time:278ms
h264_nvenc ultrafast encode bps:906.10kbpslibx264 superfast encode time:381ms
libx264 superfast encode bps:1084.67kbpsh264_nvenc superfast encode time:226ms
h264_nvenc superfast encode bps:906.10kbpslibx264 faster encode time:800ms
libx264 faster encode bps:928.86kbpsh264_nvenc faster encode time:219ms
h264_nvenc faster encode bps:906.10kbpsh264_nvenc fast encode time:223ms
h264_nvenc fast encode bps:923.33kbpslibx264 medium encode time:1075ms
libx264 medium encode bps:928.75kbpsthread_count: 1, thread_type:3
h264_nvenc medium encode time:279ms
h264_nvenc medium encode bps:906.10kbpsthread_count: 0, thread_type:0
libx264 slow encode time:1852ms
libx264 slow encode bps:928.24kbpsthread_count: 1, thread_type:3
h264_nvenc slow encode time:456ms
h264_nvenc slow encode bps:921.65kbpslibx264 slower encode time:3017ms
libx264 slower encode bps:925.25kbpsthread_count: 1, thread_type:3
h264_nvenc slower encode time:276ms
h264_nvenc slower encode bps:906.10kbpslibx264 veryslow encode time:4748ms
libx264 veryslow encode bps:920.88kbpsh264_nvenc veryslow encode time:289ms
h264_nvenc veryslow encode bps:906.10kbpslibx264 placebo encode time:17834ms
libx264 placebo encode bps:923.30kbpsthread_count: 1, thread_type:3
h264_nvenc placebo encode time:282ms
h264_nvenc placebo encode bps:906.10kbps#endif
更多资料:https://github.com/0voice
相关文章:
【音视频】FFmpeg 硬件(NVDIA)编码H264
FFmpeg 与x264的关系 ffmpeg软编码是使⽤x264开源项⽬,也就是说ffmpeg软编码H264最终是调⽤了x264开源项⽬,所以我们要先理解ffmpeg和x264的调⽤关系,这⾥我们主要关注x264_init。对于x264的参数都在 ffmpeg\libavcodec \libx264.c x264\co…...

贪心算法应用:超图匹配问题详解
贪心算法应用:超图匹配问题详解 贪心算法在超图匹配问题中有着广泛的应用。下面我将从基础概念到具体实现,全面详细地讲解超图匹配问题及其贪心算法解决方案。 一、超图匹配问题基础 1. 超图基本概念 **超图(Hypergraph)**是普…...
所需的总数量函数:numMoments)
OpenCV CUDA模块结构分析与形状描述符------计算指定阶数的矩(Moments)所需的总数量函数:numMoments
操作系统:ubuntu22.04 OpenCV版本:OpenCV4.9 IDE:Visual Studio Code 编程语言:C11 算法描述 该函数用于计算指定阶数的矩(Moments)所需的总数量。 在图像处理中,矩(moments)是一…...
【Web应用】若依框架:基础篇13 源码阅读-前端代码分析
文章目录 ⭐前言⭐一、课程讲解过程⭐二、自己动手实操⭐总结 标题详情作者JosieBook头衔CSDN博客专家资格、阿里云社区专家博主、软件设计工程师博客内容开源、框架、软件工程、全栈(,NET/Java/Python/C)、数据库、操作系统、大数据、人工智能、工控、网…...

[java八股文][JavaSpring面试篇]SpringCloud
了解SpringCloud吗,说一下他和SpringBoot的区别 Spring Boot是用于构建单个Spring应用的框架,而Spring Cloud则是用于构建分布式系统中的微服务架构的工具,Spring Cloud提供了服务注册与发现、负载均衡、断路器、网关等功能。 两者可以结合…...

深度学习篇---face-recognition的优劣点
face_recognition库是一个基于 Python 的开源人脸识别工具,封装了 dlib 库的深度学习模型,具有易用性高、集成度强的特点。以下从技术实现、应用场景等维度分析其优劣势: 一、核心优势 1. 极简 API 设计,开发效率极高 代码量少:几行代码即可实现人脸检测、特征提取和比对…...
基于分布式状态机的集装箱智能道口软件架构方法
集装箱码头对进出场道口的通过能力始终是要求最高的,衡量道口的直接指标为道口通行效率,道口通行效率直接体现了集装箱码头的作业效率以及对外服务水平,进而直接影响到码头的综合能力。所以,码头普遍使用智能道口实现24小时无人值…...

Oracle的Hint
racle的Hint是用来提示Oracle的优化器,用来选择用户期望的执行计划。在许多情况下,Oracle默认的执行方式并不总是最优的,只不过由于平时操作的数据量比较小,所以,好的执行计划与差的执行计划所消耗的时间差异不大&…...

手动事务的使用
使用原因: 公司需要写一个定时任务,涉及增改查操作, 定时将前端页面配置的字典数据(标签数据)同步到数据库特定的表(标签表) 查询字典表数据 字典有,数据库表没有新增 都有,判断名称,名称不同修…...
Vue 树状结构控件
1、效果图如下所示: 2、网络请求的数据结构如下: 3、新建插件文件:menu-tree.vue,插件代码如下: <template><div class"root"><div class"parent" click"onParentClick(pare…...

Spring Boot的启动流程,以及各个扩展点的执行顺序
目录 1. 初始化阶段执行顺序 1.1 Bean的构造方法(构造函数) 1.2 PostConstruct 注解方法 1.3 InitializingBean 的 afterPropertiesSet() 1.4 Bean(initMethod "自定义方法") 2. 上下文就绪后的扩展点 2.1 ApplicationContext 事件监听…...
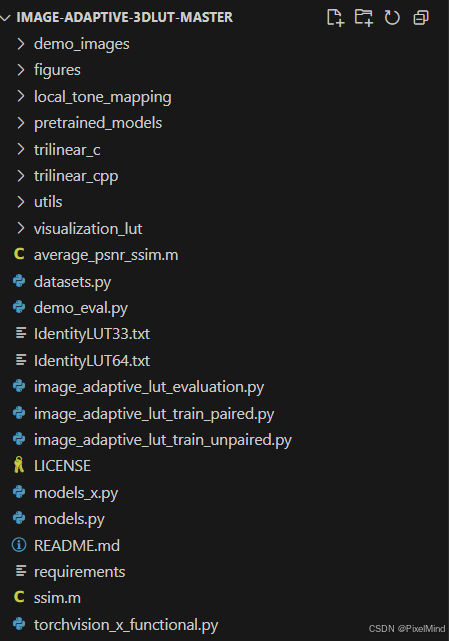
【LUT技术专题】图像自适应3DLUT代码讲解
本文是对图像自适应3DLUT技术的代码解读,原文解读请看图像自适应3DLUT文章讲解 1、原文概要 结合3D LUT和CNN,使用成对和非成对的数据集进行训练,训练后能够完成自动的图像增强,同时还可以做到极低的资源消耗。下图为整个模型的…...

Apache Doris 在数据仓库中的作用与应用实践
在当今数字化时代,企业数据呈爆炸式增长,数据仓库作为企业数据管理和分析的核心基础设施,其重要性不言而喻。而 Apache Doris,作为一款基于 MPP(Massively Parallel Processing,大规模并行处理)…...
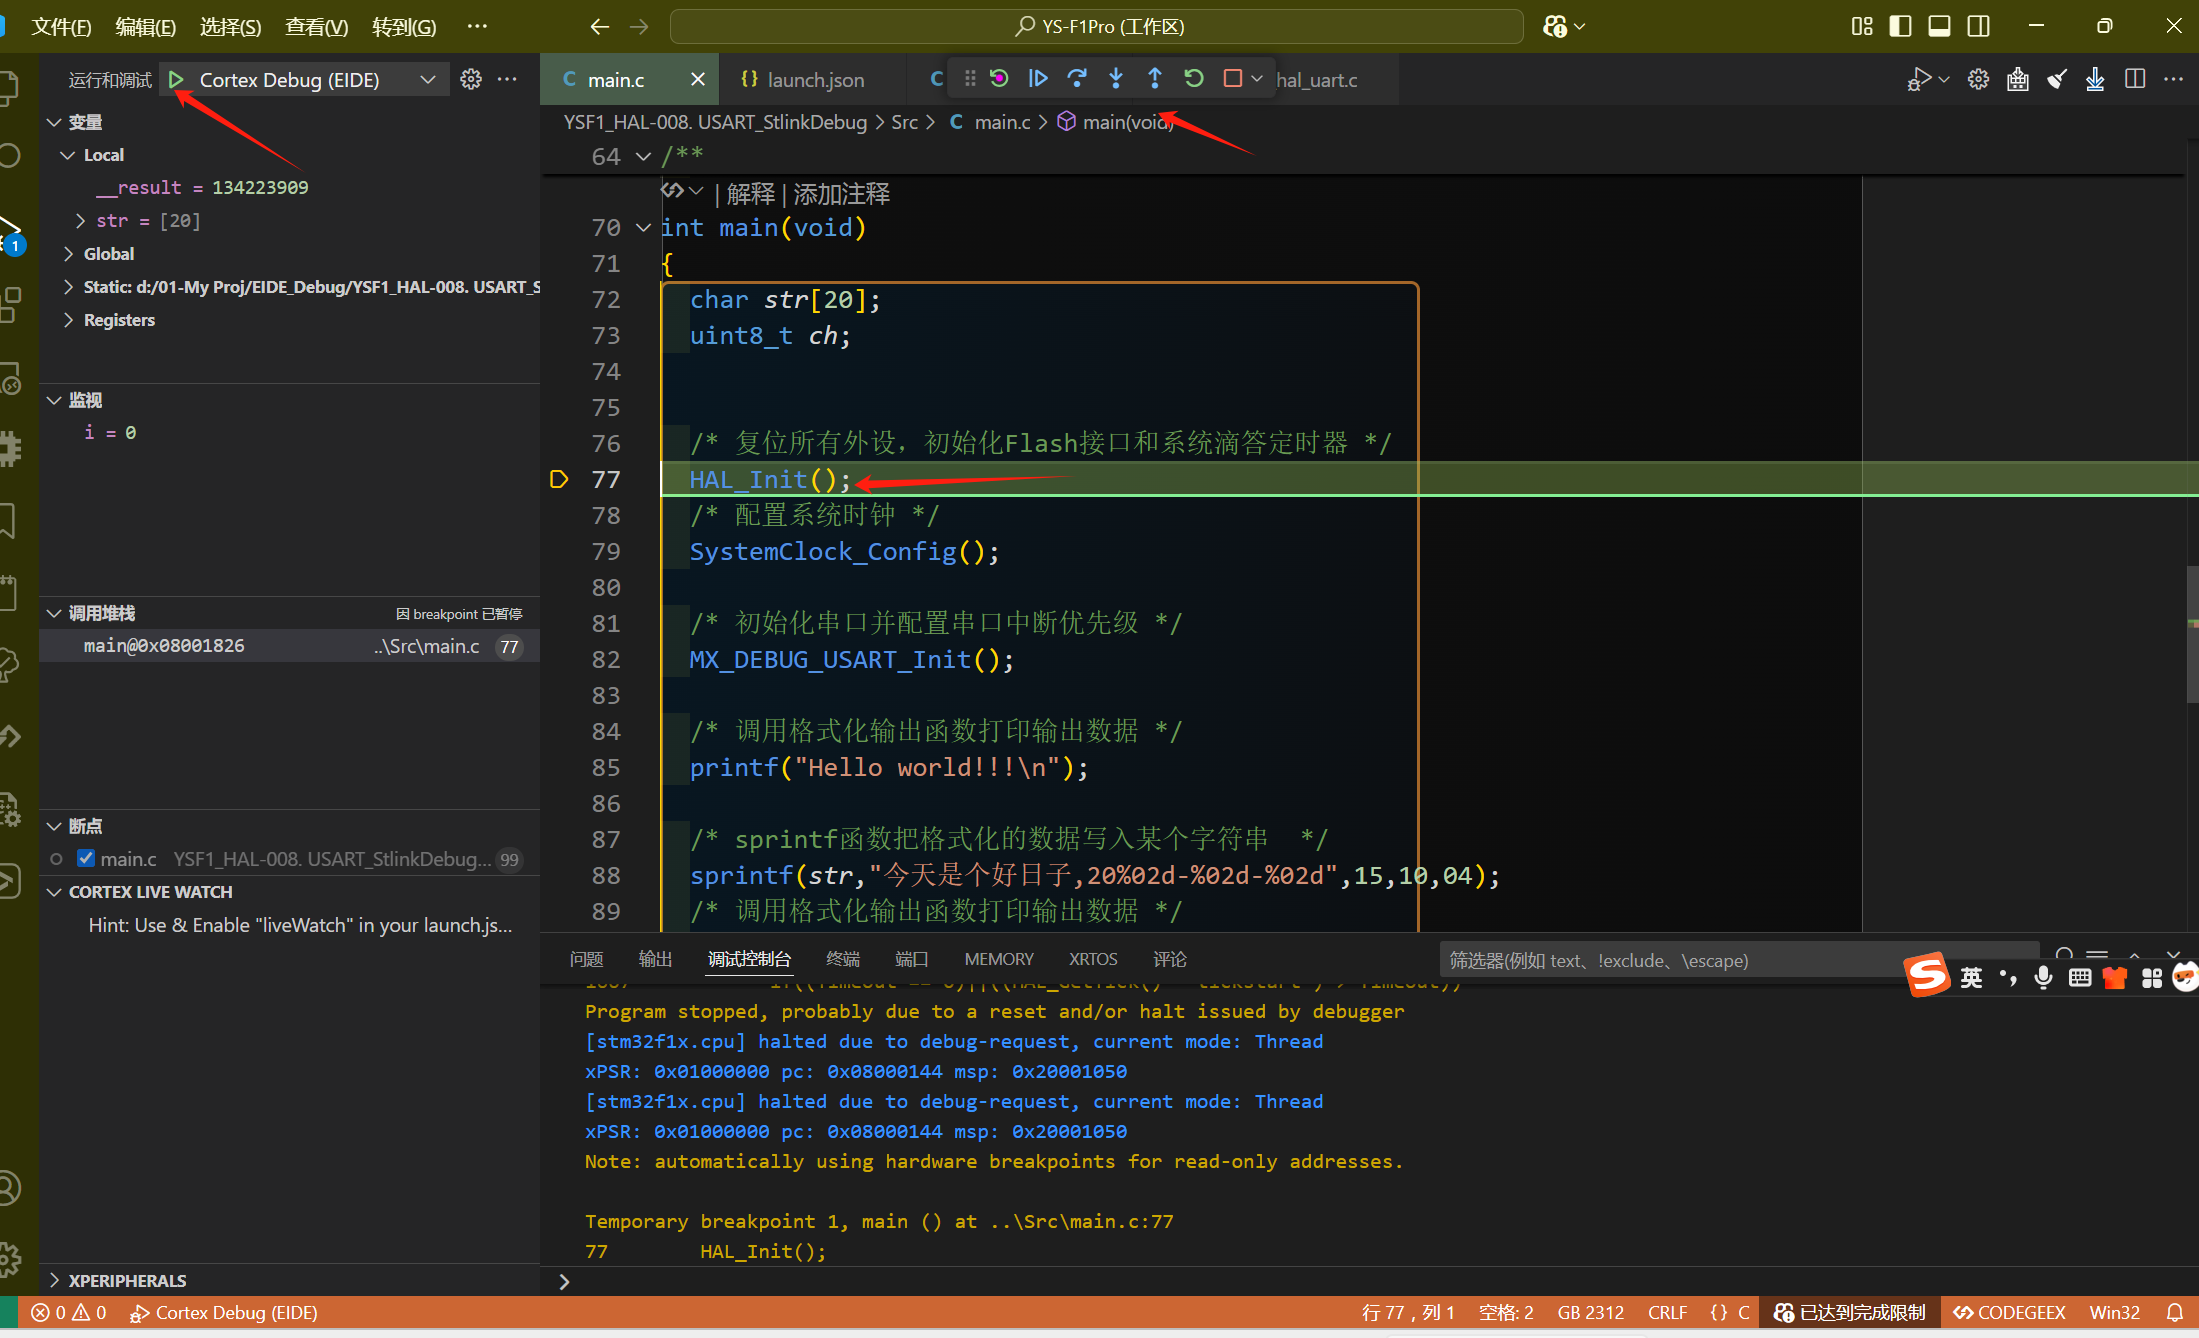
vscode使用“EIDE”和“Cortex-Debug”插件利用st-link插件实现程序烧写以及调试工作
第一步:安装vscode插件“EIDE”EIDE和“Cortex-Debug”。 第二步:配置EIDE 2.1安装“实用工具”: 2.2 EIDE插件配置:根据安装的keil C51 keil MDK IAR的相关路径设置 第三步:配置Cortex-Debug插件 点击settings.jso…...

Spring @Value注解的依赖注入实现原理
Spring Value注解的依赖注入实现原理 一,什么是Value注解的依赖注入二,实现原理三,代码实现1. 定义 Value 注解2. 实现 InstantiationAwareBeanPostProcessor3. 实现 AutowiredAnnotationBeanPostProcessor4. 占位符解析逻辑5. 定义 StringVa…...

三、kafka消费的全流程
五、多线程安全问题 1、多线程安全的定义 使用多线程访问一个资源,这个资源始终都能表现出正确的行为。 不被运行的环境影响、多线程可以交替访问、不需要任何额外的同步和协同。 2、Java实现多线程安全生产者 这里只是模拟多线程环境下使用生产者发送消息&…...

商品模块中的多规格设计:实现方式与电商/ERP系统的架构对比
在商品管理系统中,多规格设计(Multi-Specification Product Design)是一个至关重要但又极具挑战性的领域。无论是面向消费者的电商系统,还是面向企业管理的ERP系统,对商品规格的处理方式直接影响库存管理、订单履约、数…...
动手学线性神经网络:从数学原理到代码实现)
(三)动手学线性神经网络:从数学原理到代码实现
1 线性回归 线性回归是一种基本的预测模型,用于根据输入特征预测连续的输出值。它是机器学习和深度学习中最简单的模型之一,但却是理解更复杂模型的基础。 1.1 线性回归的基本元素 概念理解: 线性回归假设输入特征和输出之间存在线性关系。…...

Axure形状类组件图标库(共8套)
点击下载《月下倚楼图标库(形状组件)》 原型效果:https://axhub.im/ax9/02043f78e1b4386f/#g1 摘要 本图标库集锦精心汇集了8套专为Axure设计的形状类图标资源,旨在为产品经理、UI/UX设计师以及开发人员提供丰富多样的设计素材,提升原型设计…...

20250530-C#知识:String与StringBuilder
String与StringBuilder string字符串在开发中经常被用到,不过在需要频繁对字符串进行增加和删除时,使用StringBuilder有利于提升效率。 1、String string是一种引用类型而非值类型(某些方面像值类型)使用“”进行两个string对象的…...

从 Docker 到 Containerd:Kubernetes 容器运行时迁移实战指南
一、背景 Kubernetes 自 v1.24 起移除了 dockershim,不再原生支持 Docker Engine,用户需迁移至受支持的 CRI 兼容运行时,如: Containerd(推荐,高性能、轻量级) CRI-O(专为 Kuberne…...

uniapp中view标签使用范围
不止用于微信小程序。兼容型号,是uniapp内置组件之一,在uniapp中进行了跨平台适配。支持所有uniapp的平台。如微信小程序、h5、app、支付宝小程序...

Celery 核心概念详解及示例
Celery 核心概念详解及示例 Celery 是一个简单、灵活且可靠的分布式系统,用于处理大量消息,提供对任务队列的操作,并支持任务的调度和异步执行。它常用于深度优化 Web 应用的性能和响应速度,通过将耗时的操作移到后台异步执行&am…...

欢乐熊大话蓝牙知识14:用 STM32 或 EFR32 实现 BLE 通信模块:从0到蓝牙,你也能搞!
🚀 用 STM32 或 EFR32 实现 BLE 通信模块:从0到蓝牙,你也能搞! “我能不能自己用 STM32 或 EFR32 实现一个 BLE 模块?” 答案当然是:能!还能很帅! 👨🏭 前…...
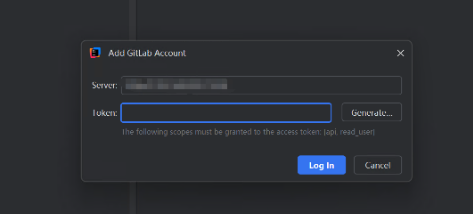
IDEA 在公司内网配置gitlab
赋值项目链接 HTTPS 将HTTP的链接 ip地址换成 内网地址 例如:https:172.16.100.18/...... 如果出现需要需要Token验证的情况: 参考:Idea2024中拉取代码时GitLab提示输入token的问题_gitlab token-CSDN博客...

黑马Java面试笔记之 微服务篇(业务)
一. 限流 你们项目中有没有做过限流?怎么做的? 为什么要限流呢? 一是并发的确大(突发流量) 二是防止用户恶意刷接口 限流的实现方式: Tomcat:可以设置最大连接数 可以通过maxThreads设置最大Tomcat连接数,实现限流,但是适用于单体架构 Nginx:漏桶算法网关,令牌桶算法自定…...

通过WiFi无线连接小米手机摄像头到电脑的方法
通过WiFi无线连接小米手机摄像头到电脑的方法 以下是基于Scrcpy和DroidCam两种工具的无线连接方案,需提前完成开发者模式与USB调试的开启(参考原教程步骤): 方法一:Scrcpy无线投屏(无需手机端安装…...

长短期记忆(LSTM)网络模型
一、概述 长短期记忆(Long Short-Term Memory,LSTM)网络是一种特殊的循环神经网络(RNN),专门设计用于解决传统 RNN 在处理长序列数据时面临的梯度消失 / 爆炸问题,能够有效捕捉长距离依赖关系。…...

深入理解 Linux 文件系统与日志文件分析
一、Linux 文件系统概述 1. 文件系统的基本概念 文件系统(File System)是操作系统用于管理和组织存储设备上数据的机制。它提供了一种结构,使得用户和应用程序能够方便地存储和访问数据。 2. Linux 文件系统结构 Linux 文件系统采用树状目…...
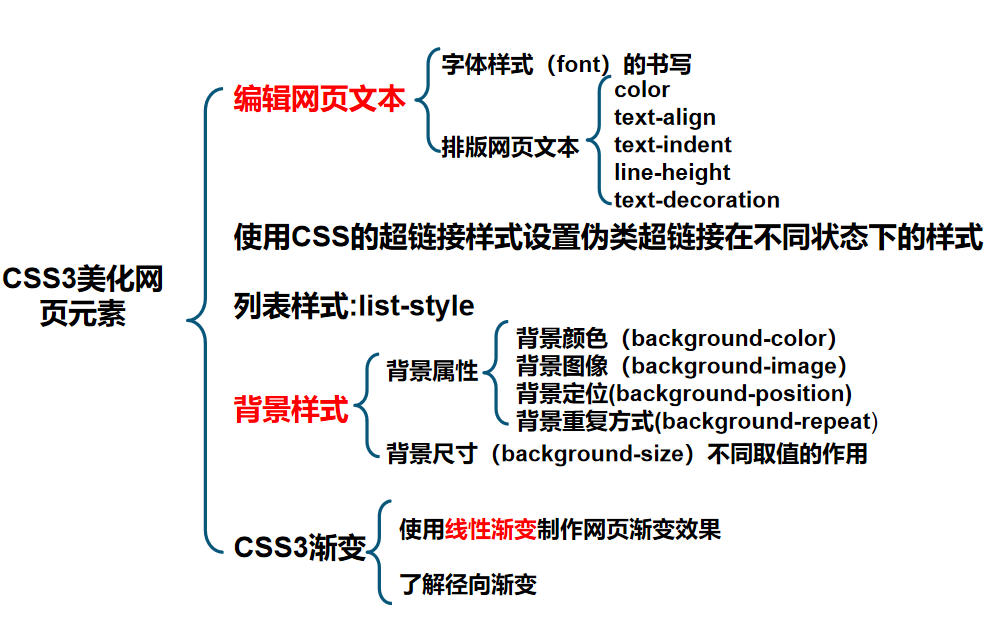
CSS3美化页面元素
1. 字体 <span>标签 字体样式⭐ 字体类型(font-family) 字体大小(font-size) 字体风格(font-style) 字体粗细(font-weight) 字体属性(font) 2. 文本 文…...