从0开始一篇文章学习Nginx
Nginx服务
HTTP介绍
## HTTP协议是Hyper Text Transfer Protocol(超文本传输协议)的缩写,是用于从万维网(WWW:World Wide Web )服务器传输超文本到本地浏览器的传送协议。
## HTTP工作在 TCP/IP协议体系中的TCP协议上,是一个基于 TCP/IP 通信协议来传递数据(HTML 文件、图片文件、查询结果等)。## HTTP 工作原理### HTTP协议工作于客户端-服务端架构上。浏览器作为HTTP客户端通过URL向HTTP服务端(web服务端)发送的请求报文,这个请求报文包含了请求方法、URL协议版本、请求头部和请求数据。服务器以一个状态行作为响应,响应的内容包括协议的版本、成功或错误代码、服务器信息、响应头部和响应数据。       ### Web服务器有:Nginx,Apache服务器,IIS服务器(Internet Information Services)等。### Web服务器根据接收到的请求后,向客户端发送响应信息。### HTTP默认端口号为80,但是你也可以改为其他端口。## HTTP 消息结构### HTTP是基于客户端/服务端(C/S)的架构模型,通过一个可靠的链接来交换信息,是一个无状态的请求/响应协议。### HTTP是无状态协议,意味着服务器不会保留关于客户端或请求的任何信息,每个请求都是独立的,即使是在持久连接(如Keep-Alive)的情况下也是如此。### 一个HTTP"客户端"是一个应用程序(Web浏览器或其他任何客户端),通过连接到服务器达到向服务器发送一个或多个HTTP的请求的目的。### 一个HTTP"服务器"同样也是一个应用程序(通常是一个Web服务,如Apache Web服务器或IIS服务器等),通过接收客户端的请求并向客户端发送HTTP响应数据。### HTTP使用统一资源标识符(Uniform Resource Identifiers, URI)来传输数据和建立连接。## 客户端请求消息### HTTP 报文可以分为两类:请求报文(request message)和响应报文(response message),两者的基本报文结构相同。### 请求报文由请求行、请求头部和请求体三部分组成。### 请求行由请求方法、请求URI和HTTP版本号组成。 ## 服务器响应消息### 响应报文由状态行、响应头部和响应体三部分组成。### 状态行由HTTP版本号、状态码和状态描述组成。### 响应头部包含了服务器的信息、日期、内容类型、内容长度等信息。### 响应体是服务器返回给客户端的实际数据。### 响应体可以是HTML文件、图片、视频等任何类型的数据。### 响应头部和响应体之间用一个空行分隔。## HTTP 请求方法### HTTP协议定义了多种请求方法,最常用的有以下几种:#### GET:请求指定的页面信息,并返回实体主体。GET请求只能用来获取数据,不能用来修改数据。#### POST:向指定资源提交数据进行处理请求(例如,提交表单或上传文件)。POST请求可能会导致数据的变化。#### PUT:向指定资源位置上传其最新内容。PUT请求通常用于更新资源。#### DELETE:请求服务器删除指定的页面。#### HEAD:类似于GET请求,只不过返回的响应中没有具体的内容,用于获取报头。#### OPTIONS:用于描述目标资源的通信选项。#### TRACE:回显服务器收到的请求,主要用于测试和诊断。#### CONNECT:HTTP/1.1协议中保留给能够将连接改为管道方式的代理服务器。#### PATCH:用于对资源进行部分修改。#### 总结 以上请求方法中,GET和POST是最常用的请求方法。其他请求方法如PUT、DELETE、HEAD、OPTIONS、TRACE、CONNECT等在实际应用中使用较少。
## HTTP 响应头信息### HTTP 响应字段(HTTP Response Headers)是服务器在返回 HTTP 响应时附加的元数据,用于向客户端(如浏览器)传递关于响应的附加信息。以下是常见的 HTTP 响应字段及其作用:### 通用字段(General Headers)#### Cache-Control- 用于指定缓存机制的指令。- 例如:`Cache-Control: no-cache`表示不使用缓存。#### Connection- 用于控制是否保持连接的状态。- 例如:`Connection: keep-alive`表示保持连接。#### Date- 表示响应被生成的日期和时间。- 例如:`Date: Wed, 21 Oct 2015 07:28:00 GMT`。### 响应字段(Response Headers)#### Status- 表示响应的状态码和状态描述。- 例如:`HTTP/1.1 200 OK`表示请求成功。#### Location- 用于重定向时指定新的 URL。- 例如:`Location: http://www.example.com/newpage`。#### Server- 表示服务器的名称和版本信息。- 例如:`Server: Apache/2.4.1 (Unix)`。#### Set-Cookie- 用于设置 Cookie。- 例如:`Set-Cookie: sessionId=abc123; Path=/; HttpOnly`。#### Retry-After- 用于指示客户端在多长时间后重试请求。- 例如:`Retry-After: 120`表示在120秒后重试。### 实体字段(Entity Headers)#### Content-Type- 表示响应体的媒体类型。- 例如:`Content-Type: text/html; charset=UTF-8`表示响应体是HTML文档。#### Content-Length- 表示响应体的长度(以字节为单位)。- 例如:`Content-Length: 348`表示响应体长度为348字节。#### Content-Encoding- 表示响应体的编码方式。- 例如:`Content-Encoding: gzip`表示响应体经过gzip压缩。#### Content-Disposition- 用于指示浏览器如何处理响应体。- 例如:`Content-Disposition: attachment; filename="file.txt"`表示将响应体作为附件下载,并指定文件名为file.txt。#### Last-Modified- 表示资源最后修改的日期和时间。- 例如:`Last-Modified: Wed, 21 Oct 2015 07:28:00 GMT`。#### ETag- 用于标识资源的版本或状态。- 例如:`ETag: "abc123"`表示资源的唯一标识符。### 安全相关字段(Security Headers)#### Strict-Transport-Security- 用于指示浏览器仅使用 HTTPS 访问网站。- 例如:`Strict-Transport-Security: max-age=31536000; includeSubDomains`表示在一年内强制使用HTTPS。#### X-Content-Type-Options- 用于防止浏览器 MIME 类型嗅探。- 例如:`X-Content-Type-Options: nosniff`表示禁止 MIME 嗅探。#### X-XSS-Protection- 用于启用或禁用浏览器的跨站脚本(XSS)保护。- 例如:`X-XSS-Protection: 1; mode=block`表示启用 XSS 保护并阻止页面加载。#### Content-Security-Policy- 用于防止跨站脚本攻击和数据注入攻击。- 例如:`Content-Security-Policy: default-src 'self'`表示只允许加载来自同一源的资源。#### X-Frame-Options- 用于防止点击劫持攻击。- 例如:`X-Frame-Options: DENY`表示禁止在框架中加载页面。#### Permissions-Policy- 用于控制浏览器功能的访问权限。- 例如:`Permissions-Policy: geolocation=(self)`表示仅允许同一源访问地理位置功能。### CORS 相关字段(跨域资源共享)#### Access-Control-Allow-Origin- 用于指定允许访问资源的源。- 例如:`Access-Control-Allow-Origin: *`表示允许所有源访问。#### Access-Control-Allow-Methods- 用于指定允许的 HTTP 方法。- 例如:`Access-Control-Allow-Methods: GET, POST`表示允许 GET 和 POST 方法。#### Access-Control-Allow-Headers- 用于指定允许的请求头部字段。- 例如:`Access-Control-Allow-Headers: Content-Type`表示允许 Content-Type 请求头部字段。#### Access-Control-Max-Age- 用于指定预检请求的有效期(以秒为单位)。- 例如:`Access-Control-Max-Age: 3600`表示预检请求在3600秒内有效。### 其他常用字段#### WWW-Authenticate- 用于指定需要进行身份验证的方式。- 例如:`WWW-Authenticate: Basic realm="Access to the staging site"`表示使用基本身份验证。#### Link- 用于指定与当前资源相关的其他资源。- 例如:`Link: <http://example.com>; rel="canonical"`表示当前资源的规范链接。
## HTTP 状态码### HTTP状态码是服务器响应请求时返回的数字代码,用于表示请求的处理结果。状态码分为五类:#### 1xx:信息性状态码,表示请求已被接收,继续处理。#### 2xx:成功状态码,表示请求已成功处理。#### 3xx:重定向状态码,表示需要进一步操作才能完成请求。#### 4xx:客户端错误状态码,表示请求有误或无法完成。#### 5xx:服务器错误状态码,表示服务器在处理请求时发生错误。### 常见的HTTP状态码:#### 200 OK:请求成功,服务器返回所请求的资源。#### 201 Created:请求成功,服务器创建了新的资源。#### 204 No Content:请求成功,但没有返回任何内容。#### 301 Moved Permanently:请求的资源已被永久移动到新位置。#### 302 Found:请求的资源临时移动到新位置。#### 304 Not Modified:请求的资源未修改,可以使用缓存的版本。#### 400 Bad Request:请求有误,服务器无法理解。#### 401 Unauthorized:请求需要身份验证,未提供或提供的凭据无效。#### 403 Forbidden:服务器拒绝请求,客户端没有权限访问资源。#### 404 Not Found:请求的资源不存在。#### 500 Internal Server Error:服务器内部错误,无法完成请求。#### 502 Bad Gateway:作为网关或代理的服务器收到无效响应。### 其他特殊状态码#### 418 I'm a teapot:表示服务器是一个茶壶,用于测试和玩笑。#### 429 Too Many Requests:客户端发送的请求过多,服务器拒绝处理。#### 451 Unavailable For Legal Reasons:由于法律原因,资源不可用。### 常见应用场景#### 301和302:用于URL重定向,301表示永久重定向,302表示临时重定向。#### 403和404:用于处理权限问题和资源不存在的问题。#### 500和502:用于处理服务器内部错误和网关错误的问题。
nginx 进阶基础
## nginx 介绍### Nginx是一个高性能的HTTP和反向代理服务器,同时也是一个IMAP/POP3/SMTP代理服务器。### Nginx的设计目标是高性能、高并发、低内存消耗和高稳定性。### Nginx使用事件驱动架构,能够处理大量并发连接,适合用于高负载的Web应用。### Nginx支持多种操作系统,包括Linux、Windows、Mac OS等。### Nginx的配置文件使用简单的文本格式,易于阅读和修改。### Nginx支持模块化设计,可以根据需要加载不同的模块来扩展功能。### Nginx可以作为负载均衡器,将请求分发到多个后端服务器,提高系统的可用性和性能。
## 为什么选择 nginx(优势)### 高并发,高性能### 高可靠---可以7*24小时不间断运行### 可扩展性强--模块化设计,使得添加模块非常的平稳。### 热部署--可以在不停止服务器的情况下升级nginx### 反向代理--可以隐藏真实的服务器IP地址### 负载均衡--可以将请求分发到多个后端服务器,提高系统的可用性和性能。### BSD许可证--nginx不止开源免费的我们还可以更具实际需求进行定制修改源代码### Nginx 安装非常的简单,配置文件 非常简洁(还能够支持perl语法),Bugs非常少的服务器
## IO多路复用### I/O multiplexing【多并发】#### 第一种方法就是最传统的多进程并发模型 (每进来一个新的I/O流会分配一个新的线程管理。)#### 第二种方法就是I/O多路复用 (单个线程,通过记录跟踪每个I/O流(sock)的状态,来同时管理多个I/O流 。)### nginx基于事件驱动模型实现I/O多路复用#### 一个请求到来了,nginx使用epoll接收请求的过程是怎样的?##### 1. nginx主进程创建一个epoll对象##### 2. nginx主进程创建一个监听socket,并将其添加到epoll对象中##### 3. nginx主进程调用epoll_wait()函数,等待事件的发生##### 4. 当有新的请求到来时,epoll_wait()函数返回,nginx主进程会将新的请求添加到epoll对象中##### 5. nginx主进程会调用worker进程处理请求##### 6. worker进程处理完请求后,将结果返回给客户端### 异步,非阻塞#### 1个master进程,n个work进程### 为什么更喜欢用Nginx 呢,Nginx 相对Apache 有那些有点呢?#### 轻量级,同样是web服务比Apache占用更少的内存及资源#### 静态处理,Nginx 静态处理性能比 Apache 高 3倍以上#### 抗并发,Nginx 处理请求是异步非阻塞的,而Apache则是阻塞型的。在高并发下Nginx 能保持低资源低消耗高性能。#### 高度模块化的设计,编写模块相对简单#### 负载均衡,Nginx 支持多种负载均衡算法#### 反向代理,Nginx 支持多种反向代理协议
## nginx安装部署和配置管理### nginx部署-Yum安装#### 1.安装epel源yum install -y epel-release#### 2.安装nginxyum install -y nginx#### 3.启动nginxsystemctl start nginx#### 4.设置开机自启systemctl enable nginx#### 5.查看nginx状态systemctl status nginx#### 6.查看nginx版本nginx -v### nginx 编译安装与配置使用#### 安装编译环境yum install -y gcc  gcc-c++  pcre pcre-devel gd-devel zlib zlib-devel openssl openssl-devel make### 安装nginxwget http://nginx.org/download/nginx-1.20.1.tar.gztar -zxvf nginx-1.20.1.tar.gzcd nginx-1.20.1./configure --prefix=/usr/local/nginx --with-http_ssl_module --with-pcre --with-http_stub_status_module --with-http_gzip_static_modulemake && make install### Nginx 编译参数#### --prefix=/usr/local/nginx                        //指向安装目录#### --conf-path=/etc/nginx/nginx.conf                //指定配置文件#### --http-log-path=/var/log/nginx/access.log        //指定访问日志#### --error-log-path=/var/log/nginx/error.log        //指定错误日志#### --pid-path=/var/run/nginx.pid                    //指定pid文件#### --http-client-body-temp-path=/var/lib/nginx/body    //设定http客户端请求临时文件路径#### --http-fastcgi-temp-path=/var/lib/nginx/fastcgi     //设定http fastcgi临时文件路径#### --http-proxy-temp-path=/var/lib/nginx/proxy         //设定http代理临时文件路径#### --http-uwsgi-temp-path=/var/lib/nginx/uwsgi         //设定http uwsgi临时文件路径#### --http-scgi-temp-path=/var/lib/nginx/scgi           //设定http scgi临时文件路径#### --with-debug                                        //启用debug日志#### --with-ipv6                                         //启用ipv6支持#### --with-http_ssl_module                              //启用ssl模块#### --with-http_stub_status_module                      //获取nginx自上次启动以来的状态#### --with-http_realip_module                 //允许从请求标头更改客户端的IP地址值,默认为关#### --with-http_auth_request_module           //实现基于一个子请求的结果的客户端授权。如果该子请求返回的#### --with-http_addition_module               //作为一个输出过滤器,支持不完全缓冲,分部分响应请求#### --with-http_dav_module                    //支持WebDAV协议#### --with-http_geoip_module                  //使用预编译的MaxMind数据库解析客户端IP地址,得到变量值#### --with-http_gunzip_module                 //解压缩gzip响应#### --with-http_gzip_static_module            //支持gzip静态文件#### --with-http_spdy_module                   //SPDY可以缩短网页的加载时间#### --with-http_sub_module                    //允许用一些其他文本替换nginx响应中的一些文本#### --with-http_xslt_module                   //过滤转换XML请求#### --with-mail                               //邮件代理模块#### --with-mail_ssl_module                    //邮件代理模块SSL支持##### #--with  表示在编译过程中需要给nginx添加的模块##### #--without 表示编译nginx时默认该模块是添加进去的当使用这个参数时表示将默认编译的模块移除### 修改配置文件/etc/nginx/nginx.conf#### 1.修改nginx.conf配置文件vim /etc/nginx/nginx.conf#### 2.修改nginx.conf配置文件##### 全局参数设置user  nobody;                            //设置nginx进程的用户和组worker_processes  1;                     //设置nginx工作进程数,建议设置为CPU核心数error_log  /var/log/nginx/error.log;     //设置错误日志文件路径pid        /var/run/nginx.pid;           //设置nginx进程ID文件路径worker_rlimit_nofile 65535;              //设置nginx进程打开的最大文件数events {use epoll;                           //设置事件驱动模型worker_connections  1024;            //设置每个工作进程的最大连接数}##### http 服务相关设置include       /etc/nginx/mime.types;     //设置MIME类型文件路径default_type  application/octet-stream;  //设置默认MIME类型log_format  main  '$remote_addr - $remote_user [$time_local] "$request" ''$status $body_bytes_sent "$http_referer" ''"$http_user_agent" "$http_x_forwarded_for"'; //设置日志格式access_log  /var/log/nginx/access.log  main; //设置访问日志文件路径sendfile        on;                          //启用高效文件传输模式(可以设置为off,降低系统负载)keepalive_timeout  65;                       //设置保持连接的超时时间,单位为秒gzip  on;                                    //启用gzip压缩gzip_types text/plain application/json;      //设置gzip压缩的MIME类型tcp_nopush        on;                        //启用TCP_NOPUSH选项##### 虚拟服务器的相关设置 server {listen       80;                         //监听80端口server_name  localhost;                 //设置服务器名称location / {root   /usr/share/nginx/html;       //设置网站根目录index  index.html index.htm;       //设置默认首页文件}error_page   404  /404.html;           //设置404错误页面location = /40x.html {}error_page   500 502 503 504  /50x.html; //设置50x错误页面location = /50x.html {}}server {listen       443 ssl;                    //监听443端口,启用SSLserver_name  localhost;                 //设置服务器名称ssl_certificate      /etc/nginx/ssl/nginx.crt; //设置SSL证书路径ssl_certificate_key  /etc/nginx/ssl/nginx.key; //设置SSL证书密钥路径location / {root   /usr/share/nginx/html;       //设置网站根目录index  index.html index.htm;       //设置默认首页文件}error_page   404  /404.html;           //设置404错误页面location = /40x.html {}error_page   500 502 503 504  /50x.html; //设置50x错误页面location = /50x.html {}}server {listen       8080;                    //监听8080端口server_name  localhost;               //设置服务器名称location / {root   /usr/share/nginx/html;     //设置网站根目录index  index.html index.htm;     //设置默认首页文件}error_page   404  /404.html;         //设置404错误页面location = /40x.html {}error_page   500 502 503 504  /50x.html; //设置50x错误页面location = /50x.html {}}### 检测nginx配置文件是否正确#### yum安装nginx -t#### 编译安装/usr/local/nginx/sbin/nginx -t### 启动nginx#### yum安装systemctl start nginx#### 编译安装/usr/local/nginx/sbin/nginx### 通过 nginx 命令控制 nginx 服务#### yum安装命令控制参数nginx -s reload                  //重新加载配置文件nginx -s reopen                  //重新打开日志文件nginx -s stop                    //停止nginx服务nginx -s quit                    //优雅停止nginx服务nginx -c /path/nginx.conf        //指定配置文件路径nginx -t -c /path/to/nginx.conf  //测试配置文件#### 编译安装命令控制参数/usr/local/nginx/sbin/nginx -s reload                 //重新加载配置文件/usr/local/nginx/sbin/nginx -s reopen                 //重新打开日志文件/usr/local/nginx/sbin/nginx -s stop                   //停止nginx服务/usr/local/nginx/sbin/nginx -s quit                   //优雅停止nginx服务/usr/local/nginx/sbin/nginx -c /path/nginx.conf       //指定配置文件路径/usr/local/nginx/sbin/nginx -t -c /path/to/nginx.conf //测试配置文件### nginx 日志文件详解#### nginx 日志文件分为 log_format 和 access_log 两部分##### log_format 定义记录的格式,其语法格式为log_format        样式名称        样式详情log_format        main            '$remote_addr - $remote_user [$time_local] "$request" ''$status $body_bytes_sent "$http_referer" ''"$http_user_agent" "$http_x_forwarded_for"';变量名 说明 $remote_addr  客户端IP地址$remote_user  客户端用户名$time_local   本地时间$request      请求行$status       响应状态码$body_bytes_sent  响应体大小$http_referer  请求来源$http_user_agent  客户端浏览器信息$http_x_forwarded_for  客户端真实IP地址$upstream_addr  上游服务器地址$upstream_response_time  上游服务器响应时间$upstream_connect_time  上游服务器连接时间$upstream_header_time  上游服务器响应头时间$request_time  请求处理时间$msec         当前时间戳$pid          进程ID$connection   连接ID$request_length  请求长度$bytes_sent   响应字节数$http_cookie  Cookie信息$http_accept  客户端支持的类型$http_accept_language  客户端支持的语言$http_accept_encoding  客户端支持的编码$http_cache_control  客户端缓存控制$http_if_modified_since  客户端缓存时间$http_if_none_match  客户端缓存标识$http_range  客户端请求的范围$http_upgrade  客户端请求的协议$http_origin  客户端请求的源$http_dnt  客户端请求的DNT$http_x_requested_with  客户端请求的X-Requested-With$http_x_forwarded_proto  客户端请求的协议$http_x_forwarded_port  客户端请求的端口$http_x_forwarded_host  客户端请求的主机$http_x_forwarded_scheme  客户端请求的协议$http_x_forwarded_server  客户端请求的服务器$http_x_forwarded_uri  客户端请求的URI$http_x_forwarded_for  客户端请求的IP地址
## 使用 limit_rate 限制客户端传输数据的速度### 编辑/etc/nginx/nginx.confserver {listen       80;server_name  localhost;location / {root   /usr/share/nginx/html;index  index.html index.htm;limit_rate  100k; //限制客户端传输数据的速度为100KB/s}error_page   404  /404.html;location = /40x.html {}error_page   500 502 503 504  /50x.html;location = /50x.html {}}
## nginx 虚拟机配置### nginx可以实现虚拟主机的配置,nginx支持三种类型的虚拟主机配置。基于域名的虚拟主机 (server_name来区分虚拟主机——应用:外部网站)基于IP的虚拟主机 (server_name来区分虚拟主机——应用:外部网站)基于端口的虚拟主机 (server_name来区分虚拟主机——应用:外部网站)### 基于域名的虚拟主机配置#### 配置通过域名区分的虚拟机server {listen       80;server_name  www.example.com; //设置服务器名称location / {root   /usr/share/nginx/html; //设置网站根目录index  index.html index.htm; //设置默认首页文件}error_page   404  /404.html; //设置404错误页面location = /40x.html {}error_page   500 502 503 504  /50x.html; //设置50x错误页面location = /50x.html {}}server {listen       80;server_name  www.example2.com; //设置服务器名称location / {root   /usr/share/nginx/html; //设置网站根目录index  index.html index.htm; //设置默认首页文件}error_page   404  /404.html; //设置404错误页面location = /40x.html {}error_page   500 502 503 504  /50x.html; //设置50x错误页面location = /50x.html {}}#### 为域名的虚拟机创建indiex文件mkdir -p /usr/share/nginx/html/www.example.commkdir -p /usr/share/nginx/html/www.example2.comecho "www.example.com" > /usr/share/nginx/html/www.example.com/index.htmlecho "www.example2.com" > /usr/share/nginx/html/www.example2.com/index.html#### 重新加载配置文件nginx -s reload/usr/local/nginx/sbin/nginx -s reload#### 客户端配置路由映射vim /etc/hosts### 基于ip的虚拟主机配置#### 配置通过ip区分的虚拟机server {listen       192.168.12.110:80; //设置服务器名称server_name  www.example.com; //设置服务器名称  location / {root   /usr/share/nginx/html; //设置网站根目录index  index.html index.htm; //设置默认首页文件}error_page   404  /404.html; //设置404错误页面location = /40x.html {}error_page   500 502 503 504  /50x.html; //设置50x错误页面location = /50x.html {}}server {    listen      192.168.12.111:80; //设置服务器名称server_name  www.example2.com; //设置服务器名称location / {root   /usr/share/nginx/html; //设置网站根目录index  index.html index.htm; //设置默认首页文件}error_page   404  /404.html; //设置404错误页面location = /40x.html {}error_page   500 502 503 504  /50x.html; //设置50x错误页面location = /50x.html {}}#### 为ip的虚拟机创建indiex文件mkdir -p /usr/share/nginx/html/www.example.commkdir -p /usr/share/nginx/html/www.example2.comecho "www.example.com" > /usr/share/nginx/html/www.example.com/index.htmlecho "www.example2.com" > /usr/share/nginx/html/www.example2.com/index.html#### 重新加载配置文件nginx -s reload/usr/local/nginx/sbin/nginx -s reload#### 客户端配置路由映射vim /etc/hosts#### 重启nginxsystemctl restart nginx/usr/local/nginx/sbin/nginx -s reload### 基于端口的虚拟主机配置#### 配置通过端口区分的虚拟机server {listen       80; //设置服务器名称server_name  www.example.com; //设置服务器名称location / {root   /usr/share/nginx/html; //设置网站根目录index  index.html index.htm; //设置默认首页文件}error_page   404  /404.html; //设置404错误页面location = /40x.html {}error_page   500 502 503 504  /50x.html; //设置50x错误页面location = /50x.html {}}server {    listen      8080; //设置服务器名称server_name  www.example2.com; //设置服务器名称location / {root   /usr/share/nginx/html; //设置网站根目录index  index.html index.htm; //设置默认首页文件}error_page   404  /404.html; //设置404错误页面location = /40x.html {}error_page   500 502 503 504  /50x.html; //设置50x错误页面location = /50x.html {}}#### 为端口的虚拟机创建indiex文件mkdir -p /usr/share/nginx/html/www.example.commkdir -p /usr/share/nginx/html/www.example2.comecho "www.example.com" > /usr/share/nginx/html/www.example.com/index.htmlecho "www.example2.com" > /usr/share/nginx/html/www.example2.com/index.html#### 重新加载配置文件nginx -s reload/usr/local/nginx/sbin/nginx -s reload#### 客户端配置路由映射vim /etc/hosts#### 重启nginxsystemctl restart nginx/usr/local/nginx/sbin/nginx -s reload
Nginx进阶-常见配置
## nginx Proxy 反向代理### 反向代理是指客户端请求一个服务器,服务器将请求转发到另一个服务器上,然后将响应返回给客户端。### 正/反向代理的区别#### 正向代理的过程隐藏了真实的请求客户端,服务器不知道真实的客户端是谁,客户端请求的服务都被代理服务器代替请求。#### 反向代理的过程隐藏了真实的服务器,客户不知道真正提供服务的人是谁,客户端请求的服务都被代理服务器处理。反向代理代理的是响应方,也就是服务端;### nginx Proxy 配置#### 相关代理模块##### ngx_http_proxy_module##### ngx_http_fastcgi_module##### ngx_http_uwsgi_module##### ngx_http_scgi_module##### ngx_http_memcached_module#### 启用 nginx proxy 代理##### 环境两台nginx真实服务器##### nginx-1 启动网站(内容)(yum安装作为应用服务器)(192.168.12.110)##### nginx-2 启动nginx反向代理(yum安装作为代理服务器)(yum)###### 编辑yum安装的nginx的配置文件:vim /etc/nginx/cond.d/default.confserver {listen       80;server_name  localhost;location / {proxy_pass http://192.168.12.110:80;        //设置代理服务器地址(nginx-1)proxy_redirect default;                     //设置代理服务器地址proxy_set_header Host $http_host;           //设置请求头部字段proxy_set_header X-Real-IP $remote_addr;    //设置真实IP地址proxy_set_header X-Forwarded-For $proxy_add_x_forwarded_for; //设置X-Forwarded-For请求头部字段proxy_connect_timeout 30;                   //设置连接超时时间proxy_send_timeout 30;                      //设置发送超时时间proxy_read_timeout 30;                      //设置读取超时时间proxy_buffer_size 128k;                    //设置代理缓冲区大小proxy_buffers 4 256k;                      //设置代理缓冲区数量和大小}}##### 重新加载nginx配置文件nginx -s reload/usr/local/nginx/sbin/nginx -s reload##### 启动nginx-1systemctl start nginx/usr/local/nginx/sbin/nginx##### 启动nginx-2systemctl start nginx/usr/local/nginx/sbin/nginx
## Nginx负载均衡### upstream配置#### upstream配置upstream backend {server  192.168.12.111:8081;server  192.168.12.112:8081;}server {listen       80;server_name  localhost;location / {proxy_pass http://backend; //设置负载均衡服务器地址proxy_redirect default; //设置代理服务器地址proxy_set_header Host $http_host; //设置请求头部字段proxy_set_header X-Real-IP $remote_addr; //设置真实IP地址proxy_set_header X-Forwarded-For $proxy_add_x_forwarded_for; //设置X-Forwarded-For请求头部字段proxy_connect_timeout 30; //设置连接超时时间proxy_send_timeout 30; //设置发送超时时间proxy_read_timeout 30; //设置读取超时时间proxy_buffer_size 128k; //设置代理缓冲区大小proxy_buffers 4 256k; //设置代理缓冲区数量和大小}}#### 负载均衡算法###### 轮询(默认)--按顺序分配请求###### 权重--按权重分配请求###### ip_hash--根据客户端IP地址分配请求###### least_conn--最少连接数分配请求###### fair--根据响应时间分配请求###### random--随机分配请求###### url_hash--根据请求URL分配请求,使每个url定向到同一个后端服务器。### 配置实例##### 轮询(默认)upstream backend {server 192.168.12.111:8081;server 192.168.12.112:8081;}server {listen       80;server_name  localhost;location / {proxy_pass http://backend; //设置负载均衡服务器地址proxy_redirect default; //设置代理服务器地址proxy_set_header Host $http_host; //设置请求头部字段proxy_set_header X-Real-IP $remote_addr; //设置真实IP地址proxy_set_header X-Forwarded-For $proxy_add_x_forwarded_for; //设置X-Forwarded-For请求头部字段proxy_connect_timeout 30; //设置连接超时时间proxy_send_timeout 30; //设置发送超时时间proxy_read_timeout 30; //设置读取超时时间proxy_buffer_size 128k; //设置代理缓冲区大小proxy_buffers 4 256k; //设置代理缓冲区数量和大小}}#### 热备份upstream backend {server 192.168.12.111:8081;server 192.168.12.112:8081 backup; //设置热备份服务器}server {listen       80;server_name  localhost;location / {proxy_pass http://backend; //设置负载均衡服务器地址proxy_redirect default; //设置代理服务器地址proxy_set_header Host $http_host; //设置请求头部字段proxy_set_header X-Real-IP $remote_addr; //设置真实IP地址proxy_set_header X-Forwarded-For $proxy_add_x_forwarded_for; //设置X-Forwarded-For请求头部字段proxy_connect_timeout 30; //设置连接超时时间proxy_send_timeout 30; //设置发送超时时间proxy_read_timeout 30; //设置读取超时时间proxy_buffer_size 128k; //设置代理缓冲区大小proxy_buffers 4 256k; //设置代理缓冲区数量和大小}}#### 权重upstream backend {server 192.168.12.111:8081 weight=3; //设置权重server 192.168.12.112:8081 weight=1; //设置权重}server {listen       80;server_name  localhost;location / {proxy_pass http://backend; //设置负载均衡服务器地址proxy_redirect default; //设置代理服务器地址proxy_set_header Host $http_host; //设置请求头部字段proxy_set_header X-Real-IP $remote_addr; //设置真实IP地址proxy_set_header X-Forwarded-For $proxy_add_x_forwarded_for; //设置X-Forwarded-For请求头部字段proxy_connect_timeout 30; //设置连接超时时间proxy_send_timeout 30; //设置发送超时时间proxy_read_timeout 30; //设置读取超时时间proxy_buffer_size 128k; //设置代理缓冲区大小proxy_buffers 4 256k; //设置代理缓冲区数量和大小}}#### ip_hashupstream backend {ip_hash; //设置ip_hashserver 192.168.12.111:8081; //设置ip_hashserver 192.168.12.112:8081; //设置ip_hash}server {listen       80;server_name  localhost;location / {proxy_pass http://backend; //设置负载均衡服务器地址proxy_redirect default; //设置代理服务器地址proxy_set_header Host $http_host; //设置请求头部字段proxy_set_header X-Real-IP $remote_addr; //设置真实IP地址proxy_set_header X-Forwarded-For $proxy_add_x_forwarded_for; //设置X-Forwarded-For请求头部字段proxy_connect_timeout 30; //设置连接超时时间proxy_send_timeout 30; //设置发送超时时间proxy_read_timeout 30; //设置读取超时时间proxy_buffer_size 128k; //设置代理缓冲区大小proxy_buffers 4 256k; //设置代理缓冲区数量和大小}}#### least_connupstream backend {least_conn; //设置least_connserver 192.168.12.111:8081; //设置least_connserver 192.168.12.112:8081; //设置least_conn}server {listen       80;server_name  localhost;location / {proxy_pass http://backend; //设置负载均衡服务器地址proxy_redirect default; //设置代理服务器地址proxy_set_header Host $http_host; //设置请求头部字段proxy_set_header X-Real-IP $remote_addr; //设置真实IP地址proxy_set_header X-Forwarded-For $proxy_add_x_forwarded_for; //设置X-Forwarded-For请求头部字段proxy_connect_timeout 30; //设置连接超时时间proxy_send_timeout 30; //设置发送超时时间proxy_read_timeout 30; //设置读取超时时间proxy_buffer_size 128k; //设置代理缓冲区大小proxy_buffers 4 256k; //设置代理缓冲区数量和大小}}#### fairupstream backend {fair; //设置fairserver 192.168.12.111:8081; //设置fairserver 192.168.12.112:8081; //设置fair}server {listen       80;server_name  localhost;location / {proxy_pass http://backend; //设置负载均衡服务器地址proxy_redirect default; //设置代理服务器地址proxy_set_header Host $http_host; //设置请求头部字段proxy_set_header X-Real-IP $remote_addr; //设置真实IP地址proxy_set_header X-Forwarded-For $proxy_add_x_forwarded_for; //设置X-Forwarded-For请求头部字段proxy_connect_timeout 30; //设置连接超时时间proxy_send_timeout 30; //设置发送超时时间proxy_read_timeout 30; //设置读取超时时间proxy_buffer_size 128k; //设置代理缓冲区大小proxy_buffers 4 256k; //设置代理缓冲区数量和大小}}#### randomupstream backend {random; //设置randomserver 192.168.12.111:8081; //设置randomserver 192.168.12.112:8081; //设置random}server {listen       80;server_name  localhost;location / {proxy_pass http://backend; //设置负载均衡服务器地址proxy_redirect default; //设置代理服务器地址proxy_set_header Host $http_host; //设置请求头部字段proxy_set_header X-Real-IP $remote_addr; //设置真实IP地址proxy_set_header X-Forwarded-For $proxy_add_x_forwarded_for; //设置X-Forwarded-For请求头部字段proxy_connect_timeout 30; //设置连接超时时间proxy_send_timeout 30; //设置发送超时时间proxy_read_timeout 30; //设置读取超时时间proxy_buffer_size 128k; //设置代理缓冲区大小proxy_buffers 4 256k; //设置代理缓冲区数量和大小}}#### url_hashupstream backend {url_hash; //设置url_hashserver 192.168.12.111:8081; //设置url_hashserver 192.168.12.112:8081; //设置url_hash}server {listen       80;server_name  localhost;location / {proxy_pass http://backend; //设置负载均衡服务器地址proxy_redirect default; //设置代理服务器地址proxy_set_header Host $http_host; //设置请求头部字段proxy_set_header X-Real-IP $remote_addr; //设置真实IP地址proxy_set_header X-Forwarded-For $proxy_add_x_forwarded_for; //设置X-Forwarded-For请求头部字段proxy_connect_timeout 30; //设置连接超时时间proxy_send_timeout 30; //设置发送超时时间proxy_read_timeout 30; //设置读取超时时间proxy_buffer_size 128k; //设置代理缓冲区大小proxy_buffers 4 256k; //设置代理缓冲区数量和大小}}### nginx配置7层协议#### 7层协议:OSI(Open System Interconnection)是一个开放性的通行系统互连参考模型,他是一个定义的非常好的协议规范,共包含七层协议。应用层(Application Layer)表示层(Presentation Layer)会话层(Session Layer)传输层(Transport Layer)网络层(Network Layer)数据链路层(Data Link Layer)物理层(Physical Layer)#### 协议配置##### 在nginx做负载均衡,负载多个服务,部分服务是需要7层的,部分服务是需要4层的,也就是说7层和4层配置在同一个配置文件中。##### 准备三台机器:代理服务器(nginx-0)192.168.12.110应用服务器(nginx-1)192.168.12.111应用服务器(nginx-2)192.168.12.112##### nginx-0 作为代理服务器####### 编辑nginx-0的配置文件vim /etc/nginx/conf.d/default.confworker_processes  4;events {worker_connections  1024;}http {include       mime.types;default_type  application/octet-stream;log_format  main  '$remote_addr - $remote_user [$time_local] "$request" ''$status $body_bytes_sent "$http_referer" ''"$http_user_agent" "$http_x_forwarded_for"';access_log  /var/log/nginx/access.log  main;sendfile        on;keepalive_timeout  65;gzip  on;upstream backend {server 192.168.12.111:8081 weight=2 max_fails=2 fail_timeout=2s; //设置nginx-1server 192.168.12.112:8081 weight=2 max_fails=2 fail_timeout=2s; //设置nginx-2}server {listen       80;server_name  localhost;charset utf-8;location / {proxy_pass http://backend; //设置nginx-1和nginx-2proxy_redirect default; //设置代理服务器地址proxy_set_header Host $http_host; //设置请求头部字段proxy_set_header X-Real-IP $remote_addr; //设置真实IP地址proxy_set_header X-Forwarded-For $proxy_add_x_forwarded_for; //设置X-Forwarded-For请求头部字段proxy_connect_timeout 30; //设置连接超时时间proxy_send_timeout 30; //设置发送超时时间proxy_read_timeout 30; //设置读取超时时间proxy_buffer_size 128k; //设置代理缓冲区大小proxy_buffers 4 256k; //设置代理缓冲区数量和大小}error_page   404  /404.html; //设置404错误页面location = /40x.html {root   html;}}}####### 重新加载nginx配置文件nginx -s reload/usr/local/nginx/sbin/nginx -s reload####### 启动nginx-0systemctl start nginx/usr/local/nginx/sbin/nginx##### 192.168.12.111\192.168.12.112 服务器yum安装的创建新的配置文件;###### 编辑配置文件vim /etc/nginx/conf.d/default.confserver {listen       8081;server_name  localhost;location / {root   /usr/share/nginx/html; //设置网站根目录index  index.html index.htm; //设置默认首页文件}error_page   404  /404.html; //设置404错误页面location = /40x.html {}error_page   500 502 503 504  /50x.html; //设置50x错误页面location = /50x.html {}}###### 为nginx-1和nginx-2创建index文件mkdir -p /usr/share/nginx/htmlecho "nginx-1" > /usr/share/nginx/html/index.htmlecho "nginx-2" > /usr/share/nginx/html/index.html###### 重新加载nginx配置文件nginx -s reload/usr/local/nginx/sbin/nginx -s reload###### 启动nginx-1和nginx-2systemctl start nginx/usr/local/nginx/sbin/nginx##### 测试nginx-0###### curl -I http://192.168.12.110    //测试nginx-0##### nginx 配置后端健康检查模块###### 编辑nginx-0的配置文件vim /etc/nginx/conf.d/default.confupstream backend {server 192.168.12.111:8081 weight=2 max_fails=2 fail_timeout=2s; //设置nginx-1server 192.168.12.112:8081 weight=2 max_fails=2 fail_timeout=2s; //设置nginx-2check interval=2000 rise=2 fall=5 timeout=1000; //设置健康检查check_http_send "GET / HTTP/1.0\r\n\r\n" type=http port=8081; //设置健康检查check_http_expect_alive http_2xx http_3xx; //设置健康检查}server {listen       80;server_name  localhost;charset utf-8;location / {proxy_pass http://backend; //设置nginx-1和nginx-2proxy_redirect default; //设置代理服务器地址proxy_set_header Host $http_host; //设置请求头部字段proxy_set_header X-Real-IP $remote_addr; //设置真实IP地址proxy_set_header X-Forwarded-For $proxy_add_x_forwarded_for; //设置X-Forwarded-For请求头部字段proxy_connect_timeout 30; //设置连接超时时间proxy_send_timeout 30; //设置发送超时时间proxy_read_timeout 30; //设置读取超时时间proxy_buffer_size 128k; //设置代理缓冲区大小proxy_buffers 4 256k; //设置代理缓冲区数量和大小}error_page   404  /404.html; //设置404错误页面location = /status {check_status; //设置健康检查状态access_log off; //关闭访问日志}location = /40x.html {root   html;}}##### 参数解释###### interval=2000  //设置健康检查间隔时间###### rise=2  //设置健康检查成功次数###### fall=5  //设置健康检查失败次数###### timeout=1000  //设置健康检查超时时间###### check_http_send "GET / HTTP/1.0\r\n\r\n" type=http port=8081; //设置健康检查请求###### check_http_expect_alive http_2xx http_3xx; //设置健康检查响应###### interval:表示每隔多少毫秒向后端发送健康检查包###### rise:表示连续多少次健康检查成功后,认为后端服务器是健康的###### fall:表示连续多少次健康检查失败后,认为后端服务器是不可用的###### timeout:表示健康检查的超时时间###### check_http_send:表示健康检查发送的请求###### check_http_expect_alive:表示健康检查响应的状态码###### type:表示发送的健康检查包是什么类型的请求;###### port:表示发送的健康检查包的端口号;### 4层协议方法(扩展)#### TCP/IP协议:之所以说TCP/IP是一个协议族,是因为TCP/IP协议包括TCP、IP、UDP、ICMP、RIP、SMTP、ARP、TFTP等许多协议,这些协议一起称为TCP/IP协议。#### TCP/IP协议分为四层应用层(Application Layer)传输层(Transport Layer)网络层(Network Layer)数据链路层(Data Link Layer)#### TCP/IP协议的工作原理TCP/IP协议是一个分层的协议族,每一层都有自己的协议,每一层都可以独立工作,每一层都可以使用不同的协议。TCP/IP协议的工作原理是将数据从应用层传输到数据链路层,然后通过网络层和传输层进行路由和传输,最后到达目标主机的应用层。TCP/IP协议的工作原理是将数据从应用层传输到数据链路层,然后通过网络层和传输层进行路由和传输,最后到达目标主机的应用层。#### 配置案例:##### 编辑nginx-0的配置文件vim /etc/nginx/conf.d/default.confstream {upstream backend {server 192.168.12.111;}server {listen 3306;proxy_pass backend;proxy_connect_timeout 1s;proxy_timeout 3s;}}##### stream块是与http块同一级别
## nginx 会话保持### nginx会话保持是指在负载均衡的情况下,客户端的请求会被转发到同一台后端服务器上,以保持会话的一致性。### nginx会话保持的实现方式有两种:#### 1. cookie会话保持##### cookie会话保持是通过在响应头中添加一个cookie来实现的,nginx会将这个cookie发送给客户端,客户端在下次请求时会将这个cookie发送给nginx,nginx会根据这个cookie将请求转发到同一台后端服务器上。##### 配置实例upstream backend {server 192.168.12.111:8081;server 192.168.12.112:8081;sticky; //设置cookie会话保持# sticky expires=1h domain=testpm.com path=/; //设置cookie会话保持(二选一即可)}server {listen       80;server_name  localhost;location / {proxy_pass http://backend; //设置nginx-1和nginx-2proxy_redirect default; //设置代理服务器地址proxy_set_header Host $http_host; //设置请求头部字段proxy_set_header X-Real-IP $remote_addr; //设置真实IP地址proxy_set_header X-Forwarded-For $proxy_add_x_forwarded_for; //设置X-Forwarded-For请求头部字段proxy_connect_timeout 30; //设置连接超时时间proxy_send_timeout 30; //设置发送超时时间proxy_read_timeout 30; //设置读取超时时间proxy_buffer_size 128k; //设置代理缓冲区大小proxy_buffers 4 256k; //设置代理缓冲区数量和大小}}###### 说明####### sticky:表示开启cookie会话保持####### expires:表示cookie的过期时间####### domain:表示cookie的域名####### path:表示cookie的路径##### 2. ip_hash会话保持##### ip_hash会话保持是通过在nginx的upstream模块中添加ip_hash指令来实现的,nginx会根据客户端的IP地址将请求转发到同一台后端服务器上。##### 配置实例upstream backend {ip_hash; //设置ip_hash会话保持server 192.168.12.111;server 192.168.12.112;ip_hash; //设置ip_hash会话保持}server {listen       80;server_name  localhost;location / {proxy_pass http://backend; //设置nginx-1和nginx-2proxy_redirect default; //设置代理服务器地址proxy_set_header Host $http_host; //设置请求头部字段proxy_set_header X-Real-IP $remote_addr; //设置真实IP地址proxy_set_header X-Forwarded-For $proxy_add_x_forwarded_for; //设置X-Forwarded-For请求头部字段proxy_connect_timeout 30; //设置连接超时时间proxy_send_timeout 30; //设置发送超时时间proxy_read_timeout 30; //设置读取超时时间proxy_buffer_size 128k; //设置代理缓冲区大小proxy_buffers 4 256k; //设置代理缓冲区数量和大小}}
## nginx 实现动静分离### 为了加快网站的解析速度,可以把动态页面和静态页面由不同的服务器来解析,加快解析速度。降低原来单个服务器的压力。 简单来说,就是使用正则表达式匹配过滤,然后交个不同的服务器。### 准备环境#### 准备三台nginx服务器,准备一个nginx代理 两个http 分别处理动态和静态。#### nginx-0 作为代理服务器##### 编辑nginx-0的配置文件vim /etc/nginx/conf.d/default.confupstream static {server 192.168.12.111:8081 weight=1 max_fails=1 fail_timeout=60s;}upstream php { server 192.168.12.112:8081 weight=1 max_fails=1 fail_timeout=60s;}                       server {listen       80;server_name  localhost;location ~ .*\.(html|jpg|png|css|js)$ {proxy_pass http://static;proxy_set_header Host $host:$server_port;proxy_set_header X-Real-IP $remote_addr;proxy_set_header X-Forwarded-For $proxy_add_x_forwarded_for;}location ~ \.(php|jsp)$ {proxy_pass http://php;proxy_set_header Host $host:$server_port;proxy_set_header X-Real-IP $remote_addr;proxy_set_header X-Forwarded-For $proxy_add_x_forwarded_for;}}#### nginx-1 作为静态服务器##### 编辑nginx-1的配置文件vim /etc/nginx/conf.d/default.confserver {listen       8081;server_name  localhost;location ~ \.(html|jpg|png|js|css) {root   /usr/share/nginx/html; //设置网站根目录expires 30d; //设置过期时间}error_page   404  /404.html; //设置404错误页面location = /40x.html {}error_page   500 502 503 504  /50x.html; //设置50x错误页面location = /50x.html {}}#### nginx-2 作为动态服务器##### 编辑nginx-2的配置文件vim /etc/nginx/conf.d/default.confserver {listen       8081;server_name  localhost;location ~ \.(php|jsp) {root   /usr/share/nginx/html; //设置网站根目录fastcgi_pass   127.0.0.1:9000; //设置fastcgi服务器地址fastcgi_index  index.php; //设置fastcgi默认首页文件fastcgi_param  SCRIPT_FILENAME  $document_root$fastcgi_script_name; //设置fastcgi参数include        fastcgi_params; //包含fastcgi参数文件}error_page   404  /404.html; //设置404错误页面location = /40x.html {}error_page   500 502 503 504  /50x.html; //设置50x错误页面location = /50x.html {}}#### 为nginx-1和nginx-2创建index文件##### 创建index文件mkdir -p /usr/share/nginx/htmlecho "nginx-1" > /usr/share/nginx/html/index.htmlecho "nginx-2" > /usr/share/nginx/html/index.html##### 创建静态文件  mkdir -p /usr/share/nginx/html/staticecho "static" > /usr/share/nginx/html/static/index.htmlecho "static" > /usr/share/nginx/html/static/index.jpgecho "static" > /usr/share/nginx/html/static/index.pngecho "static" > /usr/share/nginx/html/static/index.cssecho "static" > /usr/share/nginx/html/static/index.js##### 创建动态文件  mkdir -p /usr/share/nginx/html/dynamicecho "dynamic" > /usr/share/nginx/html/dynamic/index.phpecho "dynamic" > /usr/share/nginx/html/dynamic/index.jspecho "dynamic" > /usr/share/nginx/html/dynamic/index.phpecho "dynamic" > /usr/share/nginx/html/dynamic/index.jsp##### 创建404文件mkdir -p /usr/share/nginx/htmlecho "404" > /usr/share/nginx/html/404.htmlecho "404" > /usr/share/nginx/html/50x.html##### 创建50x文件   mkdir -p /usr/share/nginx/htmlecho "50x" > /usr/share/nginx/html/50x.htmlecho "50x" > /usr/share/nginx/html/50x.html
## nginx的localtion指令详解### Nginx 的 HTTP 配置主要包括三个区块,结构如下:http {                                                          //这个是协议级别include       mime.types; //包含mime类型文件default_type  application/octet-stream; //设置默认类型log_format  main  '$remote_addr - $remote_user [$time_local] "$request" ''$status $body_bytes_sent "$http_referer" ''"$http_user_agent" "$http_x_forwarded_for"'; //设置日志格式access_log  /var/log/nginx/access.log  main; //设置访问日志sendfile        on; //开启sendfilekeepalive_timeout  65; //设置keepalive超时时间gzip  on; //开启gzip压缩server {                                                    //这个是服务器级别listen       80; //监听80端口server_name  localhost; //设置服务器名称location / {                                            //这个是请求级别root   html; //设置网站根目录index  index.html index.htm; //设置默认首页文件}error_page   404  /404.html; //设置404错误页面location = /40x.html {}error_page   500 502 503 504  /50x.html; //设置50x错误页面location = /50x.html {}}}### location 区段#### location 区段是 Nginx 配置文件中用于匹配请求 URI 的指令,可以根据请求 URI 的不同来执行不同的操作。#### location 区段的语法格式如下:location [modifier] uri {# 处理请求的指令}#### location 区段的修饰符###### =: 精确匹配###### ~: 正则匹配(区分大小写)###### ~*: 正则匹配(不区分大小写)###### ^~: 前缀匹配(优先级高于正则匹配)###### /: 前缀匹配### 查找顺序和优先级#### location 区段的查找顺序和优先级如下:1. 精确匹配(=)2. 正则匹配(~)3. 前缀匹配(^~)4. 前缀匹配(/)### location 配置示例#### 没有修饰符 表示:必须以指定模式开始server {listen       80;server_name  localhost;location /abc123 {root   html; //设置网站根目录index  index.html index.htm; //设置默认首页文件}error_page   404  /404.html; //设置404错误页面location = /40x.html {}error_page   500 502 503 504  /50x.html; //设置50x错误页面location = /50x.html {}}#### =表示:必须与指定的模式精确匹配server {listen       80;server_name  localhost;location = /abc123 {Return return https://www.baidu.com;   //设置重定向}location / {Return return https://www.jd.com;   //设置重定向}}#### ~表示:必须与指定的模式正则匹配(区分大小写)server {listen       80;server_name  localhost;location ~ \.php$ {root   html; //设置网站根目录index  index.html index.htm; //设置默认首页文件}error_page   404  /404.html; //设置404错误页面location = /40x.html {}error_page   500 502 503 504  /50x.html; //设置50x错误页面location = /50x.html {}}#### ~*表示:必须与指定的模式正则匹配(不区分大小写)server {listen       80;server_name  localhost;location ~* \.php$ {root   html; //设置网站根目录index  index.html index.htm; //设置默认首页文件}error_page   404  /404.html; //设置404错误页面location = /40x.html {}error_page   500 502 503 504  /50x.html; //设置50x错误页面location = /50x.html {}}#### ^~表示:必须与指定的模式前缀匹配(优先级高于正则匹配)server {listen       80;server_name  localhost;location ^~ /abc123 {root   html; //设置网站根目录index  index.html index.htm; //设置默认首页文件}error_page   404  /404.html; //设置404错误页面location = /40x.html {}error_page   500 502 503 504  /50x.html; //设置50x错误页面location = /50x.html {}}#### /表示:必须与指定的模式前缀匹配server {listen       80;server_name  localhost;location /abc123 {root   html; //设置网站根目录index  index.html index.htm; //设置默认首页文件}error_page   404  /404.html; //设置404错误页面location = /40x.html {}error_page   500 502 503 504  /50x.html; //设置50x错误页面location = /50x.html {}}   #### location 区段的参数###### root: 设置网站根目录###### index: 设置默认首页文件###### alias: 设置别名###### try_files: 尝试访问文件###### expires: 设置过期时间###### add_header: 添加响应头部字段###### proxy_pass: 设置代理服务器地址###### proxy_redirect: 设置代理服务器地址###### proxy_set_header: 设置请求头部字段###### proxy_connect_timeout: 设置连接超时时间###### proxy_send_timeout: 设置发送超时时间###### proxy_read_timeout: 设置读取超时时间###### proxy_buffer_size: 设置代理缓冲区大小###### proxy_buffers: 设置代理缓冲区数量和大小
## nginx 地址重写 rewrite### 什么是Rewrite#### Rewrite是Nginx的一个模块,用于对请求的URL进行重写和重定向。#### Rewrite可以根据请求的URL进行匹配,并将其重写为指定的URL。#### Rewrite可以用于实现URL的美化、301重定向、404页面等功能。### Rewrite 相关指令#### rewrite: 用于对请求的URL进行重写#### return: 用于对请求的URL进行重定向#### set: 用于设置变量#### if: 用于条件判断#### if语句##### 应用环境server、location##### 语法格式if ($variable) {# 处理请求的指令}   ##### 语法说明if: 用于条件判断$variable: 用于判断的变量# 处理请求的指令: 用于处理请求的指令##### if 可以支持如下条件判断匹配符号=: 精确匹配~: 正则匹配(区分大小写)~*: 正则匹配(不区分大小写)^~: 前缀匹配(优先级高于正则匹配)/: 前缀匹配-f、!-f: 判断文件是否存在-d、!-d: 判断目录是否存在-e、!-e: 判断文件或目录是否存在-x、!-x: 判断文件是否可执行##### 在匹配过程中可以引用一些Nginx的全局变量$args: 请求参数$document_root: 网站根目录$host: 主机名$limit_rate: 限制下载速度$remote_method: 请求方法$remote_addr: 客户端IP地址$remote_port: 客户端端口$remote_user: 客户端用户名$request_filename: 请求文件名$request_uri: 请求URIquery_string: 查询字符串$scheme: 协议类型$server_protocol: 协议版本$server_name: 服务器名称$server_addr: 服务器IP地址$document_ruit: 网站根目录$server_port: 服务器端口#### Rewrite flag##### last: 停止当前的rewrite规则,继续执行后面的location##### break: 停止当前的rewrite规则,不再执行后面的rewrite规则##### redirect: 返回302临时重定向##### permanent: 返回301永久重定向##### 参考案例http://www.testpm.com/a/1.html ==> http://www.testpm.com/b/2.htmllocation /a {root    /html;index   1.html index.htm;rewrite .* /b/2.html permanent;}location /b {root    /html;index   2.html index.htm;}http://www.testpm.com/2019/a/1.html ==> http://www.testpm.com/2018/a/1.htmllocation /2019/a {root    /var/www/html;index   1.html index.hml;rewrite ^/2019/(.*)$ /2018/$1 permanent;}location /2018/a {root    /var/www/html;index   1.html index.htl;}http://www.qf.com/a/1.html ==> http://jd.comlocation /a {root    /html;if ($host ~* www.qf.com ) {rewrite .* http://jd.com permanent;}}http://www.qf.com/a/1.html ==> http://jd.com/a/1.htmllocation /a {root /html;if ( $host ~* qf.com ){rewrite .* http://jd.com$request_uri permanent;}}http://www.tianyun.com/login/tianyun.html ==> http://www.tianyun.com/reg/login.html?user=tianyunlocation /login {root   /usr/share/nginx/html;rewrite ^/login/(.*)\.html$ http://$host/reg/login.html?user=$1;}location /reg {root /usr/share/nginx/html;index login.html;}http://www.tianyun.com/qf/11-22-33/1.html  ==>  http://www.tianyun.com/qf/11/22/33/1.htmllocation /qf {rewrite ^/qf/([0-9]+)-([0-9]+)-([0-9]+)(.*)$ /qf/$1/$2/$3$4 permanent;}location /qf/11/22/33 {root /html;index   1.html;}#### set 指令##### set 指令是用于定义一个变量,并且赋值##### 应用环境server、location、if##### 应用示例http://alice.testpm.com ==> http://www.testpm.com/alicehttp://jack.testpm.com ==> http://www.testpm.com/jack[root@nginx-server conf.d]# cd /usr/share/nginx/html/[root@nginx-server html]# mkdir jack alice[root@nginx-server html]# echo "jack.." >> jack/index.html[root@nginx-server html]# echo "alice.." >> alice/index.html本地解析域名host文件10.0.105.202 www.testpm.com10.0.105.202 alice.testpm.com10.0.105.202 jack.testpm.com编辑配置文件:server {listen       80;server_name  www.testpm.com;location / {root   /usr/share/nginx/html;index  index.html index.htm;if ( $host ~* ^www.testpm.com$) {break;}if ( $host ~* "^(.*)\.testpm\.com$" ) {set $user $1;rewrite .* http://www.testpm.com/$user permanent;}}location /jack {root /usr/share/nginx/html;index  index.html index.hml;}location /alice {root /usr/share/nginx/html;index index.html index.hml;}}#### return 指令##### return 指令用于返回状态码给客户端##### 应用示例如果访问的.sh结尾的文件则返回403操作拒绝错误server {listen       80;server_name  www.testpm.cn;#access_log  /var/log/nginx/http_access.log  main;location / {root   /usr/share/nginx/html;index  index.html index.htm;}location ~* \.sh$ {return 403;}}80 ======> 443 :80转443端口server {listen       80;server_name  www.testpm.cn;access_log  /var/log/nginx/http_access.log  main;return 301 https://www.testpm.cn$request_uri;}server {listen 443 ssl;server_name www.testpm.cn;access_log  /var/log/nginx/https_access.log  main;#ssl on;ssl_certificate   /etc/nginx/cert/2447549_www.testpm.cn.pem;ssl_certificate_key  /etc/nginx/cert/2447549_www.testpm.cn.key;ssl_session_timeout 5m;ssl_protocols TLSv1 TLSv1.1 TLSv1.2;ssl_ciphers  ALL:!ADH:!EXPORT56:RC4+RSA:+HIGH:+MEDIUM:+LOW:+SSLv2:+EXP;ssl_prefer_server_ciphers on;location / {root  /usr/share/nginx/html;index index.html index.htm;}}#### last,break详解##### last: 停止当前的rewrite规则,继续执行后面的location##### break: 停止当前的rewrite规则,不再执行后面的rewrite规则##### 参考案例http://www.testpm.com/a/1.html ==> http://www.testpm.com/b/2.htmllocation /a {root    /html;index   1.html index.htm;rewrite .* /b/2.html last;}location /b {root    /html;index   2.html index.htm;}http://www.testpm.com/a/1.html ==> http://www.testpm.com/b/2.htmllocation /a {root    /html;index   1.html index.htm;rewrite .* /b/2.html break;}location /b {root    /html;index   2.html index.htm;}
## nginx 日志配置### nginx 日志介绍#### nginx 日志分为两种类型1. 访问日志(access log)2. 错误日志(error log)#### nginx 日志的格式1. 访问日志格式$remote_addr: 客户端IP地址$remote_user: 客户端用户名$time_local: 请求时间$request: 请求方法和请求URI$status: 响应状态码$body_bytes_sent: 响应体大小$http_referer: 请求来源地址$http_user_agent: 客户端浏览器信息2. 错误日志格式$time_local: 请求时间$pid: 进程ID$level: 日志级别$message: 日志信息3. path 指定日志的存放位置。4. 作用域http: 全局作用域server: 服务器作用域location: 请求作用域### log_format 指令#### log_format 指令用于定义访问日志的格式#### log_format 指令的语法格式如下:log_format name format;#### log_format 指令的参数name: 日志格式名称format: 日志格式#### log_format 指令的示例log_format main '$remote_addr - $remote_user [$time_local] "$request" ''$status $body_bytes_sent "$http_referer" ''"$http_user_agent" "$http_x_forwarded_for"';#### 如果不想使用Nginx预定义的格式,可以通过log_format指令来自定义。##### 语法log_format name [escape=default|json] string ...;- name 格式名称。在 access_log 指令中引用。 - escape=default|json 选择转义字符。默认值为 default。- string 访问日志格式字符串。可以包含变量和文本。##### 变量$remote_addr: 客户端IP地址$remote_user: 客户端用户名$time_local: 请求时间$request: 请求方法和请求URI$status: 响应状态码$body_bytes_sent: 响应体大小$http_referer: 请求来源地址$http_user_agent: 客户端浏览器信息$http_x_forwarded_for: X-Forwarded-For请求头部字段$request_time: 请求时间$upstream_response_time: 上游服务器响应时间$upstream_addr: 上游服务器地址$upstream_cache_status: 上游缓存状态$upstream_connect_time: 上游服务器连接时间$upstream_header_time: 上游服务器响应头时间$upstream_bytes_sent: 上游服务器发送的字节数$upstream_bytes_received: 上游服务器接收的字节数$time_iso8601: ISO 8601格式的时间$time_local: 本地时间$msec: 毫秒级时间戳#### 自定义日志格式的使用access_log /var/logs/nginx-access.log mainlog_format  main'$remote_addr - $remote_user [$time_local] "$request" ''$status $body_bytes_sent "$http_referer" ''"$http_user_agent" "$http_x_forwarded_for"';注意:如果Nginx位于负载均衡器,nginx反向代理之后,web服务器无法直接获取到客户端真实的IP地址。解决方法:在nginx.conf中添加proxy_set_header X-Forwarded-For $remote_addr;指令。#### 访问日志的配置access_log /var/log/nginx/access.log main;access_log /var/log/nginx/access.log combined;access_log /var/log/nginx/access.log custom;面试时:注意日志里面的ip地址一定要在第一列### error_log 指令#### 错误日志在Nginx中是通过error_log指令实现的。该指令记录服务器和请求处理过程中的错误信息。#### error_log 指令的语法配置错误日志文件的路径和日志级别error_log file [level];Default:	error_log logs/error.log error;#### file 参数指定日志的写入位置#### level 参数指定日志的级别debug: 调试信息info: 一般信息notice: 注意信息warn: 警告信息error: 错误信息crit: 严重错误信息alert: 紧急错误信息emerg: 紧急错误信息#### error_log 指令的示例error_log /var/log/nginx/error.log;error_log /var/log/nginx/error.log info;error_log /var/log/nginx/error.log warn;error_log /var/log/nginx/error.log error;error_log /var/log/nginx/error.log crit;error_log /var/log/nginx/error.log alert;error_log /var/log/nginx/error.log emerg;#### 配置段: http,  server, location作用域。### nginx 日志配置总结#### 访问日志access_log /var/log/nginx/access.log main;access_log /var/log/nginx/access.log combined;access_log /var/log/nginx/access.log custom;#### 错误日志error_log /var/log/nginx/error.log;error_log /var/log/nginx/error.log info;error_log /var/log/nginx/error.log warn;error_log /var/log/nginx/error.log error;error_log /var/log/nginx/error.log crit;error_log /var/log/nginx/error.log alert;error_log /var/log/nginx/error.log emerg;#### 日志格式log_format main '$remote_addr - $remote_user [$time_local] "$request" ''$status $body_bytes_sent "$http_referer" ''"$http_user_agent" "$http_x_forwarded_for"';log_format combined '$remote_addr - $remote_user [$time_local] "$request" ''$status $body_bytes_sent "$http_referer" ''"$http_user_agent" "$http_x_forwarded_for"';log_format custom '$remote_addr - $remote_user [$time_local] "$request" ''$status $body_bytes_sent "$http_referer" ''"$http_user_agent" "$http_x_forwarded_for"';
## nginx 的平滑升级### 什么是平滑升级#### 平滑升级是指在不影响用户访问的情况下,对Nginx进行升级和配置修改。#### 平滑升级可以避免服务中断和用户请求丢失。### 平滑升级的实现方式#### 1. 使用nginx -s reload命令##### nginx -s reload命令用于重新加载Nginx配置文件,并且不影响正在进行的连接。##### 该命令会先将新的配置文件加载到内存中,然后再关闭旧的工作进程,最后启动新的工作进程。#### 2. 使用nginx -s reopen命令##### nginx -s reopen命令用于重新打开Nginx日志文件,并且不影响正在进行的连接。##### 该命令会先关闭旧的日志文件,然后再打开新的日志文件。#### 3. 使用nginx -t命令##### nginx -t命令用于测试Nginx配置文件的语法是否正确,并且不影响正在进行的连接。##### 该命令会先检查配置文件的语法,然后再检查配置文件中的路径是否存在。### nginx 错误页面配置#### 1. 错误页面的配置##### error_page指令用于配置错误页面##### error_page指令的语法格式如下:error_page code [code ...] uri;##### error_page指令的参数code: 错误状态码uri: 错误页面的URI##### error_page指令的示例error_page 404 /404.html;error_page 500 502 503 504 /50x.html;#### 2. 错误页面的使用##### 错误页面可以是静态页面,也可以是动态页面##### 静态页面的使用示例server {listen       80;server_name  localhost;location / {root   html; //设置网站根目录index  index.html index.htm; //设置默认首页文件}error_page   404  /404.html; //设置404错误页面location = /40x.html {}error_page   500 502 503 504  /50x.html; //设置50x错误页面location = /50x.html {}}#### 3. 动态页面的使用示例##### 动态页面的使用示例server {listen       80;server_name  localhost;location / {root   html; //设置网站根目录index  index.html index.htm; //设置默认首页文件}error_page   404 /404.php; //设置404错误页面location = /40x.php {root   html; //设置网站根目录index  index.php index.htm; //设置默认首页文件}error_page   500 502 503 504 /50x.php; //设置50x错误页面location = /50x.php {root   html; //设置网站根目录index  index.php index.htm; //设置默认首页文件}}#### 4. 错误页面的重定向##### 错误页面的重定向示例server {listen       80;server_name  localhost;location / {root   html; //设置网站根目录index  index.html index.htm; //设置默认首页文件}error_page   404 /404.php; //设置404错误页面location = /40x.php {return 301 http://www.baidu.com; //设置重定向}error_page   500 502 503 504 /50x.php; //设置50x错误页面location = /50x.php {return 301 http://www.baidu.com; //设置重定向}}
## nginx 流量控制流量限制 (rate-limiting),我们可以用来限制用户在给定时间内HTTP请求的数量。流量限制可以用作安全目的,比如可以减慢暴力密码破解的速率,更常见的情况是该功能被用来保护上游应用服务器不被同时太多用户请求所压垮。### Nginx如何限流Nginx的”流量限制”使用漏桶算法(leaky bucket algorithm),就好比,一个桶口在倒水,桶底在漏水的水桶。如果桶口倒水的速率大于桶底的漏水速率,桶里面的水将会溢出;同样,在请求处理方面,水代表来自客户端的请求,水桶代表根据”先进先出调度算法”(FIFO)等待被处理的请求队列,桶底漏出的水代表离开缓冲区被服务器处理的请求,桶口溢出的水代表被丢弃和不被处理的请求。### 配置基本的限流--ngx_http_limit_req_module模块实现#### “流量限制”配置两个主要的指令,limit_req_zone和limit_req,limit_req_zone指令设置流量限制和内存区域的参数,但实际上并不限制请求速率。所以需要通过添加limit_req指令启用流量限制,应用在特定的location或者server块。(示例中,对于”/login/”的所有请求)。limit_req_zone指令通常在HTTP块中定义,它需要以下三个参数:-Key - 定义应用限制的请求特性。示例中的 Nginx 变量$binary_remote_addr,保存客户端IP地址的二进制形式。-Zone -定义用于存储每个IP地址状态以及被限制请求URL访问频率的内存区域。通过zone=keyword标识区域的名字(自定义),以及冒号后面跟区域大小。16000个IP地址的状态信息,大约需要1MB。-Rate -连接请求。在示例中,速率不能超过每秒1个请求。##### 示例一limit_req_zone $binary_remote_addr zone=mylimit:10m rate=1r/s;upstream myweb {server 192.168.12.149:80 weight=1 max_fails=1 fail_timeout=1;}server {listen 80;server_name localhost;location /login {limit_req zone=mylimit;proxy_pass http://myweb;proxy_set_header Host $host:$server_port;proxy_set_header X-Real-IP $remote_addr;proxy_set_header X-Forwarded-For $proxy_add_x_forwarded_for;}}##### 示例二limit_req_zone $binary_remote_addr zone=mylimit:10m rate=1r/s;upstream myweb {server 192.168.12.149:80 weight=1 max_fails=1 fail_timeout=1;}server {listen 80;server_name localhost;location /login {#limit_req zone=mylimit;limit_req zone=mylimit burst=5;#limit_req zone=mylimit burst=5 nodelay;proxy_pass http://myweb;proxy_set_header Host $host:$server_port;proxy_set_header X-Real-IP $remote_addr;proxy_set_header X-Forwarded-For $proxy_add_x_forwarded_for;}}##### nginx日志字段- limiting requests - 表明日志条目记录的是被“流量限制”请求- excess - 每毫秒超过对应“流量限制”配置的请求数量- zone - 定义实施“流量限制”的区域- client - 发起请求的客户端IP地址- server - 服务器IP地址或主机名- request - 客户端发起的实际HTTP请求- host - HTTP报头中host的值##### 发送到客户端的错误代码一般情况下,客户端超过配置的流量限制时,Nginx响应状态码为503(Service Temporarily Unavailable)。可以使用limit_req_status指令来设置为其它状态码(例如下面的404状态码):limit_req_zone $binary_remote_addr zone=mylimit:10m rate=1r/s;upstream myweb {server 192.168.12.149:80 weight=1 max_fails=1 fail_timeout=1;}server {listen 80;server_name localhost;location /login {limit_req zone=mylimit;limit_req_status 404;proxy_pass http://myweb;proxy_set_header Host $host:$server_port;proxy_set_header X-Real-IP $remote_addr;proxy_set_header X-Forwarded-For $proxy_add_x_forwarded_for;}}
## nginx 访问控制### nginx 访问控制模块基于IP的访问控制:http_access_module基于用户的信任登录:http_auth_basic_module### 基于IP的访问控制http_access_module模块可以限制IP地址的访问权限。可以允许或拒绝特定的IP地址或IP地址范围访问Nginx服务器。#### 配置语法Syntax:allow address | all;default:默认无Context:http,server,locationSyntax:deny address | all;default:默认无Context:http,server,location===================================================allow    允许     //ip或者网段deny    拒绝     //ip或者网段#### 配置测试编辑/etc/nginx/conf.d/access_mod.conf内容如下:[root@192 ~]# vim /etc/nginx/conf.d/access_mod.confserver {listen 80;server_name localhost;location  / {root /usr/share/nginx/html;index index.html index.hml;deny 192.168.12.8;allow all;}}[root@192 ~]# nginx -t[root@192 ~]# nginx -s reload#### #需要注意:1.按顺序匹配,已经被匹配的ip或者网段,后面不再被匹配。2.如果先允许所有ip访问,在定义拒绝访问。那么拒绝访问不生效。3.默认为allow all可以使用IP网段的配置方式,如allow 192.168.12.0/24;,表示满足此网段的IP都可以访问。#### 指定location拒绝所有请求server {listen 80;server_name localhost;location  / {root /usr/share/nginx/html;index index.html index.hml;deny all;    #拒绝所有}}### 基于用户的信任登录http_auth_basic_module模块可以限制用户的访问权限。可以允许或拒绝特定的用户访问Nginx服务器。#### 配置语法Syntax:auth_basic string | off;default:auth_basic off;Context:http,server,locationSyntax:auth_basic_user_file file;default:默认无Context:http,server,locationfile:存储用户名密码信息的文件。#### 配置测试编辑/etc/nginx/conf.d/access_mod.conf内容如下:[root@192 ~]# vim /etc/nginx/conf.d/access_mod.confserver {listen 80;server_name localhost;location  / {root /usr/share/nginx/html;index index.html index.hml;auth_basic "Auth access test!";auth_basic_user_file /etc/nginx/auth_conf;}}[root@192 ~]# mkdir /var/www/html    #创建目录[root@192 ~]# vim /var/www/html/index.html    #创建文件##### auth_basic不为off,开启登录验证功能,auth_basic_user_file加载账号密码文件。#### 建立口令文件[root@192 ~]# yum install -y httpd-tools #htpasswd 是开源 http 服务器 apache httpd 的一个命令工具,用于生成 http 基本认证的密码文件[root@192 ~]# htpasswd -cm /etc/nginx/auth_conf user10 # -c 创建解密文件,-m MD5加密[root@192 ~]# htpasswd -m /etc/nginx/auth_conf user20[root@192 ~]# cat /etc/nginx/auth_conf
## nginx 变量Nginx的配置文件使用语法的就是一门微型的编程语言。既然是编程语言,一般也就少不了“变量”这种东西。### nginx变量简介#### nginx变量是Nginx配置文件中的一个特殊的字符串,用于存储和传递数据。#### nginx变量可以在配置文件中使用,也可以在请求中使用。#### nginx变量的名称以$符号开头,后面跟变量名。#### nginx变量可以是内置变量,也可以是自定义变量。#### 在 Nginx 配置中,变量只能存放一种类型的值,而且也只存在一种类型,那就是字符串类型#### 所有的变量值都可以通过这种方式引用:$变量名### nginx 变量的定义和使用#### nginx中的变量分为两种,自定义变量与内置预定义变量#### 自定义变量##### 自定义变量的定义和使用set $name value;set $name $value;##### 自定义变量的示例set $name "testpm";set $name $remote_addr;#### 内置预定义变量##### 内置预定义变量的定义和使用$variable##### 内置预定义变量的示例$remote_addr: 客户端IP地址$remote_user: 客户端用户名$time_local: 请求时间$request: 请求方法和请求URI$status: 响应状态码$body_bytes_sent: 响应体大小$http_referer: 请求来源地址$http_user_agent: 客户端浏览器信息$http_x_forwarded_for: X-Forwarded-For请求头部字段$request_time: 请求时间
## nginx 监控### nginx的基础监控- 进程监控- 端口监控注意: 这两个是必须要加在zabbix监控,加触发器有问题及时告警。nginx 提供了 ngx_http_stub_status_module.这个模块提供了基本的监控功能### 监控的指标#### 基本活跃指标- Active connections: 当前活动连接数- Accepts: 已接受的连接数- Handled: 已处理的连接数- Requests: 已处理的请求数- Reading: 当前读取请求头的连接数- Writing: 当前发送响应头的连接数- Waiting: 当前处于空闲状态的连接数#### 服务器错误率- 4xx: 客户端错误率- 5xx: 服务器错误率#### 请求处理时间请求处理时间也可以被记录在 access log 中,通过分析 access log,统计请求的平均响应时间。 ----$request_time 变量#### nginx Stub Status 监控- 通过http_stub_status_module模块来实现nginx的监控- 该模块提供了nginx的基本状态信息,包括活动连接数、请求数、处理时间等- 该模块需要在nginx编译时添加--with-http_stub_status_module参数- 该模块需要在nginx配置文件中添加location /stub_status指令- 该模块需要在nginx配置文件中添加allow和deny指令来限制访问##### [root@localhost ~]# vim /etc/nginx/conf.d/status.confserver {listen 80;server_name localhost;location /nginx-status {stub_status     on;access_log      on;}}##### 配置完成后在浏览器中输入http://<本机ip>/nginx-status 查看显示信息##### 访问状态信息Active connections: 1server accepts handled requests2 2 2Reading: 0 Writing: 1 Waiting: 0##### Stub Status 参数说明Active connections: 当前活动连接数server accepts handled requests: 已接受的连接数、已处理的连接数、已处理的请求数Reading: 当前读取请求头的连接数Writing: 当前发送响应头的连接数Waiting: 当前处于空闲状态的连接数#### 基于脚本监控nginx的端口#!/usr/bin/bashcurl -I http://192.168.12.149 &> /dev/nullif [ $? -ne 0 ];thenecho "nginx 未运行,正在启动中..."sleep 1systemctl start nginxecho "正在检查nginx是否启动..."port=`netstat -lntp | grep nginx |awk '{print $4}' | awk -F':' '{print $NF}'`echo "nginx已经启动,端口为: $port"fi
## HTTPS 基本原理### https 介绍#### HTTPS是HTTP协议的安全版本,使用SSL/TLS协议对数据进行加密和解密。#### HTTPS可以保护数据的机密性、完整性和身份验证。#### HTTPS使用SSL/TLS证书来加密数据传输,确保数据在传输过程中不被窃取或篡改。#### HTTPS使用公钥和私钥进行加密和解密,确保数据的安全性。### 加密算法#### 对称加密算法- DES:数据加密标准- AES:高级加密标准- 3DES:三重数据加密标准A要给B发送数据1,A做一个对称密钥2,使用密钥给文件加密3,发送加密以后的文件和钥匙4,B拿钥匙解密#### 非对称加密算法- RSA:Rivest-Shamir-Adleman算法- DSA:数字签名算法- DH:Diffie-Hellman算法A要给B发送数据1.B做一对非对称的密钥2.发送公钥给A3.A拿公钥对数据进行加密4.发送加密后的数据给B5.B拿私钥解密#### 哈希算法- MD5:消息摘要算法- SHA-1:安全哈希算法1- SHA-2:安全哈希算法2将任意长度的信息转换为较短的固定长度的值,通常其长度要比信息小得多。例如:MD5、SHA-1、SHA-2、SHA-256 等#### 数字证书- 数字证书是由数字证书颁发机构(CA)签发的电子文档,用于证明公钥的真实性和合法性。- 数字证书包含了公钥、证书持有者的信息、证书颁发机构的信息、证书的有效期等信息。- 数字证书使用数字签名技术来保证数据的完整性和真实性。签名就是在信息的后面再加上一段内容(信息经过hash后的值),可以证明信息没有被修改过。hash值一般都会加密后(也就是签名)再和信息一起发送,以保证这个hash值不被修改。### HTTPS 协议介绍(图例)#### HTTPS协议的工作原理1. 客户端向服务器发送请求,要求建立安全连接。2. 服务器返回数字证书,包含公钥和证书信息。3. 客户端验证数字证书的合法性。4. 客户端生成随机数,用公钥加密后发送给服务器。5. 服务器使用私钥解密随机数,生成会话密钥。6. 双方使用会话密钥进行数据加密和解密。7. 数据传输完成后,关闭连接。### HTTPS 原理#### HTTP 访问过程1. 客户端向服务器发送请求,要求建立连接。2. 服务器返回响应,包含数据和状态码。3. 客户端接收响应,处理数据。#### HTTP 传输面临的风险有1. 数据被窃取:数据在传输过程中可能被第三方窃取。2. 数据被篡改:数据在传输过程中可能被第三方篡改。3. 身份伪造:第三方可能冒充服务器或客户端进行攻击。#### HTTP和HTTPS的区别1. HTTP是明文传输,HTTPS是加密传输。2. HTTP使用80端口,HTTPS使用443端口。3. HTTP不需要证书,HTTPS需要证书。4. HTTP不安全,HTTPS安全。### CA 机构(证书)#### CA(Certificate Authority)证书颁发机构主要负责证书的颁发、管理以及归档和吊销。证书内包含了拥有证书者的姓名、地址、电子邮件帐号、公钥、证书有效期、发放证书的CA、CA的数字签名等信息。#### 证书主要有三大功能:加密、签名、身份验证。\#### 证书的类型1. 根证书:根证书是由CA机构签发的证书,用于验证其他证书的合法性。2. 中级证书:中级证书是由根证书签发的证书,用于验证其他证书的合法性。3. 服务器证书:服务器证书是由CA机构签发的证书,用于验证服务器的身份。4. 客户端证书:客户端证书是由CA机构签发的证书,用于验证客户端的身份。5. 自签名证书:自签名证书是由自己签发的证书,用于验证自己的身份。6. 商业证书:商业证书是由CA机构签发的证书,用于验证商业网站的身份。7. 免费证书:免费证书是由CA机构签发的证书,用于验证个人网站的身份。#### 证书的申请1. 申请证书:向CA机构申请证书,提供相关信息。2. 验证身份:CA机构验证申请者的身份。3. 签发证书:CA机构签发证书,并发送给申请者。4. 安装证书:将证书安装到服务器上。5. 配置服务器:配置服务器使用HTTPS协议。6. 测试证书:测试证书是否安装成功。7. 更新证书:定期更新证书,确保证书的有效性。#### ssl证书---实战1. 申请ssl证书2. 下载ssl证书3. 上传ssl证书到nginx服务器4. 配置nginx使用ssl证书5. 重启nginx服务6. 测试ssl证书是否安装成功
相关文章:

从0开始一篇文章学习Nginx
Nginx服务 HTTP介绍 ## HTTP协议是Hyper Text Transfer Protocol(超文本传输协议)的缩写,是用于从万维网(WWW:World Wide Web )服务器传输超文本到本地浏览器的传送协议。 ## HTTP工作在 TCP/IP协议体系中的TCP协议上&#…...

Java高级 |【实验八】springboot 使用Websocket
隶属文章:Java高级 | (二十二)Java常用类库-CSDN博客 系列文章:Java高级 | 【实验一】Springboot安装及测试 |最新-CSDN博客 Java高级 | 【实验二】Springboot 控制器类相关注解知识-CSDN博客 Java高级 | 【实验三】Springboot 静…...

scan_mode设计原则
scan_mode设计原则 在进行mtp controller设计时,基本功能设计完成后,需要设计scan_mode设计。 1、在进行scan_mode设计时,需要保证mtp处于standby模式,不会有擦写、编程动作。 2、只需要固定mtp datasheet说明的接口即可…...
设计模式-3 行为型模式
一、观察者模式 1、定义 定义对象之间的一对多的依赖关系,这样当一个对象改变状态时,它的所有依赖项都会自动得到通知和更新。 描述复杂的流程控制 描述多个类或者对象之间怎样互相协作共同完成单个对象都无法单独度完成的任务 它涉及算法与对象间职责…...

qt 双缓冲案例对比
双缓冲 1.双缓冲原理 单缓冲:在paintEvent中直接绘制到屏幕,绘制过程被用户看到 双缓冲:先在redrawBuffer绘制到缓冲区,然后一次性显示完整结果 代码结构 单缓冲:所有绘制逻辑在paintEvent中 双缓冲:绘制…...

2025年全国I卷数学压轴题解答
第19题第3问: b b b 使得存在 t t t, 对于任意的 x x x, 5 cos x − cos ( 5 x t ) < b 5\cos x-\cos(5xt)<b 5cosx−cos(5xt)<b, 求 b b b 的最小值. 解: b b b 的最小值 b m i n min t max x g ( x , t ) b_{min}\min_{t} \max_{x} g(x,t) bmi…...
: 发布订阅模式)
JS设计模式(5): 发布订阅模式
解锁JavaScript发布订阅模式:让代码沟通更优雅 在JavaScript的世界里,我们常常会遇到这样的场景:多个模块之间需要相互通信,但是又不想让它们产生过于紧密的耦合。这时候,发布订阅模式就像一位优雅的信使,…...
实现p2p的webrtc-srs版本
1. 基本知识 1.1 webrtc 一、WebRTC的本质:实时通信的“网络协议栈”类比 将WebRTC类比为Linux网络协议栈极具洞察力,二者在架构设计和功能定位上高度相似: 分层协议栈架构 Linux网络协议栈:从底层物理层到应用层(如…...
)
Android多媒体——音/视频数据播放(十八)
在媒体数据完成解码并准备好之后,播放流程便进入了最终的呈现阶段。为了确保音视频内容能够顺利输出,系统需要首先对相应的播放设备进行初始化。只有在设备初始化成功后,才能真正开始音视频的同步渲染与播放。这一过程不仅影响播放的启动速度,也直接关系到播放的稳定性和用…...

第2篇:BLE 广播与扫描机制详解
本文是《BLE 协议从入门到专家》专栏第二篇,专注于解析 BLE 广播(Advertising)与扫描(Scanning)机制。我们将从协议层结构、广播包格式、设备发现流程、控制器行为、开发者 API、广播冲突与多设备调度等方面,全面拆解这一 BLE 最基础也是最关键的通信机制。 一、什么是 B…...

开源 vGPU 方案:HAMi,实现细粒度 GPU 切分
本文主要分享一个开源的 GPU 虚拟化方案:HAMi,包括如何安装、配置以及使用。 相比于上一篇分享的 TimeSlicing 方案,HAMi 除了 GPU 共享之外还可以实现 GPU core、memory 得限制,保证共享同一 GPU 的各个 Pod 都能拿到足够的资源。…...

EC2安装WebRTC sdk-c环境、构建、编译
1、登录新的ec2实例,证书可以跟之前的实例用一个: ssh -v -i ~/Documents/cert/qa.pem ec2-user70.xxx.165.xxx 2、按照sdk-c demo中readme的描述开始安装环境: https://github.com/awslabs/amazon-kinesis-video-streams-webrtc-sdk-c 2…...

盲盒一番赏小程序:引领盲盒新潮流
在盲盒市场日益火爆的今天,如何才能在众多盲盒产品中脱颖而出?盲盒一番赏小程序给出了答案,它以创新的玩法和优质的服务,引领着盲盒新潮流。 一番赏小程序的最大特色在于其独特的赏品分级制度。赏品分为多个等级,从普…...

边缘计算设备全解析:边缘盒子在各大行业的落地应用场景
随着工业物联网、AI、5G的发展,数据量呈爆炸式增长。但你有没有想过,我们生成的数据,真的都要发回云端处理吗?其实不一定。特别是在一些对响应时间、网络带宽、数据隐私要求高的行业里,边缘计算开始“火”了起来&#…...

Linux实现线程同步的方式有哪些?
什么是线程同步? 想象一下超市收银台:如果所有顾客(线程)同时挤向同一个收银台(共享资源),场面会一片混乱。线程同步就是给顾客们发"排队号码牌",确保: 有序访…...

python打卡day47
昨天代码中注意力热图的部分顺移至今天 知识点回顾: 热力图 作业:对比不同卷积层热图可视化的结果 import torch import torch.nn as nn import torch.optim as optim from torchvision import datasets, transforms from torch.utils.data import D…...
python学习day39
图像数据与显存 知识点回顾 1.图像数据的格式:灰度和彩色数据 2.模型的定义 3.显存占用的4种地方 a.模型参数梯度参数 b.优化器参数 c.数据批量所占显存 d.神经元输出中间状态 4.batchisize和训练的关系 import torch import torchvision import torch.nn as nn imp…...

Ansible+Zabbix-agent2快速实现对多主机监控
ansible Ansible 是一款开源的自动化工具,用于配置管理(Configuration Management)、应用部署(Application Deployment)、任务自动化(Task Automation)和编排(Orchestration…...

年度峰会上,抖音依靠人工智能和搜索功能吸引广告主
上周早些时候举行的第五届年度TikTok World产品峰会上,TikTok推出了一系列旨在增强该应用对广告主吸引力的功能。 新产品列表的首位是TikTok Market Scope,这是一个全新的分析平台,为广告主提供整个考虑漏斗的全面视图,使他们能够…...

Vuex:Vue.js 应用程序的状态管理模式
什么是Vuex? Vuex 是专门为 Vue.js 应用程序开发的状态管理模式 库。它采用集中式存储管理应用的所有组件的状态,并以相应的规则保证状态以一种可预测的方式发生变化。 在大型单页应用中,当多个组件共享状态时,简单的单向数据流…...

【中间件】Web服务、消息队列、缓存与微服务治理:Nginx、Kafka、Redis、Nacos 详解
Nginx 是什么:高性能的HTTP和反向代理Web服务器。怎么用:通过配置文件定义代理规则、负载均衡、静态资源服务等。为什么用:提升Web服务性能、高并发处理、负载均衡和反向代理。优缺点:轻量高效,但动态处理能力较弱&am…...
如何使用CodeRider插件在IDEA中生成代码
一、环境搭建与插件安装 1.1 环境准备 名称要求说明操作系统Windows 11JetBrains IDEIntelliJ IDEA 2025.1.1.1 (Community Edition)硬件配置推荐16GB内存50GB磁盘空间 1.2 插件安装流程 步骤1:市场安装 打开IDEA,进入File → Settings → Plugins搜…...

电脑定时关机工具推荐
软件介绍 本文介绍一款轻量级的电脑自动关机工具,无需安装,使用简单,可满足定时关机需求。 工具简介 这款关机助手是一款无需安装的小型软件,文件体积仅60KB,下载后可直接运行,无需复杂配置。 使用…...

Ubuntu 可执行程序自启动方法
使用 autostart(适用于桌面环境) 适用于 GNOME/KDE 桌面环境(如 Ubuntu 图形界面) 1. 创建 .desktop 文件 sudo vi ~/.config/autostart/my_laser.desktop[Desktop Entry] TypeApplication NameMy Laser Program Execbash -c &…...

Springboot多数据源配置实践
Springboot多数据源配置实践 基本配置文件数据库配置Mapper包Model包Service包中业务代码Mapper XML文件在某些复杂的业务场景中,我们可能需要使用多个数据库来存储和管理不同类型的数据,而不是仅仅依赖于单一数据库。本技术文档将详细介绍如何在 Spring Boot 项目中进行多数…...

第6章:Neo4j数据导入与导出
在实际应用中,数据的导入与导出是使用Neo4j的重要环节。无论是初始数据加载、系统迁移还是数据备份,都需要高效可靠的数据传输机制。本章将详细介绍Neo4j中的各种数据导入与导出方法,帮助读者掌握不同场景下的最佳实践。 6.1 数据导入策略 …...

uni-app学习笔记二十三--交互反馈showToast用法
showToast部分文档位于uniapp官网-->API-->界面:uni.showToast(OBJECT) | uni-app官网 uni.showToast(OBJECT) 用于显示消息提示框 OBJECT参数说明 参数类型必填说明平台差异说明titleString是提示的内容,长度与 icon 取值有关。iconString否图…...

Go爬虫开发学习记录
Go爬虫开发学习记录 基础篇:使用net/http库 Go的标准库net/http提供了完善的HTTP客户端功能,是构建爬虫的基石: package mainimport ("fmt""io""net/http" )func fetchPage(url string) string {// 创建自定…...

前端异步编程全场景解读
前端异步编程是现代Web开发的核心,它解决了浏览器单线程执行带来的UI阻塞问题。以下从多个维度进行深度解析: 一、异步编程的核心概念 JavaScript的执行环境是单线程的,这意味着在同一时间只能执行一个任务。为了不阻塞主线程,J…...
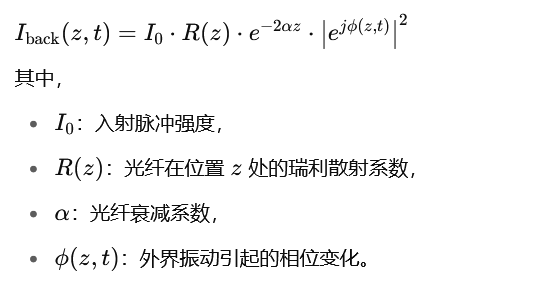
分布式光纤声振传感技术原理与瑞利散射机制解析
分布式光纤传感技术(Distributed Fiber Optic Sensing,简称DFOS)作为近年来迅速发展的新型感知手段,已广泛应用于边界安防、油气管道监测、结构健康诊断、地震探测等领域。其子类技术——分布式光纤声振传感(Distribut…...