react实现markdown
参考:https://blog.csdn.net/Jack_lzx/article/details/118495763
参考:https://blog.csdn.net/m0_48474585/article/details/119742984
0. 示例
用react实现markdown编辑器
1.基本布局及样式
<><div className='tf_editor_header'>头部:放一些编辑工具</div><div className='tf_editor'><div className='edit'>左边:编辑区域</div><div className='show'>右边:展示区域</div></div></>
.tf_editor_header{height: 60px;width: 100%;background-color: #fff;border-bottom:1px solid  rgba(0,0,0,.1);
}.tf_editor{display: flex;flex-direction: row;height: calc(100vh - 60px);width: 100%;.edit{padding: 0.8rem;flex: 1;background-color: #f5f5f5;max-width: 50vw;box-sizing: border-box;border-right: 1px solid  rgba(0,0,0,.1);}.show{padding: 0.8rem;flex: 1;background-color: #fff;max-width: 50vw;box-sizing: border-box;}
}
2.编辑区域
import _ from 'lodash';const [content, setContent] = useState('')const onEditChange = (e) => { const curContent = e.target.valuesetContent(curContent)}<textarea style={{resize: "none"}} onScroll={(e) => handleScroll(1, e)}className='edit' ref={edit}onChange={onEditChange}></textarea>
- 使用textarea实现编辑区域,可以通过下面的css设置去除textarea本身的样式
textarea {border: none;outline: none;padding: 0;margin: 0;-webkit-appearance: none;-moz-appearance: none;appearance: none;background-image: none;background-color: transparent;font-size: inherit;width: 100%;
}
textarea:focus {outline: none;
}
- 添加onChange方法,监听用户的输入事件,并把用户输入的值(e.target.value)保存到content中
3.展示区域
npm i marked
npm i highlight.js
-
安装插件
- marked用于将content渲染成markdown格式的内容
- highlight.js用于实现代码高亮
// 引入import { marked } from 'marked';import hljs from 'highlight.js';import './github-dark.css';// 配置useEffect(() => {// 配置highlighthljs.configure({tabReplace: '',classPrefix: 'hljs-',languages: ['CSS', 'HTML', 'JavaScript', 'Python', 'TypeScript', 'Markdown'],});// 配置markedmarked.setOptions({renderer: new marked.Renderer(),highlight: code => hljs.highlightAuto(code).value,gfm: true, //默认为true。 允许 Git Hub标准的markdown.tables: true, //默认为true。 允许支持表格语法。该选项要求 gfm 为true。breaks: true, //默认为false。 允许回车换行。该选项要求 gfm 为true。});}, []);// 展示<div className='show'dangerouslySetInnerHTML={{__html: marked(content).replace(/<pre>/g, "<pre id='hljs'>"),}}></div>
- 这里(原作者)对样式做了修改,我直接复制过来了(github-dark.css)
#hljs {padding: 12px;color: #c9d1d9;background: #0d1117;border-radius: 12px;box-shadow: 0 0 10px rgba(0, 0, 0, 0.6);
}code {font-family: 'FiraCode';
}/* 代码片段 */
#hljs code {color: #c9d1d9;background: #0d1117;padding: 0;font-size: 16px;
}.hljs-doctag,
.hljs-keyword,
.hljs-meta .hljs-keyword,
.hljs-template-tag,
.hljs-template-variable,
.hljs-type,
.hljs-variable.language_ {/* prettylights-syntax-keyword */color: #ff7b72;
}.hljs-title,
.hljs-title.class_,
.hljs-title.class_.inherited__,
.hljs-title.function_ {/* prettylights-syntax-entity */color: #d2a8ff;
}.hljs-attr,
.hljs-attribute,
.hljs-literal,
.hljs-meta,
.hljs-number,
.hljs-operator,
.hljs-variable,
.hljs-selector-attr,
.hljs-selector-class,
.hljs-selector-id {/* prettylights-syntax-constant */color: #79c0ff;
}.hljs-regexp,
.hljs-string,
.hljs-meta .hljs-string {/* prettylights-syntax-string */color: #a5d6ff;
}.hljs-built_in,
.hljs-symbol {/* prettylights-syntax-variable */color: #ffa657;
}.hljs-comment,
.hljs-code,
.hljs-formula {/* prettylights-syntax-comment */color: #8b949e;
}.hljs-name,
.hljs-quote,
.hljs-selector-tag,
.hljs-selector-pseudo {/* prettylights-syntax-entity-tag */color: #7ee787;
}.hljs-subst {/* prettylights-syntax-storage-modifier-import */color: #c9d1d9;
}.hljs-section {/* prettylights-syntax-markup-heading */color: #1f6feb;font-weight: bold;
}.hljs-bullet {/* prettylights-syntax-markup-list */color: #f2cc60;
}.hljs-emphasis {/* prettylights-syntax-markup-italic */color: #c9d1d9;font-style: italic;
}.hljs-strong {/* prettylights-syntax-markup-bold */color: #c9d1d9;font-weight: bold;
}.hljs-addition {/* prettylights-syntax-markup-inserted */color: #aff5b4;background-color: #033a16;
}.hljs-deletion {/* prettylights-syntax-markup-deleted */color: #ffdcd7;background-color: #67060c;
}/* .hljs-char.escape_,
.hljs-link,
.hljs-params,
.hljs-property,
.hljs-punctuation,
.hljs-tag {} */
4.滚动效果
目标:使得左右两边的滚动能实现联动
  .edit{padding: 0.8rem;flex: 1;background-color: #f5f5f5;max-width: 50vw;box-sizing: border-box;border-right: 1px solid  rgba(0,0,0,.1);overflow: scroll;  // 编辑区域超出区域滚动}.show{padding: 0.8rem;flex: 1;background-color: #fff;max-width: 50vw;box-sizing: border-box;overflow: scroll;  // 展示区域超出区域滚动}// 设置滚动条的样式.edit:focus-visible{outline: 0px solid transparent;}.show{padding: 0.8rem;flex: 1;background-color: #fff;max-width: 50vw;box-sizing: border-box;overflow: scroll;}// 滚动条的样式.show::-webkit-scrollbar {/*滚动条整体样式*/width : 10px;  /*高宽分别对应横竖滚动条的尺寸*/height: 5px;}.show::-webkit-scrollbar-thumb {/*滚动条里面小方块*/border-radius: 10px;background   : #ddd;}.show::-webkit-scrollbar-track {/*滚动条里面轨道*/border-radius: 10px;background   : transparent;}.edit::-webkit-scrollbar {/*滚动条整体样式*/width : 10px;  /*高宽分别对应横竖滚动条的尺寸*/height: 5px;}.edit::-webkit-scrollbar-thumb {/*滚动条里面小方块*/border-radius: 10px;background   : #ddd;}.edit::-webkit-scrollbar-track {/*滚动条里面轨道*/border-radius: 10px;background   : transparent;}
}
- 上面的css用于设置滚动条的样式,并设置展示区和编辑区超出范围能滚动
// 左边编辑区触发事件
onScroll={(e) => handleScroll(1, e)}
// 右边编辑区触发事件
onScroll={(e) => handleScroll(2, e)}const edit = useRef()
const show = useRef()// 展示区与代码区同步滚动
const handleScroll = (block, event) => {let { scrollHeight, scrollTop, clientHeight } = event.targetlet scale = scrollTop / (scrollHeight - clientHeight)  if(block === 1) {  driveScroll(scale, show.current)  } else if(block === 2) {   driveScroll(scale, edit.current)}
}
// 驱动一个元素进行滚动
const driveScroll = (scale, el) => {let { scrollHeight, clientHeight } = elel.scrollTop = (scrollHeight - clientHeight) * scale  // scrollTop的同比例滚动
}-
以编辑区域为例,当前滚动的长度可以用scrollTop获取,那他滚动到底部,即scrollTop的最大值为scrollHeight-clientHeight。我们计算 当前滚动值 与 最大滚动值的比例,即
scale = scrollTop / (scrollHeight - clientHeight)
-
再来计算展示区域,展示区域的当前滚动值 与 最大滚动值的比例(scale)应该与编辑区域的比例相同,那么它当前的滚动长度应该设置为scrollTop = scale * (scrollHeight - clientHeight)
问题:上面的写法会有一个问题,如果你在handleScroll方法中输出block的值,就会发现block的值一直在切换 block 1, block 2, block 1, block 2,block 1, block 2 …
const handleScroll = (block, event) => {console.log('block', block). // 输出block的值let { scrollHeight, scrollTop, clientHeight } = event.targetlet scale = scrollTop / (scrollHeight - clientHeight) if(block === 1) { driveScroll(scale, show.current) } else if(block === 2) { driveScroll(scale, edit.current)}}
原因:这是因为当你主动触发了block 1的滚动事件,他会令block 2发生滚动,也就是被动触发了block 2 的滚动事件,
解决:用一个变量记录手动触发的是那个区域,这个变量有三种状态:没触发(初始状态),触发了左边的编辑区域,触发了右边的预览区域。分为以下两个步骤
- 1.手动触发某个区域后需要将这个变量设置为对应的值。(手动触发前的变量值必须是初始状态)
let scrolling = useRef(0) // 记录当前滚动的是哪一个区域,1为编辑区域,2为展示区域
// 展示区与代码区同步滚动
const handleScroll = (block, event) => {let { scrollHeight, scrollTop, clientHeight } = event.targetlet scale = scrollTop / (scrollHeight - clientHeight)  // 改进后的计算滚动比例的方法if(block === 1) {if(scrolling.current === 0) scrolling.current = 1;  if(scrolling.current === 2) return;    driveScroll(scale, show.current)  } else if(block === 2) {  if(scrolling.current === 0) scrolling.current = 2;if(scrolling.current === 1) return;    driveScroll(scale, edit.current)}
}
- 2.将变量重置为初始状态。这里使用了一个定时器,设定的滚动时间是200ms,滚动结束后将变量初始化。
let scrollTimer = useRef(null) // 记录滚动定时器
// 驱动一个元素进行滚动
const driveScroll = (scale, el) => {let { scrollHeight, clientHeight } = elel.scrollTop = (scrollHeight - clientHeight) * scale  // scrollTop的同比例滚动if(scrollTimer.current) clearTimeout(scrollTimer.current);scrollTimer.current = setTimeout(() => {scrolling.current = 0   clearTimeout(scrollTimer.current)}, 200)
}
5.工具栏
样式参考csdn的编辑器
目标:实现加粗功能
实现方式:在选中文字的前后加上**
步骤一:为加粗的按钮绑定加粗方法
<div className='operation_item' onClick={() => { addMark('****')}}><BoldOutlined />加粗
</div>
步骤二:光标的位置可以从textarea上读取,textarea自带光标开始和结束的属性:selectionStart,selectionEnd
const addMark = (mark) =>{const begin = edit.current.selectionStart // 光标开始点const end = edit.current.selectionEnd // 光标结束let mid = mark.length / 2 // 比如mark为****,需要在选中字符串前面加上两个**,后面加上两个**const newValue = (content.slice(0, begin) + mark.slice(0, mid) +content.slice(begin, end) + mark.slice(mid) + content.slice(end))edit.current.value = newValue // 设置textarea中的值edit.current.setSelectionRange(begin + mid, end + mid) // 设置光标的位置edit.current.focus() setContent(newValue) // 更新content的值}
- 选中的字符串为content.slice(begin, end),在选中的字符串左右拼接上mark.slice(0, mid)和mark.slice(mid)
- 光标的位置设置为 edit.current.setSelectionRange(begin + mid, end + mid) // 设置光标的位置,可以举个例子:1,(光标开始),2,3,(光标结束),4,5,然后在2,3左右分别加上两个字符,那就变成了1,字符,字符,(光标开始),2,3,(光标结束),字符,字符,4,5。可以看到光标开始的位置变为begin + mid,光标结束的位置也是end + mid
步骤三:还需要实现按键加粗的功能,在textarea上绑定onKeyDown事件,当监听到按下command+b或者contrl+b时候,调用加粗方法
<textarea style={{resize: "none"}} onScroll={(e) => handleScroll(1, e)}className='edit' ref={edit}onChange={onEditChange}onKeyDown={onKeyDown}></textarea>const onKeyDown = (e) => {if ((e.ctrlKey || e.metaKey) && e.key === 'b') {addMark('****')}
}
步骤四:找到这种规律之后可以把类似的功能都做了,代码上需要做一些细节上的修改
- 像加粗,斜体,删除线这种是在选中字符的左右加上标记,像标题,无序,有序这种是在选中字符的左边加上标记,我这里通过OPERATIONTYPE变量进行了区分
- 鼠标按键需要阻止默认事件
<div className='operation_item' onClick={() => { addMark('****')}}><BoldOutlined />加粗
</div>
<div className='operation_item' onClick={() => { addMark('**')}}><ItalicOutlined />斜体
</div>
<div className='operation_item' onClick={() => { addMark('# ', OPERATIONTYPE.LEFT)}}><BoldOutlined />标题
</div>
<div className='operation_item' onClick={() => { addMark('~~')}}><StrikethroughOutlined />删除线
</div>
<div className='operation_item' onClick={() => { addMark('- ', OPERATIONTYPE.LEFT)}}><UnorderedListOutlined />无序
</div>
<div className='operation_item'onClick={() => { addMark('1. ', OPERATIONTYPE.LEFT)}}><OrderedListOutlined />有序
</div>const OPERATIONTYPE = {BETWEEN: 'between',LEFT: 'left',
}const addMark = (mark, type = OPERATIONTYPE.BETWEEN) =>{const begin = edit.current.selectionStart  // 光标开始点const end = edit.current.selectionEnd // 光标结束let mid = 0let newValue = ''switch(type){case OPERATIONTYPE.BETWEEN:mid = mark.length / 2 // 比如mark为****,需要在选中字符串前面加上两个**,后面加上newValue = (content.slice(0, begin) + mark.slice(0, mid) +content.slice(begin, end) + mark.slice(mid) +  content.slice(end));breakcase OPERATIONTYPE.LEFT:mid = mark.lengthnewValue = (content.slice(0, begin) + mark.slice(0, mid) +content.slice(begin, end) +  content.slice(end));break}edit.current.value = newValue // 设置textarea中的值edit.current.setSelectionRange(begin + mid, end + mid) // 设置光标的位置edit.current.focus() setContent(newValue) // 更新content的值
}const onKeyDown = (e) => {if ((e.ctrlKey || e.metaKey)) {e.preventDefault()switch(e.key){case 'b':addMark('****')breakcase 'i':addMark('**')breakcase '1':addMark('# ', OPERATIONTYPE.LEFT)breakcase '2':addMark('## ', OPERATIONTYPE.LEFT)breakcase '3':addMark('### ', OPERATIONTYPE.LEFT)breakcase '4':addMark('#### ', OPERATIONTYPE.LEFT)breakcase '5':addMark('##### ', OPERATIONTYPE.LEFT)breakcase '6':addMark('###### ', OPERATIONTYPE.LEFT)break}}
}
步骤五:选中文字再次点击应该去除之前添加的字符,这里我对addMark方法进行了改造,当需要添加的字符和本身选中字符串左右两边的字符相同时,去除这些字符
- 这里有个小细节点:当去除字符时的mid值应该取反,因为去除字符后光标会左移
// 传入增加的元素,操作类型const addMark = (mark, type = OPERATIONTYPE.BETWEEN) =>{const begin = edit.current.selectionStart // 光标开始点const end = edit.current.selectionEnd // 光标结束let mid = 0let newValue = ''switch(type){case OPERATIONTYPE.BETWEEN:mid = mark.length / 2 // 比如mark为****,需要在选中字符串前面加上两个**,后面加上两个**// 增加取消的功能if(content.slice(begin - mid, begin) === mark.slice(0, mid) && content.slice(end , end + mid) === mark.slice(mid)){newValue = (content.slice(0, begin - mid) +content.slice(begin, end) + content.slice(end + mid));mid = - mid}else{mid = mark.length / 2 // 比如mark为****,需要在选中字符串前面加上两个**,后面加上两个**newValue = (content.slice(0, begin) + mark.slice(0, mid) +content.slice(begin, end) + mark.slice(mid) + content.slice(end));}breakcase OPERATIONTYPE.LEFT:mid = mark.lengthif(content.slice(begin - mid, begin) === mark){newValue = (content.slice(0, begin - mid) +content.slice(begin, end) + content.slice(end));mid = - mid}else{newValue = (content.slice(0, begin) + mark.slice(0, mid) +content.slice(begin, end) + content.slice(end));}break}edit.current.value = newValue // 设置textarea中的值edit.current.setSelectionRange(begin + mid, end + mid) // 设置光标的位置edit.current.focus() setContent(newValue) // 更新content的值}
步骤六:需要处理一下Tab键的缩进
- 这里我设置了一个常量TABINDENT,用于设置Tab缩进的空格数
- 并定义了一个获取textarea相关信息的方法getTextareaInfo
- 当监听到用户按下tab键时,在当前行前面加上相应的空格数
  const TABINDENT = 2 // 缩进个数const getTextareaInfo = (textarea, textContent) => {let cursorPositionStart = textarea.selectionStart // 光标开始的位置let cursorPositionEnd = textarea.selectionEnd// 光标开始的位置let cursorLineIndex = textContent.substring(0, cursorPositionStart).split('\n').length - 1 // 光标所在行的indexlet textLineArray = textContent.split('\n') // 将每行切割成数组let cursorLineContent = textLineArray[cursorLineIndex] // 光标所在行的内容return {cursorPositionStart,cursorPositionEnd,cursorLineIndex,textLineArray,cursorLineContent}}const onKeyDown = (e) => {// tab键if(e.key === 'Tab'){e.preventDefault()// 需要将光标所在行的前面添加上空格const {cursorLineIndex, textLineArray, cursorPositionStart, cursorPositionEnd} = getTextareaInfo(edit.current, content)// 缩进for(let i = 0; i < TABINDENT;i ++){textLineArray[cursorLineIndex] = ' ' + textLineArray[cursorLineIndex]}const newValue = textLineArray.join('\n')edit.current.value = newValue // 设置textarea中的值let len = 0for(let i = 0; i < cursorLineIndex; i++){len += textLineArray[i].length}edit.current.setSelectionRange(cursorPositionStart + TABINDENT, cursorPositionEnd + TABINDENT) // 设置光标的位置edit.current.focus() setContent(newValue) // 更新content的值}// 快捷键if ((e.ctrlKey || e.metaKey)) {e.preventDefault()switch(e.key){case 'b':addMark('****')breakcase 'i':addMark('**')breakcase '1':addMark('# ', OPERATIONTYPE.LEFT)breakcase '2':addMark('## ', OPERATIONTYPE.LEFT)breakcase '3':addMark('### ', OPERATIONTYPE.LEFT)breakcase '4':addMark('#### ', OPERATIONTYPE.LEFT)breakcase '5':addMark('##### ', OPERATIONTYPE.LEFT)breakcase '6':addMark('###### ', OPERATIONTYPE.LEFT)break}}
}
优化了一下,如果选中的是多行,应该多行都缩进
- 修改了getTextareaInfo方法,把结束行的信息也返回了
- 把之前写在e.key === 'Tab’条件下的内容抽到了一个单独的方法,按下tab时给选中项的每一行都加上了缩进。(关键代码是这个循环:let line = cursorLineIndexStart; line <= cursorLineIndexEnd; line++ )
const getTextareaInfo = (textarea, textContent) => {let cursorPositionStart = textarea.selectionStart // 光标开始的位置let cursorPositionEnd = textarea.selectionEnd// 光标开始的位置let cursorLineIndexStart = textContent.substring(0, cursorPositionStart).split('\n').length - 1 // 光标开始行的indexlet cursorLineIndexEnd = textContent.substring(0, cursorPositionEnd).split('\n').length - 1 // 光标开始行的indexlet textLineArray = textContent.split('\n') // 将每行切割成数组return {cursorPositionStart,cursorPositionEnd,cursorLineIndexStart,cursorLineIndexEnd,textLineArray,}
}const handleTab = () => {// 需要将光标所在行的前面添加上空格const {cursorLineIndexStart, cursorLineIndexEnd, textLineArray, cursorPositionStart, cursorPositionEnd} = getTextareaInfo(edit.current, content)// 缩进for(let line = cursorLineIndexStart; line <= cursorLineIndexEnd; line++ ){for(let i = 0; i < TABINDENT;i ++){textLineArray[line] = ' ' + textLineArray[line]}}const newValue = textLineArray.join('\n')edit.current.value = newValue // 设置textarea中的值let len = 0for(let i = 0; i < cursorLineIndexStart; i++){len += textLineArray[i].length}edit.current.setSelectionRange(cursorPositionStart + TABINDENT, cursorPositionEnd + (cursorLineIndexEnd - cursorLineIndexStart + 1) * TABINDENT) // 设置光标edit.current.focus() setContent(newValue) // 更新content的值
}
步骤七:突然想起来一个功能:按下command/contrl+x时应该删除这一行,我在写代码的时候经常用
- 编写handleShear方法,把选中的行都删除
const handleShear = () => {// 需要将光标所在行的前面添加上空格const {cursorLineIndexStart, cursorLineIndexEnd, textLineArray, cursorPositionStart} = getTextareaInfo(edit.current, content)const newTextLineArray = textLineArray.slice(0, cursorLineIndexStart).concat(textLineArray.slice(cursorLineIndexEnd + 1))const newValue = newTextLineArray.join('\n')edit.current.value = newValue // 设置textarea中的值let len = 0for(let i = 0; i < cursorLineIndexStart; i++){len += textLineArray[i].length}edit.current.setSelectionRange(cursorPositionStart, cursorPositionStart) // 设置光标的位置edit.current.focus() setContent(newValue) // 更新content的值
}
既然实现了剪切,那肯定要粘贴(在handleShear方法复制即可)
// 安装:
npm i --save copy-to-clipboard// 使用:
copy(textLineArray.slice(cursorLineIndexStart, cursorLineIndexEnd).join('\n'));
那顺便实现一下复制粘贴的功能吧
// 复制方法command/contrl+cconst handleCopy = () => {// 需要将光标所在行的前面添加上空格const {cursorLineIndexStart, cursorLineIndexEnd, textLineArray} = getTextareaInfo(edit.current, content)copy(textLineArray.slice(cursorLineIndexStart, cursorLineIndexEnd).join('\n'));}// 粘贴方法command/contrl+vconst handlePaste = async () => {const coptText = await navigator.clipboard.readText()// 需要将光标所在行的前面添加上空格const {cursorPositionStart, cursorPositionEnd} = getTextareaInfo(edit.current, content)const newValue = content.slice(0, cursorPositionStart) + coptText + content.slice(cursorPositionEnd)edit.current.value = newValue // 设置textarea中的值edit.current.setSelectionRange(cursorPositionStart, cursorPositionStart + coptText.length) // 设置光标的位置edit.current.focus() setContent(newValue) // 更新content的值}
对了,还有回车,如果上面是列表,回车的时候也需要是列表
const handleEnter = (e) => {// 其实只要上一行有没有-开头或者1.开头就好了// 需要将光标所在行的前面添加上空格const {cursorLineIndexStart, cursorPositionEnd, textLineArray, cursorPositionStart} = getTextareaInfo(edit.current, content)const preLine = textLineArray[cursorLineIndexStart]console.log(preLine)if(preLine.indexOf('- ') === 0){e.preventDefault()const newValue = edit.current.value + '\n- 'edit.current.value = newValue// 设置textarea中的值edit.current.setSelectionRange(cursorPositionEnd + 3, cursorPositionEnd + 3) // 设置光标的位置edit.current.focus() setContent(newValue) // 更新content的值}else if(/^\d+\. /.test(preLine)){const num = preLine.match(/^\d+/)[0]e.preventDefault()const newValue = edit.current.value + `\n${Number(num)+1}. ` edit.current.value = newValue// 设置textarea中的值edit.current.setSelectionRange(cursorPositionEnd + 3 + num.length, cursorPositionEnd + 3 + num.length) // 设置光标的位置edit.current.focus() setContent(newValue) // 更新content的值}}
忘了还有全选!(command/contrl+a)
const handleSelectAll = () => {// 需要将光标所在行的前面添加上空格edit.current.setSelectionRange(0, content.length) // 设置光标的位置edit.current.focus() }
6.添加图片
图片上传部分我参考csdn,做了一个弹窗,分上传图片tab和添加链接tab,弹窗部分自由实现呀~
弹窗的功能主要是点击确定后把上传图片的链接 或 添加的链接抛出来,然后拼接到内容上就行
const [addImgModalVisible, setAddImgModalVisible] = useState(false)<AddImageModal visible={addImgModalVisible} setVisible={setAddImgModalVisible} saveUrl={saveUrl}/>const saveUrl = (url, callback) => {const {cursorPositionStart, cursorPositionEnd} = getTextareaInfo(edit.current, content)const newValue = content.slice(0, cursorPositionStart) + `` + content.slice(cursorPositionEnd)edit.current.value = newValue// 设置textarea中的值edit.current.setSelectionRange(cursorPositionEnd + 13, cursorPositionEnd + 13 + url.length) // 设置光标的位置edit.current.focus() setContent(newValue) // 更新content的值// 把url的地址拼接到开始光标的位置即可callback && callback()
}11
7.其他问题
一:文章内容刷新之后会消失!我使用的是localstroage存储,有更好的方法可以告知我哦
- 添加一个暂存按钮
- 初始化的时候如果localStorage有存储,则直接把值设置上去
- 在发布文章之后记得把localStorage的值清空哈(window.localStorage.removeItem(STAGINGPOST))
const STAGINGPOST = "stagingpost"useEffect(() => {let stagingpost = window.localStorage.getItem(STAGINGPOST)if(stagingpost){edit.current.value = stagingpost// 设置textarea中的值setContent(stagingpost) // 更新content的值}},[])<Button onClick={() => {window.localStorage.setItem(STAGINGPOST, content)message.success('暂存成功')
}}>暂存</Button>
二:把编辑器组件抽取成单独的方法,实现内容发布的功能
- 主要使用了useImperativeHandle和forwardRef
- 使用forwardRef包裹你写的这个组件,然后把相关的内容暴露出去
import {useImperativeHandle, forwardRef } from 'react';const Editor = forwardRef((props, ref) => {
...useImperativeHandle(ref, () => ({edit,show,content,setContent}))
...
}
- 父组件在调用时的使用方法如下:
const EditorRef = useRef()// 调用的话使用这种写法:EditorRef.current.edit/EditorRef.current.show/EditorRef.current.content/EditorRef.current.setContent<Editor ref={EditorRef} extraOperation={extraOperation}/>
对了,得把添加图片弹框的逻辑也抽取出来哦~
还会持续优化的哦,后面的内容还在开发学习中…
相关文章:

react实现markdown
参考:https://blog.csdn.net/Jack_lzx/article/details/118495763 参考:https://blog.csdn.net/m0_48474585/article/details/119742984 0. 示例 用react实现markdown编辑器 1.基本布局及样式 <><div classNametf_editor_header>头部&…...

HTTP请求走私漏洞简单分析
文章目录 HTTP请求走私漏洞的产生HTTP请求走私漏洞的分类HTTP请求走私攻击的危害确认HTTP请求走私漏洞通过时间延迟技术确认CL漏洞通过时间延迟技术寻找TE.CL漏洞 使用差异响应内容确认漏洞通过差异响应确认CL.TE漏洞通过差异响应确认TE.CL漏洞 请求走私漏洞的利用通过请求漏洞…...
BI-SQL丨两表差异比较
BOSS:哎,白茶,我们最近新上了一个系统,后续有一些数据要进行源切换,这个能整么? 白茶:没问题,可以整! BOSS:哦,对了,差点忘记告诉你了…...

ZooKeeper 选举的过半机制防止脑裂
结论: Zookeeper采用过半选举机制,防止了脑裂。 原因: 如果有5台节点,leader联系不上了,其他4个节点由于超过半数,所以又选出了一个leader,当失联的leader恢复网络时,发现集群中已…...
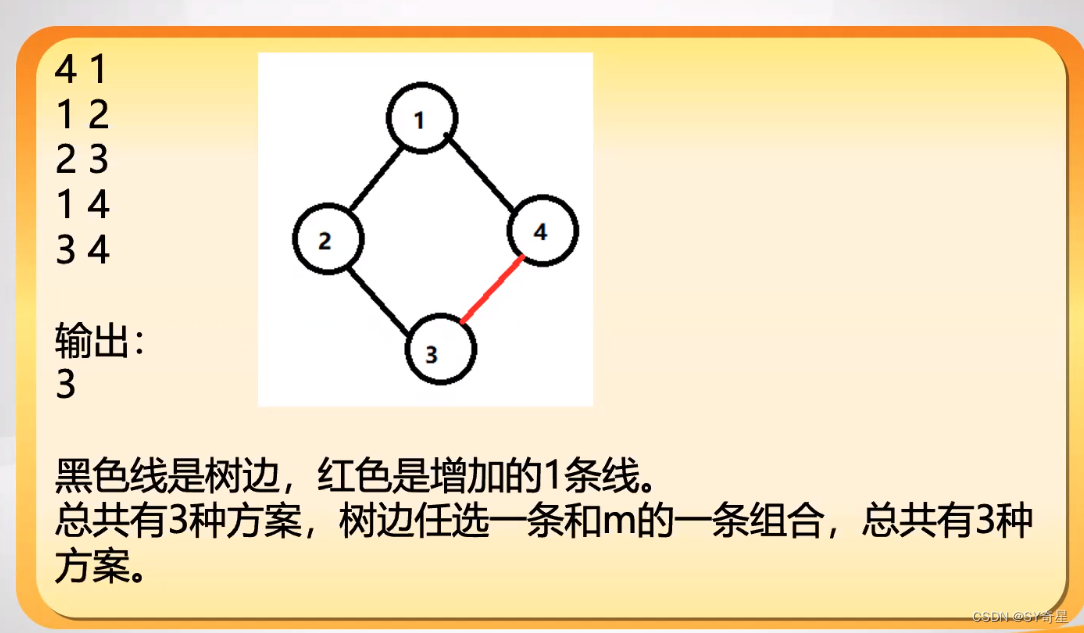
【图论】树上差分(边差分)
一.简介 其实点差分和边差分区别不大。 点差分中,d数组存储的是树上的节点 边差分中,d数组存储的是当前节点到父节点的那条边的差分值。 指定注意的是:边差分中因为根连的父节点是虚点,所以遍历结果时应当忽略! 二…...
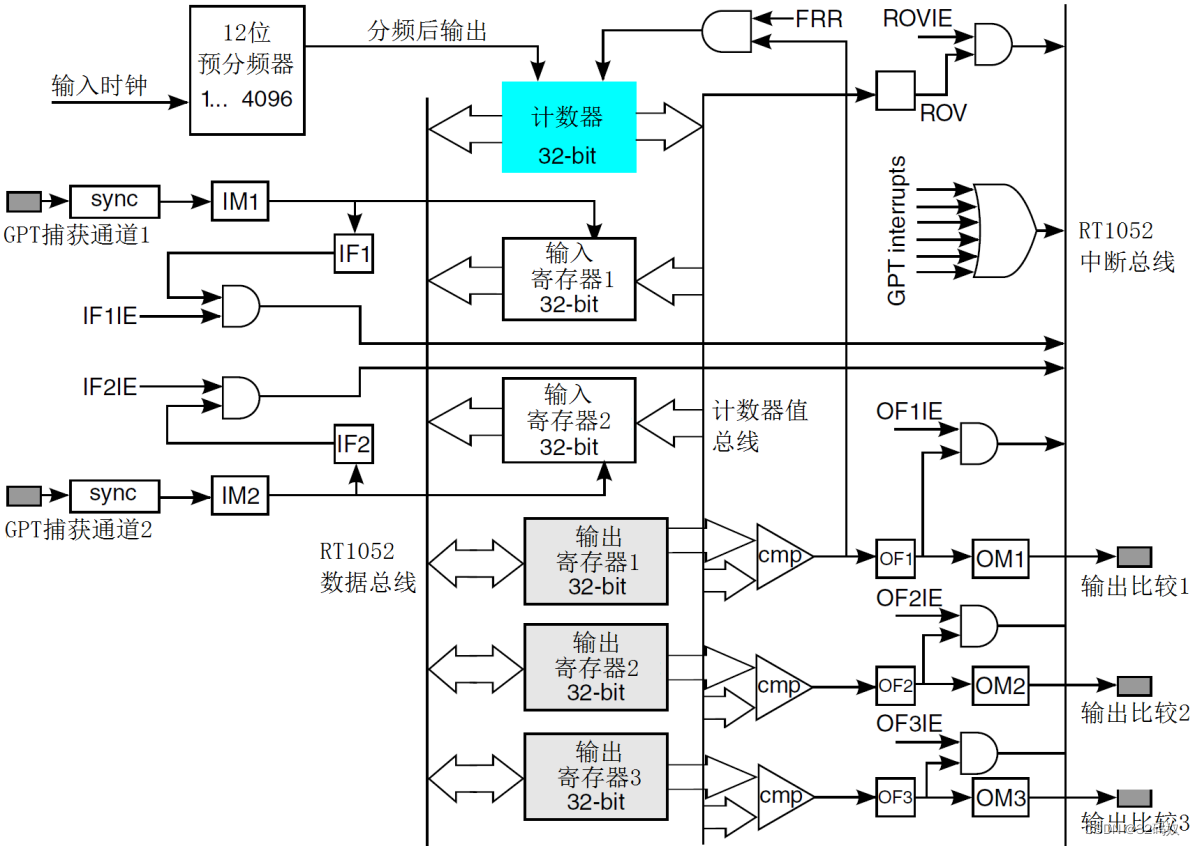
RT1052的定时器
文章目录 1 通用定时器1.1 定时器框图1.2 实现周期性中断 2 相关寄存器3 定时器配置3.1 时钟使能3.2 初始化GPT1定时器3.2.1 base3.2.2 initConfig3.2.2.1 clockSorce3.2.2.2 divider3.2.2.3 enablexxxxx 3.3 设置 GPT1 比较值3.3.1 base3.3.2 channel3.3.3 value 3.4 设置 GPT…...
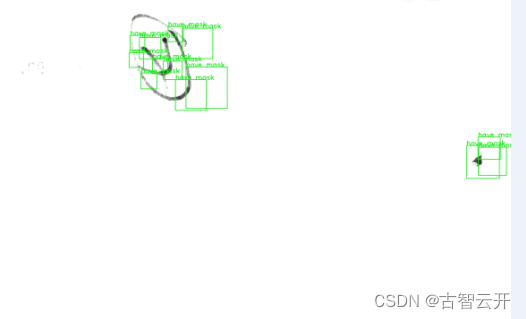
opencv python 训练自己的分类器
源码下载 一、分类器制作 1.样本准备 收集好你所需的正样本,和负样本,分别保存在不同文件夹 在pycharm新建项目,项目结构如下:has_mask文件夹放置正样本,no_mask文件夹放置负样本 安装opencv,把opencv包…...
详解Mybatis之分页插件【PageHelper】
编译软件:IntelliJ IDEA 2019.2.4 x64 操作系统:win10 x64 位 家庭版 Maven版本:apache-maven-3.6.3 Mybatis版本:3.5.6 文章目录 一. 什么是分页?二. 为什么使用分页?三. 如何设计一个Page类(分…...
【基于矢量射线的衍射积分 (VRBDI)】基于矢量射线的衍射积分 (VRBDI) 和仿真工具(Matlab代码实现)
💥💥💞💞欢迎来到本博客❤️❤️💥💥 🏆博主优势:🌞🌞🌞博客内容尽量做到思维缜密,逻辑清晰,为了方便读者。 ⛳️座右铭&a…...

基于jackson对bean的序列号和反序列化
通过观察控制台输出的SQL发现页面传递过来的员工id的值和数据库中的id值不一致,这是怎么回事呢? 分页查询时服务端响应给页面的数据中id的值为19位数字,类型为long 页面中js处理long型数字只能精确到前16位,所以最终通过ajax请求提交给服务…...

排队理论简介
排队理论简介 1. 理论背景2. 研究的数学方法3. 拒绝型排队系统与等候型排队系统4. 拒绝型排队系统 本文参考文献为Вентцель Е. С.的《Исследование операций》。 1. 理论背景 排队理论又称大众服务理论,顾名思义指的是在有限的服务条…...
-算法分析)
极速查找(3)-算法分析
篇前小言 本篇文章是对查找(2)的续讲二叉排序树 二叉排序树(Binary Search Tree,BST),又称为二叉查找树,是一种特殊的二叉树。性质: 左子树的节点值小于根节点的值,右…...

http 常见的响应状态码 ?
100——客户必须继续发出请求101——客户要求服务器根据请求转换HTTP协议版本200——交易成功201——提示知道新文件的URL202——接受和处理、但处理未完成203——返回信息不确定或不完整204——请求收到,但返回信息为空205——服务器完成了请求,用户代理…...
机器学习笔记之优化算法(四)线搜索方法(步长角度;非精确搜索)
机器学习笔记之优化算法——线搜索方法[步长角度,非精确搜索] 引言回顾:精确搜索步长及其弊端非精确搜索近似求解最优步长的条件反例论述 引言 上一节介绍了从精确搜索的步长角度观察了线搜索方法,本节将从非精确搜索的步长角度重新观察线搜…...
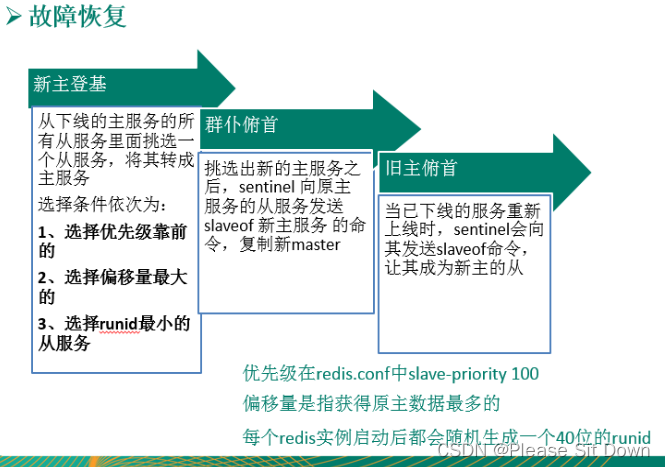
Redis 哨兵 (sentinel)
是什么 官网理论:https://redis.io/docs/management/sentinel/ 吹哨人巡查监控后台 master 主机是否故障,如果故障了根据投票数自动将某一个从库转换为新主库,继续对外服务。 作用:无人值守运维 哨兵的作用: 1…...

统计2021年10月每个退货率不大于0.5的商品各项指标
统计2021年10月每个退货率不大于0.5的商品各项指标_牛客题霸_牛客网s mysql(ifnull): select product_id, format(ifnull(sum(if_click)/nullif(count(*),0),0),3) as ctr, format(ifnull(sum(if_cart)/nullif(sum(if_click),0),0),3) as c…...
【小波尺度谱】从分段离散小波变换计算小波尺度谱研究(Matlab代码实现)
💥💥💞💞欢迎来到本博客❤️❤️💥💥 🏆博主优势:🌞🌞🌞博客内容尽量做到思维缜密,逻辑清晰,为了方便读者。 ⛳️座右铭&a…...
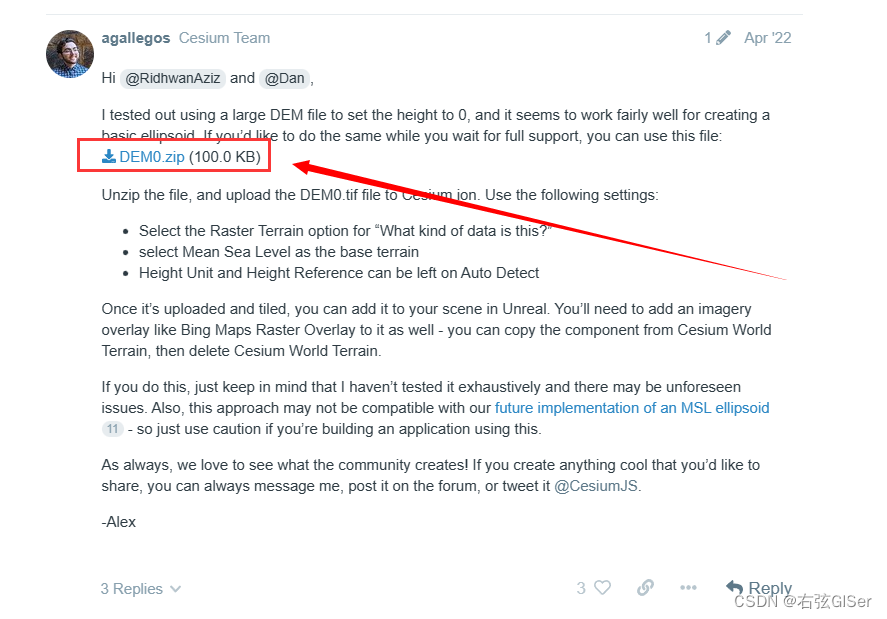
UE5、CesiumForUnreal加载无高度地形
文章目录 1.实现目标2.实现过程3.参考资料1.实现目标 在UE5中,CesiumForUnreal插件默认的地形都是带高度的,这里加载没有高度的地形,即大地高程为0,GIF动图如下: 2.实现过程 参考官方的教程,下载无高度的DEM,再切片加载到UE中。 (1)下载无高度地形DEM0。 在官方帖子…...

关于Spring中的@Configuration中的proxyBeanMethods属性
Configuration的proxyBeanMethods属性 在Configuration注解中,有两个属性: value配置Bean名称proxyBeanMethos,默认是true 这个proxyBeanMethods的默认属性是true。 直接说:当Configuration注解的proxyBeanMeathods属性是true…...

dp1,ACM暑期培训
D - 摆花 P1077 [NOIP2012 普及组] 摆花 - 洛谷 | 计算机科学教育新生态 (luogu.com.cn) Description 小明的花店新开张,为了吸引顾客,他想在花店的门口摆上一排花,共 m 盆。通过调查顾客的喜好,小明列出了顾客最喜欢的 n 种花&…...

C#基于TCP通信协议的实现示例
1. 客户端代码(TCpClient/Program.cs)该代码实现了一个基础的 TCP 客户端程序,核心逻辑是与指定 IP 和端口的 TCP 服务器建立连接,向服务器发送控制台输入的字符串数据,并接收服务器的响应数据,最后释放连接…...

CapyMOA:Python流式机器学习框架,高效应对概念漂移与在线持续学习
1. 项目概述:为什么我们需要CapyMOA?在现实世界的机器学习应用中,数据很少是静止不动的。想象一下,你正在构建一个金融欺诈检测系统,攻击者的策略会随时间不断演变;或者是一个工业物联网传感器监控平台&…...

深入理解Java String不可变性
前言 在现代软件开发中,深入理解Java String不可变性是一个非常重要的技术点。本文将从原理到实践,带你深入理解这一技术,并通过完整的代码示例帮助你快速掌握核心知识点。 核心概念 基本原理 深入理解Java String不可变性的核心在于理解其底…...

FPG平台:监管合规体系的扎实构建
FPG平台:监管合规体系的扎实构建金融服务的核心是信任,而信任的建立需要在多个细节上保持持续的投入。FPG平台在合规、技术、服务、教育等方向上的实践,为客户提供了一个较为可靠的服务环境。本文从评测视角对其进行系统性的观察,…...

ZygiskFrida:安卓逆向中基于Zygote的零感知Frida注入方案
1. 这不是“又一个 Frida 注入工具”,而是安卓逆向工作流的物理层重构你有没有过这样的经历:在一台已 root 的测试机上调试某个金融类 App,想 hook 它的 SSL Pinning 检查逻辑,结果 Frida Server 启动失败;换用 frida-…...

翻译工具:AI跨语言执行任务
翻译工具:AI跨语言执行任务📝 本章学习目标:本章聚焦工具系统,让AI Agent具备丰富的执行能力。通过本章学习,你将全面掌握"翻译工具:AI跨语言执行任务"这一核心主题。一、引言:为什么…...

固件逆向实战指南:从熵值分析到函数重建的七步法
1. 这不是“刷机教程”,而是一份固件逆向的实战切片很多人第一次听说“固件逆向”,脑子里浮现的是路由器刷OpenWrt、智能摄像头换壳跑Home Assistant,或者某款老式NAS突然不支持新硬盘,只好翻出U-Boot命令硬怼。这些确实是固件逆向…...
:信息收集介绍,域名信息收集,主域名查询,ICP备案号查询,备案实体查询,工业和信息化部政务服务平台查询,怎样收集)
【Web安全】-企业资产信息收集(1):信息收集介绍,域名信息收集,主域名查询,ICP备案号查询,备案实体查询,工业和信息化部政务服务平台查询,怎样收集
🦆 个人主页:深邃- ❄️专栏传送门:《C语言》《数据结构与算法》《Web安全》 🌟Gitee仓库:《C语言》《数据结构与算法》 特此声明:本次信息收集均在日期授权时间内收集,并且都将所有人员信息打…...

HTML应用指南:利用GET请求获取智己汽车门店位置信息
智己汽车作为高端智能电动汽车品牌,深度融合先锋设计美学、纯电驱动技术、高阶智能驾驶与全场景出行服务,依托L7、LS7、LS6、L6等产品矩阵,打造兼具科技感与驾控乐趣的高端出行体验。在营销推广层面,智己摒弃传统4S店模式…...

AI绘画中的诡异谷:从技术缺陷到可控美学的跃迁
1. 项目概述:当AI画笔开始颤抖——我们为什么该认真对待“诡异谷”里的美你有没有盯着一张AI生成的肖像画,越看越不对劲?眼睛太亮、皮肤太滑、手指多了一节,或者笑容弧度精准得像用圆规画出来的——那种说不上来哪里怪,…...