gpu-manager安装及测试
提示:GPU-manager安装为主部分内容做了升级开箱即用,有用请点收藏❤抱拳
文章目录
- 前言
- 一、约束条件
- 二、使用步骤
- 1.下载镜像
- 1.1 查看当前虚拟机的驱动类型:
- 2.部署gpu-manager
- 3.部署gpu-admission
- 4.修改kube-scheduler.yaml
- 4.1 新建/etc/kubernetes/scheduler-policy-config.json
- 4.2 新建/etc/kubernetes/scheduler-extender.yaml
- 4.3 修改/etc/kubernetes/manifests/kube-scheduler.yaml
- 4.1 结果查看
- 测试
- 总结
前言
本文只做开箱即用部分,想了解GPUManager虚拟化方案技术层面请直接点击:GPUmanager虚拟化方案
一、约束条件
1、虚拟机需要完成直通式绑定,也就是物理GPU与虚拟机绑定,我做的是hyper-v的虚拟机绑定参照上一篇文章
2、对于k8s要求1.10版本以上
3、GPU-Manager 要求集群内包含 GPU 机型节点
4、每张 GPU 卡一共有100个单位的资源,仅支持0 - 1的小数卡,以及1的倍数的整数卡设置。显存资源是以256MiB为最小的一个单位的分配显存
我的版本:k8s-1.20
二、使用步骤
1.下载镜像
镜像地址:https://hub.docker.com/r/tkestack/gpu-manager/tags
manager:docker pull tkestack/gpu-manager:v1.1.5
https://hub.docker.com/r/tkestack/gpu-quota-admission/tags
admission:docker pull tkestack/gpu-quota-admission:v1.0.0
1.1 查看当前虚拟机的驱动类型:
docker info

2.部署gpu-manager
拥有GPU节点打标签:
kubectl label node XX nvidia-device-enable=enable
如果docker驱动是systemd 需要在yaml指定,因为GPUmanager默认cgroupfs
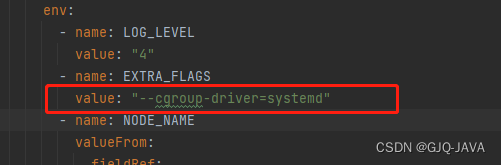
创建yaml内容如下:
apiVersion: v1
kind: ServiceAccount
metadata:name: gpu-managernamespace: kube-system
---
apiVersion: rbac.authorization.k8s.io/v1
kind: ClusterRoleBinding
metadata:name: gpu-manager-role
subjects:- kind: ServiceAccountname: gpu-managernamespace: kube-system
roleRef:kind: ClusterRolename: cluster-adminapiGroup: rbac.authorization.k8s.io
---
apiVersion: apps/v1
kind: DaemonSet
metadata:name: gpu-manager-daemonsetnamespace: kube-system
spec:updateStrategy:type: RollingUpdateselector:matchLabels:name: gpu-manager-dstemplate:metadata:# This annotation is deprecated. Kept here for backward compatibility# See https://kubernetes.io/docs/tasks/administer-cluster/guaranteed-scheduling-critical-addon-pods/annotations:scheduler.alpha.kubernetes.io/critical-pod: ""labels:name: gpu-manager-dsspec:serviceAccount: gpu-managertolerations:# This toleration is deprecated. Kept here for backward compatibility# See https://kubernetes.io/docs/tasks/administer-cluster/guaranteed-scheduling-critical-addon-pods/- key: CriticalAddonsOnlyoperator: Exists- key: tencent.com/vcuda-coreoperator: Existseffect: NoSchedule# Mark this pod as a critical add-on; when enabled, the critical add-on# scheduler reserves resources for critical add-on pods so that they can# be rescheduled after a failure.# See https://kubernetes.io/docs/tasks/administer-cluster/guaranteed-scheduling-critical-addon-pods/priorityClassName: "system-node-critical"# only run node has gpu devicenodeSelector:nvidia-device-enable: enablehostPID: truecontainers:- image: tkestack/gpu-manager:v1.1.5imagePullPolicy: IfNotPresentname: gpu-managersecurityContext:privileged: trueports:- containerPort: 5678volumeMounts:- name: device-pluginmountPath: /var/lib/kubelet/device-plugins- name: vdrivermountPath: /etc/gpu-manager/vdriver- name: vmdatamountPath: /etc/gpu-manager/vm- name: logmountPath: /var/log/gpu-manager- name: checkpointmountPath: /etc/gpu-manager/checkpoint- name: run-dirmountPath: /var/run- name: cgroupmountPath: /sys/fs/cgroupreadOnly: true- name: usr-directorymountPath: /usr/local/hostreadOnly: true- name: kube-rootmountPath: /root/.kubereadOnly: trueenv:- name: LOG_LEVELvalue: "4"- name: EXTRA_FLAGSvalue: "--cgroup-driver=systemd"- name: NODE_NAMEvalueFrom:fieldRef:fieldPath: spec.nodeNamevolumes:- name: device-pluginhostPath:type: Directorypath: /var/lib/kubelet/device-plugins- name: vmdatahostPath:type: DirectoryOrCreatepath: /etc/gpu-manager/vm- name: vdriverhostPath:type: DirectoryOrCreatepath: /etc/gpu-manager/vdriver- name: loghostPath:type: DirectoryOrCreatepath: /etc/gpu-manager/log- name: checkpointhostPath:type: DirectoryOrCreatepath: /etc/gpu-manager/checkpoint# We have to mount the whole /var/run directory into container, because of bind mount docker.sock# inode change after host docker is restarted- name: run-dirhostPath:type: Directorypath: /var/run- name: cgrouphostPath:type: Directorypath: /sys/fs/cgroup# We have to mount /usr directory instead of specified library path, because of non-existing# problem for different distro- name: usr-directoryhostPath:type: Directorypath: /usr- name: kube-roothostPath:type: Directorypath: /root/.kube
执行yaml文件:
kubectl apply -f gpu-manager.yaml
kubectl get pod -A|grep  gpu 查询结果
3.部署gpu-admission
创建yaml内容如下:
apiVersion: v1
kind: ServiceAccount
metadata:name: gpu-admissionnamespace: kube-system
---
apiVersion: rbac.authorization.k8s.io/v1
kind: ClusterRoleBinding
metadata:name: gpu-admission-as-kube-scheduler
subjects:- kind: ServiceAccountname: gpu-admissionnamespace: kube-system
roleRef:kind: ClusterRolename: system:kube-schedulerapiGroup: rbac.authorization.k8s.io
---
apiVersion: rbac.authorization.k8s.io/v1
kind: ClusterRoleBinding
metadata:name: gpu-admission-as-volume-scheduler
subjects:- kind: ServiceAccountname: gpu-admissionnamespace: kube-system
roleRef:kind: ClusterRolename: system:volume-schedulerapiGroup: rbac.authorization.k8s.io
---
apiVersion: rbac.authorization.k8s.io/v1
kind: ClusterRoleBinding
metadata:name: gpu-admission-as-daemon-set-controller
subjects:- kind: ServiceAccountname: gpu-admissionnamespace: kube-system
roleRef:kind: ClusterRolename: system:controller:daemon-set-controllerapiGroup: rbac.authorization.k8s.io
---
apiVersion: apps/v1
kind: Deployment
metadata:labels:component: schedulertier: control-planeapp: gpu-admissionname: gpu-admissionnamespace: kube-system
spec:selector:matchLabels:component: schedulertier: control-planereplicas: 1template:metadata:labels:component: schedulertier: control-planeversion: secondspec:serviceAccountName: gpu-admissioncontainers:- image: thomassong/gpu-admission:47d56ae9name: gpu-admissionenv:- name: LOG_LEVELvalue: "4"ports:- containerPort: 3456dnsPolicy: ClusterFirstWithHostNethostNetwork: truepriority: 2000000000priorityClassName: system-cluster-critical
---
apiVersion: v1
kind: Service
metadata:name: gpu-admissionnamespace: kube-system
spec:ports:- port: 3456protocol: TCPtargetPort: 3456selector:app: gpu-admissiontype: ClusterIP
执行yaml文件:
kubectl create -f gpu-admission.yaml
kubectl get pod -A|grep  gpu 查询结果
4.修改kube-scheduler.yaml
4.1 新建/etc/kubernetes/scheduler-policy-config.json
创建内容:
vim /etc/kubernetes/scheduler-policy-config.json
复制如下内容:
{"kind": "Policy","apiVersion": "v1","predicates": [{"name": "PodFitsHostPorts"},{"name": "PodFitsResources"},{"name": "NoDiskConflict"},{"name": "MatchNodeSelector"},{"name": "HostName"}],"priorities": [{"name": "BalancedResourceAllocation","weight": 1},{"name": "ServiceSpreadingPriority","weight": 1}],"extenders": [{"urlPrefix": "http://gpu-admission.kube-system:3456/scheduler","apiVersion": "v1beta1","filterVerb": "predicates","enableHttps": false,"nodeCacheCapable": false}],"hardPodAffinitySymmetricWeight": 10,"alwaysCheckAllPredicates": false
}
4.2 新建/etc/kubernetes/scheduler-extender.yaml
创建内容:
vim /etc/kubernetes/scheduler-extender.yaml
复制如下内容:
apiVersion: kubescheduler.config.k8s.io/v1alpha1
kind: KubeSchedulerConfiguration
clientConnection:kubeconfig: "/etc/kubernetes/scheduler.conf"
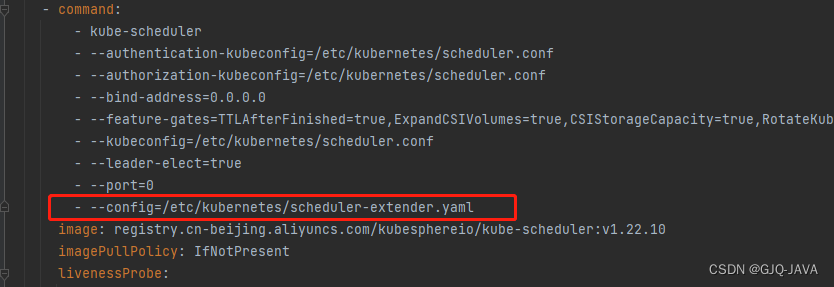
algorithmSource:policy:file:path: "/etc/kubernetes/scheduler-policy-config.json"4.3 修改/etc/kubernetes/manifests/kube-scheduler.yaml
修改内容:
vim /etc/kubernetes/manifests/kube-scheduler.yaml
复制如下内容:
apiVersion: v1
kind: Pod
metadata:creationTimestamp: nulllabels:component: kube-schedulertier: control-planename: kube-schedulernamespace: kube-system
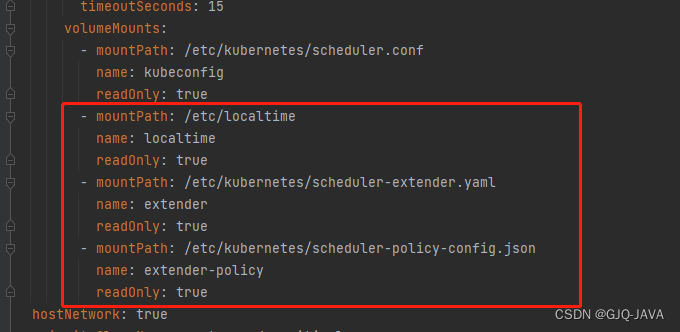
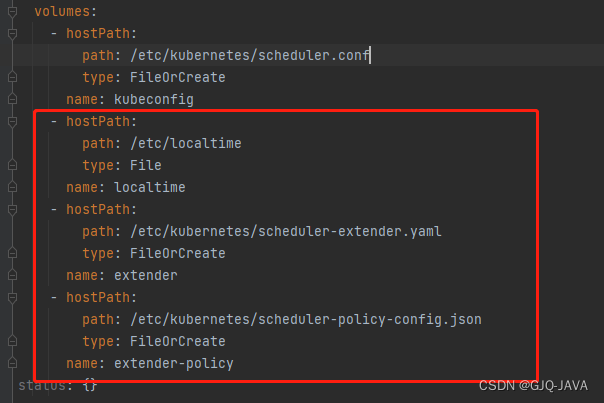
spec:containers:- command:- kube-scheduler- --authentication-kubeconfig=/etc/kubernetes/scheduler.conf- --authorization-kubeconfig=/etc/kubernetes/scheduler.conf- --bind-address=0.0.0.0- --feature-gates=TTLAfterFinished=true,ExpandCSIVolumes=true,CSIStorageCapacity=true,RotateKubeletServerCertificate=true- --kubeconfig=/etc/kubernetes/scheduler.conf- --leader-elect=true- --port=0- --config=/etc/kubernetes/scheduler-extender.yamlimage: registry.cn-beijing.aliyuncs.com/kubesphereio/kube-scheduler:v1.22.10imagePullPolicy: IfNotPresentlivenessProbe:failureThreshold: 8httpGet:path: /healthzport: 10259scheme: HTTPSinitialDelaySeconds: 10periodSeconds: 10timeoutSeconds: 15name: kube-schedulerresources:requests:cpu: 100mstartupProbe:failureThreshold: 24httpGet:path: /healthzport: 10259scheme: HTTPSinitialDelaySeconds: 10periodSeconds: 10timeoutSeconds: 15volumeMounts:- mountPath: /etc/kubernetes/scheduler.confname: kubeconfigreadOnly: true- mountPath: /etc/localtimename: localtimereadOnly: true- mountPath: /etc/kubernetes/scheduler-extender.yamlname: extenderreadOnly: true- mountPath: /etc/kubernetes/scheduler-policy-config.jsonname: extender-policyreadOnly: truehostNetwork: truepriorityClassName: system-node-criticalsecurityContext:seccompProfile:type: RuntimeDefaultvolumes:- hostPath:path: /etc/kubernetes/scheduler.conftype: FileOrCreatename: kubeconfig- hostPath:path: /etc/localtimetype: Filename: localtime- hostPath:path: /etc/kubernetes/scheduler-extender.yamltype: FileOrCreatename: extender- hostPath:path: /etc/kubernetes/scheduler-policy-config.jsontype: FileOrCreatename: extender-policy
status: {}
修改内容入下:
修改完成k8s自动重启,如果没有重启执行 kubectl delete pod -n [podname]
4.1 结果查看
执行命令:
kubectl describe node master[节点名称]
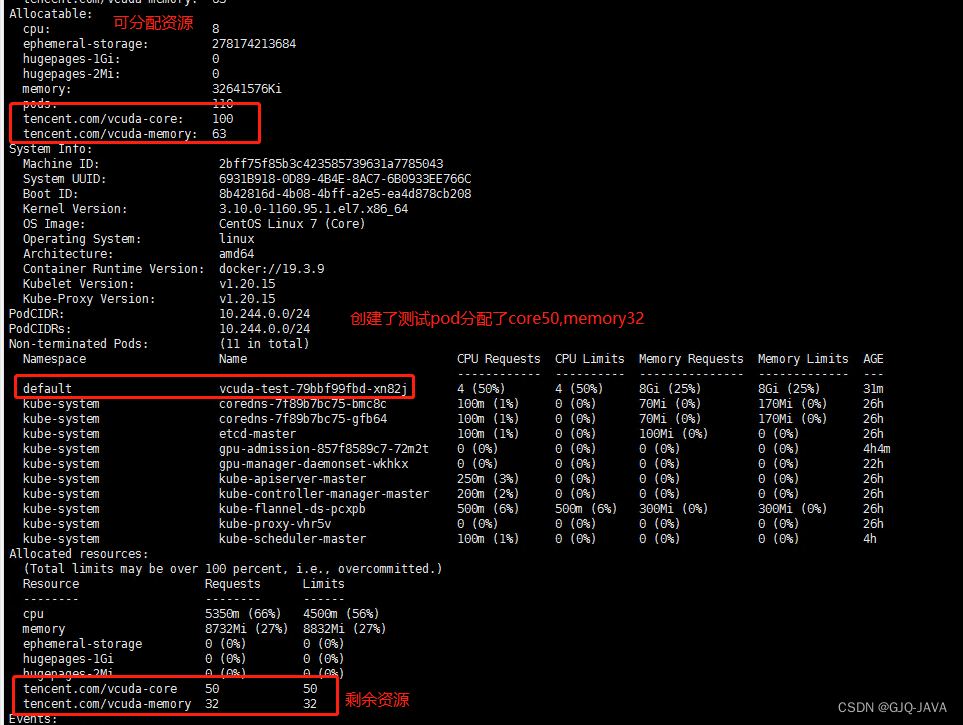
测试
镜像下载:docker pull gaozhenhai/tensorflow-gputest:0.2
创建yaml内容: vim vcuda-test.yaml
apiVersion: apps/v1
kind: Deployment
metadata:labels:k8s-app: vcuda-testqcloud-app: vcuda-testname: vcuda-testnamespace: default
spec:replicas: 1selector:matchLabels:k8s-app: vcuda-testtemplate:metadata:labels:k8s-app: vcuda-testqcloud-app: vcuda-testspec:containers:- command:- sleep- 360000senv:- name: PATHvalue: /usr/local/sbin:/usr/local/bin:/usr/sbin:/usr/bin:/sbin:/binimage: gaozhenhai/tensorflow-gputest:0.2imagePullPolicy: IfNotPresentname: tensorflow-testresources:limits:cpu: "4"memory: 8Gitencent.com/vcuda-core: "50"tencent.com/vcuda-memory: "32"requests:cpu: "4"memory: 8Gitencent.com/vcuda-core: "50"tencent.com/vcuda-memory: "32"
启动yaml:kubectl apply -f vcuda-test.yaml
进入容器:
kubectl exec -it `kubectl get pods -o name | cut -d '/' -f2` -- bash
执行测试命令:
cd /data/tensorflow/cifar10 && time python cifar10_train.py
查看结果:
执行命令:nvidia-smi pmon -s u -d 1、命令查看GPU资源使用情况
总结
到此vgpu容器层虚拟化全部完成
相关文章:
gpu-manager安装及测试
提示:GPU-manager安装为主部分内容做了升级开箱即用,有用请点收藏❤抱拳 文章目录 前言一、约束条件二、使用步骤1.下载镜像1.1 查看当前虚拟机的驱动类型: 2.部署gpu-manager3.部署gpu-admission4.修改kube-scheduler.yaml
Go和Java实现享元模式
Go和Java实现享元模式 下面通过一个实例来说明享元模式的使用。 1、享元模式 享元模式主要用于减少创建对象的数量,以减少内存占用和提高性能。这种类型的设计模式属于结构型模式,它提 供了减少对象数量从而改善应用所需的对象结构的方式。 享元模式…...
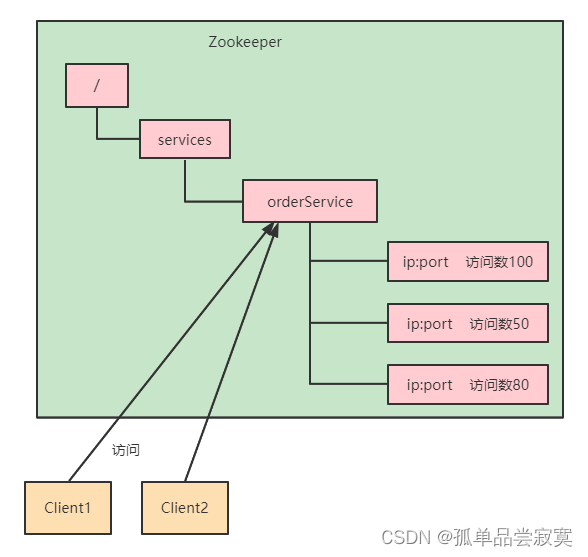
Zookeeper特性与节点数据类型详解
CAP&Base理论 CAP理论 cap理论是指对于一个分布式计算系统来说,不可能满足以下三点: 一致性 : 在分布式环境中,一致性是指数据在多个副本之间是否能够保持一致的 特性,等同于所有节点访问同一份最新的数据副本。在一致性的需…...
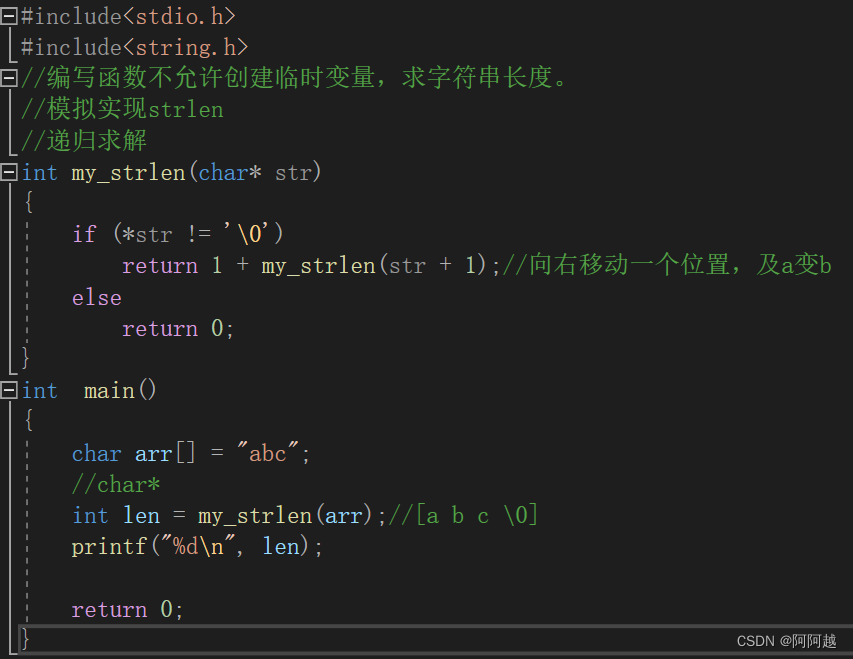
函数的递归
1、什么是递归? 程序调用自身的编程技巧称为递归。 递归作为一种算法在程序设计语言中广泛应用。一个过程或函数在其定义或说明中有直接或间接调用自身的一种方法,它通常把一个大型复杂的问题层层转化为一个与原问题相似的规模较小的问题来求解&#x…...

Android T 窗口层级其二 —— 层级结构树的构建(更新中)
如何通过dump中的内容找到对应的代码? 我们dump窗口层级发现会有很多信息,adb shell dumpsys activity containers 这里我们以其中的DefaultTaskDisplayArea为例 在源码的framework目录下查找该字符串,找到对应的代码就可以通过打印堆栈或者…...
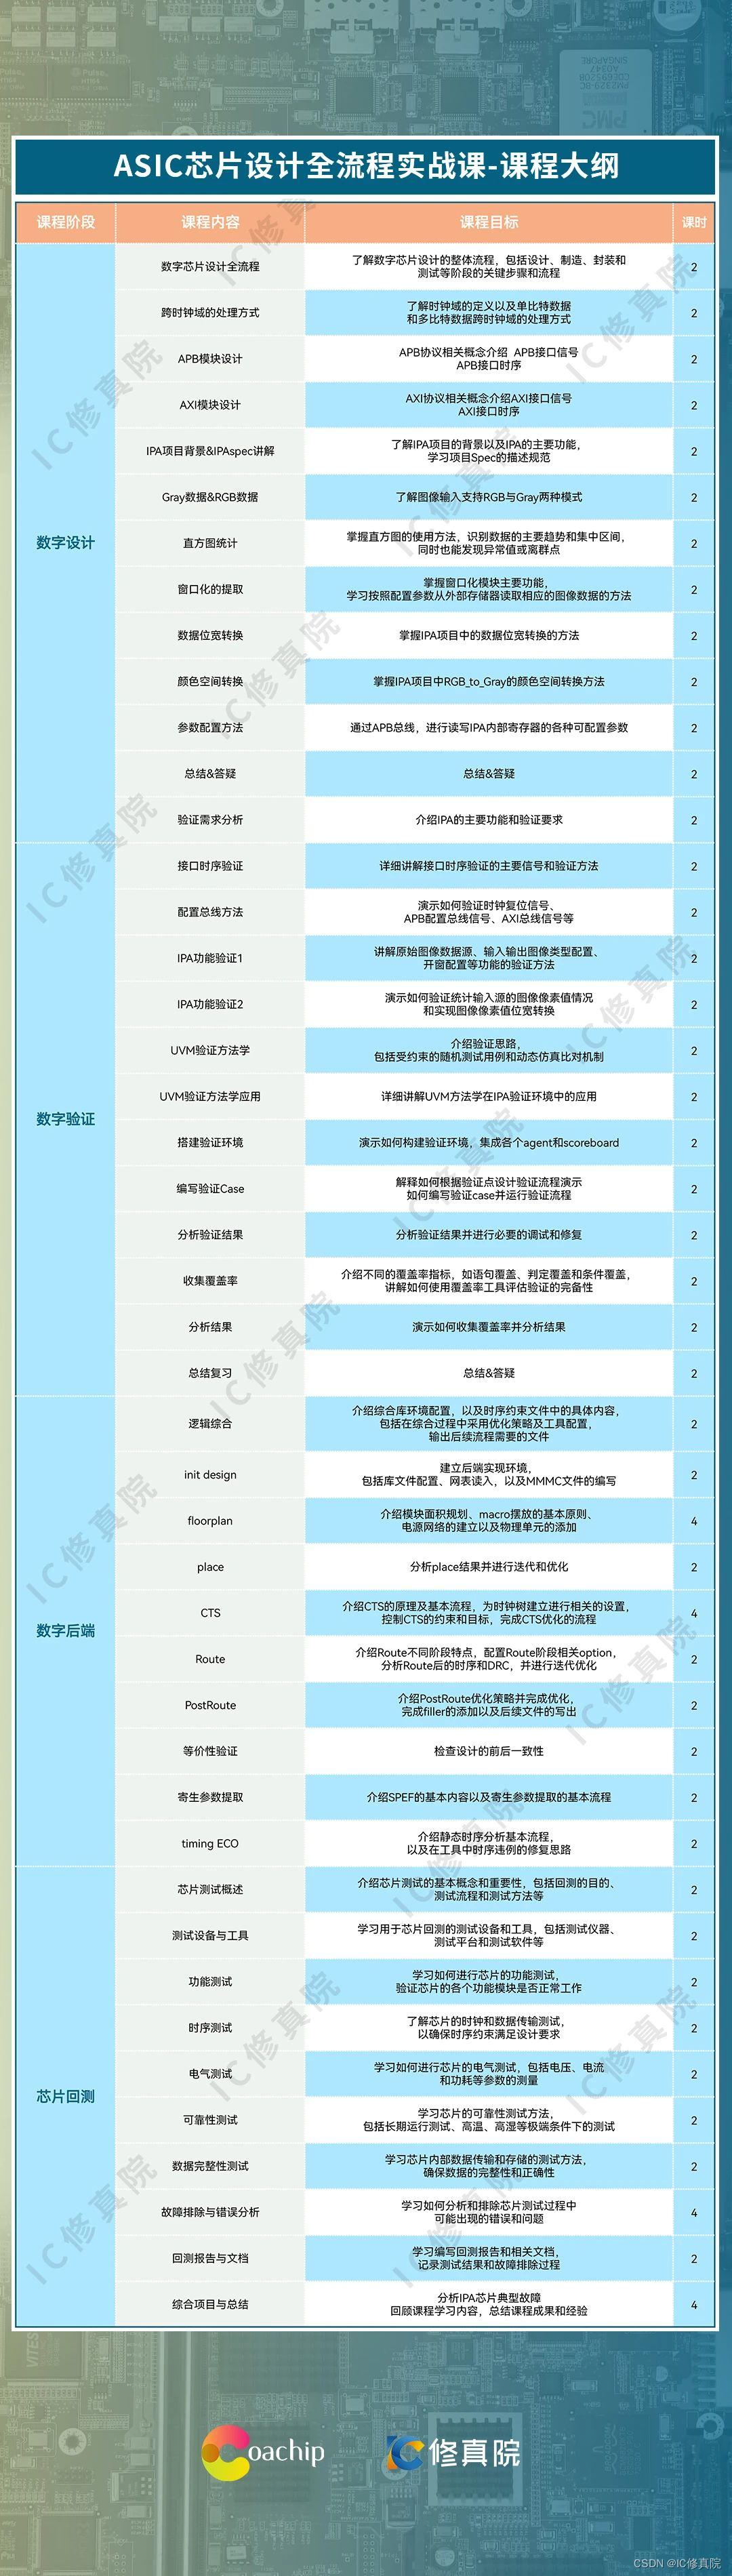
ASIC芯片设计全流程项目实战课重磅上线 ,支持 65nm制程流片 !
全流程项目实战课学什么? 此次推出【 ASIC芯片设计全流程项目实战课】,基于IPA图像处理加速器,以企业级真实ASIC项目为案例,学员可参与全流程项目实践,以及65nm真实流片! 众所周知,放眼整个IC硕…...

背上沉重的书包准备run之react篇
沉重,太沉重了。。。没理好捏,等我脑子歇歇再好好补充一下 react特性? React 是一个用于构建用户界面的 JavaScript 库,它具有以下特性: 组件化开发:React 基于组件化思想,将 UI 拆分为独立、…...

LAMP及论坛搭建
一、概述 LAMP架构是目前成熟的企业网站应用模式之一,指的是协同工作的一整套系统和相关软件,能够提供动态Web站点服务及其应用开发环境。LAMP是一个缩写词,具体包括Linux操作系统、Apache网站服务器、MySQL数据库服务器、PHP(或…...
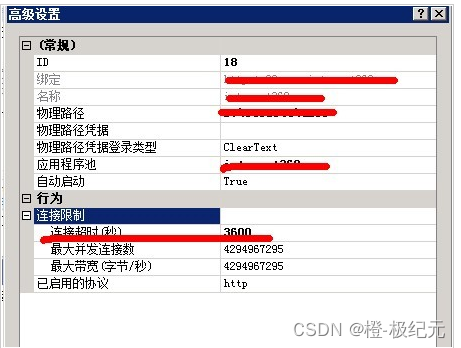
php-cgi.exe - FastCGI 进程超过了配置的请求超时时限
解决方案一: 处理(php-cgi.exe - FastCGI 进程超过了配置的请求超时时限)的问题 内容转载: 处理(php-cgi.exe - FastCGI 进程超过了配置的请求超时时限)的问题_php技巧_脚本之家 【详细错误】: HTTP 错误 500.0 - Internal Server Error C:…...
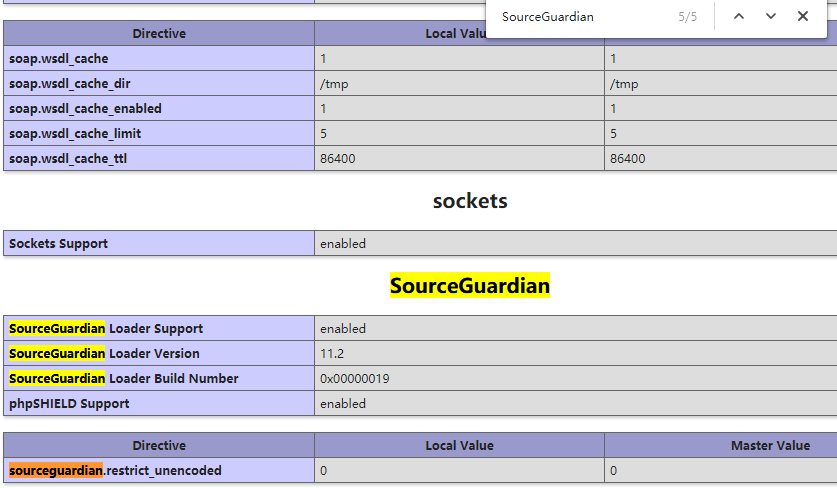
linux系统虚拟主机开启支持SourceGuardian(sg11)加密组件
注意:sg11我司只支持linux系统虚拟主机自主安装。支持php5.3及以上版本。 1、登陆主机控制面板,找到【远程文件下载】这个功能。 2、远程下载文件填写http://download.myhostadmin.net/vps/sg11_for_linux.zip 下载保存的路径填写/others/ 3、点击控制…...
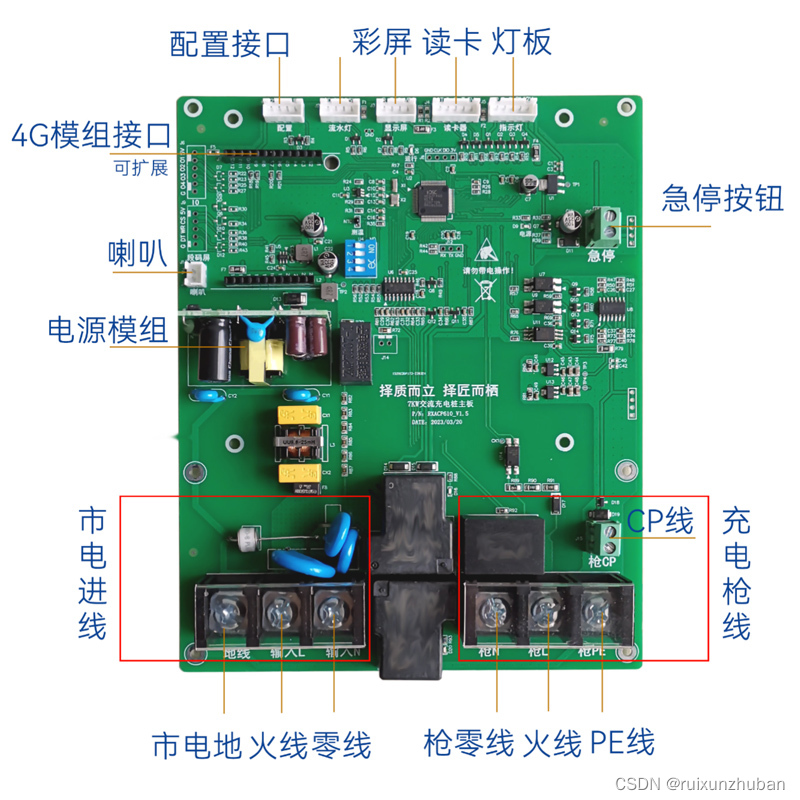
让我们一起探讨汽车充电桩控制主板的应用
你是否想过,你的汽车充电桩可以更智能?可以支持更多类型的电池,更多操作系统,更多协议和更多电源?让我们一起探讨汽车充电桩控制主板的应用。 控制主板是充电桩的大脑,它可以应用于各种充电桩,包括智能充电桩、电动汽…...
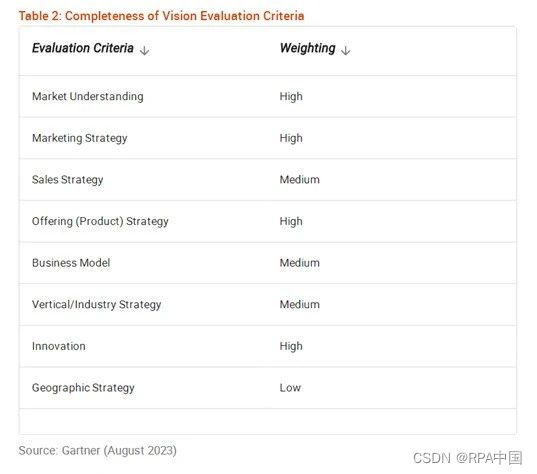
Gartner发布《2023年全球RPA魔力象限》:90%RPA厂商,将提供生成式AI自动化
8月3日,全球著名咨询调查机构Gartner发布了《2023年全球RPA魔力象限》,通过产品能力、技术创新、市场影响力等维度,对全球16家卓越RPA厂商进行了深度评估。 弘玑Cyclone(Cyclone Robotics)、来也(Laiye&am…...
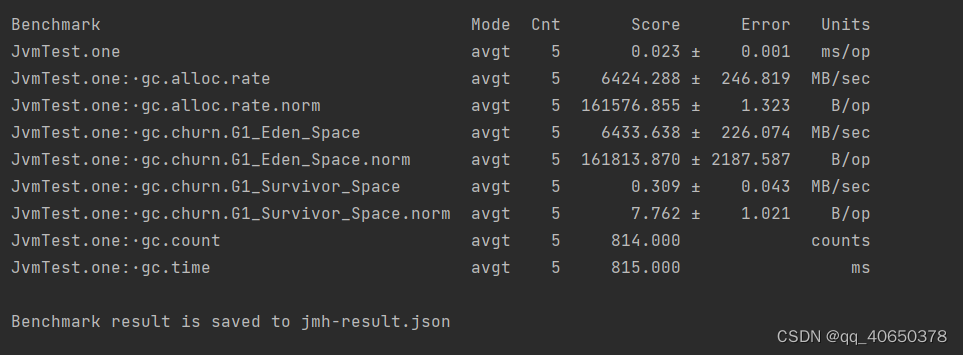
springboot整合JMH做优化实战
这段时间接手项目出现各种问题,令人不胜烦扰。吐槽下公司做项目完全靠人堆,大上快上风格注定留下一地鸡毛,修修补补不如想如何提升同事代码水准免得背锅。偶然看到关于JMH对于优化java代码的直观性,于是有了这篇文章,希…...

利用ffmpeg分析视频流
ffprobe -show_packets -i "rtsp://192.168.61.46:8554/live?channel0&type0":该命令用于显示 RTSP 流中的数据包信息,例如时间戳、大小、持续时间等。 ffprobe -i "rtsp://192.168.61.46:8554/live?channel0&type0"&…...
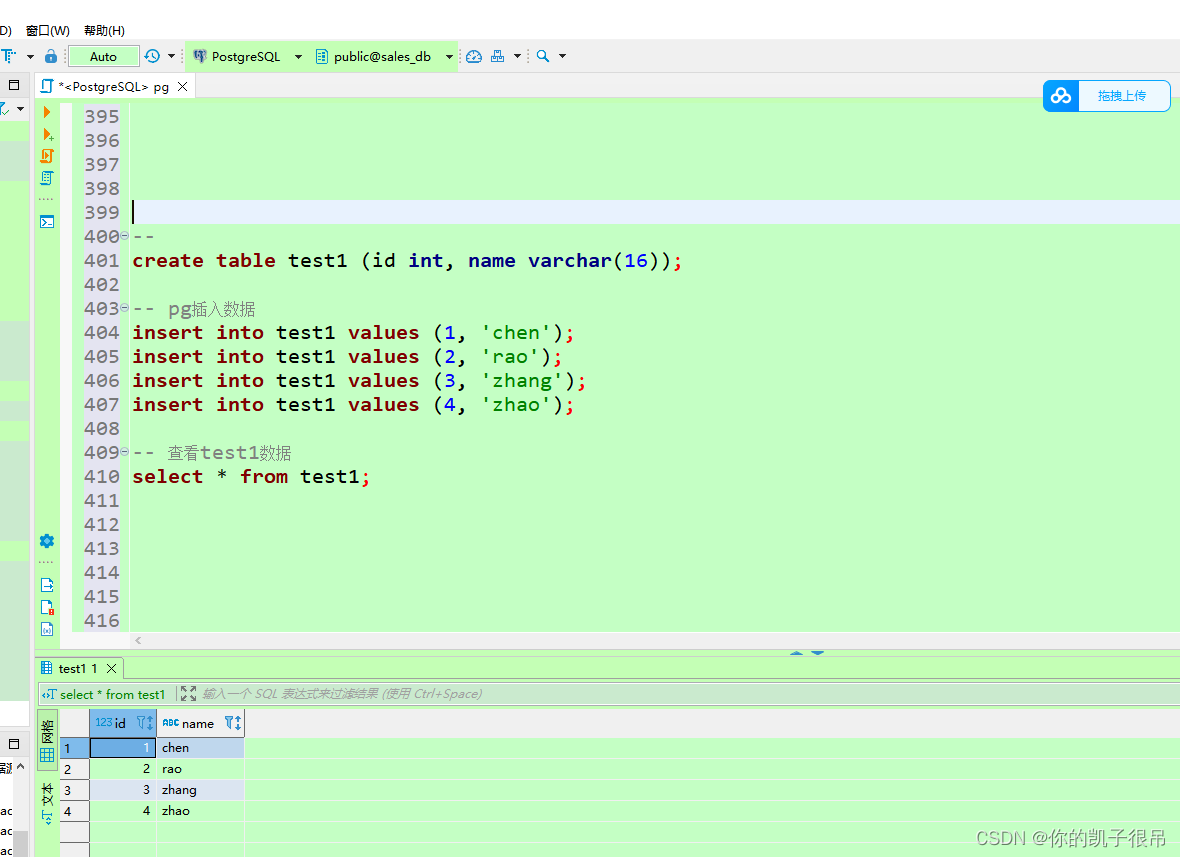
基于kettle实现pg数据定时转存mongodb
mogodb 待创建 基于kettle实现pg数据定时转存mongodb_kettle 实时迁移 mongodb_呆呆的私房菜的博客-CSDN博客...
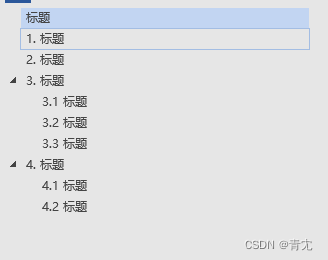
使用 POI 在 Word 中重新开始编号、自定义标题格式
效果图 引入依赖 <!-- https://mvnrepository.com/artifact/org.apache.poi/poi --><dependency><groupId>org.apache.poi</groupId><artifactId>poi</artifactId><version>4.1.2</version></dependency><!-- https…...

【java】default/private/public/protected比较
访问修饰符 访问修饰符本类同包子类其他privateYdefaultYYprotectedYYYpublicYYYY 总结: private、default、proteced、public访问范围依次增大、限制能力依次减弱;被private修饰的成员只能在本类中调用;default是默认类型,成员…...
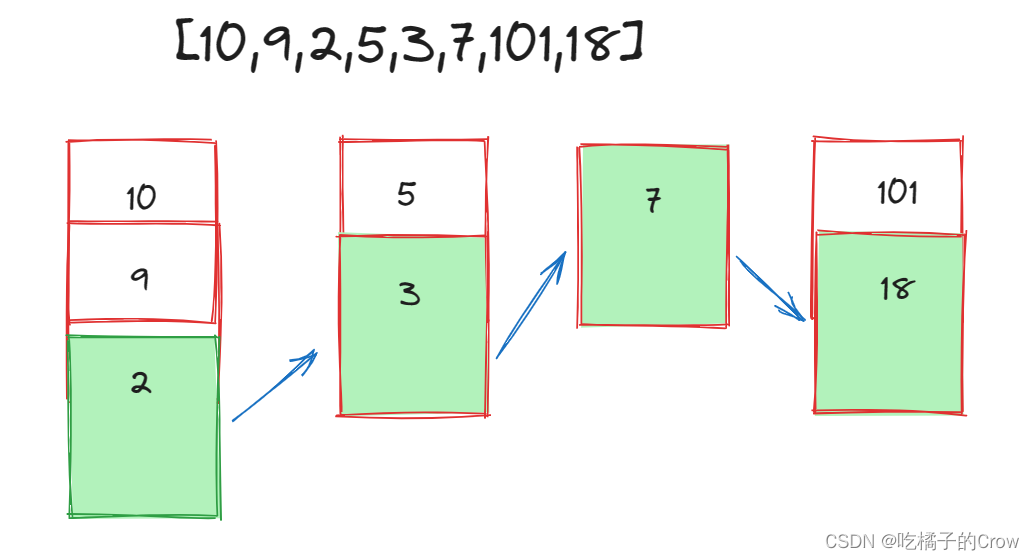
面试热题(最长上升子序列)
给你一个整数数组 nums ,找到其中最长严格递增子序列的长度。 子序列 是由数组派生而来的序列,删除(或不删除)数组中的元素而不改变其余元素的顺序。例如,[3,6,2,7] 是数组 [0,3,1,6,2,2,7] 的子序列。 输入࿱…...

Vue 简版文件预览笔记
简版文件预览笔记 调用方法 <script lang"ts" setup>import {exportFileData,preViewFile,} from /xxx/tools.ts;import {fileDownload,} from /api/xxx/xx;// 预览方法const handleViewBtn () > {const filePath 获取预览地址;const urlFormat 获取预…...
数据结构--栈和队列
文章目录 栈的概念和结构栈的实现栈的数据结构栈的初始化和销毁出栈和入栈获取栈顶、大小,判空 队列的概念和结构队列的实现队列的数据结构队列的初始化和销毁队列的插入 队列的删除获取队头和队尾的数据获取队列长度和判空 栈和队列的一些题目1.有效的括号2.用队列…...

434649494
4546465484...

Linux环境下CTC语音唤醒模型的一键部署教程
Linux环境下CTC语音唤醒模型的一键部署教程 1. 引言 语音唤醒技术现在越来越普及了,就像我们平时对智能音箱说"小爱同学"或者"天猫精灵"一样,设备听到特定关键词就会激活响应。今天要介绍的是一个专门为移动端设计的CTC语音唤醒模…...

CTFHub文件上传靶场通关保姆级教程:从.htaccess到双写后缀的实战避坑
CTFHub文件上传靶场通关保姆级教程:从.htaccess到双写后缀的实战避坑 当你第一次接触CTF比赛中的文件上传漏洞挑战时,可能会被各种防御机制搞得晕头转向。别担心,这篇教程将带你一步步攻破CTFHub文件上传靶场的所有关卡,从最基础的…...

终极指南:如何用VR-Reversal免费将3D视频转为2D播放
终极指南:如何用VR-Reversal免费将3D视频转为2D播放 【免费下载链接】VR-reversal VR-Reversal - Player for conversion of 3D video to 2D with optional saving of head tracking data and rendering out of 2D copies. 项目地址: https://gitcode.com/gh_mirr…...

Windows右键菜单管理神器:ContextMenuManager让你的操作效率翻倍
Windows右键菜单管理神器:ContextMenuManager让你的操作效率翻倍 【免费下载链接】ContextMenuManager 🖱️ 纯粹的Windows右键菜单管理程序 项目地址: https://gitcode.com/gh_mirrors/co/ContextMenuManager 你是否厌倦了Windows右键菜单被各种…...
电价预测的模型进化论:从LSTM过拟合到Transformer实战
1. 电价预测的挑战与LSTM的困境 电力市场价格的波动受到供需关系、天气变化、燃料成本等多重因素影响,呈现出复杂的非线性特征。传统时间序列模型(如ARIMA)在捕捉这种复杂模式时往往力不从心,而长短期记忆网络(LSTM&am…...

郭老师-人生是一场意识的修行
人生是一场意识的修行 ——六句真言,唤醒心灵智慧“生命不是为了抵达某个终点, 而是为了—— 在每一场经历中, 认出自己。”🌿 真正的成长,是心力的成长; 真正的智慧,是心灵的智慧。ἳ…...

Yosys内部数据结构与优化流程深度解析
1. Yosys工具与RTLIL数据结构概述 Yosys作为开源硬件综合工具链的核心组件,其内部实现了一套名为RTLIL(Register Transfer Level Intermediate Language)的中间表示语言。这套数据结构的设计直接决定了工具的性能上限和优化潜力。我第一次接触…...

TypeScript的awaited类型:展开Promise的嵌套类型
TypeScript的awaited类型:展开Promise的嵌套类型 在异步编程中,Promise是JavaScript处理异步操作的核心工具,但多层嵌套的Promise类型往往让类型推断变得复杂。TypeScript 4.5引入的awaited类型,正是为了解决这一问题而生。它能够…...
)
银行报表填报避坑指南:G01-G04最新版本差异解析(2023更新)
银行报表填报避坑指南:G01-G04最新版本差异解析(2023更新) 银行报表填报工作向来是金融从业者的必修课,尤其是G01-G04系列报表作为监管报送的核心内容,其版本更新往往牵动着整个机构的神经。去年底至今,监管…...