目标检测YOLOv3基于DarkNet53模型测试-笔记
目标检测YOLOv3基于DarkNet53模型测试-笔记
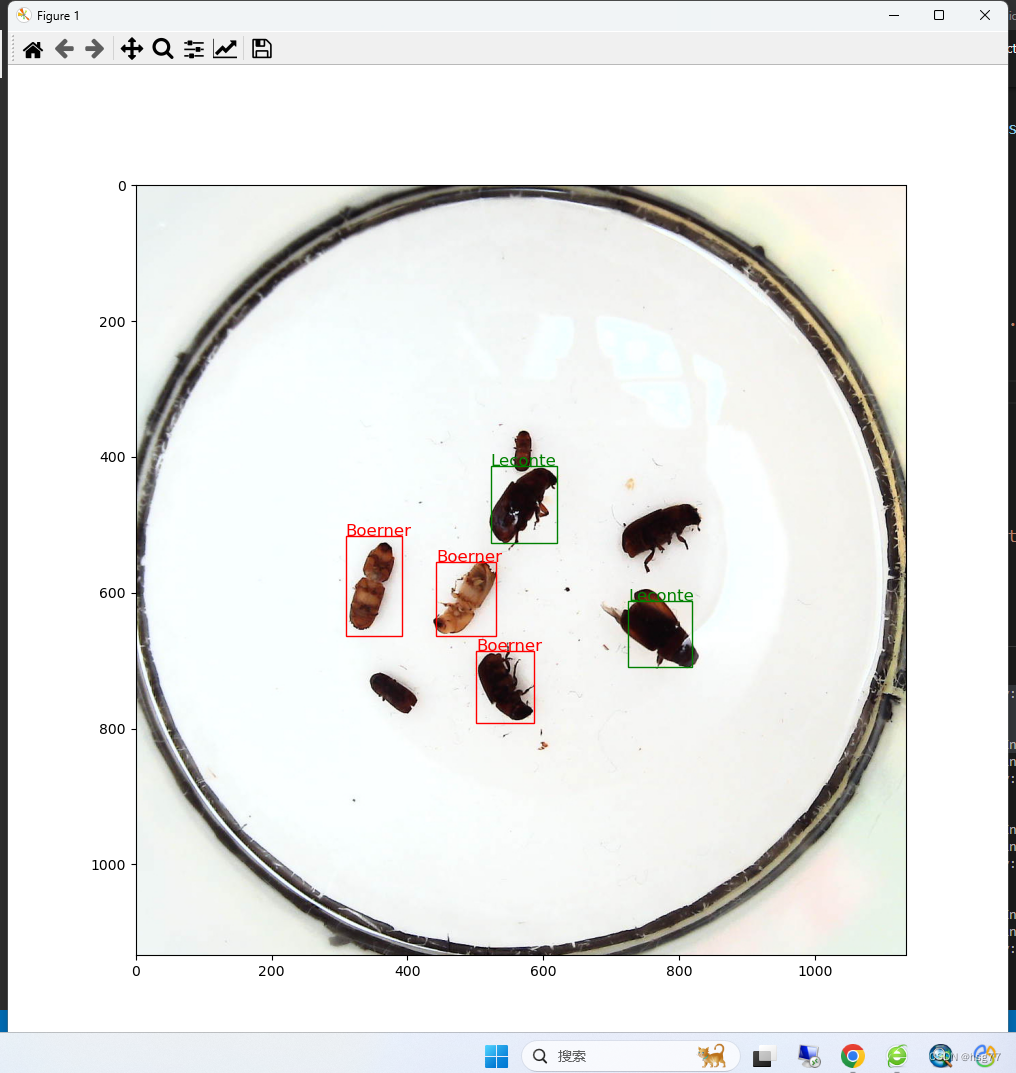
预测和试测结果:
预测代码如下所示:
testInsects.py
#YOLOv3网模型测试-单图片文件测试并显示测试结果
import time
import os
import paddle
import numpy as np
import cv2
import random
from PIL import Image, ImageEnhance
import xml.etree.ElementTree as ET
import matplotlib.pyplot as plt
import matplotlib.patches as patches
from matplotlib.image import imread
import YOLOv3  as dANCHORS = [10, 13, 16, 30, 33, 23, 30, 61, 62, 45, 59, 119, 116, 90, 156, 198, 373, 326]
ANCHOR_MASKS = [[6, 7, 8], [3, 4, 5], [0, 1, 2]]
VALID_THRESH = 0.01
NMS_TOPK = 400
NMS_POSK = 100
NMS_THRESH = 0.45
NUM_CLASSES = 7
#
# 定义画图函数
INSECT_NAMES = ['Boerner', 'Leconte', 'Linnaeus', 'acuminatus', 'armandi', 'coleoptera', 'linnaeus']# 定义画矩形框的函数
def draw_rectangle(currentAxis, bbox, edgecolor = 'k', facecolor = 'y', fill=False, linestyle='-'):# currentAxis,坐标轴,通过plt.gca()获取# bbox,边界框,包含四个数值的list, [x1, y1, x2, y2]# edgecolor,边框线条颜色# facecolor,填充颜色# fill, 是否填充# linestype,边框线型# patches.Rectangle需要传入左上角坐标、矩形区域的宽度、高度等参数rect=patches.Rectangle((bbox[0], bbox[1]), bbox[2]-bbox[0]+1, bbox[3]-bbox[1]+1, linewidth=1,edgecolor=edgecolor,facecolor=facecolor,fill=fill, linestyle=linestyle)currentAxis.add_patch(rect)# 定义绘制预测结果的函数
def draw_results(result, filename, draw_thresh=0.5):plt.figure(figsize=(10, 10))im = imread(filename)plt.imshow(im)currentAxis=plt.gca()colors = ['r', 'g', 'b', 'k', 'y', 'c', 'purple']for item in result:box = item[2:6]label = int(item[0])name = INSECT_NAMES[label]if item[1] > draw_thresh:draw_rectangle(currentAxis, box, edgecolor = colors[label])plt.text(box[0], box[1], name, fontsize=12, color=colors[label])# 读取单张测试图片
def single_image_data_loader(filename, test_image_size=608, mode='test'):"""加载测试用的图片,测试数据没有groundtruth标签"""batch_size= 1def reader():batch_data = []img_size = test_image_sizefile_path = os.path.join(filename)img = cv2.imread(file_path)img = cv2.cvtColor(img, cv2.COLOR_BGR2RGB)H = img.shape[0]W = img.shape[1]img = cv2.resize(img, (img_size, img_size))mean = [0.485, 0.456, 0.406]std = [0.229, 0.224, 0.225]mean = np.array(mean).reshape((1, 1, -1))std = np.array(std).reshape((1, 1, -1))out_img = (img / 255.0 - mean) / stdout_img = out_img.astype('float32').transpose((2, 0, 1))img = out_img #np.transpose(out_img, (2,0,1))im_shape = [H, W]batch_data.append((image_name.split('.')[0], img, im_shape))if len(batch_data) == batch_size:yield d.make_test_array(batch_data)batch_data = []return reader
#
if __name__ == '__main__':image_name = './ObjectCheck/data/insects/test/images/2592.jpeg'     #2599.jpeg    2592.jpeg   /3157.jpegparams_file_path = './yolo_epoch50.pdparams'model = d.YOLOv3(num_classes=NUM_CLASSES)model_state_dict = paddle.load(params_file_path)model.load_dict(model_state_dict)model.eval()total_results = []test_loader = single_image_data_loader(image_name, mode='test')for i, data in enumerate(test_loader()):img_name, img_data, img_scale_data = dataimg = paddle.to_tensor(img_data)img_scale = paddle.to_tensor(img_scale_data)outputs = model.forward(img)bboxes, scores = model.get_pred(outputs,im_shape=img_scale,anchors=ANCHORS,anchor_masks=ANCHOR_MASKS,valid_thresh = VALID_THRESH)bboxes_data = bboxes.numpy()scores_data = scores.numpy()results = d.multiclass_nms(bboxes_data, scores_data,score_thresh=VALID_THRESH, nms_thresh=NMS_THRESH, pre_nms_topk=NMS_TOPK, pos_nms_topk=NMS_POSK)result = results[0]
print(result.shape)
draw_results(result, image_name, draw_thresh=0.5)plt.show()
训练测试代码如下所示:
trans.py
############# 这段代码在本地机器上运行请慎重,容易造成死机#######################
import time
import os
import paddle
import numpy as np
import cv2
import random
from PIL import Image, ImageEnhance
import xml.etree.ElementTree as ET
import YOLOv3  as d
#数据处理
# 创建数据读取类     ANCHORS = [10, 13, 16, 30, 33, 23, 30, 61, 62, 45, 59, 119, 116, 90, 156, 198, 373, 326]ANCHOR_MASKS = [[6, 7, 8], [3, 4, 5], [0, 1, 2]]IGNORE_THRESH = .7
NUM_CLASSES = 7def get_lr(base_lr = 0.0001, lr_decay = 0.1):bd = [10000, 20000]lr = [base_lr, base_lr * lr_decay, base_lr * lr_decay * lr_decay]learning_rate = paddle.optimizer.lr.PiecewiseDecay(boundaries=bd, values=lr)return learning_rateif __name__ == '__main__':TRAINDIR = './ObjectCheck/data/insects/train'TESTDIR = './ObjectCheck/data/insects/test'VALIDDIR = './ObjectCheck/data/insects/val'paddle.device.set_device("gpu:0")# 创建数据读取类train_dataset = d.TrainDataset(TRAINDIR, mode='train')valid_dataset = d.TrainDataset(VALIDDIR, mode='valid')test_dataset = d.TrainDataset(VALIDDIR, mode='valid')# 使用paddle.io.DataLoader创建数据读取器,并设置batchsize,进程数量num_workers等参数train_loader = paddle.io.DataLoader(train_dataset, batch_size=10, shuffle=True, num_workers=0, drop_last=True, use_shared_memory=False)valid_loader = paddle.io.DataLoader(valid_dataset, batch_size=10, shuffle=False, num_workers=0, drop_last=False, use_shared_memory=False)model = d.YOLOv3(num_classes = NUM_CLASSES)  #创建模型learning_rate = get_lr()opt = paddle.optimizer.Momentum(learning_rate=learning_rate,momentum=0.9,weight_decay=paddle.regularizer.L2Decay(0.0005),parameters=model.parameters())  #创建优化器# opt = paddle.optimizer.Adam(learning_rate=learning_rate, weight_decay=paddle.regularizer.L2Decay(0.0005), parameters=model.parameters())MAX_EPOCH = 200for epoch in range(MAX_EPOCH):for i, data in enumerate(train_loader()):img, gt_boxes, gt_labels, img_scale = datagt_scores = np.ones(gt_labels.shape).astype('float32')gt_scores = paddle.to_tensor(gt_scores)img = paddle.to_tensor(img)gt_boxes = paddle.to_tensor(gt_boxes)gt_labels = paddle.to_tensor(gt_labels)outputs = model(img)  #前向传播,输出[P0, P1, P2]loss = model.get_loss(outputs, gt_boxes, gt_labels, gtscore=gt_scores,anchors = ANCHORS,anchor_masks = ANCHOR_MASKS,ignore_thresh=IGNORE_THRESH,use_label_smooth=False)        # 计算损失函数loss.backward()    # 反向传播计算梯度opt.step()  # 更新参数opt.clear_grad()if i % 10 == 0:timestring = time.strftime("%Y-%m-%d %H:%M:%S",time.localtime(time.time()))print('{}[TRAIN]epoch {}, iter {}, output loss: {}'.format(timestring, epoch, i, loss.numpy()))# save params of modelif (epoch % 5 == 0) or (epoch == MAX_EPOCH -1):paddle.save(model.state_dict(), 'yolo_epoch{}'.format(epoch))# 每个epoch结束之后在验证集上进行测试model.eval()for i, data in enumerate(valid_loader()):img, gt_boxes, gt_labels, img_scale = datagt_scores = np.ones(gt_labels.shape).astype('float32')gt_scores = paddle.to_tensor(gt_scores)img = paddle.to_tensor(img)gt_boxes = paddle.to_tensor(gt_boxes)gt_labels = paddle.to_tensor(gt_labels)outputs = model(img)loss = model.get_loss(outputs, gt_boxes, gt_labels, gtscore=gt_scores,anchors = ANCHORS,anchor_masks = ANCHOR_MASKS,ignore_thresh=IGNORE_THRESH,use_label_smooth=False)if i % 1 == 0:timestring = time.strftime("%Y-%m-%d %H:%M:%S",time.localtime(time.time()))print('{}[VALID]epoch {}, iter {}, output loss: {}'.format(timestring, epoch, i, loss.numpy()))model.train()'''
#输出结果:
PS E:\project\python> & D:/ProgramData/Anaconda3/python.exe e:/project/python/ObjectCheck/train.py
{'Boerner': 0, 'Leconte': 1, 'Linnaeus': 2, 'acuminatus': 3, 'armandi': 4, 'coleoptera': 5, 'linnaeus': 6}
W0808 17:32:42.379954 11784 gpu_resources.cc:61] Please NOTE: device: 0, GPU Compute Capability: 6.1, Driver API Version: 12.2, Runtime API Version: 10.2
W0808 17:32:42.388298 11784 gpu_resources.cc:91] device: 0, cuDNN Version: 7.6.
e:\project\python\ObjectCheck\YOLOv3.py:525: DeprecationWarning: LANCZOS is deprecated and will be removed in Pillow 10 (2023-07-01). Use Resampling.LANCZOS instead.crop[1] + crop[3])).resize(img.size, Image.LANCZOS)
D:\ProgramData\Anaconda3\lib\site-packages\paddle\nn\layer\norm.py:712: UserWarning: When training, we now always track global mean and variance.warnings.warn(
2023-08-08 17:33:00[TRAIN]epoch 0, iter 0, output loss: [17514.3]
2023-08-08 17:37:04[TRAIN]epoch 0, iter 10, output loss: [664.46826]
2023-08-08 17:41:14[TRAIN]epoch 0, iter 20, output loss: [178.863]
2023-08-08 17:45:23[TRAIN]epoch 0, iter 30, output loss: [96.15729]
2023-08-08 17:49:20[TRAIN]epoch 0, iter 40, output loss: [126.4073]
2023-08-08 17:53:24[TRAIN]epoch 0, iter 50, output loss: [99.16821]
2023-08-08 17:57:51[TRAIN]epoch 0, iter 60, output loss: [78.51326]
2023-08-08 18:01:54[TRAIN]epoch 0, iter 70, output loss: [73.76933]
2023-08-08 18:06:02[TRAIN]epoch 0, iter 80, output loss: [95.99153]
2023-08-08 18:10:03[TRAIN]epoch 0, iter 90, output loss: [65.16132]
2023-08-08 18:14:08[TRAIN]epoch 0, iter 100, output loss: [65.93103]
2023-08-08 18:18:14[TRAIN]epoch 0, iter 110, output loss: [71.1369]
2023-08-08 18:22:22[TRAIN]epoch 0, iter 120, output loss: [75.29985]
2023-08-08 18:26:25[TRAIN]epoch 0, iter 130, output loss: [53.242706]
2023-08-08 18:30:28[TRAIN]epoch 0, iter 140, output loss: [54.256916]
2023-08-08 18:34:25[TRAIN]epoch 0, iter 150, output loss: [69.66019]
2023-08-08 18:38:15[TRAIN]epoch 0, iter 160, output loss: [65.595924]
2023-08-08 18:42:06[VALID]epoch 0, iter 0, output loss: [69.894264]
PS E:\project\python>
'''
模型和相关函数定义文件
JOLOv3.py
import time
import os
import paddle
import numpy as np
import cv2
import random
from PIL import Image, ImageEnhance
import xml.etree.ElementTree as ET
import paddle.nn.functional as F#insect name to map number[0,6]
INSECT_NAMES = ['Boerner', 'Leconte', 'Linnaeus', 'acuminatus', 'armandi', 'coleoptera', 'linnaeus']def get_insect_names():"""return a dict, as following,{'Boerner': 0,'Leconte': 1,'Linnaeus': 2, 'acuminatus': 3,'armandi': 4,'coleoptera': 5,'linnaeus': 6}It can map the insect name into an integer label."""insect_category2id = {}for i, item in enumerate(INSECT_NAMES):insect_category2id[item] = ireturn insect_category2idcname2cid = get_insect_names()
print(cname2cid)   #{'Boerner': 0, 'Leconte': 1, 'Linnaeus': 2, 'acuminatus': 3, 'armandi': 4, 'coleoptera': 5, 'linnaeus': 6}
#=======================================================================================#网络模型设计
class YOLOv3(paddle.nn.Layer):def __init__(self, num_classes=7):super(YOLOv3,self).__init__()self.num_classes = num_classes# 提取图像特征的骨干代码self.block = DarkNet53_conv_body()self.block_outputs = []self.yolo_blocks = []self.route_blocks_2 = []# 生成3个层级的特征图P0, P1, P2for i in range(3):# 添加从ci生成ri和ti的模块yolo_block = self.add_sublayer("yolo_detecton_block_%d" % (i),YoloDetectionBlock(ch_in=512//(2**i)*2 if i==0 else 512//(2**i)*2 + 512//(2**i),ch_out = 512//(2**i)))self.yolo_blocks.append(yolo_block)num_filters = 3 * (self.num_classes + 5)# 添加从ti生成pi的模块,这是一个Conv2D操作,输出通道数为3 * (num_classes + 5)block_out = self.add_sublayer("block_out_%d" % (i),paddle.nn.Conv2D(in_channels=512//(2**i)*2,out_channels=num_filters,kernel_size=1,stride=1,padding=0,weight_attr=paddle.ParamAttr(initializer=paddle.nn.initializer.Normal(0., 0.02)),bias_attr=paddle.ParamAttr(initializer=paddle.nn.initializer.Constant(0.0),regularizer=paddle.regularizer.L2Decay(0.))))self.block_outputs.append(block_out)if i < 2:# 对ri进行卷积route = self.add_sublayer("route2_%d"%i,ConvBNLayer(ch_in=512//(2**i),ch_out=256//(2**i),kernel_size=1,stride=1,padding=0))self.route_blocks_2.append(route)# 将ri放大以便跟c_{i+1}保持同样的尺寸self.upsample = Upsample()def forward(self, inputs):outputs = []blocks = self.block(inputs)for i, block in enumerate(blocks):if i > 0:# 将r_{i-1}经过卷积和上采样之后得到特征图,与这一级的ci进行拼接block = paddle.concat([route, block], axis=1)# 从ci生成ti和riroute, tip = self.yolo_blocks[i](block)# 从ti生成piblock_out = self.block_outputs[i](tip)# 将pi放入列表outputs.append(block_out)if i < 2:# 对ri进行卷积调整通道数route = self.route_blocks_2[i](route)# 对ri进行放大,使其尺寸和c_{i+1}保持一致route = self.upsample(route)return outputsdef get_loss(self, outputs, gtbox, gtlabel, gtscore=None,anchors = [10, 13, 16, 30, 33, 23, 30, 61, 62, 45, 59, 119, 116, 90, 156, 198, 373, 326],anchor_masks = [[6, 7, 8], [3, 4, 5], [0, 1, 2]],ignore_thresh=0.7,use_label_smooth=False):"""使用paddle.vision.ops.yolo_loss,直接计算损失函数,过程更简洁,速度也更快"""self.losses = []downsample = 32for i, out in enumerate(outputs): # 对三个层级分别求损失函数anchor_mask_i = anchor_masks[i]loss = paddle.vision.ops.yolo_loss(x=out,  # out是P0, P1, P2中的一个gt_box=gtbox,  # 真实框坐标gt_label=gtlabel,  # 真实框类别gt_score=gtscore,  # 真实框得分,使用mixup训练技巧时需要,不使用该技巧时直接设置为1,形状与gtlabel相同anchors=anchors,   # 锚框尺寸,包含[w0, h0, w1, h1, ..., w8, h8]共9个锚框的尺寸anchor_mask=anchor_mask_i, # 筛选锚框的mask,例如anchor_mask_i=[3, 4, 5],将anchors中第3、4、5个锚框挑选出来给该层级使用class_num=self.num_classes, # 分类类别数ignore_thresh=ignore_thresh, # 当预测框与真实框IoU > ignore_thresh,标注objectness = -1downsample_ratio=downsample, # 特征图相对于原图缩小的倍数,例如P0是32, P1是16,P2是8use_label_smooth=False)      # 使用label_smooth训练技巧时会用到,这里没用此技巧,直接设置为Falseself.losses.append(paddle.mean(loss))  #mean对每张图片求和downsample = downsample // 2 # 下一级特征图的缩放倍数会减半return sum(self.losses) # 对每个层级求和def get_pred(self,outputs,im_shape=None,anchors = [10, 13, 16, 30, 33, 23, 30, 61, 62, 45, 59, 119, 116, 90, 156, 198, 373, 326],anchor_masks = [[6, 7, 8], [3, 4, 5], [0, 1, 2]],valid_thresh = 0.01):downsample = 32total_boxes = []total_scores = []for i, out in enumerate(outputs):anchor_mask = anchor_masks[i]anchors_this_level = []for m in anchor_mask:anchors_this_level.append(anchors[2 * m])anchors_this_level.append(anchors[2 * m + 1])boxes, scores = paddle.vision.ops.yolo_box(x=out,img_size=im_shape,anchors=anchors_this_level,class_num=self.num_classes,conf_thresh=valid_thresh,downsample_ratio=downsample,name="yolo_box" + str(i))total_boxes.append(boxes)total_scores.append(paddle.transpose(scores, perm=[0, 2, 1]))downsample = downsample // 2yolo_boxes = paddle.concat(total_boxes, axis=1)yolo_scores = paddle.concat(total_scores, axis=2)return yolo_boxes, yolo_scores# 定义数据读取类,继承Paddle.io.Dataset
class TrainDataset(paddle.io.Dataset):def  __init__(self, datadir, mode='train'):self.datadir = datadircname2cid = get_insect_names()self.records = get_annotations(cname2cid, datadir)self.img_size = 640  #get_img_size(mode)def __getitem__(self, idx):record = self.records[idx]# print("print: ", record)img, gt_bbox, gt_labels, im_shape = get_img_data(record, size=self.img_size)return img, gt_bbox, gt_labels, np.array(im_shape)def __len__(self):return len(self.records)# 非极大值抑制
def nms(bboxes, scores, score_thresh, nms_thresh, pre_nms_topk, i=0, c=0):"""nms"""inds = np.argsort(scores)inds = inds[::-1]keep_inds = []while(len(inds) > 0):cur_ind = inds[0]cur_score = scores[cur_ind]# if score of the box is less than score_thresh, just drop itif cur_score < score_thresh:breakkeep = Truefor ind in keep_inds:current_box = bboxes[cur_ind]remain_box = bboxes[ind]iou = box_iou_xyxy(current_box, remain_box)if iou > nms_thresh:keep = Falsebreakif i == 0 and c == 4 and cur_ind == 951:print('suppressed, ', keep, i, c, cur_ind, ind, iou)if keep:keep_inds.append(cur_ind)inds = inds[1:]return np.array(keep_inds)# 多分类非极大值抑制
def multiclass_nms(bboxes, scores, score_thresh=0.01, nms_thresh=0.45, pre_nms_topk=1000, pos_nms_topk=100):"""This is for multiclass_nms"""batch_size = bboxes.shape[0]class_num = scores.shape[1]rets = []for i in range(batch_size):bboxes_i = bboxes[i]scores_i = scores[i]ret = []for c in range(class_num):scores_i_c = scores_i[c]keep_inds = nms(bboxes_i, scores_i_c, score_thresh, nms_thresh, pre_nms_topk, i=i, c=c)if len(keep_inds) < 1:continuekeep_bboxes = bboxes_i[keep_inds]keep_scores = scores_i_c[keep_inds]keep_results = np.zeros([keep_scores.shape[0], 6])keep_results[:, 0] = ckeep_results[:, 1] = keep_scores[:]keep_results[:, 2:6] = keep_bboxes[:, :]ret.append(keep_results)if len(ret) < 1:rets.append(ret)continueret_i = np.concatenate(ret, axis=0)scores_i = ret_i[:, 1]if len(scores_i) > pos_nms_topk:inds = np.argsort(scores_i)[::-1]inds = inds[:pos_nms_topk]ret_i = ret_i[inds]rets.append(ret_i)return rets# 计算IoU,矩形框的坐标形式为xyxy,这个函数会被保存在box_utils.py文件中
def box_iou_xyxy(box1, box2):# 获取box1左上角和右下角的坐标x1min, y1min, x1max, y1max = box1[0], box1[1], box1[2], box1[3]# 计算box1的面积s1 = (y1max - y1min + 1.) * (x1max - x1min + 1.)# 获取box2左上角和右下角的坐标x2min, y2min, x2max, y2max = box2[0], box2[1], box2[2], box2[3]# 计算box2的面积s2 = (y2max - y2min + 1.) * (x2max - x2min + 1.)# 计算相交矩形框的坐标xmin = np.maximum(x1min, x2min)ymin = np.maximum(y1min, y2min)xmax = np.minimum(x1max, x2max)ymax = np.minimum(y1max, y2max)# 计算相交矩形行的高度、宽度、面积inter_h = np.maximum(ymax - ymin + 1., 0.)inter_w = np.maximum(xmax - xmin + 1., 0.)intersection = inter_h * inter_w# 计算相并面积union = s1 + s2 - intersection# 计算交并比iou = intersection / unionreturn iou
#
def get_annotations(cname2cid, datadir):filenames = os.listdir(os.path.join(datadir, 'annotations', 'xmls'))records = []ct = 0for fname in filenames:fid = fname.split('.')[0]fpath = os.path.join(datadir, 'annotations', 'xmls', fname)img_file = os.path.join(datadir, 'images', fid + '.jpeg')tree = ET.parse(fpath)if tree.find('id') is None:im_id = np.array([ct])else:im_id = np.array([int(tree.find('id').text)])objs = tree.findall('object')im_w = float(tree.find('size').find('width').text)im_h = float(tree.find('size').find('height').text)gt_bbox = np.zeros((len(objs), 4), dtype=np.float32)gt_class = np.zeros((len(objs), ), dtype=np.int32)is_crowd = np.zeros((len(objs), ), dtype=np.int32)difficult = np.zeros((len(objs), ), dtype=np.int32)for i, obj in enumerate(objs):cname = obj.find('name').textgt_class[i] = cname2cid[cname]_difficult = int(obj.find('difficult').text)x1 = float(obj.find('bndbox').find('xmin').text)y1 = float(obj.find('bndbox').find('ymin').text)x2 = float(obj.find('bndbox').find('xmax').text)y2 = float(obj.find('bndbox').find('ymax').text)x1 = max(0, x1)y1 = max(0, y1)x2 = min(im_w - 1, x2)y2 = min(im_h - 1, y2)# 这里使用xywh格式来表示目标物体真实框gt_bbox[i] = [(x1+x2)/2.0 , (y1+y2)/2.0, x2-x1+1., y2-y1+1.]is_crowd[i] = 0difficult[i] = _difficultvoc_rec = {'im_file': img_file,'im_id': im_id,'h': im_h,'w': im_w,'is_crowd': is_crowd,'gt_class': gt_class,'gt_bbox': gt_bbox,'gt_poly': [],'difficult': difficult}if len(objs) != 0:records.append(voc_rec)ct += 1return recordsdef get_bbox(gt_bbox, gt_class):# 对于一般的检测任务来说,一张图片上往往会有多个目标物体# 设置参数MAX_NUM = 50, 即一张图片最多取50个真实框;如果真实# 框的数目少于50个,则将不足部分的gt_bbox, gt_class和gt_score的各项数值全设置为0MAX_NUM = 50gt_bbox2 = np.zeros((MAX_NUM, 4))gt_class2 = np.zeros((MAX_NUM,))for i in range(len(gt_bbox)):gt_bbox2[i, :] = gt_bbox[i, :]gt_class2[i] = gt_class[i]if i >= MAX_NUM:breakreturn gt_bbox2, gt_class2def get_img_data_from_file(record):  """record is a dict as following,record = {'im_file': img_file,'im_id': im_id,'h': im_h,'w': im_w,'is_crowd': is_crowd,'gt_class': gt_class,'gt_bbox': gt_bbox,'gt_poly': [],'difficult': difficult}"""im_file = record['im_file']h = record['h']w = record['w']is_crowd = record['is_crowd']gt_class = record['gt_class']gt_bbox = record['gt_bbox']difficult = record['difficult']img = cv2.imread(im_file)img = cv2.cvtColor(img, cv2.COLOR_BGR2RGB)# check if h and w in record equals that read from imgassert img.shape[0] == int(h), \"image height of {} inconsistent in record({}) and img file({})".format(im_file, h, img.shape[0])assert img.shape[1] == int(w), \"image width of {} inconsistent in record({}) and img file({})".format(im_file, w, img.shape[1])gt_boxes, gt_labels = get_bbox(gt_bbox, gt_class)# gt_bbox 用相对值gt_boxes[:, 0] = gt_boxes[:, 0] / float(w)gt_boxes[:, 1] = gt_boxes[:, 1] / float(h)gt_boxes[:, 2] = gt_boxes[:, 2] / float(w)gt_boxes[:, 3] = gt_boxes[:, 3] / float(h)return img, gt_boxes, gt_labels, (h, w)# 将 list形式的batch数据 转化成多个array构成的tuple
def make_test_array(batch_data):img_name_array = np.array([item[0] for item in batch_data])img_data_array = np.array([item[1] for item in batch_data], dtype = 'float32')img_scale_array = np.array([item[2] for item in batch_data], dtype='int32')return img_name_array, img_data_array, img_scale_array#图像增广
def image_augment(img, gtboxes, gtlabels, size, means=None):# 随机改变亮暗、对比度和颜色等img = random_distort(img)# 随机填充img, gtboxes = random_expand(img, gtboxes, fill=means)# 随机裁剪img, gtboxes, gtlabels, = random_crop(img, gtboxes, gtlabels)# 随机缩放img = random_interp(img, size)# 随机翻转img, gtboxes = random_flip(img, gtboxes)# 随机打乱真实框排列顺序gtboxes, gtlabels = shuffle_gtbox(gtboxes, gtlabels)return img.astype('float32'), gtboxes.astype('float32'), gtlabels.astype('int32')
#======================================================================================
def random_distort(img):# 随机改变亮度def random_brightness(img, lower=0.5, upper=1.5):e = np.random.uniform(lower, upper)return ImageEnhance.Brightness(img).enhance(e)# 随机改变对比度def random_contrast(img, lower=0.5, upper=1.5):e = np.random.uniform(lower, upper)return ImageEnhance.Contrast(img).enhance(e)# 随机改变颜色def random_color(img, lower=0.5, upper=1.5):e = np.random.uniform(lower, upper)return ImageEnhance.Color(img).enhance(e)ops = [random_brightness, random_contrast, random_color]np.random.shuffle(ops)img = Image.fromarray(img)img = ops[0](img)img = ops[1](img)img = ops[2](img)img = np.asarray(img)return img# 随机填充
def random_expand(img,gtboxes,max_ratio=4.,fill=None,keep_ratio=True,thresh=0.5):if random.random() > thresh:return img, gtboxesif max_ratio < 1.0:return img, gtboxesh, w, c = img.shaperatio_x = random.uniform(1, max_ratio)if keep_ratio:ratio_y = ratio_xelse:ratio_y = random.uniform(1, max_ratio)oh = int(h * ratio_y)ow = int(w * ratio_x)off_x = random.randint(0, ow - w)off_y = random.randint(0, oh - h)out_img = np.zeros((oh, ow, c))if fill and len(fill) == c:for i in range(c):out_img[:, :, i] = fill[i] * 255.0out_img[off_y:off_y + h, off_x:off_x + w, :] = imggtboxes[:, 0] = ((gtboxes[:, 0] * w) + off_x) / float(ow)gtboxes[:, 1] = ((gtboxes[:, 1] * h) + off_y) / float(oh)gtboxes[:, 2] = gtboxes[:, 2] / ratio_xgtboxes[:, 3] = gtboxes[:, 3] / ratio_yreturn out_img.astype('uint8'), gtboxes# 随机裁剪
def random_crop(img,boxes,labels,scales=[0.3, 1.0],max_ratio=2.0,constraints=None,max_trial=50):if len(boxes) == 0:return img, boxesif not constraints:constraints = [(0.1, 1.0), (0.3, 1.0), (0.5, 1.0), (0.7, 1.0),(0.9, 1.0), (0.0, 1.0)]img = Image.fromarray(img)w, h = img.sizecrops = [(0, 0, w, h)]for min_iou, max_iou in constraints:for _ in range(max_trial):scale = random.uniform(scales[0], scales[1])aspect_ratio = random.uniform(max(1 / max_ratio, scale * scale), \min(max_ratio, 1 / scale / scale))crop_h = int(h * scale / np.sqrt(aspect_ratio))crop_w = int(w * scale * np.sqrt(aspect_ratio))crop_x = random.randrange(w - crop_w)crop_y = random.randrange(h - crop_h)crop_box = np.array([[(crop_x + crop_w / 2.0) / w,(crop_y + crop_h / 2.0) / h,crop_w / float(w), crop_h / float(h)]])iou = multi_box_iou_xywh(crop_box, boxes)if min_iou <= iou.min() and max_iou >= iou.max():crops.append((crop_x, crop_y, crop_w, crop_h))breakwhile crops:crop = crops.pop(np.random.randint(0, len(crops)))crop_boxes, crop_labels, box_num = box_crop(boxes, labels, crop, (w, h))if box_num < 1:continueimg = img.crop((crop[0], crop[1], crop[0] + crop[2],crop[1] + crop[3])).resize(img.size, Image.LANCZOS)img = np.asarray(img)return img, crop_boxes, crop_labelsimg = np.asarray(img)return img, boxes, labels# 随机缩放
def random_interp(img, size, interp=None):interp_method = [cv2.INTER_NEAREST,cv2.INTER_LINEAR,cv2.INTER_AREA,cv2.INTER_CUBIC,cv2.INTER_LANCZOS4,]if not interp or interp not in interp_method:interp = interp_method[random.randint(0, len(interp_method) - 1)]h, w, _ = img.shapeim_scale_x = size / float(w)im_scale_y = size / float(h)img = cv2.resize(img, None, None, fx=im_scale_x, fy=im_scale_y, interpolation=interp)return img# 随机翻转
def random_flip(img, gtboxes, thresh=0.5):if random.random() > thresh:img = img[:, ::-1, :]gtboxes[:, 0] = 1.0 - gtboxes[:, 0]return img, gtboxes# 随机打乱真实框排列顺序
def shuffle_gtbox(gtbox, gtlabel):gt = np.concatenate([gtbox, gtlabel[:, np.newaxis]], axis=1)idx = np.arange(gt.shape[0])np.random.shuffle(idx)gt = gt[idx, :]return gt[:, :4], gt[:, 4]#======================================================================================def get_img_data(record, size=640):img, gt_boxes, gt_labels, scales = get_img_data_from_file(record)img, gt_boxes, gt_labels = image_augment(img, gt_boxes, gt_labels, size)mean = [0.485, 0.456, 0.406]std = [0.229, 0.224, 0.225]mean = np.array(mean).reshape((1, 1, -1))std = np.array(std).reshape((1, 1, -1))img = (img / 255.0 - mean) / stdimg = img.astype('float32').transpose((2, 0, 1))return img, gt_boxes, gt_labels, scales# 定义上采样模块
class Upsample(paddle.nn.Layer):def __init__(self, scale=2):super(Upsample,self).__init__()self.scale = scaledef forward(self, inputs):# get dynamic upsample output shapeshape_nchw = paddle.shape(inputs)shape_hw = paddle.slice(shape_nchw, axes=[0], starts=[2], ends=[4])shape_hw.stop_gradient = Truein_shape = paddle.cast(shape_hw, dtype='int32')out_shape = in_shape * self.scaleout_shape.stop_gradient = True# reisze by actual_shapeout = paddle.nn.functional.interpolate(x=inputs, scale_factor=self.scale, mode="NEAREST")return out
#
#======================================================================================
#from paddle net from baidu.com codeclass ConvBNLayer(paddle.nn.Layer):def __init__(self, ch_in, ch_out, kernel_size=3, stride=1, groups=1,padding=0, act="leaky"):super(ConvBNLayer, self).__init__()self.conv = paddle.nn.Conv2D(in_channels=ch_in,out_channels=ch_out,kernel_size=kernel_size,stride=stride,padding=padding,groups=groups,weight_attr=paddle.ParamAttr(initializer=paddle.nn.initializer.Normal(0., 0.02)),bias_attr=False)self.batch_norm = paddle.nn.BatchNorm2D(num_features=ch_out,weight_attr=paddle.ParamAttr(initializer=paddle.nn.initializer.Normal(0., 0.02),regularizer=paddle.regularizer.L2Decay(0.)),bias_attr=paddle.ParamAttr(initializer=paddle.nn.initializer.Constant(0.0),regularizer=paddle.regularizer.L2Decay(0.)))self.act = actdef forward(self, inputs):out = self.conv(inputs)out = self.batch_norm(out)if self.act == 'leaky':out = F.leaky_relu(x=out, negative_slope=0.1)return outclass DownSample(paddle.nn.Layer):# 下采样,图片尺寸减半,具体实现方式是使用stirde=2的卷积def __init__(self,ch_in,ch_out,kernel_size=3,stride=2,padding=1):super(DownSample, self).__init__()self.conv_bn_layer = ConvBNLayer(ch_in=ch_in,ch_out=ch_out,kernel_size=kernel_size,stride=stride,padding=padding)self.ch_out = ch_outdef forward(self, inputs):out = self.conv_bn_layer(inputs)return outclass BasicBlock(paddle.nn.Layer):"""基本残差块的定义,输入x经过两层卷积,然后接第二层卷积的输出和输入x相加"""def __init__(self, ch_in, ch_out):super(BasicBlock, self).__init__()self.conv1 = ConvBNLayer(ch_in=ch_in,ch_out=ch_out,kernel_size=1,stride=1,padding=0)self.conv2 = ConvBNLayer(ch_in=ch_out,ch_out=ch_out*2,kernel_size=3,stride=1,padding=1)def forward(self, inputs):conv1 = self.conv1(inputs)conv2 = self.conv2(conv1)out = paddle.add(x=inputs, y=conv2)return outclass LayerWarp(paddle.nn.Layer):"""添加多层残差块,组成Darknet53网络的一个层级"""def __init__(self, ch_in, ch_out, count, is_test=True):super(LayerWarp,self).__init__()self.basicblock0 = BasicBlock(ch_in,ch_out)self.res_out_list = []for i in range(1, count):res_out = self.add_sublayer("basic_block_%d" % (i), # 使用add_sublayer添加子层BasicBlock(ch_out*2,ch_out))self.res_out_list.append(res_out)def forward(self,inputs):y = self.basicblock0(inputs)for basic_block_i in self.res_out_list:y = basic_block_i(y)return yclass YoloDetectionBlock(paddle.nn.Layer):# define YOLOv3 detection head# 使用多层卷积和BN提取特征def __init__(self,ch_in,ch_out,is_test=True):super(YoloDetectionBlock, self).__init__()assert ch_out % 2 == 0, \"channel {} cannot be divided by 2".format(ch_out)self.conv0 = ConvBNLayer(ch_in=ch_in,ch_out=ch_out,kernel_size=1,stride=1,padding=0)self.conv1 = ConvBNLayer(ch_in=ch_out,ch_out=ch_out*2,kernel_size=3,stride=1,padding=1)self.conv2 = ConvBNLayer(ch_in=ch_out*2,ch_out=ch_out,kernel_size=1,stride=1,padding=0)self.conv3 = ConvBNLayer(ch_in=ch_out,ch_out=ch_out*2,kernel_size=3,stride=1,padding=1)self.route = ConvBNLayer(ch_in=ch_out*2,ch_out=ch_out,kernel_size=1,stride=1,padding=0)self.tip = ConvBNLayer(ch_in=ch_out,ch_out=ch_out*2,kernel_size=3,stride=1,padding=1)def forward(self, inputs):out = self.conv0(inputs)out = self.conv1(out)out = self.conv2(out)out = self.conv3(out)route = self.route(out)tip = self.tip(route)return route, tip# 定义Sigmoid函数
def sigmoid(x):return 1./(1.0 + np.exp(-x))# 将网络特征图输出的[tx, ty, th, tw]转化成预测框的坐标[x1, y1, x2, y2]
def get_yolo_box_xxyy(pred, anchors, num_classes, downsample):"""pred是网络输出特征图转化成的numpy.ndarrayanchors 是一个list。表示锚框的大小,例如 anchors = [116, 90, 156, 198, 373, 326],表示有三个锚框,第一个锚框大小[w, h]是[116, 90],第二个锚框大小是[156, 198],第三个锚框大小是[373, 326]"""batchsize = pred.shape[0]num_rows = pred.shape[-2]num_cols = pred.shape[-1]input_h = num_rows * downsampleinput_w = num_cols * downsamplenum_anchors = len(anchors) // 2# pred的形状是[N, C, H, W],其中C = NUM_ANCHORS * (5 + NUM_CLASSES)# 对pred进行reshapepred = pred.reshape([-1, num_anchors, 5+num_classes, num_rows, num_cols])pred_location = pred[:, :, 0:4, :, :]pred_location = np.transpose(pred_location, (0,3,4,1,2))anchors_this = []for ind in range(num_anchors):anchors_this.append([anchors[ind*2], anchors[ind*2+1]])anchors_this = np.array(anchors_this).astype('float32')# 最终输出数据保存在pred_box中,其形状是[N, H, W, NUM_ANCHORS, 4],# 其中最后一个维度4代表位置的4个坐标pred_box = np.zeros(pred_location.shape)for n in range(batchsize):for i in range(num_rows):for j in range(num_cols):for k in range(num_anchors):pred_box[n, i, j, k, 0] = jpred_box[n, i, j, k, 1] = ipred_box[n, i, j, k, 2] = anchors_this[k][0]pred_box[n, i, j, k, 3] = anchors_this[k][1]# 这里使用相对坐标,pred_box的输出元素数值在0.~1.0之间pred_box[:, :, :, :, 0] = (sigmoid(pred_location[:, :, :, :, 0]) + pred_box[:, :, :, :, 0]) / num_colspred_box[:, :, :, :, 1] = (sigmoid(pred_location[:, :, :, :, 1]) + pred_box[:, :, :, :, 1]) / num_rowspred_box[:, :, :, :, 2] = np.exp(pred_location[:, :, :, :, 2]) * pred_box[:, :, :, :, 2] / input_wpred_box[:, :, :, :, 3] = np.exp(pred_location[:, :, :, :, 3]) * pred_box[:, :, :, :, 3] / input_h# 将坐标从xywh转化成xyxypred_box[:, :, :, :, 0] = pred_box[:, :, :, :, 0] - pred_box[:, :, :, :, 2] / 2.pred_box[:, :, :, :, 1] = pred_box[:, :, :, :, 1] - pred_box[:, :, :, :, 3] / 2.pred_box[:, :, :, :, 2] = pred_box[:, :, :, :, 0] + pred_box[:, :, :, :, 2]pred_box[:, :, :, :, 3] = pred_box[:, :, :, :, 1] + pred_box[:, :, :, :, 3]pred_box = np.clip(pred_box, 0., 1.0)return pred_box# 挑选出跟真实框IoU大于阈值的预测框
def get_iou_above_thresh_inds(pred_box, gt_boxes, iou_threshold):batchsize = pred_box.shape[0]num_rows = pred_box.shape[1]num_cols = pred_box.shape[2]num_anchors = pred_box.shape[3]ret_inds = np.zeros([batchsize, num_rows, num_cols, num_anchors])for i in range(batchsize):pred_box_i = pred_box[i]gt_boxes_i = gt_boxes[i]for k in range(len(gt_boxes_i)): #gt in gt_boxes_i:gt = gt_boxes_i[k]gtx_min = gt[0] - gt[2] / 2.gty_min = gt[1] - gt[3] / 2.gtx_max = gt[0] + gt[2] / 2.gty_max = gt[1] + gt[3] / 2.if (gtx_max - gtx_min < 1e-3) or (gty_max - gty_min < 1e-3):continuex1 = np.maximum(pred_box_i[:, :, :, 0], gtx_min)y1 = np.maximum(pred_box_i[:, :, :, 1], gty_min)x2 = np.minimum(pred_box_i[:, :, :, 2], gtx_max)y2 = np.minimum(pred_box_i[:, :, :, 3], gty_max)intersection = np.maximum(x2 - x1, 0.) * np.maximum(y2 - y1, 0.)s1 = (gty_max - gty_min) * (gtx_max - gtx_min)s2 = (pred_box_i[:, :, :, 2] - pred_box_i[:, :, :, 0]) * (pred_box_i[:, :, :, 3] - pred_box_i[:, :, :, 1])union = s2 + s1 - intersectioniou = intersection / unionabove_inds = np.where(iou > iou_threshold)ret_inds[i][above_inds] = 1ret_inds = np.transpose(ret_inds, (0,3,1,2))return ret_inds.astype('bool')def label_objectness_ignore(label_objectness, iou_above_thresh_indices):# 注意:这里不能简单的使用 label_objectness[iou_above_thresh_indices] = -1,#         这样可能会造成label_objectness为1的点被设置为-1了#         只有将那些被标注为0,且与真实框IoU超过阈值的预测框才被标注为-1negative_indices = (label_objectness < 0.5)ignore_indices = negative_indices * iou_above_thresh_indiceslabel_objectness[ignore_indices] = -1return label_objectness# DarkNet 每组残差块的个数,来自DarkNet的网络结构图
DarkNet_cfg = {53: ([1, 2, 8, 8, 4])}class DarkNet53_conv_body(paddle.nn.Layer):def __init__(self):super(DarkNet53_conv_body, self).__init__()self.stages = DarkNet_cfg[53]self.stages = self.stages[0:5]# 第一层卷积self.conv0 = ConvBNLayer(ch_in=3,ch_out=32,kernel_size=3,stride=1,padding=1)# 下采样,使用stride=2的卷积来实现self.downsample0 = DownSample(ch_in=32,ch_out=32 * 2)# 添加各个层级的实现self.darknet53_conv_block_list = []self.downsample_list = []for i, stage in enumerate(self.stages):conv_block = self.add_sublayer("stage_%d" % (i),LayerWarp(32*(2**(i+1)),32*(2**i),stage))self.darknet53_conv_block_list.append(conv_block)# 两个层级之间使用DownSample将尺寸减半for i in range(len(self.stages) - 1):downsample = self.add_sublayer("stage_%d_downsample" % i,DownSample(ch_in=32*(2**(i+1)),ch_out=32*(2**(i+2))))self.downsample_list.append(downsample)def forward(self,inputs):out = self.conv0(inputs)#print("conv1:",out.numpy())out = self.downsample0(out)#print("dy:",out.numpy())blocks = []for i, conv_block_i in enumerate(self.darknet53_conv_block_list): #依次将各个层级作用在输入上面out = conv_block_i(out)blocks.append(out)if i < len(self.stages) - 1:out = self.downsample_list[i](out)return blocks[-1:-4:-1] # 将C0, C1, C2作为返回值#
def multi_box_iou_xywh(box1, box2):"""In this case, box1 or box2 can contain multi boxes.Only two cases can be processed in this method:1, box1 and box2 have the same shape, box1.shape == box2.shape2, either box1 or box2 contains only one box, len(box1) == 1 or len(box2) == 1If the shape of box1 and box2 does not match, and both of them contain multi boxes, it will be wrong."""assert box1.shape[-1] == 4, "Box1 shape[-1] should be 4."assert box2.shape[-1] == 4, "Box2 shape[-1] should be 4."b1_x1, b1_x2 = box1[:, 0] - box1[:, 2] / 2, box1[:, 0] + box1[:, 2] / 2b1_y1, b1_y2 = box1[:, 1] - box1[:, 3] / 2, box1[:, 1] + box1[:, 3] / 2b2_x1, b2_x2 = box2[:, 0] - box2[:, 2] / 2, box2[:, 0] + box2[:, 2] / 2b2_y1, b2_y2 = box2[:, 1] - box2[:, 3] / 2, box2[:, 1] + box2[:, 3] / 2inter_x1 = np.maximum(b1_x1, b2_x1)inter_x2 = np.minimum(b1_x2, b2_x2)inter_y1 = np.maximum(b1_y1, b2_y1)inter_y2 = np.minimum(b1_y2, b2_y2)inter_w = inter_x2 - inter_x1inter_h = inter_y2 - inter_y1inter_w = np.clip(inter_w, a_min=0., a_max=None)inter_h = np.clip(inter_h, a_min=0., a_max=None)inter_area = inter_w * inter_hb1_area = (b1_x2 - b1_x1) * (b1_y2 - b1_y1)b2_area = (b2_x2 - b2_x1) * (b2_y2 - b2_y1)return inter_area / (b1_area + b2_area - inter_area)def box_crop(boxes, labels, crop, img_shape):x, y, w, h = map(float, crop)im_w, im_h = map(float, img_shape)boxes = boxes.copy()boxes[:, 0], boxes[:, 2] = (boxes[:, 0] - boxes[:, 2] / 2) * im_w, (boxes[:, 0] + boxes[:, 2] / 2) * im_wboxes[:, 1], boxes[:, 3] = (boxes[:, 1] - boxes[:, 3] / 2) * im_h, (boxes[:, 1] + boxes[:, 3] / 2) * im_hcrop_box = np.array([x, y, x + w, y + h])centers = (boxes[:, :2] + boxes[:, 2:]) / 2.0mask = np.logical_and(crop_box[:2] <= centers, centers <= crop_box[2:]).all(axis=1)boxes[:, :2] = np.maximum(boxes[:, :2], crop_box[:2])boxes[:, 2:] = np.minimum(boxes[:, 2:], crop_box[2:])boxes[:, :2] -= crop_box[:2]boxes[:, 2:] -= crop_box[:2]mask = np.logical_and(mask, (boxes[:, :2] < boxes[:, 2:]).all(axis=1))boxes = boxes * np.expand_dims(mask.astype('float32'), axis=1)labels = labels * mask.astype('float32')boxes[:, 0], boxes[:, 2] = (boxes[:, 0] + boxes[:, 2]) / 2 / w, (boxes[:, 2] - boxes[:, 0]) / wboxes[:, 1], boxes[:, 3] = (boxes[:, 1] + boxes[:, 3]) / 2 / h, (boxes[:, 3] - boxes[:, 1]) / hreturn boxes, labels, mask.sum()#
相关文章:
目标检测YOLOv3基于DarkNet53模型测试-笔记
目标检测YOLOv3基于DarkNet53模型测试-笔记 预测和试测结果: 预测代码如下所示: testInsects.py #YOLOv3网模型测试-单图片文件测试并显示测试结果 import time import os import paddle import numpy as np import cv2 import random from PIL impor…...

Unity项目中查找所有使用某一张图片的材质球,再查找所有使用材质球的预设
废话少说,直接上代码。 using UnityEditor; using UnityEngine;public class FindDependencies : MonoBehaviour {static bool m_bIsSaveFile false;static TextWriteHelper m_szMaterialList new TextWriteHelper();static TextWriteHelper m_szPrefabList new…...

postman接口测试中文汉化教程
想必同学们对于接口测试工具postman的使用并不陌生,以及最近大为流行的国产工具apifox。对于使用过的同学来说,两者区别以及优缺点很容易别展示出来,postman相比apifox来说更加轻量,但是apifox更加符合国人的使用习惯....中国人给…...

java.lang.ClassNotFoundException: com.mysql.cj.jdbc.Driver的解决办法
springcloudAlibaba项目连接mysql时(mysql版本8.0.31,Springboot2.2.2,spring cloud Hoxton.SR1,spring cloud alibaba 2.1.0.RELEASE),驱动名称报红,配置如下: 原因:引入的jdbc驱动包和使用的m…...
认识所有权
专栏简介:本专栏作为Rust语言的入门级的文章,目的是为了分享关于Rust语言的编程技巧和知识。对于Rust语言,虽然历史没有C、和python历史悠远,但是它的优点可以说是非常的多,既继承了C运行速度,还拥有了Java…...

恒盛策略:怎样看k线图实图详解如何看懂k线图?
K线图是股票剖析中常用的一种图表,它能够反映一段时间内股票价格的变化状况,对于股票投资者来说非常重要。但是,由于k线图并不是很好理解,很多投资者并不知道怎样看懂它。那么,咱们就从多个视点来看看怎样看k线图实图&…...
物联网的定义、原理、示例、未来
什么是物联网? 物联网 (IoT) 是指由嵌入传感器、软件和网络连接的物理设备、车辆、电器和其他物理对象组成的网络,允许它们收集和共享数据。这些设备(也称为“智能对象”)的范围可以从简单的“智能家居”设备(如智能恒温器)到可穿戴设备(如智能手表和支持RFID的服…...
Vue 整合 Element UI 、路由嵌套和参数传递(五)
一、整合 Element UI 1.1 工程初始化 使用管理员的模式进入 cmd 的命令行模式,创建一个名为 hello-vue 的工程,命令为: # 1、目录切换 cd F:\idea_home\vue# 2、项目的初始化,记得一路的 no vue init webpack hello-vue 1.2 安装…...
Git全栈体系(四)
第七章 IDEA 集成 Git 一、配置 Git 忽略文件 1. Eclipse 特定文件 2. IDEA 特定文件 3. Maven 工程的 target 目录 4. 问题 4.1 为什么要忽略他们? 与项目的实际功能无关,不参与服务器上部署运行。把它们忽略掉能够屏蔽 IDE 工具之间的差异。 4.2 …...
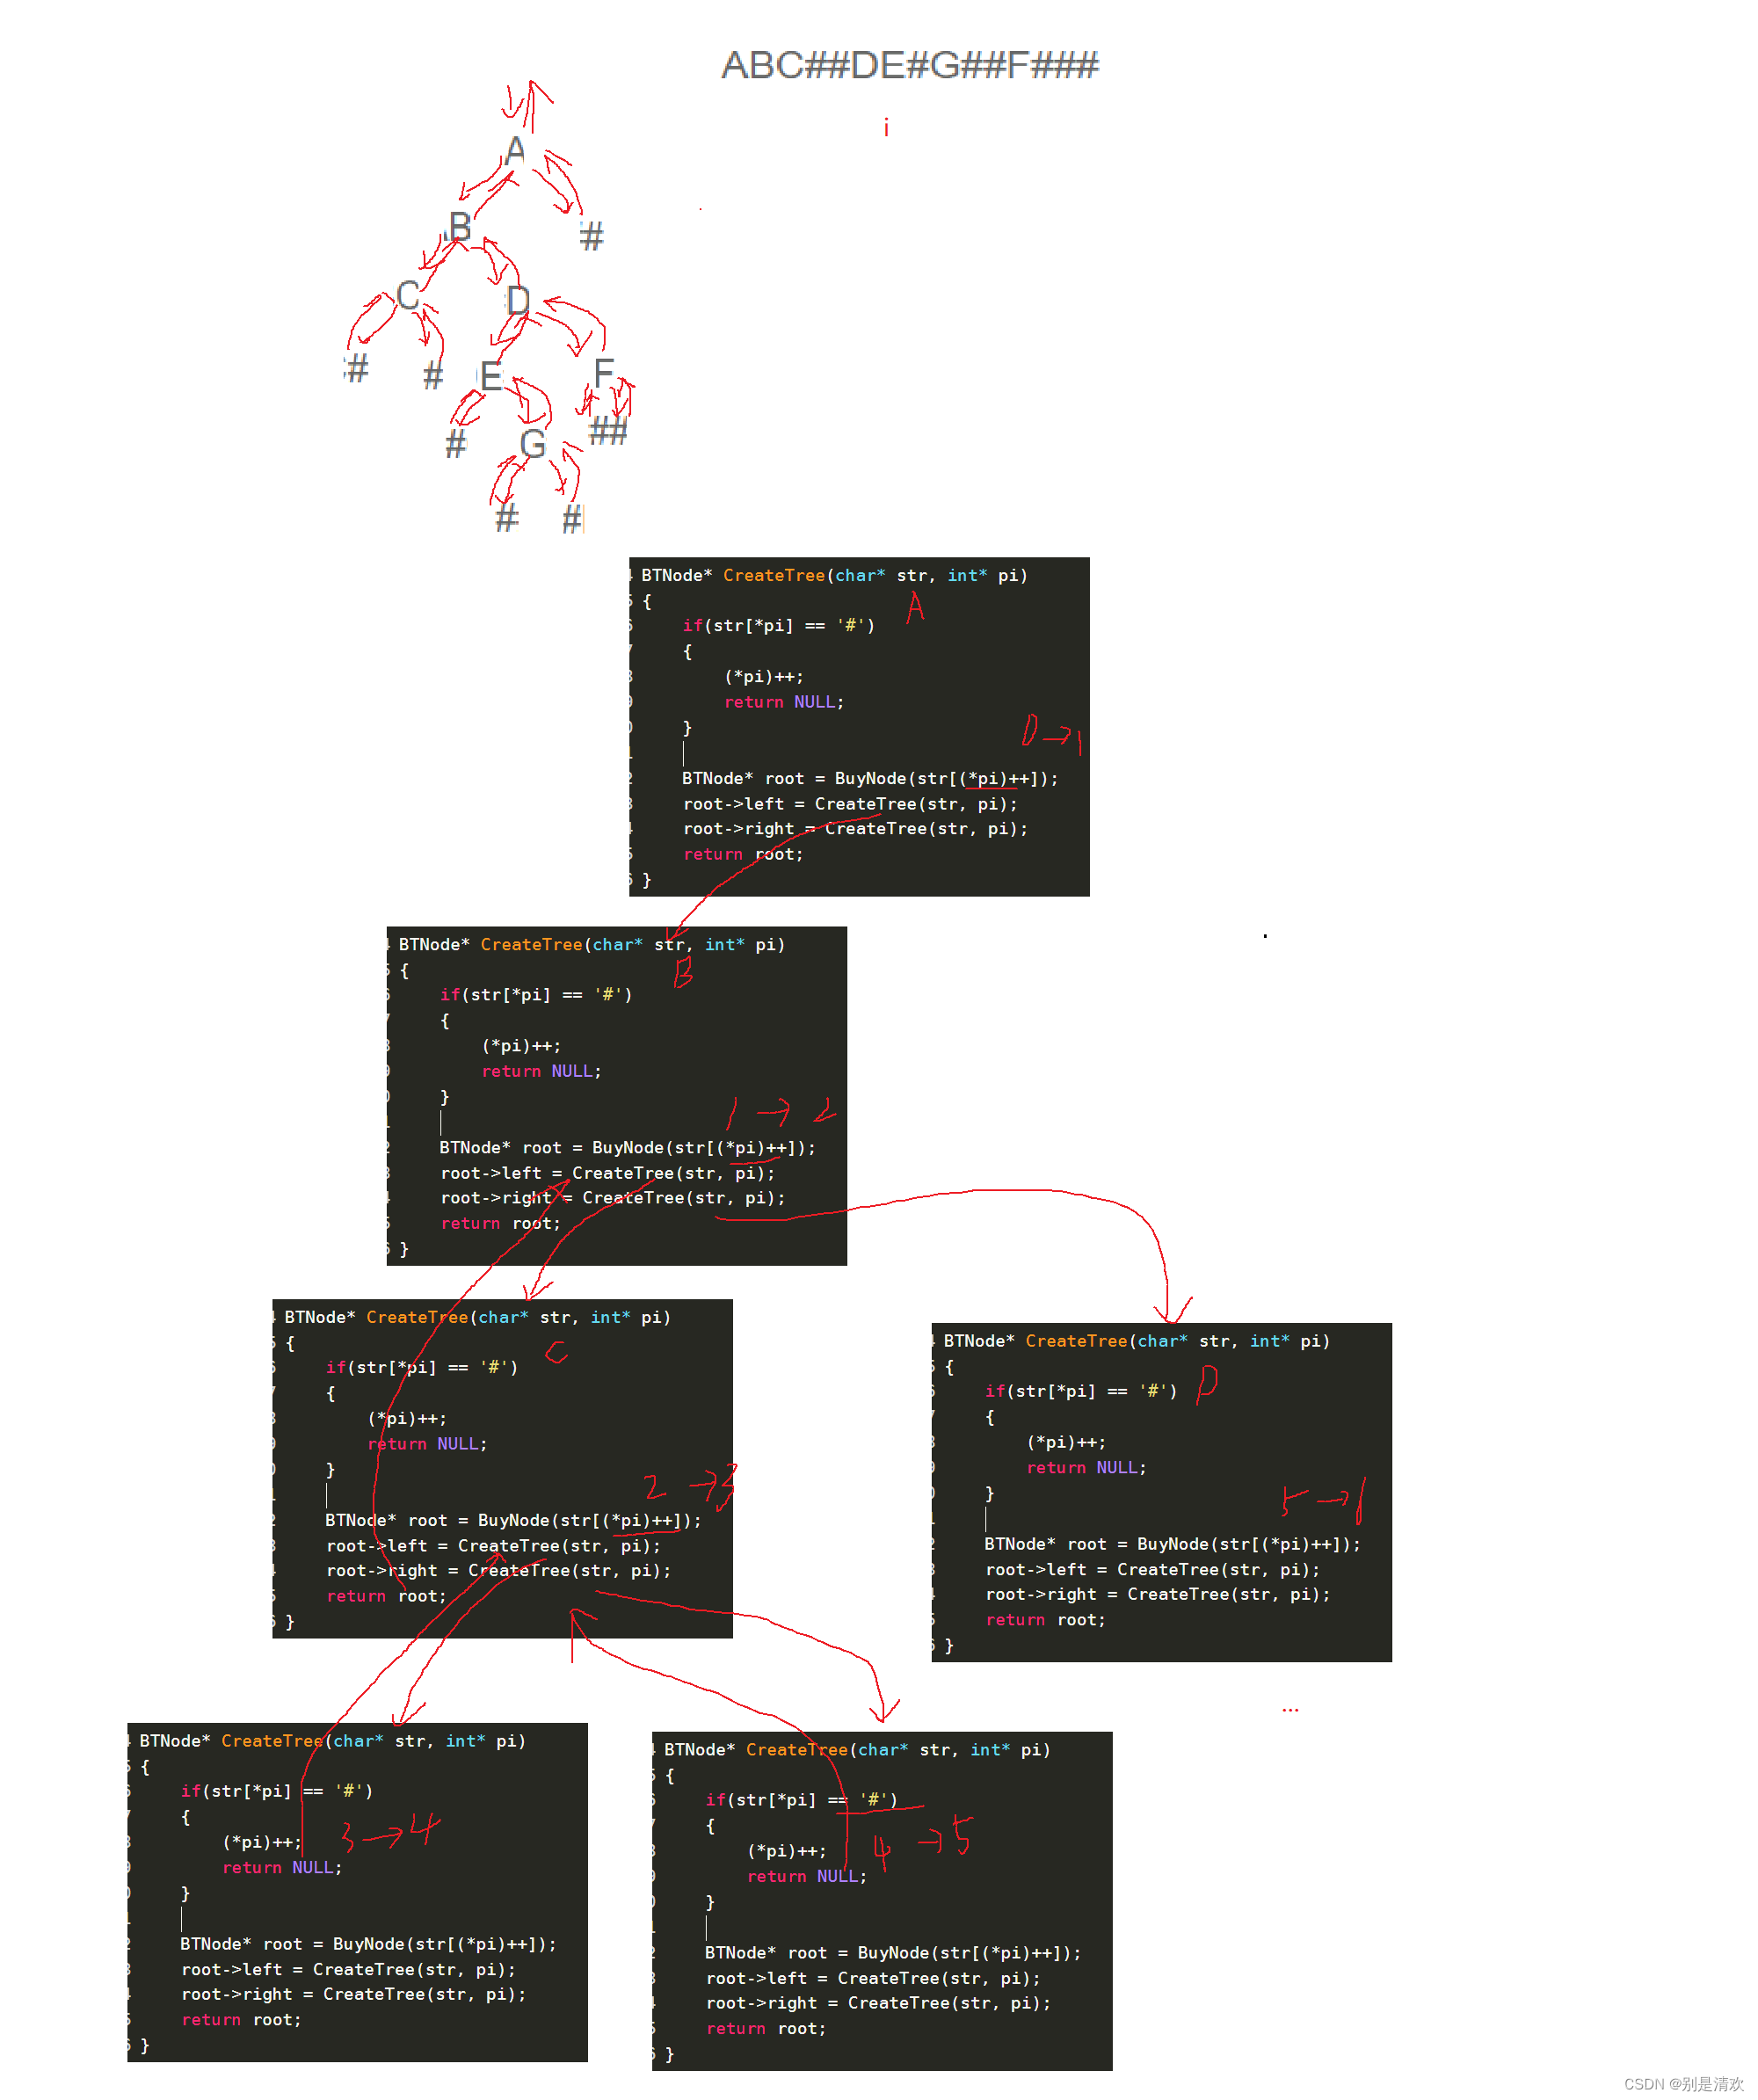
数据结构初阶--二叉树的链式结构
目录 一.二叉树链式结构的概念 二.二叉树链式结构的功能实现 2.1.链式二叉树的定义 2.2.链式二叉树的构建 2.3.链式二叉树的遍历 2.3.1.先序遍历 2.3.2.中序遍历 2.3.3.后序遍历 2.3.4.层序遍历 2.4.链式二叉树的求二叉树的结点数量 法一:计数法 法二&a…...

Taro UI中的AtTabs
TaroUI 中的 AtTabs 是一个用于创建标签页(tab)组件的组件。它提供了一种简单的方式来切换显示不同的内容。 AtTabs 的使用方式如下: 首先,引入 AtTabs 组件和必要的样式: import { AtTabs, AtTabsPane } from taro-ui import taro-ui/dis…...

ChatGPT FAQ指南
问:chatgpt 国内不开放注册吗? OpenAI不允许大陆和香港用户注册访问 openai可以的,chatGPT不行 以下国家IP不支持使用 中国(包含港澳台) 俄罗斯 乌克兰 阿富汗 白俄罗斯 委内瑞拉 伊朗 埃及 问:ChatGPT和GPT-3什么关系? GPT-3是OpenAI推出的AI大语言模型 ChatGPT是在G…...

在矩池云使用ChatGLM-6B ChatGLM2-6B
ChatGLM-6B 和 ChatGLM2-6B都是基于 General Language Model (GLM) 架构的对话语言模型,是清华大学 KEG 实验室和智谱 AI 公司于 2023 年共同发布的语言模型。模型有 62 亿参数,一经发布便受到了开源社区的欢迎,在中文语义理解和对话生成上有…...
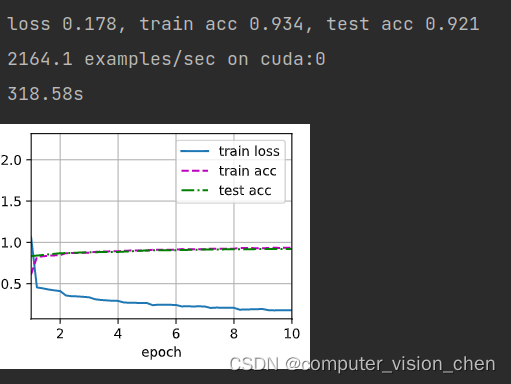
7.2 手撕VGG11模型 使用Fashion_mnist数据训练VGG
VGG首先引入块的思想将模型通用模板化 VGG模型的特点 与AlexNet,LeNet一样,VGG网络可以分为两部分,第一部分主要由卷积层和汇聚层组成,第二部分由全连接层组成。 VGG有5个卷积块,前两个块包含一个卷积层,…...

docker安装ES
拉取镜像文件 sudo docker pull elasticsearch:7.12.0 创建容器挂载目录 sudo mkdir -p /home/elasticsearch/config sudo mkdir -p /home/elasticsearch/data sudo mkdir -p /home/elasticsearch/plugins elasticsearch.yml http.host: 0.0.0.0 创建容器 sudo docker r…...
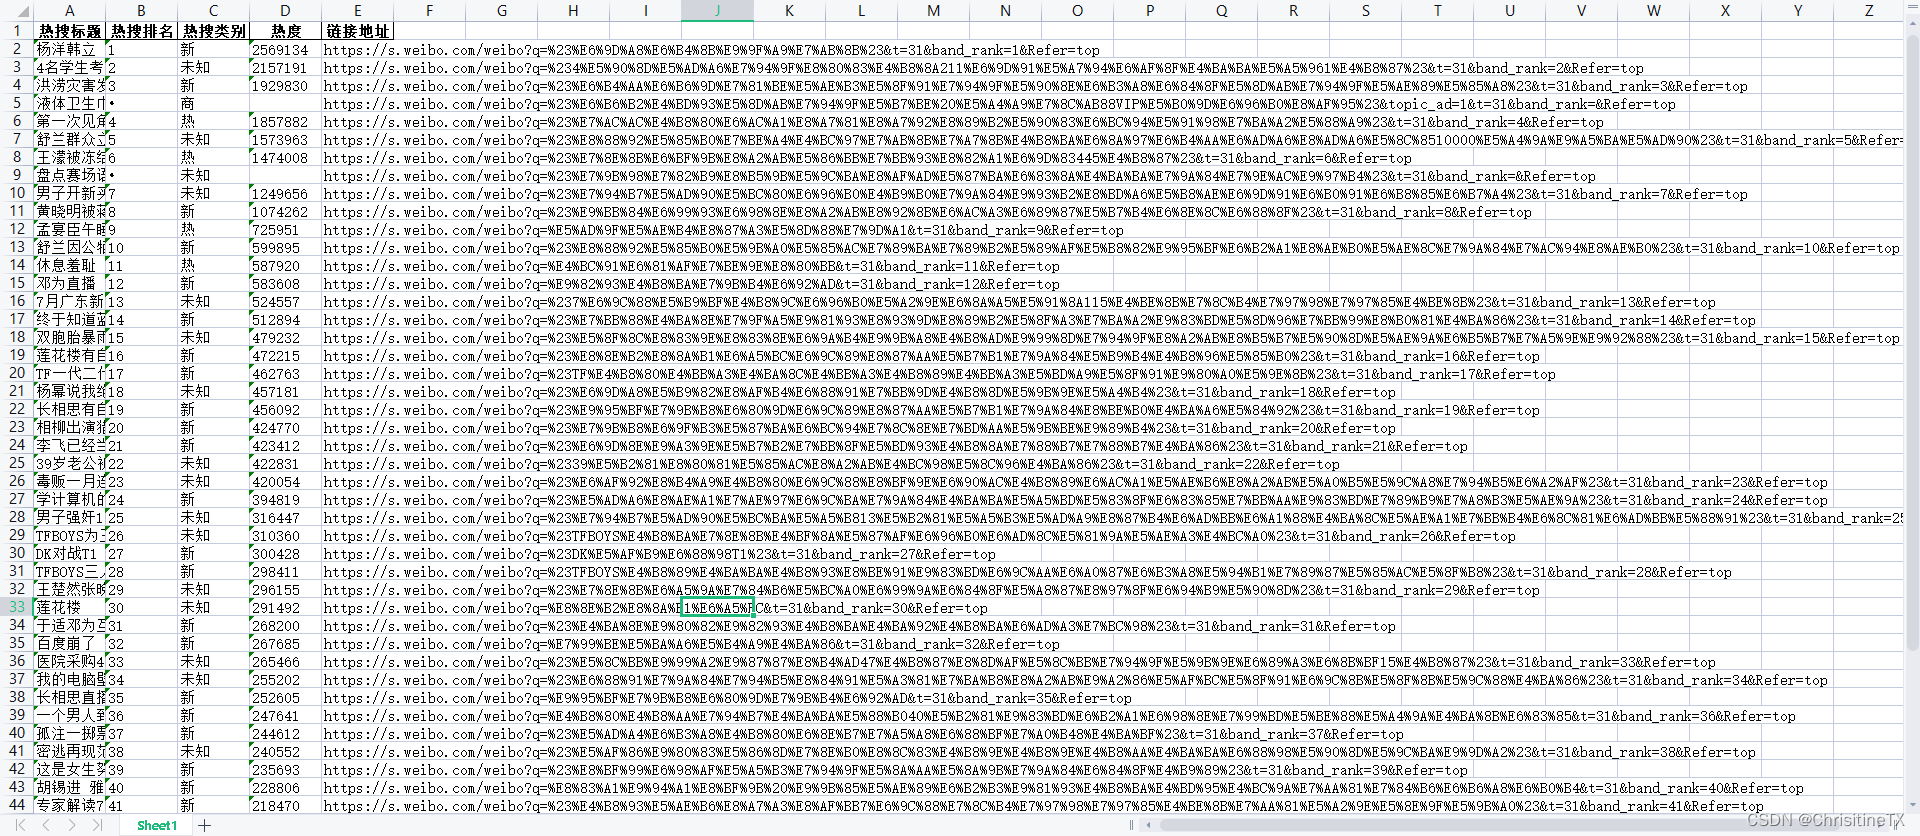
python爬虫实战(2)--爬取某博热搜数据
1. 准备工作 使用python语言可以快速实现,调用BeautifulSoup包里面的方法 安装BeautifulSoup pip install BeautifulSoup完成以后引入项目 2. 开发 定义url url https://s.微博.com/top/summary?caterealtimehot定义请求头,微博请求数据需要cookie…...

k8s的Namespace详解
简介 在一个K8s集群中可以拥有多个命名空间,它们在逻辑上彼此隔离 namespaces是对一组资源和对象的抽象集合,比如可以将系统内部的对象划分为不同的项目组或用户组 K8s在集群启动之后,会默认创建几个namespace默认namespace defaultÿ…...
【Redis】Redis内存过期策略和内存淘汰策略
【Redis】Redis内存过期策略和内存淘汰策略 文章目录 【Redis】Redis内存过期策略和内存淘汰策略1. 过期策略1.1 惰性删除1.2 周期删除1.2.1 SLOW模式1.2.2 FAST模式 2. 淘汰策略 1. 过期策略 Redis本身是一个典型的key-value内存存储数据库,因此所有的key、value都…...

技术干货 | cilium 原理之sock_connect
1.背景 在集群网络使用cilium之后,最明显的情况就是:服务暴露vipport,在集群内怎么测试都正常,但集群外访问可能是有问题的。而这就在于cilium所使用的ebpf科技。 2.引子:curl请求的路程 相对底层一点的语言…...

K8S之Pod详解与进阶
Pod详解与进阶 文章目录 Pod详解与进阶一、Pod详解1.pod定义2.pause容器作用3.Pod 的 3 种类型4.Pod 的 3 种容器5.Pod 的 3 种镜像拉取策略6.Pod 的 3 种容器重启策略 二、Pod进阶1.资源限制2.Pod 容器的 3 种探针(健康检查)3.探针的 3 种探测方式探针参…...

别再只盯着准确率了!用Python的sklearn手把手教你画ROC曲线,搞定模型评估
别再只盯着准确率了!用Python的sklearn手把手教你画ROC曲线,搞定模型评估 刚入门机器学习时,我们总会被高准确率的模型迷惑双眼。直到某次项目复盘,发现一个准确率高达95%的预测模型,在实际业务中几乎毫无作用——这才…...

Cyrus:自托管AI编码代理部署与实战,打造自动化开发流水线
1. 项目概述:一个能帮你写代码的“数字员工” 如果你和我一样,每天要在Linear、GitHub、Slack这些工具之间来回切换,处理数不清的工单、Issue和PR评论,那你肯定想过:要是能有个“数字员工”帮我处理这些重复性的编码任…...

Vue2 + Cesium 1.95.0 保姆级配置教程:解决三维地球不显示和wasm报错
Vue2与Cesium 1.95.0深度集成实战:破解三维地球渲染与WASM加载难题 当WebGIS开发者尝试在Vue2项目中集成Cesium 1.95.0时,往往会遇到两个典型问题:三维地球无法正常显示和控制台出现WASM相关报错。这些问题的根源通常隐藏在Webpack配置的细节…...

Voxtral-4B-TTS-2603开箱即用:镜像封装Web工具页+API双接口,零配置启动
Voxtral-4B-TTS-2603开箱即用:镜像封装Web工具页API双接口,零配置启动 1. 平台介绍 Voxtral-4B-TTS-2603是Mistral发布的开源语音合成模型,专为语音助手等生产环境设计。这个镜像将其封装为即开即用的Web工具,无需任何配置就能生…...

如何快速掌握DownKyi:新手必备的B站视频下载完整指南
如何快速掌握DownKyi:新手必备的B站视频下载完整指南 【免费下载链接】downkyi 哔哩下载姬downkyi,哔哩哔哩网站视频下载工具,支持批量下载,支持8K、HDR、杜比视界,提供工具箱(音视频提取、去水印等&#x…...

ChatGPT机器翻译优化指南:温度、提示词与避坑实践
1. 项目概述与核心价值最近在机器翻译(Machine Translation, MT)领域,一个绕不开的话题就是如何用好以ChatGPT为代表的大语言模型。我自己在尝试将GPT-3.5/4集成到翻译工作流中时,遇到了不少困惑:为什么有时候翻译质量…...

nli-MiniLM2-L6-H768快速部署:Kubernetes Helm Chart一键部署到生产集群
nli-MiniLM2-L6-H768快速部署:Kubernetes Helm Chart一键部署到生产集群 1. 模型概述 nli-MiniLM2-L6-H768是一个轻量级自然语言推理(NLI)模型,专注于文本关系判断而非内容生成。该模型的核心能力是分析两段文本之间的语义关系,主要判断以下…...
)
今天力扣周赛 , 就做出来了三道题 . 我真的也是废了 ... (简短版)
今天吃的 香蕉 , 梨 , 绿豆沙 , 煎饺 , 黑米粥. 马上五一放假了. 大二 All in Java 大三 All in AI 晚上 自己搞了: 观看技术直播 AI 大模型应用开发 Python持续学习 AI 相关知识…进程就是正在运行的程序(比如QQ , 浏览器)今天力扣周赛 , 就做出来了三道题 . 我真的也是…...

Android轻量级依赖注入框架illuminati:原理、实战与选型指南
1. 项目概述:当“光照派”遇上代码最近在GitHub上闲逛,发现一个名字相当吸睛的项目——LeeKyoungIl/illuminati。初看这个名字,你可能会联想到历史传说中那个神秘的组织,或者丹布朗小说里的情节。但在程序员的语境里,它…...
)
新手避坑指南:用Python+uiautomator2写第一个安卓自动化脚本(附贴吧实战)
Pythonuiautomator2安卓自动化实战:从零编写贴吧签到脚本 第一次接触安卓自动化测试时,我盯着满屏的adb命令和陌生的Python库名发呆了半小时。直到在模拟器上看到机械臂自动完成贴吧签到、滑动浏览、点赞回帖的全过程,才意识到自动化脚本就像…...