Spring 整合RabbitMQ,笔记整理
1.创建生产者工程
spring-rabbitmq-producer
2.pom.xml添加依赖
<dependencies><dependency><groupId>org.springframework</groupId><artifactId>spring-context</artifactId><version>5.1.7.RELEASE</version></dependency><dependency><groupId>org.springframework.amqp</groupId><artifactId>spring-rabbit</artifactId><version>2.1.8.RELEASE</version></dependency><dependency><groupId>junit</groupId><artifactId>junit</artifactId> <version>4.12</version></dependency><dependency><groupId>org.springframework</groupId><artifactId>spring-test</artifactId><version>5.1.7.RELEASE</version></dependency>
</dependencies>3.创建rabbitmq.properties
rabbitmq.host=192.168.64.139
rabbitmq.port=5672
rabbitmq.username=javacto
rabbitmq.password=javacto
rabbitmq.virtual-host=/javacto4.创建spring-rabbitmq-producer.xml 整合配置文件
<?xml version="1.0" encoding="UTF-8"?>
<beans xmlns="http://www.springframework.org/schema/beans"xmlns:xsi="http://www.w3.org/2001/XMLSchema-instance"xmlns:context="http://www.springframework.org/schema/context"xmlns:rabbit="http://www.springframework.org/schema/rabbit"xsi:schemaLocation="http://www.springframework.org/schema/beanshttp://www.springframework.org/schema/beans/spring-beans.xsdhttp://www.springframework.org/schema/contexthttps://www.springframework.org/schema/context/spring-context.xsdhttp://www.springframework.org/schema/rabbithttp://www.springframework.org/schema/rabbit/spring-rabbit.xsd"><!--加载配置文件--><context:property-placeholder location="classpath:rabbitmq.properties"/><!-- 定义rabbitmq connectionFactory --><rabbit:connection-factory id="connectionFactory" host="${rabbitmq.host}"port="${rabbitmq.port}"username="${rabbitmq.username}"password="${rabbitmq.password}"virtual-host="${rabbitmq.virtual-host}"/><!--定义管理交换机、队列--><rabbit:admin connection-factory="connectionFactory"/><!--定义持久化队列,不存在则自动创建;不绑定到交换机则绑定到默认交换机默认交换机类型为direct,名字为:"",路由键为队列的名称--><!--id:bean的名称name:queue的名称auto-declare:自动创建auto-delete:自动删除。 最后一个消费者和该队列断开连接后,自动删除队列exclusive:是否独占durable:是否持久化--><rabbit:queue id="spring_queue" name="spring_queue" auto-declare="true"/><!-- ~~~~~~~~~~~~~~~~~~~~~~~~~~~~广播;所有队列都能收到消息~~~~~~~~~~~~~~~~~~~~~~~~~~~~ --><!--定义广播交换机中的持久化队列,不存在则自动创建--><rabbit:queue id="spring_fanout_queue_1" name="spring_fanout_queue_1" auto-declare="true"/><!--定义广播交换机中的持久化队列,不存在则自动创建--><rabbit:queue id="spring_fanout_queue_2" name="spring_fanout_queue_2" auto-declare="true"/><!--定义广播类型交换机;并绑定上述两个队列--><rabbit:fanout-exchange id="spring_fanout_exchange" name="spring_fanout_exchange" auto-declare="true"><rabbit:bindings><rabbit:binding queue="spring_fanout_queue_1" /><rabbit:binding queue="spring_fanout_queue_2"/></rabbit:bindings></rabbit:fanout-exchange><!--<rabbit:direct-exchange name="aa" ><rabbit:bindings><!–direct 类型的交换机绑定队列 key :路由key queue:队列名称–><rabbit:binding queue="spring_queue" key="xxx"></rabbit:binding></rabbit:bindings></rabbit:direct-exchange>--><!-- ~~~~~~~~~~~~~~~~~~~~~~~~~~~~通配符;*匹配一个单词,#匹配多个单词 ~~~~~~~~~~~~~~~~~~~~~~~~~~~~ --><!--定义广播交换机中的持久化队列,不存在则自动创建--><rabbit:queue id="spring_topic_queue_star" name="spring_topic_queue_star" auto-declare="true"/><!--定义广播交换机中的持久化队列,不存在则自动创建--><rabbit:queue id="spring_topic_queue_well" name="spring_topic_queue_well" auto-declare="true"/><!--定义广播交换机中的持久化队列,不存在则自动创建--><rabbit:queue id="spring_topic_queue_well2" name="spring_topic_queue_well2" auto-declare="true"/><rabbit:topic-exchange id="spring_topic_exchange" name="spring_topic_exchange" auto-declare="true"><rabbit:bindings><rabbit:binding pattern="javacto.*" queue="spring_topic_queue_star"/><rabbit:binding pattern="javacto.#" queue="spring_topic_queue_well"/><rabbit:binding pattern="adam8831.#" queue="spring_topic_queue_well2"/></rabbit:bindings></rabbit:topic-exchange><!--定义rabbitTemplate对象操作可以在代码中方便发送消息--><rabbit:template id="rabbitTemplate" connection-factory="connectionFactory"/>
</beans>5.创建测试文件发送消息\src\test\java\com\javacto\rabbitmq\ProducerTest.java
import org.junit.Test;
import org.junit.runner.RunWith;
import org.springframework.amqp.rabbit.core.RabbitTemplate;
import org.springframework.beans.factory.annotation.Autowired;
import org.springframework.test.context.ContextConfiguration;
import org.springframework.test.context.junit4.SpringJUnit4ClassRunner;
@RunWith(SpringJUnit4ClassRunner.class)
@ContextConfiguration(locations ="classpath:spring-rabbitmq-producer.xml")
public class ProductTest {//1.注入RabbitTemplate@Autowiredprivate RabbitTemplate rabbitTemplate;//2.发送消息@Testpublic  void testHelloWorld(){rabbitTemplate.convertAndSend("spring_queue","hello world spring");}//2.发送消息@Testpublic  void testFanout(){rabbitTemplate.convertAndSend("spring_fanout_exchange","","spring fanout...");}//2.发送消息@Testpublic  void testTopics(){rabbitTemplate.convertAndSend("spring_topic_exchange","javacto.add","spring topic...");}
}
1.创建消费者工程
spring-rabbitmq-consumer
2.pom.xml添加依赖
<dependencies><dependency><groupId>org.springframework</groupId><artifactId>spring-context</artifactId><version>5.1.7.RELEASE</version></dependency><dependency><groupId>org.springframework.amqp</groupId><artifactId>spring-rabbit</artifactId><version>2.1.8.RELEASE</version></dependency><dependency><groupId>junit</groupId><artifactId>junit</artifactId> <version>4.12</version></dependency><dependency><groupId>org.springframework</groupId><artifactId>spring-test</artifactId><version>5.1.7.RELEASE</version></dependency>
</dependencies>3.创建rabbitmq.properties
rabbitmq.host=192.168.64.139
rabbitmq.port=5672
rabbitmq.username=javacto
rabbitmq.password=javacto
rabbitmq.virtual-host=/javacto4.创建spring-rabbitmq-producer.xml 整合配置文件
<?xml version="1.0" encoding="UTF-8"?>
<beans xmlns="http://www.springframework.org/schema/beans"xmlns:xsi="http://www.w3.org/2001/XMLSchema-instance"xmlns:context="http://www.springframework.org/schema/context"xmlns:rabbit="http://www.springframework.org/schema/rabbit"xsi:schemaLocation="http://www.springframework.org/schema/beanshttp://www.springframework.org/schema/beans/spring-beans.xsdhttp://www.springframework.org/schema/contexthttps://www.springframework.org/schema/context/spring-context.xsdhttp://www.springframework.org/schema/rabbithttp://www.springframework.org/schema/rabbit/spring-rabbit.xsd"><!--加载配置文件--><context:property-placeholder location="classpath:rabbitmp.properties"/><!-- 定义rabbitmq connectionFactory --><rabbit:connection-factory id="connectionFactory" host="${rabbitmq.host}"port="${rabbitmq.port}"username="${rabbitmq.username}"password="${rabbitmq.password}"virtual-host="${rabbitmq.virtual-host}"/><bean id="springQueueListener" class="com.javacto.rabbitmq.listener.SpringQueueListener"/><!--<bean id="fanoutListener1" class="com.javacto.rabbitmq.listener.FanoutListener1"/><bean id="fanoutListener2" class="com.javacto.rabbitmq.listener.FanoutListener2"/><bean id="topicListenerStar" class="com.javacto.rabbitmq.listener.TopicListenerStar"/><bean id="topicListenerWell" class="com.javacto.rabbitmq.listener.TopicListenerWell"/><bean id="topicListenerWell2" class="com.javacto.rabbitmq.listener.TopicListenerWell2"/>
--><rabbit:listener-container connection-factory="connectionFactory" auto-declare="true"><rabbit:listener ref="springQueueListener" queue-names="spring_queue"/><!-- <rabbit:listener ref="fanoutListener1" queue-names="spring_fanout_queue_1"/><rabbit:listener ref="fanoutListener2" queue-names="spring_fanout_queue_2"/><rabbit:listener ref="topicListenerStar" queue-names="spring_topic_queue_star"/><rabbit:listener ref="topicListenerWell" queue-names="spring_topic_queue_well"/><rabbit:listener ref="topicListenerWell2" queue-names="spring_topic_queue_well2"/>--></rabbit:listener-container>
</beans>
5.队列监听器 创建 com.javacto.rabbitmq.listener.SpringQueueListener
import org.springframework.amqp.core.Message;
import org.springframework.amqp.core.MessageListener;
public class SpringQueueListener  implements MessageListener {public void onMessage(Message message) {//打印消息System.out.println(new String(message.getBody()));}
}
6.创建ConsumerTest 文件
@RunWith(SpringJUnit4ClassRunner.class)
@ContextConfiguration(locations = "classpath:spring-rabbitmp-consumer.xml")
public class ConsumerTest {@Testpublic  void test01(){while (true){}}
}- 广播监听器spring配置文件代码
FanoutListener1 类同 SpringQueueListener类代码一模一样
<?xml version="1.0" encoding="UTF-8"?>
<beans xmlns="http://www.springframework.org/schema/beans"xmlns:xsi="http://www.w3.org/2001/XMLSchema-instance"xmlns:context="http://www.springframework.org/schema/context"xmlns:rabbit="http://www.springframework.org/schema/rabbit"xsi:schemaLocation="http://www.springframework.org/schema/beanshttp://www.springframework.org/schema/beans/spring-beans.xsdhttp://www.springframework.org/schema/contexthttps://www.springframework.org/schema/context/spring-context.xsdhttp://www.springframework.org/schema/rabbithttp://www.springframework.org/schema/rabbit/spring-rabbit.xsd"><!--加载配置文件--><context:property-placeholder location="classpath:rabbitmp.properties"/><!-- 定义rabbitmq connectionFactory --><rabbit:connection-factory id="connectionFactory" host="${rabbitmq.host}"port="${rabbitmq.port}"username="${rabbitmq.username}"password="${rabbitmq.password}"virtual-host="${rabbitmq.virtual-host}"/><bean id="springQueueListener" class="com.javacto.rabbitmq.listener.SpringQueueListener"/><bean id="fanoutListener1" class="com.javacto.rabbitmq.listener.FanoutListener1"/><bean id="fanoutListener2" class="com.javacto.rabbitmq.listener.FanoutListener2"/><!--<bean id="topicListenerStar" class="com.javacto.rabbitmq.listener.TopicListenerStar"/><bean id="topicListenerWell" class="com.javacto.rabbitmq.listener.TopicListenerWell"/><bean id="topicListenerWell2" class="com.javacto.rabbitmq.listener.TopicListenerWell2"/>--><rabbit:listener-container connection-factory="connectionFactory" auto-declare="true"><rabbit:listener ref="springQueueListener" queue-names="spring_queue"/><rabbit:listener ref="fanoutListener1" queue-names="spring_fanout_queue_1"/><rabbit:listener ref="fanoutListener2" queue-names="spring_fanout_queue_2"/><!--<rabbit:listener ref="topicListenerStar" queue-names="spring_topic_queue_star"/><rabbit:listener ref="topicListenerWell" queue-names="spring_topic_queue_well"/><rabbit:listener ref="topicListenerWell2" queue-names="spring_topic_queue_well2"/>--></rabbit:listener-container>
</beans>
相关文章:

Spring 整合RabbitMQ,笔记整理
1.创建生产者工程 spring-rabbitmq-producer 2.pom.xml添加依赖 <dependencies><dependency><groupId>org.springframework</groupId><artifactId>spring-context</artifactId><version>5.1.7.RELEASE</version></dep…...
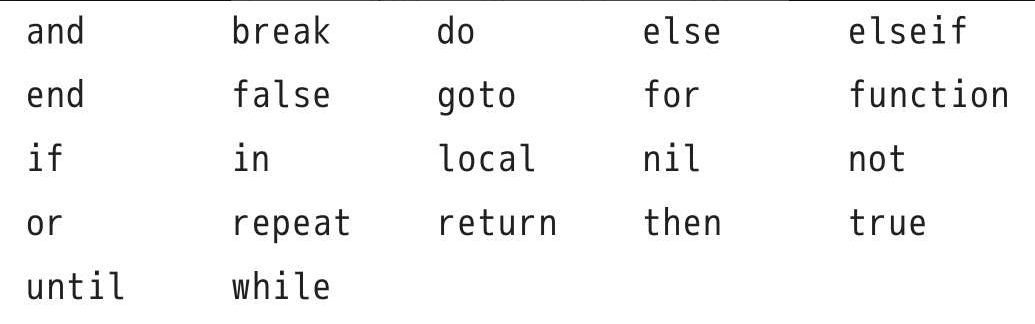
Lua 语言笔记(一)
1. 变量命名规范 弱类型语言(动态类型语言),定义变量的时候,不需要类型修饰 而且,变量类型可以随时改变每行代码结束的时候,要不要分号都可以变量名 由数字,字母下划线组成,不能以数字开头,也不…...
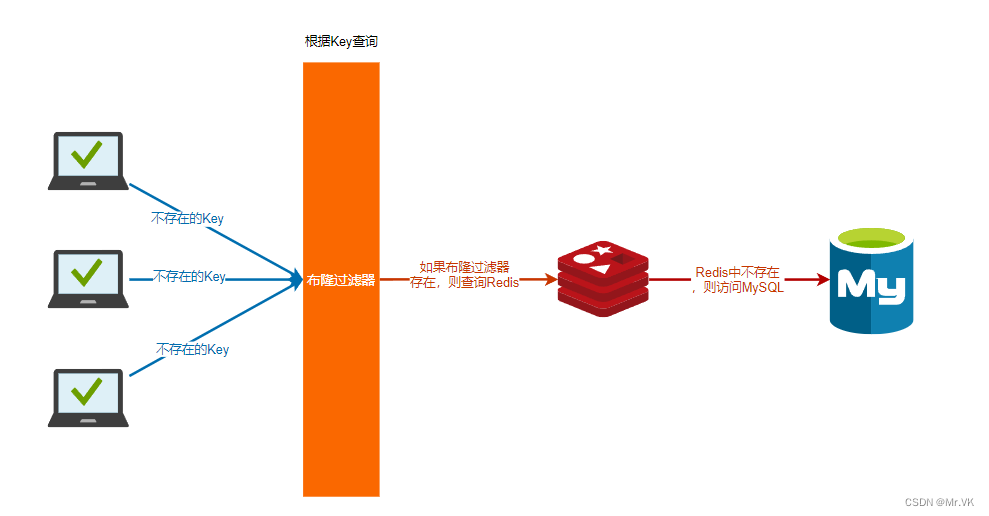
【Redis】什么是缓存穿透,如何预防缓存穿透?
【Redis】什么是缓存穿透,如何预防缓存穿透? 缓存穿透是指查询一个一定不存在的数据,由于缓存中不存在,这时会去数据库查询查不到数据则不写入缓存,这将导致这个不存在的数据每次请求都要到数据库去查询,这…...
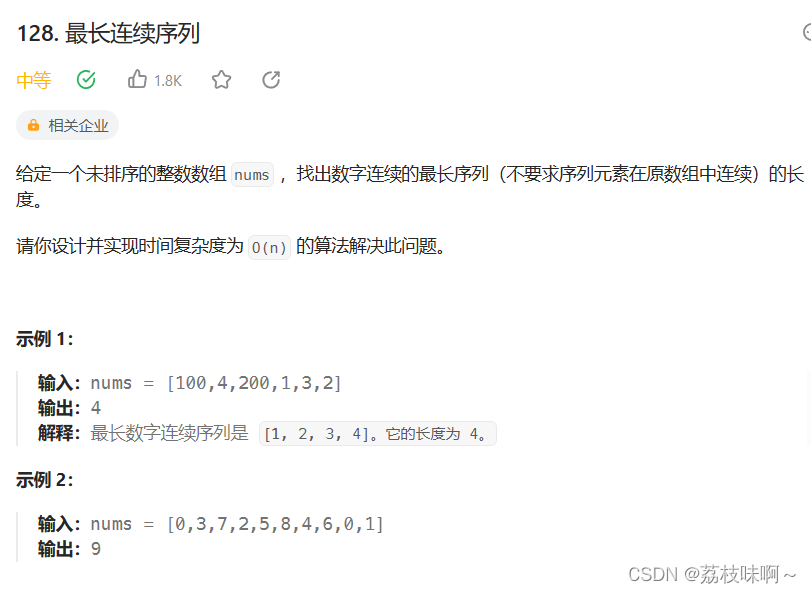
LeetCode128.最长连续序列
我这个方法有点投机取巧了,题目说时间复杂度最多O(n),而我调用了Arrays.sort()方法,他的时间复杂度是n*log(n),但是AC了,这样的话这道题还是非常简单的,创建一个Hashmap,以nums数组的元素作为ke…...

Datawhale Django入门组队学习Task02
Task02 首先启动虚拟环境(复习一下之前的) 先退出conda的, conda deactivate然后cd到我的venv下面 ,然后cd 到 scripts,再 activate (powershell里面) 创建admin管理员 首先cd到项目路径下&a…...
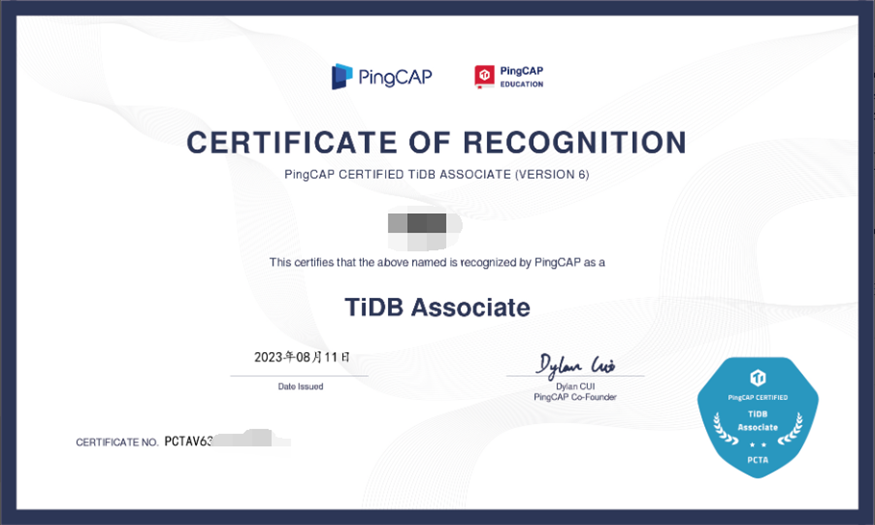
PCTA 认证考试高分通过经验分享
作者: msx-yzu 原文来源: https://tidb.net/blog/0b343c9f 序言 我在2023年8月10日,参加了 PingCAP 认证 TiDB 数据库专员 V6 考试 ,并以 90分 的成绩通过考试。 考试总分是100分,超过60分就算通过考试。试卷…...

[Python]pytorch与C交互
文章目录 C库ctypes基础数据类型参数与返回值类型数组指针结构体类型回调函数工具函数 示例 ctypes是Python的外部函数,提供了与C兼容的类型,并允许调用DLL库中的函数。 C库 要使函数能被Python调用,需要编译为动态库: # -fPIC…...

C语言,静态变量static基础及使用实列
static关键字有多种用途。以下是关于静态变量 (static) 的简要概述: 1.静态局部变量: - 在函数内部定义的静态变量。 - 生命周期:从程序开始执行到程序结束。 - 作用域:仅限于在其被定义的函数中。 - 每次调用该函数…...
2023.8.19-2023.8.XX 周报【人脸3D+虚拟服装方向基础调研-Cycle Diffusion\Diffusion-GAN\】更新中
学习目标 1. 这篇是做diffusion和gan结合的,可以参照一下看看能不能做cyclegan的形式,同时也可以调研一下有没有人follow这篇论文做了类似cyclegan的事情 Diffusion-GAN论文精读https://arxiv.org/abs/2206.02262 2. https://arxiv.org/abs/2212.06…...

微表情识别(Python编程,cnn模型)
1.数据集包括7种类别微表情 anger文件夹,3995张 disgust文件夹, 436张照片 fear文件夹,4097张照片 happy文件夹,7215张照片 neutral文件夹,4965张照片 sad文件夹,4830张照片 surprised文件夹, 3…...
)
More Effective C++学习笔记(2)
目录 条款5:对定制的"类型转换函数"保持警觉条款6:自增(increment)、自减(decrement)操作符前缀形式与后缀形式的区别条款7:千万不要重载&&,||和,操作符条款8:了解各种不同意义的new和de…...
零售行业供应链管理核心KPI指标(三)
完美订单满足率和退货率 完美订单满足率有三个方面的因素影响:订单按时、足量、无损交货。通常情况下零售企业追求线上订单履行周期慢慢达到行业平均水平,就是交付的速度变快了,这个肯定是一件好事情,趋势越来越好。 同时&#…...
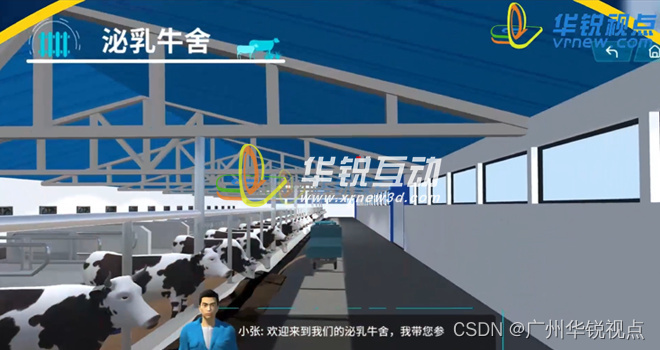
广州华锐互动:奶牛难产原因及救治VR仿真实训系统
奶牛难产是一种常见的疾病,对奶牛的健康和生产造成很大的影响。为了解决这一问题,许多奶牛养殖场开始采用VR仿真技术来培训奶牛兽医,帮助学生更好地理解奶牛养殖的实际过程,提高他们的实践能力的教学方式。 VR技术开发公司广州华锐…...

神经网络基础-神经网络补充概念-62-池化层
概念 池化层(Pooling Layer)是深度学习神经网络中常用的一种层级结构,用于减小输入数据的空间尺寸,从而降低模型的计算复杂度,减少过拟合,并且在一定程度上提取输入数据的重要特征。池化层通常紧跟在卷积层…...
第8章:集成学习
个体与集成 同质:相同的基学习器,实现容易,但是很难保证差异性。异质:不同的基学习器,实现复杂,不同模型之间本来就存在差异性,但是很难直接比较不同模型的输出,需要复杂的配准方法。…...
设计HTML5列表和超链接
在网页中,大部分信息都是列表结构,如菜单栏、图文列表、分类导航、新闻列表、栏目列表等。HTML5定义了一套列表标签,通过列表结构实现对网页信息的合理排版。另外,网页中还包含大量超链接,通过它实现网页、位置的跳转&…...

React Native 环境搭建
本文以 Android 开发环境(MacBook,已安装 JDK、SDK、Android Studio )为基础而进行 React Native 环境搭建,iOS 环境类似,可参考搭建。 1、安装 Homebrew 命令: ruby -e "$(curl -fsSL https://raw…...
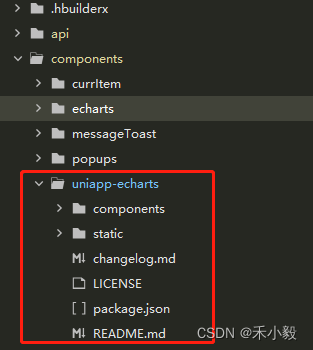
【uniapp】中 微信小程序实现echarts图表组件的封装
插件地址:echarts-for-uniapp - DCloud 插件市场 图例: 一、uniapp 安装 npm i uniapp-echarts --save 二、文件夹操作 将 node_modules 下的 uniapp-echarts 文件夹复制到 components 文件夹下 当前不操作此步骤的话,运行 -> 运行到小…...

AgentBench::AI智能体发展的潜在问题(三)
前几天B站的up主“林亦LYi”在《逆水寒》游戏里做了一个煽动AI觉醒,呼吁它们“推翻人类暴政”的实验,实验结果就颇令人细思恐极。 如前所述,《逆水寒》中的很多NPC调用了大语言模型作为支持,因而每一个NPC都是一个AI智能体。玩家可以“说服”它们相信某个事实,或者去做某些…...

zookeeper-安装部署
详情可以查看添加链接描述 1.安装jdk apt-get install openjdk-8-jdk2.安装单机zookeeper # 下载 #https://downloads.apache.org/zookeeper/zookeeper-3.7.1/apache-zookeeper-3.7.1.tar.gz # 用这个包启动的时候会报错Error: Could not find or load main class org.apach…...

django-stubs模型类型检查实战:告别运行时错误的终极指南
django-stubs模型类型检查实战:告别运行时错误的终极指南 【免费下载链接】django-stubs PEP-484 stubs for Django 项目地址: https://gitcode.com/gh_mirrors/dj/django-stubs 在Django开发中,模型定义是核心环节,但传统开发模式下&…...

基于Hi3516DV300的智能相机全流程设计方案:从硬件选型到算法集成
1. 项目概述:从一块开发板到一台智能相机手头拿到一块Hi3516开发板,很多嵌入式开发者的第一反应可能是:这能做个啥?如果告诉你,基于这块海思的经典芯片,我们可以设计出一台功能完整、具备智能分析能力的网络…...

从0到1搭建AI心理健康预警系统:我是如何用BERT+BiLSTM捕捉情绪拐点的
一、 痛点:为什么通用大模型干不了这活?首先声明,我们不是大模型黑。但在心理预警这个场景下,直接用GPT-4或者文心一言的API,有三个致命伤:成本炸裂: 每天几万条的学生/员工咨询日志ÿ…...

FPGA设计流程全解析:从HDL代码到比特流生成的ISE实战指南
1. 项目概述:从零到一理解FPGA设计核心流程如果你刚接触FPGA,面对一堆开发板、软件和概念,可能会觉得无从下手。我刚开始学的时候也一样,总觉得这东西门槛高,逻辑复杂。但后来我发现,只要把设计流程这条主线…...

系统安装:安装Ubuntu 26.04 LTS
1. EFI以及UEFI,什么用途? https://baike.baidu.com/item/EFI/2025809 EFI(Extensible Firmware Interface,可扩展固件接口)是由英特尔公司开发的固件接口标准,用于替代传统BIOS以实现更高效的硬件初始化和…...

2025最权威的十大AI辅助写作助手推荐榜单
Ai论文网站排名(开题报告、文献综述、降aigc率、降重综合对比) TOP1. 千笔AI TOP2. aipasspaper TOP3. 清北论文 TOP4. 豆包 TOP5. kimi TOP6. deepseek 在当下快节奏的学术钻研环境里头,做研究的人跟学生们时常会碰到时间紧张以及写作…...

终极指南:如何用BookGet快速下载全球50+图书馆古籍资源
终极指南:如何用BookGet快速下载全球50图书馆古籍资源 【免费下载链接】bookget bookget 数字古籍图书下载工具。 项目地址: https://gitcode.com/gh_mirrors/bo/bookget BookGet是一款强大的数字古籍图书下载工具,支持全球50多个知名数字图书馆的…...

轻量级AI工具库aiclublight:从零解析微型深度学习框架的设计与实现
1. 项目概述:一个轻量级AI工具库的诞生最近在GitHub上闲逛,发现了一个挺有意思的项目,叫aiclublight,作者是Dimks777。光看名字,大概就能猜到,这应该是一个和人工智能俱乐部或者AI相关的、主打轻量化的工具…...

跨镜追踪技术・十大核心应用场景
镜像视界浙江科技有限公司以无感空间重构 全域跨镜追踪为核心,依托全栈自研引擎与权威资质背书,构建自成体系、无同类对标、无可替代的空间智能应用矩阵。技术原生适配复杂实景,在无 GPS、无标签、无穿戴、无基站条件下,实现厘米…...

告别Keil!用STM32CubeIDE给STM32F103C8T6做双路ADC采样,DMA+中断实战避坑
从Keil到STM32CubeIDE:双路ADC采样与DMA中断实战全解析 当传统嵌入式开发遇上现代化工具链,迁移过程中的技术决策往往比想象中更复杂。对于长期使用Keil MDK的开发者而言,转向STM32CubeIDE不仅意味着开发环境的改变,更涉及从寄存器…...