【Unity3D赛车游戏】【六】如何在Unity中为汽车添加发动机和手动挡变速?

👨💻个人主页:@元宇宙-秩沅
👨💻 hallo 欢迎 点赞👍 收藏⭐ 留言📝 加关注✅!
👨💻 本文由 秩沅 原创
👨💻 收录于专栏:Unity游戏demo
⭐🅰️Unity3D赛车游戏⭐
文章目录
- ⭐🅰️Unity3D赛车游戏⭐
- ⭐前言⭐
- ⭐常见问题⭐
- 🎶(==A==)车辆模型——绘制发动机马力与转速曲线
- 😶🌫️添加并绘制AnimationCurve 动画曲线
- 😶🌫️AnimationCurve .EvaluateAPI
- 🎶(==B==)车辆模型——发动机和手动挡位的初步实现
- 😶🌫️添加发动机相关的属性
- 😶🌫️更新输入控制脚本增添换挡输入
- 😶🌫️换挡管理,挡位比率
- 🎶(==C==)车辆模型——脚本记录
- 😶🌫️CarMoveControl
- 😶🌫️CameraContorl
- 😶🌫️UIContorl
- 😶🌫️ InputManager
⭐前言⭐
–
😶🌫️版本: Unity2021
😶🌫️适合人群:Unity初学者
😶🌫️学习目标:3D赛车游戏的基础制作
😶🌫️技能掌握:
⭐常见问题⭐
🎶(A)车辆模型——绘制发动机马力与转速曲线
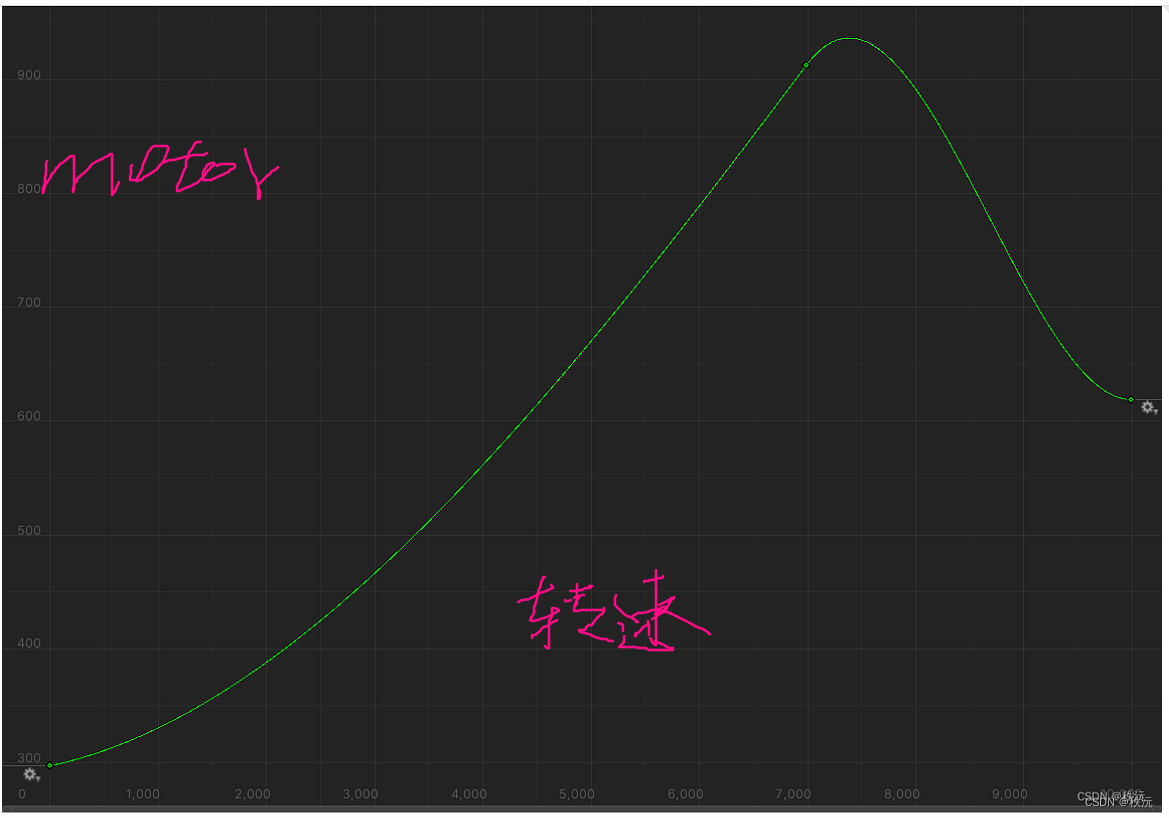
😶🌫️添加并绘制AnimationCurve 动画曲线
shift控制Y轴伸缩,ctrl控制x轴伸缩

- 跑车发动机一般是7百左右,我们就按照跑车的最大功率来做
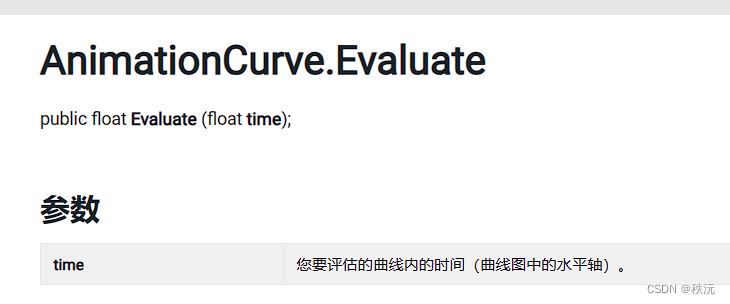
😶🌫️AnimationCurve .EvaluateAPI
通过X轴获取Y轴值
🎶(B)车辆模型——发动机和手动挡位的初步实现
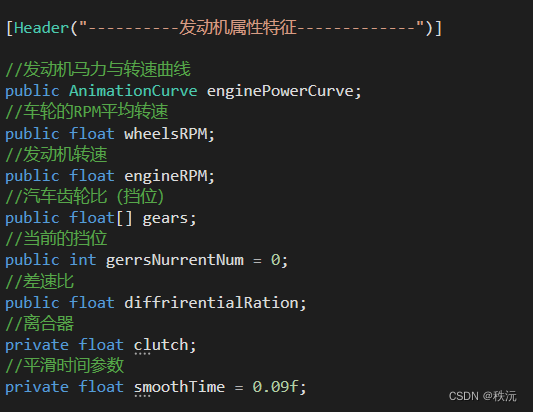
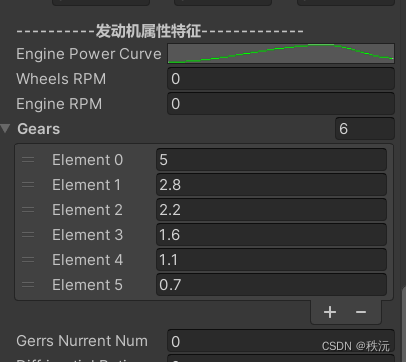
😶🌫️添加发动机相关的属性
发动机功率=扭矩转速n
知识百科:说到汽车发动机,要了解几个参数。排量,功率,扭矩,转速。那么这里和参数之间的关系如何,
排量,就是发动机气缸排出气体的多少。因此说到排量,不管四缸,三缸,二缸,一缸,只要大小一样,排量就相同。
功率,单位时间内做功的多少。那么排量越大,单位时间做功就会越多,因此,排量越大,功率也会越大。
扭矩,它的单位是N·M,所以它是力运动单位距离的结果。它反应的是加速度。扭矩越大,加速能力就越强。
转速,它是单位时间内齿轮转动的圈数。齿轮转的越快,传输给轮胎的转速就越高,车子就跑的越快。
- 关键代码
//汽车引擎发动机相关public void CarEnginePower(){WheelRPM();//将轮轴的转速获取// 扭矩力(发动机功率) = 功率=扭矩*转速*nmotorflaot = -enginePowerCurve.Evaluate(engineRPM)* gears[gerrsNurrentNum] * InputManager.InputManagerment.vertical;float velocity = 0.0f;//发动机的转速 与 车轮转速 和 挡位比率 成比例engineRPM = Mathf.SmoothDamp(engineRPM, 1000 + Mathf.Abs(wheelsRPM) * 3.6f * (gears[gerrsNurrentNum]), ref velocity, smoothTime);print(engineRPM);VerticalContorl(); //驱动管理}
😶🌫️更新输入控制脚本增添换挡输入
using System.Collections;
using System.Collections.Generic;
using UnityEngine;
//-------------------------------------
//—————————————————————————————————————
//___________项目:
//___________功能: 输入控制管理器
//___________创建者:秩沅_______________
//_____________________________________
//-------------------------------------
public class InputManager : MonoBehaviour
{//单例模式管理static private InputManager inputManagerment;static public InputManager InputManagerment => inputManagerment;public float horizontal;  //水平方向动力值public float vertical;    //垂直方向动力值public bool  handbanl;    //手刹动力值public bool shiftSpeed;   //加速shift键//public float clutch;    //离合器public bool addGears;     //升档public bool lowGears;     //降档void Awake(){inputManagerment = this;}void FixedUpdate(){//与Unity中输入管理器的值相互对应horizontal = Input.GetAxis("Horizontal");vertical = Input.GetAxis("Vertical");handbanl = Input.GetAxis("Jump")!= 0 ? true :false ; //按下空格键时就是1,否则为0shiftSpeed = Input.GetKey(KeyCode.LeftShift) ? true : false;//clutch   = Input.GetKey(KeyCode.LeftShift) ? 0 : Mathf.Lerp(clutch ,1,Time .deltaTime);addGears   = Input.GetKeyDown(KeyCode.E ) ? true : false;lowGears   = Input.GetKeyDown(KeyCode.Q ) ? true : false;}
}😶🌫️换挡管理,挡位比率
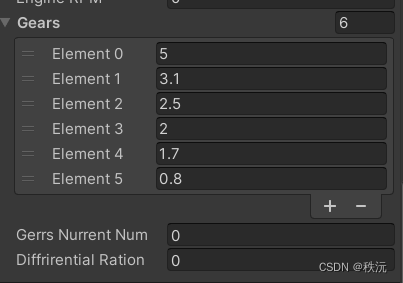
//换挡管理public void shifterGearsChange(){if(InputManager.InputManagerment .addGears ) //如果按下E键,加挡{if(gerrsNurrentNum < gears.Length - 1 )gerrsNurrentNum++;}if(InputManager.InputManagerment.lowGears ) //如果按下Q键,减档{if (gerrsNurrentNum > 0)gerrsNurrentNum--;}}
🎶(C)车辆模型——脚本记录
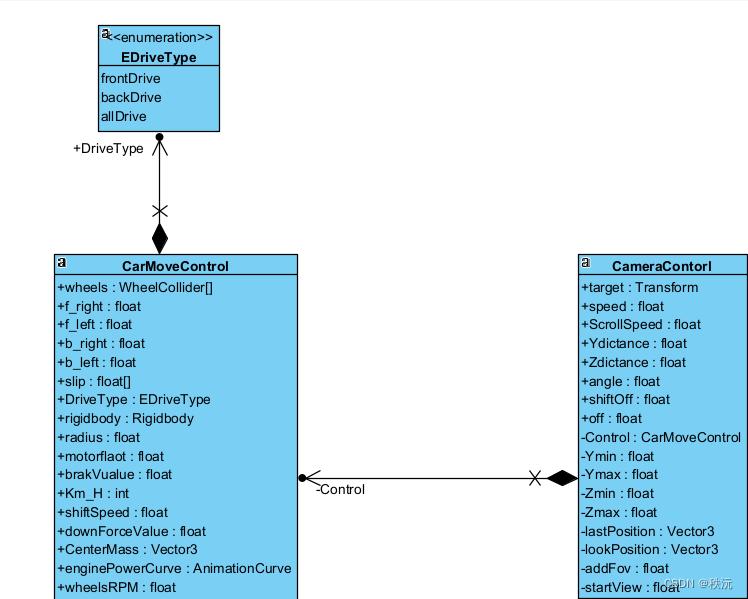
😶🌫️CarMoveControl
using System.Collections;
using System.Collections.Generic;
using UnityEngine;
//-------------------------------------
//—————————————————————————————————————
//___________项目: ______________
//___________功能: 车轮的运动
//___________创建者:_______秩沅________
//_____________________________________
//-------------------------------------//驱动模式的选择
public enum EDriveType
{frontDrive, //前轮驱动backDrive, //后轮驱动allDrive //四驱
}public class CarMoveControl : MonoBehaviour
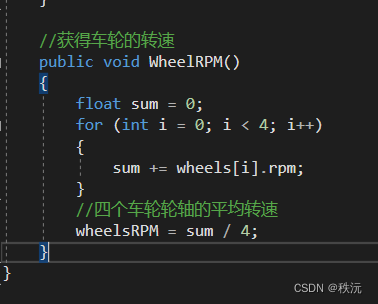
{//-------------------------------------------[Header("----------轮碰撞器特征-------------")]//四个轮子的碰撞器public WheelCollider[] wheels;[SerializeField]//网格的获取private GameObject[] wheelMesh;//四个轮胎扭矩力的大小public float f_right;public float f_left;public float b_right;public float b_left;//车轮打滑参数识别public float[] slip;//初始化三维向量和四元数private Vector3 wheelPosition = Vector3.zero;private Quaternion wheelRotation = Quaternion.identity;//-------------------------------------------//驱动模式选择 _默认前驱public EDriveType DriveType = EDriveType.frontDrive;[Header("----------车辆属性特征-------------")]//车刚体public Rigidbody rigidbody;//轮半径public float radius = 0.25f;//扭矩力度public float motorflaot = 8000f;//刹车力public float brakVualue = 800000f;//速度:每小时多少公里public int Km_H;//加速的速度增量public float shiftSpeed = 4000;//下压力public float downForceValue = 1000f;//质心public Vector3 CenterMass;[Header("----------发动机属性特征-------------")]//发动机马力与转速曲线public AnimationCurve enginePowerCurve;//车轮的RPM平均转速public float wheelsRPM;//发动机转速public float engineRPM;//汽车齿轮比(挡位)public float[] gears;//当前的挡位public int gerrsNurrentNum = 0;//差速比public float diffrirentialRation;//离合器private float clutch;//平滑时间参数private float smoothTime = 0.09f;//一些属性的初始化private void Start(){rigidbody = GetComponent<Rigidbody>();slip = new float[4];}private void FixedUpdate(){VerticalAttribute();//车辆物理属性管理WheelsAnimation(); //车轮动画CarEnginePower(); //汽车发动机HorizontalContolr(); //转向管理HandbrakControl(); //手刹管理ShiftSpeed();//加速相关}//车辆物理属性相关public void VerticalAttribute(){//---------------速度实时---------------//1m/s = 3.6km/hKm_H = (int)(rigidbody.velocity.magnitude * 3.6);Km_H = Mathf.Clamp(Km_H, 0, 200); //油门速度为 0 到 200 Km/H之间//--------------扭矩力实时---------------//显示每个轮胎的扭矩f_right = wheels[0].motorTorque;f_left = wheels[1].motorTorque;b_right = wheels[2].motorTorque;b_left = wheels[3].motorTorque;//-------------下压力添加-----------------//速度越大,下压力越大,抓地更强rigidbody.AddForce(-transform.up * downForceValue * rigidbody.velocity.magnitude);//-------------质量中心同步----------------//质量中心越贴下,越不容易翻rigidbody.centerOfMass = CenterMass;}//垂直轴方向运动管理(驱动管理)public void VerticalContorl(){switch (DriveType){case EDriveType.frontDrive://选择前驱if (InputManager.InputManagerment.vertical != 0) //当按下WS键时生效{for (int i = 0; i < wheels.Length - 2; i++){//扭矩力度wheels[i].motorTorque = InputManager.InputManagerment.vertical * (motorflaot / 2); //扭矩马力归半}}else{for (int i = 0; i < wheels.Length - 2; i++){//扭矩力度wheels[i].motorTorque = 0;}}break;case EDriveType.backDrive://选择后驱if (InputManager.InputManagerment.vertical != 0) //当按下WS键时生效{for (int i = 2; i < wheels.Length; i++){//扭矩力度wheels[i].motorTorque = InputManager.InputManagerment.vertical * (motorflaot / 2); //扭矩马力归半}}else{for (int i = 2; i < wheels.Length; i++){//扭矩力度wheels[i].motorTorque = 0;}}break;case EDriveType.allDrive://选择四驱if (InputManager.InputManagerment.vertical != 0) //当按下WS键时生效{for (int i = 0; i < wheels.Length; i++){//扭矩力度wheels[i].motorTorque = InputManager.InputManagerment.vertical * (motorflaot / 4); //扭矩马力/4}}else{for (int i = 0; i < wheels.Length; i++){//扭矩力度wheels[i].motorTorque = 0;}}break;default:break;}}//水平轴方向运动管理(转向管理)public void HorizontalContolr(){if (InputManager.InputManagerment.horizontal > 0){//后轮距尺寸设置为1.5f ,轴距设置为2.55f ,radius 默认为6,radius 越大旋转的角度看起来越小wheels[0].steerAngle = Mathf.Rad2Deg * Mathf.Atan(2.55f / (radius + (1.5f / 2))) * InputManager.InputManagerment.horizontal;wheels[1].steerAngle = Mathf.Rad2Deg * Mathf.Atan(2.55f / (radius - (1.5f / 2))) * InputManager.InputManagerment.horizontal;}else if (InputManager.InputManagerment.horizontal < 0){wheels[0].steerAngle = Mathf.Rad2Deg * Mathf.Atan(2.55f / (radius - (1.5f / 2))) * InputManager.InputManagerment.horizontal;wheels[1].steerAngle = Mathf.Rad2Deg * Mathf.Atan(2.55f / (radius + (1.5f / 2))) * InputManager.InputManagerment.horizontal;}else{wheels[0].steerAngle = 0;wheels[1].steerAngle = 0;}}//手刹管理public void HandbrakControl(){if (InputManager.InputManagerment.handbanl){//后轮刹车wheels[2].brakeTorque = brakVualue;wheels[3].brakeTorque = brakVualue;}else{wheels[2].brakeTorque = 0;wheels[3].brakeTorque = 0;}//------------刹车效果平滑度显示------------for (int i = 0; i < slip.Length; i++){WheelHit wheelhit;wheels[i].GetGroundHit(out wheelhit);slip[i] = wheelhit.forwardSlip; //轮胎在滚动方向上打滑。加速滑移为负,制动滑为正}}//车轮动画相关public void WheelsAnimation(){for (int i = 0; i < wheels.Length; i++){//获取当前空间的车轮位置 和 角度wheels[i].GetWorldPose(out wheelPosition, out wheelRotation);//赋值给wheelMesh[i].transform.position = wheelPosition;wheelMesh[i].transform.rotation = wheelRotation * Quaternion.AngleAxis(90, Vector3.forward);}}//加速以及动画相关public void ShiftSpeed(){//按下shift加速键时if (InputManager.InputManagerment.shiftSpeed){//向前增加一个力rigidbody.AddForce(-transform.forward * shiftSpeed);}else{rigidbody.AddForce(transform.forward * 0);}}//汽车引擎发动机相关public void CarEnginePower(){WheelRPM();//将轮轴的转速获取// 扭矩力(发动机功率) = 功率=扭矩*转速*nmotorflaot = -enginePowerCurve.Evaluate(engineRPM) * gears[gerrsNurrentNum];float velocity = 0.0f;//发动机的转速 与 车轮转速 和 挡位比率 成比例engineRPM = Mathf.SmoothDamp(engineRPM, 1000 + Mathf.Abs (wheelsRPM) * 3.6f * (gears[gerrsNurrentNum]), ref velocity, smoothTime);print(engineRPM);VerticalContorl(); //驱动管理shifterGearsChange(); //换挡管理}//获得车轮的转速public void WheelRPM(){float sum = 0;for (int i = 0; i < 4; i++){sum += wheels[i].rpm;}//四个车轮轮轴的平均转速wheelsRPM = sum / 4;}//换挡管理public void shifterGearsChange(){if(InputManager.InputManagerment .addGears ) //如果按下E键,加挡{if(gerrsNurrentNum < gears.Length - 1 )gerrsNurrentNum++;}if(InputManager.InputManagerment.lowGears ) //如果按下Q键,减档{if (gerrsNurrentNum > 0)gerrsNurrentNum--;}}
}😶🌫️CameraContorl
using System.Collections;
using System.Collections.Generic;
using UnityEngine;
//-------------------------------------
//—————————————————————————————————————
//___________项目:       ______________
//___________功能: 相机的管理
//___________创建者:秩沅_______________
//_____________________________________
//-------------------------------------
public class CameraContorl : MonoBehaviour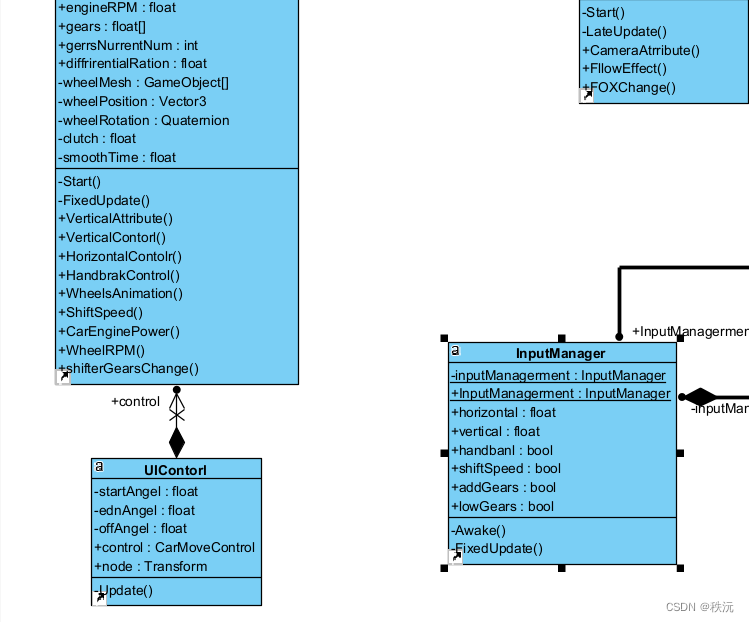
{//目标物体public Transform target;private CarMoveControl Control;public float speed;[Header("----------相机基础属性-------------")]//鼠标滑轮的速度public float ScrollSpeed = 45f;public float Ydictance = 0f;private float Ymin = 0f;private float Ymax = 4f;public float Zdictance = 4f;private float Zmin = 4f;private float Zmax = 15f;//相机看向的角度 和最終位置public float angle = -25 ;private Vector3 lastPosition;private Vector3 lookPosition;[Header("----------加速时相机属性-------------")]//加速时的跟随力度[Range(1, 5)]public float shiftOff;//目标视野 (让其显示可见)[SerializeField ]private float addFov;//当前视野private float startView;public float off = 20;//为一些属性初始化private void Start(){startView = Camera.main.fieldOfView; //将相机的开始属性赋入addFov = 30;}void LateUpdate(){FllowEffect(); //相机属性显示CameraAtrribute(); //相机跟随功能FOXChange(); //加速时相机视野的变化}//相机属性显示public void CameraAtrribute(){//实时速度Control = target.GetComponent<CarMoveControl>();speed = Mathf .Lerp (speed , Control.Km_H / 4 ,Time.deltaTime ) ;speed = Mathf.Clamp(speed, 0, 55); //对应最大200公里每小时}//相机跟随功能public void FllowEffect() {//Z轴和Y轴的距离和鼠标滑轮联系Ydictance += Input.GetAxis("Mouse ScrollWheel") * ScrollSpeed * Time.deltaTime;//平滑效果Zdictance += Input.GetAxis("Mouse ScrollWheel") * ScrollSpeed * Time.deltaTime*2;//設置Y軸和x轴的滚轮滑动范围 Ydictance = Mathf.Clamp(Ydictance, Ymin, Ymax);Zdictance = Mathf.Clamp(Zdictance, Zmin, Zmax);//确定好角度,四元数 * 三维向量 = 三维向量 和最终位置lookPosition = Quaternion.AngleAxis(angle, target.right) * -target.forward;lastPosition = target.position + Vector3.up * Ydictance - lookPosition * Zdictance;差值更新位置,速度越快镜头跟随越快,速度越慢镜头跟随越慢transform.position = lastPosition; //更新角度transform.rotation = Quaternion.LookRotation(lookPosition);}//加速时相机视野的变化public void FOXChange(){if(Input.GetKey(KeyCode.LeftShift) ) //按下坐标shift键生效{Camera.main.fieldOfView = Mathf.Lerp(Camera.main.fieldOfView , startView + addFov ,Time .deltaTime * shiftOff );}else{Camera.main.fieldOfView = Mathf.Lerp(Camera.main.fieldOfView, startView, Time.deltaTime * shiftOff);}}}😶🌫️UIContorl
using System.Collections;
using System.Collections.Generic;
using UnityEngine;
//-------------------------------------
//—————————————————————————————————————
//___________项目:       ______________
//___________功能:  UI相关的脚本管理
//___________创建者:_______秩沅________
//_____________________________________
//-------------------------------------
public class UIContorl : MonoBehaviour
{//------------------仪表盘----------------//速度指针开始角度和最终角度private float startAngel = 215, ednAngel = -35;//速度指针偏差角度private float offAngel;//获取速度的对象public CarMoveControl control;//速度指针组件public Transform node;//----------------------------------------void Update(){//偏差角度 = 每度(速度)旋转的角度 * 速度offAngel = (startAngel - ednAngel) / 180 * control.Km_H;//offAngel = (startAngel - ednAngel)  * control.engineRPM /10000;//仪表盘的管理,与速度同步node.eulerAngles = new Vector3 (0, 0, startAngel -offAngel);}
}😶🌫️ InputManager
using System.Collections;
using System.Collections.Generic;
using UnityEngine;
//-------------------------------------
//—————————————————————————————————————
//___________项目:       ______________
//___________功能: 输入控制管理器
//___________创建者:秩沅_______________
//_____________________________________
//-------------------------------------
public class InputManager : MonoBehaviour
{//单例模式管理static private InputManager inputManagerment;static public InputManager InputManagerment => inputManagerment;public float horizontal;  //水平方向动力值public float vertical;    //垂直方向动力值public bool  handbanl;    //手刹动力值public bool shiftSpeed;   //加速shift键//public float clutch;    //离合器public bool addGears;     //升档public bool lowGears;     //降档void Awake(){inputManagerment = this;}void FixedUpdate(){//与Unity中输入管理器的值相互对应horizontal = Input.GetAxis("Horizontal");vertical = Input.GetAxis("Vertical");handbanl = Input.GetAxis("Jump")!= 0 ? true :false ; //按下空格键时就是1,否则为0shiftSpeed = Input.GetKey(KeyCode.LeftShift) ? true : false;//clutch   = Input.GetKey(KeyCode.LeftShift) ? 0 : Mathf.Lerp(clutch ,1,Time .deltaTime);addGears   = Input.GetKeyDown(KeyCode.E ) ? true : false;lowGears   = Input.GetKeyDown(KeyCode.Q ) ? true : false;}
}
⭐【Unityc#专题篇】之c#进阶篇】
⭐【Unityc#专题篇】之c#核心篇】
⭐【Unityc#专题篇】之c#基础篇】
⭐【Unity-c#专题篇】之c#入门篇】
⭐【Unityc#专题篇】—进阶章题单实践练习
⭐【Unityc#专题篇】—基础章题单实践练习
⭐【Unityc#专题篇】—核心章题单实践练习
你们的点赞👍 收藏⭐ 留言📝 关注✅是我持续创作,输出优质内容的最大动力!、
相关文章:
【Unity3D赛车游戏】【六】如何在Unity中为汽车添加发动机和手动挡变速?
👨💻个人主页:元宇宙-秩沅 👨💻 hallo 欢迎 点赞👍 收藏⭐ 留言📝 加关注✅! 👨💻 本文由 秩沅 原创 👨💻 收录于专栏:Uni…...

【Go 基础篇】切片:Go语言中的灵活数据结构
在Go语言中,切片(Slice)是一种强大且灵活的数据结构,用于管理和操作一系列元素。与数组相比,切片的大小可以动态调整,这使得它成为处理动态数据集合的理想选择。本文将围绕Go语言中切片的引入,介…...

龙芯2K1000LA移植交叉编译环境以及QT
嵌入式大赛结束了,根据这次比赛中记的凌乱的笔记,整理了一份龙芯2K1000LA的环境搭建过程,可能笔记缺少了一部分步骤或者错误,但是大致步骤可以当作参考。 一、交叉编译工具链 下载连接:龙芯 GNU 编译工具链 | 龙芯开…...

javaee spring依赖注入之spel方式
spring依赖注入之spel方式 <dependency><groupId>org.springframework</groupId><artifactId>spring-expression</artifactId><version>4.3.18.RELEASE</version></dependency>package com.test.pojo;import java.util.List; …...
【Java集合学习1】ArrayList集合学习及集合概述分析
JavaArrayList集合学习及集合学习概述 一、Java集合概述 Java 集合, 也叫作容器,主要是由两大接口派生而来:一个是 Collection接口,主要用于存放单一元素;另一个是 Map 接口,主要用于存放键值对。对于Col…...
TouchGFX之调试
DebugPrinter类是一种在显示屏上打印调试消息的简单方法,无需向屏幕添加控件。 在使用DebugPrinter之前,需要分配一个实例并将其传递给Application类,且DebugPrinter实例必须兼容所使用的LCD类。 该表列出了DebugPrinter类名称: …...
C# winform加载yolov8模型测试(附例程)
第一步:在NuGet中下载Yolov8.Net 第二步:引用 using Yolov8Net; 第三步:加载模型 private IPredictor yolov8 YoloV8Predictor.Create("D:\\0MyWork\\Learn\\vs2022\\yolov_onnx\\best.onnx", mylabel); 第四步:图…...

浙大陈越何钦铭数据结构07-图6 旅游规划
题目: 有了一张自驾旅游路线图,你会知道城市间的高速公路长度、以及该公路要收取的过路费。现在需要你写一个程序,帮助前来咨询的游客找一条出发地和目的地之间的最短路径。如果有若干条路径都是最短的,那么需要输出最便宜的一条路径。 输入…...
项目登录)
VUE笔记(七)项目登录
1、安装elementui 在终端执行 vue add element 注册组件 如果要使用哪个组件,大家需要在plugins/element.js中注册该组件 import Vue from vue import { Button } from element-ui Vue.use(Button) 在页面组件中使用 <el-button type"primary"&…...
大语言模型之六- LLM之企业私有化部署
数据安全是每个公司不得不慎重对待的,为了提高生产力,降本增效又不得不接受新技术带来的工具,私有化部署对于公司还是非常有吸引力的。大语言模型这一工具结合公司的数据可以大大提高公司生产率。 私有化LLM需要处理的问题 企业内私有化LLM…...
Python3 列表
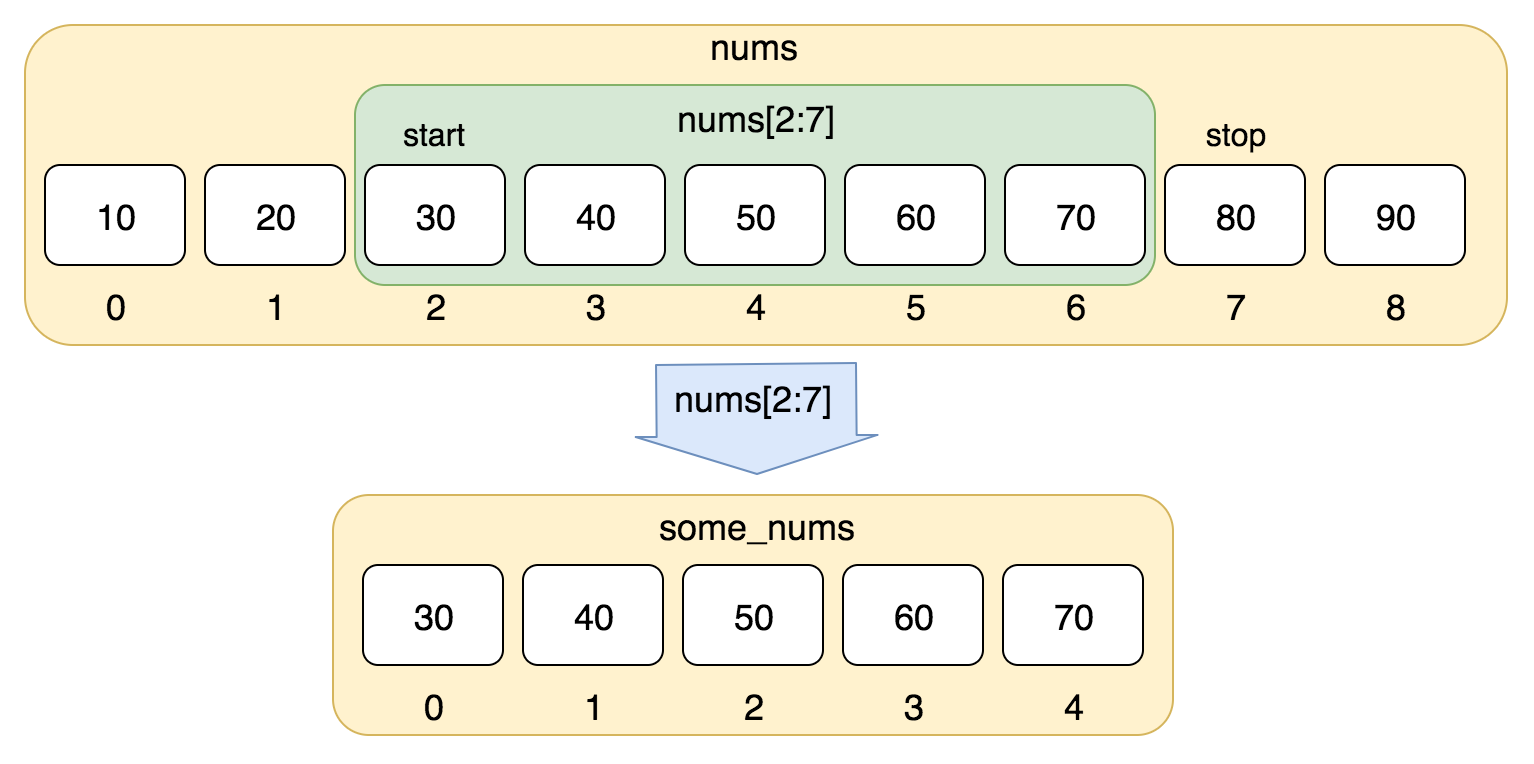
Python3 列表 序列是 Python 中最基本的数据结构。 序列中的每个值都有对应的位置值,称之为索引,第一个索引是 0,第二个索引是 1,依此类推。 Python 有 6 个序列的内置类型,但最常见的是列表和元组。 列表都可以进…...

OpenCV基础知识(8)— 图形检测
前言:Hello大家好,我是小哥谈。图形检测是计算机视觉的一项重要功能。通过图形检测可以分析图像中可能存在的形状,然后对这些形状进行描绘,例如搜索并绘制图像的边缘,定位图像的位置,判断图像中有没有直线、…...
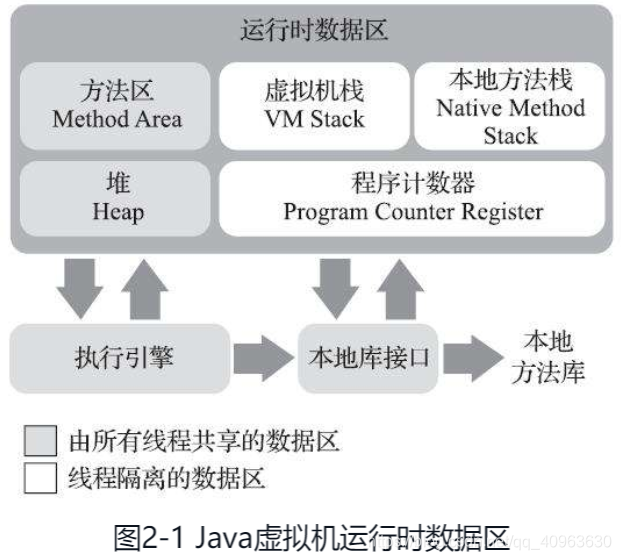
Java虚拟机
文章目录 JVM运行时数据区域HotSpot虚拟机对象探秘实战:OutOfMemoryError异常 JVM 运行时数据区域 HotSpot虚拟机对象探秘 实战:OutOfMemoryError异常...

c++学习 之 函数重载注意事项
文章目录 引用作为函数重载的条件函数重载遇到默认参数 引用作为函数重载的条件 #include <iostream> using namespace std; void fun(int &a) {cout << "void fun(int & a)" << endl; }void fun(const int &a) {cout << "…...

2023-08-27 LeetCode每日一题(合并区间)
2023-08-27每日一题 一、题目编号 56. 合并区间二、题目链接 点击跳转到题目位置 三、题目描述 以数组 intervals 表示若干个区间的集合,其中单个区间为 intervals[i] [starti, endi] 。请你合并所有重叠的区间,并返回 一个不重叠的区间数组&#…...

C#,数值计算——调适数值积分法(adaptive quadrature)的计算方法与源程序
1 文本格式 using System; namespace Legalsoft.Truffer { /// <summary> /// 调适数值积分法 /// adaptive quadrature /// </summary> public class Adapt { private double x1 { get; } 0.942882415695480; private …...

微信小程序发布迭代版本后如何提示用户强制更新新版本
在点击小程序发布的时候选择,升级选项 之前用户使用过的再打开小程序页面就会弹出升级弹窗modal...
星际争霸之小霸王之小蜜蜂(七)--消失的子弹
目录 前言 一、删除子弹 二、限制子弹数量 三、继续重构代码 总结 前言 昨天我们已经让子弹飞了起来,但是会面临一个和之前小蜜蜂一样的问题,小蜜蜂的行动应该限制在窗口内,那么子弹也是有相同之处,也需要限制一个移动范围&…...
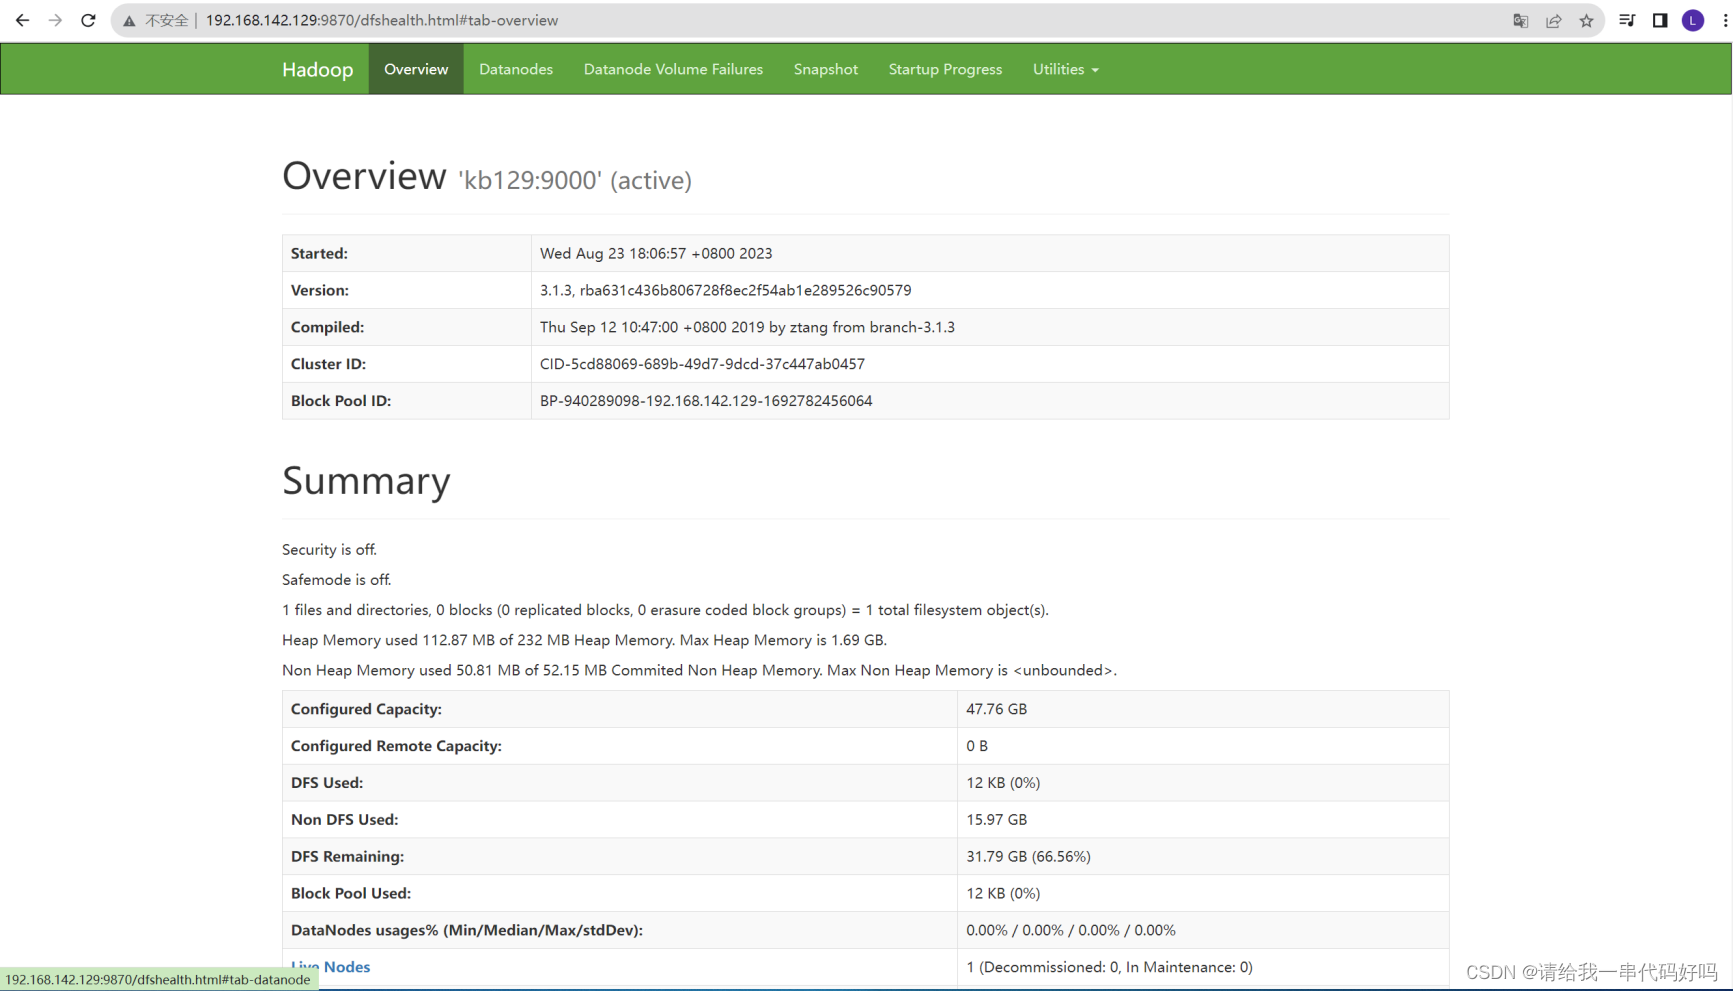
Hadoop入门机安装hadoop
0目录 1.Hadoop入门 2.linux安装hadoop 1.Hadoop入门 定义 Hadoop是一个由Apache基金会所开发的分布式系统基础架构。用户可以在不了解分布式底层细节的情况下,开发分布式程序。充分利用集群的威力进行高速运算和存储。 优势 高可靠性:Hadoop底层维护多…...

cookie技术介绍
title: cookie技术 date: 2023-08-27 21:34:19 tags: [cookie, 网络, http] categories: 网络 我们经常说的cookie缓存数据,允许cookie是什么意思? Cookie也被称作Cookies,它是一种让网站的服务器端可以把少量数据存储在客户端的硬盘或内存中&#x…...

我的数字孪生项目踩坑记:UE5里嵌入Web页面,从插件安装到交互调试的全流程
我的数字孪生项目踩坑记:UE5里嵌入Web页面,从插件安装到交互调试的全流程记得第一次在UE5项目中尝试嵌入Web页面时,我天真地以为这不过是个简单的"拖拽-配置-运行"过程。直到连续三个通宵与各种报错搏斗后,才真正理解为…...
)
Unity打包Linux服务器应用踩坑记:从发布到后台稳定运行(含Systemd服务配置)
Unity服务器应用Linux部署实战:从Systemd配置到稳定运维引言:当Unity遇见Linux服务器三年前接手第一个Unity服务器项目时,我完全没料到会在部署环节连踩72小时坑。那个本该简单的部署过程,最终演变成与Linux权限、内存泄漏和日志管…...

AI写论文神器合集!4款AI论文写作工具,解决你的论文烦恼!
AI写论文工具测评 在2025年,学术写作正在经历一场智能化的浪潮,越来越多的人开始尝试使用AI写论文工具。尽管这些工具的数量众多,但在撰写硕士或博士论文等长篇学术作品时,它们往往面临很多挑战。许多AI写论文工具缺乏必要的理论…...

Obsidian Calendar Plugin:时间维度驱动的笔记工作流架构革新
Obsidian Calendar Plugin:时间维度驱动的笔记工作流架构革新 【免费下载链接】obsidian-calendar-plugin Simple calendar widget for Obsidian. 项目地址: https://gitcode.com/gh_mirrors/ob/obsidian-calendar-plugin Obsidian Calendar Plugin 作为 Obs…...

量子机器学习预测误差:从T/N线性关系到紧致界理论突破
1. 量子机器学习预测误差:从理论到实践的深度解析在量子机器学习这个前沿交叉领域,我们常常面临一个核心挑战:如何评估一个在有限数据上训练出的量子模型,面对全新未知数据时的真实表现?这不仅是理论研究者关心的课题&…...

机器学习势能面构建实战:从量子化学数据到高精度分子模拟
1. 项目概述:当机器学习“学会”了化学反应的势能面在计算化学的世界里,我们一直面临着一个核心矛盾:精度与效率的权衡。如果你想精确地描述一个化学反应,比如DNA复制过程中碱基对的质子转移,你需要动用量子化学方法&a…...

中介核对对账
...

2026财务分析师新人如何快速提升能力:从“账房先生”到“战略参谋”的跃迁之路
2026年的财务领域,规则已经彻底改写。传统的“记账、算账、报账”正在被RPA和AI快速替代,企业真正渴求的,不再是只会做账的“会计”,而是能够深入业务、洞察数据、驱动决策的财务分析师。这不仅是职业进阶的必然要求,更…...

全波形反演新思路:大步长梯度优化器如何克服周波跳跃难题
1. 项目概述:当梯度优化器“大步快跑”时,它能跳出周波跳跃的陷阱吗?在地球物理勘探领域,全波形反演(FWI)被誉为速度建模的“圣杯”,它通过迭代匹配模拟地震数据与观测数据,来反推地…...
)
告别SSH断连焦虑:手把手教你用Screen在Linux后台挂起任务(含源码编译避坑)
告别SSH断连焦虑:Linux后台任务守护神器Screen实战指南凌晨三点,服务器上的深度学习模型训练到第18个小时,突然笔记本电量耗尽——这是许多开发者经历过的噩梦。当重新连接SSH时,那些本应持续运行的任务早已随着终端关闭而终止。这…...