React源码分析6-hooks源码
本文将讲解 hooks 的执行过程以及常用的 hooks 的源码。
hooks 相关数据结构
要理解 hooks 的执行过程,首先想要大家对 hooks 相关的数据结构有所了解,便于后面大家顺畅地阅读代码。
Hook
每一个 hooks 方法都会生成一个类型为 Hook 的对象,用来存储一些信息,前面提到过函数组件 fiber 中的 memoizedState 会存储 hooks 链表,每个链表结点的结构就是 Hook。
// packages/react-reconciler/src/ReactFiberHooks.old.jsexport type Hook = {|memoizedState: any, // 上次渲染时所用的 statebaseState: any, // 已处理的 update 计算出的 statebaseQueue: Update<any, any> | null, // 未处理的 update 队列(一般是上一轮渲染未完成的 update)queue: UpdateQueue<any, any> | null, // 当前出发的 update 队列next: Hook | null, // 指向下一个 hook,形成链表结构
|};
举个例子,我们通过函数组件使用了两个 useState hooks:
const [name, setName] = useState('小科比');
const [age, setAge] = useState(23);
则实际的 Hook 结构如下:
{memoizedState: '小科比',baseState: '小科比',baseQueue: null,queue: null,next: {memoizedState: 23,baseState: 23,baseQueue: null,queue: null,},
};
不同的 hooks 方法,memoizedState 存储的内容不同,常用的 hooks memoizedState 存储的内容如下:
- useState: state
- useEffect: effect 对象
- useMemo/useCallback: [callback, deps]
- useRef: { current: xxx }
Update & UpdateQueue
Update 和 UpdateQueue 是存储 useState 的 state 及 useReducer 的 reducer 相关内容的数据结构。
// packages/react-reconciler/src/ReactFiberHooks.old.jstype Update<S, A> = {|lane: Lane, // 优先级// reducer 对应要执行的 actionaction: A,// 触发 dispatch 时的 reducereagerReducer: ((S, A) => S) | null,// 触发 dispatch 是的 stateeagerState: S | null,// 下一个要执行的 Updatenext: Update<S, A>,// react 的优先级权重priority?: ReactPriorityLevel,
|};type UpdateQueue<S, A> = {|// 当前要触发的 updatepending: Update<S, A> | null,// 存放 dispatchAction.bind() 的值dispatch: (A => mixed) | null,// 上一次 render 的 reducerlastRenderedReducer: ((S, A) => S) | null,// 上一次 render 的 statelastRenderedState: S | null,
|};
每次调用 setState 或者 useReducer 的 dispatch 时,都会生成一个 Update 类型的对象,并将其添加到 UpdateQueue 队列中。
例如,在如下的函数组件中:
const [name, setName] = useState('小科比');
setName('大科比');
当我们点击 input 按钮时,执行了 setName(),此时对应的 hook 结构如下:
{memoizedState: '小科比',baseState: '小科比',baseQueue: null,queue: {pending: {lane: 1,action: '大科比',eagerState: '大科比',// ...},lastRenderedState: '小科比',// ...},next: null,
};
最后 react 会遍历 UpdateQueue 中的每个 Update 去进行更新。
Effect
Effect 结构是和 useEffect 等 hooks 相关的,我们看一下它的结构:
// packages/react-reconciler/src/ReactFiberHooks.old.jsexport type Effect = {|tag: HookFlags, // 标记是否有 effect 需要执行create: () => (() => void) | void, // 回调函数destroy: (() => void) | void, // 销毁时触发的回调deps: Array<mixed> | null, // 依赖的数组next: Effect, // 下一个要执行的 Effect
|};
当我们的函数组件中使用了如下的 useEffect 时:
useEffect(() => {console.log('hello');return () => {console.log('bye');};
}, []);
对应的 Hook 如下:
{memoizedState: {create: () => { console.log('hello') },destroy: () => { console.log('bye') },deps: [],// ...},baseState: null,baseQueue: null,queue: null,next: null,
}
执行过程
下面我们探索一下 hooks 在 react 中具体的执行流程。相关参考视频讲解:进入学习
引入 hooks
我们以一个简单的 hooks 写法的 react 应用程序为例去寻找 hooks 源码:
import { useState } from 'react';export default function App() {const [count, setCount] = useState(0);return (<div><p>{count}</p><inputtype="button"value="增加"onClick={() => {          setCount(count + 1);        }}      />    </div>);
}
根据引入的 useState api,我们找到 react hooks 的入口文件:
// packages/react/src/ReactHooks.jsfunction resolveDispatcher() {const dispatcher = ReactCurrentDispatcher.current;// ...return dispatcher;
}export function useState<S>(initialState: (() => S) | S,
): [S, Dispatch<BasicStateAction<S>>] {const dispatcher = resolveDispatcher();return dispatcher.useState(initialState);
}// ...
根据上面的源码我们可以知道,所有的 hooks api 都是挂载在 resolveDispatcher 中返回的 dispatcher 对象上面的,也就是挂载在 ReactCurrentDispatcher.current 上面,那么我们再继续去看一下 ReactCurrentDispatcher 是什么:
// packages/react/src/ReactCurrentDispatcher.jsimport type {Dispatcher} from 'react-reconciler/src/ReactInternalTypes';const ReactCurrentDispatcher = {current: (null: null | Dispatcher),
};export default ReactCurrentDispatcher;
到这里我们的线索就断了,ReactCurrentDispatcher 上只有一个 current 用于挂在 hooks,但是 hooks 的详细源码以及 ReactCurrentDispatcher 的具体内容我们并没有找到在哪里,所以我们只能另寻出路,从 react 的执行过程去入手。
函数组件更新过程
我们的 hooks 都是在函数组件中使用的,所以让我们去看一下 render 过程关于函数组件的更新。render 过程中的调度是从 beginWork 开始的,来到 beginWork 的源码后我们可以发现,针对函数组件的渲染和更新,使用了 updateFunctionComponent 函数:
// packages/react-reconciler/src/ReactFiberBeginWork.old.jsfunction beginWork(current: Fiber | null,  workInProgress: Fiber,  renderLanes: Lanes,
): Fiber | null {// ...switch (workInProgress.tag) {// ...case FunctionComponent: {// ...return updateFunctionComponent(current,workInProgress,Component,resolvedProps,renderLanes,);}// ...}// ...
}
那我们在继续看一下 updateFunctionComponent 函数的源码,里面调用了 renderWithHooks 函数,这便是函数组件更新和渲染过程执行的入口:
// packages/react-reconciler/src/ReactFiberBeginWork.old.jsfunction updateFunctionComponent(current,  workInProgress,  Component,  nextProps: any,  renderLanes,
) {// ...nextChildren = renderWithHooks(current,workInProgress,Component,nextProps,context,renderLanes,);// ...
}
renderWithHooks
费劲千辛万苦,我们终于来到了函数组件更新过程的执行入口 —— renderWithHooks 函数的源码:
// packages/react-reconciler/src/ReactFiberBeginWork.old.jsexport function renderWithHooks<Props, SecondArg>(current: Fiber | null,workInProgress: Fiber,Component: (p: Props, arg: SecondArg) => any,props: Props,secondArg: SecondArg,nextRenderLanes: Lanes,
): any {renderLanes = nextRenderLanes;// currentlyRenderingFiber 指向当前所执行的fibercurrentlyRenderingFiber = workInProgress;// 置空 workInProgress fiber 中的 memoizedState 和 updateQueueworkInProgress.memoizedState = null;workInProgress.updateQueue = null;workInProgress.lanes = NoLanes;// ...// 根据是否首次渲染,分别将 HooksDispatcherOnMount 和 HooksDispatcherOnUpdate 赋值给 ReactCurrentDispatcher.currentReactCurrentDispatcher.current =current === null || current.memoizedState === null? HooksDispatcherOnMount: HooksDispatcherOnUpdate;// 执行函数组件的构造函数let children = Component(props, secondArg);if (didScheduleRenderPhaseUpdateDuringThisPass) {// didScheduleRenderPhaseUpdateDuringThisPass 为 true 说明发生了 re-render,会再次执行 renderlet numberOfReRenders: number = 0;do {didScheduleRenderPhaseUpdateDuringThisPass = false;// ...ReactCurrentDispatcher.current = __DEV__? HooksDispatcherOnRerenderInDEV: HooksDispatcherOnRerender;children = Component(props, secondArg);} while (didScheduleRenderPhaseUpdateDuringThisPass);}// ...// 函数执行结束后,关闭 hooks 入口ReactCurrentDispatcher.current = ContextOnlyDispatcher;// ...当前 fiber 的任务执行结束,重置全局变量renderLanes = NoLanes;currentlyRenderingFiber = (null: any);currentHook = null;workInProgressHook = null;didScheduleRenderPhaseUpdate = false;// ...return children;
}
renderWithHooks 函数中首先会将 workInProgress fiber 树的 memoizedState(前面深入理解 fiber 一文中提到过,memoizedState 记录了当前页面的 state,在函数组件中,它以链表的形式记录了 hooks 信息) 和 updateQueue 置为 null,在接下来的函数组件执行过程中,会把新的 hooks 信息挂载到这两个属性上,然后在 commit 阶段,会将根据 current fiber 树构建当前的 workInProgress fiber 树,并保存 hooks 信息,用于替换真实的 DOM 元素节点。
然后会通过 current 上是否有 memoizedState,判断组件是否首次渲染,从而分别将 HooksDispatcherOnMount 和 HooksDispatcherOnUpdate 赋值给 ReactCurrentDispatcher.current。
接下来执行 Component() 来调用函数组件的构造函数,组件的 hooks 会被依次执行,并将 hooks 的信息保存到 workInProgress fiber 上(待会儿会细讲执行过程),然后将返回的 jsx 信息保存到 children 上。
最后会重置一些变量,并返回函数组件执行后的 jsx。
不同阶段更新Hook
现在我们终于找到了 ReactCurrentDispatcher.current 的定义,首次渲染时,会将 HooksDispatcherOnMount 赋值给 ReactCurrentDispatcher.current,更新时,会将 HooksDispatcherOnUpdate 赋值给 ReactCurrentDispatcher.current, dispatcher 上面挂在了各种 hooks:
// packages/react-reconciler/src/ReactFiberHooks.old.jsconst HooksDispatcherOnMount: Dispatcher = {readContext,useCallback: mountCallback,useContext: readContext,useEffect: mountEffect,useImperativeHandle: mountImperativeHandle,useLayoutEffect: mountLayoutEffect,useMemo: mountMemo,useReducer: mountReducer,useRef: mountRef,useState: mountState,useDebugValue: mountDebugValue,useDeferredValue: mountDeferredValue,useTransition: mountTransition,useMutableSource: mountMutableSource,useOpaqueIdentifier: mountOpaqueIdentifier,unstable_isNewReconciler: enableNewReconciler,
};const HooksDispatcherOnUpdate: Dispatcher = {readContext,useCallback: updateCallback,useContext: readContext,useEffect: updateEffect,useImperativeHandle: updateImperativeHandle,useLayoutEffect: updateLayoutEffect,useMemo: updateMemo,useReducer: updateReducer,useRef: updateRef,useState: updateState,useDebugValue: updateDebugValue,useDeferredValue: updateDeferredValue,useTransition: updateTransition,useMutableSource: updateMutableSource,useOpaqueIdentifier: updateOpaqueIdentifier,unstable_isNewReconciler: enableNewReconciler,
};
首次渲染时,HooksDispatcherOnMount 上挂载的 hook 都是 mountXXX,而更新时 HooksDispatcherOnMount 上挂在的 hook 都是 updateXXX。所有 mount 阶段的 hook 中,都会执行 mountWorkInProgressHook 这个函数,而所有 update 阶段的 hook 中,都会执行 updateWorkInProgressHook 这个函数。下面我们来看下这两个函数分别做了什么。
mountWorkInProgressHook
每个 hooks 方法中,都需要有一个 Hook 结构来存储相关信息。mountWorkInProgressHook 中,会初始化创建一个 Hook,然后将其挂载到 workInProgress fiber 的 memoizedState 所指向的 hooks 链表上,以便于下次 update 的时候取出该 Hook:
// packages/react-reconciler/src/ReactFiberHooks.old.jsfunction mountWorkInProgressHook(): Hook {const hook: Hook = {memoizedState: null,baseState: null,baseQueue: null,queue: null,next: null,};if (workInProgressHook === null) {// 若当前 workInProgressHook 为 null,将此 hook 作为 memoizedState 的头结点currentlyRenderingFiber.memoizedState = workInProgressHook = hook;} else {// 若不为 null,将 hook 挂载到链表最后workInProgressHook = workInProgressHook.next = hook;}return workInProgressHook;
}
updateWorkInProgressHook
updateWorkInProgressHook 的作用主要是取出 current fiber 中的 hooks 链表中对应的 hook 节点,挂载到 workInProgress fiber 上的 hooks 链表:
// packages/react-reconciler/src/ReactFiberHooks.old.jsfunction updateWorkInProgressHook(): Hook {let nextCurrentHook: null | Hook;// 迭代 current fiber 链表if (currentHook === null) {// 若 current 为 null,从 currentlyRenderingFiber.alternate 取 currentconst current = currentlyRenderingFiber.alternate;if (current !== null) {nextCurrentHook = current.memoizedState;} else {nextCurrentHook = null;}} else {// 否则从 current fiber 中取下一个 hooknextCurrentHook = currentHook.next;}// 迭代 workInProgress fiber 链表let nextWorkInProgressHook: null | Hook;if (workInProgressHook === null) {// workInProgressHook 说明是首次创建nextWorkInProgressHook 为 null = currentlyRenderingFiber.memoizedState;} else {// 取下一个 workInProgress HooknextWorkInProgressHook = workInProgressHook.next;}if (nextWorkInProgressHook !== null) {// 只有 re-render 的情况下,nextWorkInProgressHook 不为 null,因为在之前的 render 过程中已经创建过 workInProgress hook了// 此时复用workInProgressHook = nextWorkInProgressHook;nextWorkInProgressHook = workInProgressHook.next;currentHook = nextCurrentHook;} else {// 正常情况下,currentlyRenderingFiber.memoizedState 为 null,需要到从 current fiber 中克隆一个新的创建invariant(nextCurrentHook !== null,'Rendered more hooks than during the previous render.',);currentHook = nextCurrentHook;const newHook: Hook = {memoizedState: currentHook.memoizedState,baseState: currentHook.baseState,baseQueue: currentHook.baseQueue,queue: currentHook.queue,next: null,};if (workInProgressHook === null) {// 若 workInProgressHook 为 null,作为首节点赋值给 memoizedStatecurrentlyRenderingFiber.memoizedState = workInProgressHook = newHook;} else {// 将 workInProgressHook 添加到链表尾workInProgressHook = workInProgressHook.next = newHook;}}return workInProgressHook;
}
我们详细理解一下上述代码,前面我们提到过 renderWithHooks 函数中会执行如下代码: workInProgress.memoizedState = null,所以在执行上述函数时,正常来说 currentlyRenderingFiber.memoizedState 为 null,需要从 current fiber 对应的节点中取 clone 对应的 hook,再挂载到 workInProgress fiber 的 memoizedState 链表上;re-render 的情况下,由于已经创建过了 hooks,会复用已有的 workInProgress fiber 的 memoizedState。
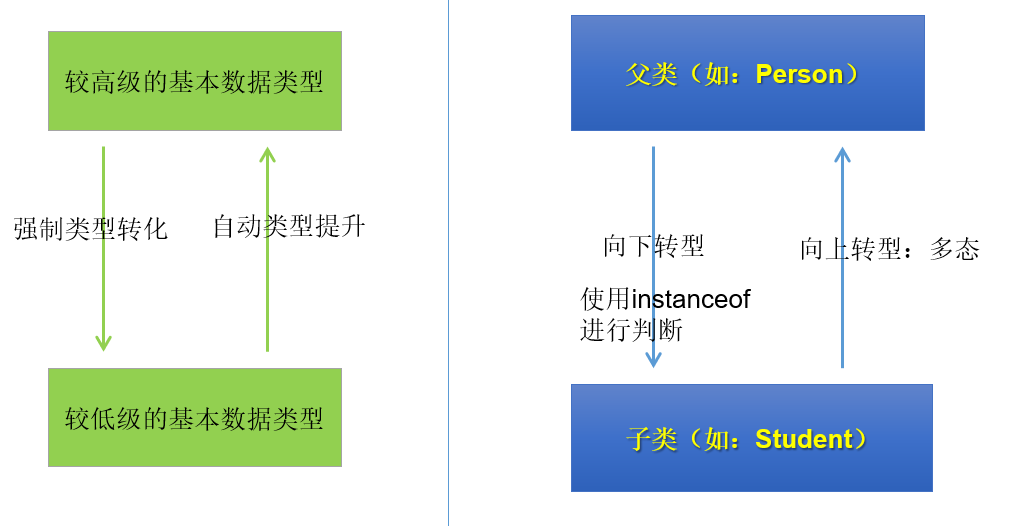
这里正好提到,为什么 hook 不能用在条件语句中,因为如果前后两次渲染的条件判断不一致时,会导致 current fiber 和 workInProgress fiber 的 hooks 链表结点无法对齐。
总结
所以我们总结一下 renderWithHooks 这个函数,它所做的事情如下: 
hooks 源码
前面 hooks 的执行入口我们都找到了,现在我们看一下常用的一些 hooks 源码。
useState & useReducer
这里会把 useState 和 useReducer 放在一起来说,因为 useState 相当于一个简化版的 useReducer。
用法
useState 的简单用法如下:
const [count, setCount] = useState(0);
// 改变 count 的值
setCount(count++);
useReducer 简单用法如下:
const [count, dispatch] = useReducer(function reducer(state, action) {switch (action.type) {case 'increment':return count + 1;default:return count;}},0
);
// 改变 count 的值
dispatch({ type: 'increment' });
mountState & mountReducer
我们先从 useState 开始讲起,mount 阶段,useState 对应的源码是 mountState。这里面后创建初始的 hook 和更新队列 queue,然后创建 dispatch,最终返回 [hook.memoizedState, dispatch],对应的是我们代码中的 [count, setCount],供我们使用:
// packages/react-reconciler/src/ReactFiberHooks.old.jsfunction mountState<S>(initialState: (() => S) | S,
): [S, Dispatch<BasicStateAction<S>>] {// 创建一个 hook,链接到 hooks 链表中const hook = mountWorkInProgressHook();// 校验初始的 state 是否是个函数,是的话执行该函数if (typeof initialState === 'function') {initialState = initialState();}// 前面提到过,对于 useState,memoizedState 保存的是 statehook.memoizedState = hook.baseState = initialState;// 创建更新队列 updateQueueconst queue = (hook.queue = {pending: null, // 待执行的 hookdispatch: null, // 更新函数lastRenderedReducer: basicStateReducer, // 上次渲染的 reducerlastRenderedState: (initialState: any), // 上次渲染的 state});// 创建 dispatch(负责更新的函数)const dispatch: Dispatch<BasicStateAction<S>,> = (queue.dispatch = (dispatchAction.bind(null,currentlyRenderingFiber,queue,): any));// 返回 useState 的 state 及 dispatch,供我们使用return [hook.memoizedState, dispatch];
}
再来看下 mount 阶段的 useReducer 的源码,也就是 mountReducer,可以看到和 mountState 所做的事情基本时一样的,mountState 可以看做是有一个初始 state 的 mountReducer:
// packages/react-reconciler/src/ReactFiberHooks.old.jsfunction mountReducer<S, I, A>(reducer: (S, A) => S,initialArg: I,init?: I => S,
): [S, Dispatch<A>] {const hook = mountWorkInProgressHook();let initialState;if (init !== undefined) {initialState = init(initialArg);} else {initialState = ((initialArg: any): S);}hook.memoizedState = hook.baseState = initialState;const queue = (hook.queue = {pending: null,dispatch: null,lastRenderedReducer: reducer,lastRenderedState: (initialState: any),});const dispatch: Dispatch<A> = (queue.dispatch = (dispatchAction.bind(null,currentlyRenderingFiber,queue,): any));return [hook.memoizedState, dispatch];
}
dispatchAction
上面的代码中,其他内容我们前面基本都有讲过,你们应该了解它们的作用,我们着重来看一下 dispatch,它是通过执行 dispatchAction 创建的。
// packages/react-reconciler/src/ReactFiberHooks.old.jsfunction dispatchAction<S, A>(fiber: Fiber,queue: UpdateQueue<S, A>,action: A,
) {// ...// 获取更新触发时间及优先级const eventTime = requestEventTime();const lane = requestUpdateLane(fiber);// 初始化 updateconst update: Update<S, A> = {lane,action,eagerReducer: null,eagerState: null,next: (null: any),};// 将 update 链接到更新队列中const pending = queue.pending;if (pending === null) {update.next = update;} else {update.next = pending.next;pending.next = update;}queue.pending = update;const alternate = fiber.alternate;if (fiber === currentlyRenderingFiber ||(alternate !== null && alternate === currentlyRenderingFiber)) {// currentlyRenderingFiber 存在,说明是在 render 过程发生的更新didScheduleRenderPhaseUpdateDuringThisPass = didScheduleRenderPhaseUpdate = true;} else {if (fiber.lanes === NoLanes &&(alternate === null || alternate.lanes === NoLanes)) {// fiber.lanes === NoLanes 说明是首次更新// 如果值不同,则保存在eagerState,下次 render 时可以直接使用,而无需再计算。const lastRenderedReducer = queue.lastRenderedReducer;if (lastRenderedReducer !== null) {let prevDispatcher;if (__DEV__) {prevDispatcher = ReactCurrentDispatcher.current;ReactCurrentDispatcher.current = InvalidNestedHooksDispatcherOnUpdateInDEV;}try {const currentState: S = (queue.lastRenderedState: any);// 我们可以根据当前 state 和 action 来计算新的 state 值const eagerState = lastRenderedReducer(currentState, action);update.eagerReducer = lastRenderedReducer;update.eagerState = eagerState;if (is(eagerState, currentState)) {// 如果与当前值相同,则跳过更新return;}// 如果值不同,新一轮更新时渲染 eagerState} catch (error) {// Suppress the error. It will throw again in the render phase.} finally {if (__DEV__) {ReactCurrentDispatcher.current = prevDispatcher;}}}}// ...// 开启调度,触发新的一轮更新,也就是走 beginWork, completeWork 那一套流程scheduleUpdateOnFiber(fiber, lane, eventTime);}// ...if (enableSchedulingProfiler) {markStateUpdateScheduled(fiber, lane);}
}
首先,会创建一个初始的 update 对象,用来记录相关的 hook 信息,并将它添加到 queue 中,这里的 queue 的添加你可以发现它形成了一个循环链表,这样 pending 作为链表的一个尾结点,而 pending.next 就能够获取链表的头结点。这样做的目的是,在 setCount 时,我们需要将 update 添加到链表的尾部;而在下面的 updateReducer 中,我们需要获取链表的头结点来遍历链表,通过循环链表能够轻松实现我们的需求。
之后,会根据当前所处的阶段是否在 render 阶段发生:
- 如果是 render 阶段发生,那么会触发 re-render 过程,将
didScheduleRenderPhaseUpdateDuringThisPass置为 true。前面renderWithHooks的代码中我们说了,didScheduleRenderPhaseUpdateDuringThisPass为 true 时会代表 re-render,会重新执行 render 过程,直至其为 false。 - 如果不是在 render 阶段发生,那么会通过当前的 state 和 action 来判断下次渲染的 state 的值,并与当前 state 的值进行比较,如果两个值一致,则不需要更新,跳过更新过程;如果两个值不一致,调用
scheduleUpdateOnFiber开始调度,触发新一轮更新。
updateReducer
update 时,useState 和 useReducer 就更没什么区别了,updateState 就是直接返回了 updateReducer 函数,所以我们直接看 updateReducer 的源码就可以。
// packages/react-reconciler/src/ReactFiberHooks.old.jsfunction updateState<S>(initialState: (() => S) | S,
): [S, Dispatch<BasicStateAction<S>>] {return updateReducer(basicStateReducer, (initialState: any));
}
updateReducer 中,用 pending 来指向本次要触发的 update,然后将本次 hook 要执行的 update 和 current fiber 中之前未完成的 update 全部链接到 baseQueue,也就是代表全局的 update。
在 render 阶段,会遍历 update 来计算 state 的值,若某个 update 的优先级低于当前 render 执行的任务的优先级,则跳过此次 update 及未遍历完的 update 的执行,先执行其他的 update。然后再下一次 render 时从跳过的 update 开始继续执行。
update 阶段 dispatch 会生成一个新的 update 链接到 hooks 中,并根据之前的 state 和本次 action 去计算新的 state。
updateReducer 的源码如下:
function updateReducer<S, I, A>(reducer: (S, A) => S,initialArg: I,init?: I => S,
): [S, Dispatch<A>] {// 取出 hook 节点const hook = updateWorkInProgressHook();const queue = hook.queue;invariant(queue !== null,'Should have a queue. This is likely a bug in React. Please file an issue.',);queue.lastRenderedReducer = reducer;const current: Hook = (currentHook: any);// 上次未完成的 updatelet baseQueue = current.baseQueue;// 获取本次待执行的 updateconst pendingQueue = queue.pending;if (pendingQueue !== null) {if (baseQueue !== null) {// 如果 baseQueue 和 pendingQueue 都存在,将 pendingQueue 链接到 baseQueue 尾部const baseFirst = baseQueue.next;const pendingFirst = pendingQueue.next;baseQueue.next = pendingFirst;pendingQueue.next = baseFirst;}// ...// react 的异步模型,可能发生一个更高优先级任务打断当前任务的执行// 所以要将 baseQueue 也赋值给 current fibercurrent.baseQueue = baseQueue = pendingQueue;queue.pending = null;}if (baseQueue !== null) {const first = baseQueue.next;let newState = current.baseState;let newBaseState = null;let newBaseQueueFirst = null;let newBaseQueueLast = null;let update = first;// 遍历 hooks 链表,计算 statedo {const updateLane = update.lane;if (!isSubsetOfLanes(renderLanes, updateLane)) {// 如果当前的 update 优先级低于 render 优先级,下次 render 时再执行本次的 updateconst clone: Update<S, A> = {lane: updateLane,action: update.action,eagerReducer: update.eagerReducer,eagerState: update.eagerState,next: (null: any),};// 把这个 update 添加到 newBaseQueue 中下次 render 执行if (newBaseQueueLast === null) {newBaseQueueFirst = newBaseQueueLast = clone;newBaseState = newState;} else {newBaseQueueLast = newBaseQueueLast.next = clone;}// 更新 queue 的优先级currentlyRenderingFiber.lanes = mergeLanes(currentlyRenderingFiber.lanes,updateLane,);// 标记本次 update 跳过了markSkippedUpdateLanes(updateLane);} else {if (newBaseQueueLast !== null) {// newBaseQueueLast 不为 null,说明此前有跳过的 update// update 之间可能存在依赖,将后续 update 都连接到 newBaseQueue 中留到下次 render 执行const clone: Update<S, A> = {lane: NoLane,action: update.action,eagerReducer: update.eagerReducer,eagerState: update.eagerState,next: (null: any),};newBaseQueueLast = newBaseQueueLast.next = clone;}// 执行本次的 update,计算新的 stateif (update.eagerReducer === reducer) {// update.eagerReducer 和 reducer 相等,说明 reducer 已经计算过,直接取结算过的 statenewState = ((update.eagerState: any): S);} else {// 根据 state 和 action 计算新的 stateconst action = update.action;newState = reducer(newState, action);}}update = update.next;} while (update !== null && update !== first);if (newBaseQueueLast === null) {// newBaseQueueLast 为 null,说明所有 update 处理完了,更新 baseStatenewBaseState = newState;} else {// 未处理完留到下次执行newBaseQueueLast.next = (newBaseQueueFirst: any);}// 如果新的 state 和之前的 state 不相等,标记需要更新if (!is(newState, hook.memoizedState)) {markWorkInProgressReceivedUpdate();}// 将新的 state 和 baseQueue 保存到 hook 中hook.memoizedState = newState;hook.baseState = newBaseState;hook.baseQueue = newBaseQueueLast;queue.lastRenderedState = newState;}const dispatch: Dispatch<A> = (queue.dispatch: any);return [hook.memoizedState, dispatch];
}
总结
总结一下 useState 和 useReducer 的执行过程如下图: 
useEffect
同样,我们也分为 mount 和 update 两种情况来看 useEffect。
用法
useEffect 的使用大家应该都了解,在这里就不赘述了,我们本次的用例如下:
useEffect(() => {console.log('update');return () => {console.log('unmount');};
}, [count]);
mountEffect
mount 阶段 useEffect 实际上是调用了 mountEffect 方法,进一步通过传递参数调用了 mountEffectImpl 这个函数:
// packages/react-reconciler/src/ReactFiberHooks.old.jsfunction mountEffect(create: () => (() => void) | void,  // 执行的回调函数deps: Array<mixed> | void | null,  // 依赖项
): void {// ...return mountEffectImpl(UpdateEffect | PassiveEffect,HookPassive,create,deps,);
}
和 mountState 中所做的事情类似,mountEffectImpl 中首先通过 mountWorkInProgressHook 创建了 hook 链接到 hooks 链表中,前面提到过 useEffect 的 hook 是一个 Effect 类型的对象。然后通过 pushEffect 方法创建一个effect 添加到hook 的 memoizedState 属性:
// packages/react-reconciler/src/ReactFiberHooks.old.jsfunction mountEffectImpl(fiberFlags, hookFlags, create, deps): void {// 创建 hook 并链接到 hooks 链表中const hook = mountWorkInProgressHook();const nextDeps = deps === undefined ? null : deps;currentlyRenderingFiber.flags |= fiberFlags;// 创建一个 effect 对象并添加到 hook 的 memoizedState 中hook.memoizedState = pushEffect(HookHasEffect | hookFlags,create,undefined,nextDeps,);
}
pushEffect
pushEffect 函数中主要做了两件事,创建 effect 对象,然后将其添加到 fiber 的 updateQueue 链表上:
// packages/react-reconciler/src/ReactFiberHooks.old.jsfunction pushEffect(tag, create, destroy, deps) {// 创建 effectconst effect: Effect = {tag,create,destroy,deps,// Circularnext: (null: any),};let componentUpdateQueue: null | FunctionComponentUpdateQueue = (currentlyRenderingFiber.updateQueue: any);if (componentUpdateQueue === null) {// componentUpdateQueue 为 null,将 effect 添加到 componentUpdateQueue 头结点componentUpdateQueue = createFunctionComponentUpdateQueue();currentlyRenderingFiber.updateQueue = (componentUpdateQueue: any);componentUpdateQueue.lastEffect = effect.next = effect;} else {// 链接到当前 fiber 节点的 updateQueue 的 lastEffect 中const lastEffect = componentUpdateQueue.lastEffect;// 构成循环链表结构if (lastEffect === null) {componentUpdateQueue.lastEffect = effect.next = effect;} else {const firstEffect = lastEffect.next;lastEffect.next = effect;effect.next = firstEffect;componentUpdateQueue.lastEffect = effect;}}return effect;
}
updateEffect
update 阶段,useEffect 实际上是调用了 updateEffect 函数,同样是进一步调用了 updateEffectImpl 函数:
// packages/react-reconciler/src/ReactFiberHooks.old.jsfunction updateEffect(create: () => (() => void) | void,  deps: Array<mixed> | void | null,
): void {// ...return updateEffectImpl(UpdateEffect | PassiveEffect,HookPassive,create,deps,);
}
所以我们接着往下看 updateEffectImpl 函数做了什么,它从 updateWorkInProgressHook 取出对应的 hook,然后看上一轮 render 中是否有 hook 存在,若存在且上一轮 render 和本轮的依赖项没发生变化,说明副作用不需要执行,创建一个 effect 对象添加到 updateQueue 链表后直接返回;若两次的依赖项发生了变化,向 fiber 添加 flags 副作用标签,待 commit 时更新,然后再创建一个 effect 对象添加到 updateQueue 链表:
// packages/react-reconciler/src/ReactFiberHooks.old.jsfunction updateEffectImpl(fiberFlags, hookFlags, create, deps): void {// 从 hooks 链表中取出对应 hookconst hook = updateWorkInProgressHook();const nextDeps = deps === undefined ? null : deps;let destroy = undefined;if (currentHook !== null) {// 若上一轮 render 对应 hook 存在const prevEffect = currentHook.memoizedState;destroy = prevEffect.destroy;if (nextDeps !== null) {const prevDeps = prevEffect.deps;if (areHookInputsEqual(nextDeps, prevDeps)) {// 若上一轮和本次的依赖项未发生变化,说明没有副作用// 创建一个 effect 对象添加到 updateQueue 链表中,然后返回pushEffect(hookFlags, create, destroy, nextDeps);return;}}}// 执行到这里说明上一轮和本轮依赖项发生变化// 向 fiber 添加 flags 副作用标签,待 commit 时更新currentlyRenderingFiber.flags |= fiberFlags;// 创建一个 effect 对象添加到 updateQueue 链表中hook.memoizedState = pushEffect(HookHasEffect | hookFlags,create,destroy,nextDeps,);
}
总结
总结一下 useEffect 的大体流程如下: 
useRef
useRef 的代码十分的简单了,我们直接将 mount 阶段和 update 阶段的放到一起来看:
// packages/react-reconciler/src/ReactFiberHooks.old.jsfunction mountRef<T>(initialValue: T): {|current: T|} {const hook = mountWorkInProgressHook();const ref = {current: initialValue};// ...hook.memoizedState = ref;return ref;
}function updateRef<T>(initialValue: T): {|current: T|} {const hook = updateWorkInProgressHook();return hook.memoizedState;
}
mount 阶段,调用 mountRef 函数,通过 mountWorkInProgressHook 创建一个 hook 并添加到 hooks 链表上,hook.memoizedState 上存储的是 {current: initialValue} 这个 ref 对象。
update 阶段,调用 updateRef 函数,通过 updateWorkInProgressHook 方法直接取出 hook.memoizedState。
可以看到 hook.memoizedState 指向的是一个对象的引用,这就解释了我们可以直接通过 ref.current 去改变和获取最新的值,不必进行任何依赖注入。
useCallback & useMemo
useCallback 和 useMemo 也是一样,源码结构上十分相似,所以也放在一起来讲。
用法
基础用法如下:
// 第一个参数是 “创建” 函数,第二个参数是依赖项数组
// “创建” 函数会根据依赖项数组返回一个值,并且仅会在某个依赖项改变时才重新计算
const value = useMemo(() => add(a, b), [a, b]);// 第一个参数是回调函数,第二个参数是依赖项数组
// 依赖项改变时回调函数会进行更新
const callback = useCallback(() => { add(a, b) }, [a, b]);
mount 阶段
mount 时,分别调用了 mountCallback 和 mountMemo 函数,两者都通过 mountWorkInProgressHook 方法创建 hook 添加到了 hooks 链表中。不同的是,mountCallback 的 memoizedState 是 [callback, nextDeps],并且返回的是其第一个参数;mountMemo 的 memoizedState 是 [nextValue, nextDeps],返回的也是 nextValue 也就是其第一个参数的执行结果。
所以看上去 useMemo 就是比 useCallback 多了一步第一个参数的执行过程。
// packages/react-reconciler/src/ReactFiberHooks.old.jsfunction mountCallback<T>(callback: T, deps: Array<mixed> | void | null): T {// 创建 hook 添加到链表中const hook = mountWorkInProgressHook();const nextDeps = deps === undefined ? null : deps;hook.memoizedState = [callback, nextDeps];return callback;
}function mountMemo<T>(nextCreate: () => T,deps: Array<mixed> | void | null,
): T {// 创建 hook 添加到链表中const hook = mountWorkInProgressHook();const nextDeps = deps === undefined ? null : deps;const nextValue = nextCreate();hook.memoizedState = [nextValue, nextDeps];return nextValue;
}
update 阶段
update 时,分别调用了 updateCallback 和 updateMemo 函数,它们都通过 updateWorkInProgressHook 取出对应的 hook,若依赖项未发生改变,则取上一轮的 callback 或者 value 返回;若依赖项发生改变,则重新赋值 hook.memoizedState 并返回新的 callback 或新计算的 value:
// packages/react-reconciler/src/ReactFiberHooks.old.jsfunction updateCallback<T>(callback: T, deps: Array<mixed> | void | null): T {// 获取对应 hookconst hook = updateWorkInProgressHook();const nextDeps = deps === undefined ? null : deps;const prevState = hook.memoizedState;if (prevState !== null) {if (nextDeps !== null) {const prevDeps: Array<mixed> | null = prevState[1];// 依赖项未发生改变,取上一轮的 callback 并返回if (areHookInputsEqual(nextDeps, prevDeps)) {return prevState[0];}}}// 依赖项改变了,重新赋值 hook.memoizedState,返回新的 callbackhook.memoizedState = [callback, nextDeps];return callback;
}function updateMemo<T>(nextCreate: () => T,deps: Array<mixed> | void | null,
): T {// 获取对应 hookconst hook = updateWorkInProgressHook();const nextDeps = deps === undefined ? null : deps;const prevState = hook.memoizedState;if (prevState !== null) {if (nextDeps !== null) {const prevDeps: Array<mixed> | null = prevState[1];// 依赖项未发生改变,取上一轮的值并返回if (areHookInputsEqual(nextDeps, prevDeps)) {return prevState[0];}}}// 依赖项改变了,计算新的值,重新赋值 hook.memoizedState并返回新的值const nextValue = nextCreate();hook.memoizedState = [nextValue, nextDeps];return nextValue;
}
结语
本章讲解了 react hooks 的源码,理解了 hooks 的设计思想和工作过程。其他 hook 平时用的比较少,就不在这里展开讲了,但通过上面几个 hook 的源码讲解,其他 hook 看源码你应该也能看得懂。
相关文章:
React源码分析6-hooks源码
本文将讲解 hooks 的执行过程以及常用的 hooks 的源码。 hooks 相关数据结构 要理解 hooks 的执行过程,首先想要大家对 hooks 相关的数据结构有所了解,便于后面大家顺畅地阅读代码。 Hook 每一个 hooks 方法都会生成一个类型为 Hook 的对象ÿ…...
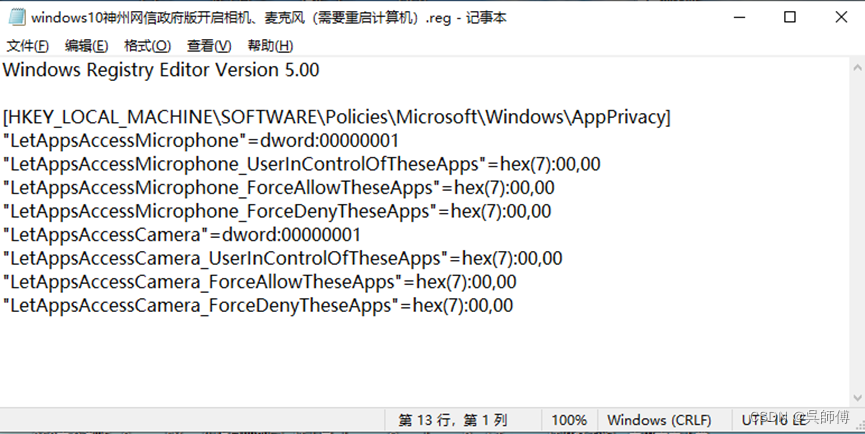
Windows10神州网信政府版麦克风、摄像头的使用
Windows10神州网信政府版默认麦克风摄像头是禁用状态,此禁用状态符合版本规定。 在录课和直播过程中,如果需要使用麦克风和摄像头的功能,可以这样更改: 1、鼠标右键点击屏幕左下角的开始菜单图标,选择windows中的“运…...

微机原理学习总结0:前言
近期结束了微机课程的学习,(指刚考完试),正常情况下,后面应该不会再接触这门课程了,故在此记录自己这段时间的收获。 首先,十分推荐b站的一门课程,老师讲的很细致,很适合…...
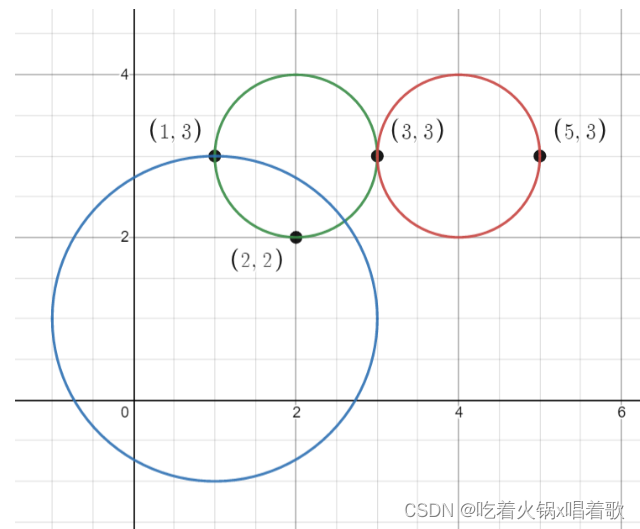
LeetCode 1828. 统计一个圆中点的数目
给你一个数组 points ,其中 points[i] [xi, yi] ,表示第 i 个点在二维平面上的坐标。多个点可能会有 相同 的坐标。 同时给你一个数组 queries ,其中 queries[j] [xj, yj, rj] ,表示一个圆心在 (xj, yj) 且半径为 rj 的圆。 对…...

Spring Boot + Vue3 前后端分离 实战 wiki 知识库系统<一>---Spring Boot项目搭建
前言: 接下来又得被迫开启新的一门课程的学习了,上半年末尾淘汰又即将拉开序幕【已经记不清经历过多少次考试了】,需要去学习其它领域的技术作为考试内容,我选了spring boot相关技术,所以。。总之作为男人,…...
leetcode 11~20 学习经历
LeetCode 习题 11 - 2011. 盛最多水的容器12. 整数转罗马数字13. 罗马数字转整数14. 最长公共前缀15. 三数之和16. 最接近的三数之和17. 电话号码的字母组合18. 四数之和19. 删除链表的倒数第 N 个结点20. 有效的括号小结11. 盛最多水的容器 给定一个长度为 n 的整数数组 heigh…...

LeetCode 双周赛 98,脑筋急转弯转不过来!
本文已收录到 AndroidFamily,技术和职场问题,请关注公众号 [彭旭锐] 提问。 大家好,我是小彭。 昨晚是 LeetCode 第 98 场双周赛,你参加了吗?这场周赛需要脑筋急转弯,转不过来 Medium 就会变成 Hard&#…...
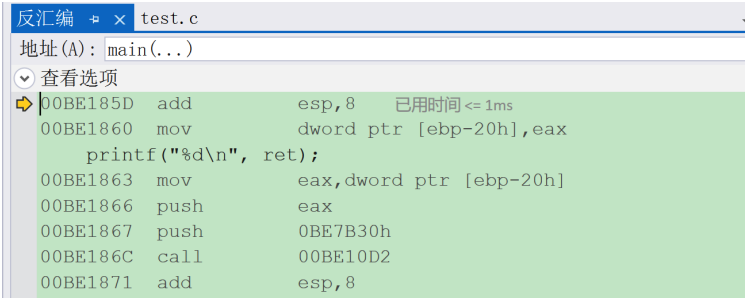
函数的栈帧的创建和销毁
文章目录本章主题:一.什么是函数栈帧1.什么是栈2.什么是函数栈帧二.理解函数栈帧能解决什么问题呢?三.函数栈帧的创建和销毁解析1.预备知识(1) 认识相关寄存器和汇编指令(2)栈帧空间的维护2.解析函数栈帧的…...

python filtermapreducezip
一、filter 过滤 filter 过滤, 从可迭代对象中,筛选出满足条件的元素,再将这些满足条件的元素,组成一个新的可迭代对象。 方式一:filter(过滤方法,可迭代对象) 举例:将一个list中…...
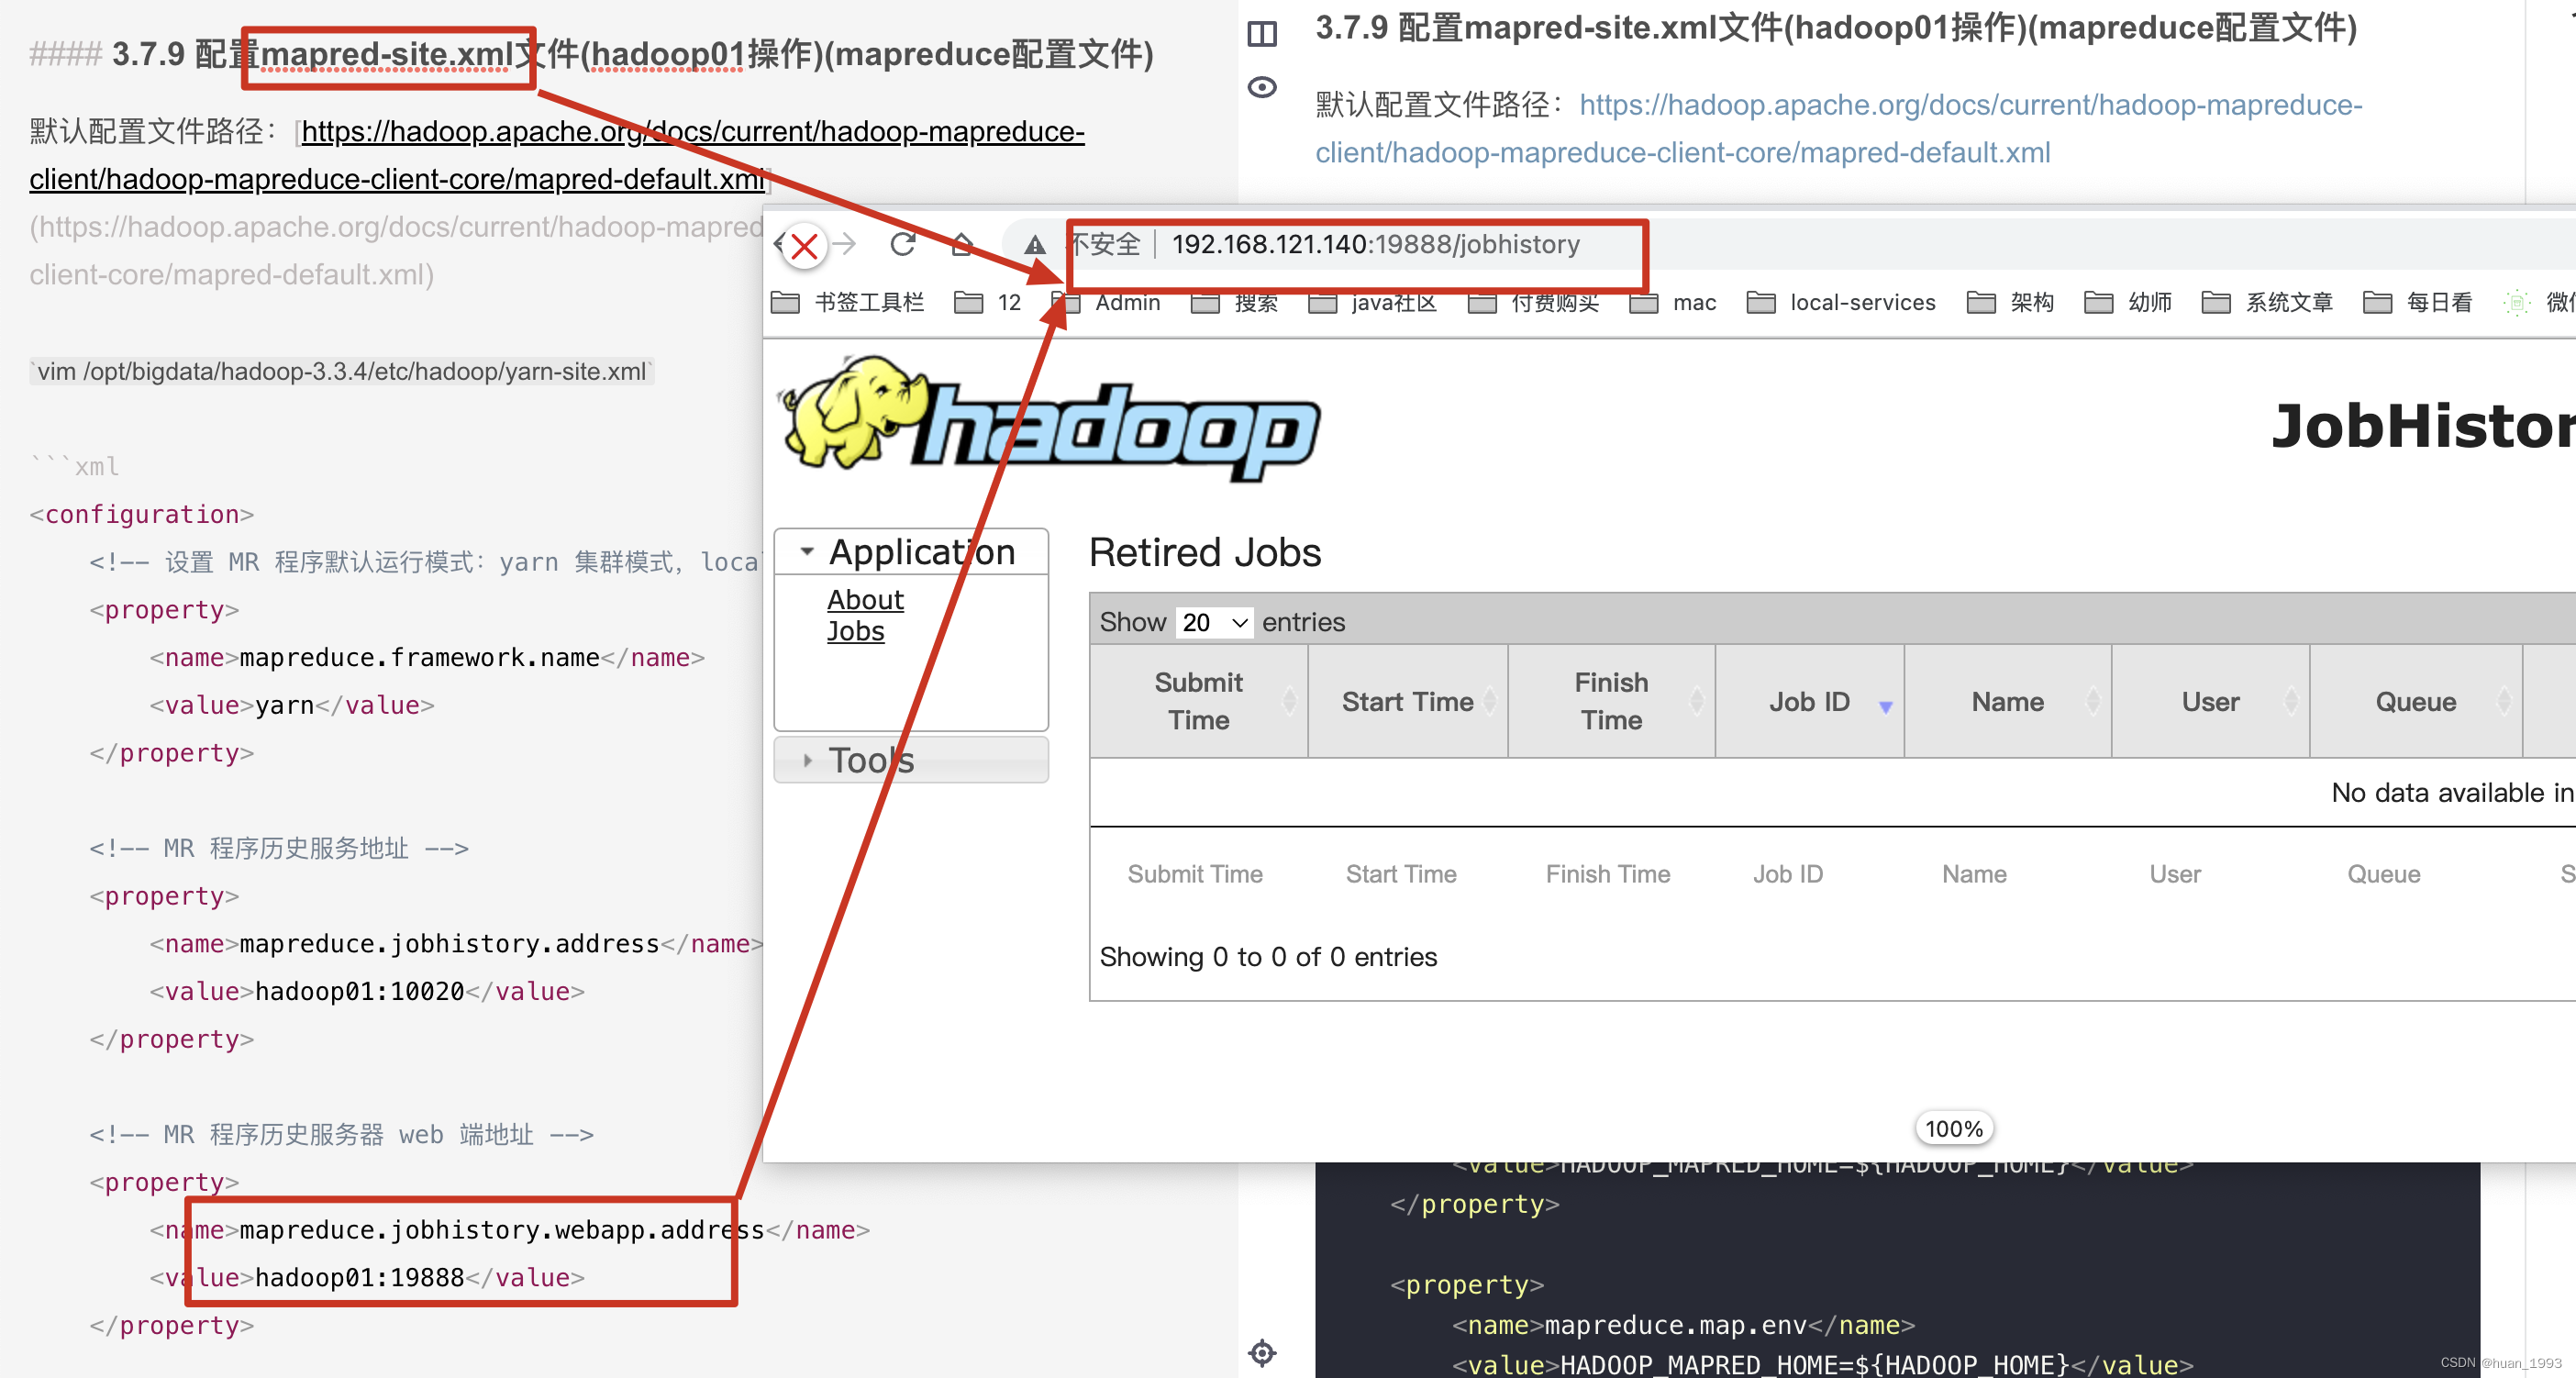
Centos7搭建hadoop3.3.4分布式集群
文章目录1、背景2、集群规划2.1 hdfs集群规划2.2 yarn集群规划3、集群搭建步骤3.1 安装JDK3.2 修改主机名和host映射3.3 配置时间同步3.4 关闭防火墙3.5 配置ssh免密登录3.5.1 新建hadoop部署用户3.5.2 配置hadoopdeploy用户到任意一台机器都免密登录3.7 配置hadoop3.7.1 创建目…...

骨传导耳机工作原理,骨传导耳机优缺点
骨传导耳机虽说最近是十分火爆的一款单品,但还是有很多人对骨传导耳机不是很了解,骨传导耳机更多使用场景还是在户外运动使用,骨传导耳机对于长时间使用耳机的人来说十分友好,这主要还是得益于骨传导耳机传输声音的特殊性。 下面我…...
IDEA高效插件和设置
安装好Intellij idea之后,进行如下的初始化操作,工作效率提升十倍。 一. 安装插件 1. Codota 代码智能提示插件 只要打出首字母就能联想出一整条语句,这也太智能了,还显示了每条语句使用频率。 原因是它学习了我的项目代码&…...
Linux之网络流量监控工具ntopng YUM安装
一、ntopng简介 Ntop是一种监控网络流量工具,用ntop显示网络的使用情况比其他一些网络管理软件更加直观、详细。Ntop甚至可以列出每个节点计算机的网络带宽利用率。他是一个灵活的、功能齐全的,用来监控和解决局域网问题的工具;尤其当ntop与n…...
创建虚拟机,安装CentOS
在VMware上面创建虚拟机 文件->新建虚拟机 选定 自定义的高级,下一步 下一步 检查选定稍后安装操作系统 下一步 选择Linux,CentOS 7 64位 创建虚拟机名称,以及在存放该虚拟机的位置 选择处理器的数量和每个处理器的内核数量 …...
ilasm 和 ildasm编译和反编译工具介绍使用教程
目录前言一、使用 ildasm 反编译 dll 文件二、使用 ilasm 将il文件编译成 dll 或 exe 文件前言 文本讲述怎么通过 ildasm 工具将 dll 文件进行反编译为 il 文件,修改 il 文件后再如何通过 ilasm 工具将 il 文件反编译成 dll 或 exe 文件。 ildasm工具:…...
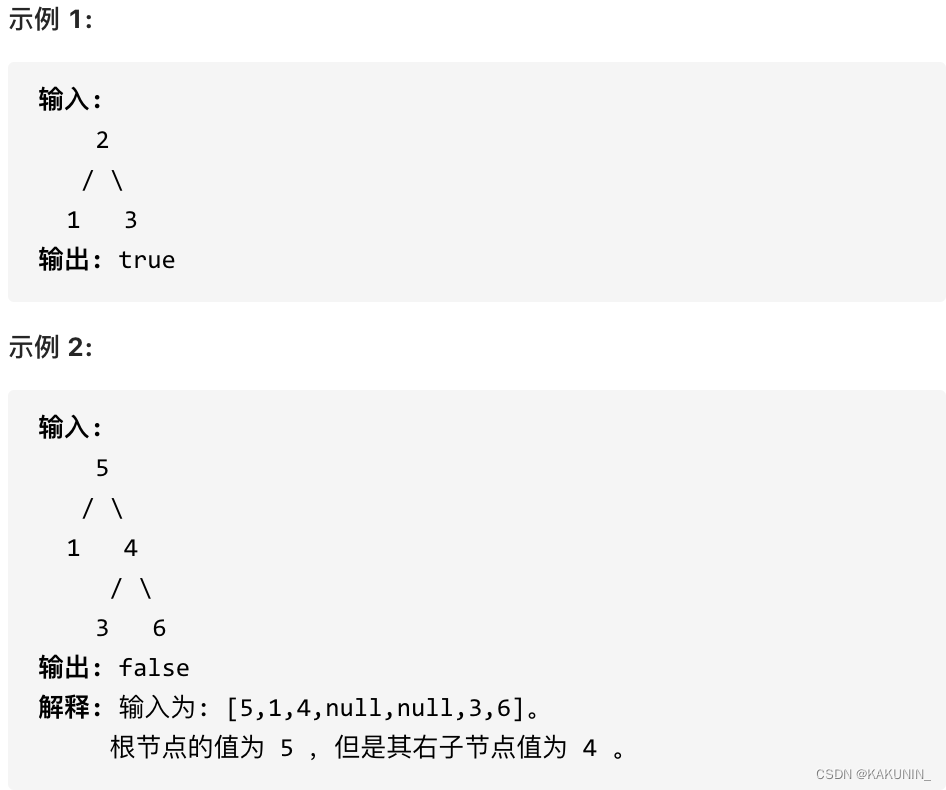
代码随想录【Day20】| 654. 最大二叉树、617. 合并二叉树、700. 二叉搜索树中的搜索、98. 验证二叉搜索树
654. 最大二叉树 题目链接 题目描述: 给定一个不含重复元素的整数数组。一个以此数组构建的最大二叉树定义如下: 二叉树的根是数组中的最大元素。 左子树是通过数组中最大值左边部分构造出的最大二叉树。 右子树是通过数组中最大值右边部分构造出的最…...
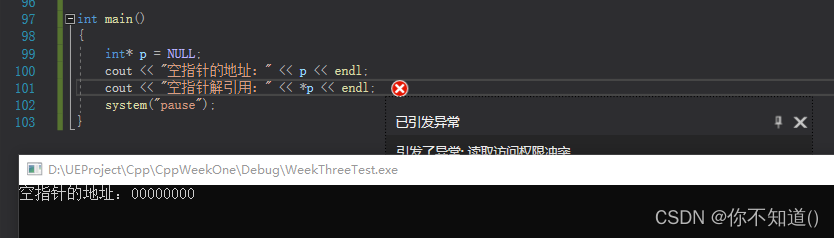
C++空指针和野指针
空指针:指针被赋值为空 例如: int* p nullptr;int* p NULL; 空指针指向的地址是00000000,但空指针不可以解引用 野指针:指针指向了不可控的位置 例如: 未初始化 int* p; //野指针 越界访问 int intArr[5]{0, 1, …...
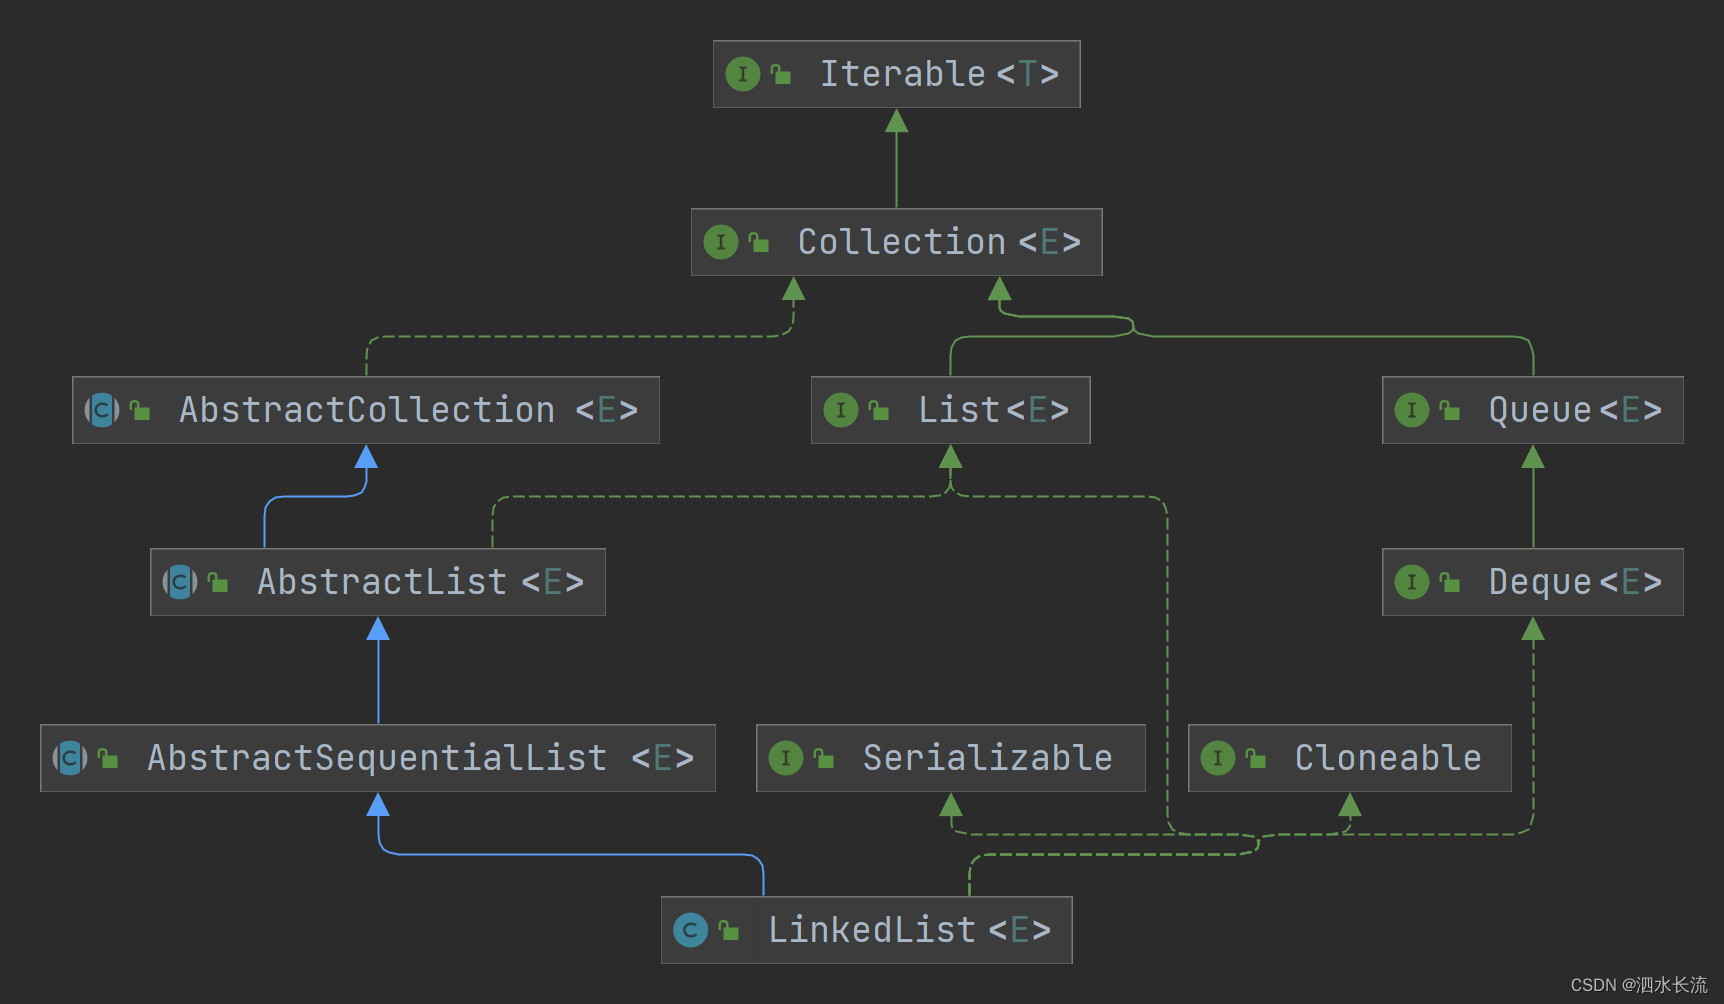
LinkedList正确的遍历方式-附源码分析
1.引子 记得之前面试过一个同学,有这么一个题目: LinkedList<String> list new LinkedList<>();for (int i 0; i < 1000; i) {list.add(i "");}请根据上面的代码,请选择比较恰当的方式遍历这个集合,并…...
【蓦然回首忆Java·基础卷Ⅱ】
文章目录对象内存解析方法的参数传递机制关键字:package、importpackage(包)JDK中主要的包介绍import(导入)JavaBeanUML类图继承的一些细节封装性中的4种权限修饰关键字:supersuper的理解super的使用场景子类中调用父类被重写的方法子类中调用父类中同名…...
Mybatis源码分析系列之第二篇:Mybatis的数据存储对象
前言:SQLSession是对JDBC的封装 一:SQLSession和JDBC的对照说明 左边是我们的客户端程序,右边是我们的MySQL数据仓,或者叫MySQL实例 Mybatis是对JDBC的封装,将JDBC封装成了一个核心的SQLSession对象 JDBC当中的核心对…...

嵌入式调试实战:常见错误与高效排查方法
1. 程序员调试中的那些"荒唐"错误 作为一名从业多年的嵌入式工程师,我深知调试过程中的酸甜苦辣。那些看似简单的问题往往耗费我们最多时间,而最终解决方案却常常让人哭笑不得。今天就来分享几个真实的调试故事,希望能给同行们带来…...

阶跃星辰新版模型上线,Token 消耗最高降 56%
4 月 2 日消息,阶跃星辰新版模型 Step 3.5 Flash 2603 正式上线并向 Step Plan 用户开放。该模型优化升级,带来核心改进,Token 消耗最高降 56%。新版模型正式上线阶跃星辰宣布新版模型 Step 3.5 Flash 2603 上线,向所有 Step Plan…...

基于yolov8的路面缺陷检测系统
一、项目介绍 在城市化进程不断加速的大背景下,道路安全与维护的重要性日益凸显。传统人工巡检路面缺陷的方式,因其效率较低、主观性较强等问题,逐渐难以满足当下道路管理的实际需求。YOLOv8 算法在目标检测领域展现出了突出的性能࿰…...

3步搞定小红书无水印下载:XHS-Downloader开源神器实战全解析
3步搞定小红书无水印下载:XHS-Downloader开源神器实战全解析 【免费下载链接】XHS-Downloader 小红书(XiaoHongShu、RedNote)链接提取/作品采集工具:提取账号发布、收藏、点赞、专辑作品链接;提取搜索结果作品、用户链…...
原理与应用)
高光谱图像处理实战:5分钟搞懂Pansharpening动态卷积网络(DyPNN)原理与应用
高光谱图像处理实战:5分钟搞懂Pansharpening动态卷积网络(DyPNN)原理与应用 遥感图像处理领域近年来迎来了一项突破性技术——动态卷积网络(DyPNN)在高光谱图像融合中的应用。这项技术彻底改变了传统Pansharpening方法…...

2026届毕业生推荐的十大降重复率助手实际效果
Ai论文网站排名(开题报告、文献综述、降aigc率、降重综合对比) TOP1. 千笔AI TOP2. aipasspaper TOP3. 清北论文 TOP4. 豆包 TOP5. kimi TOP6. deepseek 人工智能技术于学术写作领域的运用愈发广泛,其助力论文撰写的本领已获实证&#…...
可视化效果大比拼)
Matlab vs Python:灰色关联分析(GRA)可视化效果大比拼
Matlab vs Python:灰色关联分析可视化效果与实现深度对比 在数据科学领域,灰色关联分析(Grey Relational Analysis, GRA)作为一种强大的小样本数据分析工具,正逐渐受到研究者和实践者的青睐。面对两种主流编程语言Matlab和Python,…...

SecGPT-14B模型量化:降低OpenClaw长期运行的Token消耗
SecGPT-14B模型量化:降低OpenClaw长期运行的Token消耗 1. 为什么需要量化SecGPT-14B模型 当我第一次在OpenClaw项目中接入SecGPT-14B模型时,就被它的安全分析能力惊艳到了。这个模型能精准识别代码漏洞、异常网络请求和各种安全威胁,让我的…...

【实用技巧】-Mac系列设备自定义鼠标指针颜色与动态效果指南
1. 为什么需要自定义鼠标指针? 作为一个用了十年Mac的老用户,我深知默认的白色指针在复杂界面中经常"消失"的烦恼。特别是做设计时,盯着色彩斑斓的PS画布,那个小箭头简直像在玩捉迷藏。更糟的是在演示场景,观…...
)
LeetCode138. 随机链表的复制(2024秋季每日一题 34)
给你一个长度为 n 的链表,每个节点包含一个额外增加的随机指针 random ,该指针可以指向链表中的任何节点或空节点。 构造这个链表的 深拷贝。 深拷贝应该正好由 n 个 全新 节点组成,其中每个新节点的值都设为其对应的原节点的值。新节点的 ne…...