使用Visual Studio 2022实现透明按钮和标签、POPUP样式窗体的一种工业系统的UI例程
例程实现的功能说明
1、主窗体采用POPUP样式,无标题栏、无菜单栏,适合工业类软件
2、按钮、标签使用自绘,实现透明样式,可以实现灵活的样式设计,更具设计感
按钮重绘函数:OnDrawItem()按钮样式设定:WS_CHILD | WS_VISIBLE | BS_DEFPUSHBUTTON | BS_OWNERDRAW消息处理函数的设定:
case WM_DRAWITEM:OnDrawItem(hWnd, message, wParam, lParam);break;case WM_CTLCOLORBTN:return (LRESULT)(HBRUSH)GetStockObject(NULL_BRUSH);break;
标签重回函数:DrawStatic()
case WM_CTLCOLORSTATIC:return DrawStatic(hWnd, message, wParam, lParam);break;
3、整个UI进行了独立设计,导出了函数,可以在主程序使用
4、实现了全局变量的导入,减少了局部变量的使用
5、使用pBITMAPINFO结构体实现了图形图像的灵活绘制与显示
6、根据窗口尺寸,绘制了几个RGB格式位图图像,显示到了指定窗口上
7、实现了状态栏文本消息的显示,当消息不需要刷新时,不进行显示的刷新操作
状态栏文本显示函数:SetStatusBarText()
8、右侧面板预留了几个空白的区域用于应用系统的扩展
9、按钮和右侧预留的功能子窗口的创建使用了数组,通过for循环创建
10、按钮和右侧预留的功能子窗口使用了字符串数组,循环加载文本信息
11、状态栏子项的宽度使用百分比进行自动计算
12、按钮的菜单ID 使用变量进行自动计算,只需要定义首个按钮的ID即可
13、开放给用户的图像显示窗口封装了函数
显示图像缓冲区数据到窗口的函数:show_imageBuffer()
14、使用F10键或ESC、退出按钮均可以退出系统
15、创建了三种字体供系统使用
以下是UI的样式

 以下是代码:
UI.h
#pragma once
#include <windows.h>
#include <stdio.h>
#include <CommCtrl.h>	//SysListView32控件调用的库#pragma comment(lib,"comctl32.lib")// 使用Windows视觉效果
#if defined _M_IX86
#pragma comment(linker,"/manifestdependency:\"type='win32' "\" name='Microsoft.Windows.Common-Controls' "\" version='6.0.0.0' processorArchitecture='x86' "\"publicKeyToken='6595b64144ccf1df' language='*'\"")
#elif defined _M_IA64
#pragma comment(linker,"/manifestdependency:\"type='win32'"\" name='Microsoft.Windows.Common-Controls' "\"version='6.0.0.0' processorArchitecture='ia64'"\" publicKeyToken='6595b64144ccf1df' language='*'\"")
#elif defined _M_X64
#pragma comment(linker,"/manifestdependency:\"type='win32'"\" name='Microsoft.Windows.Common-Controls'"\" version='6.0.0.0' processorArchitecture='amd64'"\" publicKeyToken='6595b64144ccf1df' language='*'\"")
#else
#pragma comment(linker,"/manifestdependency:\"type='win32'"\" name='Microsoft.Windows.Common-Controls'"\" version='6.0.0.0' processorArchitecture='*' "\"publicKeyToken='6595b64144ccf1df' language='*'\"")
#endif#define IDB_EXIT		3001	/* 顶部按钮组的起始编号 */// 创建客户界面的函数
bool createUI(HWND hwndmain, WCHAR* szWindowClass, int width, int height, int* analySize, int* axis_size, int* img_size);// 对Owner_Draw样式的按钮进行重新绘制
VOID OnDrawItem(HWND hWnd, UINT uMsg, WPARAM wParam, LPARAM lParam);// 重绘static控件函数
INT_PTR DrawStatic(HWND hWnd, UINT uMsg, WPARAM wParam, LPARAM lParam);/*名称:SetStatusBarText功能:设置状态栏某一格的文本参数:hStatus状态栏句柄,i项,szString标题
*/
int SetStatusBarText(int i, char* szString);// 将RGB位图缓冲数据显示到窗口
void show_imageBuffer(int id, HWND hWnd, unsigned char *src);
pch.h
// pch.h: 这是预编译标头文件。
// 下方列出的文件仅编译一次,提高了将来生成的生成性能。
// 这还将影响 IntelliSense 性能,包括代码完成和许多代码浏览功能。
// 但是,如果此处列出的文件中的任何一个在生成之间有更新,它们全部都将被重新编译。
// 请勿在此处添加要频繁更新的文件,这将使得性能优势无效。#ifndef PCH_H
#define PCH_H// 添加要在此处预编译的标头
#include "framework.h"#endif //PCH_H
pch.cpp
// pch.cpp: 与预编译标头对应的源文件#include "pch.h"// 当使用预编译的头时,需要使用此源文件,编译才能成功。UI.cpp
#include "pch.h"
#include "UI.h"#define MAX_LOADSTRING	100//#define BorderStyle		// 显示边框#if defined BorderStyle#define staticStyle WS_CHILD | WS_VISIBLE | WS_BORDER#define	buttonStyle WS_CHILD | WS_VISIBLE | WS_BORDER | BS_DEFPUSHBUTTON | BS_OWNERDRAW
#else#define staticStyle WS_CHILD | WS_VISIBLE#define	buttonStyle WS_CHILD | WS_VISIBLE | BS_DEFPUSHBUTTON | BS_OWNERDRAW
#endifCOLORREF Caption_Color = RGB(0x00, 0x7A, 0xCC);		// 应用系统标题字的文本颜色
COLORREF BtnOn_Color = RGB(0x32, 0xB9, 0x00);		// 按钮按下时的文本颜色
COLORREF color_btn_normal = RGB(0x7A, 0xC0, 0xFF);	// 按钮常态时的文本颜色
COLORREF color_imgWnd_text = RGB(0xFF, 0x0F, 0x00);	// 图像窗口文本色BITMAPINFO	BMP_Analys;
unsigned char pFrameBuffer[3840 * 2160 * 3];
HDC			hdc_image;				/* 图像窗口的设备句柄	*/
HWND		hwndStatusBar;			/* 状态栏窗口句柄		*/extern HWND	hwnd_Analys;
HDC			hdc_analys;				/* 分析窗口的设备句柄	*/BITMAPINFO	BMP_Axis = { 0 };
extern HWND	hwnd_Axis_L;			/* 左侧坐标轴窗口的句柄	*/
extern HWND	hwnd_Axis_R;			/* 右侧坐标轴窗口的句柄	*/BITMAPINFO	BMP_Image = { 0 };
extern HWND	hwnd_Image;				/* 坐标轴窗口的句柄	*/const int BarNum = 6;
char status_text[BarNum][256] = { "视觉传感器","输出状态", "专机连接状态","相机曝光时间", "相机帧率","处理时间" };
bool bRefreshChk = false;BITMAPINFO* pBmpInf;
void show_imageBuffer(int id, HWND hWnd, unsigned char *src)
{switch (id){case 0:pBmpInf = &BMP_Analys;break;case 1:pBmpInf = &BMP_Axis;break;case 2:pBmpInf = &BMP_Axis;break;case 3:pBmpInf = &BMP_Image;break;default:break;}int width = pBmpInf->bmiHeader.biWidth,height = pBmpInf->bmiHeader.biHeight;hdc_analys = GetDC(hWnd);// 将数据送到窗口进行显示StretchDIBits(hdc_analys,0, 0, width, height,0, 0, width, height,src, pBmpInf, DIB_RGB_COLORS, SRCCOPY);
}// 对Owner_Draw样式的按钮进行重新绘制
VOID OnDrawItem(HWND hWnd, UINT uMsg, WPARAM wParam, LPARAM lParam)
{LPDRAWITEMSTRUCT pBtn = (LPDRAWITEMSTRUCT)lParam;if (pBtn->CtlType == ODT_BUTTON) // 控件的类型是Owner-drawn button{if (pBtn->itemState & ODS_SELECTED)// 选中的状态  SetTextColor(pBtn->hDC, BtnOn_Color);elseSetTextColor(pBtn->hDC, color_btn_normal);TCHAR szName[256] = { 0 };int nOldMode = SetBkMode(pBtn->hDC, TRANSPARENT);	//设置文字背景模式  GetWindowText(pBtn->hwndItem, szName, 256);			//取得按钮上面原来的文字  DrawText(pBtn->hDC, szName, (int)wcslen(szName), &pBtn->rcItem, DT_CENTER | DT_SINGLELINE | DT_VCENTER);	//绘制位置  }
}// 重绘static控件函数
INT_PTR DrawStatic(HWND hWnd, UINT uMsg, WPARAM wParam, LPARAM lParam)
{int i = GetWindowLong((HWND)lParam, GWL_ID);switch (i){case 0:break;default:break;}SetTextColor((HDC)wParam, Caption_Color);SetBkMode((HDC)wParam, TRANSPARENT);return (INT_PTR)GetStockObject(NULL_BRUSH);
}/*  名称:SetStatusBarText功能:设置状态栏某一格的文本参数:i序号,szString字符串指针
*/
int SetStatusBarText(int i, char* szString)
{if ((i >= BarNum) || (hwndStatusBar == nullptr))return 0;// 比较两个字符串是否一致int len_in = (int)strlen(szString), len_raw = (int)strlen(status_text[i]);if ((len_in == len_raw) && bRefreshChk){for (int j = 0; j < len_in; ++j){if (szString[j] != status_text[i][j])  break;elseif (j == (len_in - 1))return 1; }}memcpy_s(status_text[i], len_in, szString, len_in);status_text[i][len_in] = 0;len_in ++;int nwLen = MultiByteToWideChar(CP_ACP, 0, status_text[i], len_in, NULL, 0);LPWSTR lpszPath = new WCHAR[len_in];MultiByteToWideChar(CP_ACP, 0, status_text[i], len_in, lpszPath, nwLen);SendMessage(hwndStatusBar, SB_SETTEXT, (WPARAM)i, (LPARAM)lpszPath);if(!bRefreshChk)bRefreshChk = (i==(BarNum-1));return 1;
}/* HDC窗口显示字符串 */
void HDC_DrawText(int id_hdc, int x, int y, char* lpstr)
{HDC hdc = ((id_hdc == 0) ? hdc_analys : hdc_image);int len_in = (int)strlen(lpstr)+1;int nwLen = MultiByteToWideChar(CP_ACP, 0, lpstr, len_in, NULL, 0);LPWSTR lpszPath = new WCHAR[len_in];MultiByteToWideChar(CP_ACP, 0, lpstr, len_in, lpszPath, nwLen);TextOut(hdc, x, y, lpszPath, nwLen);
}// 创建应用程序字体的函数
void createAppFont(HFONT* hFont, int mHeight, LOGFONT fontName)
{LOGFONT LogFont;memset(&LogFont, 0, sizeof(LOGFONT));memcpy_s(&LogFont, sizeof(LOGFONT), &fontName, sizeof(LOGFONT));LogFont.lfHeight = mHeight;*hFont = CreateFontIndirect(&LogFont);
}/*  名称:SetStatus函数功能:将状态栏划分成多格参数:hWnd主窗口句柄,hStatus状态栏句柄
*/
int SetStatus(HWND hWnd, HWND hStatus, int num, int* barwidth)
{RECT WinRect;GetClientRect(hWnd, &WinRect);for (int i = 1; i < num - 1; i++)barwidth[i] = barwidth[i - 1] + barwidth[i];barwidth[num - 1] = WinRect.right - 2;SendMessage(hStatus, SB_SETPARTS, (WPARAM)num, (LPARAM)barwidth);return 1;
}// 创建顶部控件组函数
void create_toppannel(HWND hparent,int mainwidth, int width, int height, int margin,int fontSize_caption, HFONT caption,HFONT hFont_Detail)
{// LOGO的标签int ctrlheight = height - margin * 3, Logo_width= ctrlheight+16, x0 = margin, y0 = margin;HWND hwnd_Logo = CreateWindow(TEXT("static"), L"Logo", staticStyle,x0, y0, Logo_width, ctrlheight, hparent, NULL, NULL, NULL);SendMessage(hwnd_Logo, WM_SETFONT, (WPARAM)caption, 1);// 标题的标签x0 += margin + Logo_width, ctrlheight = fontSize_caption + margin * 2;HWND hwnd_appCaption = CreateWindow(L"static", L"Wise Vision System", staticStyle,x0 , y0, width, ctrlheight, hparent, NULL, NULL, NULL);SendMessage(hwnd_appCaption, WM_SETFONT, (WPARAM)caption, 1);// 子标题的标签y0 += fontSize_caption + margin, ctrlheight = height - ctrlheight - margin * 2;int detail_height = height - fontSize_caption - margin * 4;HWND hwnd_appname = CreateWindow(L"static", L"Wise Vision System Ver 1.0", staticStyle,x0, y0, width, ctrlheight, hparent, NULL, NULL, NULL);SendMessage(hwnd_appname, WM_SETFONT, (WPARAM)hFont_Detail, 1);// 右侧按钮const int button_num = 8;LPCWSTR ButtonText[button_num] = { L"退出系统",L"锁定系统", L"设备信息",L"参数设置", L"模板管理", L"录制视频",L"关闭输出",L"相机参数" };int button_width = Logo_width;x0 = mainwidth - button_width - margin * (button_num);HWND hwnd_Button[button_num];for (int i = 0; i < button_num; ++i){hwnd_Button[i] = CreateWindowEx(NULL, L"button", ButtonText[i], buttonStyle,x0, 0, button_width, height, hparent, (HMENU)(IDB_EXIT + i), NULL, NULL);SendMessage(hwnd_Button[i], WM_SETFONT, (WPARAM)hFont_Detail, 1);x0 -= button_width + margin * 10;}
}// 创建右侧面板控件组函数
void createRightPannel(HWND hparent,int width,int height,int margin,HFONT font_detail)
{/* 右侧子窗口的数量 */const int children_num = 4;/* 子窗口的标题 */LPCWSTR pannelR_labeltext[children_num] = { L"控制参数",L"相机参数", L"算法参数",L"运行状态" };/* 子窗口高度占容器高度的百分比 */int children_height[children_num] = { 20,25,25,30 };/* 子窗口高度的百分比 *//* 子窗口句柄数组 */HWND hPanel_R[children_num];int x0 = margin, y0 = margin, control_width = width - margin * 2;for (int i = 0; i < children_num; ++i){int control_height = children_height[i] * height / 100;if (i == (children_num - 1))control_height = height - y0 - margin;hPanel_R[i] = CreateWindow(L"static", pannelR_labeltext[i], staticStyle,x0, y0, control_width, control_height, hparent, NULL, NULL, NULL);SendMessage(hPanel_R[i], WM_SETFONT, (WPARAM)font_detail, 1);y0 += control_height + margin;}
}// 创建左侧面板控件组函数
void createLeftPannel(HWND hparent, int width, int height, int margin, HFONT font_normal,int* analys_size,int* ax_size, int* imgwnd_size)
{int ctrl_width = width- margin*3,ctrl_height = 128,x0 = margin, y0 = height - ctrl_height;analys_size[0] = ctrl_width -= (ctrl_width % 4);analys_size[1] = ctrl_height -= (ctrl_height % 4);// 底部分析数据窗口hwnd_Analys = CreateWindow(L"static", L"动态分析数据窗口", staticStyle,x0, y0, ctrl_width, ctrl_height, hparent, NULL, NULL, NULL);SendMessage(hwnd_Analys, WM_SETFONT, (WPARAM)font_normal, 1);BMP_Analys.bmiHeader.biWidth = ctrl_width;BMP_Analys.bmiHeader.biHeight = ctrl_height;BMP_Analys.bmiHeader.biBitCount = 24;BMP_Analys.bmiHeader.biSize = 40;BMP_Analys.bmiHeader.biPlanes = 1;BMP_Analys.bmiHeader.biSizeImage = ctrl_width * ctrl_height * 3 + 1024;BMP_Analys.bmiHeader.biXPelsPerMeter = 2834;BMP_Analys.bmiHeader.biYPelsPerMeter = 2834;BMP_Analys.bmiHeader.biCompression = 0;BMP_Analys.bmiHeader.biClrUsed = 0;BMP_Analys.bmiHeader.biClrImportant = 0;for (int i = 0; i < 256; i++)BMP_Analys.bmiColors[i] = { (unsigned char)i,(unsigned char)i,(unsigned char)i ,0 };// 左侧坐标轴标记窗口ctrl_width = 128;ctrl_height = y0 - margin * 2, y0 = margin;ax_size[0] = ctrl_width -= (ctrl_width % 4);ax_size[1] = ctrl_height -= (ctrl_height % 4);hwnd_Axis_L = CreateWindow(L"static", L"Y坐标轴_L", staticStyle,x0, y0, ctrl_width, ctrl_height, hparent, NULL, NULL, NULL);SendMessage(hwnd_Axis_L, WM_SETFONT, (WPARAM)font_normal, 1);BMP_Axis.bmiHeader.biWidth = ctrl_width;BMP_Axis.bmiHeader.biHeight = ctrl_height;BMP_Axis.bmiHeader.biBitCount = 24;BMP_Axis.bmiHeader.biSize = 40;BMP_Axis.bmiHeader.biPlanes = 1;BMP_Axis.bmiHeader.biSizeImage = ctrl_width * ctrl_height * 3 + 1024;BMP_Axis.bmiHeader.biXPelsPerMeter = 2834;BMP_Axis.bmiHeader.biYPelsPerMeter = 2834;BMP_Axis.bmiHeader.biCompression = 0;BMP_Axis.bmiHeader.biClrUsed = 0;BMP_Axis.bmiHeader.biClrImportant = 0;for (int i = 0; i < 256; i++)BMP_Axis.bmiColors[i] = { (unsigned char)i,(unsigned char)i,(unsigned char)i ,0 };// 图像窗口x0 = ctrl_width + x0 + margin;ctrl_width = width - ctrl_width * 2 - margin * 5;imgwnd_size[0] = ctrl_width -= (ctrl_width % 4);imgwnd_size[1] = ctrl_height -= (ctrl_height % 4);hwnd_Image = CreateWindow(L"static", L"实时图像", staticStyle,x0, y0, ctrl_width, ctrl_height, hparent, NULL, NULL, NULL);SendMessage(hwnd_Image, WM_SETFONT, (WPARAM)font_normal, 1);BMP_Image.bmiHeader.biWidth = ctrl_width;BMP_Image.bmiHeader.biHeight = ctrl_height;BMP_Image.bmiHeader.biBitCount = 24;BMP_Image.bmiHeader.biSize = 40;BMP_Image.bmiHeader.biPlanes = 1;BMP_Image.bmiHeader.biSizeImage = ctrl_width * ctrl_height * 3 + 1024;BMP_Image.bmiHeader.biXPelsPerMeter = 2834;BMP_Image.bmiHeader.biYPelsPerMeter = 2834;BMP_Image.bmiHeader.biCompression = 0;BMP_Image.bmiHeader.biClrUsed = 0;BMP_Image.bmiHeader.biClrImportant = 0;for (int i = 0; i < 256; i++)BMP_Image.bmiColors[i] = { (unsigned char)i,(unsigned char)i,(unsigned char)i ,0 };// 右侧坐标轴标记窗口ctrl_width = 128;x0 = width - ctrl_width - margin * 2;hwnd_Axis_R = CreateWindow(L"static", L"Y坐标轴_R", staticStyle,x0, y0, ctrl_width, ctrl_height, hparent, NULL, NULL, NULL);SendMessage(hwnd_Axis_R, WM_SETFONT, (WPARAM)font_normal, 1);
}// 创建客户界面的函数
bool createUI(HWND hwndmain, WCHAR* szWindowClass, int width, int height,int* analys_size,int* ax_size, int* imgwnd_size)
{INITCOMMONCONTROLSEX stylesStruct;stylesStruct.dwSize = sizeof(stylesStruct);stylesStruct.dwICC = ICC_STANDARD_CLASSES;InitCommonControlsEx(&stylesStruct);InitCommonControls();			// 初始化控件库:comctl32.lib comctl32.dllNONCLIENTMETRICS ncm;							// 操作系统使用的字体	ncm.cbSize = sizeof(NONCLIENTMETRICS);          // 取出系统的字体作为本应用程序的字体SystemParametersInfo(SPI_GETNONCLIENTMETRICS, sizeof(NONCLIENTMETRICS), &ncm, 0);// 根据操作系统的字体创建应用程序使用的字体HFONT	hFont_caption;							// 标题字体句柄HFONT	hFont_Detail;							// 小标题字体句柄HFONT	hFont_normal;							// 小标题字体句柄const int	fontSize_caption = 54;			    // 标题字体的大小const int	detail_fontSize = 32;			    // 小标题字体的大小const int	normal_fontSize = 24;			    // 标准字体的大小createAppFont(&hFont_caption, fontSize_caption, ncm.lfCaptionFont);createAppFont(&hFont_Detail, detail_fontSize, ncm.lfCaptionFont);createAppFont(&hFont_normal, normal_fontSize, ncm.lfCaptionFont);COLORREF	CaptionTextColor = RGB(0xFF, 0xFF, 0x00);	// 图像窗口文本色HWND hMain = hwndmain;int main_width = width, main_height = height, /* 主窗口的宽度、高度 */ margin = 2/*  */;// 状态栏窗口int statusBarheight = 22, bar_width = main_width / BarNum;int barWidth[BarNum] = { bar_width,bar_width,bar_width,bar_width,bar_width,0 };hwndStatusBar = CreateWindowEx(0, L"msctls_statusbar32", L"", WS_VISIBLE | WS_CHILD | WS_BORDER, 0, 0, 0, statusBarheight, hMain, NULL, NULL, NULL);SendMessage(hwndStatusBar, WM_SETFONT, (WPARAM)hFont_normal, 1);SetStatus(hMain, hwndStatusBar, BarNum, barWidth);for (int i = 0; i < BarNum; ++i)SetStatusBarText(i, status_text[i]);// Top面板窗口int height_top = main_height / 12;HWND hPanel_Top = CreateWindow(szWindowClass, L"top", WS_CHILD | WS_VISIBLE | WS_BORDER,0, 0, main_width, height_top, hMain, NULL, NULL, NULL);create_toppannel(hPanel_Top, main_width, width * 2 / 5, height_top, margin, fontSize_caption, hFont_caption, hFont_Detail);// 右侧视图int width_right = main_width / 5,subheight = main_height - statusBarheight - height_top - margin * 3,x0 = main_width - width_right- margin,y0 = margin + height_top;HWND hPanel_right = CreateWindow(szWindowClass, L"right", WS_CHILD | WS_VISIBLE | WS_BORDER,x0, y0, width_right, subheight, hMain, NULL, NULL, NULL);createRightPannel(hPanel_right, main_width / 5, subheight,margin, hFont_Detail);// 左侧视图窗口int width_left = main_width - width_right - margin * 2;HWND hPanel_Left = CreateWindow(szWindowClass, L"", WS_CHILDWINDOW | WS_VISIBLE | WS_BORDER,0, y0, width_left, subheight, hMain, NULL, NULL, NULL);createLeftPannel(hPanel_Left, width_left, subheight, margin, hFont_normal,analys_size, ax_size,imgwnd_size);return false;
}
resource.h
//{{NO_DEPENDENCIES}}
// Microsoft Visual C++ 生成的包含文件。
// 使用者 VisionGuidance.rc#define IDS_APP_TITLE			103#define IDR_MAINFRAME			128
#define IDD_VISIONGUIDANCE_DIALOG	102
#define IDD_ABOUTBOX			103
#define IDM_ABOUT				104
#define IDM_EXIT				105
#define IDI_VISIONGUIDANCE		107
#define IDI_SMALL				108
#define IDC_VISIONGUIDANCE		109
#define IDC_MYICON				2
#ifndef IDC_STATIC
#define IDC_STATIC				-1
#endif// 新对象的下一组默认值
//
#ifdef APSTUDIO_INVOKED
#ifndef APSTUDIO_READONLY_SYMBOLS#define _APS_NO_MFC					130
#define _APS_NEXT_RESOURCE_VALUE	129
#define _APS_NEXT_COMMAND_VALUE		32771
#define _APS_NEXT_CONTROL_VALUE		1000
#define _APS_NEXT_SYMED_VALUE		110
#endif
#endif
framework.h
#pragma once#include "targetver.h"
#define WIN32_LEAN_AND_MEAN             // 从 Windows 头文件中排除极少使用的内容
// Windows 头文件
#include <windows.h>
// C 运行时头文件
#include <stdlib.h>
#include <malloc.h>
#include <memory.h>
#include <tchar.h>
targetver.h
#pragma once// // 包含 SDKDDKVer.h 可定义可用的最高版本的 Windows 平台。
// 如果希望为之前的 Windows 平台构建应用程序,在包含 SDKDDKVer.h 之前请先包含 WinSDKVer.h 并
// 将 _WIN32_WINNT 宏设置为想要支持的平台。
#include <SDKDDKVer.h>
VisionGuidance.h
#pragma once#include "resource.h"VisionGuidance.cpp
// VisionGuidance.cpp : 定义应用程序的入口点。
//#include "pch.h"
#include "framework.h"
#include "VisionGuidance.h"
#include "UI.h"#define MAX_LOADSTRING 100// 全局变量:
HINSTANCE hInst;                                // 当前实例
WCHAR szTitle[MAX_LOADSTRING];                  // 标题栏文本
WCHAR szWindowClass[MAX_LOADSTRING];            // 主窗口类名// 此代码模块中包含的函数的前向声明:
ATOM                MyRegisterClass(HINSTANCE hInstance);
BOOL                InitInstance(HINSTANCE, int);
LRESULT CALLBACK    WndProc(HWND, UINT, WPARAM, LPARAM);
INT_PTR CALLBACK    AboutApp(HWND, UINT, WPARAM, LPARAM);// 此代码模块使用的UI元素
int		analysSize[2] = { 0 };	// 分析窗口的尺寸
HWND	hwnd_Analys;
BYTE*	pAnalysBuff = new BYTE[3840 * 512 * 3];int		axisSize[2] = { 0 };	// 坐标轴窗口的尺寸
HWND	hwnd_Axis_L;			/* 左侧坐标轴窗口的句柄	*/
HWND	hwnd_Axis_R;			/* 右侧坐标轴窗口的句柄	*/
BYTE*	pAxisBuff = new BYTE[2160 * 512 * 3];int		imgSize[2] = { 0 };		// 坐标轴窗口的尺寸
HWND	hwnd_Image;				/* 坐标轴窗口的句柄	*/
BYTE*	pFrameBuff = new BYTE[3840 * 2160 * 3];int APIENTRY wWinMain(_In_ HINSTANCE hInstance,_In_opt_ HINSTANCE hPrevInstance,_In_ LPWSTR    lpCmdLine,_In_ int       nCmdShow)
{UNREFERENCED_PARAMETER(hPrevInstance);UNREFERENCED_PARAMETER(lpCmdLine);// TODO: 在此处放置代码。// 初始化全局字符串LoadStringW(hInstance, IDS_APP_TITLE, szTitle, MAX_LOADSTRING);LoadStringW(hInstance, IDC_VISIONGUIDANCE, szWindowClass, MAX_LOADSTRING);MyRegisterClass(hInstance);// 执行应用程序初始化:if (!InitInstance (hInstance, nCmdShow)){return FALSE;}HACCEL hAccelTable = LoadAccelerators(hInstance, MAKEINTRESOURCE(IDC_VISIONGUIDANCE));MSG msg;// 主消息循环:while (GetMessage(&msg, nullptr, 0, 0)){if (!TranslateAccelerator(msg.hwnd, hAccelTable, &msg)){TranslateMessage(&msg);DispatchMessage(&msg);}}return (int) msg.wParam;
}//
//  函数: MyRegisterClass()
//
//  目标: 注册窗口类。
//
ATOM MyRegisterClass(HINSTANCE hInstance)
{HBRUSH	BackBR = CreateSolidBrush(RGB(0xE0, 0xF0, 0xF0));	// 主窗口的颜色画刷WNDCLASSEXW wcex;wcex.cbSize = sizeof(WNDCLASSEX);wcex.style          = CS_HREDRAW | CS_VREDRAW;wcex.lpfnWndProc    = WndProc;wcex.cbClsExtra     = 0;wcex.cbWndExtra     = 0;wcex.hInstance      = hInstance;wcex.hIcon          = LoadIcon(hInstance, MAKEINTRESOURCE(IDI_VISIONGUIDANCE));wcex.hCursor        = LoadCursor(nullptr, IDC_ARROW);wcex.hbrBackground = (HBRUSH)(COLOR_WINDOW + 3);// BackBR;wcex.lpszMenuName   = NULL /*MAKEINTRESOURCEW(IDC_VISIONGUIDANCE)*/;wcex.lpszClassName  = szWindowClass;wcex.hIconSm        = LoadIcon(wcex.hInstance, MAKEINTRESOURCE(IDI_SMALL));return RegisterClassExW(&wcex);
}//
//   函数: InitInstance(HINSTANCE, int)
//
//   目标: 保存实例句柄并创建主窗口
//
//   注释:
//
//        在此函数中,我们在全局变量中保存实例句柄并
//        创建和显示主程序窗口。
//
BOOL InitInstance(HINSTANCE hInstance, int nCmdShow)
{hInst = hInstance; // 将实例句柄存储在全局变量中int	mScrWidth = GetSystemMetrics(SM_CXSCREEN);	// 主显示器水平分辨率int  mScrHeight = GetSystemMetrics(SM_CYSCREEN);	// 主显示器竖直分辨率HWND hWnd = CreateWindowExW(NULL, szWindowClass, szTitle, WS_POPUPWINDOW,CW_USEDEFAULT, CW_USEDEFAULT, mScrWidth, mScrHeight, nullptr, nullptr, hInstance, nullptr);if (!hWnd){return FALSE;}createUI(hWnd, szWindowClass, mScrWidth, mScrHeight, analysSize, axisSize, imgSize);for (int i = 0; i < analysSize[1]; ++i){for (int x = 0; x < analysSize[0]; ++x){pAnalysBuff[i * analysSize[0] * 3 + x * 3] = i * 2;pAnalysBuff[i * analysSize[0] * 3 + x * 3 + 1] = i * 2;pAnalysBuff[i * analysSize[0] * 3 + x * 3 + 2] = i * 2;}}for (int i = 0; i < axisSize[1]; ++i) {int value = 0;for (int x = 0; x < axisSize[0]; ++x) {if (x < 63)value += 4;elseif(x>64)value -= 4;pAxisBuff[i * axisSize[0] * 3 + x * 3] = value;pAxisBuff[i * axisSize[0] * 3 + x * 3 + 1] = value;pAxisBuff[i * axisSize[0] * 3 + x * 3 + 2] = value;}}for (int i = 0; i < imgSize[1]; ++i) {for (int x = 0; x < imgSize[0]; ++x) {pFrameBuff[i * imgSize[0] * 3 + x * 3] = x+i;pFrameBuff[i * imgSize[0] * 3 + x * 3 + 1] = x / 2;pFrameBuff[i * imgSize[0] * 3 + x * 3 + 2] = x / 4;}}ShowWindow(hWnd, nCmdShow);UpdateWindow(hWnd);return TRUE;
}//
//  函数: OnButtonClicked(HWND, UINT, WPARAM, LPARAM)
//
//  功能: 处理按钮的消息。
//
void OnButtonClicked(HWND hWnd, UINT uMsg, WPARAM wParam, LPARAM lParam)
{char msg[256] = { 0 };int wmId = LOWORD(wParam);// 分析菜单选择:switch (wmId){case IDB_EXIT:if (MessageBox(NULL, TEXT("确认退出吗?"), L"请确认", MB_ICONWARNING | MB_YESNO | MB_DEFBUTTON1) == IDYES)PostQuitMessage(0);break;case IDB_EXIT + 1:show_imageBuffer(0,hwnd_Analys, pAnalysBuff);break;case IDB_EXIT + 2:show_imageBuffer(1, hwnd_Axis_L, pAxisBuff);sprintf_s(msg, "IDB_EXIT + 2");SetStatusBarText(5, msg);break;case IDB_EXIT + 3:show_imageBuffer(2, hwnd_Axis_R, pAxisBuff);sprintf_s(msg, "IDB_EXIT + 3");SetStatusBarText(5, msg);break;case IDB_EXIT + 4:show_imageBuffer(3, hwnd_Image, pFrameBuff);sprintf_s(msg, "IDB_EXIT + 4");SetStatusBarText(5, msg);break;default:break;}
}//
//  函数: WndProc(HWND, UINT, WPARAM, LPARAM)
//
//  目标: 处理主窗口的消息。
//
//  WM_COMMAND  - 处理应用程序菜单
//  WM_PAINT    - 绘制主窗口
//  WM_DESTROY  - 发送退出消息并返回
//
//
LRESULT CALLBACK WndProc(HWND hWnd, UINT message, WPARAM wParam, LPARAM lParam)
{int m_Ret = 0;switch (message){case WM_DRAWITEM:OnDrawItem(hWnd, message, wParam, lParam);break;case WM_CTLCOLORBTN:return (LRESULT)(HBRUSH)GetStockObject(NULL_BRUSH);break;case WM_CTLCOLORSTATIC:return DrawStatic(hWnd, message, wParam, lParam);break;case WM_COMMAND:{int wmId = LOWORD(wParam);// 分析菜单选择:switch (wmId){case IDM_ABOUT:DialogBox(hInst, MAKEINTRESOURCE(IDD_ABOUTBOX), hWnd, AboutApp);break;case IDM_EXIT:DestroyWindow(hWnd);break;default:OnButtonClicked(hWnd, message, wParam, lParam);return DefWindowProc(hWnd, message, wParam, lParam);}}break;case WM_SYSKEYUP:switch (wParam){case VK_F10:	/* F10键属于系统键 */if (MessageBox(NULL, TEXT("确认退出吗?"), L"请确认", MB_ICONWARNING | MB_YESNO | MB_DEFBUTTON1) == IDYES)PostQuitMessage(0);break;default:break;}break;case WM_KEYUP:	/* 捕获了键盘的功能键操作 */switch (wParam){case VK_ESCAPE:if (MessageBox(NULL, TEXT("确认退出吗?"), L"请确认", MB_ICONWARNING | MB_YESNO | MB_DEFBUTTON1) == IDYES)PostQuitMessage(0);break;case VK_F9: /* 关于窗口 */DialogBox(hInst, MAKEINTRESOURCE(IDD_ABOUTBOX), hWnd, AboutApp);break;case VK_F11:/* F11键不属于系统键 */DialogBox(hInst, MAKEINTRESOURCE(IDD_ABOUTBOX), hWnd, AboutApp);break;default:break;}break;case WM_CHAR:break;case WM_PAINT:{PAINTSTRUCT ps;HDC hdc = BeginPaint(hWnd, &ps);// TODO: 在此处添加使用 hdc 的任何绘图代码...EndPaint(hWnd, &ps);}break;case WM_DESTROY:PostQuitMessage(0);break;default:return DefWindowProc(hWnd, message, wParam, lParam);}return 0;
}// “关于”框的消息处理程序。
INT_PTR CALLBACK AboutApp(HWND hDlg, UINT message, WPARAM wParam, LPARAM lParam)
{UNREFERENCED_PARAMETER(lParam);switch (message){case WM_INITDIALOG:return (INT_PTR)TRUE;case WM_COMMAND:if (LOWORD(wParam) == IDOK || LOWORD(wParam) == IDCANCEL){EndDialog(hDlg, LOWORD(wParam));return (INT_PTR)TRUE;}break;}return (INT_PTR)FALSE;
}
相关文章:
使用Visual Studio 2022实现透明按钮和标签、POPUP样式窗体的一种工业系统的UI例程
例程实现的功能说明 1、主窗体采用POPUP样式,无标题栏、无菜单栏,适合工业类软件 2、按钮、标签使用自绘,实现透明样式,可以实现灵活的样式设计,更具设计感 按钮重绘函数:OnDrawItem()按钮样式设定&#…...

【爬虫】7.1. JavaScript动态渲染界面爬取-Selenium
JavaScript动态渲染界面爬取-Selenium的简单学习 文章目录 JavaScript动态渲染界面爬取-Selenium的简单学习1. Selenium准备工作2. Selenium简单用法2.1. 初始化浏览器对象-webdriver.Chrome()2.2. 访问界面-browser.get()2.3. 查找节点-find_element()2.4. 节点交互-send_keys…...
:推导式)
菜鸟教程《Python 3 教程》笔记(12):推导式
菜鸟教程《Python 3 教程》笔记(12) 12 推导式12.1 列表推导式12.2 字典推导式12.3 集合推导式12.4 元组推导式(生成器表达式) 笔记带有个人侧重点,不追求面面俱到。 12 推导式 出处: 菜鸟教程 - Python3 …...

MAC修改python3命令为py
1, 找到python3安装路径 2, vi ~/.bash_profile 3, 增加内容: alias py“/usr/bin/python3” 4, 重载source ~/.bash_profile 5,执行py...
Windows下Git Bash调用rsync
rsync 提供了补充只需要在git安装目录下放入对应的文件即可。 需要将这个三个文件放到git的bin目录下 如果是默认安装路径是如下: C:\Program Files\Git\usr\bin 然后大功告成。...

springboot自定义事件发布及监听
自定义线程池 Configuration public class MyThreadPool {//ThreadPoolTaskExecutor不会自动创建ThreadPoolExecutor,需要手动调initialize才会创建。如果Bean就不需手动,会自动InitializingBean的afterPropertiesSet来调initializeBean("myExecut…...
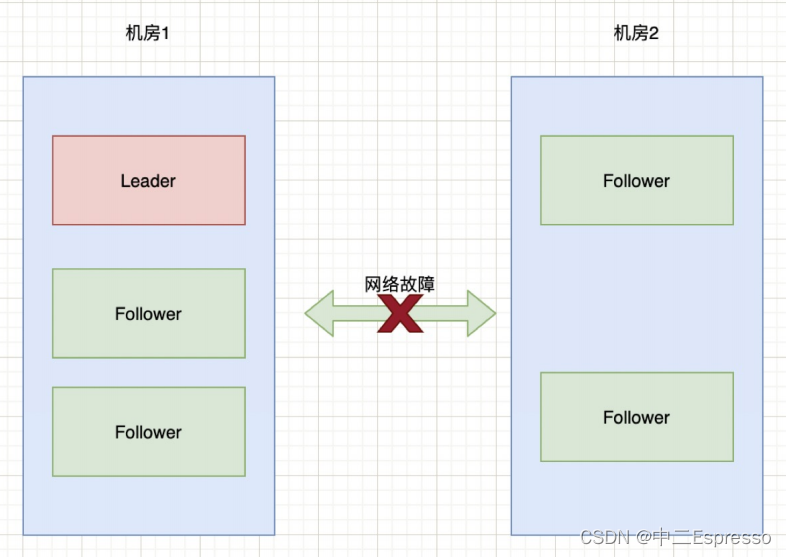
手写RPC框架--2.介绍Zookeeper
RPC框架-Gitee代码(麻烦点个Starred, 支持一下吧) RPC框架-GitHub代码(麻烦点个Starred, 支持一下吧) 该项目的RPC通信将采用NettyZookeeper,所以会在前两章介绍使用方法 介绍Zookeeper Zookeepera.概述1) 数据模型2) Watcher机制 b.安装和基本操作1) Java操作zooke…...
Docker harbor 私有仓库的部署和管理
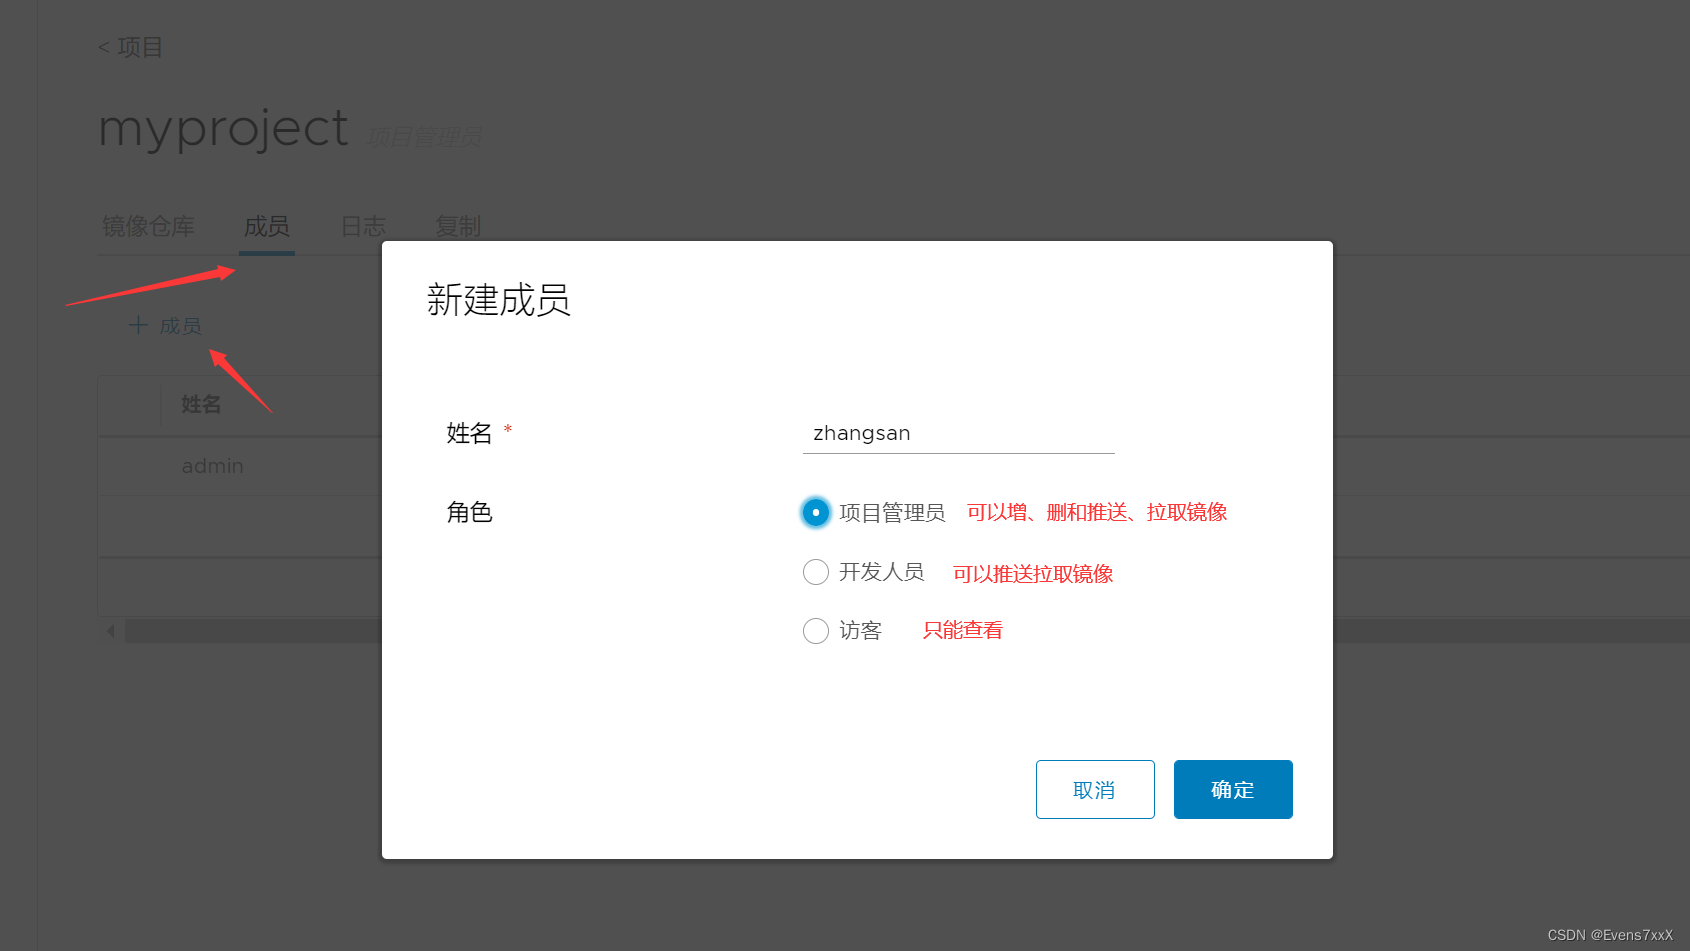
目录 一、什么是Harbor 二、Harbor的特性 三、Harbor的构成 四、部署配置Docker Harbor 1. 首先需要安装 Docker-Compose 服务 2.部署 Harbor 服务 3.使用harbor仓库 (1)项目管理 (2)用户管理 一、什么是Harbor Harbor …...

从零开始搭建AI网站(6):如何使用响应式编程
响应式编程(Reactive Programming)是一种编程范式,旨在处理异步数据流和事件流。它通过使用观察者模式和函数式编程的概念,将数据流和事件流抽象为可观察的序列,然后通过操作这些序列来实现各种功能。 在响应式编程中…...
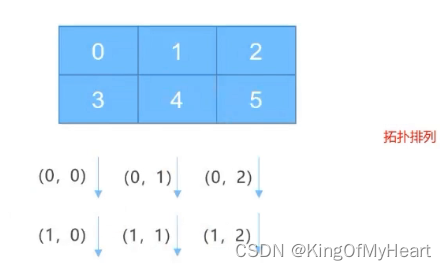
MPI之虚拟进程拓扑
什么是虚拟进程拓扑 在很多并行应用进程中,进程的线性排列不能充分的反映进程间在逻辑上的通信模型,通常由问题几何和所用的算法决定,进程经常被排列成二维或者三维网络形式的拓扑模型而通常用一个图来描述逻辑进程排列,此种逻辑…...

Three.js相机参数及Z-Fighting问题的解决方案
本主题讨论透视相机以及如何为远距离环境设置合适的视锥体。 推荐:用 NSDT编辑器 快速搭建可编程3D场景 透视相机是一种投影模式,旨在模仿人类在现实世界中看待事物的方式。 这是渲染 3D 场景最常用的投影模式。 - three.js 如果你看一下 Three.js 文档…...

微信小程序食疗微信小程序的设计与实现
摘要 现在人们的生活水平高了,大家都想在多活个几十年,要想实现这个想法,有很多事情都必须考虑到,第一个就是适当运动,第二个就是心情好,第三个就是要注意饮食。民以食为天,科学合理的饮食结构是…...

mac环境使用pkgbuild命令打pkg包的几个小细节
mac环境使用pkgbuild命令打pkg包的几个小细节 最近,研发提出要使用jenkins来自动生成mac环境下的pkg包,研究了一下,可以使用pkgbuild来打包。但是有几个小细节需要注意一下: 1 如果有pre-install和post-install脚本,…...
在 Spring Boot 中集成 MinIO 对象存储
MinIO 是一个开源的对象存储服务器,专注于高性能、分布式和兼容S3 API的存储解决方案。本文将介绍如何在 Spring Boot 应用程序中集成 MinIO,以便您可以轻松地将对象存储集成到您的应用中。 安装minio 拉取 minio Docker镜像 docker pull minio/minio创…...
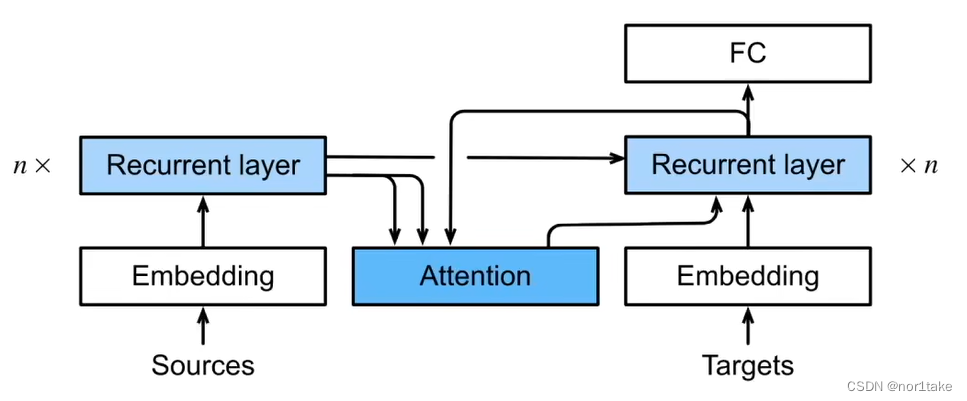
seq2seq与引入注意力机制的seq2seq
1、什么是 seq2seq? 就是字面意思,“句子 到 句子”。比如翻译。 2、seq2seq 有一些特点 seq2seq 的整体架构是 “编码器-解码器”。 其中,编码器是 RNN,并将 最后一个hidden state(隐藏状态)【即&…...
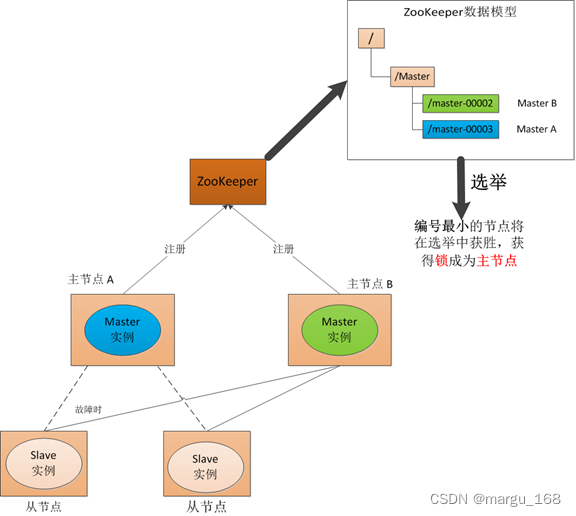
【zookeeper】zookeeper介绍
分布式协调技术 在学习ZooKeeper之前需要先了解一种技术——分布式协调技术。那么什么是分布式协调技术?其实分布式协调技术主要用来解决分布式环境当中多个进程之间的同步控制,让他们有序的去访问某种临界资源,防止造成"脏数据"的…...
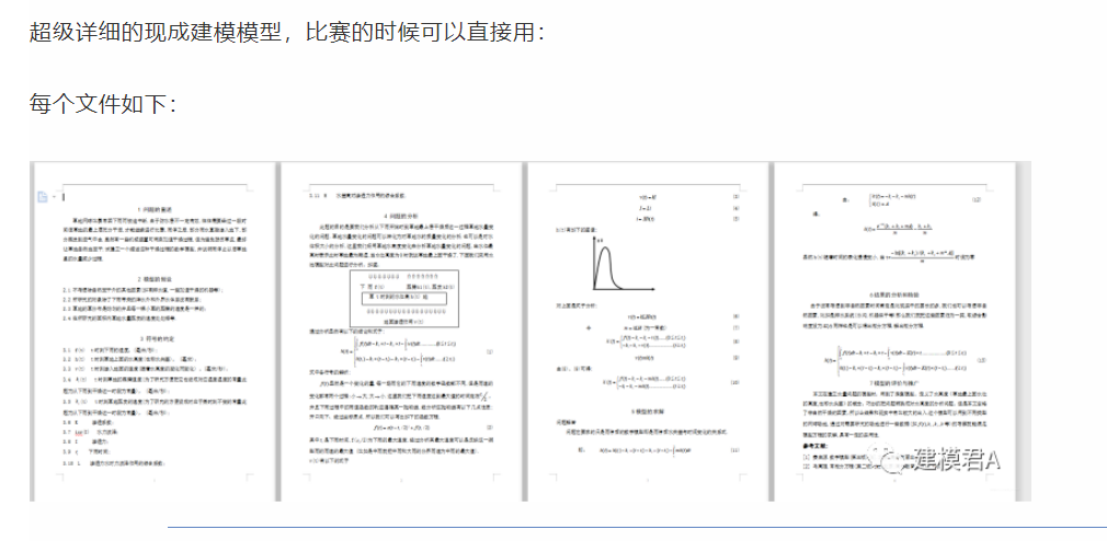
2023高教社杯数学建模思路 - 案例:ID3-决策树分类算法
文章目录 0 赛题思路1 算法介绍2 FP树表示法3 构建FP树4 实现代码 建模资料 0 赛题思路 (赛题出来以后第一时间在CSDN分享) https://blog.csdn.net/dc_sinor?typeblog 1 算法介绍 FP-Tree算法全称是FrequentPattern Tree算法,就是频繁模…...

springboot docker
在Spring Boot中使用Docker可以帮助你将应用程序与其依赖的容器化,并简化部署和管理过程。 当你在Spring Boot中使用Docker时,你的代码不需要特殊的更改。你可以按照通常的方式编写Spring Boot应用程序。 java示例代码,展示了如何编写一个基…...
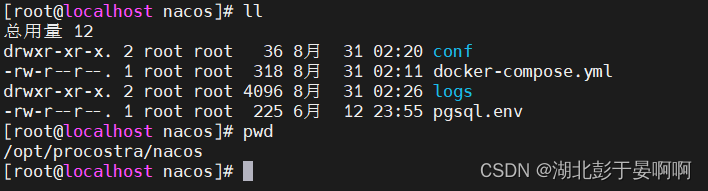
docker-compose 部署nacos 整合 postgresql 为DB
标题docker-compose 部署nacos 整合 postgresql 为DB 前提: 已经安装好postgresql数据库 先创建好一个数据库 nacos,执行以下sql: /** Copyright 1999-2018 Alibaba Group Holding Ltd.** Licensed under the Apache License, Version 2.0 (the "…...

详解 ElasticSearch Kibana 配置部署
默认安装部署所在机器允许外网 SSH工具 Putty 链接:https://pan.baidu.com/s/1b6gumtsjL_L64rEsOdhd4A 提取码:lxs9 Winscp 链接:https://pan.baidu.com/s/1tD8_2knvv0EJ5OYvXP6VTg 提取码:lxs9 WinSCP安装直接下一步到完成…...

C语言双端队列完整实现:一行代码吃透头尾操作,算法效率拉满
一、为什么C语言实现双端队列,是数据结构的必学天花板?在C语言数据结构里,队列、栈都是基础中的基础,但真正能把灵活度、效率、内存管理三者揉到一起的,还得是双端队列(deque)。普通队列只能一头…...

适合地产人用的中介房源管理系统
在房产经纪行业,房源管理与客源管理是经纪人日常工作的核心,直接影响业务效率与成交转化。选择一套适配行业需求的中介房源管理系统,能帮助中介团队规范流程、降低运营成本、大幅提升业绩。今天我们以客观视角,详细解析全房源系统…...
重构)
嘈杂工业场景下的自适应VAD与双码本声纹识别鉴权系统:基于端侧轻量化神经网络与向量量化(VQ)重构
在大型化工车间、能源集控中心以及金融极密隔离库房中,离线声纹识别是物理访问控制和身份安全核验的重要生物特征屏障。然而,在环境本底噪声高达80dB以上的恶劣工业场景下,常规的语音活动检测(VAD)会频繁误触ÿ…...

Sangfor文件夹可以删除吗?【图文讲解】深信服文件夹残留清理?如何彻底删除深信服?Sangfor文件夹是什么?
(1)问题背景打开C盘,突然冒出个Sangfor 文件夹,占用好几个 GB 空间,想删又不敢删,怕删坏系统、断网崩溃;上网一查,说法五花八门,有人说是病毒,有人说是办公软…...

谷氨酸发酵过程的软测量建模【附模型】
✨ 长期致力于软测量、谷氨酸发酵、动力学模型、支持向量机、高斯过程、变量选择、异常状态研究工作,擅长数据搜集与处理、建模仿真、程序编写、仿真设计。 ✅ 专业定制毕设、代码 ✅ 如需沟通交流,点击《获取方式》 (1)多阶段高斯…...

收藏干货|2026 版企业 AI 落地实操指南,程序员小白入门避坑必备
如今人工智能早已脱离概念炒作阶段,全面扎根企业实际业务场景,成为技术从业者与企业管理者无法回避的发展课题。各行各业都加速布局AI赛道,行业心态也从初期观望试探,彻底转变为实打实的落地攻坚。 不少企业高层主动牵头统筹AI规划…...

DIY四路自动音频源切换器:从信号检测到继电器隔离的完整设计
1. 项目概述与核心需求解析作为一个喜欢在工作室里捣鼓各种音频设备的玩家,我经常遇到一个挺烦人的问题:我的功放只有一组输入,但我想接的设备却有好几个——台式电脑、平板、蓝牙接收模块,还有一台树莓派。每次想切换音源&#x…...

OmenSuperHub:基于WMI BIOS控制的高性能笔记本硬件管理方案
OmenSuperHub:基于WMI BIOS控制的高性能笔记本硬件管理方案 【免费下载链接】OmenSuperHub Control Omen laptop performance, fan speeds, and keyboard lighting, and unlock power limits. 项目地址: https://gitcode.com/gh_mirrors/om/OmenSuperHub 在惠…...

多模型聚合平台如何助力网站AIB测试与选型
🚀 告别海外账号与网络限制!稳定直连全球优质大模型,限时半价接入中。 👉 点击领取海量免费额度 多模型聚合平台如何助力网站AIB测试与选型 对于网站产品经理而言,首页文案的生成质量直接影响用户的第一印象和转化率。…...

基于TESS光变曲线与深度学习的O型星物理参数预测研究
1. 项目概述与核心挑战在恒星天体物理研究中,大质量O型星扮演着至关重要的角色。它们不仅是宇宙中光度最高的天体之一,其强烈的辐射、恒星风和最终的超新星爆发,更是驱动星系化学演化和能量注入星际介质的关键引擎。然而,深入理解…...