JavaScript-XHR-深入理解
JavaScript-XHR-深入理解
- 1. XHR(Asynchronous JavaScript And XML)初始
- 1.1. xhr request demo
- 1.2. status of XHRHttpRequest
- 1.3. send synchronous request by xhr
- 1.4. onload监听数据加载完成
- 1.5. http status code
- 1.6. get/post request with josn/form/urlcoded
- 1.7. encapsulate an ajax function to send requests
- 1.8. encapsulate an ajax function to send requests with Promise
- 2. Fetch
- 2.1. fetch demo
1. XHR(Asynchronous JavaScript And XML)初始
1.1. xhr request demo
- 第一步:创建网络请求的AJAX 对象(使用 XMLHttpRequest
- 第二步:监听XMLHttpRequest 对象状态的变化,或者监听 onload 事件(请求完成时触发);
- 第三步:配置网络请求(通过open 方法);
- 第四步:发送send 网络请求;
<!DOCTYPE html>
<html lang="en">
<head><meta charset="UTF-8"><meta http-equiv="X-UA-Compatible" content="IE=edge"><meta name="viewport" content="width=device-width, initial-scale=1.0"><title>JS-learn</title>
</head>
<body><button class="dataClick">get data</button><p></p><textarea class="dataArea"></textarea><script>const buttonData = document.querySelector(".dataClick");const dataInput = document.querySelector(".dataArea")// debuggerbuttonData.onclick = function getData(){// 1. create XMLHttpRequest objectconst xhr = new XMLHttpRequest()// 2. monitor the change of status (macrotask)xhr.onreadystatechange = () => {if (xhr.readyState !== XMLHttpRequest.DONE) return// get the response dataconst resJSON = JSON.parse(xhr.response)console.log('response: ', resJSON)// data = resJSONdataInput.value = JSON.stringify(resJSON)}// 2. configure request openxhr.open('get', 'http://123.xxx:8000/home/multidata')// 4. send requestxhr.send()}</script>
</body>
</html>
1.2. status of XHRHttpRequest


1.3. send synchronous request by xhr
<!DOCTYPE html>
<html lang="en">
<head><meta charset="UTF-8"><meta http-equiv="X-UA-Compatible" content="IE=edge"><meta name="viewport" content="width=device-width, initial-scale=1.0"><title>JS-learn</title>
</head>
<body><button class="dataClick">get data</button><button class="clearClick">clear</button><p></p><textarea class="dataArea"></textarea><script>const buttonData = document.querySelector(".dataClick");const dataInput = document.querySelector(".dataArea")const clearData =  document.querySelector(".clearClick")// debuggerbuttonData.onclick = function getData(){// 1. create XMLHttpRequest objectconst xhr = new XMLHttpRequest()// 2. monitor the change of status (macrotask)xhr.onreadystatechange = () => {if (xhr.readyState !== XMLHttpRequest.DONE) {console.log(xhr.readyState)return}// get the response dataconst resJSON = JSON.parse(xhr.response)console.log('response: ', resJSON)console.log('status: ', xhr.status)console.log('xhr: ', xhr)// data = resJSONdataInput.value = JSON.stringify(resJSON)}// 2. configure request openxhr.open('get', 'http://xxxx.32:8000/home/multidata', true)// 4. send requestxhr.send()console.log('here is the log after sending')}clearData.onclick = () => {dataInput.value = ""}</script></body>
</html>

// 2. configure request openxhr.open('get', 'http://123.207.32.32:8000/home/multidata', false)

1.4. onload监听数据加载完成
<!DOCTYPE html>
<html lang="en">
<head><meta charset="UTF-8"><meta http-equiv="X-UA-Compatible" content="IE=edge"><meta name="viewport" content="width=device-width, initial-scale=1.0"><title>JS-learn</title>
</head>
<body><button class="dataClick">get data</button><button class="clearClick">clear</button><p></p><textarea class="dataArea"></textarea><script>const buttonData = document.querySelector(".dataClick");const dataInput = document.querySelector(".dataArea")const clearData =  document.querySelector(".clearClick")// debuggerbuttonData.onclick = function getData(){// 1. create XMLHttpRequest objectconst xhr = new XMLHttpRequest()// 2. monitor onload eventxhr.onload = () => {console.log('onload')dataInput.value = xhr.response}// 2. configure request openxhr.open('get', 'http://xxx.32:8000/home/multidata', false)// 4. send requestxhr.send()}clearData.onclick = () => {dataInput.value = ""}</script></body>
</html>
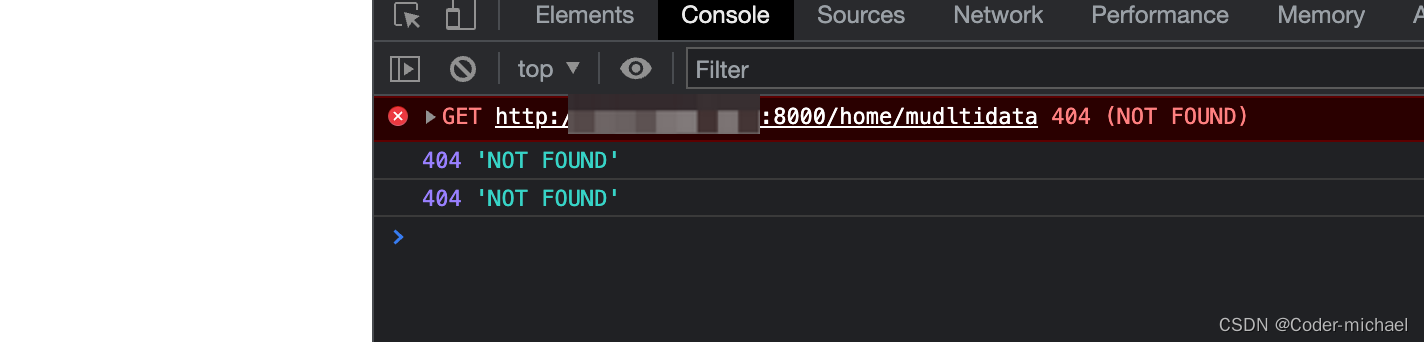
1.5. http status code
<!DOCTYPE html>
<html lang="en">
<head><meta charset="UTF-8"><meta http-equiv="X-UA-Compatible" content="IE=edge"><meta name="viewport" content="width=device-width, initial-scale=1.0"><title>JS-learn</title>
</head>
<body><button class="dataClick">get data</button><button class="clearClick">clear</button><p></p><textarea class="dataArea"></textarea><script>const buttonData = document.querySelector(".dataClick");const dataInput = document.querySelector(".dataArea")const clearData =  document.querySelector(".clearClick")// debuggerbuttonData.onclick = function getData(){// 1. create XMLHttpRequest objectconst xhr = new XMLHttpRequest()// 2. monitor onload eventxhr.onload = () => {console.log(xhr.status, xhr.statusText)// make a judgement based on http status codeif (xhr.status >= 200 && xhr.status < 300) {console.log('get response success: ', xhr.response)} else {console.log(xhr.status, xhr.statusText)}dataInput.value = xhr.response}xhr.onerror = () => {console.log('send request error: ', xhr.status, xhr.statusText)}// 2. configure request openxhr.open('get', 'http://xxx.32:8000/home/mudltidata', false)// 4. send requestxhr.send()}clearData.onclick = () => {dataInput.value = ""}</script></body>
</html>
1.6. get/post request with josn/form/urlcoded
<!DOCTYPE html>
<html lang="en">
<head><meta charset="UTF-8"><meta http-equiv="X-UA-Compatible" content="IE=edge"><meta name="viewport" content="width=device-width, initial-scale=1.0"><title>JS-learn</title>
</head>
<body><button class="dataClick">get data</button><button class="clearClick">clear</button><p></p><textarea class="dataArea"></textarea><form class="info"><input type="text" name="username"><input type="password" name="password"></form><p></p><button class="send">send request</button><script>const buttonData = document.querySelector(".dataClick");const dataInput = document.querySelector(".dataArea")const clearData =  document.querySelector(".clearClick")const formEl = document.querySelector(".info")const sendBtn = document.querySelector(".send")// debuggersendBtn.onclick = function getData(){// 1. create XMLHttpRequest objectconst xhr = new XMLHttpRequest()// 2. monitor onload eventxhr.onload = () => {console.log(xhr.status, xhr.statusText)// make a judgement based on http status codeif (xhr.status >= 200 && xhr.status < 300) {console.log('get response success: ', xhr.response)} else {console.log(xhr.status, xhr.statusText)}dataInput.value = xhr.response}xhr.onerror = () => {console.log('send request error: ', xhr.status, xhr.statusText)}// 2. configure request open// 2.1. http get// xhr.open('get', 'http://xxx.32:1888/02_param/get?name=michael&age=18&address=广州市')// xhr.send()// 2.2. post: urlencoded// xhr.open('post', 'http://xxx.32:1888/02_param/posturl')// xhr.setRequestHeader('Content-type', 'application/x-www-form-urlencoded')// xhr.send('name=michael&age=18&address=广州市')// 2.3. post: formdata// xhr.open('post', 'http://xxx.32:1888/02_param/postform')// const formData = new FormData(formEl)// xhr.send(formData)// 2.4. post: jsonxhr.open('post', 'http://xxx.32:1888/02_param/postjson')xhr.setRequestHeader('Content-type', 'application/json')xhr.send(JSON.stringify({name: "michael", age:18, height: 1.8}))// 4. send request// xhr.send()}clearData.onclick = () => {dataInput.value = ""}</script></body>
</html>
1.7. encapsulate an ajax function to send requests
<!DOCTYPE html>
<html lang="en">
<head><meta charset="UTF-8"><meta http-equiv="X-UA-Compatible" content="IE=edge"><meta name="viewport" content="width=device-width, initial-scale=1.0"><title>JS-learn</title>
</head>
<body><button class="send">send request</button><script>// my ajax request classfunction myAjax({url,method = 'get',data = {},headers = {},success,  // callback function after sending requeset successfullyfailure   // callback function where there is any error } = {}){// 1. create a XMLHttpRequesetconst xhr = new XMLHttpRequest()//  2. monitor the dataxhr.onload = function() {if (xhr.status >= 200 && xhr.status < 300) {success && success()} else {failure && failure({status: xhr.status, message: xhr.statusText})}}// 3. set the response typexhr.responseType = 'json'// 4. configure openif (method.toUpperCase() === 'GET') {const queryStr = []for (const key in data) {queryStr.push(`${key}=${data[key]}`)}url = url + '?' + queryStr.join('&')xhr.open(method, url)xhr.send()}else {xhr.open(method, url)xhr.setRequestHeader('Content-type', 'application/json')xhr.send(JSON.stringify(data))}return xhr}const sendBtn = document.querySelector(".send")// sendBtn.onclick = function getData(){//   myAjax({//     url: "http://xxx.32:1888/02_param/gest",//     method: "GET",//     data: {//       name: "michael",//       age: 18//     },//     success: function(res) {//       console.log("res:", res)//     },//     failure: function(err) {//       alert(err.message)//     }//   })// }sendBtn.onclick = function getData(){myAjax({url: "http://xxx.32:1888/02_param/postjson",method: "post",data: {name: "michael",age: 18},success: function(res) {console.log("res:", res)},failure: function(err) {alert(err.message)}})}</script></body>
</html>
1.8. encapsulate an ajax function to send requests with Promise
function myAjax({url,method = "get",data = {},timeout = 10000,headers = {}, // token
} = {}) {// 1. create a XMLHttpRequest objectconst xhr = new XMLHttpRequest()// 2. create a promise objectconst promise = new Promise((resolve, reject) => {// 3. monitor dataxhr.onload = function() {if (xhr.status >= 200 && xhr.status < 300) {resolve(xhr.response)} else {reject({ status: xhr.status, message: xhr.statusText })}}// 4. set response type and timeoutxhr.responseType = 'json'xhr.timeout = timeout// 5. configure openif (method.toUpperCase() === 'GET') {const queryStr = []for (const key in data) {queryStr.push(`${key}&${data[key]}`)}url = url + '?' + queryStr.join('&')xhr.open(method, url)xhr.send()} else {xhr.open(method, url)xhr.setRequestHeader('Content-type', 'application/json')xhr.send(JSON.stringify(data))}})promise.xhr = xhrreturn promise
}
2. Fetch
2.1. fetch demo
<!DOCTYPE html>
<html lang="en">
<head><meta charset="UTF-8"><meta http-equiv="X-UA-Compatible" content="IE=edge"><meta name="viewport" content="width=device-width, initial-scale=1.0"><title>Fetch</title>
</head>
<body><button class="send">send request</button><script>const sendBtn = document.querySelector('.send')// 1. fetch send http request// sendBtn.onclick = () => {//     fetch('http://xxx.32:8000/home/multidata').then(result => {//         console.log(result)//     }).catch(reason => {//         console.log(reason)//     })// }// 2. optimize code when using fetch// 2.1. first solution// sendBtn.onclick =  () => {//     fetch('http://xxx.32:8000/home/multidata').then(result => {//         return result.json()//     }).then(result => {//         console.log('result: ', result)//     }).catch(reason => {//         console.log('error: ', reason)//     })// }// 2.2. second solution// async function getData(){//     const response = await fetch('http://xxx.32:8000/home/multidata')//     const result = await response.json()//     console.log('result: ', result)// }// sendBtn.onclick = getData// 3. send post request with params// 3.1. send json // async function getData() {//     const response = await fetch('http://xxx.32:1888/02_param/postjson', {//         method: 'post',//         headers: { 'Content-type': 'application/json' },//         body: JSON.stringify({//             name: 'michael',//             age: 18//         })//     })//     console.log(response.ok, response.status, response.statusText)//     const result = await response.json()//     console.log('result: ', result)// }// sendBtn.onclick = getData// 3.2. send formasync function getDate() {const formData = new FormData()formData.append('name', 'michael')formData.append('age', 18)const response = await fetch('http://xxxx.32:1888/02_param/postform', {method: 'post',body: formData})console.log(response.ok, response.status, response.statusText)const result = await response.json()console.log('result: ', result)}sendBtn.onclick = getDate</script>
</body>
相关文章:
JavaScript-XHR-深入理解
JavaScript-XHR-深入理解1. XHR(Asynchronous JavaScript And XML)初始1.1. xhr request demo1.2. status of XHRHttpRequest1.3. send synchronous request by xhr1.4. onload监听数据加载完成1.5. http status code1.6. get/post request with josn/form/urlcoded1.7. encaps…...
mathtype7.0最新版安装下载及使用教程
MathType是一款专业的数学公式编辑器,理科生专用的必备工具,可应用于教育教学、科研机构、工程学、论文写作、期刊排版、编辑理科试卷等领域。2014年11月,Design Science将MathType升级到MathType 6.9版本。在苏州苏杰思网络有限公司与Design…...

响应状态码
✨作者:猫十二懿 ❤️🔥账号:CSDN 、掘金 、个人博客 、Github 🎉公众号:猫十二懿 一、状态码大类 状态码分类说明1xx响应中——临时状态码,表示请求已经接受,告诉客户端应该继续请求或者如果…...
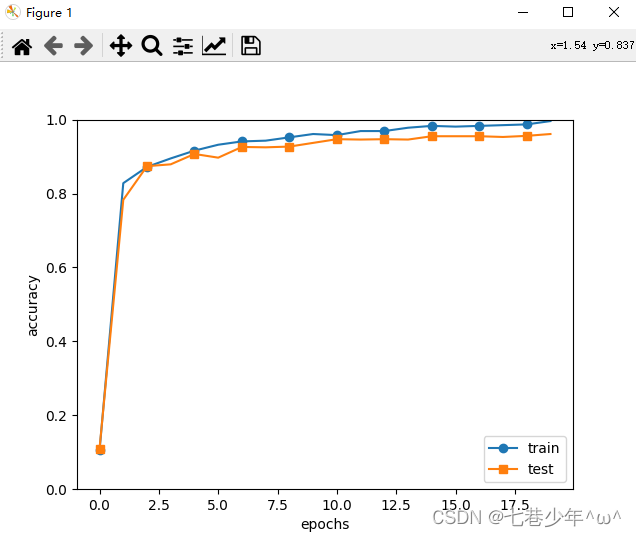
第六章.卷积神经网络(CNN)—CNN的实现(搭建手写数字识别的CNN)
第六章.卷积神经网络(CNN) 6.2 CNN的实现(搭建手写数字识别的CNN) 1.网络构成 2.代码实现 import pickle import matplotlib.pyplot as plt import numpy as np import sys, ossys.path.append(os.pardir)from dataset.mnist import load_mnist from collections import Order…...

【go】defer底层原理
defer的作用 defer声明的函数在当前函数return之后执行,通常用来做资源、连接的关闭和缓存的清除等。 A defer statement pushes a function call onto a list. The list of saved calls is executed after the surrounding function returns. Defer is commonly u…...
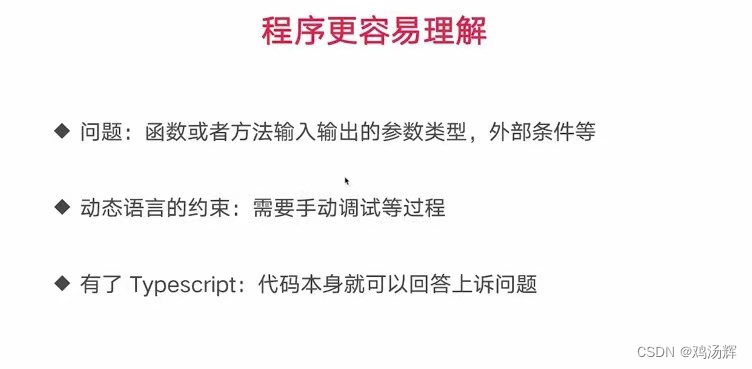
TypeScript 学习笔记
最近在学 ts 顺便记录一下自己的学习进度,以及一些知识点的记录,可能不会太详细,主要是用来巩固和复习的,会持续更新 前言 想法 首先我自己想说一下自己在学ts之前,对ts的一个想法和印象,在我学习之前&a…...
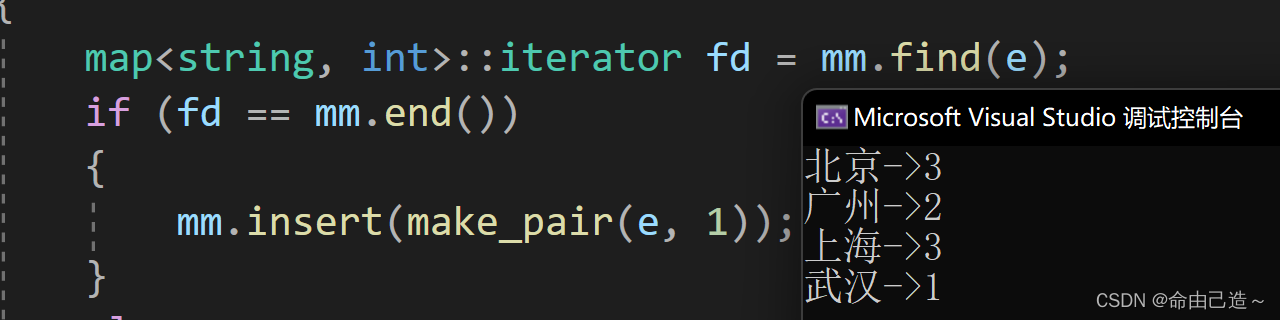
【C++】map和set的使用
map和set一、set1.1 set的介绍1.2 set的使用1.2.1 set的构造1.2.2 set的迭代器1.2.3 set的修改1.2.3.1 insert && find && erase1.2.3.2 count1.3 multiset二、map2.1 map的介绍2.2 map的使用2.2.1 map的修改2.2.1.1 insert2.2.1.2 统计次数2.3 multimap一、se…...

微电影广告具有哪些特点?
微电影广告是广告主投资的,以微电影为形式载体,以新媒体为主要传播载体,综合运用影视创作手法拍摄的集故事性、艺术性和商业性于一体的广告。它凭借精彩的电影语言和强大的明星效应多渠道联动传播,润物细无声地渗透和传递着商品信…...
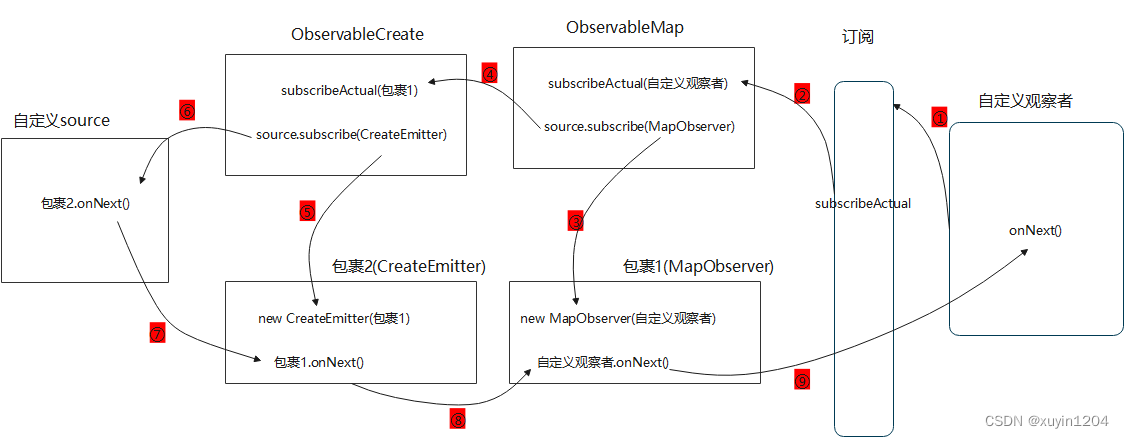
Android RxJava框架源码解析(四)
目录一、观察者Observer创建过程二、被观察者Observable创建过程三、subscribe订阅过程四、map操作符五、线程切换原理简单示例1: private Disposable mDisposable; Observable.create(new ObservableOnSubscribe<String>() {Overridepublic void subscribe(…...

Linux信号-进程退出状态码
当进程因收到信号被终止执行退出后,父进程可以通过wait或waitpid得到它的exit code。进程被各信号终止的退出状态码总结如下:信号编号信号名称信号描述默认处理方式Exit code1SIGHUP挂起终止12SIGINT终端中断终止23SIGQUIT终端退出终止、coredump1314SIG…...
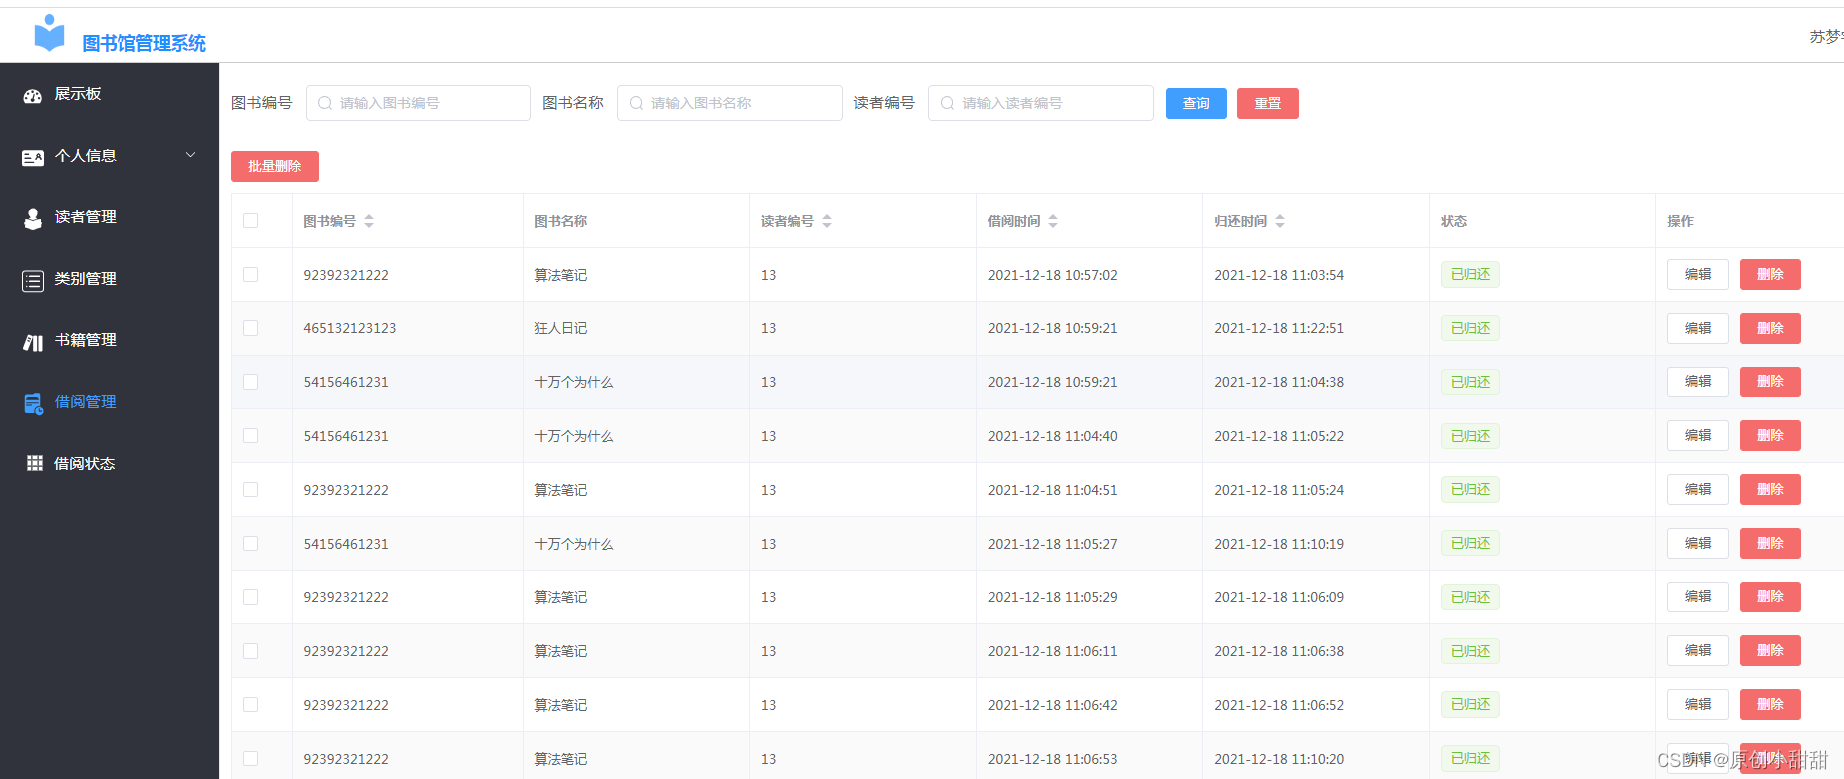
springcloud+vue实现图书管理系统
一、前言: 今天我们来分享一下一个简单的图书管理系统 我们知道图书馆系统可以有两个系统,一个是管理员管理图书的系统,管理员可以(1)查找某一本图书情况、(2)增加新的图书、(3&…...
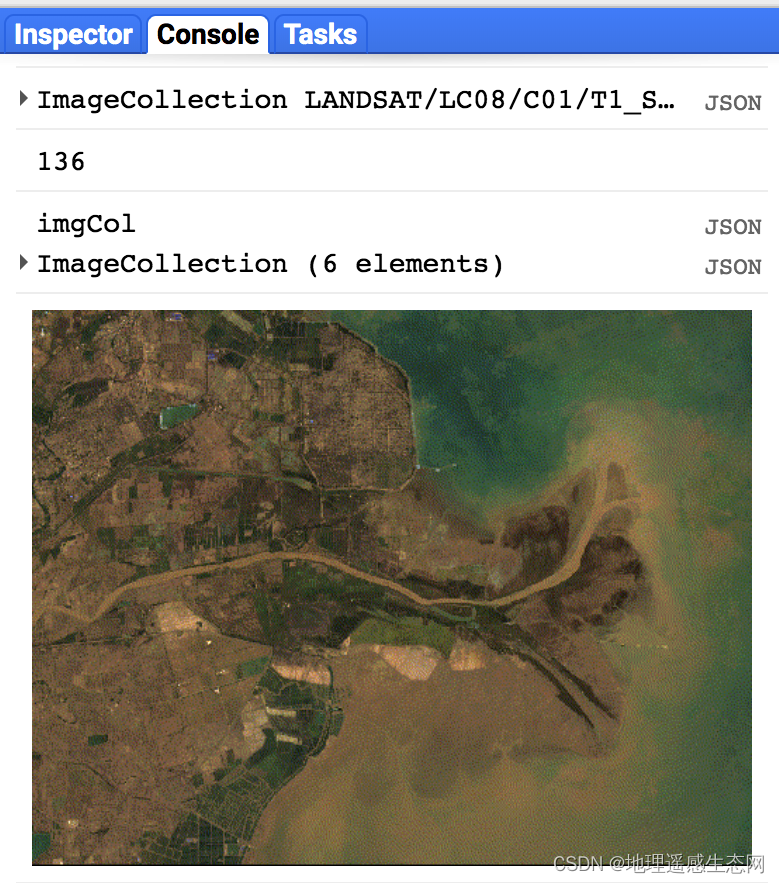
GEE学习笔记 六十:GEE中生成GIF动画
生成GIF动画这个是GEE新增加的功能之一,这一篇文章我会简单介绍一下如何使用GEE来制作GIF动画。 相关API如下: 参数含义: params:设置GIF动画显示参数,详细的参数可以参考ee.data.getMapId() callback:回调…...

react中的useEffect
是函数组件中执行的副作用,副作用就是指每次组件更新都会执行的函数,可以用来取代生命周期。 1. 基本用法 import { useEffect } from "react"; useEffect(()>{console.log(副作用); });2. 副作用分为需要清除的和不需要清除 假如设置…...
 复制)
故障安全(Crash-Safe) 复制
二进制日志记录是故障安全的:MySQL 仅记录完成的事件或事务使用 sync-binlog 提高安全性默认值是1,最安全的,操作系统在每次事务后写入文件将svnc-binloq 设置为0,当操作系统根据其内部规则写入文件的同时服务器崩溃时性能最好但事务丢失的可…...

Spring aop之针对注解
前言 接触过Spring的都知道,aop是其中重要的特性之一。笔者在开发做项目中,aop更多地是要和注解搭配:在某些方法上加上自定义注解,然后要对这些方法进行增强(很少用execution指定,哪些包下的哪些方法要增强)。那这时就…...

【JavaScript速成之路】JavaScript数据类型转换
📃个人主页:「小杨」的csdn博客 🔥系列专栏:【JavaScript速成之路】 🐳希望大家多多支持🥰一起进步呀! 文章目录前言数据类型转换1,转换为字符串型1.1,利用“”拼接转换成…...

21-绑定自定义事件
绑定自定义事件 利用自定义事件获取子组件的值 父组件给子组件绑定一个自定义事件,实际上是绑定到了子组件的实例对象vc上: <!-- 自定义myEvent事件 --> <Student v-on:myEventgetStudentName/>在父组件中编写getStudentName的实现&#…...

【Mysql】触发器
【Mysql】触发器 文章目录【Mysql】触发器1. 触发器1.1 介绍1.2 语法1.2.1 创建触发器1.2.2 查看触发器1.2.3 删除触发器1.2.4 案例1. 触发器 1.1 介绍 触发器是与表有关的数据库对象,指在insert、update、delete之前(BEFORE)或之后(AFTER),触发并执行…...

CODESYS开发教程11-库管理器
今天继续我们的小白教程,老鸟就不要在这浪费时间了😊。 前面一期我们介绍了CODESYS的文件读写函数库SysFile。大家可能发现了,在CODESYS的开发中实际上是离不开各种库的使用,其中包括系统库、第三方库以及用户自己开发的库。实际…...
【UnityAR相关】Unity Vuforia扫图片成模型具体步骤
1 资产准备 导入要生成的fbx模型(带有材质), 你会发现导入fbx的材质丢失了: 选择Standard再Extract Materials导出材质到指定文件夹下(我放在Assets->Materials了 ok啦! 材质出现了, 模型…...

如何用deberta-v3-base-zeroshot-v2.0构建企业级NLP应用?完整教程来了
如何用deberta-v3-base-zeroshot-v2.0构建企业级NLP应用?完整教程来了 【免费下载链接】deberta-v3-base-zeroshot-v2.0 项目地址: https://ai.gitcode.com/hf_mirrors/NingBo_Ascend/deberta-v3-base-zeroshot-v2.0 deberta-v3-base-zeroshot-v2.0是一款基…...

百考通智能任务书:贴合你的选题,拒绝空话假大空
毕业设计任务书是高校教学管理中的关键环节,它不仅标志着研究工作的正式启动,更是后续开题、实施、论文撰写和答辩全过程的行动依据。然而,许多学生在撰写时常常因不熟悉本专业写作规范、技术表达能力有限,或缺乏权威模板参考而陷…...

告别手写UI!用NXP GUI Guider拖拽设计LVGL界面,5分钟搞定音乐播放器Demo
嵌入式UI开发革命:5分钟用GUI Guider构建LVGL音乐播放器在嵌入式系统开发中,用户界面(UI)设计曾长期是工程师的痛点——既要考虑资源受限的硬件环境,又要实现流畅美观的交互体验。传统手动编写UI代码的方式不仅效率低下,调试过程更…...

【DeepSeek开源协议识别权威指南】:20年合规专家亲授3大协议陷阱与5步精准识别法
更多请点击: https://intelliparadigm.com 第一章:DeepSeek开源协议识别的底层逻辑与合规价值 DeepSeek系列模型(如DeepSeek-V2、DeepSeek-Coder)虽以“开源”名义发布,但其实际许可状态需通过结构化协议解析才能准确…...

PentestGPT实战部署指南:AI驱动的渗透测试工作流落地
1. 这不是另一个“AI安全”的概念玩具,而是一套能真正跑起来的渗透测试辅助工作流“PentestGPT”这个名字刚在GitHub上出现时,我第一反应是点开又关掉——过去三年里,我见过太多打着“AI渗透”旗号的项目:有的只是把ChatGPT API封…...

搞定这 5 个全栈电商项目,面试别再用 Todo-List 凑数了
找独立开发练手项目或者写简历项目时,最忌讳两件事:一是太简单(纯前端 Mock 数据,点两下就没了),二是太假(一上来就硬套微服务、消息队列、高并发,结果自己根本Hold不住)…...

孤舟笔记 互联网常用框架篇三 Dubbo是如何动态感知服务下线的?注册中心和服务端双保险
文章目录先说结论机制一:注册中心通知机制二:心跳检测机制三:连接事件感知机制四:定时拉取四种机制的协作回答技巧与点评加分回答面试官点评个人网站微服务环境下,服务实例随时可能上下线——重启、扩容、宕机……调用…...

Keil µVision链接器错误204解决方案
1. 问题现象与背景解析最近在使用Keil Vision进行嵌入式开发时,不少工程师遇到了一个令人头疼的链接器错误。具体表现为编译时出现"FATAL ERROR 204: INVALID KEYWORD"的致命错误,错误位置指向链接器控制文件中的特定行。这个问题在C166和C51两…...

CUDA并行计算与FSR框架优化实践
1. CUDA并行计算与FSR框架概述在GPU加速计算领域,CUDA(Compute Unified Device Architecture)作为NVIDIA推出的并行计算平台和编程模型,已经成为高性能计算的事实标准。其核心设计理念是将计算任务分解为网格(Grid&…...

圈复杂度>12=技术债炸弹?DeepSeek静态分析实战:从17.8→3.2的重构路径全披露
更多请点击: https://codechina.net 第一章:圈复杂度>12技术债炸弹?DeepSeek静态分析实战:从17.8→3.2的重构路径全披露 当函数圈复杂度(Cyclomatic Complexity)持续高于12,它不再是…...