当前位置: 首页 > news >正文

Mind+Python+Mediapipe项目——AI健身之跳绳

原文:Mind+Python+Mediapipe项目——AI健身之跳绳 - DF创客社区 - 分享创造的喜悦

【项目背景】
跳绳是一个很好的健身项目,为了获知所跳个数,有的跳绳上会有计数器。但这也只能跳完这后看到,能不能在跳的过程中就能看到,这样能让我们坚持跳的更多,更有趣味性。
【项目设计】

通过Mind+Python模式下加载Google的开源Mediapipe人工智能算法库,识别人体姿态,来判断跳绳次数,并通过Pinpong库控制LED灯实时显示次数。
【测试程序】
测试程序中,使用人体姿态23,24两坐标点中点与标准点的比较来确认跳绳完成程度。
 
  1. import numpy as np
  2. import time
  3. import cv2
  4. import PoseModule as pm
  5. cap = cv2.VideoCapture("tiaosheng.mp4")
  6. detector = pm.poseDetector()
  7. count = 0
  8. dir = 0
  9. pTime = 0
  10. success=True
  11. point_sd=0
  12. while success:
  13.   success, img = cap.read()
  14.   if success:
  15.     img = cv2.resize(img, (640, 480))
  16.     img = detector.findPose(img, False)
  17.     lmList = detector.findPosition(img, False)
  18.    
  19.     if len(lmList) != 0:
  20.         
  21.         point = detector.midpoint(img, 24, 23)
  22.         if point_sd==0:
  23.             point_sd=point
  24.             print(point_sd["y"])
  25.         # 计算个数
  26.         print(point["y"])
  27.         if point["y"]> point_sd["y"]+15:
  28.          
  29.             if dir == 0:
  30.                 count += 0.5
  31.                 dir = 1
  32.         if point["y"]<point_sd["y"]+5:
  33.         
  34.             if dir == 1:
  35.                 count += 0.5
  36.                 dir = 0
  37.         #print(count)
  38.         cv2.putText(img, str(int(count)), (45, 460), cv2.FONT_HERSHEY_PLAIN, 7,(255, 0, 0), 8)
  39.     cTime = time.time()
  40.     fps = 1 / (cTime - pTime)
  41.     pTime = cTime
  42.     cv2.putText(img, str(int(fps)), (50, 100), cv2.FONT_HERSHEY_PLAIN, 5,(255, 0, 0), 5)
  43.     cv2.imshow("Image", img)
  44.     cv2.waitKey(1)
复制代码
【PoseModule.py】

上面程序用到的“PoseModule.py”文件中,在”poseDetector“类中增加了“midpoint”函数,用于求两点的中点坐标。
 
  1. import math
  2. import mediapipe as mp
  3. import cv2
  4. class poseDetector():
  5.     def __init__(self, mode=False, upBody=False, smooth=True,
  6.                  detectionCon=0.5, trackCon=0.5):
  7.         self.mode = mode
  8.         self.upBody = upBody
  9.         self.smooth = smooth
  10.         self.detectionCon = detectionCon
  11.         self.trackCon = trackCon
  12.         self.mpDraw = mp.solutions.drawing_utils
  13.         self.mpPose = mp.solutions.pose
  14.         self.pose = self.mpPose.Pose(self.mode, self.upBody, self.smooth,
  15.                                      self.detectionCon, self.trackCon)
  16.     def findPose(self, img, draw=True):
  17.         imgRGB = cv2.cvtColor(img, cv2.COLOR_BGR2RGB)
  18.         self.results = self.pose.process(imgRGB)
  19.         if self.results.pose_landmarks:
  20.             if draw:
  21.                 self.mpDraw.draw_landmarks(img, self.results.pose_landmarks,
  22.                                            self.mpPose.POSE_CONNECTIONS)
  23.         return img
  24.     def findPosition(self, img, draw=True):
  25.         self.lmList = []
  26.         if self.results.pose_landmarks:
  27.             for id, lm in enumerate(self.results.pose_landmarks.landmark):
  28.                 h, w, c = img.shape
  29.                 # print(id, lm)
  30.                 cx, cy = int(lm.x * w), int(lm.y * h)
  31.                 self.lmList.append([id, cx, cy])
  32.                 if draw:
  33.                     cv2.circle(img, (cx, cy), 5, (255, 0, 0), cv2.FILLED)
  34.         return self.lmList
  35.     def midpoint(self,img,p1,p2,draw=True):
  36.         x1, y1 = self.lmList[p1][1:]
  37.         x2, y2 = self.lmList[p2][1:]
  38.         x3=int((x1+x2)/2)
  39.         y3=int((y1+y2)/2)
  40.         if draw:
  41.          cv2.circle(img, (x3, y3), 10, (0, 0, 255), cv2.FILLED)
  42.          cv2.circle(img, (x3, y3), 15, (0, 0, 255), 2)
  43.         point={"x":x3,"y":y3}
  44.         return point
  45.     def findAngle(self, img, p1, p2, p3, draw=True):
  46.         # Get the landmarks
  47.         x1, y1 = self.lmList[p1][1:]
  48.         x2, y2 = self.lmList[p2][1:]
  49.         x3, y3 = self.lmList[p3][1:]
  50.         # Calculate the Angle
  51.         angle = math.degrees(math.atan2(y3 - y2, x3 - x2) -
  52.                              math.atan2(y1 - y2, x1 - x2))
  53.         if angle < 0:
  54.             angle += 360
  55.         # print(angle)
  56.         # Draw
  57.         if draw:
  58.             cv2.line(img, (x1, y1), (x2, y2), (255, 255, 255), 3)
  59.             cv2.line(img, (x3, y3), (x2, y2), (255, 255, 255), 3)
  60.             cv2.circle(img, (x1, y1), 10, (0, 0, 255), cv2.FILLED)
  61.             cv2.circle(img, (x1, y1), 15, (0, 0, 255), 2)
  62.             cv2.circle(img, (x2, y2), 10, (0, 0, 255), cv2.FILLED)
  63.             cv2.circle(img, (x2, y2), 15, (0, 0, 255), 2)
  64.             cv2.circle(img, (x3, y3), 10, (0, 0, 255), cv2.FILLED)
  65.             cv2.circle(img, (x3, y3), 15, (0, 0, 255), 2)
  66.             cv2.putText(img, str(int(angle)), (x2 - 50, y2 + 50),
  67.                         cv2.FONT_HERSHEY_PLAIN, 2, (0, 0, 255), 2)
  68.         return angle
复制代码
【测试网络视频】

【存在的问题】
测试结果令人比较满意,但这里存在这样两个问题:1、标准点point_sd这个坐标是以视频开始第一帧画面是站在原地未起跳为前提。
2、标准点纵坐标的判定区间(point_sd["y"]+5与 point_sd["y"]+15)是根据运行后的数据人为分析出来的,只对这一段视频有效,不具有通用性。
【解决问题思路】
1、在正式跳绳计数前,先试跳,通过数据分析出标准点、判定区间(防止数据在判定点抖动,出现错误计数)。在上个程序中判定点为:point_sd["y"]+10。
2、以手势控制屏幕上的虚拟按钮来分析初始化数据,并启动跳绳计数及终止计数。
【解决问题步骤】

第一步:实现手势控制屏幕按钮。
程序中使用了计时器,以防止连续触发问题。
 
  1. import cv2
  2. import numpy as np
  3. import time
  4. import os
  5. import HandTrackingModule as htm
  6. #######################
  7. brushThickness = 25
  8. eraserThickness = 100
  9. ########################
  10. drawColor = (255, 0, 255)
  11. cap = cv2.VideoCapture(0)
  12. cap.set(3, 640)
  13. cap.set(4, 480)
  14. detector = htm.handDetector(detectionCon=0.65,maxHands=1)
  15. imgCanvas = np.zeros((480, 640, 3), np.uint8)
  16. rect=[(20, 20), (120, 120)]
  17. font = cv2.FONT_HERSHEY_SIMPLEX
  18. cv2.rectangle(imgCanvas, rect[0], rect[1],(0, 255, 0), 2)
  19. cv2.putText(imgCanvas, "SET", (45,85), font, 1, drawColor, 2)
  20. bs=0
  21. bs2=0
  22. while True:
  23. # 1. Import image
  24. success, img = cap.read()
  25. if success:
  26.   img = cv2.flip(img, 1)
  27. # 2. Find Hand Landmarks
  28.   img = detector.findHands(img)
  29.   lmList = detector.findPosition(img, draw=False)
  30.   
  31.   if len(lmList) !=0:
  32.   
  33. # tip of index and middle fingers
  34.    x1, y1 = lmList[8][1:]
  35.    x2, y2 = lmList[12][1:]
  36. # 3. Check which fingers are up
  37.    fingers = detector.fingersUp()
  38. # print(fingers)
  39. # 5.  Index finger is up
  40.    if fingers[1] and fingers[2] == False:
  41.     cv2.circle(img, (x1, y1), 15, drawColor, cv2.FILLED)
  42.     if bs2==1:
  43.       if time.time()-time_start>3:
  44.          bs2=0
  45.     else:      
  46.      if x1>rect[0][0] and x1<rect[1][0] and y1>rect[0][1] and y1<rect[1][1]:
  47.       if bs==0:
  48.        print("OK")
  49.        imgCanvas = np.zeros((480, 640, 3), np.uint8)
  50.        cv2.rectangle(imgCanvas, rect[0], rect[1],(0, 255, 0), 2)
  51.        cv2.putText(imgCanvas, "STOP", (30,85), font, 1, drawColor, 2)
  52.        bs=1
  53.        bs2=1
  54.        time_start=time.time()
  55.       else:
  56.        imgCanvas = np.zeros((480, 640, 3), np.uint8)
  57.    
  58.   imgGray = cv2.cvtColor(imgCanvas, cv2.COLOR_BGR2GRAY)
  59.   
  60.   img = cv2.bitwise_or(img,imgCanvas)
  61. # img = cv2.addWeighted(img,0.5,imgCanvas,0.5,0)
  62.   cv2.imshow("Image", img)
  63.   cv2.waitKey(1)
复制代码

上面程序引用的“HandTrackingModule.py”文件。
 
  1. import cv2
  2. import mediapipe as mp
  3. import time
  4. import math
  5. import numpy as np
  6. class handDetector():
  7.     def __init__(self, mode=False, maxHands=2, detectionCon=0.8, trackCon=0.5):
  8.         self.mode = mode
  9.         self.maxHands = maxHands
  10.         self.detectionCon = detectionCon
  11.         self.trackCon = trackCon
  12.         self.mpHands = mp.solutions.hands
  13.         self.hands = self.mpHands.Hands(self.mode, self.maxHands,
  14.         self.detectionCon, self.trackCon)
  15.         self.mpDraw = mp.solutions.drawing_utils
  16.         self.tipIds = [4, 8, 12, 16, 20]
  17.     def findHands(self, img, draw=True):
  18.         imgRGB = cv2.cvtColor(img, cv2.COLOR_BGR2RGB)
  19.         self.results = self.hands.process(imgRGB)
  20.     # print(results.multi_hand_landmarks)
  21.         if self.results.multi_hand_landmarks:
  22.             for handLms in self.results.multi_hand_landmarks:
  23.                 if draw:
  24.                     self.mpDraw.draw_landmarks(img, handLms,
  25.                     self.mpHands.HAND_CONNECTIONS)
  26.         return img
  27.     def findPosition(self, img, handNo=0, draw=True):
  28.         xList = []
  29.         yList = []
  30.         bbox = []
  31.         self.lmList = []
  32.         if self.results.multi_hand_landmarks:
  33.             myHand = self.results.multi_hand_landmarks[handNo]
  34.             for id, lm in enumerate(myHand.landmark):
  35.             # print(id, lm)
  36.                 h, w, c = img.shape
  37.                 cx, cy = int(lm.x * w), int(lm.y * h)
  38.                 xList.append(cx)
  39.                 yList.append(cy)
  40.             # print(id, cx, cy)
  41.                 self.lmList.append([id, cx, cy])
  42.                 if draw:
  43.                     cv2.circle(img, (cx, cy), 5, (255, 0, 255), cv2.FILLED)
  44.             xmin, xmax = min(xList), max(xList)
  45.             ymin, ymax = min(yList), max(yList)
  46.             bbox = xmin, ymin, xmax, ymax
  47.             if draw:
  48.                 cv2.rectangle(img, (xmin - 20, ymin - 20), (xmax + 20, ymax + 20),
  49.         (0, 255, 0), 2)
  50.         return self.lmList
  51.     def fingersUp(self):
  52.         fingers = []
  53.     # Thumb
  54.         if self.lmList[self.tipIds[0]][1] > self.lmList[self.tipIds[0] - 1][1]:
  55.             fingers.append(1)
  56.         else:
  57.             fingers.append(0)
  58.     # Fingers
  59.         for id in range(1, 5):
  60.             if self.lmList[self.tipIds[id]][2] < self.lmList[self.tipIds[id] - 2][2]:
  61.                 fingers.append(1)
  62.             else:
  63.                 fingers.append(0)
  64.         # totalFingers = fingers.count(1)
  65.         return fingers
  66.     def findDistance(self, p1, p2, img, draw=True,r=15, t=3):
  67.         x1, y1 = self.lmList[p1][1:]
  68.         x2, y2 = self.lmList[p2][1:]
  69.         cx, cy = (x1 + x2) // 2, (y1 + y2) // 2
  70.         if draw:
  71.             cv2.line(img, (x1, y1), (x2, y2), (255, 0, 255), t)
  72.             cv2.circle(img, (x1, y1), r, (255, 0, 255), cv2.FILLED)
  73.             cv2.circle(img, (x2, y2), r, (255, 0, 255), cv2.FILLED)
  74.             cv2.circle(img, (cx, cy), r, (0, 0, 255), cv2.FILLED)
  75.             length = math.hypot(x2 - x1, y2 - y1)
  76.         return length, img, [x1, y1, x2, y2, cx, cy]
复制代码第二步,分析数据,得到判定点纵坐标。思路是,坐标数据是上下波动,将数据中的波峰和波谷分别提取出来计算均值,然后取中值,和差值。中值为判定点,差值用来确定判定区域。波峰和波谷的判定采用的是两边数据与当前数据做差值看差值方向,如果方向相反,即为峰值。但这里就存在,Mediapipe识别准确度的问题,可能在上升或下降的过程中数据不平滑,出现数据波动。可能在分析时,出现误判,采集到错误的峰值。后期可采用滤波算法处理此问题。现在看效果,还不错。
 
  1. import numpy as np
  2. import time
  3. import cv2
  4. import PoseModule as pm
  5. import math
  6. def max_min(a):
  7. h = []
  8. l = []
  9. for i in range(1, len(a)-1):
  10.     if(a[i-1] < a[i] and a[i+1] < a[i]):
  11.         h.append(a[i])
  12.     elif(a[i-1] > a[i] and a[i+1] > a[i]):
  13.         l.append(a[i])
  14. if(len(h) == 0):
  15.     h.append(max(a))
  16. if(len(l) == 0):
  17.     l.append(min(a[a.index(max(a)):]))
  18. mid=(np.mean(h)+np.mean(l))/2
  19. print(int(mid),int(np.mean(h)-np.mean(l)))
  20. return(int(mid),int(np.mean(h)-np.mean(l)))
  21. cap = cv2.VideoCapture("tiaosheng.mp4")
  22. detector = pm.poseDetector()
  23. count = 0
  24. dir = 0
  25. pTime = 0
  26. success=True
  27. point=[]
  28. while success:
  29.   success, img = cap.read()
  30.   if success:
  31.     img = cv2.resize(img, (640, 480))
  32.     img = detector.findPose(img, False)
  33.     lmList = detector.findPosition(img, False)
  34.    
  35.     if len(lmList) != 0:
  36.         point_tem=detector.midpoint(img, 24, 23)
  37.         point.append(point_tem['y'])
  38.         cv2.putText(img, str(point_tem['y']), (45, 460), cv2.FONT_HERSHEY_PLAIN, 7,(255, 0, 0), 8)
  39.     cTime = time.time()
  40.     fps = 1 / (cTime - pTime)
  41.     pTime = cTime
  42.     cv2.putText(img, str(int(fps)), (50, 100), cv2.FONT_HERSHEY_PLAIN, 5,(255, 0, 0), 5)
  43.     cv2.imshow("Image", img)
  44.     cv2.waitKey(1)
  45. max_min(point)
  46. cap.release()
  47. cv2.destroyAllWindows()
复制代码
 
 
最终得到“304 26”为“中值 差值”
 
【完整程序】

将以上分段程序进行整合,得到完整程序,并进行实地测试。(纯手工敲码)
 
  1. import cv2
  2. import numpy as np
  3. import time
  4. import os
  5. import HandTrackingModule as htm
  6. import PoseModule as pm
  7. #计算判定点
  8. def max_min(a):
  9. h = []
  10. l = []
  11. for i in range(1, len(a)-1):
  12.     if(a[i-1] < a[i] and a[i+1] < a[i]):
  13.         h.append(a[i])
  14.     elif(a[i-1] > a[i] and a[i+1] > a[i]):
  15.         l.append(a[i])
  16. if(len(h) == 0):
  17.     h.append(max(a))
  18. if(len(l) == 0):
  19.     l.append(min(a[a.index(max(a)):]))
  20. mid=(np.mean(h)+np.mean(l))/2
  21. print(int(mid),int(np.mean(h)-np.mean(l)))
  22. return(int(mid),int(np.mean(h)-np.mean(l)))
  23. #######################
  24. brushThickness = 25
  25. eraserThickness = 100
  26. ########################
  27. drawColor = (255, 0, 255)
  28. cap = cv2.VideoCapture(0)
  29. cap.set(3, 640)
  30. cap.set(4, 480)
  31. detector_hand = htm.handDetector(detectionCon=0.65,maxHands=1)
  32. detector_pose = pm.poseDetector()
  33. imgCanvas = np.zeros((480, 640, 3), np.uint8)
  34. rect=[(20, 20), (120, 120)]
  35. font = cv2.FONT_HERSHEY_SIMPLEX
  36. cv2.rectangle(imgCanvas, rect[0], rect[1],(0, 255, 0), 2)
  37. cv2.putText(imgCanvas, "SET", (45,85), font, 1, drawColor, 2)
  38. bs=0
  39. bs2=0
  40. bs3=0
  41. point=[]
  42. count=0
  43. pTime = 0
  44. dire=0
  45. while True:
  46. success, img = cap.read()
  47. if success:
  48.       img = cv2.flip(img, 1)
  49.       if bs==1 and bs2==0:
  50.        if bs3==1:
  51.          if time.time()-time_start<4:
  52.           cv2.putText(img, str(3-int(time.time()-time_start)), (300, 240), cv2.FONT_HERSHEY_PLAIN, 10,(255, 255, 0), 5)
  53.          else:
  54.           bs3=0
  55.           time_start=time.time()
  56.        else:
  57.           if time.time()-time_start<11:
  58.             img = detector_pose.findPose(img, False)
  59.             lmList = detector_pose.findPosition(img, False)
  60.    
  61.             if len(lmList) != 0:
  62.                 point_tem=detector_pose.midpoint(img, 24, 23)
  63.                 point.append(point_tem['y'])
  64.                 cv2.putText(img, str(point_tem['y']), (45, 460), cv2.FONT_HERSHEY_PLAIN, 7,(255, 0, 0), 8)
  65.             cv2.putText(img, str(10-int(time.time()-time_start)), (500, 460), cv2.FONT_HERSHEY_PLAIN, 10,(255, 255, 0), 5)
  66.           else:
  67.               point_sd,l=max_min(point)
  68.               bs=2
  69.               cv2.rectangle(imgCanvas, rect[0], rect[1],(0, 255, 0), 2)
  70.               cv2.putText(imgCanvas, "START", (30,85), font, 1, drawColor, 2)
  71.          
  72.       if bs==3 and bs2==0:  
  73.        if bs3==1:
  74.          if time.time()-time_start<4:
  75.           cv2.putText(img, str(3-int(time.time()-time_start)), (300, 240), cv2.FONT_HERSHEY_PLAIN, 10,(255, 255, 0), 5)
  76.          else:
  77.           bs3=0
  78.           time_start=time.time()
  79.        else:
  80.           img = detector_pose.findPose(img, False)
  81.           lmList = detector_pose.findPosition(img, False)
  82.    
  83.           if len(lmList) != 0:
  84.             point = detector_pose.midpoint(img, 24, 23)
  85.             if point["y"]> point_sd+l/4:
  86.          
  87.               if dire == 0:
  88.                 count += 0.5
  89.                 dire = 1
  90.             if point["y"]<point_sd-l/4:
  91.         
  92.               if dire == 1:
  93.                 count += 0.5
  94.                 dire = 0
  95.       
  96.             cv2.putText(img, str(int(count)), (45, 460), cv2.FONT_HERSHEY_PLAIN, 7,(255, 0, 0), 8)  
  97.       if bs2==1:#等待三秒
  98.          if time.time()-time_start>4:
  99.             bs2=0
  100.             time_start=time.time()
  101.                      
  102.       else:
  103.         #手势操作
  104.         img = detector_hand.findHands(img)
  105.         lmList = detector_hand.findPosition(img, draw=False)
  106.         if len(lmList) !=0:
  107.          x1, y1 = lmList[8][1:]
  108.          x2, y2 = lmList[12][1:]
  109.          fingers = detector_hand.fingersUp()
  110.          #出示食指
  111.          if fingers[1] and fingers[2] == False:
  112.           cv2.circle(img, (x1, y1), 15, drawColor, cv2.FILLED)     
  113.           if x1>rect[0][0] and x1<rect[1][0] and y1>rect[0][1] and y1<rect[1][1]:#食指进入按钮区域
  114.            if bs==0:
  115.             print("OK")
  116.             imgCanvas = np.zeros((480, 640, 3), np.uint8)
  117.             bs=1
  118.             bs2=1
  119.             bs3=1
  120.             time_start=time.time()
  121.            elif bs==1:
  122.             imgCanvas = np.zeros((480, 640, 3), np.uint8)
  123.             bs2=1
  124.             bs3=1
  125.             time_start=time.time()
  126.            elif bs==2:
  127.             imgCanvas = np.zeros((480, 640, 3), np.uint8)
  128.             cv2.rectangle(imgCanvas, rect[0], rect[1],(0, 255, 0), 2)
  129.             cv2.putText(imgCanvas, "STOP", (30,85), font, 1, drawColor, 2)
  130.             bs=3  
  131.             bs2=1
  132.             bs3=1
  133.             time_start=time.time()
  134.            elif bs==3:
  135.             imgCanvas = np.zeros((480, 640, 3), np.uint8)
  136.             cv2.rectangle(imgCanvas, rect[0], rect[1],(0, 255, 0), 2)
  137.             cv2.putText(imgCanvas, "START", (30,85), font, 1, drawColor, 2)
  138.             bs=2  
  139.             bs2=1
  140.             bs3=1
  141.             time_start=time.time()
  142.       cTime = time.time()
  143.       fps = 1 / (cTime - pTime)
  144.       pTime = cTime
  145.       cv2.putText(img, str(int(fps)), (500, 100), cv2.FONT_HERSHEY_PLAIN, 5,(255, 0, 0), 5)
  146.       imgGray = cv2.cvtColor(imgCanvas, cv2.COLOR_BGR2GRAY)
  147.       img = cv2.bitwise_or(img,imgCanvas)
  148.       cv2.imshow("Image", img)
  149.       cv2.waitKey(1)
复制代码

【计数炫灯】
使用Pinpong库,连接Micro:bit,控制LED灯随跳绳次数增加亮灯数。


相关文章:

Mind+Python+Mediapipe项目——AI健身之跳绳

原文&#xff1a;MindPythonMediapipe项目——AI健身之跳绳 - DF创客社区 - 分享创造的喜悦 【项目背景】跳绳是一个很好的健身项目&#xff0c;为了获知所跳个数&#xff0c;有的跳绳上会有计数器。但这也只能跳完这后看到&#xff0c;能不能在跳的过程中就能看到&#xff0c;…...

数据库概述

20世纪60年代后期&#xff0c;就出现了数据库技术。取得成就如下&#xff1a;造就了四位图灵奖得主发展成为以数据建模和DBMS核心技术为主&#xff0c;内容丰富的一门学科。带动了一个巨大的软件产业-DBMS产品及其相关工具和解决方案。四个基本概念数据数据是数据库中存储的基本…...

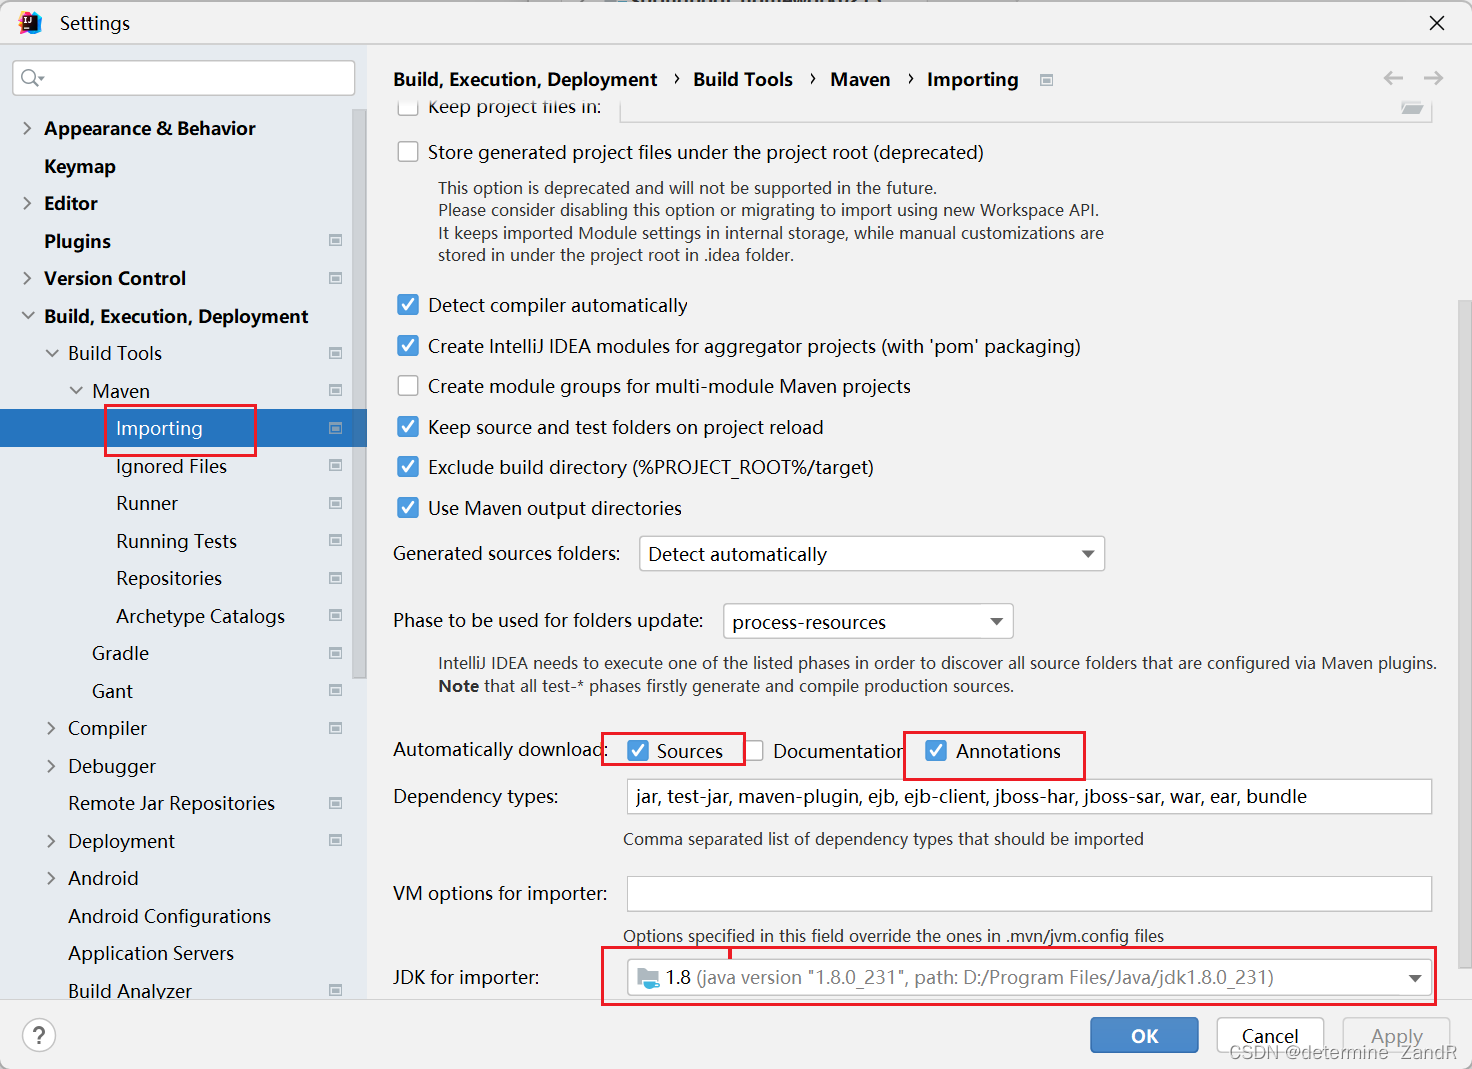
【已解决】解决IDEA的maven刷新依赖时出现Connot reconnect错误

前言 小编我将用CSDN记录软件开发求学之路上亲身所得与所学的心得与知识&#xff0c;有兴趣的小伙伴可以关注一下&#xff01;也许一个人独行&#xff0c;可以走的很快&#xff0c;但是一群人结伴而行&#xff0c;才能走的更远&#xff01;让我们在成长的道路上互相学习&#…...

动态链接库(.so)文件的变编译和引用、执行

动态链接库(.so)文件的变编译和引用 动态链接库&#xff1a;SO&#xff08;Shared Object&#xff09;是一种动态链接库&#xff0c;也被称为共享库。它是一种可被多个程序共享使用的二进制代码库&#xff0c;其中包含已编译的函数和代码。与静态链接库不同&#xff0c;动态链接…...

linux(centos8)文件解压命令

linux解压命令tar 解压命令常用解压命令1 [.tar] 文件 解压到当前文件夹2 [.tar.gz] 文件 解压到当前文件夹3 [.tar] 解压到指定文件夹 -C 必须是大写unzip 解压命令常用解压命令1 [.zip]解压到当前文件夹2 [.zip] 解压到指定文件夹2 [.zip] 解压到指定文件夹&#xff08;强行覆…...

阅读笔记6——通道混洗

一、逐点卷积 当前先进的轻量化网络大都使用深度可分离卷积或组卷积&#xff0c;以降低网络的计算量&#xff0c;但这两种操作都无法改变特征图的通道数&#xff0c;因此需要使用11的卷积。总体来说&#xff0c;逐点的11卷积有如下两点特性&#xff1a; 可以促进通道之间的信息…...

上海亚商投顾:沪指失守3300点 卫星导航概念全天强势

上海亚商投顾前言&#xff1a;无惧大盘涨跌&#xff0c;解密龙虎榜资金&#xff0c;跟踪一线游资和机构资金动向&#xff0c;识别短期热点和强势个股。市场情绪指数早间低开后震荡回升&#xff0c;沪指盘中一度翻红&#xff0c;随后又再度走低&#xff0c;创业板指午后跌近1%。…...

疯狂的SOVA:Android银行木马“新标杆”

2021年8月初&#xff0c;一款针对Android银行APP的恶意软件出现在人们的视野中&#xff0c;ThreatFabric 安全研究人员首次发现了这一木马&#xff0c;在其C2服务器的登录面板&#xff0c;研究人员发现&#xff0c;攻击者将其称之为SOVA。 ** SO** ** V** ** A简介** 在俄语中…...

汽车零部件企业数字工厂管理系统建设方案

在汽车零部件制造领域&#xff0c;伴随工业信息化与机器人化&#xff0c;制造模式逐渐从 CAD/CAE/CAM 数字化设计及加工走向全产品周期虚拟现实的数字化工厂管理系统平台&#xff0c;实现虚拟现实设计制造&#xff0c;防范产品缺陷并预防设备故障&#xff0c;大幅提高生产效率。…...

【线程同步工具】Semaphore源码解析

控制对资源的一个或多个副本的并发访问 Java API 提供了一种信号量机制 Semaphore。 一个信号量就是一个计数器&#xff0c; 可用于保护对一个或多个共享资源的访问。 当一个线程要访问多个共享资源中的一个时&#xff0c;它首先需要获得一个信号量。如果信号量内部的计数器的…...

获取实时天气

一、用天气API&#xff08;需要付费&#xff09; 网址&#xff1a;https://www.tianqiapi.com/请求方式及url&#xff1a;请求方式&#xff1a;GET接口地址&#xff1a;https://tianqiapi.com/free/day请求示例https://www.tianqiapi.com/free/day?appid_____&appsecret__…...

【数据库】redis数据持久化

目录 数据持久化 一&#xff0c; RDB 1&#xff0c; 什么是RDB 2&#xff0c;持久化流程 3&#xff0c; 相关配置 案例演示&#xff1a; 4&#xff0c; 备份和恢复 1、备份 2、恢复 3&#xff0c;优势 4&#xff0c; 劣势 二&#xff0c;AOF 1&#xff0c;什么是A…...

前端编译、JIT编译、AOT编译

一、前端编译&#xff1a;java设计之初就是强调跨平台&#xff0c;通过javac将源文件编译成于平台无关的class文件&#xff0c; 它定义了执行 Java 程序所需的所有信息&#xff08;许多Java"语法糖"&#xff0c;是在这个阶段完成的&#xff0c;不依赖虚拟机&#xff…...

父子组件中,子组件调用父组件的方法

父子组件中&#xff0c;子组件调用父组件的方法 方法一&#xff1a;直接在子组件中通过this.$parent.event来调用父组件的方法 父组件 <template><p><child>父组件</child></p> </template> <script>import child from ~/compone…...

第七章.深度学习

第七章.深度学习 7.1 深度学习 深度学习是加深了层的深度神经网络。 1.加深层的好处 1).可以减少网络的参数数量 5*5的卷积运算示例&#xff1a; 重复两次3*3的卷积层示例&#xff1a; 图像说明&#xff1a; ①.一次5 * 5的卷积运算的区域可以由两次3 * 3的卷积运算抵消&a…...

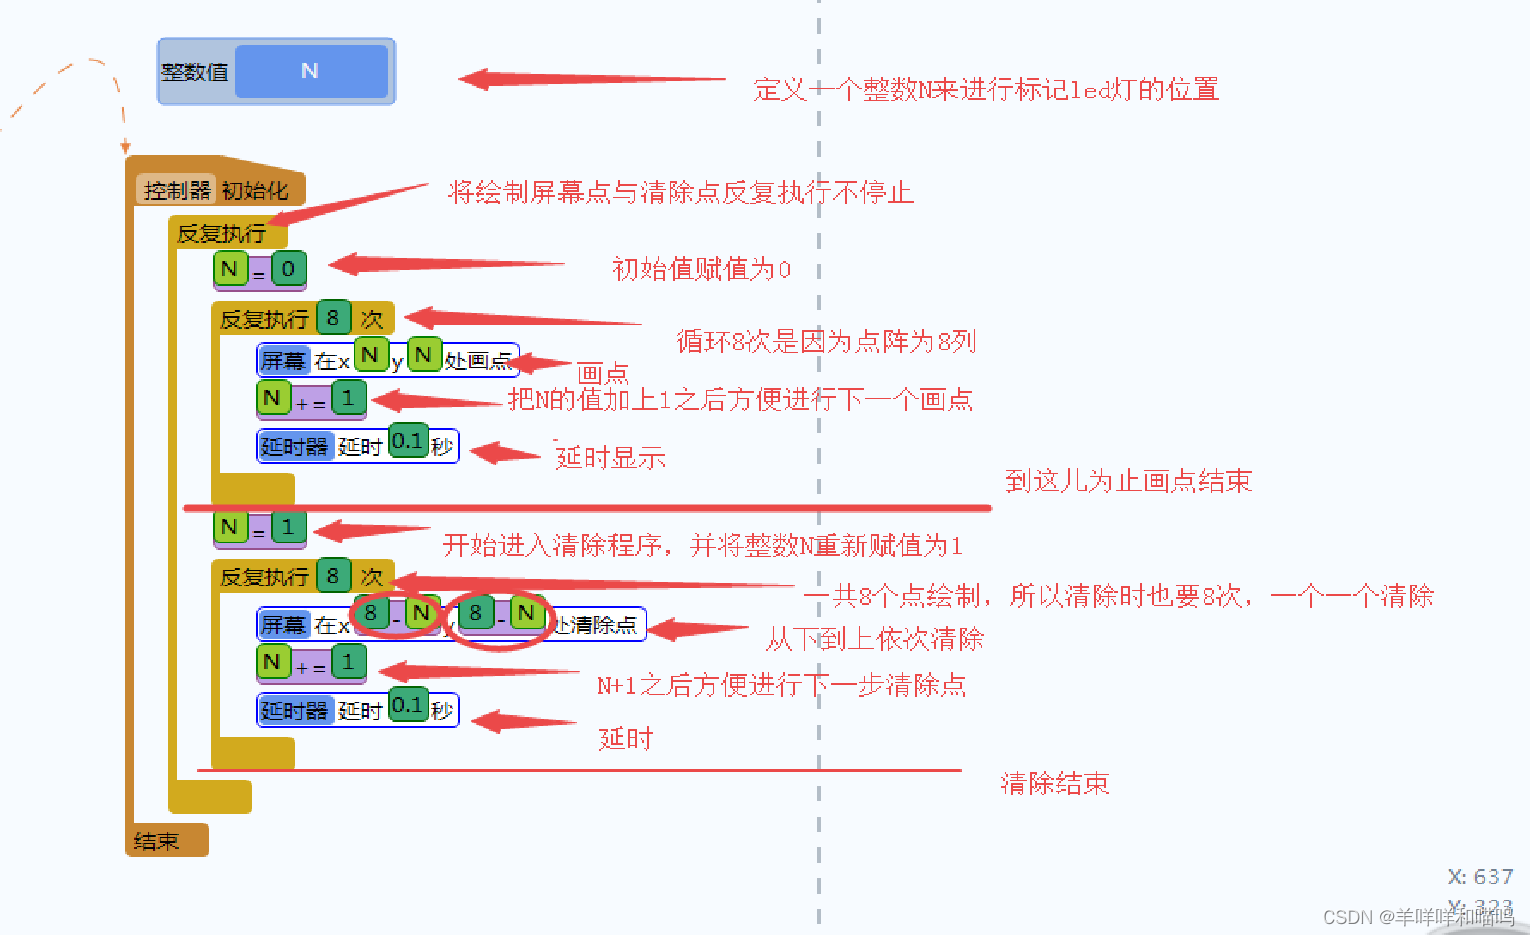
小学生学Arduino---------点阵(三)动态的显示与清除

学习目标&#xff1a; 1、理解“整数值”的概念与使用 2、理解“N1”指令的意义 3、掌握“反复执行多次”指令的使用 4、掌握屏幕模块的清除功能指令 5、理解“反复执行”指令与“反复执行多次”指令的嵌套使用 6、搭建电路图 7、编写程序 效果&#xff1a; 整数包括&#xf…...

opencv图片处理

目录1 图片处理1.1 显示图片1.2 旋转图片1.3 合并图片1.4、Mat类1.4.1、像素的储存结构1.4.2、访问像素数据1.6、rgb转灰度图1.7、二值化1.8、对比度和亮度1.9、图片缩放1.9.1、resize临近点算法双线性内插值1.9.2、金字塔缩放1.10、图片叠加1 图片处理 1.1 显示图片 #includ…...

C++ Primer Plus 学习笔记(二)—— 复合类型

数组 当我们只是定义了数组&#xff0c;而没有对数组进行初始化时&#xff0c;那数组的值将是未定义的。 在对数组进行初始化时&#xff0c;如果只对数组的一部分进行初始化&#xff0c;编译器会将把其他元素自动设置为0。 #include <iostream>using namespace std;in…...

代码随想录算法训练营第七天 | 454.四数相加II 、 383. 赎金信、15. 三数之和、18. 四数之和 、总结

打卡第七天&#xff0c;还是哈希表。 今日任务 454.四数相加II383.赎金信15.三数之和18.四数之和总结 454.四数相加II 代码随想录 class Solution { public:int fourSumCount(vector<int>& nums1, vector<int>& nums2, vector<int>& nums3, ve…...

apply函数族

apply函数族 apply函数族是R语言中帮助用户实现高效的向量化运算的一系列函数&#xff0c;包括apply,lapply,sapply,vapply等。 apply() apply函数以列或行为单位进行循环操作&#xff0c;可以处理matrix、array数据&#xff0c;返回一个向量或matrix。 apply(data,1/2,fuc…...

Unpaywall:5分钟快速安装,轻松解锁付费学术论文的实用指南

Unpaywall&#xff1a;5分钟快速安装&#xff0c;轻松解锁付费学术论文的实用指南 【免费下载链接】unpaywall-extension Firefox/Chrome extension that gives you a link to a free PDF when you view scholarly articles 项目地址: https://gitcode.com/gh_mirrors/un/unp…...

保姆级教程:在Windows电脑上免梯子安装GPT4All最新版(附模型下载避坑指南)

Windows系统本地部署GPT4All全流程指南&#xff1a;从零基础到高效运行最近半年&#xff0c;开源大语言模型生态中最令人兴奋的变化之一&#xff0c;就是像GPT4All这样的工具让普通开发者也能在消费级硬件上运行强大的AI模型。作为一名长期关注AI本地化部署的技术顾问&#xff…...

别再只看BLEU分数了:Gemini代码生成能力专业评测框架(覆盖语义正确性、上下文感知度、调试友好性3大稀缺指标)

更多请点击&#xff1a; https://codechina.net 第一章&#xff1a;别再只看BLEU分数了&#xff1a;Gemini代码生成能力专业评测框架&#xff08;覆盖语义正确性、上下文感知度、调试友好性3大稀缺指标&#xff09; 传统NLP评估中&#xff0c;BLEU等基于n-gram重叠的指标在代码…...

如何快速下载并配置TaoToken命令行工具实现一键接入

&#x1f680; 告别海外账号与网络限制&#xff01;稳定直连全球优质大模型&#xff0c;限时半价接入中。 &#x1f449; 点击领取海量免费额度 如何快速下载并配置TaoToken命令行工具实现一键接入 对于需要在本地或服务器环境接入多个大模型的开发者而言&#xff0c;手动配置…...

unrpa:5步掌握Ren‘Py游戏资源提取的完整指南

unrpa&#xff1a;5步掌握RenPy游戏资源提取的完整指南 【免费下载链接】unrpa A program to extract files from the RPA archive format. 项目地址: https://gitcode.com/gh_mirrors/un/unrpa 对于热爱RenPy视觉小说的玩家和开发者来说&#xff0c;unrpa是打开游戏资源…...

Cursor Pro破解终极指南:5步实现永久免费使用的完整解决方案

Cursor Pro破解终极指南&#xff1a;5步实现永久免费使用的完整解决方案 【免费下载链接】cursor-free-vip [Support 0.45]&#xff08;Multi Language 多语言&#xff09;自动注册 Cursor Ai &#xff0c;自动重置机器ID &#xff0c; 免费升级使用Pro 功能: Youve reached yo…...

创新方案:DouZero_For_HappyDouDiZhu - AI智能斗地主实战指南

创新方案&#xff1a;DouZero_For_HappyDouDiZhu - AI智能斗地主实战指南 【免费下载链接】DouZero_For_HappyDouDiZhu 基于DouZero定制AI实战欢乐斗地主 项目地址: https://gitcode.com/gh_mirrors/do/DouZero_For_HappyDouDiZhu 你是否曾想过在斗地主游戏中拥有一个永…...

PXE启动Ubuntu时,你的initrd.img配置对了吗?一个参数让无盘启动快3倍

PXE启动Ubuntu时initrd.img的深度调优指南当你在凌晨三点盯着PXE启动进度条缓慢爬升时&#xff0c;是否想过那个看似简单的initrd.img文件里藏着多少性能玄机&#xff1f;作为运维老兵的我在经历了数十次无盘系统部署后&#xff0c;发现90%的PXE启动性能问题都源于initrd配置不…...

magic - trace:高分辨率追踪利器,解决应用难题,还能深入洞悉程序运行!

magic - trace 概述magic - trace 能够收集并展示进程活动的高分辨率追踪信息&#xff0c;可用于解决生产环境中应用程序处理请求速度慢、了解代码实际运行情况、获取应用崩溃前活动历史等问题。它性能开销在 2% - 10% 之间&#xff0c;使用时无需修改应用程序&#xff0c;能以…...

大语言模型驱动的定性研究编码自动化:GATOS工作流实践指南

1. 项目概述&#xff1a;当大语言模型遇见定性研究编码如果你做过定性研究&#xff0c;比如分析几百份开放式问卷、访谈转录稿&#xff0c;或者处理海量的用户反馈&#xff0c;你肯定对“编码”这个环节又爱又恨。爱的是&#xff0c;它能将杂乱无章的文本转化为结构化的见解&am…...