CompletableFuture异步回调
CompletableFuture异步回调
- CompletableFuture
- Future模式
- CompletableFuture详解
- 1.CompletableFuture的UML类关系
- 2.CompletionStage接口
- 3.使用runAsync和supplyAcync创建子任务
- 4.设置子任务回调钩子
- 5.调用handle()方法统一处理异常和结果
- 6.线程池的使用
- 异步任务的串行执行
- thenApply()方法
- thenRun()方法
- thenAccept()方法
- thenCompose()方法
- 四个任务串行方法的区别
- 异步任务的合并执行
- thenCombine()方法
- runAfterBoth()方法
- thenAcceptBoth()方法
- allOf()等待所有的任务结束
- 泡茶喝实例
CompletableFuture
Future模式
Future模式是高并发设计与开发过程中常见的设计模式,它的核心思想是异步调用。对于Future模式来说,它不是立即返回我们所需要的数据,但是它会返回一个契约(或异步任务),将来我们可以凭借这个契约(或异步任务)获取需要的结果。
在进行传统的RPC(远程调用)时,同步调用RPC是一段耗时的过程。当客户端发出RPC请求后,服务端完成请求处理需要很长的一段时间才会返回,这个过程中客户端一直在等待,直到数据返回后,再进行其他任务的处理。现有一个Client同步对三个Server分别进行一次RPC调用,具体如下图:

假设一次远程调用的时间为500毫秒,则一个Client同步对三个Server分别进行一次RPC调用的总时间需要耗费1500毫秒。可以使用Future模式对其进行改造,将同步的RPC调用改为异步并发的RPC调用,一个Client异步并发对三个Server分别进行一次RPC调用,如下图:

假设一次远程调用的时间为500毫秒,则一个Client异步并发对三个Server分别进行一次RPC调用的总时间只要耗费500毫秒。使用Future模式异步并发地进行RPC调用,客户端在得到一个RPC地返回结果前并不急于获取该结果,而是充分利用等待时间去执行其他地耗时操作(如其他RPC调用),这就是Future模式地核心所在。
Java的
Future实现类并没有支持异步回调,仍然需要主动获取耗时任务的结果,而Java8的CompletableFuture组件实现了异步回调模式。
在Java中,Future只是一个泛型接口,位于java.util.concurrent包下,其中定义了5个方法,主要包括如下几个功能:
- 取消异步执行中的任务
- 判断任务是否被取消
- 判断异步任务是否执行完成
- 获取异步任务完成后的执行结果
public interface Future<V> {//取消异步执行boolean cancel(boolean mayInterruptIfRunning);//获取异步任务的取消状态boolean isCancelled();//判断异步任务是否执行完成boolean isDone();//获取异步任务完成后的执行结果V get() throws InterruptedException, ExecutionException;//设置时限,获取异步任务完成后的执行结果V get(long timeout, TimeUnit unit)throws InterruptedException, ExecutionException, TimeoutException;
}
总体来说,Future是一个对异步任务进行交互、操作的接口。但是Future仅仅是一个接口,通过它没有办法直接对异步任务操作,JDK提供了一个默认的实现类–FutureTask。
CompletableFuture详解
CompletableFuture是JDK1.8引入的实现类,该类实现了Future和CompletionStage两个接口。该类的实例作为一个异步任务,可以在自己异步执行完成之后触发一些其他的异步任务,从而达到异步回调的效果。
1.CompletableFuture的UML类关系

这里的CompletionStage代表异步计算过程中的某一个阶段,一个阶段完成以后可能会进入另一个阶段。一个阶段可以理解为一个子任务,每一个子任务会包装一个Java函数式接口实例,表示该子任务所要执行的操作。
2.CompletionStage接口
CompletionStage代表某个同步或异步计算的一个阶段,或者一系列异步任务中的一个子任务(或者阶段性任务)。
每个CompletionStage子任务所包装的可以是一个Function、Consumer或者Runnable函数式接口实例。这三个常用的函数式接口的特点如下:
(1)Function
Function接口的特点是:有输入、有输出。包装了Function实例的CompletionStage子任务需要一个输入参数,并会产生一个输出结果到下一步。
(2)Runnable
Runnable接口的特点是:无输入、无输出。包装了Runnable实例的CompletionStage子任务既不需要任何输入参数,又不会产生任何输出。
(3)Consumer
Consumer接口的特点是:有输入、无输出。包装了Consumer实例的CompletinStage子任务需要一个输入参数,但不会产生任何输出。
多个CompletionStage构成了一条任务流水线,一个环节执行完成了可以将结果移交给下一个环节(子任务)。多个CompletionStage子任务之间可以使用链式调用,下面是一个例子:
oneStage.thenApply(x->square(x)).thenAccept(y->System.out.println(y)).thenRun(()->System.out.println())对上例的解释如下:
oneStage是一个CompletionStage子任务,这是一个前提。
x->square(x)是一个Function类型的Lambda表达式,被thenApply()方法包装成了一个CompletionStage子任务,该子任务需要接收一个参数x,然后输出一个结果----x的平方值。
y->System.out.println(y)是一个Consumer类型的Lambda表达式,被thenAccept()方法包装成了一个CompletionStage子任务,该子任务需要消耗上一个子任务的输出值,但是此子任务并没有输出。
()->System.out.println()是一个Runnable类型的Lambda表达式,被thenRun()方法包装成了一个CompletionStage子任务,既不消耗上一个子任务的输出,又不产生结果。
CompletionStage代表异步计算过程中的某一个阶段,一个阶段完成以后可能会触发另一个阶段。虽然一个子任务可以触发其他子任务,但是并不能保证后续子任务的执行顺序。
3.使用runAsync和supplyAcync创建子任务
CompletionStage子任务的创建是通过CompletebleFuture完成的。CompletableFuture类提供了非常强大的Future的扩展功能来帮助我们简化异步编程的复杂性,提供了函数式编程的能力来帮我们通过回调的方式处理计算结果,也提供了转换和组合CompletionStage()的方法。
CompletableFuture定义了一组方法用于创建CompletionStage子任务(或者阶段性任务),基础的方法如下:
//子任务包装一个Supplier实例,并调用ForkJoinPool.commonPool()线程来执行public static <U> CompletableFuture<U> supplyAsync(Supplier<U> supplier) {return asyncSupplyStage(asyncPool, supplier);}//子任务包装一个Supplier实例,并使用指定的executor线程池来执行public static <U> CompletableFuture<U> supplyAsync(Supplier<U> supplier,Executor executor) {return asyncSupplyStage(screenExecutor(executor), supplier);}//子任务包装一个Runnable实例,并调用ForkJoinPool.commonPool()线程来执行public static CompletableFuture<Void> runAsync(Runnable runnable) {return asyncRunStage(asyncPool, runnable);}//子任务包装一个Runnable实例,并使用指定的executor线程池来执行public static CompletableFuture<Void> runAsync(Runnable runnable,Executor executor) {return asyncRunStage(screenExecutor(executor), runnable);}
在使用CompletableFuture创建CompletionStage子任务时,如果没有指定Executor线程池,在默认情况下CompletionStage会使用公共的ForkJoinPool线程池。
两个创建CompletionStage子任务的示例如下:
public class CompletableFutureDemo {//创建一个无消耗值(无输入值)、无返回值的异步子任务public static void runAsyncDemo() throws Exception {CompletableFuture<Void> future = CompletableFuture.runAsync(() -> {try {Thread.sleep(1000);System.out.println("run end...");} catch (InterruptedException e) {throw new RuntimeException(e);}});//等待异步任务执行完成,限时等待2秒future.get(2, TimeUnit.SECONDS);}//创建一个无消耗值(无输入值)、有返回值的异步子任务public static void supplyAsyncDemo() throws Exception {CompletableFuture<Long> future = CompletableFuture.supplyAsync(() -> {long start = System.currentTimeMillis();try {Thread.sleep(1000);} catch (InterruptedException e) {throw new RuntimeException(e);}System.out.println("run end...");return System.currentTimeMillis() - start;});//等待异步任务执行完成,限时等待2秒long time = future.get(2, TimeUnit.SECONDS);System.out.println("异步执行耗时(秒):" + time / 1000);}public static void main(String[] args) throws Exception {runAsyncDemo();supplyAsyncDemo();}
}
4.设置子任务回调钩子
可以为CompletionStage子任务设置特定的回调钩子,当计算结果完成或者抛出异常的时候,执行这些特定的回调钩子。
设置子任务回调钩子的主要函数如下:
//设置子任务完成时的回调钩子
public CompletableFuture<T> whenComplete(BiConsumer<? super T, ? super Throwable> action) {return uniWhenCompleteStage(null, action);
}
//设置子任务完成时的回调钩子,可能不在同一线程执行
public CompletableFuture<T> whenCompleteAsync(BiConsumer<? super T, ? super Throwable> action) {return uniWhenCompleteStage(asyncPool, action);
}
//设置子任务完成时的回调钩子,提交给线程池executor执行
public CompletableFuture<T> whenCompleteAsync(BiConsumer<? super T, ? super Throwable> action, Executor executor) {return uniWhenCompleteStage(screenExecutor(executor), action);
}
//设置异常处理的回调钩子
public CompletableFuture<T> exceptionally(Function<Throwable, ? extends T> fn) {return uniExceptionallyStage(fn);
}
下面是一个CompletionStage子任务设置完成钩子和异常钩子的简单示例:
public class CompletableFutureDemo1 {public static void whenCompleteDemo() throws Exception {//创建异步任务CompletableFuture<Void> future = CompletableFuture.runAsync(() -> {try {//模拟执行一秒Thread.sleep(1000);} catch (InterruptedException e) {throw new RuntimeException(e);}System.out.println(Thread.currentThread().getName()+":抛出异常");throw new RuntimeException(Thread.currentThread().getName()+":发生异常");});//设置异步任务执行完成后的回调钩子future.whenComplete(new BiConsumer<Void, Throwable>() {@Overridepublic void accept(Void unused, Throwable throwable) {System.out.println(Thread.currentThread().getName()+":执行完成!");}});//设置异步任务发生异常后的回调钩子future.exceptionally(new Function<Throwable, Void>() {@Overridepublic Void apply(Throwable throwable) {System.out.println(Thread.currentThread().getName()+":执行失败!" + throwable.getMessage());return null;}});//获取异步任务的结果future.get();}public static void main(String[] args) throws Exception {whenCompleteDemo();}
}
调用cancel()方法取消CompletableFuture时,任务被视为异常完成,completeExceptionally()方法所设置的异常回调钩子也会被执行。
如果没有设置异常回调钩子,发生内部异常时会有两种情况发生:
(1)在调用get()和get(long,TimeUnit)方法启动任务时,如果遇到内部异常,get()方法就会抛出ExecutionException(执行异常)。
(2)在调用join()和getNow(T)启动任务时(大多数情况下都是如此),如果遇到内部异常,join()和getNow(T)方法就会抛出CompletionException。
5.调用handle()方法统一处理异常和结果
除了分别通过whenComplete、exceptionally设置完成钩子、异常钩子之外,还可以调用handle()方法统一处理结果和异常。
handle方法有三个重载版本如下:
//在执行任务的同一个线程中处理异常和结果
public <U> CompletableFuture<U> handle(BiFunction<? super T, Throwable, ? extends U> fn) {return uniHandleStage(null, fn);
}
//可能不在执行任务的同一个线程中处理异常和结果
public <U> CompletableFuture<U> handleAsync(BiFunction<? super T, Throwable, ? extends U> fn) {return uniHandleStage(asyncPool, fn);
}
//在指定线程池executor中处理异常和结果
public <U> CompletableFuture<U> handleAsync(BiFunction<? super T, Throwable, ? extends U> fn, Executor executor) {return uniHandleStage(screenExecutor(executor), fn);
}
handle()方法的示例代码如下:
public class CompletableDemo2 {public static void handleDemo() throws Exception {CompletableFuture<Void> future = CompletableFuture.runAsync(() -> {try {//模拟执行1秒Thread.sleep(1000);} catch (InterruptedException e) {throw new RuntimeException(e);}System.out.println(Thread.currentThread().getName()+":抛出异常");throw new RuntimeException(Thread.currentThread().getName()+":发生异常");});//统一处理异常和结果future.handle(new BiFunction<Void, Throwable, Void>() {@Overridepublic Void apply(Void unused, Throwable throwable) {if (throwable == null) {System.out.println(Thread.currentThread().getName()+":没有发生异常!");} else {System.out.println(Thread.currentThread().getName()+":sorry,发生了异常!");}return null;}});future.get();}public static void main(String[] args) throws Exception {handleDemo();}
}
6.线程池的使用
默认情况下,通过静态方法runAsync()、supplyAsync()创建的CompletableFuture任务会使用公共的ForkJoinPool线程池,默认的线程数是CPU的核数。
问题是,如果所有CompletableFuture共享一个线程池,那么一旦有任务执行一些很慢的IO操作,就会导致线程池中的所有线程都阻塞在IO操作上,造成线程饥饿,进而影响整个系统的性能。所以,强烈建议根据不同的业务类型创建不同的线程池,以避免相互干扰。
public class CompletableDemo3 {public static void threadPoolDemo() throws Exception {//混合线程池ExecutorService pool = Executors.newFixedThreadPool(10);CompletableFuture<Long> future = CompletableFuture.supplyAsync(() -> {System.out.println(Thread.currentThread().getName()+":run begin...");long start = System.currentTimeMillis();try {Thread.sleep(1000);//模拟执行1秒} catch (InterruptedException e) {throw new RuntimeException(e);}System.out.println(Thread.currentThread().getName()+":run end...");return System.currentTimeMillis() - start;}, pool);//等待异步任务执行完成,限时等待2秒Long time = future.get(2, TimeUnit.SECONDS);System.out.println(Thread.currentThread().getName()+":异步执行耗时(秒):" + time / 1000);}public static void main(String[] args) throws Exception {threadPoolDemo();}
}

异步任务的串行执行
如果两个异步任务需要串行(一个任务依赖另一个任务)执行,可以通过CompletionStage接口的thenApply()、thenAccept()、thenRun()和thenCompose()四个方法来实现。
thenApply()方法
//后一个任务与前一个任务在同一个线程中执行
public <U> CompletableFuture<U> thenApply(Function<? super T,? extends U> fn)
//后一个任务与前一个任务不在同一个线程中执行
public <U> CompletableFuture<U> thenApplyAsync(Function<? super T,? extends U> fn)
//后一个任务在指定的executor线程池中执行
public <U> CompletableFuture<U> thenApplyAsync(Function<? super T,? extends U> fn, Executor executor)
thenApply的三个重载版本有一个共同的参数fn,该参数表示要串行执行的第二个异步任务,它的类型为Function。fn的类型声明涉及两个泛型参数,具体如下:
- 泛型参数T:上一个任务所返回结果的类型。
- 泛型参数U:当前任务的返回值类型。
调用thenApply分两步计算(10+10)*2:
//调用thenApply分两步计算(10+10)*2
public class ThenApplyDemo {public static void main(String[] args) throws ExecutionException, InterruptedException {CompletableFuture<Long> future = CompletableFuture.supplyAsync(new Supplier<Long>() {@Overridepublic Long get() {long firstStep = 10L + 10L;System.out.println(Thread.currentThread().getName()+":firstStep out is " + firstStep);return firstStep;}}).thenApplyAsync(new Function<Long, Long>() {@Overridepublic Long apply(Long firstStepOut) {long secondStep = firstStepOut * 2;System.out.println(Thread.currentThread().getName()+":secondStep out is " + secondStep);return secondStep;}});Long result = future.get();System.out.println(Thread.currentThread().getName()+":out is " + result);}
}

thenRun()方法
thenRun()方法与thenApply()方法不同的是,不关心任务的处理结果。只要前一个任务执行完成,就开始执行后一个串行任务。
//后一个任务与前一个任务在同一个线程中执行
public CompletableFuture<Void> thenRun(Runnable action)
//后一个任务与前一个任务不在同一个线程中执行
public CompletableFuture<Void> thenRunAsync(Runnable action)
//后一个任务在指定的executor线程池中执行
public CompletableFuture<Void> thenRunAsync(Runnable action,Executor executor)
从方法的声明可以看出,thenRun()方法同thenApply()方法类似,不同的是前一个任务处理完成后,thenRun()并不会把计算的结果传给后一个任务,而且后一个任务也没有结果输出。
thenRun系列方法中的action参数是Runnable类型的,所以thenRun()既不能接收参数也不支持返回值。
thenAccept()方法
调用thenAccept()方法时后一个任务可以接收(或消费)前一个任务的处理结果,但是后一个任务没有结果输出。
//后一个任务与前一个任务在同一个线程中执行
public CompletableFuture<Void> thenAccept(Consumer<? super T> action)
//后一个任务与前一个任务不在同一个线程中执行
public CompletableFuture<Void> thenAcceptAsync(Consumer<? super T> action)
//后一个任务在指定的executor线程池中执行
public CompletableFuture<Void> thenAcceptAsync(Consumer<? super T> action,Executor executor)
thenCompose()方法
thenCompose方法在功能上与thenApply()、thenAccept()、thenRun()一样,可以对两个任务进行串行的调度操作,第一个任务操作完成时,将它的结果作为参数传递给第二个任务。
public <U> CompletableFuture<U> thenCompose(Function<? super T, ? extends CompletionStage<U>> fn)
public <U> CompletableFuture<U> thenComposeAsync(Function<? super T, ? extends CompletionStage<U>> fn) public <U> CompletableFuture<U> thenComposeAsync(Function<? super T, ? extends CompletionStage<U>> fn,Executor executor)
thenCompose()方法要求第二个任务的返回值是一个CompletionStage异步实例。因此,可以调用CompletableFuture.supplyAsync()方法将第二个任务所要调用的普通异步方法包装成一个CompletionStage实例。
这里使用thenCompose()分两步计算(10+10)*2
public class ThenComposeDemo {public static void main(String[] args) throws ExecutionException, InterruptedException {CompletableFuture<Long> future = CompletableFuture.supplyAsync(new Supplier<Long>() {@Overridepublic Long get() {long firstStep = 10 + 10;System.out.println(Thread.currentThread().getName()+":first out is " + firstStep);return firstStep;}}).thenCompose(new Function<Long, CompletionStage<Long>>() {@Overridepublic CompletionStage<Long> apply(Long firstStepOut) {//将第二个任务所要调用的普通异步方法包装成一个CompletionState异步实例return CompletableFuture.supplyAsync(new Supplier<Long>() {//两个任务所要调用的普通异步方法@Overridepublic Long get() {long secondStep = firstStepOut * 2;System.out.println(Thread.currentThread().getName()+":second Step out is " + secondStep);return secondStep;}});}});Long result = future.get();System.out.println(Thread.currentThread().getName()+":out is " + result);}
}

四个任务串行方法的区别
thenApply()、thenRun()、thenAccept()这三个方法的不同之处主要在于其核心参数fn、action、consumer的类型不同,分别为Function<T,R>、Runnable、Consumer<? super T>类型。
但是,thenCompose()方法与thenApply()方法有本质的不同:
- thenCompose()的返回值是一个新的CompletionStage实例,可以持续用来进行下一轮CompletionStage任务的调度。
- thenApply()的返回值就是第二个任务的普通异步方法的执行结果,它的返回类型与第二不执行的普通异步方法的返回类型相同,通过thenApply()所返回的值不能进行下一轮CompletionStage链式(或者流式)调用。
异步任务的合并执行
如果某个任务同时依赖另外两个异步任务的执行结果,就需要对另外两个异步任务进行合并。以泡茶为例,“泡茶喝”任务需要对“烧水”任务与“清洗”任务进行合并。
thenCombine()方法
thenCombine()会在两个CompletionStage任务都执行完成后,把两个任务的结果一起交给thenCombine()来处理。
//合并代表第二步任务(参数other)的CompletionStage实例,返回第三步任务的CompletionStage
public <U,V> CompletableFuture<V> thenCombine(CompletionStage<? extends U> other,BiFunction<? super T,? super U,? extends V> fn)
//不一定在同一个线程中执行第三步任务的CompletionStage实例
public <U,V> CompletableFuture<V> thenCombineAsync(CompletionStage<? extends U> other,BiFunction<? super T,? super U,? extends V> fn)
//第三步任务的CompletionStage实例在指定的executor线程池中执行
public <U,V> CompletableFuture<V> thenCombineAsync(CompletionStage<? extends U> other,BiFunction<? super T,? super U,? extends V> fn, Executor executor)
thenCombine()方法的调用者为第一步的CompletionStage实例,该方法的第一个参数为第二步的CompletionStage实例,该方法的返回值为第三步的CompletioStage实例。在逻辑上,thenCombine()方法的功能是将第一步、第二步的结果合并到第三步上。
thenCombine()系列方法有两个核心参数:
- other参数:表示待合并的第二部任务的CompletionStage实例。
- fn参数:表示第一个任务和第二个任务执行完成后,第三步需要执行的逻辑。
fn参数的类型为BiFunction<? super T,? super U,? extends V>,该类型的声明涉及三个泛型参数:
- T:表示第一个任务所返回结果的类型
- U:表示第二个任务所返回结果的类型
- V:表示第三个任务所返回结果的类型
调用thenCombine分三步计算(10+10)*(10+10):
//使用thenCombine()计算(10+10)*(10+10)
public class ThenCombineDemo {public static void main(String[] args) throws ExecutionException, InterruptedException {CompletableFuture<Integer> future1 = CompletableFuture.supplyAsync(new Supplier<Integer>() {@Overridepublic Integer get() {Integer firstStep = 10 + 10;System.out.println(Thread.currentThread().getName()+":firstStep out is " + firstStep);return firstStep;}});CompletableFuture<Integer> future2 = CompletableFuture.supplyAsync(new Supplier<Integer>() {@Overridepublic Integer get() {Integer secondStep = 10 + 10;System.out.println(Thread.currentThread().getName()+":secondStep out is " + secondStep);return secondStep;}});CompletableFuture<Integer> future3 = future1.thenCombine(future2, new BiFunction<Integer, Integer, Integer>() {@Overridepublic Integer apply(Integer step1Out, Integer step2Out) {return step1Out * step2Out;}});Integer result = future3.get();System.out.println(Thread.currentThread().getName()+":out is " + result);}
}

runAfterBoth()方法
funAfterBoth()方法不关心每一步任务的输入参数和处理结果。
//合并第二步任务的CompletionStage实例,返回第三步任务的CompletionStage
public CompletableFuture<Void> runAfterBoth(CompletionStage<?> other,Runnable action)
//不一定在同一个线程中执行第三步任务的CompletionStage实例
public CompletableFuture<Void> runAfterBothAsync(CompletionStage<?> other,Runnable action)
//第三步任务的CompletionStage实例在指定的executor线程池中执行
public CompletableFuture<Void> runAfterBothAsync(CompletionStage<?> other,Runnable action,Executor executor)
thenAcceptBoth()方法
该方法是对runAfterBoth()方法和thenCombine()方法的特点进行了折中,调用thenAcceptBoth()方法,第三个任务可以接收其合并过来的第一个任务、第二个任务的处理结果,但是第三个任务(合并任务)却不能返回结果。
public <U> CompletableFuture<Void> thenAcceptBoth(CompletionStage<? extends U> other,BiConsumer<? super T, ? super U> action)
public <U> CompletableFuture<Void> thenAcceptBothAsync(CompletionStage<? extends U> other,BiConsumer<? super T, ? super U> action)
public <U> CompletableFuture<Void> thenAcceptBothAsync(CompletionStage<? extends U> other,BiConsumer<? super T, ? super U> action, Executor executor)
allOf()等待所有的任务结束
CompletionStage接口的allOf()会等待所有的任务结束,以合并所有的任务。thenCombine()只能合并两个任务,如果需要合并多个异步任务,那么可以调用allOf()。
//allOF()会等待所有的任务结束,以合并所有的任务
public class AllOfDemo {public static void main(String[] args) {CompletableFuture<Void> future1 = CompletableFuture.runAsync(() -> System.out.println(Thread.currentThread().getName()+":模拟异步任务1"));CompletableFuture<Void> future2 = CompletableFuture.runAsync(() -> System.out.println(Thread.currentThread().getName()+":模拟异步任务2"));CompletableFuture<Void> future3 = CompletableFuture.runAsync(() -> System.out.println(Thread.currentThread().getName()+":模拟异步任务3"));CompletableFuture<Void> future4 = CompletableFuture.runAsync(() -> System.out.println(Thread.currentThread().getName()+":模拟异步任务4"));CompletableFuture<Void> all = CompletableFuture.allOf(future1, future2, future3, future4);all.join();System.out.println(Thread.currentThread().getName()+":所有异步任务都已经执行完毕");}
}

CompletableFuture中的方法太多了,这里只介绍常用的
泡茶喝实例
为了异步执行整个排查流程,分别设计三个线程:泡茶线程(MainThread,主线程)、烧水线程(HotWaterThread)和清洗线程(WashThread)。
-
泡茶线程的工作是:启动清洗线程、启动烧水线程,等清洗、烧水的工作完成后,泡茶喝;
-
清洗线程的工作是:洗茶壶、洗茶杯;
-
烧水线程的工作是:洗好水壶,灌上凉水,放在火上,一直等水烧开。
我们使用CompletableFuture实现整个泡茶喝程序。我们分3个任务:
任务1负责洗水壶、烧开水
任务2负责洗茶壶、洗茶杯和拿茶叶
任务3负责泡茶
public class DrinkTea {public static final int SLEEP_GAP = 3000;    //等待3秒public static void main(String[] args) throws ExecutionException, InterruptedException {//任务1:洗水壶->烧开水CompletableFuture<Boolean> hotJob = CompletableFuture.supplyAsync(() -> {System.out.println(Thread.currentThread().getName() + ":洗好水壶");System.out.println(Thread.currentThread().getName() + ":烧开水");//线程睡眠一段时间,代表烧水中try {Thread.sleep(SLEEP_GAP);} catch (InterruptedException e) {throw new RuntimeException(e);}System.out.println(Thread.currentThread().getName() + ":水开了");return true;});//任务2:洗茶壶->洗茶杯->拿茶叶CompletableFuture<Boolean> washJob = CompletableFuture.supplyAsync(() -> {System.out.println(Thread.currentThread().getName() + ":洗茶壶");System.out.println(Thread.currentThread().getName() + ":洗茶杯");System.out.println(Thread.currentThread().getName() + ":拿茶叶");//线程睡眠一段时间,代表清洗中try {Thread.sleep(SLEEP_GAP);} catch (InterruptedException e) {throw new RuntimeException(e);}System.out.println(Thread.currentThread().getName() + ":洗完了");return true;});//任务3:任务1和任务2完成后执行泡茶CompletableFuture<String> drinkJob = hotJob.thenCombine(washJob, new BiFunction<Boolean, Boolean, String>() {@Overridepublic String apply(Boolean hotOK, Boolean washOK) {if (hotOK && washOK) {System.out.println(Thread.currentThread().getName() + ":泡茶喝,茶喝完");return "茶喝完了";}return "没有喝到茶";}});//等待任务3执行结果System.out.println(Thread.currentThread().getName() + ":" + drinkJob.get());}
}

相关文章:
CompletableFuture异步回调
CompletableFuture异步回调 CompletableFutureFuture模式CompletableFuture详解1.CompletableFuture的UML类关系2.CompletionStage接口3.使用runAsync和supplyAcync创建子任务4.设置子任务回调钩子5.调用handle()方法统一处理异常和结果6.线程池的使用 异步任务的串行执行thenA…...

Python中匹配模糊的字符串
嗨喽~大家好呀,这里是魔王呐 ❤ ~! python更多源码/资料/解答/教程等 点击此处跳转文末名片免费获取 如何使用thefuzz 库,它允许我们在python中进行模糊字符串匹配。 此外,我们将学习如何使用process 模块,该模块允许我们在模糊…...

PHP图片文件管理功能系统源码
文件图库管理单PHP源码直接解压就能用,单文件,indexm.php文件可以重新命名,上传到需要访问的目录中, 可以查看目录以及各个文件,图片等和下载及修改管理服务。 源码下载:https://download.csdn.net/downloa…...

(枚举 + 树上倍增)Codeforces Round 900 (Div. 3) G
Problem - G - Codeforces 题意: 思路: 首先,目标值和结点权值是直接联系的,最值不可能直接贪心,一定是考虑去枚举一些东西,依靠这种枚举可以遍历所有的有效情况,思考的方向一定是枚举 如果去…...
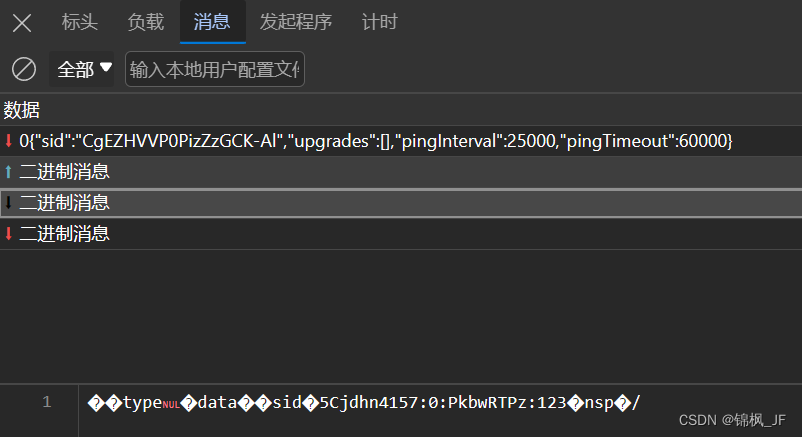
websocket逆向【python实现websocket拦截】
python实现websocket拦截 前言一、拦截的优缺点优点:缺点:二、实现方法1.环境配置2.代码三、总结前言 开发者工具F12,筛选ws后,websocket的消息是这样显示的,如何获取这里面的消息呢? 以下是本篇文章正文内容 一、拦截的优缺点 主要讲解一下websocket拦截的实现,现在…...

软件测试自动化的成本效益分析
随着软件测试技术的发展,人们已经从最初的手工测试转变为手工和自动化技术相结合的测试方法。目前,人们更多的是关心自动化测试框架、自动化测试工具以及脚本研究等技术方面,而在软件自动化测试方案的效益分析方面涉及较少。 软件测试的目的是…...

【Java】状态修饰符 final static
目录 final 修饰我们的成员方法、成员变量、类 示例代码: final 修饰的局部变量 示例代码: static 示例代码: static 访问特点: 示例代码: static关键字的用途 示例代码: static 修饰常量 示例…...

笔试编程ACM模式JS(V8)、JS(Node)框架、输入输出初始化处理、常用方法、技巧
目录 考试注意事项 先审完题意,再动手 在本地编辑器(有提示) 简单题515min 通过率0%,有额外log 常见输入处理 str-> num arr:line.split( ).map(val>Number(val)) 初始化数组 new Array(length).fill(v…...
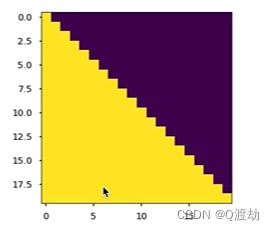
learn掩码张量
目录 1、什么是掩码张量 2、掩码张量的作用 3、代码演示 (1)、定义一个上三角矩阵,k0或者 k默认为 0 (2)、k1 (3)、k-1 4、掩码张量代码实现 (1)、输出效果 &…...
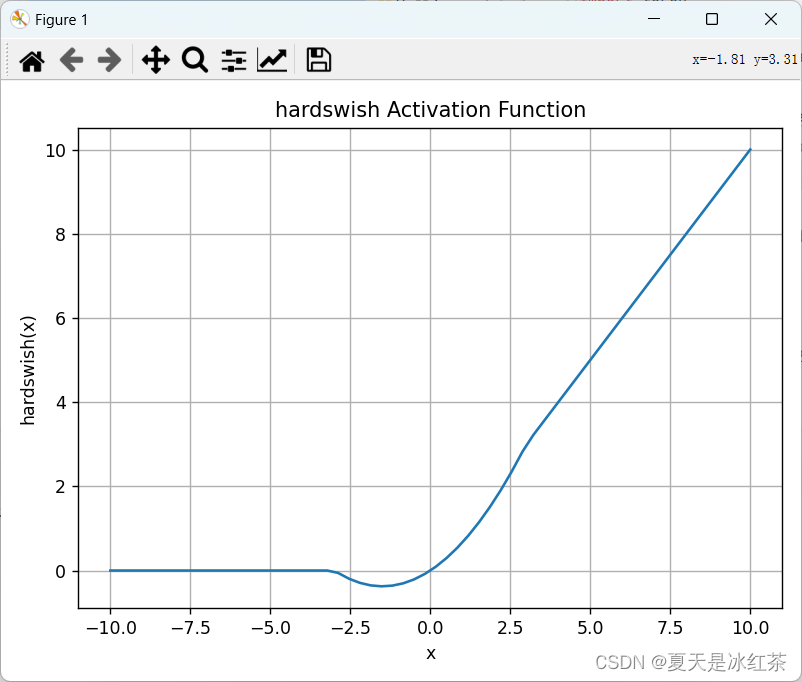
激活函数介绍
介绍 神经网络当中的激活函数用来提升网络的非线性,以增强网络的表征能力。它有这样几个特点:有界,必须为非常数,单调递增且连续可求导。我们常用的有sigmoid或者tanh,但我们都知道这两个都存在一定的缺点,…...
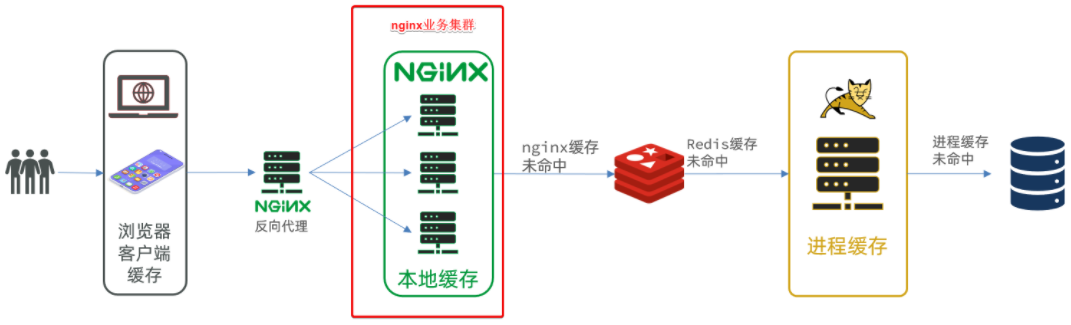
docker方式启动一个java项目-Nginx本地有代码,并配置反向代理
文章目录 案例导入说明1.安装MySQL1.1.准备目录1.2.运行命令1.3.修改配置1.4.重启 2.导入SQL3.导入Demo工程3.1.分页查询商品(仔细看代码,很多新的MP编程技巧)3.2.新增商品3.3.修改商品3.4.修改库存3.5.删除商品3.6.根据id查询商品3.7.根据id…...

前端和后端是Web开发选哪个好?
前端和后端是Web开发中的两个不同的领域,哪一种更适合学习?前景更广呢? 一、引言 Web前端开发就像装饰房间的小瓦匠,勤勤恳恳,仔仔细细,粉饰墙壁,妆点家具。会 HTML,CSS,懂点 JS。…...
HTTP协议,请求响应
、概述 二、HTTP请求协议 三、HTTP响应协议 四、请求数据 1.简单实体参数 RequestMapping("/simpleParam")public String simpleParam(RequestParam(name "name" ,required false ) String username, Integer age){System.out.println (username "…...
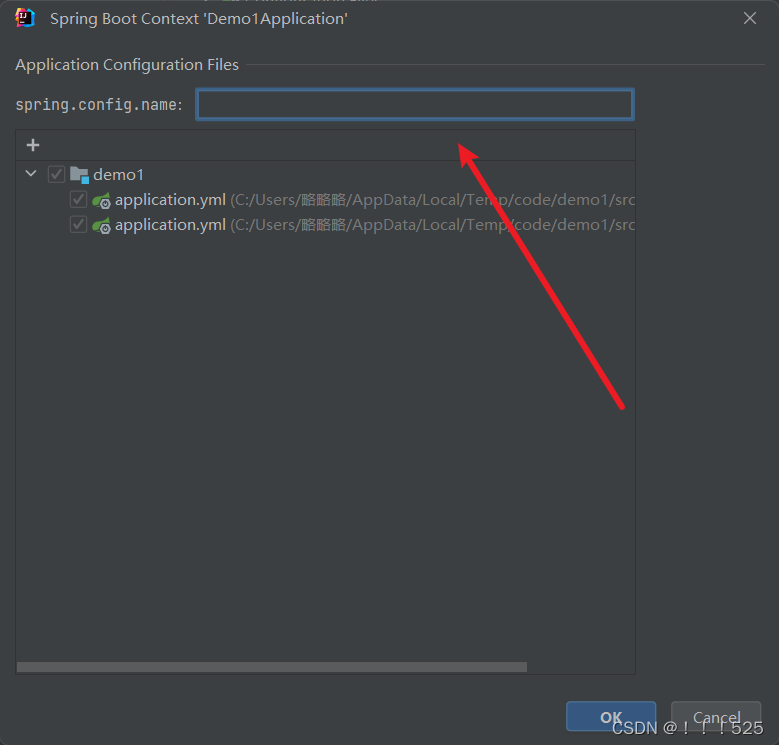
idea配置文件属性提示消息解决方案
在项目文件路径下找到你没有属性提示消息的文件 选中,ok即可 如果遇到ok无法确认的情况: 在下图所示位置填写配置文件名称即可...
EdgeView 4 for Mac:重新定义您的图像查看体验
您是否厌倦了那些功能繁杂、操作复杂的图像查看器?您是否渴望一款简单、快速且高效的工具,以便更轻松地浏览和管理您的图像库?如果答案是肯定的,那么EdgeView 4 for Mac将是您的理想之选! EdgeView 4是一款专为Mac用户…...
的好处有哪些?)
流程自动化(RPA)的好处有哪些?
流程自动化(RPA)是一种通过软件机器人实现业务流程自动化的技术。它可以模拟人类在计算机上执行的操作,从而自动化重复性、繁琐的任务,提高工作效率和准确性。流程自动化(RPA)的好处很多,下面我…...

医学影像系统【简称PACS】源码
PACS(Picture Archiving and Comuniations Systems)即PACS,图像存储与传输系统,是应用于医院中管理医疗设备如CT,MR等产生的医学图像的信息系统。目标是支持在医院内部所有关于图像的活动,集成了医疗设备,图像存储和分…...

大家都在用哪些敏捷开发项目管理软件?
敏捷开发是一种以人为核心、迭代、循序渐进的开发方法。 敏捷开发的特点是高度灵活性和适应性、迭代式开发。 敏捷开发方法强调快速响应变化,因此它具有高度的灵活性和适应性。开发团队可以根据客户需求和市场变化快速调整开发计划和产品功能,以确保产品…...

python机器学习基础教程01-环境搭建
书籍源代码 github上源代码 https://github.com/amueller/introduction_to_ml_with_python 安装anaconda虚拟环境 创建虚拟环境 conda create -p E:\Python\envs\mlstupy35 python3.5 # 激活环境 conda activate E:\Python\envs\mlstupy35 # 创建学习目录 cd G:\Python\ml…...

TinyWebServer学习笔记-Config
为了弄清楚具体的业务逻辑,我们直接从主函数开始看源代码: #include "config.h"int main(int argc, char *argv[]) {//需要修改的数据库信息,登录名,密码,库名string user "root";string passwd "root";string databas…...

ARM生态产品创新评估:从芯片到系统的技术选型方法论
1. 从一次投票看ARM生态的演进与产品创新逻辑2015年秋天,EE Times上的一则投票通知,可能被很多人当作一次普通的行业活动而滑过。标题很简单——“Vote for Best ARM-Based Product”。但如果你恰好是一位嵌入式开发者、半导体行业的从业者,或…...
常见问题)
使用S32 Design Studio(S32DS)常见问题
S32DS常见问题如下:1. 编译器找不到ld文件工程路径不能有中文字符2. 编译器找不到make文件鼠标右键点击工程,在弹出菜单中点击 “Properties” 按钮,弹出属性对话框,点击 Tool Settings 选项卡,在左侧树状框中点击 C/C…...
)
别再手动画图了!用Python ASE + Matplotlib一键生成高质量材料结构图(附完整代码)
科研绘图革命:用Python ASEMatplotlib实现材料结构可视化自动化 深夜的实验室里,屏幕荧光映照着一张疲惫的脸——这可能是许多材料科学研究者共同的记忆。当你在论文截稿日前夕,还在反复调整VESTA中的原子位置、尝试各种角度截图时࿰…...

企业级AI助手框架:私有化部署、工具调用与RAG实战指南
1. 项目概述:一个面向企业级应用的开源AI助手框架最近在GitHub上闲逛,发现了一个挺有意思的项目,叫entaoai。第一眼看到这个仓库名,我下意识地觉得这可能又是一个基于某个大模型API的简单封装工具。但点进去仔细研究了一下源码和文…...
优化技术与实践)
半导体制造中的光学邻近校正(OPC)优化技术与实践
1. 光学邻近校正(OPC)在半导体制造中的关键作用在32nm以下节点的半导体制造中,光学邻近效应已成为制约光刻精度的首要瓶颈。当特征尺寸远小于曝光波长时(例如193nm光刻下的22nm节点),光线衍射会导致图案边缘…...

Angular 17与Firebase全栈实战:从零构建现代化Web应用
1. 项目概述:一个基于 Angular 17 的现代化 Web 应用最近接手并重构了一个名为 Ditectrev 的 Web 项目,它本质上是一个功能性的前端应用,旨在解决特定领域的信息展示与交互需求。这个项目最初由 Angular CLI 17.3.17 生成,但原始的…...

探索Windows上的安卓应用部署:APK Installer技术实践指南
探索Windows上的安卓应用部署:APK Installer技术实践指南 【免费下载链接】APK-Installer An Android Application Installer for Windows 项目地址: https://gitcode.com/GitHub_Trending/ap/APK-Installer 想在Windows电脑上直接运行安卓应用,却…...

网络安全协议验证不求人:手把手教你用VirtualBox导入SPAN虚拟机跑AVISPA
网络安全协议验证实战:VirtualBoxSPAN虚拟机快速搭建AVISPA实验环境 在网络安全研究领域,协议验证是确保通信安全性的关键环节。AVISPA(Automated Validation of Internet Security Protocols and Applications)作为自动化验证工…...

从零移植Debian到红米2:解锁MSM8916上的主线Linux手机体验
1. 为什么选择红米2作为Linux移植平台 红米2作为2015年发布的入门级智能手机,搭载高通骁龙410(MSM8916)平台,1GB内存8GB存储的配置在今天看来已经相当落伍。但正是这种"过时硬件"反而成为了极客们眼中的宝藏开发板。我选…...

Nexus Machine架构:边缘计算中稀疏矩阵处理的革新
1. 项目概述:Nexus Machine架构的创新价值在边缘计算和AI推理领域,稀疏矩阵计算(如SpMSpM、SpMV)和图形处理(如BFS、PageRank)等不规则工作负载正面临严峻的性能瓶颈。传统CGRA(Coarse-Grained …...