Adobe Premiere Pro:掌控视频剪辑的魔法之手,让你的创作腾飞!
🎉🎉欢迎来到我的CSDN主页!🎉🎉
🏅我是尘缘,一个在CSDN分享笔记的博主。📚📚
👉点击这里,就可以查看我的主页啦!👇👇
尘缘的个人主页
🎁如果感觉还不错的话请给我点赞吧!🎁🎁
💖期待你的加入,一起学习,一起进步!💖💖

目录
- 1 Adobe Premiere Pro 应用及教程
- 1.1 Premiere Pro Overview 概述
- 1.2 Learn the Basics 学习基础知识
- 1.3 Creative and Stylistic Edits 创意和风格编辑
- 2 Adobe Premiere Pro 2022 项目文件、素材文件组织方式
- 3 技巧
1 Adobe Premiere Pro 应用及教程
位置: 帮助 --> Premiere Pro 应用内教程
对应的工作区为: 窗口 --> 工作区 --> Learning (Alt+Shift+9)
对应的工作区文件为:C:\Program Files\Adobe\Adobe Premiere Pro 2022\XML\LEARNINGWORKSPACELAYOUT.xml
工程文件: C:\Users\Public\Documents\Adobe\Premiere Pro\22.0\Tutorial\Going Home project
1.1 Premiere Pro Overview 概述
Completely New? Start Here!
全新? 从这里开始!Premiere Pro Overview
Premiere Pro 概述A two-minute overview of the interface and the essentials needed to get started.
两分钟的界面概览和入门所需的基本知识。
-
Panels 面板
-
Project panel 项目
Import and organize the media assets you’ll use in your project.
导入和组织您将在项目中使用的媒体资产。
-
Source Monitor panel 源
Preview the clips you’ve imported before editing them.
在编辑之前预览您导入的剪辑。
-
Program Monitor panel 节目
Preview your project as you create it. 在创建项目时预览项目。
-
Timeline panel 时间线
Arrange and edit your clips to create your actual project.
排列和编辑您的剪辑以创建您的实际项目。
-
-
Adjust Panels 调整面板
Panels can be:
- Resized
- Undocked and moved around
- Grouped together within the same panel area
面板可以:
- 调整大小
- 取消停靠并四处移动
- 在同一个面板区域内组合在一起
1.2 Learn the Basics 学习基础知识
The Basics
基础知识Learn the Basics
学习基础知识Four interactive tutorials that cover each step of the vodeo editing process needed to create your first movie.
四个交互式教程,涵盖创建第一部电影所需的视频编辑过程的每个步骤。
-
Importing Media 导入媒体
-
The Final Product 最终产品
Before you begin, take a look at the project in its final state so you have a better idea of what you’ll create.
在开始之前,请查看项目的最终状态,以便更好地了解要创建的内容。
Press Play in the Program Monitor panel to preview what you’ll be making.
按“节目”面板中的“播放”预览您将制作的内容。
-
Importing Video Clips 导入视频剪辑
选择 Next 后,会弹出提示框,询问是否保存文件,选择否
The Project has been reset, and this is what premiere Pro looks like when you first open the application.
该项目已被重置,这就是您首次打开应用程序时 Premiere Pro 的外观。
The first step of any Premiere Pro project is to import the vodeo files you’ll be working with. These files are called clips.
任何 Premiere Pro 项目的第一步都是导入您将使用的视频文件。 这些文件称为剪辑。
Double-click in the center of the Project panel where it says “Import media to start”. This will launch an Explorer window.
双击“项目”面板中心的“导入媒体以开始”。 这将启动一个资源管理器窗口。
Select any three files and click Open/Import.
选择任意三个文件并单击打开/导入。
-
Previewing Clips 预览剪辑
Before you start putting your video together, you’ll want to use the Source Monitor panel to review the clips you’ve imported to find the right parts to use.
在开始将视频放在一起之前,您需要使用“源”面板查看已导入的剪辑,以找到要使用的正确部分。
Double-click on any of the clips in the Project panel.
双击“项目”面板中的任何剪辑。
-
-
Preparing Your Clips for Editing 准备剪辑进行编辑
-
Adding Clips to the Timeline Panel 将剪辑添加到时间轴面板
You’ve imported the clips, but you can’t edit them until you’ve put them into the Timeline panel.
您已导入剪辑,但在将它们放入“时间轴”面板之前无法对其进行编辑。
Select Clips 1,2, and 3 in the Project panel by holding down CONTROL and clicking each one.
通过按住 CONTROL 并单击每一个,在“项目”面板中选择剪辑 1、2 和 3。
Drag and drop the files from the Project panel to the Timeline panel (on to the area marked “Drop media here to create sequence”)
将文件从“项目”面板拖放到“时间线”面板(到标记为“将媒体拖放到此处以创建序列”的区域)
-
Vodeo and Audio Tracks 视频和音频轨道
Your clips now are sitting in your sequence on the Timeline panel in horizontal areas called tracks. Tracks hold the vodeo and audio files you edit in your sequence. Your sequence currently contains two tracks, a video track(V1) and an audio track (A1).
您的剪辑现在位于时间线面板上称为轨道的水平区域中的序列中。 轨道保存您在序列中编辑的视频和音频文件。 您的序列当前包含两个轨道,一个视频轨道 (V1) 和一个音频轨道 (A1)。
You’ll spend a lot of time editing your clips, so it’s very important to understand how to navigate to your clips in the Timeline tracks.
您将花费大量时间编辑剪辑,因此了解如何导航到时间轴轨道中的剪辑非常重要。
Click on the Timeline panel to make it your active panel and use the = and - keys to zoom in and out of the tracks.
单击“时间线”面板使其成为活动面板并使用 = 和 - 键放大和缩小轨道。
Use the CONTROL + =/- keys to make the size of the tracks bigger or smaller.
使用 CONTROL + =/- 键使轨道的大小变大或变小。
-
-
Editing Your Clips 编辑你的剪辑
-
Moving Around the Sequence 在序列中移动
For this tutorial, note that we’ve added a music file to the A1 track for you.
对于本教程,请注意我们已为您将音乐文件添加到 A1 曲目。
Before you start editing, you’ll need to go through the sequence and identify where you’d like to make changes. The fastest way to move around the sequence and review your clips is using the playhead (the vertical blue line in the Timeline panel).
在开始编辑之前,您需要检查序列并确定要进行更改的位置。 在序列中移动和查看剪辑的最快方法是使用播放头(时间线面板中的垂直蓝线)。
Press the SPACEBAR to start playing the sequence.
按空格键开始播放序列。
Press the SPACEBAR again to stop playing the sequence.
再次按空格键停止播放序列。
FOr faster navigation, click and drag the playhead across the Timeline panel to find the part of your sequence you’re looking for.
为了更快地导航,单击并在时间线面板上拖动播放头以找到您正在寻找的序列部分。
Use the gray scroll bar at the bottom of the Timeline panel to scroll through your seqauence.
使用“时间线”面板底部的灰色滚动条滚动您的序列。
-
Moving Clips 移动剪辑
After reviewing your sequence, let’s say you think your movie would look better if you swapped Clip 2 and Clip 3.
在查看您的序列后,假设您认为如果交换剪辑 2 和剪辑 3,您的电影会更好看。
While holding down CONTROL click and drag Clip 3 over Clip 2, until the beginning of Clip 3 snaps in place over the beginning of Clip 2, then release the mouse.
在按住 CONTROL 的同时单击并将剪辑 3 拖到剪辑 2 上,直到剪辑 3 的开头与剪辑 2 的开头对齐,然后松开鼠标。
-
Trimming Clips 修剪剪辑
The clips have been reset to the correct order from the last step to help you follow along.
剪辑已从最后一步重置为正确的顺序,以帮助您跟进。
Another common reason to edit your cliops is because they’re too long. What if you need your movie to be only 15 seconds long? You can use trimming to shorten the length of a clip.
编辑剪辑的另一个常见原因是它们太长了。 如果你需要你的电影只有 15 秒长怎么办? 您可以使用修剪来缩短剪辑的长度。
Move you cursor to eh end of Clip 2 until it changes from a black arrow to a red, left-facing trimming icon.
将光标移动到剪辑 2 的末端,直到它从黑色箭头变为红色的朝左修剪图标。
Click and drag your cursor slowly until the end of the clip reaches the playhead(currently at the 15 second mark).
单击并缓慢拖动光标,直到剪辑的末尾到达播放头(当前位于 15 秒标记处)。
-
Editing Practice 编辑练习
In this next section, you have the opportunity to reinforce your learning by trying a short editing challenge, similar to the example you just saw in the previous step.
在下一部分中,您有机会通过尝试一个简短的编辑挑战来加强您的学习,类似于您在上一步中看到的示例。
Click Next to continue to the challenge.
单击下一步继续挑战。
-
Edit Challenge 编辑挑战
Your overall video is still longer than 15 seconds because the audio track is much longer than the video track.
您的整个视频仍然超过 15 秒,因为音频轨道比视频轨道长得多。
See if you can shorten the length of the audio track to match the video track. Use the hints below if you get stuck.
看看您是否可以缩短音轨的长度以匹配视频轨道。 如果您遇到困难,请使用以下提示。
-
-
Exporting Your Project Content 导出您的项目内容
-
Exporting Your Work 导出你的工作
In this tutorial, you’ll export your short movie using some basic HD settings you might use for uploading your video to social media.
在本教程中,您将使用一些可能用于将视频上传到社交媒体的基本高清设置导出短片。
Click on the Timeline panel and then press CONTROL + M to open the Export Settings dialog box.
单击“时间线”面板,然后按 CONTROL + M 打开“导出设置”对话框。
Don’t worry about all the different setting options.
不要担心所有不同的设置选项。
On the right, under Export Settings, change the Format option to H.264.
在右侧的导出设置下,将格式选项更改为 H.264。
Under the format oiption, change the Preset option to Match Source - Medium Bitrate.
在格式选项下,将预设选项更改为匹配源 - 中等比特率。
Click on the blue file name next to the Output Name option and rename your file to something relevant.
单击“输出名称”选项旁边的蓝色文件名,然后将文件重命名为相关的名称。
Click Export.
单击导出。
-
1.3 Creative and Stylistic Edits 创意和风格编辑
In this tutorial series, you'll add stylistic and creative edits to the video created in the previous tutorial series.
在本教程系列中,您将为在上一教程系列中创建的视频添加风格和创意编辑。These tutorials are meant to be interactive, so follow along for maximum learning.
这些教程是交互式的,因此请继续学习以获得最大程度的学习。Skills and Projects
技能和项目Creative and Stylistic Edits
创意和风格编辑Five interacitive tutorials that teach the basics of adjusting clip speed, adding titles and transitions, adjusting audio, and color correction.
五个交互式教程,教授调整剪辑速度、添加标题和过渡、调整音频和色彩校正的基础知识。
-
Changing the Speed of Clips 改变剪辑的速度
-
The Final Product 最终产品
Before you begin, take a look at the project in its final state so you have a better idea of what you’ll create.
在开始之前,请查看项目的最终状态,以便更好地了解要创建的内容。
Press Play in the Program Monitor panel to preview the video.
按节目监视器面板中的播放以预览视频。
-
Creating Slow Motion 制作慢动作
The project has been reset to how it looked at the end of the last tutorial series.
该项目已重置为上一个教程系列结束时的样子。
One of the most popular creative edits is changing the speed of your clips to create a slow-motion effect.
最受欢迎的创意编辑之一是更改剪辑的速度以创建慢动作效果。
Let’s say you want to slow down Clip 3 to match the speed of the other clips.
假设您想减慢剪辑 3 的速度以匹配其他剪辑的速度。
Right-click on Clip 3 and select Speed/Duration in the options menu.
右键单击剪辑 3,然后在选项菜单中选择速度/持续时间。
In the Speed/Duration settings, first change the Speed to 50% then click on the Ripple Edit, Shift Trailing Clips option and click OK.
在速度/持续时间设置中,首先将速度更改为 50%,然后单击波纹编辑、移动尾随剪辑选项并单击确定。
-
Adjusting Speed Practice 调整速度练习
In this next section, you have the opportunity to reinforce your learning by trying a short speed adjustment challenge, similar to the example you just saw in the previous steps.
在下一部分中,您将有机会通过尝试短速度调整挑战来加强您的学习,类似于您在前面步骤中看到的示例。
-
Practice 实践
The same setting used to slow down a clip can be used to speed it up.
用于减慢剪辑的相同设置可用于加快剪辑速度。
Try to use the Speed/Duration setting to return Clip 3 to its original speed. Use the hints below if you need help.
尝试使用速度/持续时间设置将剪辑 3 恢复到其原始速度。 如果您需要帮助,请使用以下提示。
-
-
Adding Titles 添加标题
-
The Essential Graphics Panel 基本图形面板
One of the most common ways to enhance your movie is by adding titles to help tell your story. You can use titles to create opening and closing credits, or introduce unkonwn people and placess.
增强电影效果的最常见方法之一是添加标题来帮助讲述您的故事。 您可以使用标题来创建开场和结束演职员表,或介绍未知的人和地点。
In this tutorial, you’ll use the Essential Graphics panel to add an opening title to your project.
在本教程中,您将使用基本图形面板为您的项目添加一个开头标题。
In the application menu, click on Window > Essential Graphics.
在应用程序菜单中,单击 窗口 > 基本图形。
-
Adding a Title to the Sequence 为序列添加标题
Let’s say you want to add an opening title to the beginning of your sequence, like in the movies. (Title graphics are represented as magenta rectangles in the Timeline panel).
假设您想在序列的开头添加一个开场标题,就像在电影中一样。 (标题图形在“时间轴”面板中表示为洋红色矩形)。
Enter the word “Title” in the panel’s search bar and press ENTER
在面板的搜索栏中输入单词“Title”,然后按 ENTER
Find the title named, “basic Title”
找到名为“基本标题”的标题
Using the animated graphic above as a reference, hold down CONTROL and click and drag the title icon to the beginning of the sequence until its magenta clip snaps in place at the beginning of the V1 track.
使用上面的动画图形作为参考,按住 CONTROL 并单击标题图标并将其拖动到序列的开头,直到其洋红色剪辑卡在 V1 轨道的开头。
注意:如果提示 Adobe “解析字体 SourchHanSansCN-Regular” 的错误。是缺少字体。在网上搜索 SourchHanSansCN-Regular 思源黑体 CN 字体文件后将字体文件复制到 C:\WINDOWS\Fonts
Bgngee
VoxRound -
Editing a Title 编辑标题
You can edit almost any property of a title, from its color and font size to its position on the screen.
您几乎可以编辑标题的任何属性,从颜色和字体大小到它在屏幕上的位置。
Make sure the playhead is positioned over the title clip so you can see “Your Title Here” in the Program Monitor panel
确保播放头位于标题剪辑上方,以便您可以在节目监视器面板中看到“Your Title Here”
To open the title’s property settings, click on the “Your Title Here” text in the Program Monitor panel.
要打开标题的属性设置,请单击“节目监视器”面板中的“Your Title Here”文本。
-
Adding Titles on Top of Clips 在剪辑顶部添加标题
Move the playhead to the beginning of Clip 1 in the V1 track.
将播放头移动到 V1 轨道中 剪辑 1 的开头。
In the Browse tab of the Essential Graphics panel, type “Lower Third” into the search bar and press ENTER
在“基本图形”面板的“浏览”选项卡中,在搜索栏中键入“基本下方三分之一”,然后按 回车
Find the title name, “Basic Lower Third”.
找到标题名称“基本下方三分之一”。
Using the animated graphic above as a reference, click and drag the title on to the V2 track, and drop it directly above the beginning of Clip 1.
使用上面的动画图形作为参考,单击标题并将其拖到 V2 轨道上,然后将其直接放在 Clip 1 的开头上方。
-
-
Adding Transitions to Clips 给剪辑添加转场
-
Transitions and the Effects Panel 过渡和效果面板
A transition moves a scene from one clip to the next. The most common transition is the cut, when one clip simply ends and another begins. But other transitions can help add elements of storytelling, like dissolving between clips to show the passage of time.
过渡将场景从一个剪辑移动到下一个剪辑。 最常见的过渡是剪辑,当一个剪辑简单地结束而另一个剪辑开始时。 但是其他过渡可以帮助添加讲故事的元素,例如在剪辑之间溶解以显示时间的流逝。
In this tutorial, you’ll add some basic transitions to your sequence using the Effects panel
在本教程中,您将使用“效果”面板向序列添加一些基本过渡
In the application menu, click on Window > Effects
在应用程序菜单中,单击窗口 > 效果
-
Adding a Cross Dissolve 添加交叉溶解
You can add a transition at the beginning or the end of a single clip, or between two clips. Let’s add a fade, also known as a Cross Dissolve, between Clip 1 and Clip 3.
您可以在单个剪辑的开头或结尾或两个剪辑之间添加转场。 让我们在 剪辑 1 和 剪辑 3 之间添加一个淡入淡出,也称为 交叉溶解。
In the search bar, type “Cross Dissolve”
在搜索栏中,输入“交叉溶解”
Click and drag the Cross Dissolve effect on the V1 track until its yellow outline covers both the end of Clip 1 and the beginning of Clip 3, then drop it in place.
单击并拖动 V1 轨道上的 Cross Dissolve 效果,直到其黄色轮廓覆盖 Clip 1 的结尾和 Clip 3 的开头,然后将其放置到位。
-
Transitions Practice 过渡练习
In this next section, you have the opportunity to reinforce your learning by trying a short transitions challenge, similar to the example you just saw in the previous steps.
在下一部分中,您有机会通过尝试一个简短的转换挑战来加强您的学习,类似于您在前面的步骤中看到的示例。
-
Practice with Transitions 过渡练习
Transitions can also be applied to titles. See if you can use what you’ve learned about transitions and change the titles so that they fade in and out of the sequence. Use the hints elow if you ge stuck.
过渡也可以应用于标题。 看看你是否可以使用你所学到的关于过渡的知识并更改标题,以便它们淡入和淡出序列。 如果您遇到困难,请使用以下提示。
-
-
Working with Audio 使用音频
-
Adjusting Clip Volume 调整剪辑音量
The difference between a professional film and an amateur video is often the audio. Having the right audio levels is critical for a sucessful project.
专业电影和业余视频之间的区别通常在于音频。 拥有正确的音频电平对于成功的项目至关重要。
An extra voiceover audio track has been added to the project for this tutorial. If you play the sequence. you’ll notice that the background music in A1 is too loud for the voiceover in A2.
本教程的项目中添加了一个额外的画外音音轨。 如果你播放序列。 您会注意到 A1 中的背景音乐对于 A2 中的画外音来说太大声了。
In the A1 audio track of the Timeline panel, find the horizontal. white line that divides the green audio clip into two identical halves.
在 时间线 面板的 A1 音轨中,找到水平线。 白线将绿色音频剪辑分成相同的两半。
Click on the white line and drag it downwards, to around -6 dB.
单击白线并将其向下拖动到 -6 dB 左右。
-
Fading Audio 音乐渐弱
Right now the music ends abruptly. Let’s say you want to gradually fade the music out instead.
现在音乐突然结束了。 假设您想要逐渐淡出音乐。
Open the Effects panel by going to Window > Effects and delete any text currently in the search bar.
通过转到 窗口 > 效果 打开效果面板并删除当前在搜索栏中的所有文本。
Open Audio Transitions > Crossfade and select Exponential Fade
打开 音频过度 > 交叉淡化 并选择 指数淡化
Drag and drop the Exponential Fade effect on to the end of the background music clip in the A1 track.
将指数渐变效果拖放到 A1 轨道中背景音乐剪辑的末尾。
-
-
Adjusting the Color of Clips 调整剪辑的颜色
-
The Lumetri Color Panel Lumetri颜色面板
Color correction is the process of adjusting your clips until the colors look as close as possible to how the human eye sees them.
颜色校正是调整剪辑的过程,直到颜色看起来尽可能接近人眼看到的颜色。
The easiest way to improve the look of your clips in Premiere Pro is to use the Lumetri Color panel.
在 Premiere Pro 中改善剪辑外观的最简单方法是使用 Lumetri颜色面板。
I the application menu, click on Window > Lumetri Color.
在应用程序菜单中,单击 窗口 > Lumetri 颜色。
-
Adjusting White Balance 调整白平衡
There seems to be a blue tint to Clip 3. You can fix this by adjusting the white balance of the clip.
剪辑 3 似乎有蓝色调。您可以通过调整剪辑的白平衡来解决此问题。
In the V1 track of the Timeline panel, click on Clip 3 to select it, and move the playhead over it so you can see the clip in the Program Monitor.
在 时间线 面板的 V1 轨道中,单击 剪辑 3 将其选中,然后将播放头移到它上面,这样您就可以在节目监视器中看到该剪辑。
In the Lumetri Color panel, click on the Basic Correction section to expand the options.
在 Lumetri 颜色面板中,单击基本校正部分以展开选项。
Click on the Eye Dropper icon next to the WB Selector, and then in the Program Monitor panel, click on the white clouds.
单击 白平衡选择器旁边的滴管图标,然后在节目监视器面板中,单击白云。
-
Creativity with Color 创意与色彩
The style and look of this movie is completely up to you. Get creative and use the different settings of Lumetri Color panel to adjust the look and feel of the clips.
这部电影的风格和外观完全取决于您。 发挥创意并使用 Lumetri 颜色面板的不同设置来调整剪辑的外观。
Things to consider trying:
要考虑尝试的事情:
Adjust each of the basic settings to see how they change different aspects of the clip.
调整每个 基本校正 以查看它们如何更改剪辑的不同方面。
Explore fifferent “Looks” under the Creative settings.
在 创意 设置下探索不同的“Look”。
Create color casts under Color Wheels & Match.
在 色轮和匹配 设置下创建色偏。
-
Adobe Premiere Pro 学习和支持
Premiere Pro 教程
2 Adobe Premiere Pro 2022 项目文件、素材文件组织方式
20220511_AdobePremierePro2022Overview01 FOOTAGE02 AUDIOVOICEOVERH4NMUSICSFX03 SEQUENCES04 GRAPHICS20220511_AdobePremierePro2022Overview01 FOOTAGE02 AUDIOVOICEOVERH4NMUSICSFX03 GRAPHICS04 MUSIC05 PHOTOS06 DOCUMENTS07 PREMIERE08 AE09 EXPORTS
3 技巧
- PR导出的视频不完整怎么办?
- 遇到这种情况,点击pr,打开项目,点击素材库上的序列。(或已经剪辑的视频选要导出的)
- 选择了,点击 标记 > 清除出点入点。
- 鼠标、键盘点击工具 PointerFocus
- Registration code: 10325357x215372
- 截屏工具 Snipaste
- F1 截屏
- F3 贴图
- 屏幕放大、缩小工具 ZoomIt
- 使用快捷键 CTRL+4 来 开启/关闭 LiveZoom 模式
- 在LiveZoom 模式下,使用 CTRL+UP, CTRL+DOWN 来放大、缩小显示区域
- 第一字体

💖如果觉得有用的话还请点个赞吧 💖
相关文章:
Adobe Premiere Pro:掌控视频剪辑的魔法之手,让你的创作腾飞!
🎉🎉欢迎来到我的CSDN主页!🎉🎉 🏅我是尘缘,一个在CSDN分享笔记的博主。📚📚 👉点击这里,就可以查看我的主页啦!👇&#x…...
ES知识点全面整理
● 我们从很多年前就知道 ES6, 也就是官方发布的 ES2015 ● 从 2015 年开始, 官方觉得大家命名太乱了, 所以决定以年份命名 ● 但是大家还是习惯了叫做 ES6, 不过这不重要 ● 重要的是, ES6 关注的人非常多, 大家也会主动去关注 ● 但是从 2016 年以后, 每年官方都会出现新…...

【电商API封装接口】电商百万商品资源一键导入,助力企业流量变现
电商API接口是淘宝开放平台提供的一组数据接口,供开发者使用来获取淘宝平台上商品、店铺、订单等相关信息。根据功能和分类,淘宝API主要包括以下几个方面: 1. 商品API:提供了搜索、详情、评价等与商品相关的接口,可以…...

bootz启动 Linux内核过程中涉及的全局变量images
一. bootz启动Linux uboot 启动Linux内核使用bootz命令。当然还有其它的启动命令,例如,bootm命令等等。 本文只分析 bootz命令启动 Linux内核的过程。 本文具体分析 bootz启动 Linux内核过程涉及的一个重要的全局变量 images。 二. bootz 启动 Linux…...
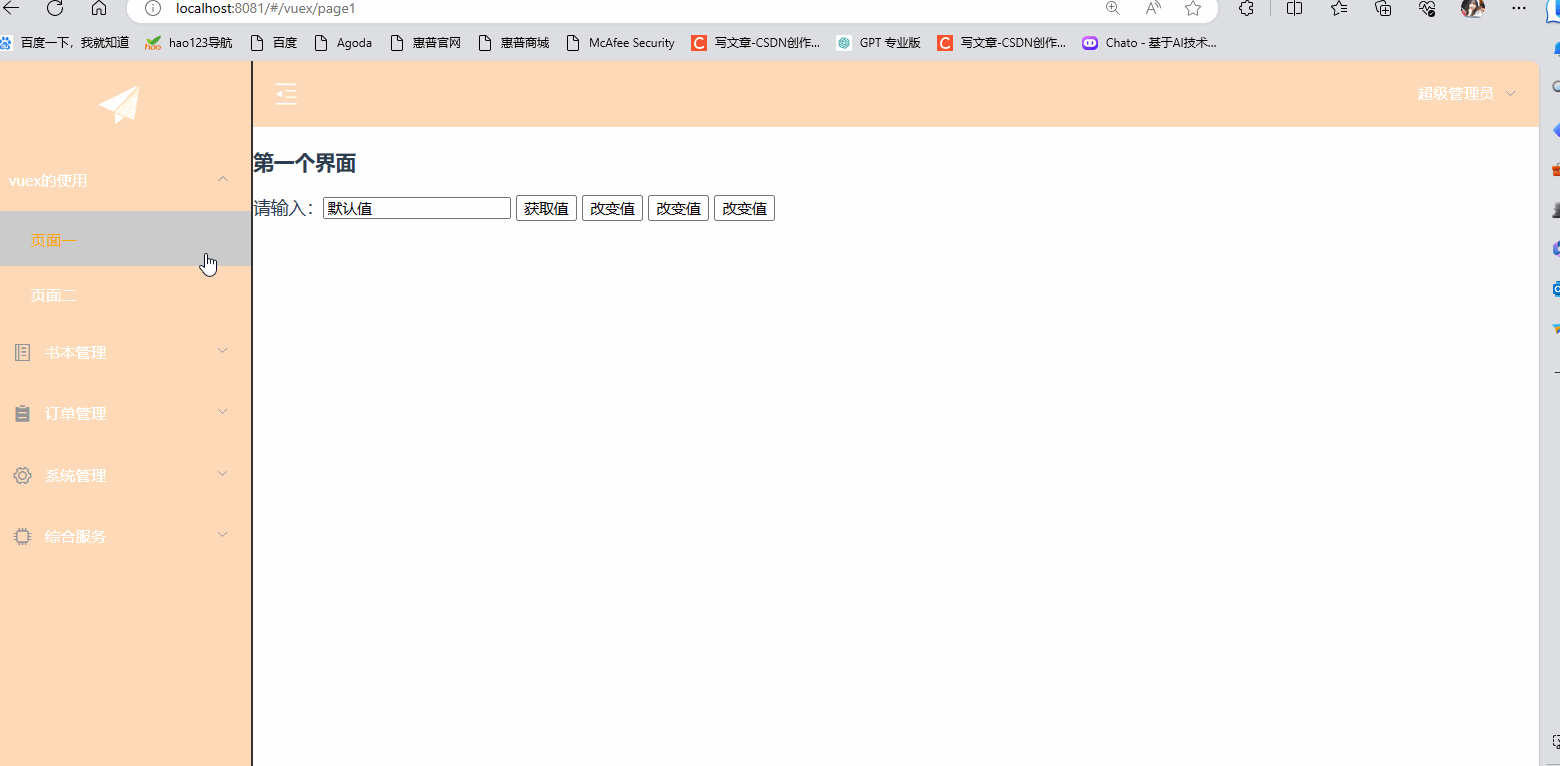
Vuex的使用,详细易懂
目录 一.前言 二.Vuex的简介 三.vuex的使用 3.1 安装Vuex 3.2 使用Vuex的步骤: 四.vuex的存值取值(改变值) 五.vuex的异步请求 好啦,今天的分享就到这啦!!! 一.前言 今天我们继续前面的E…...
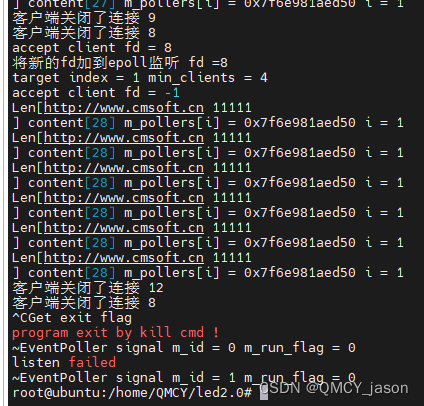
基于多线程的Reactor模式的 回声服务器 EchoServer
记录下 一个线程专门用来接受accept获取客户端的fd 获取fd之后 从剩余的执行线程中 找到一个连接客户端数量最少的线程 然后将客户端的fd加入到这个线程中并通过EPOLL监听这个fd 线程之间通过eventfd来通信 将客户端的fd传到 对应的线程中 参考了MediaServer 引入…...

《TWS蓝牙耳机通信原理与接口技术》
+他V hezkz17进数字音频系统研究开发交流答疑群(课题组) 耳机BT与手机BT通信 主耳与从耳通信 耳机BLE盒手机BLE通信 充电盒与耳机通信 上位机与耳机通信 上位机与充电盒通信 1 耳机BT与手机BT通信 传输音频数据传递控制信息 (3) 耳机BLE与手机BLE通信 安卓/苹果app-耳机…...
敏捷开发使用
1.敏捷开发 敏捷开发以用户的需求进化为核心,采用迭代、循序渐进的方法进行软件开发。在敏捷开发中,软件项目在构建初期被切分成多个子项目,各个子项目的成果都经过测试,具备可视、可集成和可运行使用的特征。换言之,就…...
cdsn目录处理:```,```# 目录校正
原标题 <small> cdsn目录处理: ,中间添加 # 空格 空行后 遇到的底部空行出错,书接上回,处理空行【python查找替换:查找空行,空行前后添加,中间添加 # 空格 空行后遇到的第1行文字&am…...
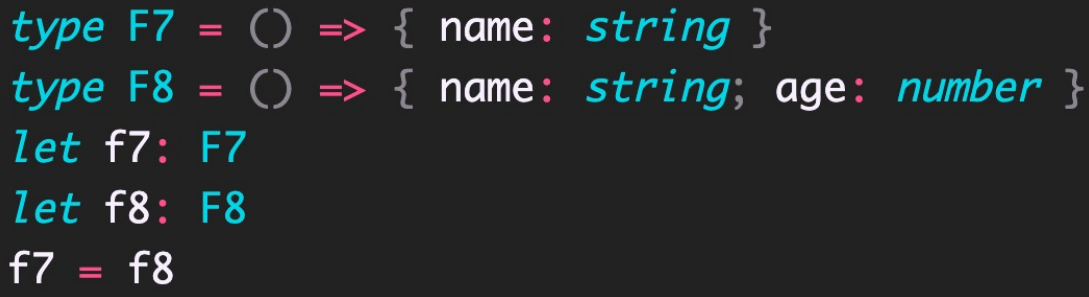
前端TypeScript学习day03-TS高级类型
(创作不易,感谢有你,你的支持,就是我前行的最大动力,如果看完对你有帮助,请留下您的足迹) 目录 TypeScript 高级类型 class 类 class继承 extends implements 类成员可见性 public protected …...

LeetCode-101-对称二叉树
题目描述: 给你一个二叉树的根节点 root , 检查它是否轴对称。 题目链接:LeetCode-101-对称二叉树 解题思路:判断2个二叉树是否可以相互翻转,考察同时处理2个二叉树的遍历情况。 代码实现: class Solution …...

9-AJAX-上-原理详解
一、定义 1、什么是Ajax Ajax:即异步 JavaScript 和XML。Ajax是一种用于创建快速动态网页的技术。通过在后台与进行少量数据交换,Ajax可以使网页实现异步更新。这意味着可以在不重新加载整个网页的情况下,对网页的某部分进行更新。而传统的…...
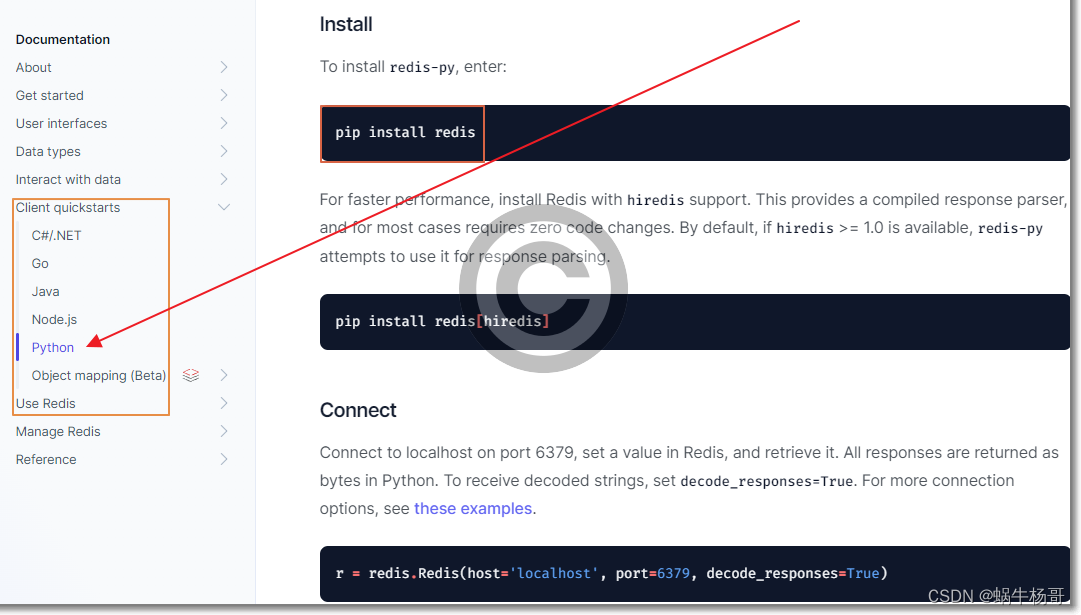
Python3操作Redis最新版|CRUD基本操作(保姆级)
Python3中类的高级语法及实战 Python3(基础|高级)语法实战(|多线程|多进程|线程池|进程池技术)|多线程安全问题解决方案 Python3数据科学包系列(一):数据分析实战 Python3数据科学包系列(二):数据分析实战 Python3数据科学包系列(三):数据分析实战 Win11查看安装的Python路…...

微信又被吐槽了,委屈啊
昨天的时候,一打开微博热搜榜,一看,微信又被吐槽了,微信占用存储这件事几乎年年会被骂,几乎也会年年被吐槽。 这次的起因呢,是一个人整理了一个方法:「微信内存从 126G 清理到 75G 我是怎么做到…...

刷题笔记27——并查集
很长一段时间,我的生活看似马上就要开始了。但是总有一些障碍阻挡着,有些事得先解决,有些工作还有待完成,时间貌似不够用,还有一笔债务8要去付清,然后生活就会开始。最后我终于明白,这些障碍&am…...

Python 模拟类属性
文章目录 模拟类属性的原因模拟类属性的可能解决方案使用 PropertyMock 模拟类属性在不使用 PropertyMock 的情况下模拟类属性Python 模拟类构造函数使用 patch.object 装饰器来修补构造函数本文的主要目的是介绍如何使用 python 单元测试模块 unittest 操作类属性以进行测试和…...
面试算法24:反转链表
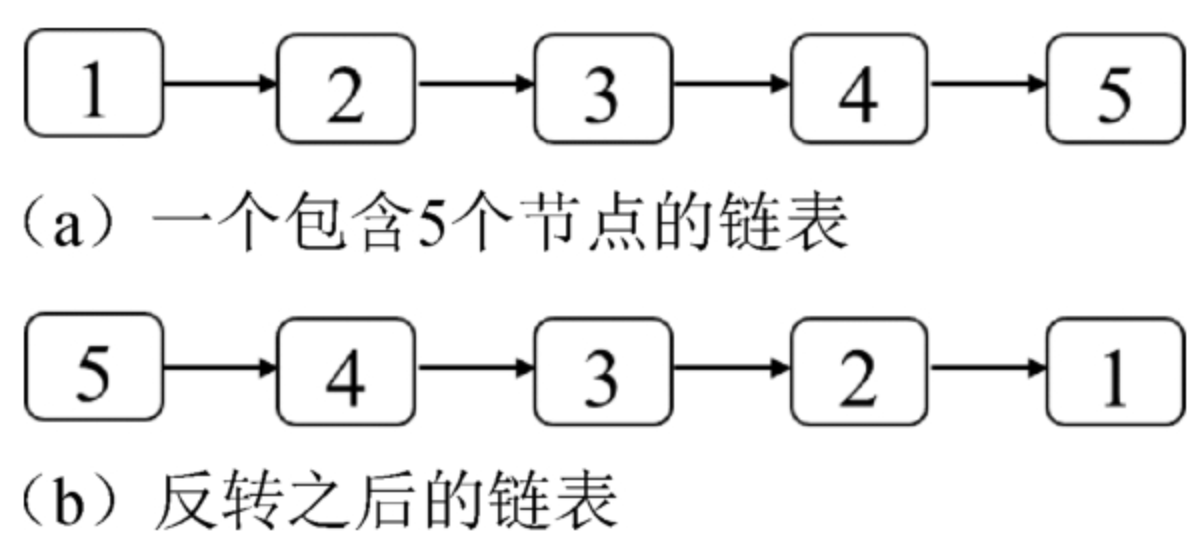
题目 定义一个函数,输入一个链表的头节点,反转该链表并输出反转后链表的头节点。例如,把图4.8(a)中的链表反转之后得到的链表如图4.8(b)所示。 分析 由于节点j的next指针指向了它的前一个节…...
【论文阅读】面向抽取和理解基于Transformer的自动作文评分模型的隐式评价标准(实验结果部分)
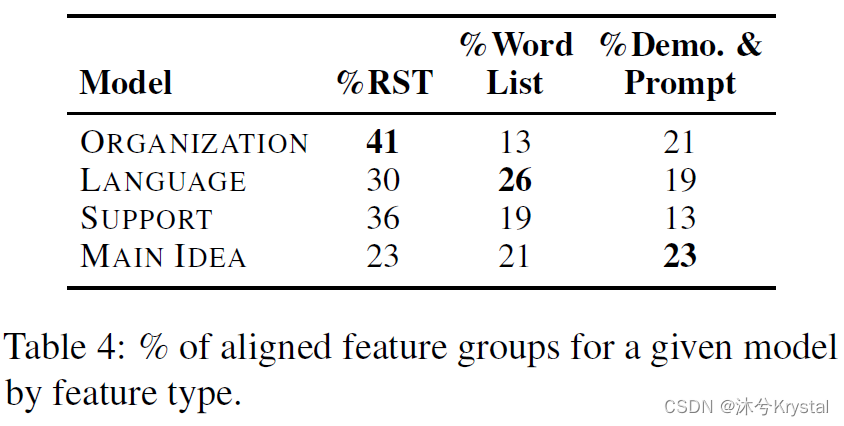
方法 结果 在这一部分,我们展示对于每个模型比较的聚合的统计分析当涉及到计算特征和独立的特征组(表格1),抽取功能组和对齐重要功能组(表格2),并且最后,我们提供从模型比较&#x…...
VueRouter与expres/koa中间件的关联
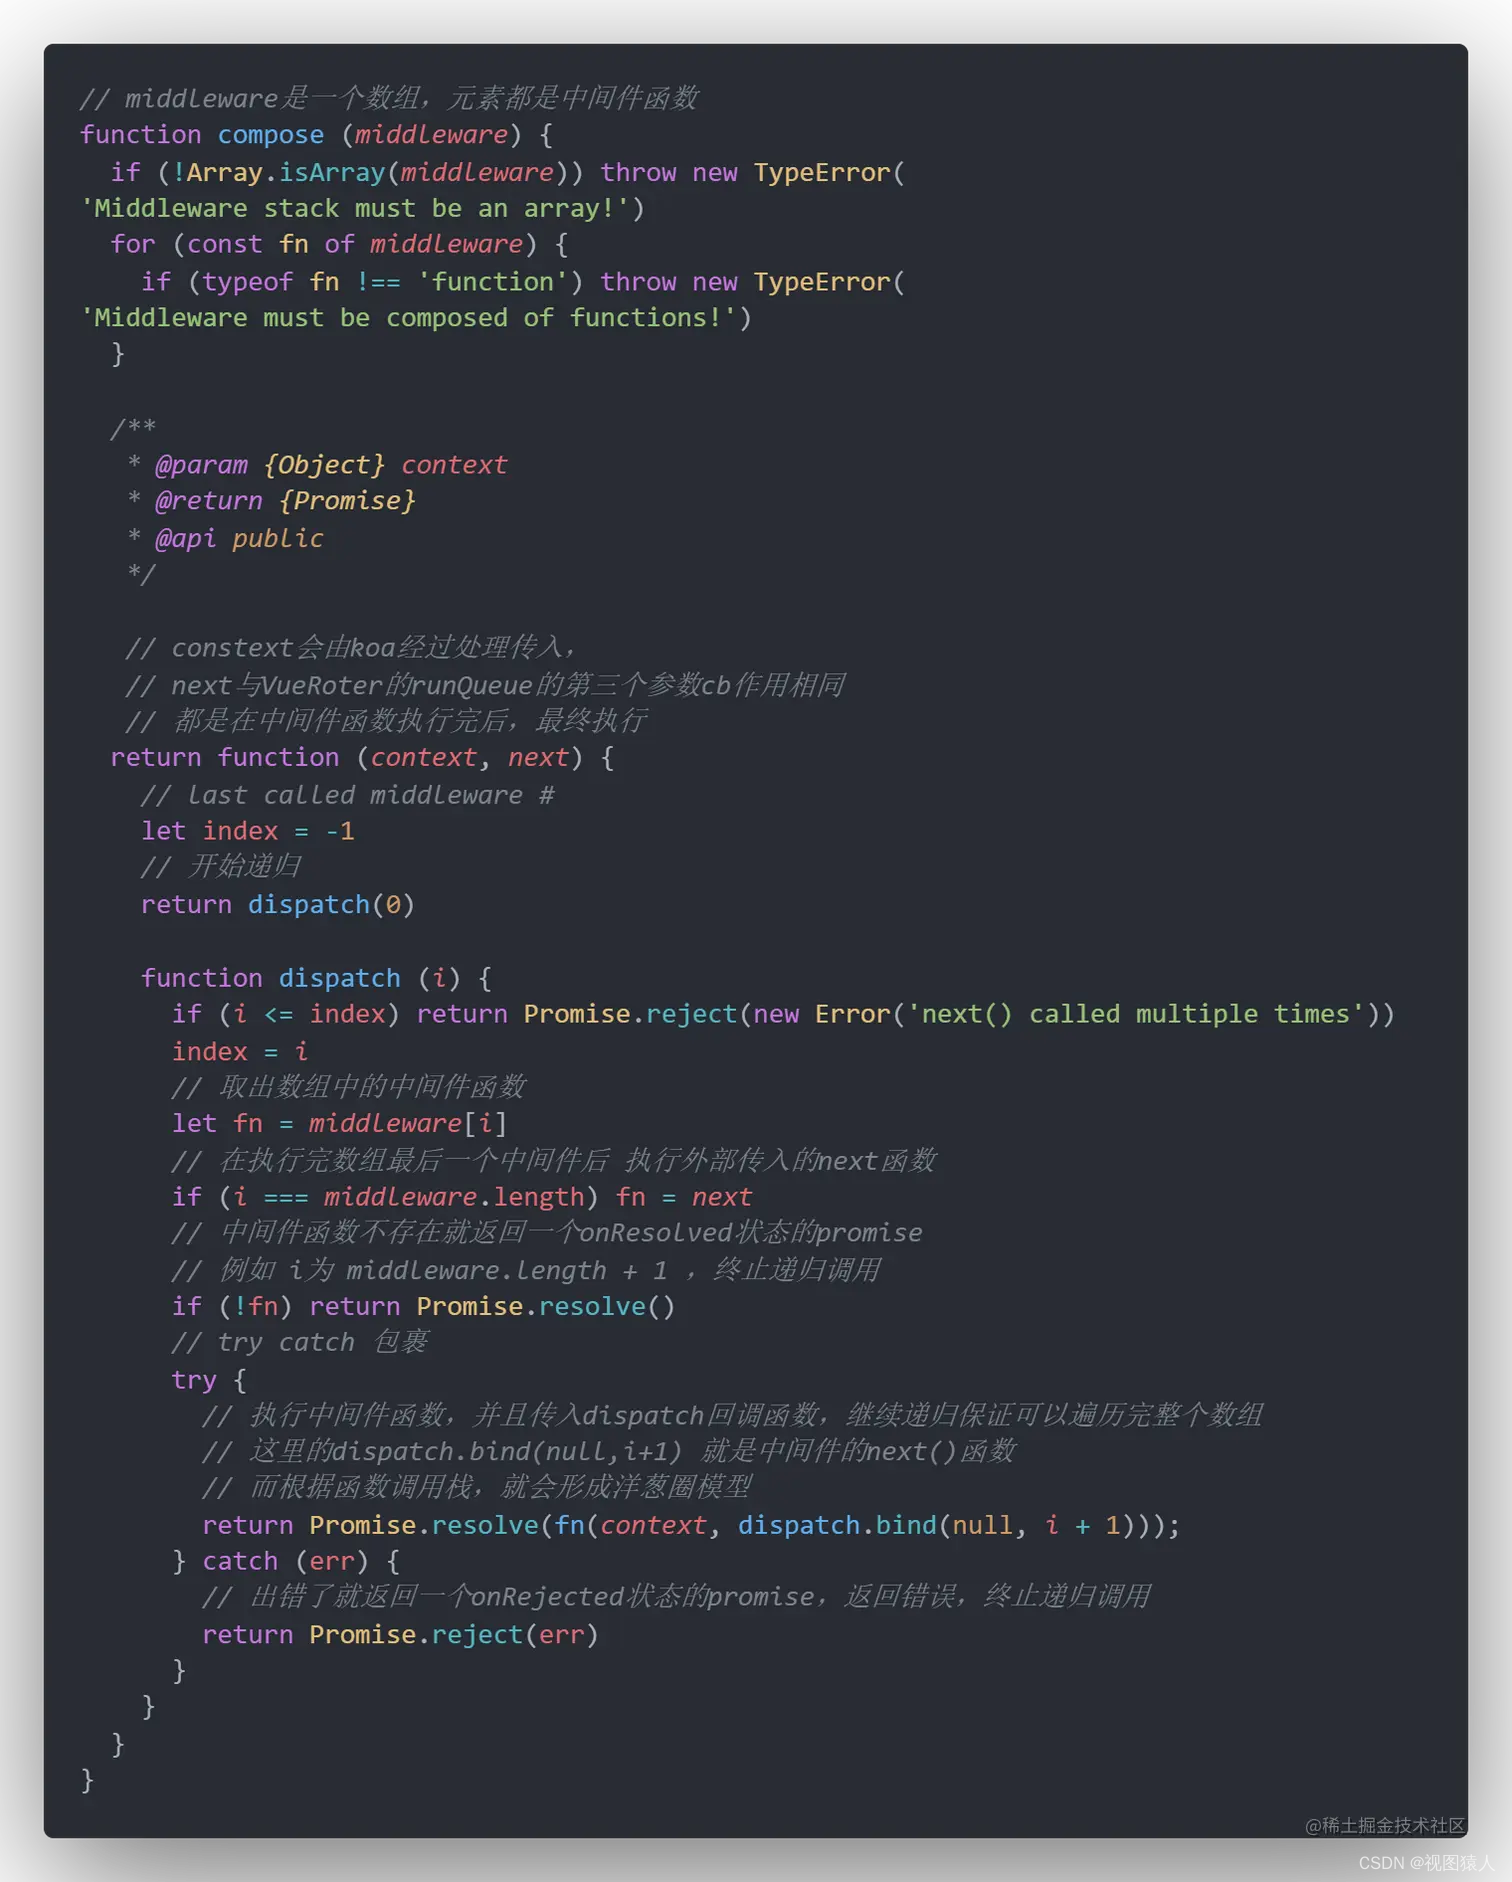
ueRouter: runQueue 路由守卫都是有三个参数to,from,next。其中next就是下方的fn执行时候传入的第二个参数(回调函数),只有该回调执行后才会挨个遍历queue内的守卫。 中间件的作用 隔离基础设施与业务逻辑之间的细节。详细的内容位于《深入浅出Node.js》P210 另外一…...
二十、SpringCloud Alibaba Seata处理分布式事务
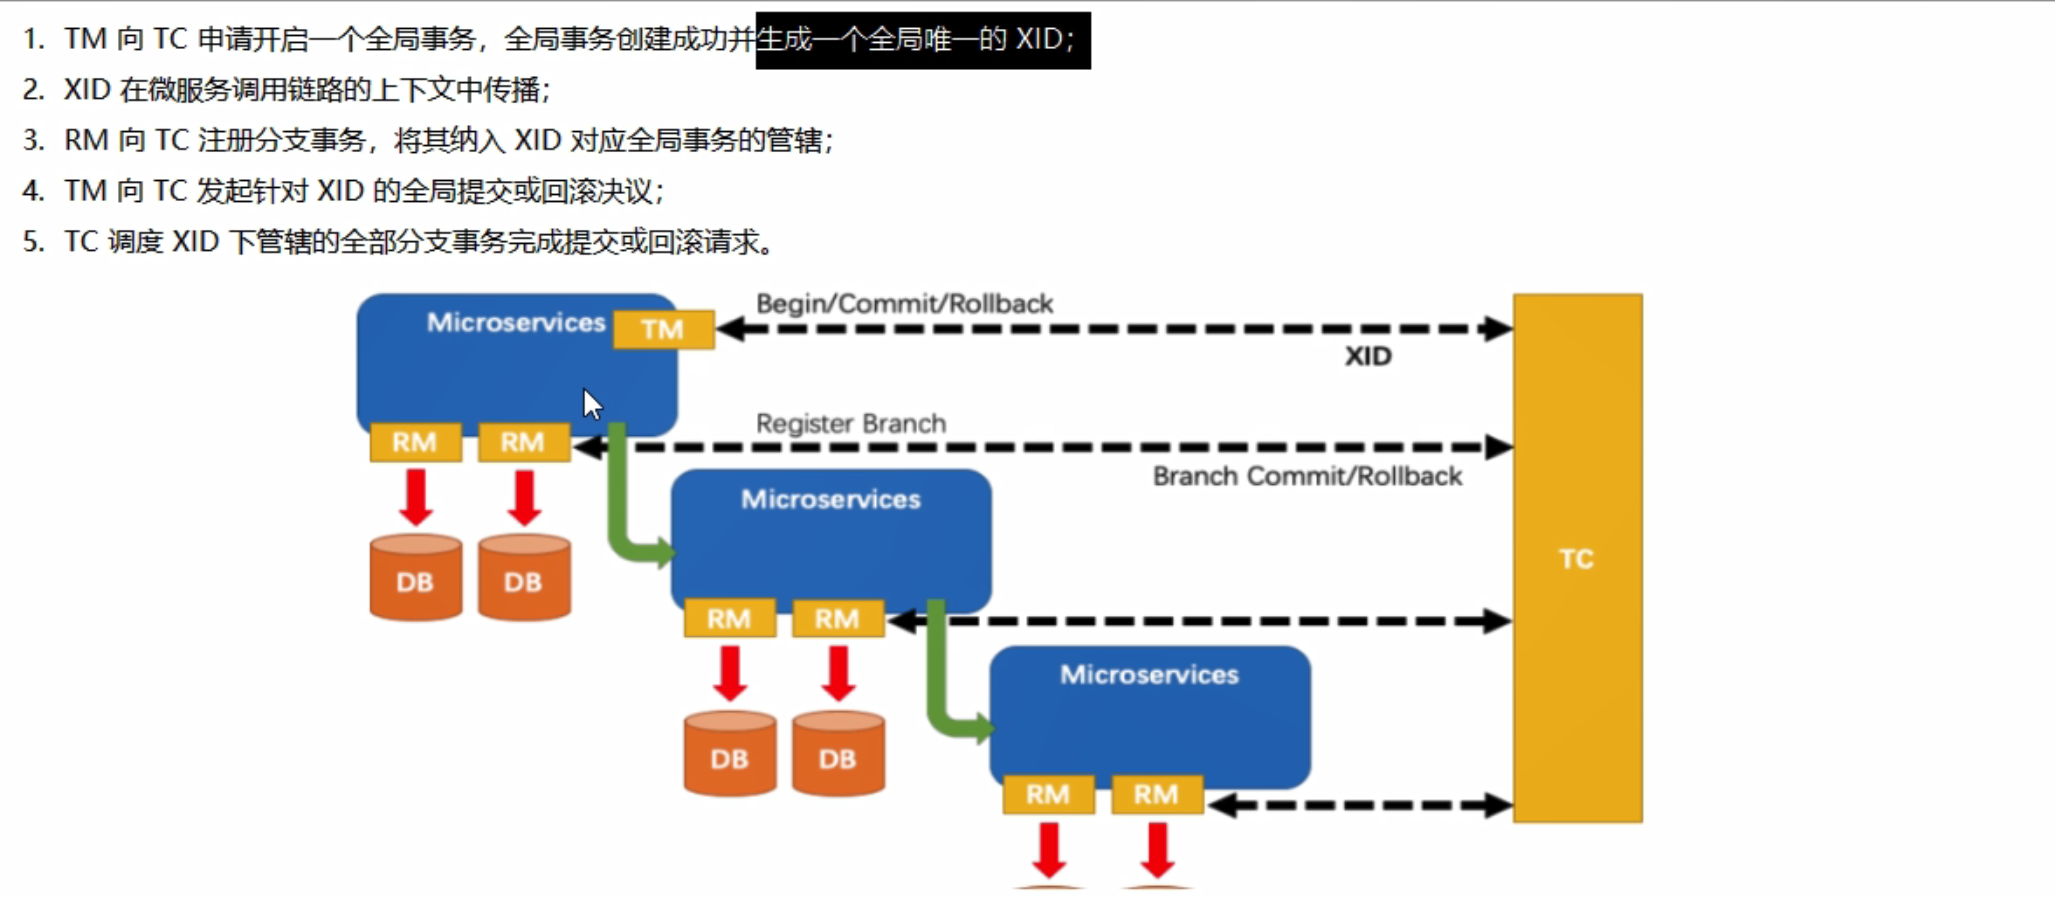
目录 一、分布式事务问题1、分布式之前2、分布式之后 二、Seata简介1、Seata是什么?2、Seata能干嘛?3、去拿下?4、怎么玩 三、Seata-server安装四、订单、库存、账户业务数据库准备五、订单、库存、账户业务微服务准备六、Seata原理介绍 一、…...

Android 11开发避坑:为什么你的App获取的Wifi MAC地址总是变?手把手教你配置固定MAC
Android 11开发实战:彻底解决Wifi MAC地址随机化问题最近在开发一个设备管理系统时,遇到了一个棘手的问题:我们的App在Android 11设备上获取的Wifi MAC地址每次都不一样,导致基于MAC地址的设备识别功能完全失效。经过一周的深入研…...

如何在macOS上免费解锁QQ音乐加密文件:完整指南
如何在macOS上免费解锁QQ音乐加密文件:完整指南 【免费下载链接】QMCDecode QQ音乐QMC格式转换为普通格式(qmcflac转flac,qmc0,qmc3转mp3, mflac,mflac0等转flac),仅支持macOS,可自动识别到QQ音乐下载目录,默认转换结果…...
重构)
嘈杂工业场景下的自适应VAD与双码本声纹识别鉴权系统:基于端侧轻量化神经网络与向量量化(VQ)重构
在大型化工车间、能源集控中心以及金融极密隔离库房中,离线声纹识别是物理访问控制和身份安全核验的重要生物特征屏障。然而,在环境本底噪声高达80dB以上的恶劣工业场景下,常规的语音活动检测(VAD)会频繁误触ÿ…...

3分钟掌握HashCalculator:你的文件完整性守护专家
3分钟掌握HashCalculator:你的文件完整性守护专家 【免费下载链接】HashCalculator 哈希值计算工具,批量计算/批量校验/查找重复文件/改变哈希值等,支持集成到系统右键菜单 项目地址: https://gitcode.com/gh_mirrors/ha/HashCalculator …...

【数据结构与算法】数据结构基础——栈和队列
目录栈和队列1. 栈1.1 栈的概念1.2 栈的实现方式分析1.3 栈的实现1.3.1 栈的初始化与销毁1.3.2 入栈与出栈1.3.3 栈的判空与有效元素个数1.3.4 栈顶元素1.4 栈的扩展1.4.1 两栈共享空间2. 队列2.1 队列的概念2.2 队列的实现方式分析2.3 队列的实现2.3.1 队列的初始化与销毁2.3.…...

UE4SS终极指南:从零开始掌握虚幻引擎脚本系统
UE4SS终极指南:从零开始掌握虚幻引擎脚本系统 【免费下载链接】RE-UE4SS Injectable LUA scripting system, SDK generator, live property editor and other dumping utilities for UE4/5 games 项目地址: https://gitcode.com/gh_mirrors/re/RE-UE4SS UE4S…...

在数据预处理与分析流水线中集成大模型API进行智能标注与摘要
🚀 告别海外账号与网络限制!稳定直连全球优质大模型,限时半价接入中。 👉 点击领取海量免费额度 在数据预处理与分析流水线中集成大模型API进行智能标注与摘要 对于数据工程师而言,处理海量非结构化文本数据是一项常见…...

如何在原神中解放双手:自动钓鱼、拾取与对话跳过的终极指南
如何在原神中解放双手:自动钓鱼、拾取与对话跳过的终极指南 【免费下载链接】genshin-impact-script 原神脚本,包含自动钓鱼、自动拾取、自动跳过对话等多项实用功能。A Genshin Impact script includes many useful features such as automatic fishing…...

Linux CPU性能优化:D状态和Z状态排查与处理
文章目录一、Linux进程五大基本状态1. 运行状态(R,Running / Runnable)2. 可中断睡眠状态(S,Interruptible Sleep)3. 不可中断睡眠状态(D,Uninterruptible Sleep)4. 停止…...

麒麟桌面CVE-2024-1086漏洞深度修复指南
1. 这个漏洞不是“修个补丁就完事”:麒麟桌面系统CVE-2024-1086的真实威胁图谱你可能刚在安全通告里看到“麒麟桌面系统修复CVE-2024-1086”,顺手点了个更新,心里想着“又一个内核提权漏洞,打上补丁不就完了?”——我去…...