Android组件通信——ActivityGroup(二十五)
1. ActivityGroup
1.1 知识点
(1)了解ActivityGroup的作用;
(2)使用ActivityGroup进行复杂标签菜单的实现;
(3)使用PopupWindow组件实现弹出菜单组件开发;
1.2 具体内容


<LinearLayout xmlns:android="http://schemas.android.com/apk/res/android"xmlns:tools="http://schemas.android.com/tools"android:layout_width="match_parent"android:layout_height="match_parent"android:orientation="vertical"tools:context=".ActivityGroupActivity" ><LinearLayout android:gravity="center_horizontal"android:layout_width="match_parent"android:layout_height="wrap_content"><TextView android:id="@+id/cust_title"android:textSize="28sp"android:text="ActivityGroup实现分页导航"android:layout_width="wrap_content"android:layout_height="wrap_content"/> </LinearLayout><!-- 中间动态加载的View --><ScrollView android:measureAllChildren="true"android:id="@+id/containerBody" android:layout_weight="1"android:layout_height="fill_parent"android:layout_width="fill_parent"></ScrollView><LinearLayout android:background="@android:color/black"android:layout_gravity="bottom"android:orientation="horizontal"android:layout_height="wrap_content"android:layout_width="fill_parent"><!-- 导航按钮1 --><ImageView android:id="@+id/img1"android:src="@android:drawable/ic_dialog_dialer"android:layout_marginLeft="7dp" android:layout_marginTop="3dp"android:layout_marginBottom="3dp"android:layout_height="wrap_content"android:layout_width="wrap_content"/><!-- 导航按钮2 --><ImageView android:id="@+id/img2"android:src="@android:drawable/ic_dialog_info"android:layout_marginLeft="7dp" android:layout_marginTop="3dp"android:layout_marginBottom="3dp"android:layout_height="wrap_content"android:layout_width="wrap_content"/><!-- 导航按钮3 --><ImageView android:id="@+id/img3"android:src="@android:drawable/ic_dialog_alert"android:layout_marginLeft="7dp" android:layout_marginTop="3dp"android:layout_marginBottom="3dp"android:layout_height="wrap_content"android:layout_width="wrap_content"/></LinearLayout></LinearLayout>package com.example.activitygroupproject;import android.app.ActivityGroup;
import android.content.Intent;
import android.os.Bundle;
import android.view.View;
import android.view.View.OnClickListener;
import android.view.Window;
import android.widget.ImageView;
import android.widget.ScrollView;public class ActivityGroupActivity extends ActivityGroup {ScrollView container =null;@Overrideprotected void onCreate(Bundle savedInstanceState) {super.onCreate(savedInstanceState);requestWindowFeature(Window.FEATURE_NO_TITLE);//隐藏标题栏setContentView(R.layout.activity_activity_group);container = (ScrollView) super.findViewById(R.id.containerBody);//导航1ImageView img1= (ImageView) super.findViewById(R.id.img1);img1.setOnClickListener(new OnClickListener() {@Overridepublic void onClick(View v) {container.removeAllViews();//清空子Viewcontainer.addView(getLocalActivityManager().startActivity("Module1", new Intent(ActivityGroupActivity.this,ModuleView1.class).addFlags(Intent.FLAG_ACTIVITY_CLEAR_TOP)).getDecorView());}});//导航2ImageView img2= (ImageView) super.findViewById(R.id.img2);img2.setOnClickListener(new OnClickListener() {@Overridepublic void onClick(View v) {container.removeAllViews();//清空子Viewcontainer.addView(getLocalActivityManager().startActivity("Module2", new Intent(ActivityGroupActivity.this,ModuleView2.class).addFlags(Intent.FLAG_ACTIVITY_CLEAR_TOP)).getDecorView());}});//导航3ImageView img3= (ImageView) super.findViewById(R.id.img3);img3.setOnClickListener(new OnClickListener() {@Overridepublic void onClick(View v) {container.removeAllViews();//清空子Viewcontainer.addView(getLocalActivityManager().startActivity("Module3", new Intent(ActivityGroupActivity.this,ModuleView3.class).addFlags(Intent.FLAG_ACTIVITY_CLEAR_TOP)).getDecorView());}});}}
下面是子Activity的布局和文件:
<RelativeLayout xmlns:android="http://schemas.android.com/apk/res/android"xmlns:tools="http://schemas.android.com/tools"android:layout_width="match_parent"android:layout_height="match_parent"android:paddingBottom="@dimen/activity_vertical_margin"android:paddingLeft="@dimen/activity_horizontal_margin"android:paddingRight="@dimen/activity_horizontal_margin"android:paddingTop="@dimen/activity_vertical_margin"tools:context=".ModuleView1" ><TextViewandroid:layout_width="wrap_content"android:layout_height="wrap_content"android:text="第一个Module" /></RelativeLayout>package com.example.activitygroupproject;import android.os.Bundle;
import android.app.Activity;
import android.view.Menu;public class ModuleView1 extends Activity {@Overrideprotected void onCreate(Bundle savedInstanceState) {super.onCreate(savedInstanceState);setContentView(R.layout.activity_module_view1);}}
共有三个子Activity,其余两个类似,就只写一个。
以下实现目前非常流行的标签页实现形式FragmentTabHost+ViewPager。
主布局:
<LinearLayout xmlns:android="http://schemas.android.com/apk/res/android"xmlns:tools="http://schemas.android.com/tools"android:layout_width="match_parent"android:layout_height="match_parent"android:orientation="vertical"tools:context=".FragmentTabHostActivity" ><android.support.v4.view.ViewPagerandroid:id="@+id/pager"android:layout_width="match_parent"android:layout_height="0dp"android:layout_weight="1"/><FrameLayoutandroid:visibility="gone"android:layout_width="match_parent"android:layout_height="0dp"android:layout_weight="1"/><android.support.v4.app.FragmentTabHostandroid:id="@android:id/tabhost"android:layout_width="match_parent"android:layout_height="wrap_content"><FrameLayout android:id="@android:id/tabcontent"android:layout_width="0dp"android:layout_height="0dp"android:layout_weight="0"></FrameLayout></android.support.v4.app.FragmentTabHost></LinearLayout>Activity:
package com.example.fragmenttabhost;import java.util.ArrayList;
import java.util.List;import android.R.color;
import android.os.Bundle;
import android.support.v4.app.Fragment;
import android.support.v4.app.FragmentActivity;
import android.support.v4.app.FragmentManager;
import android.support.v4.app.FragmentPagerAdapter;
import android.support.v4.app.FragmentTabHost;
import android.support.v4.view.ViewPager;
import android.support.v4.view.ViewPager.OnPageChangeListener;
import android.view.LayoutInflater;
import android.view.View;
import android.view.ViewGroup;
import android.widget.ImageView;
import android.widget.TabHost.OnTabChangeListener;
import android.widget.TabHost.TabSpec;
import android.widget.TabWidget;
import android.widget.TextView;public class FragmentTabHostActivity extends FragmentActivity {FragmentTabHost mTabHost = null;LayoutInflater layoutInflater = null;Class fragmentArray[] = {FragmentPage1.class,FragmentPage2.class,FragmentPage3.class};int mImageViewArray[] = {android.R.drawable.ic_dialog_dialer,android.R.drawable.ic_dialog_info,android.R.drawable.ic_dialog_alert};String mTextViewArray[] = {"首页","消息","好友"};ViewPager vp;List<Fragment> list = new ArrayList<Fragment>();@Overrideprotected void onCreate(Bundle savedInstanceState) {super.onCreate(savedInstanceState);setContentView(R.layout.activity_fragment_tab_host);//实例化组件initView();initPager();}public void initView(){vp = (ViewPager) super.findViewById(R.id.pager);vp.setOnPageChangeListener(new ViewPagerListener());layoutInflater = LayoutInflater.from(this);//实例化布局对象mTabHost = (FragmentTabHost) super.findViewById(android.R.id.tabhost);mTabHost.setup(this,getSupportFragmentManager(),R.id.pager);//实例化FragmentTabHost对象mTabHost.setOnTabChangedListener(new TabHostListener());int count = fragmentArray.length;//获取子tab的个数for(int i= 0;i<count;i++){//为每一个Tab按钮设置图标文字和内容TabSpec tabSpec = mTabHost.newTabSpec(mTextViewArray[i]).setIndicator(getTabItemView(i));mTabHost.addTab(tabSpec,fragmentArray[i],null);//将子tab添加进TabHost//设置按钮的背景mTabHost.getTabWidget().getChildAt(i).setBackgroundResource(color.background_dark);}}private void initPager(){FragmentPage1 p1 = new FragmentPage1();FragmentPage2 p2 = new FragmentPage2();FragmentPage3 p3 = new FragmentPage3();list.add(p1);list.add(p2);list.add(p3);vp.setAdapter(new MyAdapter(getSupportFragmentManager()));}private View getTabItemView(int index){View view = layoutInflater.inflate(R.layout.tabspec_layout, null);ImageView img = (ImageView) view.findViewById(R.id.img);img.setImageResource(mImageViewArray[index]);TextView tv = (TextView) view.findViewById(R.id.tv);tv.setText(mTextViewArray[index]);return view;}class ViewPagerListener implements OnPageChangeListener{@Overridepublic void onPageScrollStateChanged(int arg0) {// TODO Auto-generated method stub}@Overridepublic void onPageScrolled(int arg0, float arg1, int arg2) {// TODO Auto-generated method stub}@Overridepublic void onPageSelected(int arg0) {//根据焦点来确认切换到那个TabTabWidget  widget = mTabHost.getTabWidget();int oldFocusability = widget.getDescendantFocusability();widget.setDescendantFocusability(ViewGroup.FOCUS_BLOCK_DESCENDANTS);mTabHost.setCurrentTab(arg0);widget.setDescendantFocusability(oldFocusability);}}class TabHostListener implements OnTabChangeListener{@Overridepublic void onTabChanged(String tabId) {int position = mTabHost.getCurrentTab();vp.setCurrentItem(position);}}class MyAdapter extends FragmentPagerAdapter{public MyAdapter(FragmentManager fm) {super(fm);// TODO Auto-generated constructor stub}@Overridepublic Fragment getItem(int arg0) {// TODO Auto-generated method stubreturn list.get(arg0);}@Overridepublic int getCount() {// TODO Auto-generated method stubreturn list.size();}}
}
单个标签布局:
<?xml version="1.0" encoding="utf-8"?>
<LinearLayout xmlns:android="http://schemas.android.com/apk/res/android"android:layout_width="match_parent"android:layout_height="match_parent"android:orientation="vertical" ><ImageView android:id="@+id/img"android:layout_width="wrap_content"android:layout_height="wrap_content"android:padding="3dp"/><TextView android:id="@+id/tv"android:layout_width="wrap_content"android:layout_height="wrap_content"android:textSize="10sp"android:textColor="#FFFFFF"/></LinearLayout>
单个fragment:
package com.example.fragmenttabhost;import android.os.Bundle;
import android.support.v4.app.Fragment;
import android.view.LayoutInflater;
import android.view.View;
import android.view.ViewGroup;public class FragmentPage1 extends Fragment {@Overridepublic View onCreateView(LayoutInflater inflater,ViewGroup container,Bundle savedInstanceState){return inflater.inflate(R.layout.fragment, null);}
}
单个fragment布局:
<?xml version="1.0" encoding="utf-8"?>
<LinearLayout xmlns:android="http://schemas.android.com/apk/res/android"android:layout_width="match_parent"android:layout_height="match_parent"android:orientation="vertical" ><ImageViewandroid:layout_width="match_parent"android:layout_height="match_parent"android:src="@drawable/ic_launcher"/></LinearLayout>
1.3 小结
(1)ActivityGroup可以让多个Activity在一个屏幕上集中显示;
(2)通过PopupWindow组件可以实现弹出菜单的功能。
相关文章:
Android组件通信——ActivityGroup(二十五)
1. ActivityGroup 1.1 知识点 (1)了解ActivityGroup的作用; (2)使用ActivityGroup进行复杂标签菜单的实现; (3)使用PopupWindow组件实现弹出菜单组件开发; 1.2 具体…...

js的继承的方式
1.对象冒充继承 使用 bind,call,apply 解决构造函数属性的继承 缺点:不能继承原型上的属性和方法 //-------------父类-------------function Person(name, age, sex) {this.name name;this.age age;this.sex sex;}Person.prototype.run function () {console.log(我${this…...

聊聊HttpClient的重试机制
序 本文主要研究一下HttpClient的重试机制 HttpRequestRetryHandler org/apache/http/client/HttpRequestRetryHandler.java public interface HttpRequestRetryHandler {/*** Determines if a method should be retried after an IOException* occurs during execution.**…...
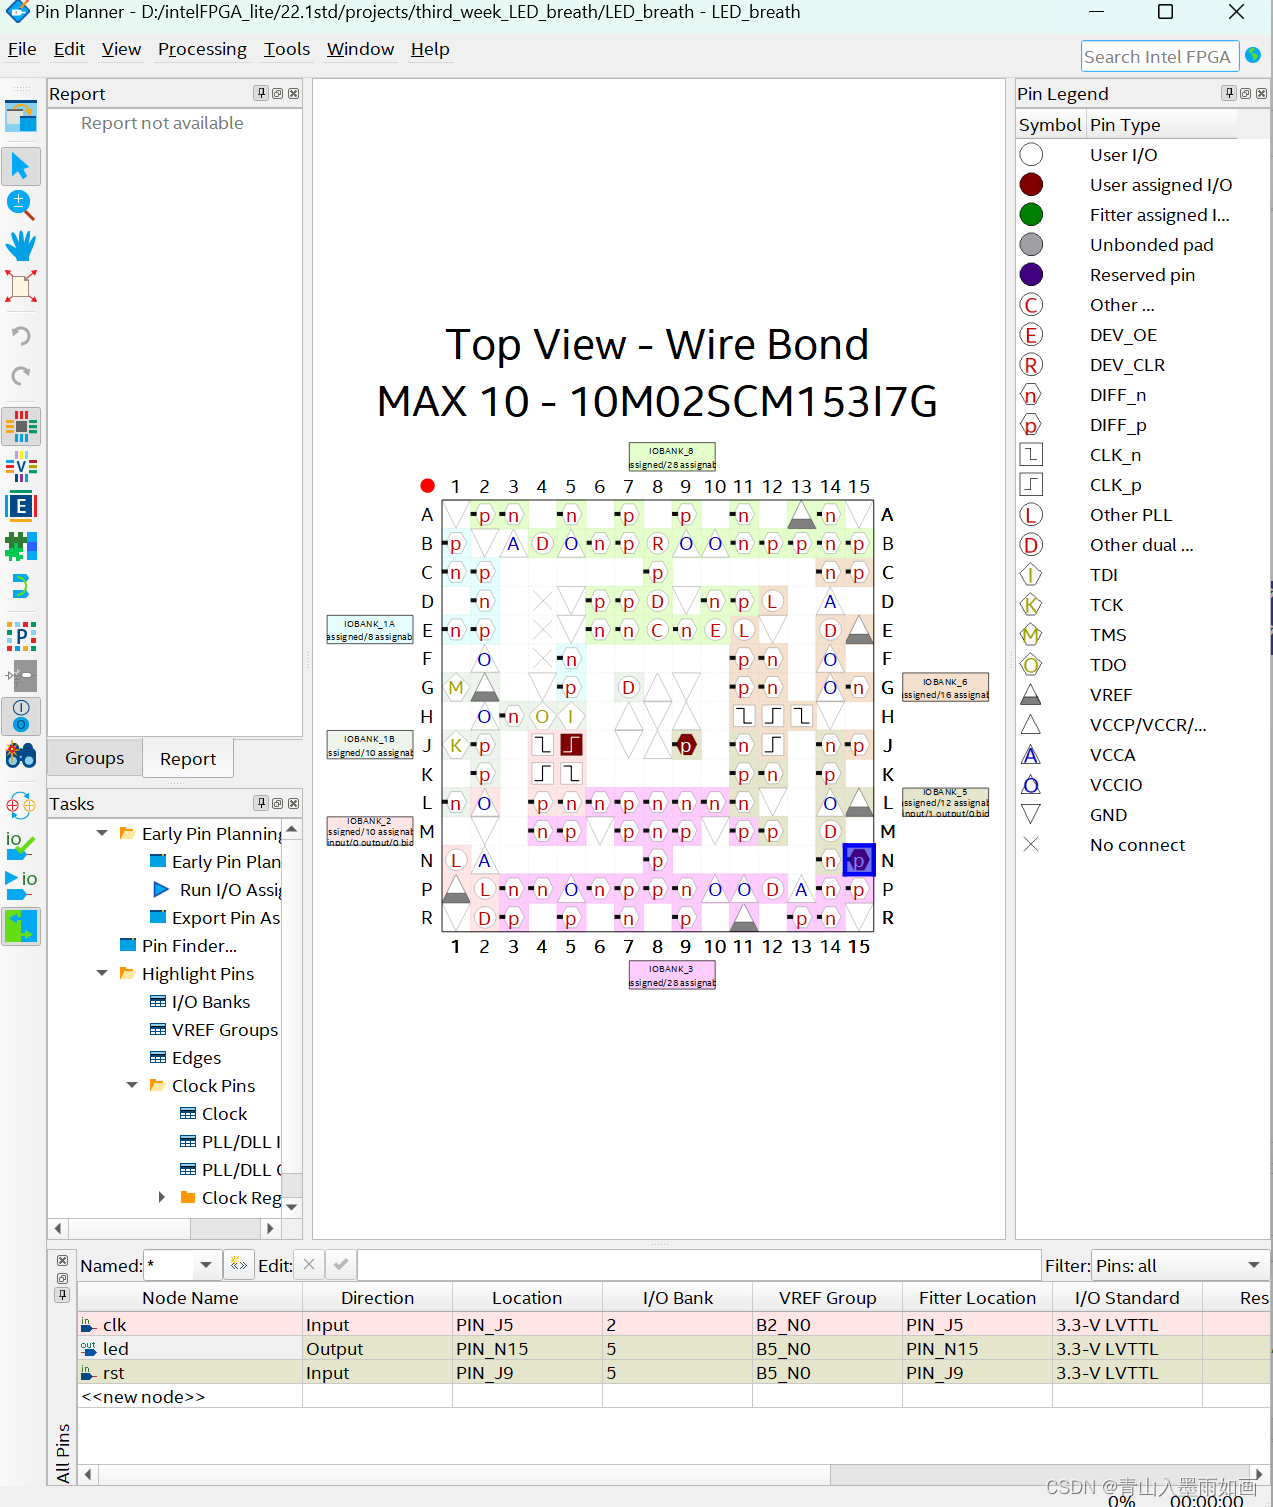
北邮22级信通院数电:Verilog-FPGA(4)第三周实验:按键消抖、呼吸灯、流水灯 操作流程注意事项
北邮22信通一枚~ 跟随课程进度更新北邮信通院数字系统设计的笔记、代码和文章 持续关注作者 迎接数电实验学习~ 获取更多文章,请访问专栏: 北邮22级信通院数电实验_青山如墨雨如画的博客-CSDN博客 目录 一.注意事项 二.按键消抖 2.1 LED_deboun…...
Ghidra101再入门(上?)-Ghidra架构介绍
Ghidra101再入门(上?)-Ghidra架构介绍 最近有群友问我,说:“用了很多年的IDA,最近想看看Ghidra,这应该怎么进行入门?“这可难到我了。。 我发现,市面上虽然介绍Ghidra怎么用的文章和书籍很多&…...

Vue3路由引入报错解决:无法找到模块“xxx.vue”的声明文件 xxx隐式拥有 “any“ 类型。
这类情况应该遇见过吧,这是因为 TypeScript只能理解 .ts 文件,无法理解 .vue 文件。 解决方法:在项目的根目录或者src文件夹下创建一个后辍为 文件名.d.ts 的文件,并写入一下内容: declare module *.vue {import { …...
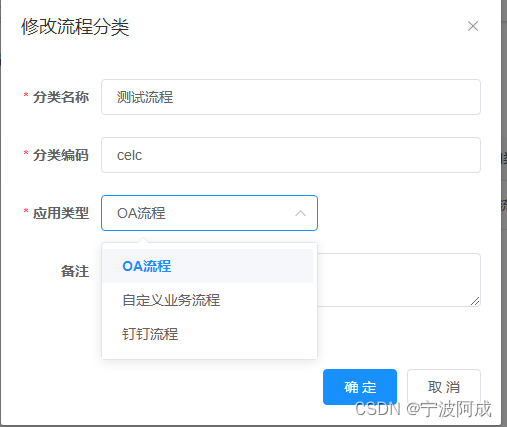
基于若依ruoyi-nbcio支持flowable流程分类里增加流程应用类型
更多ruoyi-nbcio功能请看演示系统 gitee源代码地址 前后端代码: https://gitee.com/nbacheng/ruoyi-nbcio 演示地址:RuoYi-Nbcio后台管理系统 主要考虑到流程分很多种,普通的是OA流程,还有自定义业务流程,钉钉流程等…...

JS之同步异步promise、async、await
promise异步操作 Promise是异步编程的一种解决方案 JavaScript异步与同步解析 学习promise前我们先来了解下什么是异步? 基本概念: 消息队列中的任务分为宏任务与微任务;调用栈也可以称为主线程 首先我们要知道js是单线程语言,也就是说…...

【OpenCV • c++】自定义直方图 | 灰度直方图均衡 | 彩色直方图均衡
文章目录 一、什么是直方图二、自定义直方图三、灰度直方图均衡四、彩色直方图均衡一、什么是直方图 直方图广泛应用于很多计算机视觉处理当中。通过标记帧与帧之间显著的边缘和颜色的变化,可以检测视频中的场景变化。在每个兴趣点设置一个有相似特征的直方图所构成的“标签”…...

el-tree目录和el-table实现搜索定位高亮方法
需求:el-tree目录实现搜索查询el-table表格项,双击表格项根据yiZhuMLID||muLuID定位el-tree目录,并且高亮展示在可视化区域内,再重新根据el-tree目录的yiZhuMLID搜索刷新el-table表格,定位且高亮展示相对应的yiZhuMLID…...

linux常用指令
基础命令 cd:用于切换目录。例如,要从当前目录切换到/home/user目录,可以使用命令“cd /home/user”。ls:用于列出目录内容。例如,要列出当前目录的内容,可以使用命令“ls”。mkdir:用于创建目…...
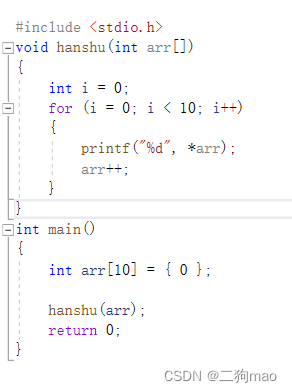
C语言,指针的一些运算
若创建一个数组:int arr[10] 0; 用指针变量来储存数组首元素的地址:int* p arr,这里arr是数组名,表示首元素地址。 若p p 1或者p之后p本来指向数组首元素地址,就变成了指向第二个元素的地址,p n即指向第n 1个地…...
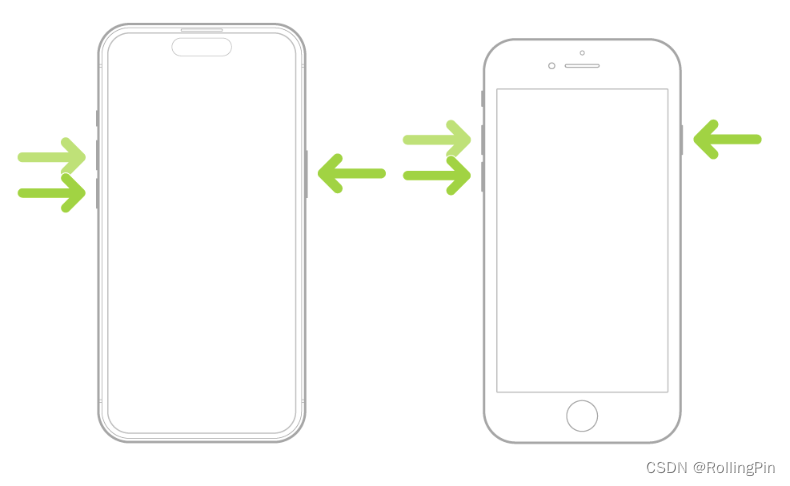
iPhone 如何强制重启
参考iPhone的官方使用手册 传送门 尤其当 iPhone 未响应,也无法将其关机再开机,此方法最有效: 按住调高音量按钮,然后快速松开。按住调低音量按钮,然后快速松开。按住侧边按钮。当 Apple 标志出现时,松开侧…...

数据结构--单链表操作
1.单链表的创建(带头结点) #include<stdlib.h> #define ElemType int typedef struct {//定义一个结点ElemType data;struct STU* next; }STU,*LinkList; bool InitList(LinkList& L) {L (STU*)malloc(sizeof(STU));//创建头结点if (L NUL…...
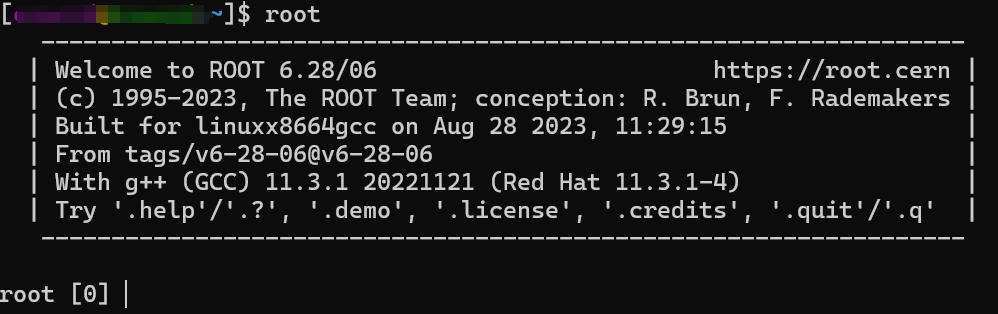
AlmaLinux (兼容centos)安装Geant4与ROOT
AlmaLinux 介绍 AlmaLinux OS 是一个开源、社区驱动的 Linux 操作系统,它填补了因 CentOS 稳定版本停止维护而留下的空白,同时更加强大。 安装 AlmaLinux 这个我用的是 windows 子系统进行安装 首先打开微软商店,然后搜索AlmaLinux&#…...
)
FPGA面试题(2)
一.同步复位和异步复位 同步复位:当clk有效时,复位才有效。优点:有利于时序分析,防止毛刺现象出现。缺点:复位信号必须大于时钟周期,大部分逻辑器件中D触发器都只有异步复位端口,需要在寄存器数…...

【C++ Primer Plus学习记录】指针——使用new来创建动态数组
目录 1.使用new创建动态数组 2.使用动态数组(如何使用指针访问数组元素) 如果程序只需要一个值,则可能会声明一个简单变量,因为对于管理一个小型数据对象来说,这样做比使用new和指针更简单。通常,对于大型…...

移动app广告变现,对接广告联盟还是选择第三方聚合广告平台?
作为互联网广告的载体,APP天生就比线下传统广告位更具优势,不受地域限制可以辐射到地球上的每一个角落,可以让广告获得更广的覆盖面。通过丰富的广告形式,精准的目标用户画像,也可以更好地实现品牌广告或效果广告的投放…...

ARM 按键控制 LED灯,蜂鸣器,风扇
main.c: #include "uart.h" #include "key_it.h" int main() {all_led_init();uart4_init();//串口初始化//中断初始化key_it_config();key3_it_config();buzzer_init();fan_init();while(1){//保证主程序不结束}return 0; }src/key_it.c: #include"…...

VirtualBox Ubuntu扩展虚拟机磁盘空间
关于Orical VM VirtualBox虚拟机安装了ubuntu linux系统,由于需要,磁盘空间不足,需要扩展磁盘空间,最终找到了一个非常简单的方法,上干货。 1、关闭虚拟机 2、运用VBoxManage命令扩展vdi文件的空间 打开windows的命…...

混合求解器:用神经网络增强传统微分方程数值方法
1. 项目概述:当数值方法遇到机器学习在科学计算和工程仿真领域,求解常微分方程(ODE)和偏微分方程(PDE)是绕不开的核心任务。无论是模拟电路中的电流变化、预测天气系统的演变,还是分析机械结构的…...

DIY复刻经典:Texar Audio Prism动态处理器克隆套件全攻略
1. 项目概述:Texar Audio Prism 克隆套件如果你在专业音频圈子里混过一段时间,尤其是对上世纪八九十年代那些经典的、带点“魔法”色彩的外置动态处理器感兴趣,那么“Texar Audio Prism”这个名字你大概率不会陌生。它不是最常见的1176或者LA…...

HFSS仿真结果怎么看?一文读懂S参数与电场图,让你的T型波导分析不再迷茫
HFSS仿真结果深度解析:从S参数到电场图的工程实践指南面对HFSS仿真生成的复杂数据图表,许多工程师常陷入"看得见数据却读不懂含义"的困境。本文将带您穿透数据表象,掌握T型波导性能分析的核心方法论。1. S参数:波导性能…...

从多路复用到三维光阵:Arduino驱动8x8x8 LED立方体全解析
1. 项目概述:用Arduino点亮一个三维世界几年前,我第一次在创客展上看到一个8x8x8的LED立方体,那种由数百个光点构成的、在三维空间中流动的动画效果,瞬间就把我吸引住了。它不像普通的平面LED屏,而是真正有“深度”的光…...

【DeepSeek事件驱动架构实战指南】:20年架构师亲授5大核心陷阱与避坑清单
更多请点击: https://kaifayun.com 第一章:DeepSeek事件驱动架构全景认知 DeepSeek事件驱动架构(Event-Driven Architecture, EDA)并非单一技术组件的堆叠,而是一种以事件为第一公民、强调松耦合与异步协作的系统设计…...

告别元素变动导致的报错:探索自动化测试脚本的 AI“自愈”能力
前言:一个所有测试人都经历过的噩梦 周三晚上十一点,CI/CD流水线再次亮起红灯。 你打开日志,满屏的NoSuchElementException扑面而来。仔细一看——前端团队在昨天的版本中重构了登录页面的DOM结构,原本的#login-btn变成了#signin-button-v2,30个测试用例因此全军覆没。 …...

如何在3分钟内为任何活动搭建专业级滚动抽奖系统?Magpie-LuckyDraw全平台开源方案深度解析
如何在3分钟内为任何活动搭建专业级滚动抽奖系统?Magpie-LuckyDraw全平台开源方案深度解析 【免费下载链接】Magpie-LuckyDraw 🏅A fancy lucky-draw tool supporting multiple platforms💻(Mac/Linux/Windows/Web/Docker) 项目地址: https…...

3分钟告别英文恐惧:Android Studio中文界面轻松切换指南
3分钟告别英文恐惧:Android Studio中文界面轻松切换指南 【免费下载链接】AndroidStudioChineseLanguagePack AndroidStudio中文插件(官方修改版本) 项目地址: https://gitcode.com/gh_mirrors/an/AndroidStudioChineseLanguagePack 你是否曾经因…...

基于Max78000与规则引导的音频数据集构建:边缘AI声音识别实战
1. 项目概述:当边缘AI遇见棕榈树里的“窃听者”在边缘计算和物联网设备大行其道的今天,我们常常面临一个核心矛盾:一方面,我们希望设备足够“聪明”,能实时识别并响应特定的声音模式,比如工厂里高压阀门的异…...

前馈补偿技术:用数字预失真驯服放大器非线性失真
1. 项目概述:用前馈补偿驯服放大器失真在音频发烧友和硬件工程师的圈子里,追求“高保真”几乎是一种信仰。我们总希望从扬声器里传出的声音,是录音现场或音乐制作人意图的完美复刻,纤毫毕现,不带一丝杂质。然而&#x…...