yolov8x-p2 实现 tensorrt 推理
简述
在最开始的yolov8提供的不同size的版本,包括n、s、m、l、x(模型规模依次增大,通过depth, width, max_channels控制大小),这些都是通过P3、P4和P5提取图片特征;
正常的yolov8对象检测模型输出层是P3、P4、P5三个输出层,为了提升对小目标的检测能力,新版本的yolov8 已经包含了P2层(P2层做的卷积次数少,特征图的尺寸(分辨率)较大,更加利于小目标识别),有四个输出层。Backbone部分的结果没有改变,但是Neck跟Head部分模型结构做了调整。

yolov8-p2 yaml
# Ultralytics YOLO 🚀, AGPL-3.0 license
# YOLOv8 object detection model with P2-P5 outputs. For Usage examples see https://docs.ultralytics.com/tasks/detect# Parameters
nc: 80  # number of classes
scales: # model compound scaling constants, i.e. 'model=yolov8n.yaml' will call yolov8.yaml with scale 'n'# [depth, width, max_channels]n: [0.33, 0.25, 1024]s: [0.33, 0.50, 1024]m: [0.67, 0.75, 768]l: [1.00, 1.00, 512]x: [1.00, 1.25, 512]# YOLOv8.0 backbone
backbone:# [from, repeats, module, args]- [-1, 1, Conv, [64, 3, 2]]  # 0-P1/2- [-1, 1, Conv, [128, 3, 2]]  # 1-P2/4- [-1, 3, C2f, [128, True]]- [-1, 1, Conv, [256, 3, 2]]  # 3-P3/8- [-1, 6, C2f, [256, True]]- [-1, 1, Conv, [512, 3, 2]]  # 5-P4/16- [-1, 6, C2f, [512, True]]- [-1, 1, Conv, [1024, 3, 2]]  # 7-P5/32- [-1, 3, C2f, [1024, True]]- [-1, 1, SPPF, [1024, 5]]  # 9# YOLOv8.0-p2 head
head:- [-1, 1, nn.Upsample, [None, 2, 'nearest']]- [[-1, 6], 1, Concat, [1]]  # cat backbone P4- [-1, 3, C2f, [512]]  # 12- [-1, 1, nn.Upsample, [None, 2, 'nearest']]- [[-1, 4], 1, Concat, [1]]  # cat backbone P3- [-1, 3, C2f, [256]]  # 15 (P3/8-small)- [-1, 1, nn.Upsample, [None, 2, 'nearest']]- [[-1, 2], 1, Concat, [1]]  # cat backbone P2- [-1, 3, C2f, [128]]  # 18 (P2/4-xsmall)- [-1, 1, Conv, [128, 3, 2]]- [[-1, 15], 1, Concat, [1]]  # cat head P3- [-1, 3, C2f, [256]]  # 21 (P3/8-small)- [-1, 1, Conv, [256, 3, 2]]- [[-1, 12], 1, Concat, [1]]  # cat head P4- [-1, 3, C2f, [512]]  # 24 (P4/16-medium)- [-1, 1, Conv, [512, 3, 2]]- [[-1, 9], 1, Concat, [1]]  # cat head P5- [-1, 3, C2f, [1024]]  # 27 (P5/32-large)- [[18, 21, 24, 27], 1, Detect, [nc]]  # Detect(P2, P3, P4, P5)
yolov8-p2 tensort 实现
参考: https://github.com/wang-xinyu/tensorrtx/tree/master/yolov8
-
model.cpp中增加buildEngineYolov8x_p2方法.Backbone
-
backbone 和 yolov8 一样 , 无需改动,照搬下来就行.
/************************************************************************************************************************************************ YOLOV8 BACKBONE ***************************************************************************************************************************************************/nvinfer1::IElementWiseLayer *conv0 = convBnSiLU(network, weightMap, *data, 80, 3, 2, 1, "model.0");nvinfer1::IElementWiseLayer *conv1 = convBnSiLU(network, weightMap, *conv0->getOutput(0), 160, 3, 2, 1, "model.1");nvinfer1::IElementWiseLayer *conv2 = C2F(network, weightMap, *conv1->getOutput(0), 160, 160, 3, true, 0.5, "model.2");nvinfer1::IElementWiseLayer *conv3 = convBnSiLU(network, weightMap, *conv2->getOutput(0), 320, 3, 2, 1, "model.3");nvinfer1::IElementWiseLayer *conv4 = C2F(network, weightMap, *conv3->getOutput(0), 320, 320, 6, true, 0.5, "model.4");nvinfer1::IElementWiseLayer *conv5 = convBnSiLU(network, weightMap, *conv4->getOutput(0), 640, 3, 2, 1, "model.5");nvinfer1::IElementWiseLayer *conv6 = C2F(network, weightMap, *conv5->getOutput(0), 640, 640, 6, true, 0.5, "model.6");nvinfer1::IElementWiseLayer *conv7 = convBnSiLU(network, weightMap, *conv6->getOutput(0), 640, 3, 2, 1, "model.7");nvinfer1::IElementWiseLayer *conv8 = C2F(network, weightMap, *conv7->getOutput(0), 640, 640, 3, true, 0.5, "model.8");nvinfer1::IElementWiseLayer *conv9 = SPPF(network, weightMap, *conv8->getOutput(0), 640, 640, 5, "model.9");
Head
-
由3个输出层 (P3、P4、P5) 变成4个输出层 (P2、P3、P4、P5)
HEAD
/************************************************************************************************************************************************* YOLOV8 HEAD ******************************************************************************************************************************************************/float scale[] = {1.0, 2.0, 2.0};nvinfer1::IResizeLayer *upsample10 = network->addResize(*conv9->getOutput(0));upsample10->setResizeMode(nvinfer1::ResizeMode::kNEAREST);upsample10->setScales(scale, 3);nvinfer1::ITensor *inputTensor11[] = {upsample10->getOutput(0), conv6->getOutput(0)};nvinfer1::IConcatenationLayer *cat11 = network->addConcatenation(inputTensor11, 2);nvinfer1::IElementWiseLayer *conv12 = C2F(network, weightMap, *cat11->getOutput(0), 640, 640, 3, false, 0.5, "model.12");nvinfer1::IResizeLayer *upsample13 = network->addResize(*conv12->getOutput(0));upsample13->setResizeMode(nvinfer1::ResizeMode::kNEAREST);upsample13->setScales(scale, 3);nvinfer1::ITensor *inputTensor14[] = {upsample13->getOutput(0), conv4->getOutput(0)};nvinfer1::IConcatenationLayer *cat14 = network->addConcatenation(inputTensor14, 2);nvinfer1::IElementWiseLayer *conv15 = C2F(network, weightMap, *cat14->getOutput(0), 320, 320, 3, false, 0.5, "model.15");nvinfer1::IResizeLayer *upsample16 = network->addResize(*conv15->getOutput(0));upsample16->setResizeMode(nvinfer1::ResizeMode::kNEAREST);upsample16->setScales(scale, 3);nvinfer1::ITensor *inputTensor17[] = {upsample16->getOutput(0), conv2->getOutput(0)};nvinfer1::IConcatenationLayer *cat17 = network->addConcatenation(inputTensor17, 2);nvinfer1::IElementWiseLayer *conv18 = C2F(network, weightMap, *cat17->getOutput(0), 160, 160, 3, false, 0.5, "model.18");nvinfer1::IElementWiseLayer *conv19 = convBnSiLU(network, weightMap, *conv18->getOutput(0), 160, 3, 2, 1, "model.19");nvinfer1::ITensor *inputTensor20[] = {conv19->getOutput(0), conv15->getOutput(0)};nvinfer1::IConcatenationLayer *cat20 = network->addConcatenation(inputTensor20, 2);nvinfer1::IElementWiseLayer *conv21 = C2F(network, weightMap, *cat20->getOutput(0), 320, 320, 3, false, 0.5, "model.21");nvinfer1::IElementWiseLayer *conv22 = convBnSiLU(network, weightMap, *conv21->getOutput(0), 320, 3, 2, 1, "model.22");nvinfer1::ITensor *inputTensor23[] = {conv22->getOutput(0), conv12->getOutput(0)};nvinfer1::IConcatenationLayer *cat23 = network->addConcatenation(inputTensor23, 2);nvinfer1::IElementWiseLayer *conv24 = C2F(network, weightMap, *cat23->getOutput(0), 640, 640, 3, false, 0.5, "model.24");nvinfer1::IElementWiseLayer *conv25 = convBnSiLU(network, weightMap, *conv24->getOutput(0), 640, 3, 2, 1, "model.25");nvinfer1::ITensor *inputTensor26[] = {conv25->getOutput(0), conv9->getOutput(0)};nvinfer1::IConcatenationLayer *cat26 = network->addConcatenation(inputTensor26, 2);nvinfer1::IElementWiseLayer *conv27 = C2F(network, weightMap, *cat26->getOutput(0), 640, 640, 3, false, 0.5, "model.27");OUTPUT
/**************************************************************************************************************************************************** YOLOV8 OUTPUT *************************************************************************************************************************************************/// output0nvinfer1::IElementWiseLayer *conv28_cv2_0_0 = convBnSiLU(network, weightMap, *conv18->getOutput(0), 64, 3, 1, 1, "model.28.cv2.0.0");nvinfer1::IElementWiseLayer *conv28_cv2_0_1 = convBnSiLU(network, weightMap, *conv28_cv2_0_0->getOutput(0), 64, 3, 1, 1, "model.28.cv2.0.1");nvinfer1::IConvolutionLayer *conv28_cv2_0_2 = network->addConvolutionNd(*conv28_cv2_0_1->getOutput(0), 64, nvinfer1::DimsHW{1, 1}, weightMap["model.28.cv2.0.2.weight"], weightMap["model.28.cv2.0.2.bias"]);conv28_cv2_0_2->setStrideNd(nvinfer1::DimsHW{1, 1});conv28_cv2_0_2->setPaddingNd(nvinfer1::DimsHW{0, 0});nvinfer1::IElementWiseLayer *conv28_cv3_0_0 = convBnSiLU(network, weightMap, *conv18->getOutput(0), 160, 3, 1, 1, "model.28.cv3.0.0");nvinfer1::IElementWiseLayer *conv28_cv3_0_1 = convBnSiLU(network, weightMap, *conv28_cv3_0_0->getOutput(0), 160, 3, 1, 1, "model.28.cv3.0.1");nvinfer1::IConvolutionLayer *conv28_cv3_0_2 = network->addConvolutionNd(*conv28_cv3_0_1->getOutput(0), kNumClass, nvinfer1::DimsHW{1, 1}, weightMap["model.28.cv3.0.2.weight"], weightMap["model.28.cv3.0.2.bias"]);conv28_cv3_0_2->setStride(nvinfer1::DimsHW{1, 1});conv28_cv3_0_2->setPadding(nvinfer1::DimsHW{0, 0});nvinfer1::ITensor *inputTensor28_0[] = {conv28_cv2_0_2->getOutput(0), conv28_cv3_0_2->getOutput(0)};nvinfer1::IConcatenationLayer *cat28_0 = network->addConcatenation(inputTensor28_0, 2); // P2// output1nvinfer1::IElementWiseLayer *conv28_cv2_1_0 = convBnSiLU(network, weightMap, *conv21->getOutput(0), 64, 3, 1, 1, "model.28.cv2.1.0");nvinfer1::IElementWiseLayer *conv28_cv2_1_1 = convBnSiLU(network, weightMap, *conv28_cv2_1_0->getOutput(0), 64, 3, 1, 1, "model.28.cv2.1.1");nvinfer1::IConvolutionLayer *conv28_cv2_1_2 = network->addConvolutionNd(*conv28_cv2_1_1->getOutput(0), 64, nvinfer1::DimsHW{1, 1}, weightMap["model.28.cv2.1.2.weight"], weightMap["model.28.cv2.1.2.bias"]);conv28_cv2_1_2->setStrideNd(nvinfer1::DimsHW{1, 1});conv28_cv2_1_2->setPaddingNd(nvinfer1::DimsHW{0, 0});nvinfer1::IElementWiseLayer *conv28_cv3_1_0 = convBnSiLU(network, weightMap, *conv21->getOutput(0), 160, 3, 1, 1, "model.28.cv3.1.0");nvinfer1::IElementWiseLayer *conv28_cv3_1_1 = convBnSiLU(network, weightMap, *conv28_cv3_1_0->getOutput(0), 160, 3, 1, 1, "model.28.cv3.1.1");nvinfer1::IConvolutionLayer *conv28_cv3_1_2 = network->addConvolutionNd(*conv28_cv3_1_1->getOutput(0), kNumClass, nvinfer1::DimsHW{1, 1}, weightMap["model.28.cv3.1.2.weight"], weightMap["model.28.cv3.1.2.bias"]);conv28_cv3_1_2->setStrideNd(nvinfer1::DimsHW{1, 1});conv28_cv3_1_2->setPaddingNd(nvinfer1::DimsHW{0, 0});nvinfer1::ITensor *inputTensor28_1[] = {conv28_cv2_1_2->getOutput(0), conv28_cv3_1_2->getOutput(0)};nvinfer1::IConcatenationLayer *cat28_1 = network->addConcatenation(inputTensor28_1, 2);// output2nvinfer1::IElementWiseLayer *conv28_cv2_2_0 = convBnSiLU(network, weightMap, *conv24->getOutput(0), 64, 3, 1, 1, "model.28.cv2.2.0");nvinfer1::IElementWiseLayer *conv28_cv2_2_1 = convBnSiLU(network, weightMap, *conv28_cv2_2_0->getOutput(0), 64, 3, 1, 1, "model.28.cv2.2.1");nvinfer1::IConvolutionLayer *conv28_cv2_2_2 = network->addConvolution(*conv28_cv2_2_1->getOutput(0), 64, nvinfer1::DimsHW{1, 1}, weightMap["model.28.cv2.2.2.weight"], weightMap["model.28.cv2.2.2.bias"]);nvinfer1::IElementWiseLayer *conv28_cv3_2_0 = convBnSiLU(network, weightMap, *conv24->getOutput(0), 160, 3, 1, 1, "model.28.cv3.2.0");nvinfer1::IElementWiseLayer *conv28_cv3_2_1 = convBnSiLU(network, weightMap, *conv28_cv3_2_0->getOutput(0), 160, 3, 1, 1, "model.28.cv3.2.1");nvinfer1::IConvolutionLayer *conv28_cv3_2_2 = network->addConvolution(*conv28_cv3_2_1->getOutput(0), kNumClass, nvinfer1::DimsHW{1, 1}, weightMap["model.28.cv3.2.2.weight"], weightMap["model.28.cv3.2.2.bias"]);nvinfer1::ITensor *inputTensor28_2[] = {conv28_cv2_2_2->getOutput(0), conv28_cv3_2_2->getOutput(0)};nvinfer1::IConcatenationLayer *cat28_2 = network->addConcatenation(inputTensor28_2, 2);// output3nvinfer1::IElementWiseLayer *conv28_cv2_3_0 = convBnSiLU(network, weightMap, *conv27->getOutput(0), 64, 3, 1, 1, "model.28.cv2.3.0");nvinfer1::IElementWiseLayer *conv28_cv2_3_1 = convBnSiLU(network, weightMap, *conv28_cv2_3_0->getOutput(0), 64, 3, 1, 1, "model.28.cv2.3.1");nvinfer1::IConvolutionLayer *conv28_cv2_3_2 = network->addConvolution(*conv28_cv2_3_1->getOutput(0), 64, nvinfer1::DimsHW{1, 1}, weightMap["model.28.cv2.3.2.weight"], weightMap["model.28.cv2.3.2.bias"]);nvinfer1::IElementWiseLayer *conv28_cv3_3_0 = convBnSiLU(network, weightMap, *conv27->getOutput(0), 160, 3, 1, 1, "model.28.cv3.3.0");nvinfer1::IElementWiseLayer *conv28_cv3_3_1 = convBnSiLU(network, weightMap, *conv28_cv3_3_0->getOutput(0), 160, 3, 1, 1, "model.28.cv3.3.1");nvinfer1::IConvolutionLayer *conv28_cv3_3_2 = network->addConvolution(*conv28_cv3_3_1->getOutput(0), kNumClass, nvinfer1::DimsHW{1, 1}, weightMap["model.28.cv3.3.2.weight"], weightMap["model.28.cv3.3.2.bias"]);nvinfer1::ITensor *inputTensor28_3[] = {conv28_cv2_3_2->getOutput(0), conv28_cv3_3_2->getOutput(0)};nvinfer1::IConcatenationLayer *cat28_3 = network->addConcatenation(inputTensor28_3, 2);DETECT
/**************************************************************************************************************************************************** YOLOV8 DETECT *************************************************************************************************************************************************/// P2nvinfer1::IShuffleLayer *shuffle28_0 = network->addShuffle(*cat28_0->getOutput(0));shuffle28_0->setReshapeDimensions(nvinfer1::Dims2{64 + kNumClass, (kInputH / 4) * (kInputW / 4)});nvinfer1::ISliceLayer *split28_0_0 = network->addSlice(*shuffle28_0->getOutput(0), nvinfer1::Dims2{0, 0}, nvinfer1::Dims2{64, (kInputH / 4) * (kInputW / 4)}, nvinfer1::Dims2{1, 1});nvinfer1::ISliceLayer *split28_0_1 = network->addSlice(*shuffle28_0->getOutput(0), nvinfer1::Dims2{64, 0}, nvinfer1::Dims2{kNumClass, (kInputH / 4) * (kInputW / 4)}, nvinfer1::Dims2{1, 1});nvinfer1::IShuffleLayer *dfl28_0 = DFL(network, weightMap, *split28_0_0->getOutput(0), 4, (kInputH / 4) * (kInputW / 4), 1, 1, 0, "model.28.dfl.conv.weight");nvinfer1::ITensor *inputTensor28_dfl_0[] = {dfl28_0->getOutput(0), split28_0_1->getOutput(0)};nvinfer1::IConcatenationLayer *cat28_dfl_0 = network->addConcatenation(inputTensor28_dfl_0, 2);// P3nvinfer1::IShuffleLayer *shuffle28_1 = network->addShuffle(*cat28_1->getOutput(0));shuffle28_1->setReshapeDimensions(nvinfer1::Dims2{64 + kNumClass, (kInputH / 8) * (kInputW / 8)});nvinfer1::ISliceLayer *split28_1_0 = network->addSlice(*shuffle28_1->getOutput(0), nvinfer1::Dims2{0, 0}, nvinfer1::Dims2{64, (kInputH / 8) * (kInputW / 8)}, nvinfer1::Dims2{1, 1});nvinfer1::ISliceLayer *split28_1_1 = network->addSlice(*shuffle28_1->getOutput(0), nvinfer1::Dims2{64, 0}, nvinfer1::Dims2{kNumClass, (kInputH / 8) * (kInputW / 8)}, nvinfer1::Dims2{1, 1});nvinfer1::IShuffleLayer *dfl28_1 = DFL(network, weightMap, *split28_1_0->getOutput(0), 4, (kInputH / 8) * (kInputW / 8), 1, 1, 0, "model.28.dfl.conv.weight");nvinfer1::ITensor *inputTensor28_dfl_1[] = {dfl28_1->getOutput(0), split28_1_1->getOutput(0)};nvinfer1::IConcatenationLayer *cat28_dfl_1 = network->addConcatenation(inputTensor28_dfl_1, 2);// P4nvinfer1::IShuffleLayer *shuffle28_2 = network->addShuffle(*cat28_2->getOutput(0));shuffle28_2->setReshapeDimensions(nvinfer1::Dims2{64 + kNumClass, (kInputH / 16) * (kInputW / 16)});nvinfer1::ISliceLayer *split28_2_0 = network->addSlice(*shuffle28_2->getOutput(0), nvinfer1::Dims2{0, 0}, nvinfer1::Dims2{64, (kInputH / 16) * (kInputW / 16)}, nvinfer1::Dims2{1, 1});nvinfer1::ISliceLayer *split28_2_1 = network->addSlice(*shuffle28_2->getOutput(0), nvinfer1::Dims2{64, 0}, nvinfer1::Dims2{kNumClass, (kInputH / 16) * (kInputW / 16)}, nvinfer1::Dims2{1, 1});nvinfer1::IShuffleLayer *dfl28_2 = DFL(network, weightMap, *split28_2_0->getOutput(0), 4, (kInputH / 16) * (kInputW / 16), 1, 1, 0, "model.28.dfl.conv.weight");nvinfer1::ITensor *inputTensor28_dfl_2[] = {dfl28_2->getOutput(0), split28_2_1->getOutput(0)};nvinfer1::IConcatenationLayer *cat28_dfl_2 = network->addConcatenation(inputTensor28_dfl_2, 2);// P5nvinfer1::IShuffleLayer *shuffle28_3 = network->addShuffle(*cat28_3->getOutput(0));shuffle28_3->setReshapeDimensions(nvinfer1::Dims2{64 + kNumClass, (kInputH / 32) * (kInputW / 32)});nvinfer1::ISliceLayer *split28_3_0 = network->addSlice(*shuffle28_3->getOutput(0), nvinfer1::Dims2{0, 0}, nvinfer1::Dims2{64, (kInputH / 32) * (kInputW / 32)}, nvinfer1::Dims2{1, 1});nvinfer1::ISliceLayer *split28_3_1 = network->addSlice(*shuffle28_3->getOutput(0), nvinfer1::Dims2{64, 0}, nvinfer1::Dims2{kNumClass, (kInputH / 32) * (kInputW / 32)}, nvinfer1::Dims2{1, 1});nvinfer1::IShuffleLayer *dfl28_3 = DFL(network, weightMap, *split28_3_0->getOutput(0), 4, (kInputH / 32) * (kInputW / 32), 1, 1, 0, "model.28.dfl.conv.weight");nvinfer1::ITensor *inputTensor28_dfl_3[] = {dfl28_3->getOutput(0), split28_3_1->getOutput(0)};nvinfer1::IConcatenationLayer *cat28_dfl_3 = network->addConcatenation(inputTensor28_dfl_3, 2);nvinfer1::IPluginV2Layer *yolo = addYoLoLayer(network, std::vector<nvinfer1::IConcatenationLayer *>{cat28_dfl_0, cat28_dfl_1, cat28_dfl_2, cat28_dfl_3});yolo->getOutput(0)->setName(kOutputTensorName);network->markOutput(*yolo->getOutput(0));
-
-
修改
yololayer.cu中forwardGpu方法void YoloLayerPlugin::forwardGpu(const float *const *inputs, float *output, cudaStream_t stream, int mYoloV8netHeight, int mYoloV8NetWidth, int batchSize) {int outputElem = 1 + mMaxOutObject * sizeof(Detection) / sizeof(float);cudaMemsetAsync(output, 0, sizeof(float), stream);for (int idx = 0; idx < batchSize; ++idx){CUDA_CHECK(cudaMemsetAsync(output + idx * outputElem, 0, sizeof(float), stream));}int numElem = 0; // int grids[3][2] = {{mYoloV8netHeight / 8, mYoloV8NetWidth / 8}, {mYoloV8netHeight / 16, mYoloV8NetWidth / 16}, {mYoloV8netHeight / 32, mYoloV8NetWidth / 32}};// todo int grids[4][2] = {{mYoloV8netHeight / 4, mYoloV8NetWidth / 4}, {mYoloV8netHeight / 8, mYoloV8NetWidth / 8}, {mYoloV8netHeight / 16, mYoloV8NetWidth / 16}, {mYoloV8netHeight / 32, mYoloV8NetWidth / 32}};// int strides[] = { 8, 16, 32 };// todo int strides[] = {4, 8, 16, 32};// for (unsigned int i = 0; i < 3; i++)// todo for (unsigned int i = 0; i < 4; i++){int grid_h = grids[i][0];int grid_w = grids[i][1];int stride = strides[i];numElem = grid_h * grid_w * batchSize;if (numElem < mThreadCount)mThreadCount = numElem;CalDetection<<<(numElem + mThreadCount - 1) / mThreadCount, mThreadCount, 0, stream>>>(inputs[i], output, numElem, mMaxOutObject, grid_h, grid_w, stride, mClassCount, outputElem);} } -
修改
main.cpp->serialize_engine,增加一个sub_type...else if (sub_type == "x-p2"){serialized_engine = buildEngineYolov8x_p2(builder, config, DataType::kFLOAT, wts_name);}... -
参考作者 (https://github.com/wang-xinyu/tensorrtx/tree/master/yolov8) , 获取wts , 然后生成模型.
./yolov8 -s ./weights/xxx.wts ./weights/xxx.engine x-p2 -
推理模型测试
./yolov8 -d xxx.engine ../images g
END
- 官网中没有找到p2的预训练模型,所以需要根据自己数据集训练模型
- 自己训练模型需要更改
config.h中对应的参数. - 以上纯手工输出,若有不对,欢迎大佬指正.
参考:
- https://github.com/ultralytics/ultralytics/tree/main
- https://github.com/wang-xinyu/tensorrtx/tree/master/yolov8

相关文章:
yolov8x-p2 实现 tensorrt 推理
简述 在最开始的yolov8提供的不同size的版本,包括n、s、m、l、x(模型规模依次增大,通过depth, width, max_channels控制大小),这些都是通过P3、P4和P5提取图片特征; 正常的yolov8对象检测模型输出层是P3、…...

Type Script的变量类型
Typescript 的重要特性之一就是数据有类型了。 常见的类型如:字符串、数值、布尔等都有了明确的定义。 变量声明的格式 let 变量名:类型 初始值;字符型 let str:string "abc";数值型 数值型也支持不同的进制,用前缀区分 支持 整…...

系统架构师备考倒计时13天(每日知识点)
1. 数据仓库四大特点 面向主题的。操作型数据库的数据组织面向事务处理任务,各个业务系统之间各自分离,而数据仓库中的数据是按照一定的主题域进行组织的。集成的。数据仓库中的数据是在对原有分散的数据库数据抽取、清理的基础上经过系统加工、汇总和整…...

20 | Spring Data JPA 中文文档
Spring Data JPA 中文文档 1. 前言 Spring Data JPA 为 Jakarta Persistence API(JPA)提供 repository 支持。它简化了需要访问JPA数据源的应用程序的开发。 1.1. 项目元数据 版本控制: https://github.com/spring-projects/spring-data-jpaBug跟踪:…...
【AOA-VMD-LSTM分类故障诊断】基于阿基米德算法AOA优化变分模态分解VMD的长短期记忆网络LSTM分类算法(Matlab代码)
💥💥💞💞欢迎来到本博客❤️❤️💥💥 🏆博主优势:🌞🌞🌞博客内容尽量做到思维缜密,逻辑清晰,为了方便读者。 ⛳️座右铭&a…...

K8s:Pod 中 command、args 与 Dockerfile 中 CMD、 ENTRYPOINT 的对应关系
写在前面 前几天被问到,这里整理笔记之前也没怎么注意这个问题理解不足小伙伴帮忙指正 曾以为老去是很遥远的事,突然发现年轻是很久以前的事了。时光好不经用,抬眼已是半生,所谓的中年危机,真正让人焦虑的不是孤单、不…...

Visual Studio Code (VS Code)安装教程
Visual Studio Code(简称“VS Code”)。 1.下载安装包 VS Code的官网: Visual Studio Code - Code Editing. Redefined 首先提及一下,vscode是不需要破解操作的; 第一步,看好版本,由于我的系…...

技巧 | 如何解决 zsh: permission denied 问题 | Mac
技巧 | 如何解决 zsh: permission denied 问题 | Mac 问题描述 在 macOS 系统终端执行 sh 程序脚本时,抛出异常 zsh: permission denied 原因分析 用户没有权限,所以才出现了这个错误,所以只需要用 chmod 修改一下权限就可以了 解决方法…...
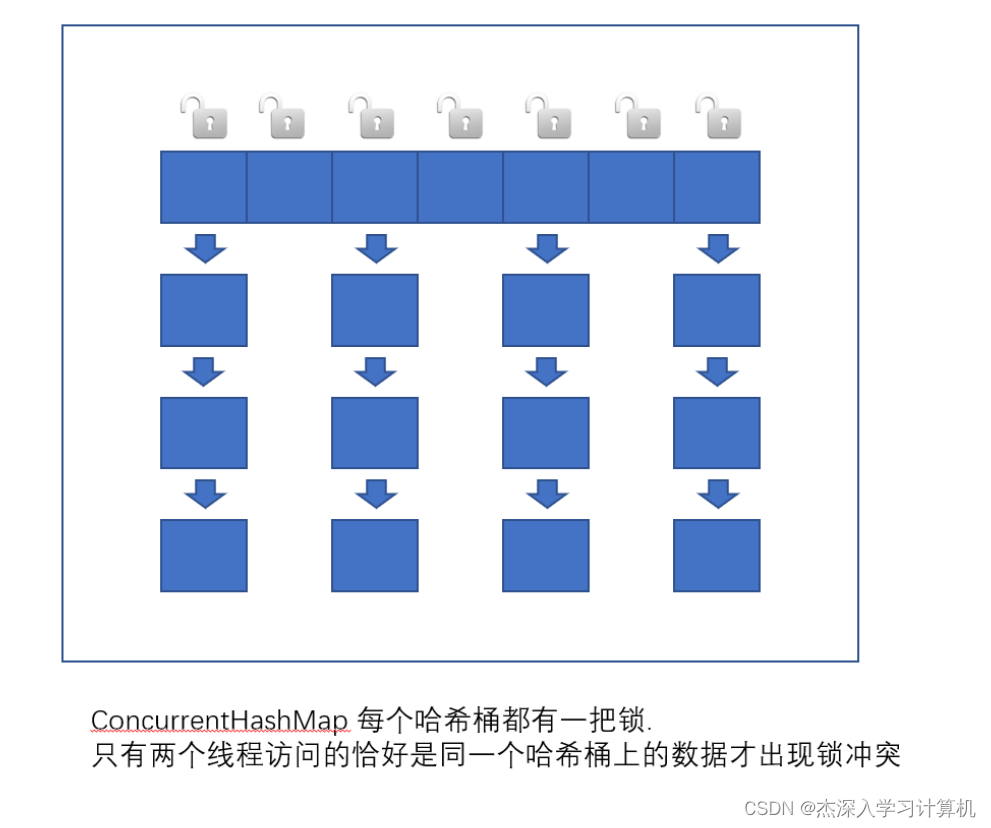
【JavaEE】线程安全的集合类 -- 多线程篇(9)
线程安全的集合类 多线程环境使用 ArrayList多线程环境使用队列多线程环境使用哈希表 多线程环境使用 ArrayList 自己使用同步机制 (synchronized 或者 ReentrantLock)Collections.synchronizedList(new ArrayList); synchronizedList 是标准库提供的一个基于 synchronized 进…...

【MySQL架构篇】MySQL字符集、大小写规范及默认数据库
文章目录 1. 字符集与字符集比较规则2. 大小写规范3. 默认数据库4. 与文件系统相关 1. 字符集与字符集比较规则 MySQL有4个级别的字符集和比较规则,分别是 服务器级别数据库级别表级别列级别 当创建对应表或列未指定字符集时,默认会取其上一级别的字符…...
【Linux系统编程】命令模式2
目录 一,Linux下的初阶认识 1,管道 2,时间戳 二,Liunx系统命令操作 1,date时间指令 2,cal日历指令 3,which和find查找指令 3-1,which指令: 3-2,find…...
【Leetcode】【中等】1726.同积元组
力扣(LeetCode)官网 - 全球极客挚爱的技术成长平台备战技术面试?力扣提供海量技术面试资源,帮助你高效提升编程技能,轻松拿下世界 IT 名企 Dream Offer。https://leetcode.cn/problems/tuple-with-same-product/ 给你…...
Git教程
文章目录 Git 介绍GIt历史Git 安装环境配置工作区、缓存区和仓库区(版本库)工作区(工作目录)暂存区仓库区git工作目录下文件的装填 Git 生成公钥及添加到gitlab或Gerrit上Git常用命令git stautsgit statu -sgit addgit commitgit reset1. git reset --ha…...
使用序列化技术保存数据 改进 IO流完成项目实战水果库存系统
上一节内容是 使用IO流完成项目实战水果库存系统https://blog.csdn.net/m0_65152767/article/details/133999972?spm1001.2014.3001.5501 package com.csdn.fruit.pojo; import lombok.AllArgsConstructor; import lombok.Data; import lombok.NoArgsConstructor; import java…...

0基础学习PyFlink——使用PyFlink的Sink将结果输出到外部系统
在《0基础学习PyFlink——使用PyFlink的SQL进行字数统计》一文中,我们直接执行了Select查询操作,在终端中直接看到了查询结果。 select word, count(1) as count from source group by word; ------------------------------------------------------ |…...

会声会影2024旗舰版详细功能介绍
随着网络视频的蓬勃发展,越来越多的人开始涉足视频剪辑领域,毕竟技多不压身嘛。在众多剪辑软件中,剪映和会声会影是备受新手青睐的两种。那么,会声会影和剪映哪个好呢?在它们之间,哪一个更适合初学者呢接&a…...

QtCreator 查看类帮助文档,快捷键操作:按两次F1 全屏帮助,Esc取消全屏
如何查看类帮助文档 选择类,按F1查看类帮助文档。 示例: #include <QLabel> // 将光标放在QLabel上,按F1右侧弹出的类帮助手册可视宽度很小,如果按两次 F1 键,帮助文档将会以全屏模式显示,以便更清…...
C语言文件操作(1)
C语言文件操作(1) 文章目录 C语言文件操作(1)一、理解文件1.概述2.分类①.正常角度②.文本文件和二进制文件 二、文件的打开和关闭1.流和标准流2.文件类型指针3.文件的打开和关闭以及使用类型 三、文件缓冲区 一、理解文件 1.概述…...
)
adb 操作命令(adb调试QT项目使用到的命令)
1.adb连接串口 获取root权限 adb root && adb remount && adb shell2.测试串口命令 stty -F /dev/ttyS4 cs8 -parenb -cstopb -echoecho "12345\n" > /dev/ttyS8cat /dev/ttyS4 &3.软件在安卓系统上的名字已经活动名称(下面是示…...
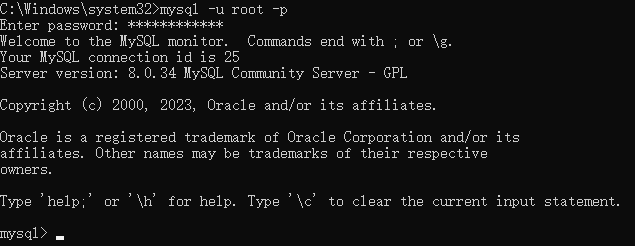
mysql下载和安装,使用
先下载安装 官方下载 已下载备份软件 安装,一路下一步设置环境变量 4. 打开一个cmd,输入mysql -u root -p...

WaveTools鸣潮工具箱:5分钟快速上手画质优化与账号管理终极指南
WaveTools鸣潮工具箱:5分钟快速上手画质优化与账号管理终极指南 【免费下载链接】WaveTools 🧰鸣潮工具箱 项目地址: https://gitcode.com/gh_mirrors/wa/WaveTools WaveTools鸣潮工具箱是一款专为《鸣潮》PC版玩家设计的强大辅助工具,…...

Windows Defender终极移除指南:高效释放系统资源的13项完整方案
Windows Defender终极移除指南:高效释放系统资源的13项完整方案 【免费下载链接】windows-defender-remover A tool which is uses to remove Windows Defender in Windows 8.x, Windows 10 (every version) and Windows 11. 项目地址: https://gitcode.com/gh_mi…...
+服务健康检查脚本)
Qwen2.5-VL-7B-Instruct部署教程:GPU算力监控(nvidia-smi)+服务健康检查脚本
Qwen2.5-VL-7B-Instruct部署教程:GPU算力监控(nvidia-smi)服务健康检查脚本 1. 项目概述 Qwen2.5-VL-7B-Instruct是一款强大的多模态视觉-语言模型,能够同时处理图像和文本输入,生成高质量的响应。该模型特别适合需要…...

计算机工程与应用投稿求助
计算机工程与应用二审后主编给了请专家复审意见,请问下朋友们这样复审的话还是二审的专家吗?这样的话中的希望还大吗?谢谢朋友们...

PDF提取不求人:MinerU镜像开箱即用,支持GPU加速
PDF提取不求人:MinerU镜像开箱即用,支持GPU加速 1. 引言:告别繁琐的PDF提取工作 在日常工作和研究中,我们经常需要从PDF文档中提取内容。无论是学术论文、技术报告还是商业文档,PDF格式因其良好的排版保持能力而广受…...

SeqGPT-560M多任务学习框架解析
SeqGPT-560M多任务学习框架解析 1. 引言 你有没有遇到过这样的情况:需要从一段文字中找出人名地名,又要判断这段话是正面还是负面情绪,还想知道它属于哪个分类?传统做法可能需要部署多个模型,每个专门处理一种任务&a…...
)
LangChain 源码剖析-消息类详解(Messages)
LangChain 源码剖析-消息类详解(Messages) 消息是包含以下内容的对象: 角色(Role)-标识消息类型(例如系统、用户) 内容(Content)-表示消息的实际内容(如文本、图像、音频、文档等) 元数据(Metadata)-可选字段,如响应信息、消息ID和令牌使用情况 LangChain提供了一种标…...

Qwen3-14B低代码平台应用:基于Dify快速构建AI工作流
Qwen3-14B低代码平台应用:基于Dify快速构建AI工作流 1. 引言:低代码时代的AI应用开发 最近遇到不少企业客户反馈,虽然大模型能力强大,但实际落地时面临两个主要障碍:一是技术团队需要投入大量资源进行模型部署和接口…...

FireRed-OCR Studio从零开始:GPU算力适配与模型缓存加速实践
FireRed-OCR Studio从零开始:GPU算力适配与模型缓存加速实践 1. 工业级文档解析工具概述 FireRed-OCR Studio是一款基于Qwen3-VL模型开发的下一代文档解析工具,专为处理复杂文档场景设计。不同于传统OCR工具,它不仅能够识别文字内容&#x…...

fre:ac音频转换终极指南:从入门到精通的完整解决方案
fre:ac音频转换终极指南:从入门到精通的完整解决方案 【免费下载链接】freac The fre:ac audio converter project 项目地址: https://gitcode.com/gh_mirrors/fr/freac fre:ac是一款功能强大的免费音频转换工具,支持多种音频格式之间的转换&…...