微信小程序OA会议系统个人中心授权登入
在我们的完成微信登入授权之前,首先我们要完成我们前面所写的代码,如果有不会的大家可以去看以下我发的前面几个文章链接我发下面了,各位加油!
微信小程序OA会议系统数据交互-CSDN博客
微信小程序会议OA系统其他页面-CSDN博客
微信小程序会议OA系统-CSDN博客 如果链接失效了大家可以去看我的首页,首页中有哦!
在我们的OA项目中我们开始写这个项目我们首先要理解如何去做,我们的思路要理清
图片解析
微信小程序登录微信登录接口演示
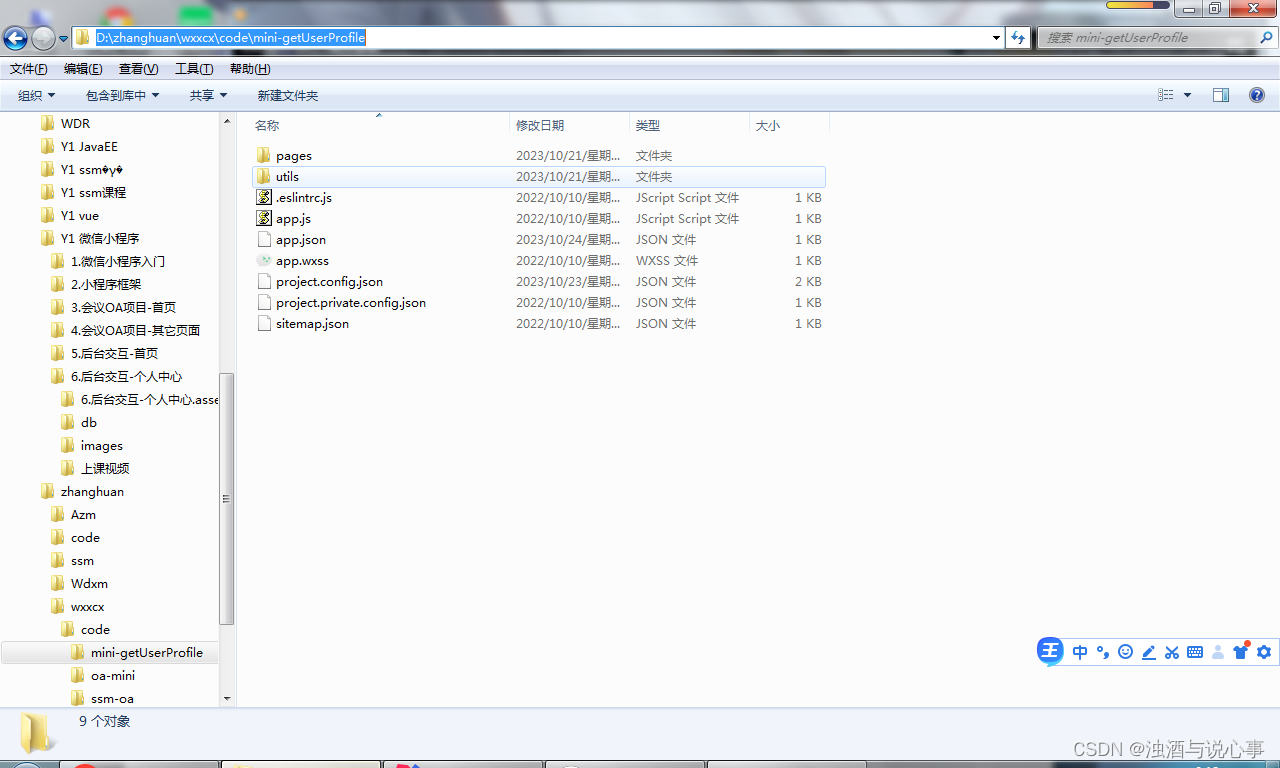
在我们开始之前在我们的微信小程序端选择好我们要的项目
进行导入

选择我们的微信小程序要的项目
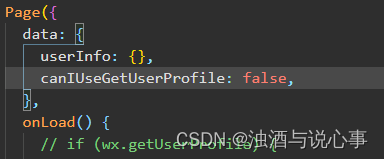
method01
method1方法获取用户信息存在一定风险,并不安全,所以把执行方法改成false
模拟器效果图片
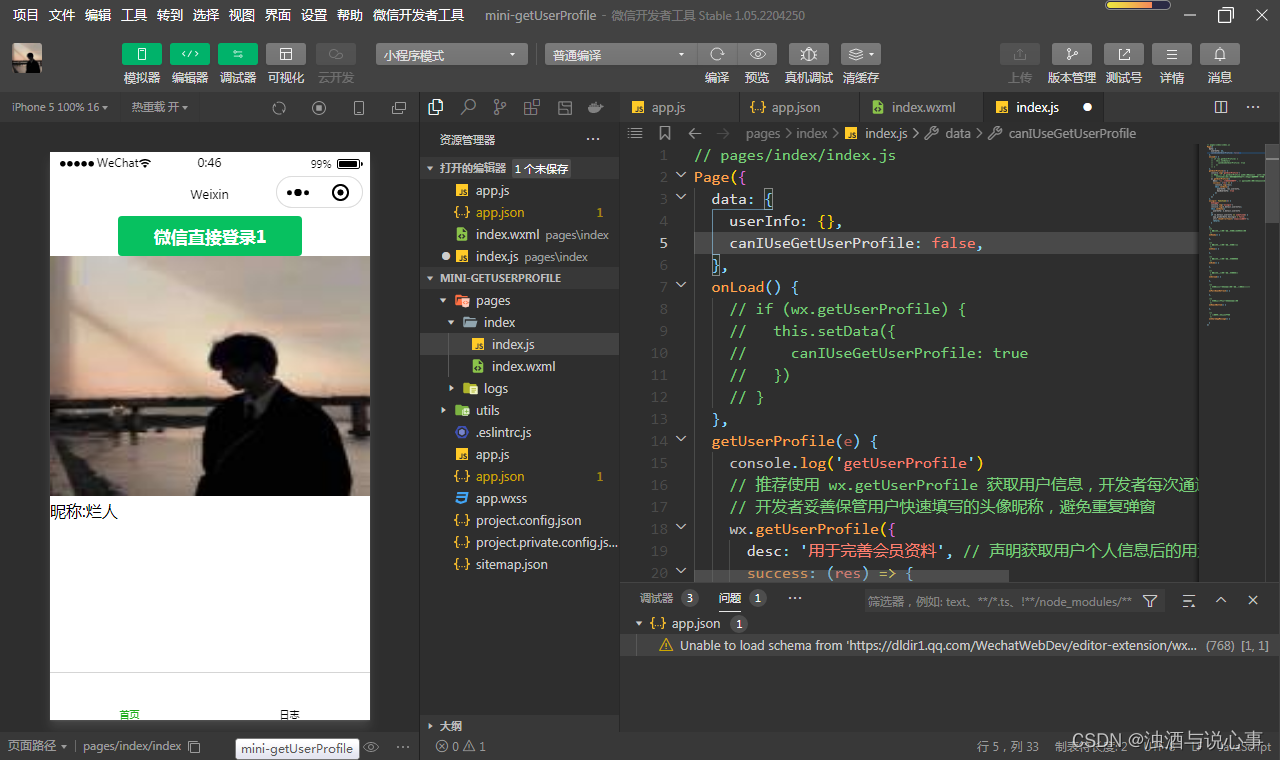
method02
method2方式获取用户信息须经用户本人确认才会获取相应信息,相对与method1方式来说给为安全。


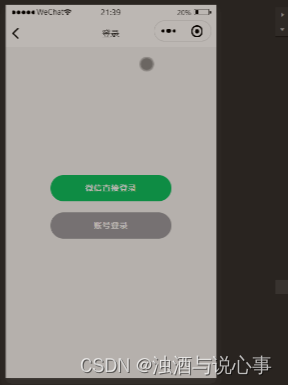
小程序授权登录
登录过程
详解
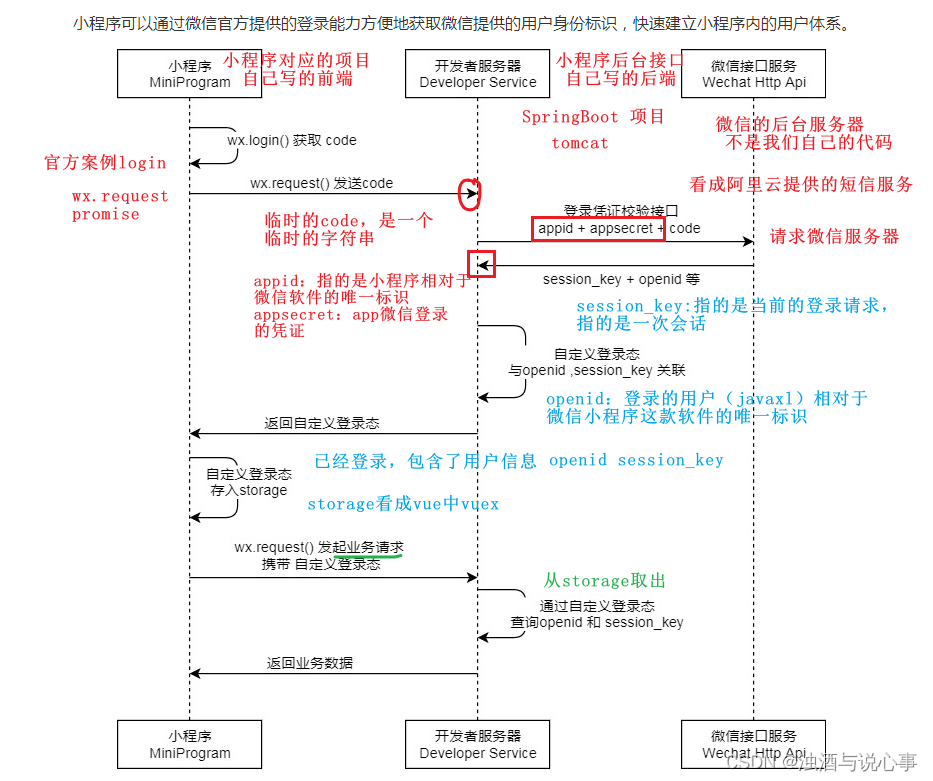
微信小程序授权登录过程如下:
-
小程序发起登录请求,调用 wx.login() 方法。
-
微信服务器返回 code,小程序将该 code 作为参数,调用 wx.request() 方法,向开发者服务器发起请求,获取用户信息。
-
开发者服务器收到请求后,在后台调用微信提供的 API,获取 session_key 和 openid。
-
开发者服务器根据获取的 session_key 和 openid,生成自己的登录态(如 token、cookie 等),并将其返回给小程序。
-
小程序将登录态保存在本地,作为用户的唯一标识,在后续的请求中携带该登录态,向开发者服务器请求数据。
需要注意的是,用户授权登录流程需要在小程序端进行,而后续的获取用户信息和生成登录态等操作则需要在开发者服务器端进行。同时,在进行用户授权的过程中,需要先调用 wx.getSetting() 方法,获取用户是否授权的权限信息,再根据用户授权情况进行后续操作。
后端代码导入
前端代码导入
前端代码
前端调用的接口地址
api.js
// 以下是业务服务器API地址// 本机开发API地址
var WxApiRoot = 'http://localhost:8080/oapro/wx/';
// 测试环境部署api地址
// var WxApiRoot = 'http://192.168.191.1:8080/oapro/wx/';
// 线上平台api地址
//var WxApiRoot = 'https://www.oa-mini.com/demo/wx/';module.exports = {IndexUrl: WxApiRoot + 'home/index', //首页数据接口SwiperImgs: WxApiRoot+'swiperImgs',MettingInfos: WxApiRoot+'meeting/list',AuthLoginByWeixin: WxApiRoot + 'auth/login_by_weixin', //微信登录UserIndex: WxApiRoot + 'user/index', //个人页面用户相关信息AuthLogout: WxApiRoot + 'auth/logout', //账号登出AuthBindPhone: WxApiRoot + 'auth/bindPhone' //绑定微信手机号
};
个人中心
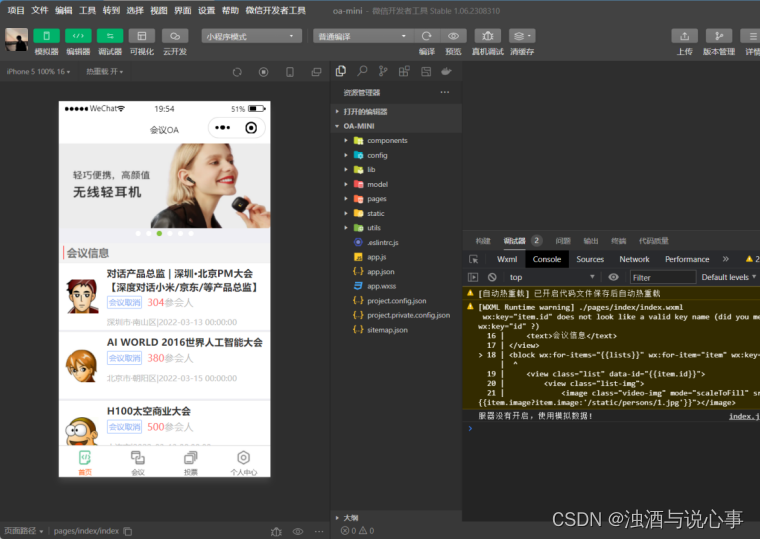
index.wxml
<view class="page-container"><view class="user-info-container"><view class="user-info"  bindtap="goLogin"><image class="user-img" mode="scaleToFill" src="{{userInfo.avatarUrl}}" /><text class="user-info-name">{{userInfo.nickName}}</text></view><image class="user-update" src="/static/tabBar/component.png" bindtap='goPages' data-url='/pages/ucenter/user/user'/></view><view class="boundary" /><view class="cells-container"><view class="cell-wrap"><image class="cell-icon" src="/static/tabBar/sdk.png" /><text class="cell-text">我主持的会议</text><view class="cell-right"><view class="cell-list-num">{{metting_pubs}}</view><view class="cell-arrow"></view></view></view><view class="cell-wrap"><image class="cell-icon" src="/static/tabBar/sdk.png" /><text class="cell-text">我参与的会议</text><view class="cell-right"><view class="cell-list-num">{{metting_joins}}</view><view class="cell-arrow"></view></view></view></view><view class="boundary" /><view class="cells-container"><view class="cell-wrap"><image class="cell-icon" src="/static/tabBar/sdk.png" /><text class="cell-text">我发布的投票</text><view class="cell-right"><view class="cell-list-num">1</view><view class="cell-arrow"></view></view></view><view class="cell-wrap"><image class="cell-icon" src="/static/tabBar/sdk.png" /><text class="cell-text">我参与的投票</text><view class="cell-right"><view class="cell-list-num">10</view><view class="cell-arrow"></view></view></view></view><view class="boundary" /><view class="cells-container"><view class="cell-wrap"><image class="cell-icon" src="/static/tabBar/template.png" /><text class="cell-text">消息</text><view class="cell-right"><view class="cell-list-num"></view><view class="cell-arrow"></view></view></view><view class="cell-wrap"><image class="cell-icon" src="/static/tabBar/component.png" /><text class="cell-text">设置</text><view class="cell-right"><view class="cell-list-num"></view><view class="cell-arrow"></view></view></view></view>
</view>
index.js
// pages/ucenter/index/index.js
var util = require('../../../utils/util.js');
var api = require('../../../config/api.js');
const app = getApp();
Page({/*** 页面的初始数据*/data: {userInfo: {nickName: '点击登录',avatarUrl: '/static/images/avatar.png'},hasLogin: false,metting_pubs: '',metting_joins: ''},/*** 生命周期函数--监听页面加载*/onLoad(options) {},/*** 生命周期函数--监听页面显示*/onShow() {this.getUserInfo();},getUserInfo() {// console.log('ucenter.index.app.globalData.hasLogin='+app.globalData.hasLogin)//获取用户的登录信息if (app.globalData.hasLogin) {let userInfo = wx.getStorageSync('userInfo');this.setData({userInfo: userInfo,hasLogin: true});//查询个人统计信息util.request(api.UserIndex).then(res => {if (res.errno === 0) {this.setData({metting_pubs: res.data.metting_pubs,metting_joins: res.data.metting_joins});}});}},goLogin() {if (!this.data.hasLogin) {wx.navigateTo({url: "/pages/auth/login/login"});}},/*** 页面跳转*/goPages: function (e) {if (this.data.hasLogin) {wx.navigateTo({url: e.currentTarget.dataset.url});} else {wx.navigateTo({url: "/pages/auth/login/login"});};}})
user.js
var util = require('../../../utils/util.js');
var api = require('../../../config/api.js');
var user = require('../../../utils/user.js');
var app = getApp();
Page({/*** 页面的初始数据*/data: {userInfo: {},hasLogin: false,userSharedUrl: ''},/*** 生命周期函数--监听页面加载*/onLoad: function (options) {},onShow: function () {let that = this;//获取用户的登录信息let userInfo = wx.getStorageSync('userInfo');this.setData({userInfo: userInfo,hasLogin: true});},getPhoneNumber: function (e) {let that = this;if (e.detail.errMsg !== "getPhoneNumber:ok") {// 拒绝授权return;}if (!this.data.hasLogin) {wx.showToast({title: '绑定失败:请先登录',icon: 'none',duration: 2000});return;}util.request(api.AuthBindPhone, {iv: e.detail.iv,encryptedData: e.detail.encryptedData}, 'POST').then(function (res) {if (res.errno === 0) {let userInfo = wx.getStorageSync('userInfo');userInfo.phone = res.data.phone;//设置手机号码wx.setStorageSync('userInfo', userInfo);that.setData({userInfo: userInfo,hasLogin: true});wx.showToast({title: '绑定手机号码成功',icon: 'success',duration: 2000});}});},exitLogin: function () {wx.showModal({title: '',confirmColor: '#b4282d',content: '退出登录?',success: function (res) {if (!res.confirm) {return;}util.request(api.AuthLogout, {}, 'POST');app.globalData.hasLogin = false;wx.removeStorageSync('token');wx.removeStorageSync('userInfo');wx.reLaunch({url: '/pages/index/index'});}})}
})
user.wxmI
<!--pages/ucenter/user/user.wxml-->
<form bindsubmit="formSubmit"><view class='personal-data'><view class='list'><view class='item acea-row row-between-wrapper'><view>头像</view><view class='pictrue'><image src='{{userInfo.avatarUrl}}'></image></view></view><view class='item acea-row row-between-wrapper'><view>名字</view><view class='input'><input type='text' disabled='true' name='nickname' value='{{userInfo.nickName}}'></input></view></view><view class='item acea-row row-between-wrapper'><view>手机号码</view><button name='phone' class='phone' value='{{userInfo.phone}}' wx:if="{{!userInfo.phone}}" bindgetphonenumber="getPhoneNumber" hover-class='none' open-type='getPhoneNumber'>点击获取</button><view class='input acea-row row-between-wrapper' wx:else><input type='text' disabled='true' name='phone' value='{{userInfo.phone}}' class='id'></input><text class='iconfont icon-suozi'></text></view></view><view class='item acea-row row-between-wrapper'><view>ID号</view><view class='input acea-row row-between-wrapper'><input type='text' value='1000{{userInfo.userId}}' disabled='true' class='id'></input><text class='iconfont icon-suozi'></text></view></view></view><button class='modifyBnt' bindtap="exitLogin">退 出</button></view>
</form>
user.wxss
@import '/static/font/iconfont.wxss';
.personal-data .list {margin-top: 15rpx;background-color: #fff;
}.personal-data .list .item {padding: 30rpx 30rpx 30rpx 0;border-bottom: 1rpx solid #f2f2f2;margin-left: 30rpx;font-size: 32rpx;color: #282828;
}.personal-data .list .item .phone {background-color: #85c43f;width: 160rpx;height: 56rpx;font-size: 24rpx;color: #fff;line-height: 56rpx;border-radius: 32rpx
}.personal-data .list .item .pictrue {width: 88rpx;height: 88rpx;
}.personal-data .list .item .pictrue image {width: 100%;height: 100%;border-radius: 50%;
}.personal-data .list .item .input {width: 415rpx;text-align: right;color: #868686;
}.personal-data .list .item .input .id {width: 365rpx;
}.personal-data .list .item .input .iconfont {font-size: 35rpx;
}.personal-data .modifyBnt {/* background-color: #85c43f; *//* background: linear-gradient(to left right, #85c43f, #fefefd); */background: radial-gradient(circle at 50%,#85c43f,#CDDC39);font-size: 32rpx;color: #fff;width: 690rpx;height: 90rpx;border-radius: 50rpx;display: flex;justify-content: center;align-items: center;line-height: 90rpx;margin: 76rpx auto 0 auto;
}.acea-row{display:flex;flex-wrap:wrap;}
.acea-row.row-top{align-items:flex-start;}
.acea-row.row-middle{align-items:center;}
.acea-row.row-bottom{align-items:flex-end;}
.acea-row.row-left{justify-content:flex-start;}
.acea-row.row-center{justify-content:center;}
.acea-row.row-right{justify-content:flex-end;}
.acea-row.row-between{justify-content:space-between;}
.acea-row.row-around{justify-content:space-around;}
.acea-row.row-column{flex-direction:column;}
.acea-row.row-column-between{flex-direction:column;justify-content:space-between;}
.acea-row.row-column-around{flex-direction:column;justify-content:space-around;}
.acea-row.row-center-wrapper{align-items:center;justify-content:center;}
.acea-row.row-between-wrapper{align-items:center;justify-content:space-between;}
view, image, text, navigator {box-sizing: border-box;padding: 0;margin: 0;
}
WxAuthController :
package com.zking.ssm.wxcontroller;/*** @Autho donkee* @Since 2022/6/27*/import cn.binarywang.wx.miniapp.bean.WxMaPhoneNumberInfo;
import com.alibaba.fastjson.JSONObject;
import com.zking.ssm.annotation.LoginUser;
import com.zking.ssm.model.UserInfo;
import com.zking.ssm.model.WxLoginInfo;
import com.zking.ssm.model.WxUser;
import com.zking.ssm.service.UserToken;
import com.zking.ssm.service.UserTokenManager;
import com.zking.ssm.service.WxUserService;
import com.zking.ssm.util.JacksonUtil;
import com.zking.ssm.util.ResponseUtil;
import com.zking.ssm.util.UserTypeEnum;
import lombok.extern.slf4j.Slf4j;
import org.springframework.beans.factory.annotation.Autowired;
import org.springframework.util.StringUtils;
import org.springframework.web.bind.annotation.PostMapping;
import org.springframework.web.bind.annotation.RequestBody;
import org.springframework.web.bind.annotation.RequestMapping;
import org.springframework.web.bind.annotation.RestController;import cn.binarywang.wx.miniapp.api.WxMaService;
import cn.binarywang.wx.miniapp.bean.WxMaJscode2SessionResult;
import javax.servlet.http.HttpServletRequest;
import java.text.DateFormat;
import java.text.SimpleDateFormat;
import java.util.Date;
import java.util.HashMap;
import java.util.Map;/*** 鉴权服务*/
@Slf4j
@RestController
@RequestMapping("/wx/auth")
public class WxAuthController {@Autowiredprivate WxMaService wxService;@Autowiredprivate WxUserService userService;/*** 微信登录** @param wxLoginInfo* 请求内容,{ code: xxx, userInfo: xxx }* @param request* 请求对象* @return 登录结果*/@PostMapping("login_by_weixin")public Object loginByWeixin(@RequestBody WxLoginInfo wxLoginInfo, HttpServletRequest request) {//客户端需携带code与userInfo信息String code = wxLoginInfo.getCode();UserInfo userInfo = wxLoginInfo.getUserInfo();if (code == null || userInfo == null) {return ResponseUtil.badArgument();}//调用微信sdk获取openId及sessionKeyString sessionKey = null;String openId = null;try {long beginTime = System.currentTimeMillis();//WxMaJscode2SessionResult result = this.wxService.getUserService().getSessionInfo(code);
// Thread.sleep(6000);long endTime = System.currentTimeMillis();log.info("响应时间:{}",(endTime-beginTime));sessionKey = result.getSessionKey();//session idopenId = result.getOpenid();//用户唯一标识 OpenID} catch (Exception e) {e.printStackTrace();}if (sessionKey == null || openId == null) {log.error("微信登录,调用官方接口失败:{}", code);return ResponseUtil.fail();}else{log.info("openId={},sessionKey={}",openId,sessionKey);}//根据openId查询wx_user表//如果不存在,初始化wx_user,并保存到数据库中//如果存在,更新最后登录时间WxUser user = userService.queryByOid(openId);if (user == null) {user = new WxUser();user.setUsername(openId);user.setPassword(openId);user.setWeixinOpenid(openId);user.setAvatar(userInfo.getAvatarUrl());user.setNickname(userInfo.getNickName());user.setGender(userInfo.getGender());user.setUserLevel((byte) 0);user.setStatus((byte) 0);user.setLastLoginTime(new Date());user.setLastLoginIp(IpUtil.client(request));user.setShareUserId(1);userService.add(user);} else {user.setLastLoginTime(new Date());user.setLastLoginIp(IpUtil.client(request));if (userService.updateById(user) == 0) {log.error("修改失败:{}", user);return ResponseUtil.updatedDataFailed();}}// tokenUserToken userToken = null;try {userToken = UserTokenManager.generateToken(user.getId());} catch (Exception e) {log.error("微信登录失败,生成token失败:{}", user.getId());e.printStackTrace();return ResponseUtil.fail();}userToken.setSessionKey(sessionKey);log.info("SessionKey={}",UserTokenManager.getSessionKey(user.getId()));Map<Object, Object> result = new HashMap<Object, Object>();result.put("token", userToken.getToken());result.put("tokenExpire", userToken.getExpireTime().toString());userInfo.setUserId(user.getId());if (!StringUtils.isEmpty(user.getMobile())) {// 手机号存在则设置userInfo.setPhone(user.getMobile());}try {DateFormat df = new SimpleDateFormat("yyyy-MM-dd");String registerDate = df.format(user.getAddTime() != null ? user.getAddTime() : new Date());userInfo.setRegisterDate(registerDate);userInfo.setStatus(user.getStatus());userInfo.setUserLevel(user.getUserLevel());// 用户层级userInfo.setUserLevelDesc(UserTypeEnum.getInstance(user.getUserLevel()).getDesc());// 用户层级描述} catch (Exception e) {log.error("微信登录:设置用户指定信息出错:"+e.getMessage());e.printStackTrace();}result.put("userInfo", userInfo);log.info("【请求结束】微信登录,响应结果:{}", JSONObject.toJSONString(result));return ResponseUtil.ok(result);}/*** 绑定手机号码** @param userId* @param body* @return*/@PostMapping("bindPhone")public Object bindPhone(@LoginUser Integer userId, @RequestBody String body) {log.info("【请求开始】绑定手机号码,请求参数,body:{}", body);String sessionKey = UserTokenManager.getSessionKey(userId);String encryptedData = JacksonUtil.parseString(body, "encryptedData");String iv = JacksonUtil.parseString(body, "iv");WxMaPhoneNumberInfo phoneNumberInfo = null;try {phoneNumberInfo = this.wxService.getUserService().getPhoneNoInfo(sessionKey, encryptedData, iv);} catch (Exception e) {log.error("绑定手机号码失败,获取微信绑定的手机号码出错:{}", body);e.printStackTrace();return ResponseUtil.fail();}String phone = phoneNumberInfo.getPhoneNumber();WxUser user = userService.selectByPrimaryKey(userId);user.setMobile(phone);if (userService.updateById(user) == 0) {log.error("绑定手机号码,更新用户信息出错,id:{}", user.getId());return ResponseUtil.updatedDataFailed();}Map<Object, Object> data = new HashMap<Object, Object>();data.put("phone", phone);log.info("【请求结束】绑定手机号码,响应结果:{}", JSONObject.toJSONString(data));return ResponseUtil.ok(data);}/*** 注销登录*/@PostMapping("logout")public Object logout(@LoginUser Integer userId) {log.info("【请求开始】注销登录,请求参数,userId:{}", userId);if (userId == null) {return ResponseUtil.unlogin();}try {UserTokenManager.removeToken(userId);} catch (Exception e) {log.error("注销登录出错:userId:{}", userId);e.printStackTrace();return ResponseUtil.fail();}log.info("【请求结束】注销登录成功!");return ResponseUtil.ok();}
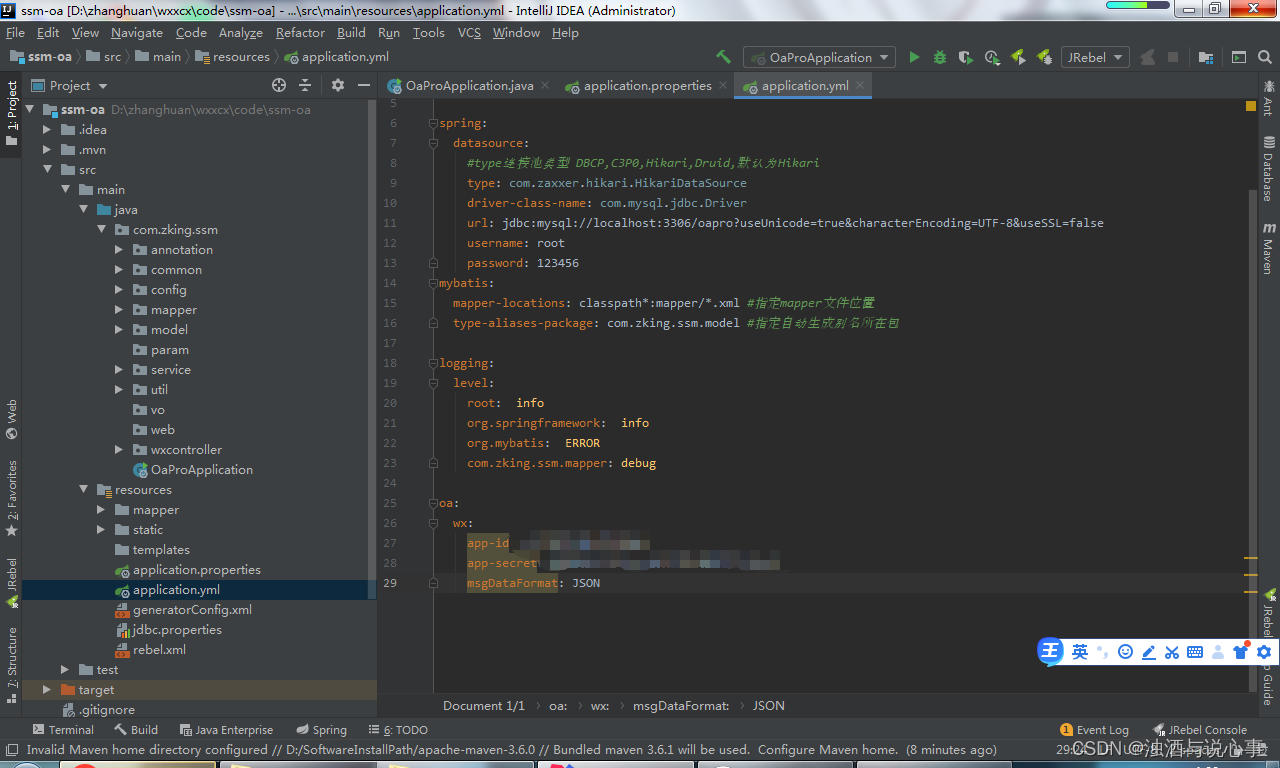
}在 application.yml 文件中进行配置后台的数据库及微信小程序的AppID(小程序ID)及AppSecret(小程序密钥),来帮助访问微信的接口服务。
相关文章:
微信小程序OA会议系统个人中心授权登入
在我们的完成微信登入授权之前,首先我们要完成我们前面所写的代码,如果有不会的大家可以去看以下我发的前面几个文章链接我发下面了,各位加油! 微信小程序OA会议系统数据交互-CSDN博客 微信小程序会议OA系统其他页面-CSDN博客 …...
Git(一)Windows下安装及使用Git Bash
目录 一、简介1.1 什么是Git?1.2 Git 的主要特点1.3 什么是 Git Bash? 二、下载三、安装3.1 同意协议3.2 选择安装位置3.3 其他配置(【Next】 即可)3.4 安装完毕3.5 打开 Git Bash 官网地址: https://www.git-scm.com/…...
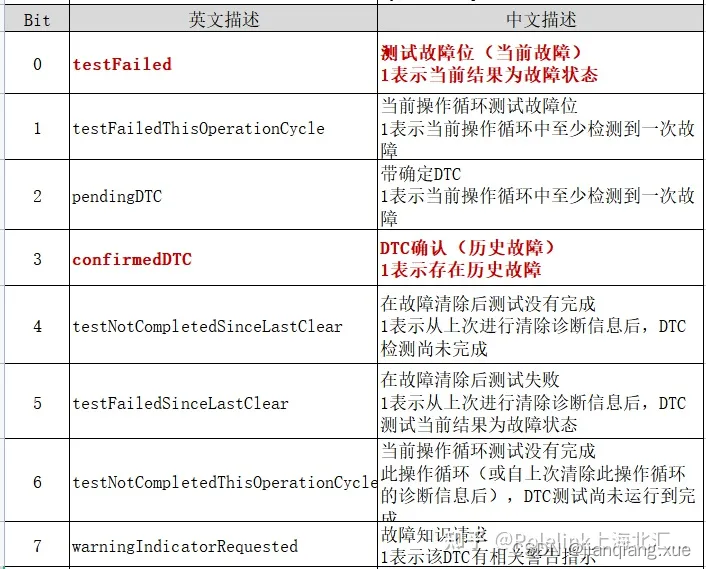
[AUTOSAR][诊断管理][ECU][$19] 读取ECU的DTC故障信息
一、简介 在车载诊断中常用的诊断协议有ISO 14229等,在协议中主要定义了诊断请求、诊断响应的报文格式及ECU该如何处理诊断请求的应用。其中ISO 14229系列标准协议定义了用于行业内诊断通信的需求规范,也就是UDS。UDS主要应用于OSI七层模型的第七层——…...
)
前端精度问题 (id 返回的和传给后端的不一致问题)
eg: 后端返回 id 10976458979374929 前端获取到的: 10976458979374928 原因: js 中 Number类型范围-2^53 1 到 2^53 - 1 Number.isSafeInteger()用来判断一个整数是否落在这个范围之内。 java中 Long 类型的取值范围是-2^63 1 到 2^63 - 1, 比JavaScript中大很多࿰…...

WPF Material Design UI框架
前言 Material Design in xaml 是开源免费的ui框架,工控软件主打的就是简单界面。 以下简称MD 相关资源 MaterialDesignInXamlToolkit Github 地址 MD 快速启动 MD 案例压缩包 MD 框架使用 启动环境配置 安装Nuget包 App.xaml 配置 <Application x:Class&qu…...
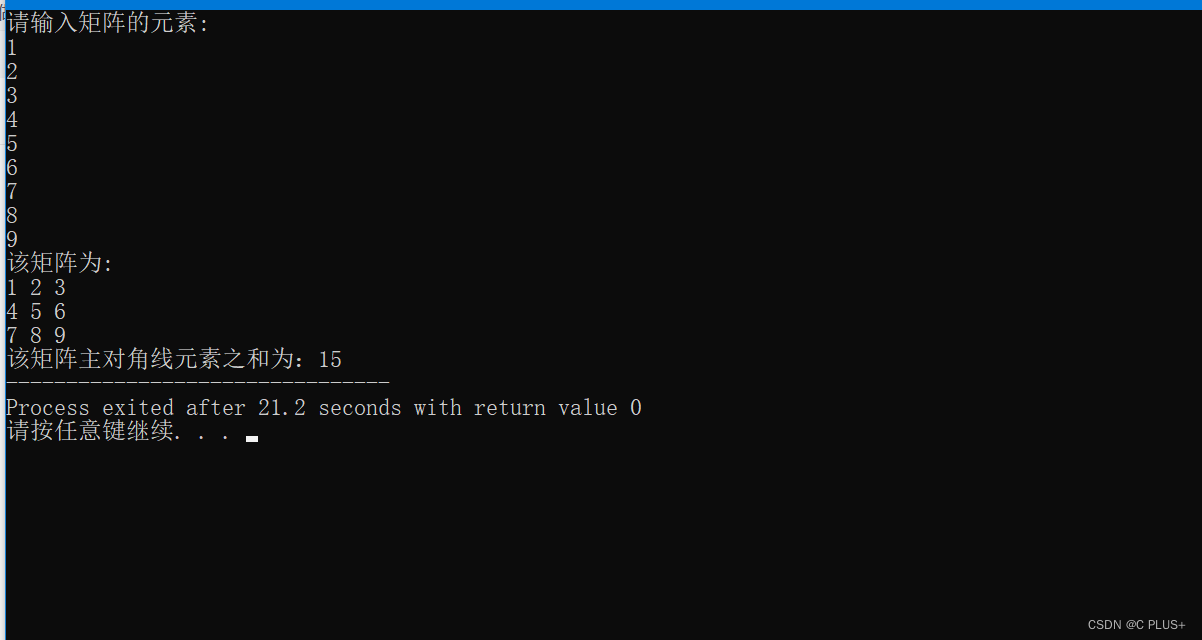
C语言求 3*3 矩阵对角线之和
完整代码: // 求 3*3 矩阵对角线之和 #include<stdio.h>int main() {int n3;int arr[3][3];// 输入矩阵printf("请输入矩阵的元素:\n");for (int i 0; i < n; i){for (int j 0; j < n; j){scanf("%d", &arr[i][j]);}}int su…...

缓存分片中的哈希算法与一致性哈希算法
什么是缓存分片 在高并发场景下,缓存往往成为了瓶颈。这时候,我们可以通过缓存数据分片的方式来解决问题。所谓缓存数据分片,就是将缓存数据按照一定的规则分成多个片段,每个片段由不同的缓存节点负责。这样做有两个好处…...
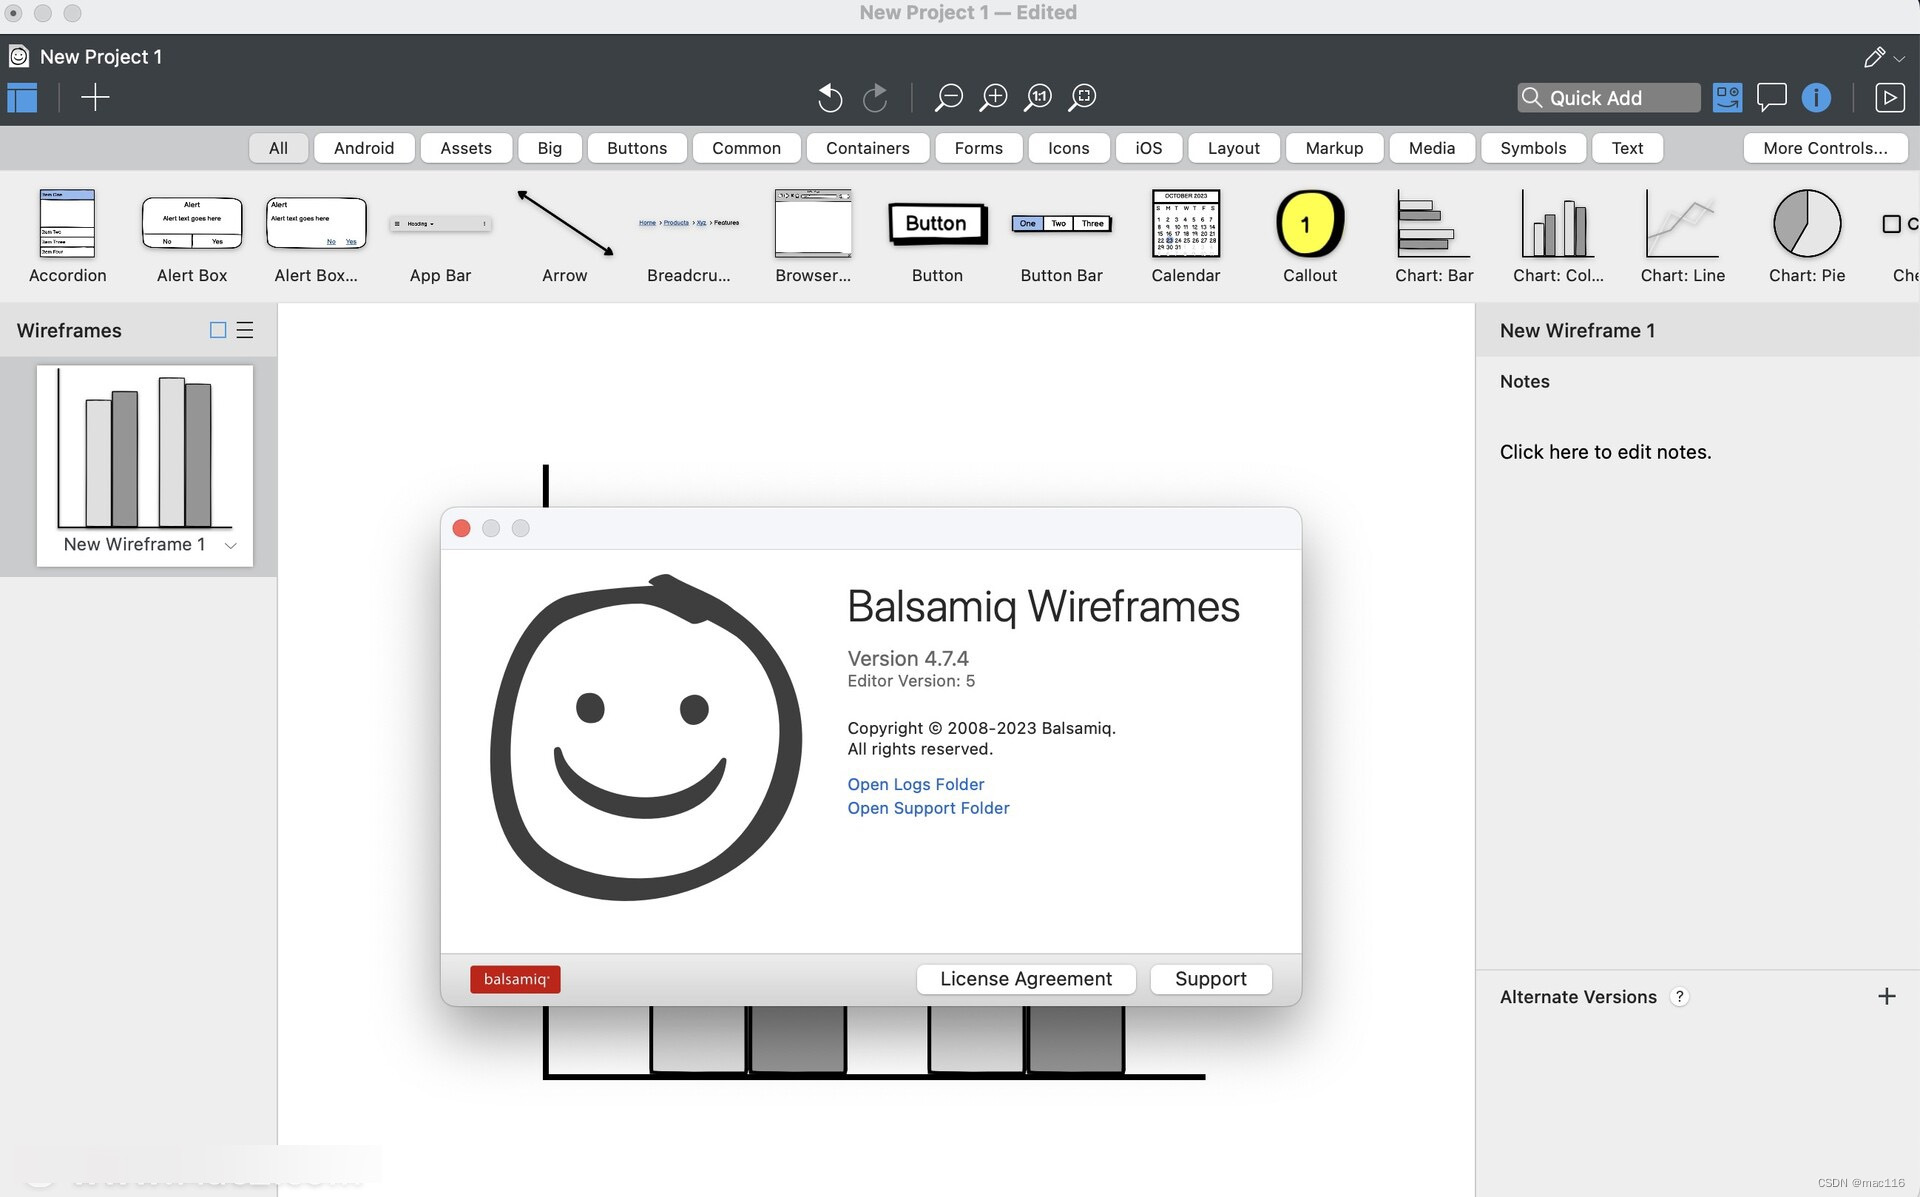
线框图软件:Balsamiq Wireframes mac中文介绍
Balsamiq Wireframes mac是一款用于创建线框图的软件工具。它旨在帮助用户快速制作出清晰、简洁的界面原型,以便在设计和开发过程中进行协作和沟通。 Balsamiq Wireframes具有简单直观的用户界面,使用户能够快速添加和编辑各种用户界面元素,如…...

【wxWidgets实现透明wxPanel_核心实现_原创思想】
描述 wxWidgets 根本就没有实现过透明wxPanel容器,你设置wxTRANSPARENT_WINDOW,结果sorry 黑色,哈哈哈哈, 就是和你作对.想想当下那么漂亮的桌面, 背景, 透明, 特效.哎 悲哀啊,实现不了,就那死板的界面特性. 网上找了好久,也是乱七八糟,改底层代码还是算了吧,升级特要命.都是只…...

重大技术问题,iPhone 15 Pro Max面临“烧屏门”风波 | 百能云芯
近期,社交媒体平台上陆续涌现大量用户和数码博主就iPhone 15 Pro Max出现烧屏问题的投诉与评论。 烧屏问题是OLED屏幕常见的一个缺陷,这是由OLED屏幕发光机制引发的,OLED屏幕可视为由无数微小的灯泡-像素点构成,这些像素点可以独立…...
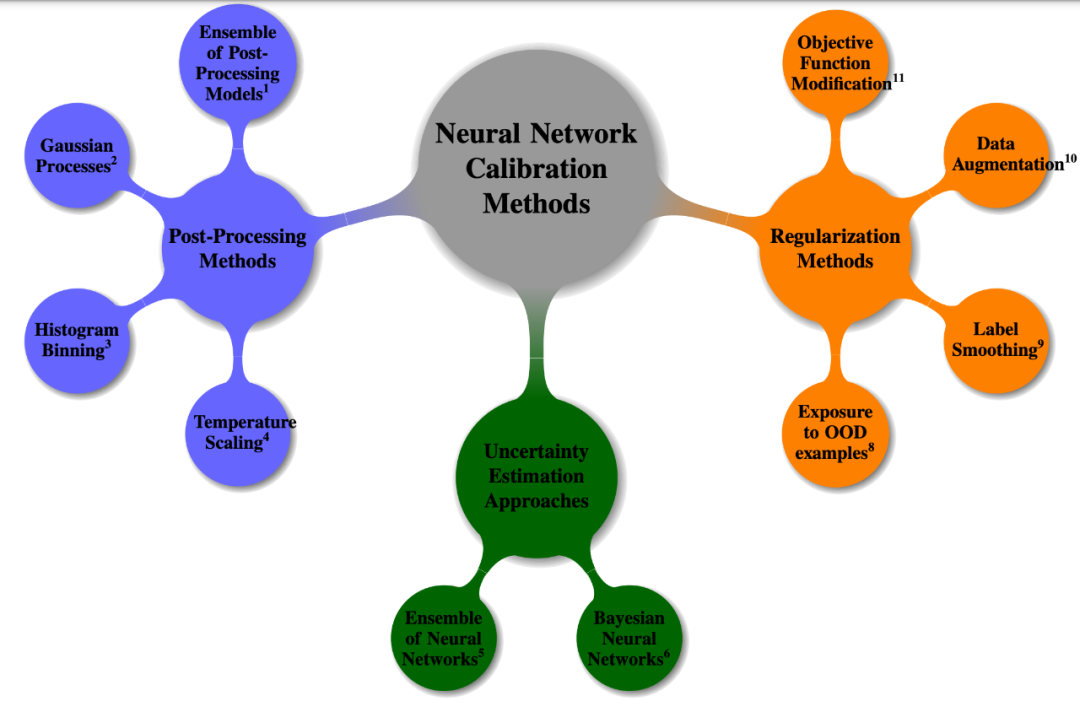
深度学习中的不确定性综述
领域学者: http://www.gatsby.ucl.ac.uk/~balaji/ 论文标题: A Survey of Uncertainty in Deep Neural Networks 论文链接: https://arxiv.org/pdf/2107.03342.pdf 概要 在过去的十年中,神经网络几乎遍及所有科学领域&#x…...

uni-app 小宠物 - 会说话的小鸟
在 template 中 <view class"container"><view class"external-shape"><view class"face-box"><view class"eye-box eye-left"><view class"eyeball-box eyeball-left"><span class"…...

POJ 3470 Walls 树上分桶
今天太晚了,代码先发上,思路明天说吧。 陌上花开,树上分桶 #include <iostream> #include <algorithm> #include <vector> using namespace std; /*** 对于y1不等于y2的,可以用datC求解,对于x1不等…...

HIVE-17824,删除hdfs分区信息,清理metastore元数据
当手动删除HDFS 分区数据时,但是并没有清理 Hive 中的分区元数据,删除操作无法自动更新hive分区表元数据。也就是从hdfs中删除大量分区数据,并没有执行如下命令: alter table drop partition commad 从hive 3.0.0开始可以使用MSCK的方法发现新分区或删除丢失的分区; MSCK [REPA…...
Python深度学习进阶与应用丨注意力(Attention)机制、Transformer模型、生成式模型、目标检测算法、图神经网络、强化学习详解等
目录 第一章 注意力(Attention)机制详解 第二章 Transformer模型详解 第三章 生成式模型详解 第四章 目标检测算法详解 第五章 图神经网络详解 第六章 强化学习详解 第七章 深度学习模型可解释性与可视化方法详解 更多应用 近年来,伴…...
javaEE -6(10000详解文件操作)
一:认识文件 我们先来认识狭义上的文件(file)。针对硬盘这种持久化存储的I/O设备,当我们想要进行数据保存时,往往不是保存成一个整体,而是独立成一个个的单位进行保存,这个独立的单位就被抽象成文件的概念,…...

图像处理之《基于多MSB预测和Huffman编码的加密图像可逆数据隐藏》论文精读
一、文章摘要 随着云存储和隐私保护的发展,可逆数据隐藏在加密图像中(RDHEI)作为一种技术越来越受到人们的关注,它可以:在图像加密领域嵌入额外的数据,确保嵌入的数据可以无差错地提取,原始图像可以无损地恢复。本文提…...

Nginx安装配置项目部署然后加SSL
个人操作笔记记录 第一步:把 nginx 的源码包nginx-1.8.0.tar.gz上传到 linux 系统 第二步:解压缩 tar zxvf nginx-1.8.0.tar.gz 第三步:进入nginx-1.8.0目录 使用 configure 命令创建一 makeFile 文件。 直接复制过去运行 ./configur…...

【算法练习Day26】分发饼干摆动序列 最大子数组和
📝个人主页:Sherry的成长之路 🏠学习社区:Sherry的成长之路(个人社区) 📖专栏链接:练题 🎯长路漫漫浩浩,万事皆有期待 文章目录 分发饼干摆动序列最大子数组…...

redis缓存击穿/穿透/雪崩面试回答
面试官:什么是缓存穿透 ? 怎么解决 ? 候选人: 嗯~~,我想一下 缓存穿透是指查询一个一定不存在的数据,如果从存储层查不到数据则不写入缓存,这将导致这个不存在的数据每次请求都要到 DB 去查询,可能导致…...

OpenClaw+SecGPT-14B成本对比:自建模型比SaaS省下80%费用
OpenClawSecGPT-14B成本对比:自建模型比SaaS省下80%费用 1. 为什么我要做这个成本对比实验 去年我开始使用OpenClaw自动化处理日常安全扫描任务时,发现一个令人头疼的问题:每次调用商业安全API的费用高得惊人。作为一个独立安全研究员&…...

WarcraftHelper终极指南:如何让经典魔兽争霸III在现代电脑上完美运行
WarcraftHelper终极指南:如何让经典魔兽争霸III在现代电脑上完美运行 【免费下载链接】WarcraftHelper Warcraft III Helper , support 1.20e, 1.24e, 1.26a, 1.27a, 1.27b 项目地址: https://gitcode.com/gh_mirrors/wa/WarcraftHelper 还在为魔兽争霸III在…...

Blazor组件化演进终极指南:2026年必须掌握的5大架构范式与3种反模式规避清单
第一章:Blazor组件化演进的底层动因与2026技术坐标系Blazor 的组件化并非单纯语法糖的迭代,而是对 Web 前端架构范式、.NET 生态边界以及现代云原生交付链路三重压力下的系统性响应。其底层动因根植于三个不可逆趋势:WebAssembly 运行时成熟度…...

STM32智能遥控婴儿车设计与实现
1. 项目概述这个基于STM32的智能遥控婴儿车项目,是我在去年为朋友家新生儿设计的实用型作品。当时朋友抱怨市面上智能婴儿车要么功能单一,要么价格昂贵,于是萌生了DIY一个多功能、低成本解决方案的想法。经过三个月的迭代开发,最终…...

ELF与镜像文件格式解析及二进制工具链实践
1. 文件格式基础概念解析在软件开发与系统底层交互过程中,我们经常会遇到各种不同类型的二进制文件。这些文件虽然都以二进制形式存储,但各自具有完全不同的结构和用途。理解它们的区别对于程序编译、链接、调试以及系统级开发都至关重要。ELF࿰…...

2025届必备的十大降AI率平台推荐
Ai论文网站排名(开题报告、文献综述、降aigc率、降重综合对比) TOP1. 千笔AI TOP2. aipasspaper TOP3. 清北论文 TOP4. 豆包 TOP5. kimi TOP6. deepseek 为了降低文本生成痕迹,针对知网AI检测系统的核心评估机制,要从语义连…...

如何快速掌握 Ego:Go 语言的终极 ERB 风格模板引擎教程
如何快速掌握 Ego:Go 语言的终极 ERB 风格模板引擎教程 【免费下载链接】ego An ERB-style templating language for Go. 项目地址: https://gitcode.com/gh_mirrors/ego/ego Ego 是一款为 Go 语言打造的 ERB 风格模板引擎,它通过将模板转译为纯 …...

Java响应式编程进入Loom纪元:Oracle JVM团队未公开的4个Virtual Thread调度约束,导致Project Reactor 3.7.x在生产环境静默降级
第一章:Java响应式编程进入Loom纪元:转型必要性与风险全景图Java平台正经历一场底层运行时范式的深刻迁移——Project Loom 的正式落地(JDK 21 GA)将虚拟线程(Virtual Threads)与结构化并发(Str…...

3步解决浏览器Markdown阅读难题:从乱码到专业渲染的蜕变之路
3步解决浏览器Markdown阅读难题:从乱码到专业渲染的蜕变之路 【免费下载链接】markdown-viewer Markdown Viewer / Browser Extension 项目地址: https://gitcode.com/gh_mirrors/ma/markdown-viewer 你是否遇到过这样的窘境:在浏览器中打开本地M…...

C# 面试高频题:装箱和拆箱是如何影响性能的?伟
OCP原则 ocp指开闭原则,对扩展开放,对修改关闭。是七大原则中最基本的一个原则。 依赖倒置原则(DIP) 什么是依赖倒置原则 核心是面向接口编程、面向抽象编程, 不是面向具体编程。 依赖倒置原则的目的 降低耦合度&#…...