.NET CORE 3.1 集成JWT鉴权和授权2
JWT:全称是JSON Web Token是目前最流行的跨域身份验证、分布式登录、单点登录等解决方案。
通俗地来讲,JWT是能代表用户身份的令牌,可以使用JWT令牌在api接口中校验用户的身份以确认用户是否有访问api的权限。
授权:这是使用JWT的最常见方案。一旦用户登录,每个后续请求将包括JWT,允许用户访问该令牌允许的路由,服务和资源。

在身份验证中,当用户使用其凭据成功登录时,将返回JSON Web令牌。由于令牌是凭证,因此必须非常小心以防止出现安全问题。一般情况下,您不应该将令牌保留的时间超过要求。
每当用户想要访问受保护的路由或资源时,用户代理应该使用承载模式发送JWT,通常在Authorization标头中,标题的内容应如下所示:
Authorization: Bearer <token>
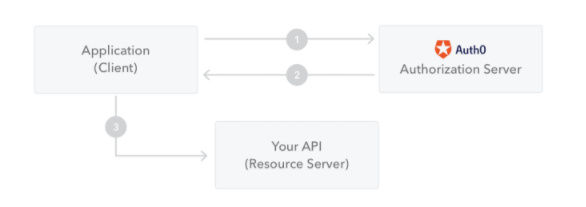
1、应用程序向授权服务器请求授权;
2、校验用户身份,校验成功,返回token;
3、应用程序使用访问令牌访问受保护的资源。
JWT的实现方式是将用户信息存储在客户端,服务端不进行保存。每次请求都把令牌带上以校验用户登录状态,这样服务就变成了无状态的,服务器集群也很好扩展。
更多理论知识可以查看官网,或者查看相关网友的文章,如下推荐文章:
- asp.net core 集成JWT(一):https://www.cnblogs.com/7tiny/archive/2019/06/13/11012035.html
- 五分钟带你了解啥是JWT:https://zhuanlan.zhihu.com/p/86937325
- C#分布式登录——jwt:https://www.cnblogs.com/yswenli/p/13510050.html
在nuget里面引用jwt集成的程序包,这里需要注意的是,如果你用的是.NET Core 3.1的框架的话,程序包版本选择3.1.7
Microsoft.AspNetCore.Authentication.JwtBearer
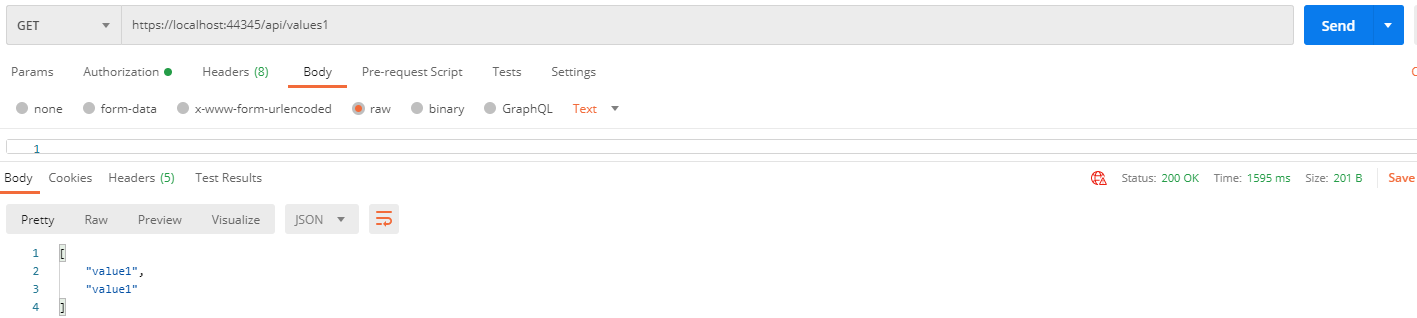
添加数据访问模拟api,新建控制器ValuesController
其中api/value1是可以直接访问的,api/value2添加了权限校验特性标签 [Authorize]
using Microsoft.AspNetCore.Authentication;
using Microsoft.AspNetCore.Authorization;
using Microsoft.AspNetCore.Mvc;
using System;
using System.Collections.Generic;
using System.Linq;
using System.Security.Claims;
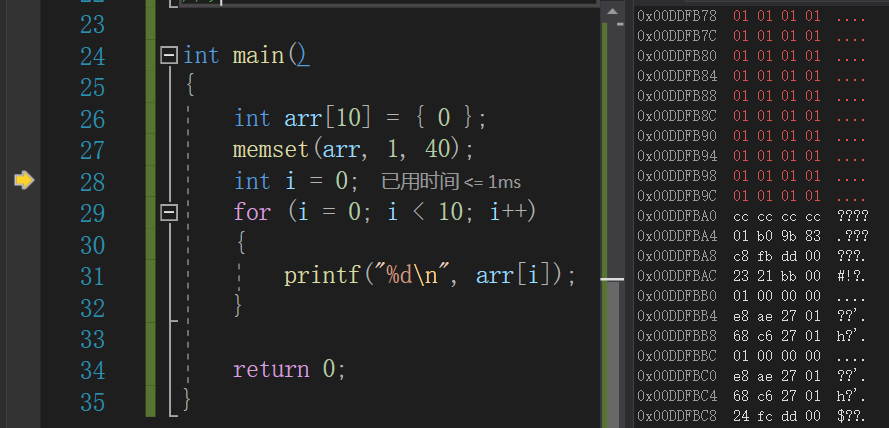
using System.Threading.Tasks;namespace jwtWebAPI.Controllers
{[ApiController]public class ValuesController : ControllerBase{[HttpGet][Route("api/values1")]public ActionResult<IEnumerable<string>> values1(){return new string[] { "value1", "value1" };}/*** 该接口用Authorize特性做了权限校验,如果没有通过权限校验,则http返回状态码为401* 调用该接口的正确姿势是:* 1.登陆,调用api/Auth接口获取到token* 2.调用该接口 api/value2 在请求的Header中添加参数 Authorization: Bearer eyJhbGciOiJIUzI1NiIsInR5cCI6IkpXVCJ9.eyJuYmYiOiIxNTYwMzM1MzM3IiwiZXhwIjoxNTYwMzM3MTM3LCJodHRwOi8vc2NoZW1hcy54bWxzb2FwLm9yZy93cy8yMDA1LzA1L2lkZW50aXR5L2NsYWltcy9uYW1lIjoiemhhbmdzYW4iLCJpc3MiOiJodHRwOi8vbG9jYWxob3N0OjUwMDAiLCJhdWQiOiJodHRwOi8vbG9jYWxob3N0OjUwMDAifQ.1S-40SrA4po2l4lB_QdzON_G5ZNT4P_6U25xhTcl7hI* Bearer后面有空格,且后面是第一步中接口返回的token值* */[HttpGet][Route("api/value2")][Authorize]public ActionResult<IEnumerable<string>> value2(){//这是获取自定义参数的方法var auth = HttpContext.AuthenticateAsync().Result.Principal.Claims;var userName = auth.FirstOrDefault(t => t.Type.Equals(ClaimTypes.NameIdentifier))?.Value;return new string[] { "访问成功:这个接口登陆过的用户都可以访问", $"userName={userName}" };}}
}添加模拟登陆生成Token的api,新建控制器AuthController
这里模拟一下登陆校验,只验证了用户密码不为空即通过校验,真实环境完善校验用户和密码的逻辑。
using Microsoft.AspNetCore.Authorization;
using Microsoft.AspNetCore.Mvc;
using Microsoft.IdentityModel.Tokens;
using System;
using System.Collections.Generic;
using System.IdentityModel.Tokens.Jwt;
using System.Linq;
using System.Security.Claims;
using System.Text;
using System.Threading.Tasks;namespace jwtWebAPI.Controllers
{[ApiController]public class AuthController : Controller{/// <summary>/// 通过账号+密码获取Token/// </summary>/// <param name="userName"></param>/// <param name="pwd"></param>/// <returns>Token</returns>[AllowAnonymous][HttpGet][Route("api/auth")]public IActionResult GetToken(string userName, string pwd){if (!string.IsNullOrEmpty(userName)){//每次登陆动态刷新Const.ValidAudience = userName + pwd + DateTime.Now.ToString();// push the user’s name into a claim, so we can identify the user later on.//这里可以随意加入自定义的参数,key可以自己随便起var claims = new[]{new Claim(JwtRegisteredClaimNames.Nbf,$"{new DateTimeOffset(DateTime.Now).ToUnixTimeSeconds()}") ,new Claim (JwtRegisteredClaimNames.Exp,$"{new DateTimeOffset(DateTime.Now.AddMinutes(3)).ToUnixTimeSeconds()}"),new Claim(ClaimTypes.NameIdentifier, userName)};//sign the token using a secret key.This secret will be shared between your API and anything that needs to check that the token is legit.var key = new SymmetricSecurityKey(Encoding.UTF8.GetBytes(Const.SecurityKey));var creds = new SigningCredentials(key, SecurityAlgorithms.HmacSha256);//.NET Core’s JwtSecurityToken class takes on the heavy lifting and actually creates the token.var token = new JwtSecurityToken(//颁发者issuer: Const.Domain,//接收者audience: Const.ValidAudience,//过期时间(可自行设定,注意和上面的claims内部Exp参数保持一致)expires: DateTime.Now.AddMinutes(3),//签名证书signingCredentials: creds,//自定义参数claims: claims);return Ok(new{token = new JwtSecurityTokenHandler().WriteToken(token)});}else{return BadRequest(new { message = "username or password is incorrect." });}}}
}
Startup添加JWT验证的相关配置
using Microsoft.AspNetCore.Authentication.JwtBearer;
using Microsoft.AspNetCore.Builder;
using Microsoft.AspNetCore.Hosting;
using Microsoft.AspNetCore.HttpsPolicy;
using Microsoft.AspNetCore.Mvc;
using Microsoft.Extensions.Configuration;
using Microsoft.Extensions.DependencyInjection;
using Microsoft.Extensions.Hosting;
using Microsoft.Extensions.Logging;
using Microsoft.IdentityModel.Tokens;
using System;
using System.Collections.Generic;
using System.Linq;
using System.Text;
using System.Threading.Tasks;namespace jwtWebAPI
{public class Startup{public Startup(IConfiguration configuration){Configuration = configuration;}public IConfiguration Configuration { get; }// This method gets called by the runtime. Use this method to add services to the container.public void ConfigureServices(IServiceCollection services){//添加jwt验证:services.AddAuthentication(JwtBearerDefaults.AuthenticationScheme).AddJwtBearer(options => {options.TokenValidationParameters = new TokenValidationParameters{ValidateLifetime = true,//是否验证失效时间ClockSkew = TimeSpan.FromSeconds(30),  //时间偏移量(允许误差时间)ValidateAudience = true,//是否验证Audience(验证之前的token是否失效)//ValidAudience = Const.GetValidudience(),//Audience//这里采用动态验证的方式,在重新登陆时,刷新token,旧token就强制失效了AudienceValidator = (m, n, z) =>{return m != null && m.FirstOrDefault().Equals(Const.ValidAudience);},ValidateIssuer = true,//是否验证Issuer(颁发者)ValidAudience = Const.Domain,//Audience    【Const是新建的一个常量类】  接收者 ValidIssuer = Const.Domain,//Issuer,这两项和前面签发jwt的设置一致      颁发者ValidateIssuerSigningKey = true,//是否验证SecurityKeyIssuerSigningKey = new SymmetricSecurityKey(Encoding.UTF8.GetBytes(Const.SecurityKey))//拿到秘钥SecurityKey};options.Events = new JwtBearerEvents{OnAuthenticationFailed = context =>{//Token expiredif (context.Exception.GetType() == typeof(SecurityTokenExpiredException)){context.Response.Headers.Add("Token-Expired", "true");}return Task.CompletedTask;}};});services.AddControllers();}// This method gets called by the runtime. Use this method to configure the HTTP request pipeline.public void Configure(IApplicationBuilder app, IWebHostEnvironment env){ //添加jwt验证app.UseAuthentication();if (env.IsDevelopment()){app.UseDeveloperExceptionPage();}app.UseHttpsRedirection();app.UseRouting();app.UseAuthorization();app.UseEndpoints(endpoints =>{endpoints.MapControllers();});}}
}
创建常量类Const
using System;
using System.Collections.Generic;
using System.Linq;
using System.Threading.Tasks;namespace jwtWebAPI
{public class Const{/// <summary>/// 这里为了演示,写死一个密钥。实际生产环境可以从配置文件读取,这个是用网上工具随便生成的一个密钥(md5或者其他都可以)/// </summary>public const string SecurityKey = "48754F4C58F9EA428FE09D714E468211";/// <summary>/// 站点地址(颁发者、接受者),这里测试和当前本地运行网站相同,实际发到正式环境应为域名地址/// </summary>public const string Domain = "https://localhost:44345";/// <summary>/// 受理人,之所以弄成可变的是为了用接口动态更改这个值以模拟强制Token失效/// 真实业务场景可以在数据库或者redis存一个和用户id相关的值,生成token和验证token的时候获取到持久化的值去校验/// 如果重新登陆,则刷新这个值/// </summary>public static string ValidAudience;}
}
JWT登录授权测试成功

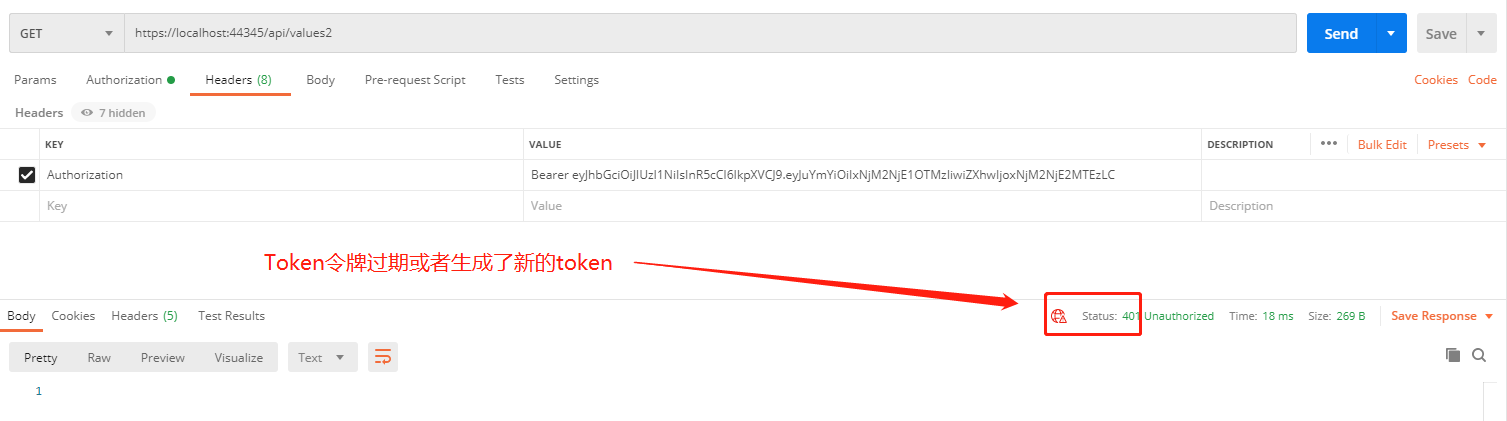
返回了状态码401,也就是未经授权:访问由于凭据无效被拒绝。 说明JWT校验生效了,我们的接口收到了保护。
调用模拟登陆授权接口:https://localhost:44345/api/auth?userName=xiongze&pwd=123456
这里的用户密码是随便写的,因为我们模拟登陆只是校验了下非空,因此写什么都能通过。
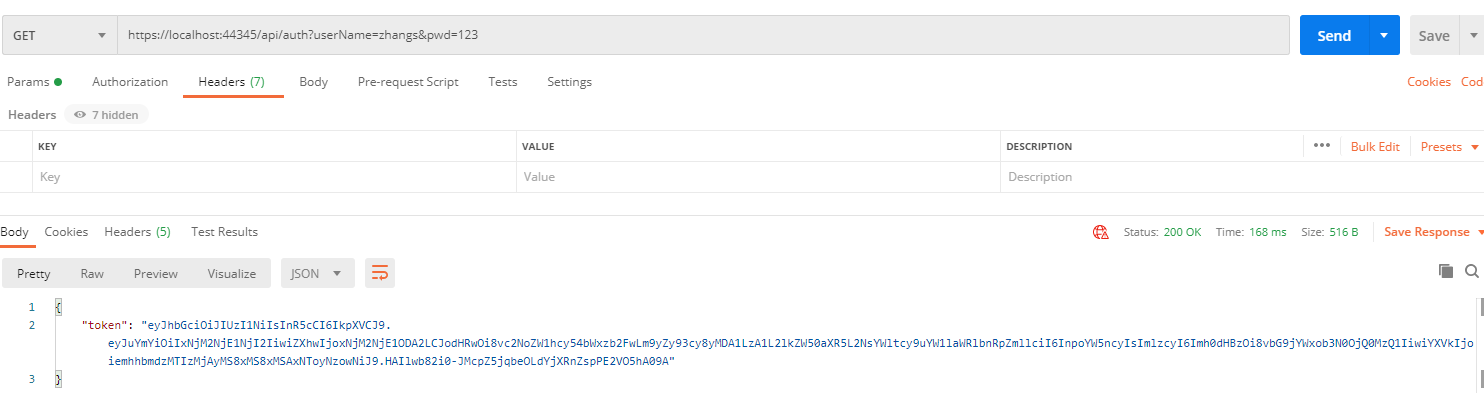
然后我们得到了一个xxx.yyy.zzz 格式的 token 值。我们把token复制出来。
在刚才401的接口(https://localhost:44345/api/values2)请求header中添加JWT的参数,把我们的token加上去
再次调用我们的模拟数据接口,但是这次我们加了一个header,KEY:Authorization Value:Bearer Tokne的值
这里需要注意 Bearer 后面是有一个空格的,然后就是我们上一步获取到的token,
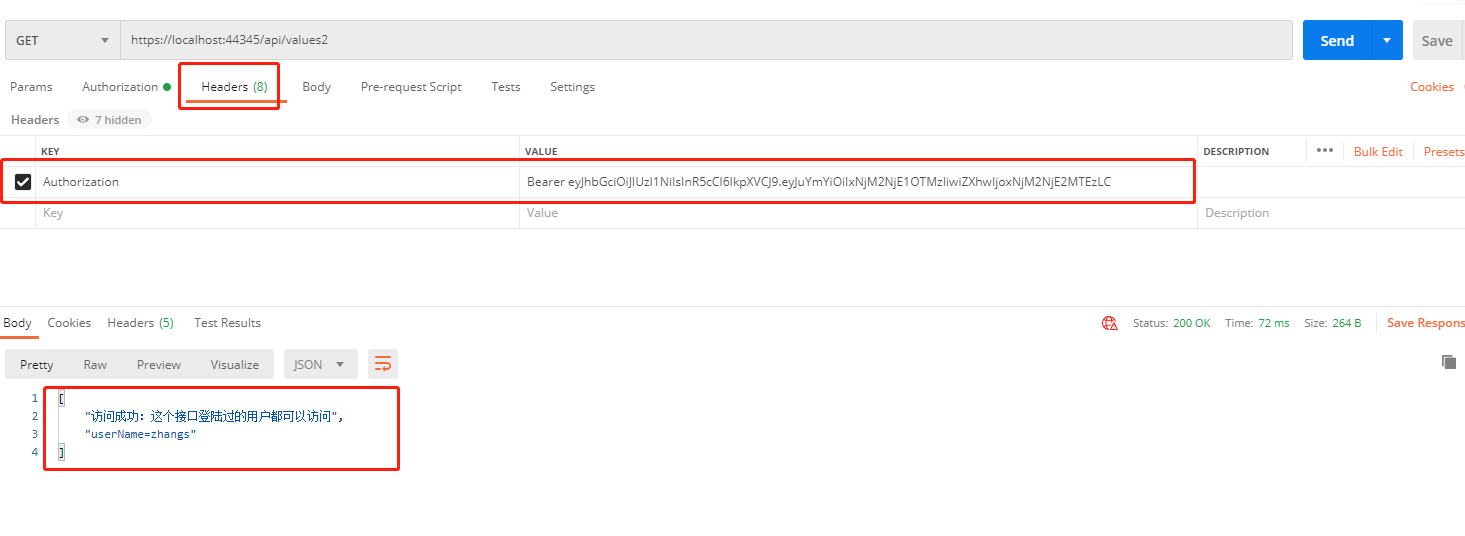
得到返回值,正确授权成功,我们是支持自定义返回参数的,上面代码里面有相关内容,比如用户名这些不敏感的信息可以带着返回。
等token设置的过期时间到了,或者重新生成了新的Token,没有及时更新,那么我们的授权也到期,401,
升级操作:接口权限隔离
上面的操作是所有登录授权成功的角色都可以进行调用所有接口,那么我们现在想要进行接口隔离限制,
也就是说,虽然授权登录了,但是我这个接口是指定权限访问的。
比如说:删除接口只能管理员角色操作,那么其他角色虽然授权登录了,但是没有权限调用删除接口。
我们在原来的操作进行改造升级看一下。
添加类
新建一个AuthManagement文件夹,添加PolicyRequirement类和PolicyHandler类,
PolicyRequirement类:
using Microsoft.AspNetCore.Authorization;
using Microsoft.AspNetCore.Http;
using System;
using System.Collections.Generic;
using System.Linq;
using System.Threading.Tasks;namespace jwtWebAPI.AuthManagement
{/// <summary>/// 权限承载实体/// </summary>public class PolicyRequirement : IAuthorizationRequirement{/// <summary>/// 用户权限集合/// </summary>public List<UserPermission> UserPermissions { get; private set; }/// <summary>/// 无权限action/// </summary>public string DeniedAction { get; set; }/// <summary>/// 构造/// </summary>public PolicyRequirement(){//没有权限则跳转到这个路由DeniedAction = new PathString("/api/nopermission");//用户有权限访问的路由配置,当然可以从数据库获取UserPermissions = new List<UserPermission> {new UserPermission {  Url="/api/values3", UserName="admin"},};}}/// <summary>/// 用户权限承载实体/// </summary>public class UserPermission{/// <summary>/// 用户名/// </summary>public string UserName { get; set; }/// <summary>/// 请求Url/// </summary>public string Url { get; set; }}
}
PolicyHandler类(注意2.x和3.x的区别)
using Microsoft.AspNetCore.Authorization;
using Microsoft.AspNetCore.Http;
using System;
using System.Collections.Generic;
using System.Linq;
using System.Security.Claims;
using System.Threading.Tasks;namespace jwtWebAPI.AuthManagement
{public class PolicyHandler : AuthorizationHandler<PolicyRequirement>{private readonly IHttpContextAccessor _httpContextAccessor;public PolicyHandler(IHttpContextAccessor httpContextAccessor){_httpContextAccessor = httpContextAccessor;}protected override Task HandleRequirementAsync(AuthorizationHandlerContext context, PolicyRequirement requirement){//赋值用户权限var userPermissions = requirement.UserPermissions;var httpContext = _httpContextAccessor.HttpContext;//请求Urlvar questUrl = httpContext.Request.Path.Value.ToUpperInvariant();//是否经过验证var isAuthenticated = httpContext.User.Identity.IsAuthenticated;if (isAuthenticated){if (userPermissions.GroupBy(g => g.Url).Any(w => w.Key.ToUpperInvariant() == questUrl)){//用户名var userName = httpContext.User.Claims.SingleOrDefault(s => s.Type == ClaimTypes.NameIdentifier).Value;if (userPermissions.Any(w => w.UserName == userName && w.Url.ToUpperInvariant() == questUrl)){context.Succeed(requirement);}else{无权限跳转到拒绝页面//httpContext.Response.Redirect(requirement.DeniedAction);return Task.CompletedTask;}}else{context.Succeed(requirement);}}return Task.CompletedTask;}}
}
添加指定角色
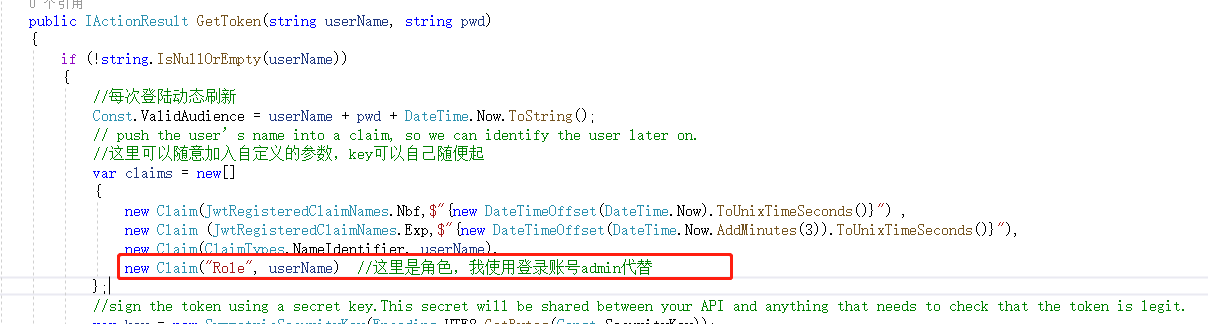
在 AuthController 控制器的GetToken授权加入自定义的参数,如下
new Claim("Role", userName) //这里是角色,我使用登录账号admin代替
在 AuthController 控制器里面添加无权限访问的方法
[AllowAnonymous]
[HttpGet]
[Route("api/nopermission")]
public IActionResult NoPermission()
{return Forbid("No Permission!");
}
修改Startup配置
在startup.cs的ConfigureServices 方法里面添加策略鉴权模式、添加JWT Scheme、注入授权Handler
修改后的文件如下
using jwtWebAPI.AuthManagement;
using Microsoft.AspNetCore.Authentication.JwtBearer;
using Microsoft.AspNetCore.Authorization;
using Microsoft.AspNetCore.Builder;
using Microsoft.AspNetCore.Hosting;
using Microsoft.AspNetCore.Http;
using Microsoft.AspNetCore.HttpsPolicy;
using Microsoft.AspNetCore.Mvc;
using Microsoft.Extensions.Configuration;
using Microsoft.Extensions.DependencyInjection;
using Microsoft.Extensions.DependencyInjection.Extensions;
using Microsoft.Extensions.Hosting;
using Microsoft.Extensions.Logging;
using Microsoft.IdentityModel.Tokens;
using System;
using System.Collections.Generic;
using System.Linq;
using System.Text;
using System.Threading.Tasks;namespace jwtWebAPI
{public class Startup{public Startup(IConfiguration configuration){Configuration = configuration;}public IConfiguration Configuration { get; }// This method gets called by the runtime. Use this method to add services to the container.public void ConfigureServices(IServiceCollection services){services//添加策略鉴权模式.AddAuthorization(options =>{options.AddPolicy("Permission", policy => policy.Requirements.Add(new PolicyRequirement()));})//添加JWT Scheme.AddAuthentication(s =>{s.DefaultAuthenticateScheme = JwtBearerDefaults.AuthenticationScheme;s.DefaultScheme = JwtBearerDefaults.AuthenticationScheme;s.DefaultChallengeScheme = JwtBearerDefaults.AuthenticationScheme;})//添加jwt验证:.AddJwtBearer(options => {options.TokenValidationParameters = new TokenValidationParameters{ValidateLifetime = true,//是否验证失效时间ClockSkew = TimeSpan.FromSeconds(30),  //时间偏移量(允许误差时间)ValidateAudience = true,//是否验证Audience(验证之前的token是否失效)//ValidAudience = Const.GetValidudience(),//Audience//这里采用动态验证的方式,在重新登陆时,刷新token,旧token就强制失效了AudienceValidator = (m, n, z) =>{return m != null && m.FirstOrDefault().Equals(Const.ValidAudience);},ValidateIssuer = true,//是否验证Issuer(颁发者)ValidAudience = Const.Domain,//Audience    【Const是新建的一个常量类】  接收者 ValidIssuer = Const.Domain,//Issuer,这两项和前面签发jwt的设置一致      颁发者ValidateIssuerSigningKey = true,//是否验证SecurityKeyIssuerSigningKey = new SymmetricSecurityKey(Encoding.UTF8.GetBytes(Const.SecurityKey))//拿到秘钥SecurityKey};options.Events = new JwtBearerEvents{OnAuthenticationFailed = context =>{//Token expiredif (context.Exception.GetType() == typeof(SecurityTokenExpiredException)){context.Response.Headers.Add("Token-Expired", "true");}return Task.CompletedTask;}};});//注入授权Handlerservices.AddSingleton<IAuthorizationHandler, PolicyHandler>();//注入获取HttpContextservices.TryAddSingleton<IHttpContextAccessor, HttpContextAccessor>();services.AddControllers();}// This method gets called by the runtime. Use this method to configure the HTTP request pipeline.public void Configure(IApplicationBuilder app, IWebHostEnvironment env){ //添加jwt验证app.UseAuthentication();if (env.IsDevelopment()){app.UseDeveloperExceptionPage();}app.UseHttpsRedirection();app.UseRouting();app.UseAuthorization();app.UseEndpoints(endpoints =>{endpoints.MapControllers();});}}
}
添加api访问的方法
在 ValuesController控制器添加指定权限访问的方法,如下:
/*** 这个接口必须用admin**/[HttpGet][Route("api/values3")][Authorize("Permission")]public ActionResult<IEnumerable<string>> values3(){//这是获取自定义参数的方法var auth = HttpContext.AuthenticateAsync().Result.Principal.Claims;var userName = auth.FirstOrDefault(t => t.Type.Equals(ClaimTypes.NameIdentifier))?.Value;var role = auth.FirstOrDefault(t => t.Type.Equals("Role"))?.Value;return new string[] { "访问成功:这个接口有管理员权限才可以访问", $"userName={userName}", $"Role={role}" };}不同权限测试访问
我们同样的方法去模拟登录,https://localhost:44345/api/auth?userName=xiongze&pwd=123
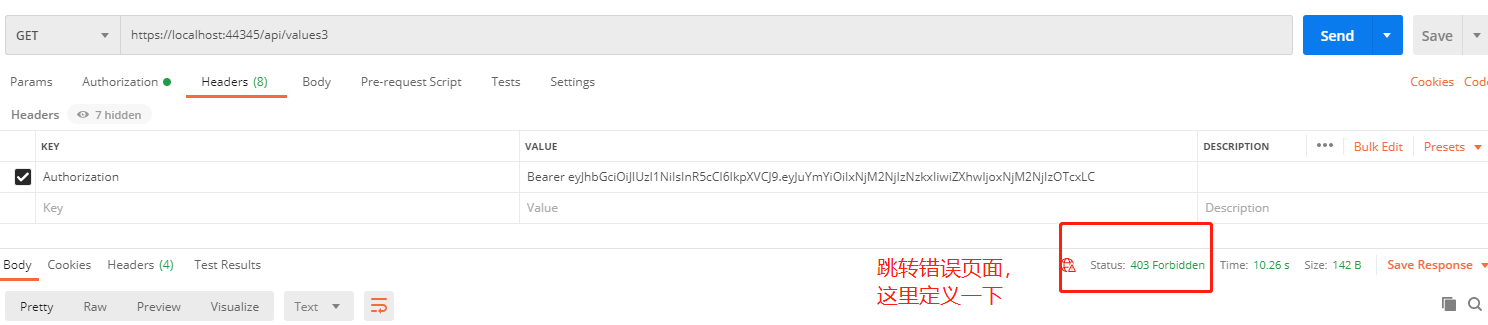
注意,账号先不用admin登录,然后用返回的token去请求我们刚刚添加的指定权限访问的接口,这个时候是没有权限访问的,因为这个是admin权限访问。
我们同样的方法去模拟登录,https://localhost:44345/api/auth?userName=xiongze&pwd=123
注意,账号先不用admin登录,然后用返回的token去请求我们刚刚添加的指定权限访问的接口,这个时候是没有权限访问的,因为这个是admin权限访问。
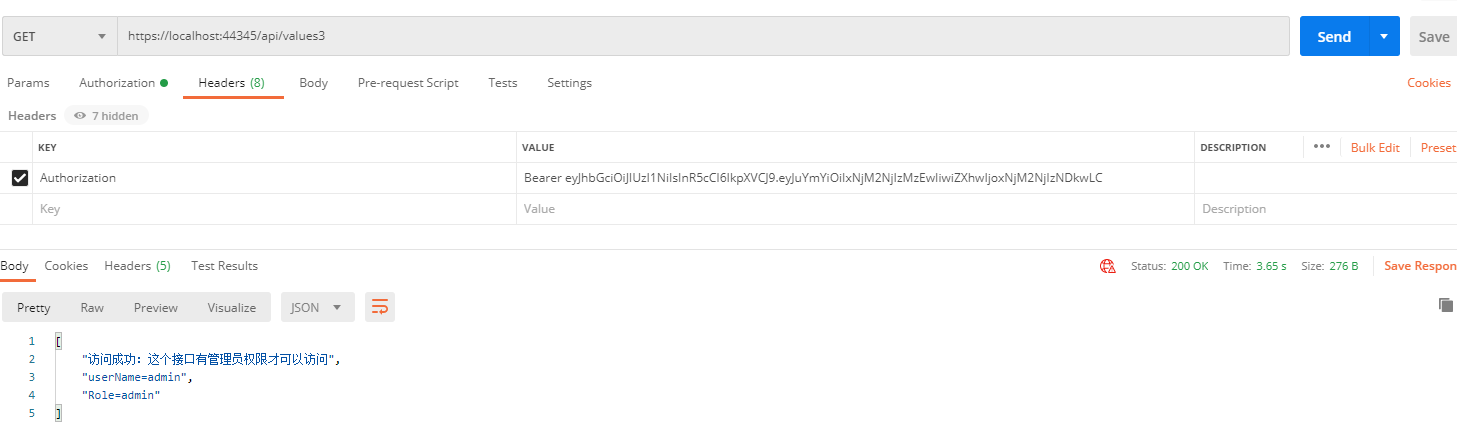
我们同样的方法去模拟登录,https://localhost:44345/api/auth?userName=admin&pwd=123
访问成功。
完结。。。
相关文章:
.NET CORE 3.1 集成JWT鉴权和授权2
JWT:全称是JSON Web Token是目前最流行的跨域身份验证、分布式登录、单点登录等解决方案。 通俗地来讲,JWT是能代表用户身份的令牌,可以使用JWT令牌在api接口中校验用户的身份以确认用户是否有访问api的权限。 授权:这是使用JWT的…...

nbcio-boot如何进行gitee第三方登录
更多nbcio-boot功能请看演示系统 gitee源代码地址 后端代码: https://gitee.com/nbacheng/nbcio-boot 前端代码:https://gitee.com/nbacheng/nbcio-vue.git 在线演示(包括H5) : http://122.227.135.243:9888 1、用户g…...
【C语言】字符函数、字符串函数与内存函数
简单不先于复杂,而是在复杂之后。 目录 0. 前言 1. 函数介绍 1.1 strlen 1.1.1 介绍 1.1.2 strlen 函数模拟实现 1.1.2.1 计数器方法 1.1.2.2 递归方法 1.1.2.3 指针 - 指针方法 1.2 strcpy 1.2.1 介绍 1.2.2 strcpy 函数模拟实现 1.3 strcat 1…...

生成树协议:监控 STP 端口和交换机
什么是生成树协议 生成树协议 (STP) 用于网络交换机,以防止循环和广播风暴。在局域网 (LAN) 中,两条或多条冗余路径可以连接到同一网段。当交换机或网桥从所有可用端口传输帧时,这些帧开始在网…...

【黑产攻防道03】利用JS参数更新检测黑产的协议破解
任何业务在运营一段时间之后都会面临黑产大量的破解。验证码和各种爬虫的关系就像猫和老鼠一样, 会永远持续地进行博弈。极验根据十一年和黑产博弈对抗的经验,将黑产的破解方式分为三类: 1.通过识别出验证码图片答案实现批量破解验证,即图片…...

什么是web3.0?
Web 3.0,也常被称为下一代互联网,代表着互联网的下一个重大演变。尽管关于Web 3.0的确切定义尚无共识,但它通常被认为是一种更分散、更开放且更智能的互联网。 以下是Web 3.0的一些主要特征和概念: 1. 去中心化 Web 3.0旨在减少…...

二、W5100S/W5500+RP2040树莓派Pico<DHCP>
文章目录 1 前言2 简介2 .1 什么是DHCP?2.2 为什么要使用DHCP?2.3 DHCP工作原理2.4 DHCP应用场景 3 WIZnet以太网芯片4 DHCP网络设置示例概述以及使用4.1 流程图4.2 准备工作核心4.3 连接方式4.4 主要代码概述4.5 结果演示 5 注意事项6 相关链接 1 前言 …...

【开源】基于SpringBoot的天然气工程业务管理系统的设计和实现
目录 一、摘要1.1 项目介绍1.2 项目录屏 二、功能模块三、使用角色3.1 施工人员3.2 管理员 四、数据库设计4.1 用户表4.2 分公司表4.3 角色表4.4 数据字典表4.5 工程项目表4.6 使用材料表4.7 使用材料领用表4.8 整体E-R图 五、系统展示六、核心代码6.1 查询工程项目6.2 工程物资…...
讯飞星火大模型V3.0 WebApi使用
讯飞星火大模型V3.0 WebApi使用 文档说明:星火认知大模型Web文档 | 讯飞开放平台文档中心 (xfyun.cn) 实现效果 初始化 首先构建一个基础脚手架项目 npm init vuelatest用到如下依赖 "dependencies": {"crypto-js": "^4.2.0",&q…...
拥有DOM力量的你究竟可以干什么
如果你希望访问 HTML 页面中的任何元素,那么您总是从访问 document 对象开始! 查找HTML元素 document.getElementById(id) 通过元素 id 来查找元素 <!DOCTYPE html> <html> <head><meta charset…...

GnuTLS recv error (-110): The TLS connection was non-properly terminated
ubuntu git下载提示 GnuTLS recv error (-110): The TLS connection was non-properly terminated解决方法 git config --global --unset http.https://github.com.proxy...
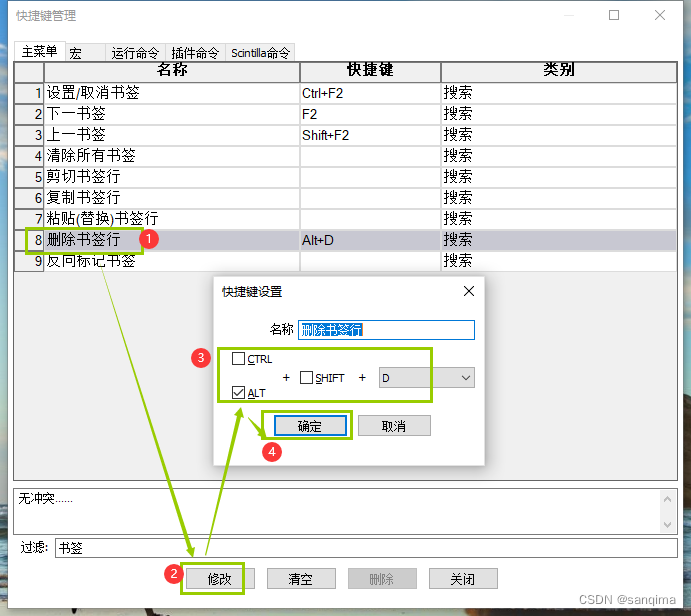
Notepad++安装插件和配置快捷键
Notepad是一款轻量级、开源的文件编辑工具,可以编辑、浏览文本文件、二进制文件、.cpp、.java、*.cs等文件。Notepad每隔1个月,就有一个新版本,其官网是: https://github.com/notepad-plus-plus/notepad-plus-plus。这里介绍其插件…...
iOS Autolayout 约束设置【顺序】的重要性!
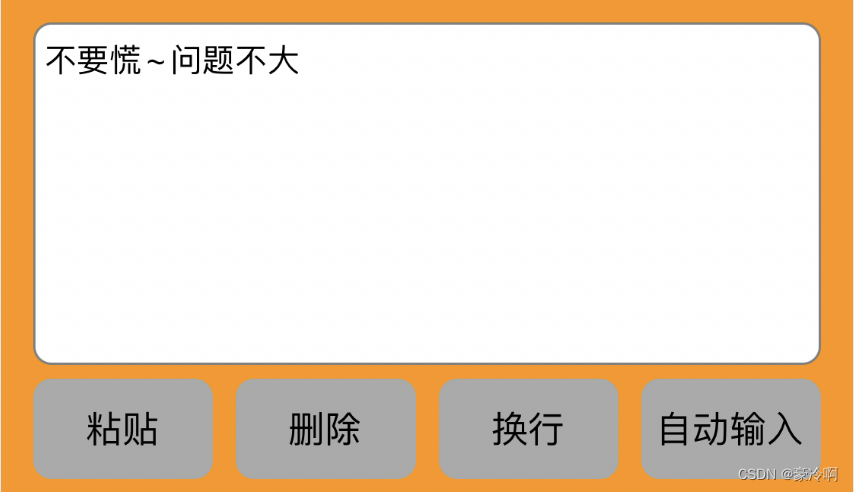
0x00 顺序不同,结果不同 看图说话 1 代码是这样滴~ 设置好约束,让 4 个按钮,宽度均分~ 结果如上图 [_pastButton.topAnchor constraintEqualToAnchor:_textView.bottomAnchor constant:6].active YES;[_pastButton.leftAnchor constraintEq…...
Echarts渲染不报错但是没有内容
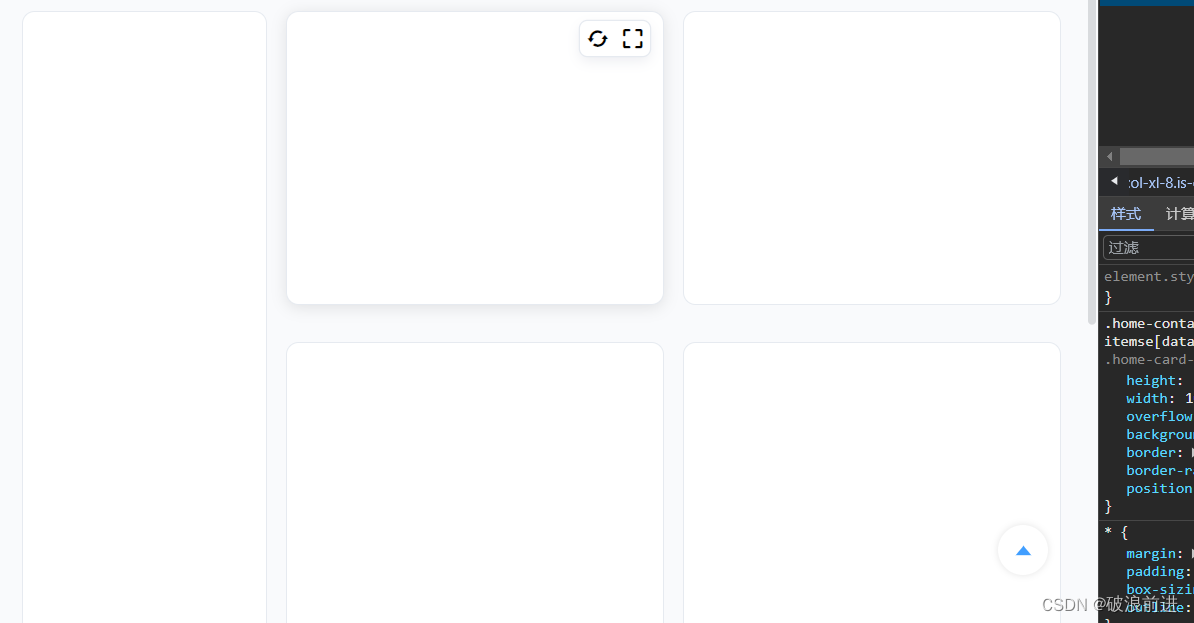
🔥博客主页: 破浪前进 🔖系列专栏: Vue、React、PHP ❤️感谢大家点赞👍收藏⭐评论✍️ 问题:在开发项目的时候使用了Echarts但是好端端的忽然就不渲染了 感觉很无语啊,毕竟好好的就不渲染了&am…...
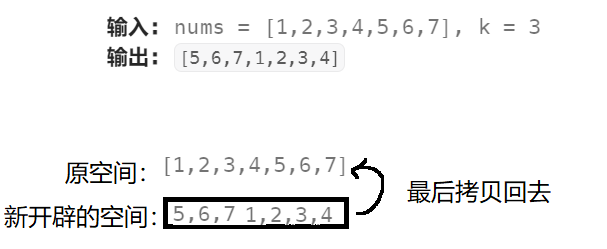
数据结构 | 算法的时间复杂度和空间复杂度【详解】
数据结构 | 算法的时间复杂度和空间复杂度【详解】 1. 什么是数据结构? 数据结构(Data Structure)是计算机存储、组织数据的方式,指相互之间存在一种或多种特定关系的数据元素的集合。 2. 什么是算法? 算法(Algorithm):就是定义良好的计算过…...
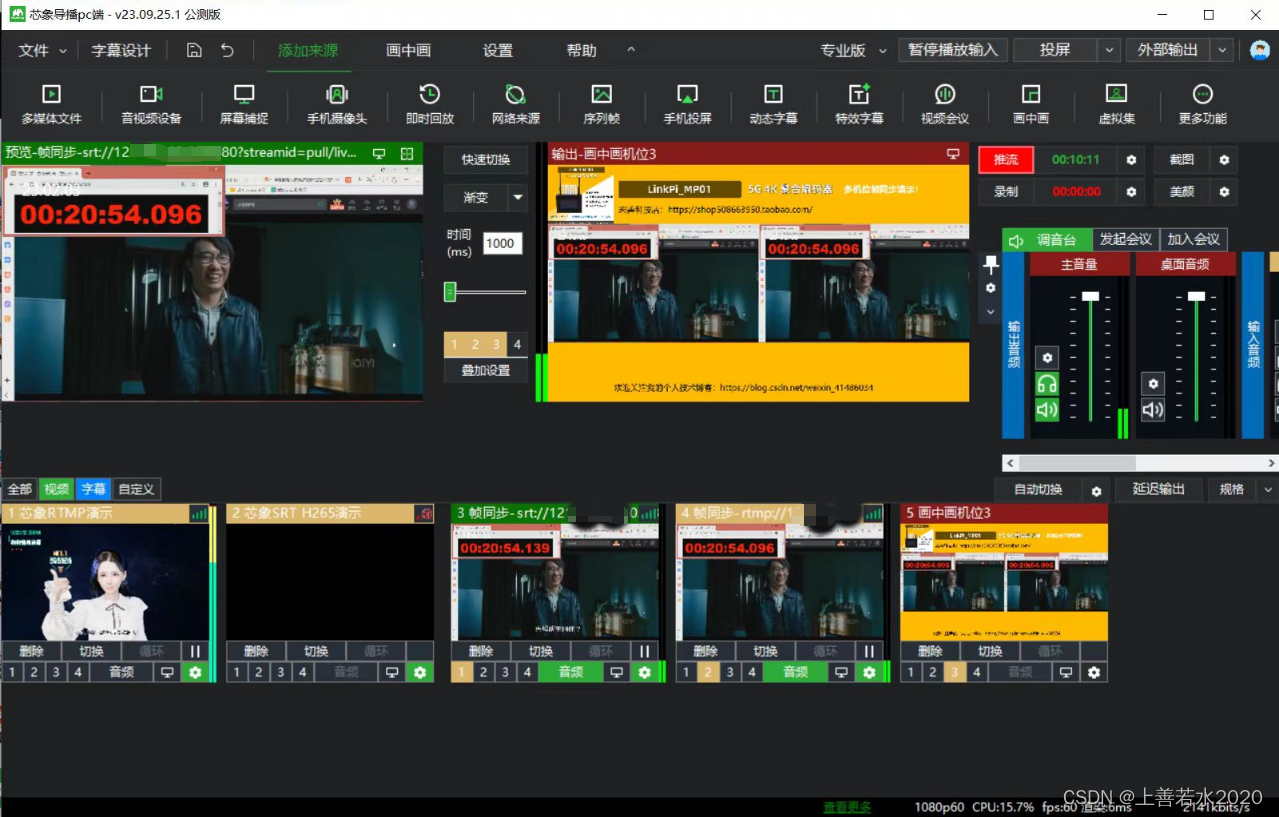
高级篇之ENC编码器多机位帧同步配置详解
高级篇之ENC编码器多机位帧同步配置详解 一 帧同步方案多样性1. 配合vMIX导播的帧同步方案3. 配合硬件导播的帧同步方案3. 配合芯象导播的帧同步 二 帧同步方案1实现步骤1. 准备设备2. 搭建环境3 配置设备3.1 配置固定机位3.2 配置帧同步转发端3.3 配置vMIX 三 效果对比1 不开帧…...
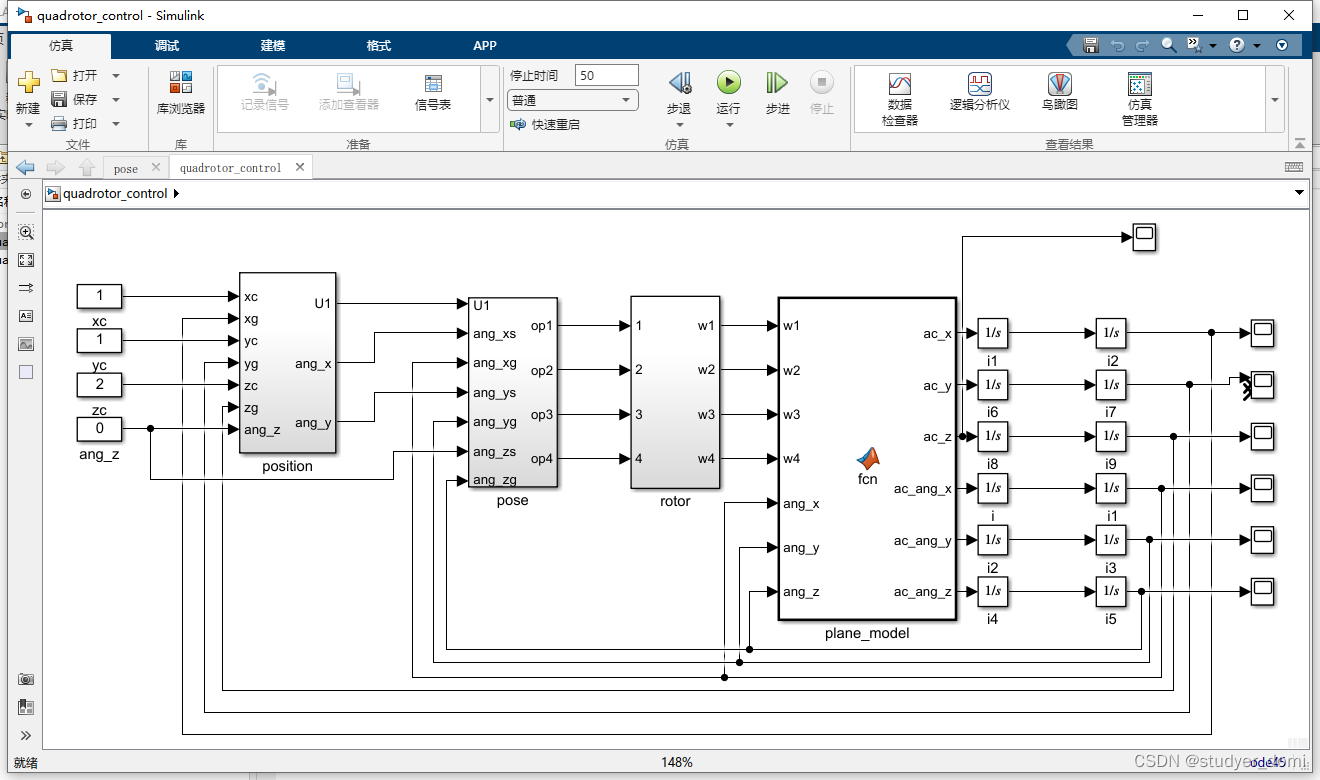
matlab simulink 四旋翼跟拍无人机仿真
1、内容简介 略 7-可以交流、咨询、答疑 2、内容说明 四旋翼跟拍无人机仿真 四旋翼、无人机 需求分析 背景介绍 无人飞行机器人,是无人驾驶且具有一定智能的空中飞行器。这是一种融合了计算机技术、人工智能技术、传感器技术、自动控制技术、新型材料技术、导航…...

jenkins、ant、selenium、testng搭建自动化测试框架
如果在你的理解中自动化测试就是在eclipse里面讲webdriver的包引入,然后写一些测试脚本,这就是你所说的自动化测试,其实这个还不能算是真正的自动化测试,你见过每次需要运行的时候还需要打开eclipse然后去选择运行文件吗ÿ…...
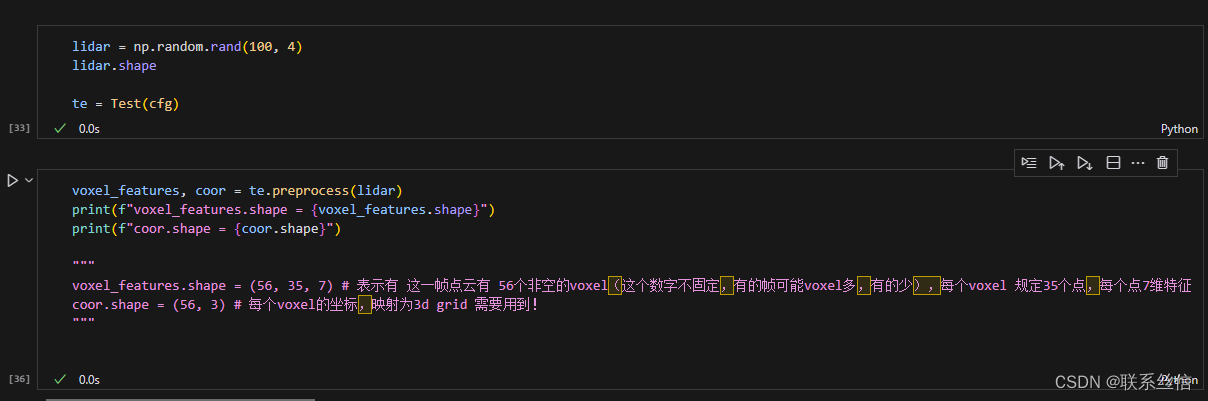
【阅读和学习代码】VoxelNet
文章目录 将点特征 转换为 voxel 特征稀疏张量 到 稠密张量,反向索引参考博客 将点特征 转换为 voxel 特征 https://github.com/skyhehe123/VoxelNet-pytorch/blob/master/data/kitti.py 【Python】np.unique() 介绍与使用 self.T : # maxiumum numbe…...

【23种设计模式】接口隔离原则
个人主页:金鳞踏雨 个人简介:大家好,我是金鳞,一个初出茅庐的Java小白 目前状况:22届普通本科毕业生,几经波折了,现在任职于一家国内大型知名日化公司,从事Java开发工作 我的博客&am…...
)
毕业设计 深度学习yolo11电动车骑行规范识别系统(源码+论文)
文章目录0 前言1 项目运行效果2 课题背景2.1. 城市交通发展现状2.2. 电动车交通安全问题2.2.1 事故频发现状2.2.2 监管难点分析2.3. 技术发展背景2.3.1 计算机视觉技术进步2.3.2 智能交通系统发展2.4. 项目研究意义4.1 理论价值2.4.2 实践价值2.5. 国内外研究现状2.5.1 国际研究…...

英雄联盟智能助手:League Akari 的5大核心功能深度解析
英雄联盟智能助手:League Akari 的5大核心功能深度解析 【免费下载链接】League-Toolkit An all-in-one toolkit for LeagueClient. Gathering power 🚀. 项目地址: https://gitcode.com/gh_mirrors/le/League-Toolkit League Akari 是一款基于英…...

高效突破小红书反爬:7个实用User-Agent伪装技巧与实战指南
高效突破小红书反爬:7个实用User-Agent伪装技巧与实战指南 【免费下载链接】XHS-Downloader 小红书(XiaoHongShu、RedNote)链接提取/作品采集工具:提取账号发布、收藏、点赞、专辑作品链接;提取搜索结果作品、用户链接…...

Java中的Comparator 和JS中的回调函数好相似
Comparator 在 Java 中的地位,非常像 JavaScript 中 Array.prototype.sort() 那个接收的 回调函数 (Comparison Function)。1. Comparator 是什么?在 Java 中,Comparator 是一个接口,它的核心作用是定义“比较逻辑”。在 Java 8 之…...

MPC-BE播放器完全手册:打造极致影音体验的终极解决方案
MPC-BE播放器完全手册:打造极致影音体验的终极解决方案 【免费下载链接】MPC-BE MPC-BE – универсальный проигрыватель аудио и видеофайлов для операционной системы Windows. 项目地址: h…...

提示词工程师正在消失?不,是升级为“AI交互架构师”——掌握这4类元提示设计能力的人已溢价2.8倍
更多请点击: https://intelliparadigm.com 第一章:提示词工程的范式迁移与角色升维 传统提示词设计常被视作“指令微调”或“模板填充”的辅助技巧,而大模型能力边界持续拓展正推动其向系统性工程范式跃迁。提示词不再仅是输入层的语法糖&am…...

深入解析tsMuxer:高效无损视频封装解决方案与实战配置指南
深入解析tsMuxer:高效无损视频封装解决方案与实战配置指南 【免费下载链接】tsMuxer tsMuxer is a transport stream muxer for remuxing/muxing elementary streams, EVO/VOB/MPG, MKV/MKA, MP4/MOV, TS, M2TS to TS to M2TS. Supported video codecs H.264/AVC, H…...

Marvis 1+5 智能体协作架构深度解析:六大 Agent 各司何职?底层又如何“对话“?
Marvis 15 智能体协作架构深度解析:六大 Agent 各司何职?底层又如何"对话"? 前言 2026 年 5 月 20 日,腾讯正式上线了操作系统级 AI 助手马维斯(Marvis)。它不走传统 AI 助手的"对话框&quo…...

卖包装薄膜怎么找客户?下游工厂在哪里
卖包装薄膜找客户,本质是找用膜的下游工厂,核心难点是把这些真实在产、真实消耗薄膜的下游厂的名单和联系人系统拿到手——报价单发不出去、拜访找不到门,问题往往出在名单环节而不是产品本身。 包装薄膜的下游客户到底是谁 包装薄膜品类多样…...

Android Studio中文界面汉化终极指南:5分钟告别英文困扰
Android Studio中文界面汉化终极指南:5分钟告别英文困扰 【免费下载链接】AndroidStudioChineseLanguagePack AndroidStudio中文插件(官方修改版本) 项目地址: https://gitcode.com/gh_mirrors/an/AndroidStudioChineseLanguagePack 还在为Androi…...