pytorch复现4_Resnet
ResNet在《Deep Residual Learning for Image Recognition》论文中提出,是在CVPR 2016发表的一种影响深远的网络模型,由何凯明大神团队提出来,在ImageNet的分类比赛上将网络深度直接提高到了152层,前一年夺冠的VGG只有19层。ImageNet的目标检测以碾压的优势成功夺得了当年识别和目标检测的冠军,COCO数据集的目标检测和图像分割比赛上同样碾压夺冠,可以说ResNet的出现对深度神经网络来说具有重大的历史意义。

在resnet出现之前,网络层数的增加会导致梯度消失或者梯度爆炸
在ResNet网络中有如下几个亮点:
(1)提出residual结构(残差结构),并搭建超深的网络结构(突破1000层)
(2)使用Batch Normalization加速训练(丢弃dropout)
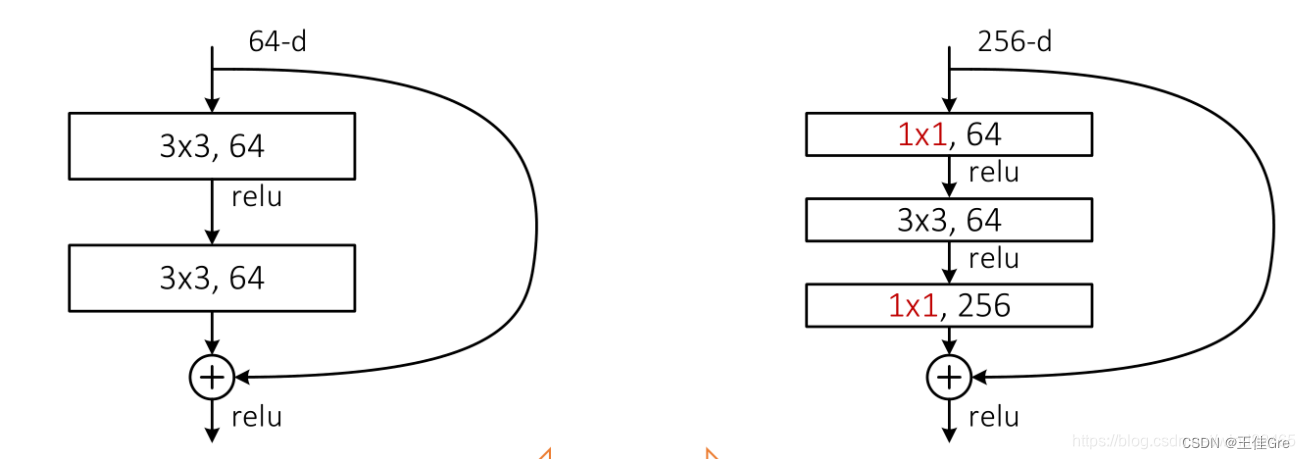
残差结构(residual)
下图是论文中给出的两种残差结构。左边的残差结构是针对层数较少网络,例如ResNet18层和ResNet34层网络。
右边是针对网络层数较多的网络,例如ResNet101,ResNet152等。
为什么深层网络要使用右侧的残差结构呢。因为,右侧的残差结构能够减少网络参数与运算量。同样输入、输出一个channel为256的特征矩阵,如果使用左侧的残差结构需要大约1170648个参数,但如果使用右侧的残差结构只需要69632个参数。明显搭建深层网络时,使用右侧的残差结构更合适。
代码:
class BasicBlock(nn.Module):expansion = 1def __init__(self, in_channel, out_channel, stride=1, downsample=None, **kwargs):super(BasicBlock, self).__init__()self.conv1 = nn.Conv2d(in_channels=in_channel, out_channels=out_channel,kernel_size=3, stride=stride, padding=1, bias=False)self.bn1 = nn.BatchNorm2d(out_channel)self.relu = nn.ReLU()self.conv2 = nn.Conv2d(in_channels=out_channel, out_channels=out_channel,kernel_size=3, stride=1, padding=1, bias=False)self.bn2 = nn.BatchNorm2d(out_channel)self.downsample = downsampledef forward(self, x):identity = xif self.downsample is not None:identity = self.downsample(x)out = self.conv1(x)out = self.bn1(out)out = self.relu(out)out = self.conv2(out)out = self.bn2(out)out += identityout = self.relu(out)return out
class Bottleneck(nn.Module):"""注意:原论文中,在虚线残差结构的主分支上,第一个1x1卷积层的步距是2,第二个3x3卷积层步距是1。但在pytorch官方实现过程中是第一个1x1卷积层的步距是1,第二个3x3卷积层步距是2,这么做的好处是能够在top1上提升大概0.5%的准确率。可参考Resnet v1.5 https://ngc.nvidia.com/catalog/model-scripts/nvidia:resnet_50_v1_5_for_pytorch"""expansion = 4def __init__(self, in_channel, out_channel, stride=1, downsample=None,groups=1, width_per_group=64):super(Bottleneck, self).__init__()width = int(out_channel * (width_per_group / 64.)) * groupsself.conv1 = nn.Conv2d(in_channels=in_channel, out_channels=width,kernel_size=1, stride=1, bias=False) # squeeze channelsself.bn1 = nn.BatchNorm2d(width)# -----------------------------------------self.conv2 = nn.Conv2d(in_channels=width, out_channels=width, groups=groups,kernel_size=3, stride=stride, bias=False, padding=1)self.bn2 = nn.BatchNorm2d(width)# -----------------------------------------self.conv3 = nn.Conv2d(in_channels=width, out_channels=out_channel*self.expansion,kernel_size=1, stride=1, bias=False) # unsqueeze channelsself.bn3 = nn.BatchNorm2d(out_channel*self.expansion)self.relu = nn.ReLU(inplace=True)self.downsample = downsampledef forward(self, x):identity = xif self.downsample is not None:identity = self.downsample(x)out = self.conv1(x)out = self.bn1(out)out = self.relu(out)out = self.conv2(out)out = self.bn2(out)out = self.relu(out)out = self.conv3(out)out = self.bn3(out)out += identityout = self.relu(out)return out完整代码:
import torch.nn as nn
import torchclass BasicBlock(nn.Module):expansion = 1def __init__(self, in_channel, out_channel, stride=1, downsample=None, **kwargs):super(BasicBlock, self).__init__()self.conv1 = nn.Conv2d(in_channels=in_channel, out_channels=out_channel,kernel_size=3, stride=stride, padding=1, bias=False)self.bn1 = nn.BatchNorm2d(out_channel)self.relu = nn.ReLU()self.conv2 = nn.Conv2d(in_channels=out_channel, out_channels=out_channel,kernel_size=3, stride=1, padding=1, bias=False)self.bn2 = nn.BatchNorm2d(out_channel)self.downsample = downsampledef forward(self, x):identity = xif self.downsample is not None:identity = self.downsample(x)out = self.conv1(x)out = self.bn1(out)out = self.relu(out)out = self.conv2(out)out = self.bn2(out)out += identityout = self.relu(out)return outclass Bottleneck(nn.Module):"""注意:原论文中,在虚线残差结构的主分支上,第一个1x1卷积层的步距是2,第二个3x3卷积层步距是1。但在pytorch官方实现过程中是第一个1x1卷积层的步距是1,第二个3x3卷积层步距是2,这么做的好处是能够在top1上提升大概0.5%的准确率。可参考Resnet v1.5 https://ngc.nvidia.com/catalog/model-scripts/nvidia:resnet_50_v1_5_for_pytorch"""expansion = 4def __init__(self, in_channel, out_channel, stride=1, downsample=None,groups=1, width_per_group=64):super(Bottleneck, self).__init__()width = int(out_channel * (width_per_group / 64.)) * groupsself.conv1 = nn.Conv2d(in_channels=in_channel, out_channels=width,kernel_size=1, stride=1, bias=False)  # squeeze channelsself.bn1 = nn.BatchNorm2d(width)# -----------------------------------------self.conv2 = nn.Conv2d(in_channels=width, out_channels=width, groups=groups,kernel_size=3, stride=stride, bias=False, padding=1)self.bn2 = nn.BatchNorm2d(width)# -----------------------------------------self.conv3 = nn.Conv2d(in_channels=width, out_channels=out_channel*self.expansion,kernel_size=1, stride=1, bias=False)  # unsqueeze channelsself.bn3 = nn.BatchNorm2d(out_channel*self.expansion)self.relu = nn.ReLU(inplace=True)self.downsample = downsampledef forward(self, x):identity = xif self.downsample is not None:identity = self.downsample(x)out = self.conv1(x)out = self.bn1(out)out = self.relu(out)out = self.conv2(out)out = self.bn2(out)out = self.relu(out)out = self.conv3(out)out = self.bn3(out)out += identityout = self.relu(out)return outclass ResNet(nn.Module):def __init__(self,block,blocks_num,num_classes=1000,include_top=True,groups=1,width_per_group=64):super(ResNet, self).__init__()self.include_top = include_topself.in_channel = 64self.groups = groupsself.width_per_group = width_per_groupself.conv1 = nn.Conv2d(3, self.in_channel, kernel_size=7, stride=2,padding=3, bias=False)self.bn1 = nn.BatchNorm2d(self.in_channel)self.relu = nn.ReLU(inplace=True)self.maxpool = nn.MaxPool2d(kernel_size=3, stride=2, padding=1)self.layer1 = self._make_layer(block, 64, blocks_num[0])self.layer2 = self._make_layer(block, 128, blocks_num[1], stride=2)self.layer3 = self._make_layer(block, 256, blocks_num[2], stride=2)self.layer4 = self._make_layer(block, 512, blocks_num[3], stride=2)if self.include_top:self.avgpool = nn.AdaptiveAvgPool2d((1, 1))  # output size = (1, 1)self.fc = nn.Linear(512 * block.expansion, num_classes)for m in self.modules():if isinstance(m, nn.Conv2d):nn.init.kaiming_normal_(m.weight, mode='fan_out', nonlinearity='relu')def _make_layer(self, block, channel, block_num, stride=1):downsample = Noneif stride != 1 or self.in_channel != channel * block.expansion:downsample = nn.Sequential(nn.Conv2d(self.in_channel, channel * block.expansion, kernel_size=1, stride=stride, bias=False),nn.BatchNorm2d(channel * block.expansion))layers = []layers.append(block(self.in_channel,channel,downsample=downsample,stride=stride,groups=self.groups,width_per_group=self.width_per_group))self.in_channel = channel * block.expansionfor _ in range(1, block_num):layers.append(block(self.in_channel,channel,groups=self.groups,width_per_group=self.width_per_group))return nn.Sequential(*layers)def forward(self, x):x = self.conv1(x)x = self.bn1(x)x = self.relu(x)x = self.maxpool(x)x = self.layer1(x)x = self.layer2(x)x = self.layer3(x)x = self.layer4(x)if self.include_top:x = self.avgpool(x)x = torch.flatten(x, 1)x = self.fc(x)return xdef resnet34(num_classes=1000, include_top=True):# https://download.pytorch.org/models/resnet34-333f7ec4.pthreturn ResNet(BasicBlock, [3, 4, 6, 3], num_classes=num_classes, include_top=include_top)def resnet50(num_classes=1000, include_top=True):# https://download.pytorch.org/models/resnet50-19c8e357.pthreturn ResNet(Bottleneck, [3, 4, 6, 3], num_classes=num_classes, include_top=include_top)def resnet101(num_classes=1000, include_top=True):# https://download.pytorch.org/models/resnet101-5d3b4d8f.pthreturn ResNet(Bottleneck, [3, 4, 23, 3], num_classes=num_classes, include_top=include_top)def resnext50_32x4d(num_classes=1000, include_top=True):# https://download.pytorch.org/models/resnext50_32x4d-7cdf4587.pthgroups = 32width_per_group = 4return ResNet(Bottleneck, [3, 4, 6, 3],num_classes=num_classes,include_top=include_top,groups=groups,width_per_group=width_per_group)def resnext101_32x8d(num_classes=1000, include_top=True):# https://download.pytorch.org/models/resnext101_32x8d-8ba56ff5.pthgroups = 32width_per_group = 8return ResNet(Bottleneck, [3, 4, 23, 3],num_classes=num_classes,include_top=include_top,groups=groups,width_per_group=width_per_group)
相关文章:
pytorch复现4_Resnet
ResNet在《Deep Residual Learning for Image Recognition》论文中提出,是在CVPR 2016发表的一种影响深远的网络模型,由何凯明大神团队提出来,在ImageNet的分类比赛上将网络深度直接提高到了152层,前一年夺冠的VGG只有19层。Image…...
【数据库】形式化关系查询语言(一):关系代数Relational Algebra:基本运算、附加关系代数、扩展的关系代数
目录 一、关系代数Relational Algebra 1. 基本运算 a. 选择运算(Select Operation) b. 投影运算(Project Operation) 组合 c. 并运算(Union Operation) d. 集合差运算(Set Difference Op…...

【计算机网络】计算机网络和因特网
一.基本术语介绍 端系统通过通信链路(communication link)和分组交换机(packet switch)连接到一起,连接这些端系统和分组交换机的物理媒体包括:同轴电缆,铜线,光纤和无线电频谱。而…...
JAVA面经整理(9)
一)什么是Spring?它有什么优点? spring是一款顶级的开源框架,他是包含了众多工具方法的IOC容器,Spring中包含了很多模块,比如说Spring-core,Spring-context,Spring-aop,Spring-web,…...
模式下的产品研发流程)
IPD(集成产品开发)模式下的产品研发流程
IPD(集成产品开发)涵盖了产品从创意提出到研发、生产、运营等,包含了产品开发到营销运营的整个过程。围绕产品(或项目)生命周期的过程的管理模式,是一套生产流程,更是时下国际先进的管理体系。I…...

Flutter GetX的使用
比较强大的状态管理框架 引入库: dependencies:get: ^4.6.6一.实现一个简单的demo 实现一个计数器功能 代码如下: import package:flutter/material.dart; import package:get/get.dart;void main() > runApp(const GetMaterialApp(home: Home()…...
【Amazon】AWS实战 | 快速发布安全传输的静态页面
文章目录 一、实验架构图二、实验涉及的AWS服务三、实验操作步骤1. 创建S3存储桶,存放网站网页2. 使用ACM建立域名证书3. 设置Cloudfront,连接S3存储桶✴️4. 设置Route53,解析域名服务5. 通过CLI工具上传网页更新内容【可选】 四、实验总结 …...

前后端登录的密码加密和解密
在一个典型的前后端应用中,前端对密码进行加密后传给后端,后端再进行解密或验证。这通常涉及前端加密、后端解密或验证的相互配合。下面是一个基本的流程: 前端加密: 前端可以使用各种加密库或算法对密码进行加密。常见的是使用哈…...

使用 Curl 和 DomCrawler 下载抖音视频链接并存储到指定文件夹
项目需求 假设我们需要从抖音平台上下载一些特定的视频,以便进行分析、编辑或其他用途。为了实现这个目标,我们需要编写一个爬虫程序来获取抖音视频的链接,并将其保存到本地文件夹中。 目标分析 在开始编写爬虫之前,我们需要了…...
取消Excel打开密码的两种方法
Excel设置了打开密码,想要取消打开密码是由两种方法的,今天分享这两种方法给大家。 想要取消密码是需要直到正确密码的,因为只有打开文件才能进行取消密码的操作 方法一: 是大家常见的取消方法,打开excel文件之后&a…...
多测师肖sir_高级金牌讲师_jmeter 反向代理录制脚本
jemeter自带的录制脚本功能,是利用代理服务器来进行录制的 1,新建一个线程组 2,新建一个代理服务器 右击工作台-添加-非测试元件-http代理服务器 3, 配置http代理服务器 端口: 默认为8888,可修改。但…...
网络取证-Tomcat-简单
题干: 我们的 SOC 团队在公司内部网的一台 Web 服务器上检测到可疑活动。为了更深入地了解情况,团队捕获了网络流量进行分析。此 pcap 文件可能包含一系列恶意活动,这些活动已导致 Apache Tomcat Web 服务器遭到破坏。我们需要进一步调查这一…...
)
3.Linux常用操作(传输、crontab定时、匹配日期删除文件等)
1. 服务器之间传输文件 1.1 传输文件到本服务器 scp -P 19622 -C dockeruser192.168.100.96:/home/dockeruser/lgr/lgr.dmp /home/dockeruser/lgr描述: 用dockeruser账号登录端口号为19622的192.168.100.96服务器,将此服务器的/home/dockeruser/lgr/l…...

ChatGPT对未来发展的影响?一般什么时候用到GPT
ChatGPT以其强大的自然语言处理能力对未来的发展具有重要影响。以下是ChatGPT的潜在影响和一般使用情况: 改善自然语言理解和生成:ChatGPT和类似的模型可以改善机器对人类语言的理解和生成。这将有助于改进各种应用领域,包括智能助手、聊天机…...
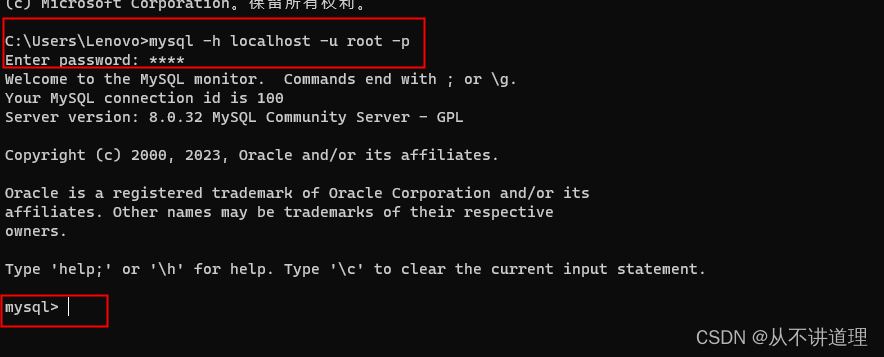
在Win10系统进行MySQL的安装、连接、卸载
在Win10系统进行MySQL的安装、连接、卸载 MySQL的安装 本教程在Win10系统下安装部署MySQL-8.0.32版。 MySQL安装参考地址 MySQL安装包地址 提取码: rnbc。 选择下载mysql-installer-community-8.0.32.0安装包。 连接数据库 方式一: 安装后,可以在开始…...

Windows下pm2调用npm和nuxt的办法
pm2调用npm pm2 start C:\Users\xiao\AppData\Roaming\npm\node_modules\npm\index.js --name test -- run start 其中index.js的路径就是npm全局安装的路径,可通过以下命令获取 npm root -g require全局npm模块的一种方法 新建文件pm2npm.js const root req…...
本地仓库转为git仓库推送到gitee
通常有两种获取 Git 项目仓库的方式: 方式一:将尚未进行版本控制的本地目录转换为 Git 仓库; 方式二:从其它服务器 克隆 一个已存在的 Git 仓库。 两种方式都会在你的本地机器上得到一个工作就绪的 Git 仓库。 方式一:…...

CSS以及JavaScript
目录 一.CSS 1.overflow溢出属性 2.定位 二.JavaScript基础 1.JavaScript引入方式 2.JavaScript数据类型 常用方法: 字符串常用方法: 在js里,什么是真,什么是假 数组的常用方法 运算符 (1)算数运…...

JVM——类的生命周期(加载阶段,连接阶段,初始化阶段)
目录 1.加载阶段2.连接阶段1.验证2.准备3.解析 3.初始化阶段4.总结 类的生命周期 1.加载阶段 ⚫ 1、加载(Loading)阶段第一步是类加载器根据类的全限定名通过不同的渠道以二进制流的方式获取字节码信息。 程序员可以使用Java代码拓展的不同的渠道。 ⚫ 2、类加载器在加载完类…...

CSS中实现元素居中的几种方法总结
一、使用 text-align: center 居中 使用 text-align: center; 可以在CSS中实现内联元素的水平居中。这个技术利用了CSS的 text-align 属性,通过对元素的文本对齐方式进行调整来实现居中效果。注:只展示主要代码。 <div class"container"&…...

Python 中的数据结构与算法:从基础到应用
Python 中的数据结构与算法:从基础到应用 1. 背景介绍 数据结构与算法是计算机科学的核心基础,它们决定了程序的效率和性能。在 Python 中,掌握常用的数据结构和算法不仅可以提高代码质量,还能解决复杂问题。本文将深入探讨 Pytho…...

哪款工具能把AI率从80%降到20%?实测3款对比
这篇文章的起点是一个具体问题:AI率80%以上的论文,用哪款工具降,能稳定降到20%以下? 我用3篇不同专业、不同AI率的论文(AI率分别为82%、86%、91%),分别测试了嘎嘎降AI、比话降AI、率零三款工具…...
 第一章:AWS IAM 配置详解)
对接亚马逊 SP-API(Amazon Selling Partner API) 第一章:AWS IAM 配置详解
1. AWS IAM 基础概念扫盲 第一次接触亚马逊SP-API的开发者,往往会在IAM配置环节卡壳。我见过不少团队在这个阶段浪费两三周时间反复调试,其实只要理解几个核心概念就能事半功倍。IAM(Identity and Access Management)就像亚马逊AW…...

RK3399 DRM显示框架实战:从零开始搭建多图层视频播放器
RK3399 DRM显示框架实战:从零构建多图层视频播放器 在智能终端设备开发领域,如何高效实现多媒体内容的叠加显示一直是工程师们面临的挑战。想象一下,当我们需要在教育平板上同时播放教学视频、展示动态课件和实时标注内容时,传统的…...

UFS4.0协议之电源与信号完整性设计探析
1. UFS4.0协议的核心电源架构解析 第一次拆解UFS4.0存储芯片时,我被其电源系统的精密设计震撼到了。与早期版本相比,UFS4.0将供电网络细分为VCC(2.5V)、VCCQ(1.2V)和VCCQ2(1.8V)三级…...
)
Ni8mare高危漏洞来袭:黑客可远程劫持n8n服务器(CVE-2026-21858)
研究人员最新发现,一项被命名为Ni8mare的最高严重级漏洞(CVSS评分10.0),允许远程未授权攻击者完全接管本地部署的n8n工作流自动化平台。该漏洞编号为CVE-2026-21858。据研究人员披露,互联网上存在超过10万台易受攻击的…...

如何永久备份微信聊天记录?WeChatMsg完整指南让数据真正属于你
如何永久备份微信聊天记录?WeChatMsg完整指南让数据真正属于你 【免费下载链接】WeChatMsg 提取微信聊天记录,将其导出成HTML、Word、CSV文档永久保存,对聊天记录进行分析生成年度聊天报告 项目地址: https://gitcode.com/GitHub_Trending/…...

终极指南:免费在电脑上玩Switch游戏,Ryujinx模拟器完整教程
终极指南:免费在电脑上玩Switch游戏,Ryujinx模拟器完整教程 【免费下载链接】Ryujinx 用 C# 编写的实验性 Nintendo Switch 模拟器 项目地址: https://gitcode.com/GitHub_Trending/ry/Ryujinx 你是否曾想过在电脑上体验《塞尔达传说:…...

4大场景化解决方案:CyberpunkSaveEditor存档修改工具全指南
4大场景化解决方案:CyberpunkSaveEditor存档修改工具全指南 【免费下载链接】CyberpunkSaveEditor A tool to edit Cyberpunk 2077 sav.dat files 项目地址: https://gitcode.com/gh_mirrors/cy/CyberpunkSaveEditor 当你在夜之城遭遇装备属性不足、任务进度…...

告别激活烦恼:用快马AI一键生成文件自动分类工具提升工作效率
最近工作中经常遇到文件杂乱无章的问题,特别是从不同渠道收集的资料散落在各个文件夹里。作为一个追求效率的程序员,我决定用Python写个自动分类工具。没想到在InsCode(快马)平台上,只用几句话描述需求就生成了完整可用的代码,整个…...