【SpringBoot】手写模拟SpringBoot核心流程
依赖包
新建一个工程,包含两个 module:
springboot 模块,表示 springboot 源码实现;
user 模块,表示业务系统,使用 springboot 模块;
依赖包:Spring、SpringMVC、Tomcat 等,引入依赖如下:
<dependencies><dependency><groupId>org.springframework</groupId><artifactId>spring-context</artifactId><version>5.3.18</version></dependency><dependency><groupId>org.springframework</groupId><artifactId>spring-web</artifactId><version>5.3.18</version></dependency><dependency><groupId>org.springframework</groupId><artifactId>spring-webmvc</artifactId><version>5.3.18</version></dependency><dependency><groupId>javax.servlet</groupId><artifactId>javax.servlet-api</artifactId><version>4.0.1</version></dependency><dependency><groupId>org.apache.tomcat.embed</groupId><artifactId>tomcat-embed-core</artifactId><version>9.0.60</version></dependency>
</dependencies>
在 user 模块下引入依赖:
<dependencies><dependency><groupId>org.example</groupId><artifactId>springboot</artifactId><version>1.0-SNAPSHOT</version></dependency>
</dependencies>
定义对应的 controller 和 service:
@RestController
public class UserController {@Autowiredprivate UserService userService;@GetMapping("test")public String test(){return userService.test();}
}
最终希望通过启动 MyApplication 的 main 方法,启动项目,能访问到 UserController。
核心注解和核心类
SpringBoot 的核心类和注解:
@SpringBootApplication,这个注解是加在应用启动类上的,也就是 main 方法所在的类;
SpringApplication,这个类中有个 run() 方法,用来启动 SpringBoot 应用的;
所以,自定义类和注解以实现上面的功能。
@FireSpringBootApplication 注解:
@Target(ElementType.TYPE)
@Retention(RetentionPolicy.RUNTIME)
@Configuration
@ComponentScan
public @interface FireSpringBootApplication {
}
FireSpringApplication 启动类:
public class FireSpringApplication {public static void run(Class clazz){}
}
在 MyApplication 中使用:
@FireSpringBootApplication
public class MyApplication {public static void main(String[] args) {FireSpringApplication.run(MyApplication.class);}
}
run 方法
需要在 run 方法中启动 tomcat,通过 tomcat 接收请求;
DispatchServlet 绑定 spring 容器,DispatchServlet 接收到请求后需要在 spring 容器中找到一个 controller 中对应的方法;
run 方法中需要实现的逻辑:
- 创建一个 Spring 容器
- 创建 Tomcat 对象
- 生成 DispatcherServlet 对象,并且和前面创建出来的 Spring 容器进行绑定
- 将 DispatcherServlet 添加到 Tomcat 中
- 启动 Tomcat
创建 Spring 容器
public class FireSpringApplication {public static void run(Class clazz){AnnotationConfigWebApplicationContext applicationContext = new AnnotationConfigWebApplicationContext();applicationContext.register(clazz);applicationContext.refresh();}
}
run 方法中传入的即使 MyApplication 类,被解析为 Spring 容器的配置类;
默认会将 MyApplication 所在的包作为扫描路径,从而扫描到 UserController 和 UserService,所以在 spring 容器启动后就会存在两个 bean 了;
启动 Tomcat
使用内嵌的 Tomact,即 Embed-Tomcat,启动代码如下:
public static void startTomcat(WebApplicationContext applicationContext){Tomcat tomcat = new Tomcat();Server server = tomcat.getServer();Service service = server.findService("Tomcat");Connector connector = new Connector();// 绑定端口connector.setPort(8081);Engine engine = new StandardEngine();engine.setDefaultHost("localhost");Host host = new StandardHost();host.setName("localhost");String contextPath = "";Context context = new StandardContext();context.setPath(contextPath);context.addLifecycleListener(new Tomcat.FixContextListener());host.addChild(context);engine.addChild(host);service.setContainer(engine);service.addConnector(connector);// 添加DispatcherServlet,并且绑定一个Spring容器tomcat.addServlet(contextPath, "dispatcher", new DispatcherServlet(applicationContext));// 设置Mapping关系context.addServletMappingDecoded("/*", "dispatcher");try {tomcat.start();} catch (LifecycleException e) {e.printStackTrace();}}
在 run 方法中调用 startTomcat 方法启动 tomcat:
public static void run(Class clazz){AnnotationConfigWebApplicationContext applicationContext = new AnnotationConfigWebApplicationContext();applicationContext.register(clazz);applicationContext.refresh();// 启动tomcatstartTomcat(applicationContext);}
到此,一个简单的 SpringBoot 就写出来了,运行 MyApplication 正常启动项目,通过浏览器就可以访问 UserController 了。
实现 Tomcat 和 Jetty 的切换
前面代码中默认启动的是 Tomcat,现在想改成这样子:
- 如果项目中有 Tomcat 的依赖,那就启动 Tomcat
- 如果项目中有 Jetty的依赖就启动 Jetty
- 如果两者都没有则报错
- 如果两者都有也报错
这个逻辑希望 SpringBoot 自动实现,对于程序员用户而言,只要在 Pom 文件中添加相关依赖就可以了,想用 Tomcat 就加 Tomcat 依赖,想用 Jetty 就加 Jetty 依赖。
Tomcat 和 Jetty 都是应用服务器,或者是 Servlet 容器,可以定义接口来表示它们,这个接口交 WebServer(SpringBoot 源码中也叫这个)。
定义接口如下:
public interface WebServer {public void start();}
Tomcat 实现类:
public class TomcatWebServer implements WebServer{@Overridepublic void start() {System.out.println("启动Tomcat");}
}
Jetty 实现类:
public class JettyWebServer implements WebServer{@Overridepublic void start() {System.out.println("启动Jetty");}
}
在 FireSpringApplication 中的 run 方法中,去获取对应的 WebServer,然后启动对应的 webServer。
代码如下:
public static void run(Class clazz){AnnotationConfigWebApplicationContext applicationContext = new AnnotationConfigWebApplicationContext();applicationContext.register(clazz);applicationContext.refresh();// 自动获取配置的Tomcat或者Jetty容器WebServer webServer = getWebServer(applicationContext);webServer.start();}public static WebServer getWebServer(ApplicationContext applicationContext){return null;
}
模拟实现条件注解
首先实现一个条件注解@FireConditionalOnClass,对应代码如下:
@Target({ ElementType.TYPE, ElementType.METHOD })
@Retention(RetentionPolicy.RUNTIME)
@Conditional(FireOnClassCondition.class)
public @interface FireConditionalOnClass {String value() default "";
}
注意核心为@Conditional(FireOnClassCondition.class)中的 FireOnClassCondition,因为它才是真正得条件逻辑:
public class FireOnClassCondition implements Condition {@Overridepublic boolean matches(ConditionContext context, AnnotatedTypeMetadata metadata) {Map<String, Object> annotationAttributes = metadata.getAnnotationAttributes(FireConditionalOnClass.class.getName());String className = (String) annotationAttributes.get("value");try {context.getClassLoader().loadClass(className);return true;} catch (ClassNotFoundException e) {return false;}}
}
具体逻辑为,拿到@FireConditionalOnClass中的 value 属性,然后用类加载器进行加载,如果加载到了所指定的这个类,那就表示符合条件,如果加载不到,则表示不符合条件。
模拟实现自动配置类
配置类代码如下:
@Configuration
public class WebServiceAutoConfiguration {@Bean@FireConditionalOnClass("org.apache.catalina.startup.Tomcat")public TomcatWebServer tomcatWebServer(){return new TomcatWebServer();}@Bean@FireConditionalOnClass("org.eclipse.jetty.server.Server")public JettyWebServer jettyWebServer(){return new JettyWebServer();}
}
表示org.apache.catalina.startup.Tomcat存在,则有 tomcatWebServer 这个bean;
表示org.eclipse.jetty.server.Server存在,则有 jettyWebServer 这个bean;
FireSpringApplication#getWebServer()方法实现:
public static WebServer getWebServer(ApplicationContext applicationContext){// key为beanName, value为Bean对象Map<String, WebServer> webServers = applicationContext.getBeansOfType(WebServer.class);if (webServers.isEmpty()) {throw new NullPointerException();}if (webServers.size() > 1) {throw new IllegalStateException();}// 返回唯一的一个return webServers.values().stream().findFirst().get();
}
这样整体 SpringBoot 启动逻辑就是这样的:
- 创建一个 AnnotationConfigWebApplicationContext 容器
- 解析 MyApplication 类,然后进行扫描
- 通过 getWebServer 方法从 Spring 容器中获取 WebServer 类型的 Bean
- 调用 WebServer 对象的 start 方法
发现自动配置类
WebServiceAutoConfiguration 需要被 SpringBoot 发现,可以通过 SPI 机制实现,比较 JDK 自带的 SPI 来实现。
在 springboot 项目中的 resources 目录下添加目录META-INF/services和文件 org.example.springboot.AutoConfiguration,文件内容为org.example.springboot.WebServiceAutoConfiguration。
接口:
public interface AutoConfiguration {
}
WebServiceAutoConfiguration 实现该接口:
@Configuration
public class WebServiceAutoConfiguration implements AutoConfiguration {@Bean@FireConditionalOnClass("org.apache.catalina.startup.Tomcat")public TomcatWebServer tomcatWebServer(){return new TomcatWebServer();}@Bean@FireConditionalOnClass("org.eclipse.jetty.server.Server")public JettyWebServer jettyWebServer(){return new JettyWebServer();}
}
再利用 spring 中的@Import技术来导入这些配置类,我们在@FireSpringBootApplication的定义上增加如下代码:
@Target(ElementType.TYPE)
@Retention(RetentionPolicy.RUNTIME)
@Configuration
@ComponentScan
@Import(FireImportSelect.class)
public @interface FireSpringBootApplication {
}
FireImportSelect:
public class FireImportSelect implements DeferredImportSelector {@Overridepublic String[] selectImports(AnnotationMetadata importingClassMetadata) {ServiceLoader<AutoConfiguration> serviceLoader = ServiceLoader.load(AutoConfiguration.class);List<String> list = new ArrayList<>();for (AutoConfiguration autoConfiguration : serviceLoader) {list.add(autoConfiguration.getClass().getName());}return list.toArray(new String[0]);}
}
如此,Spring 容器可以装载 WebServiceAutoConfiguration 配置类了,对于 user 模块而言,不需要修改代码就可以自动识别 Tomcat 和 Jetty 了。
总结
到此,实现了一个简单版本的 SpringBoot,因为 SpringBoot 首先是基于 Spring 的,而且提供的功能也更加强大,后面会对这些功能进行更深入的剖析。
相关文章:

【SpringBoot】手写模拟SpringBoot核心流程
依赖包 新建一个工程,包含两个 module: springboot 模块,表示 springboot 源码实现;user 模块,表示业务系统,使用 springboot 模块; 依赖包:Spring、SpringMVC、Tomcat 等ÿ…...

应对.locked勒索病毒:恢复、预防全方位攻略
导言: .locked勒索病毒并非简单的数字威胁,它是一场对个人和企业数字资产的精密审判。这种病毒通过各种方式感染系统,从而以瞬间之间将用户的关键文件变成数字拼图,无情地要求赎金以换取解锁的密钥。如果您正在经历勒索病毒数据恢…...

基于DS1302时钟液晶12864显示2路闹钟仿真及源程序
一、系统方案 1、本设计采用51单片机作为主控器。 2、DS1302采集年月日时分秒送到液晶12864显示。 3、按键年月日时分秒,两路闹钟。 二、硬件设计 原理图如下: 三、单片机软件设计 1、首先是系统初始化 uchar clock_time[6] {0X00,0X59,0X23,0X09,0X…...

AGC034E Complete Compress
AGC034E Complete Compress 洛谷[AGC034E] Complete Compress 题目大意 给你一棵有 n n n个节点的树,并用 01 01 01串告诉你哪些节点上有棋子(恰好一棵)。 你可以进行若干次操作,每次操作可以将两颗距离至少为 2 2 2的棋子向彼…...

python设计模式12:状态模式
什么是状态机? 关键属性: 状态和转换 状态: 系统当前状态 转换:一种状态到另外一种状态的变化。 转换由触发事件或是条件启动。 状态机-状态图 状态机使用场景: 自动售货机 电梯 交通灯 组合锁 停车计时…...
)
JS对图片尺寸和DPI进行编辑修改(1寸照修改为2寸照)
各种报名都对照片有大小限制,鉴于这种情况,网上搜了后拼凑出了如下代码,用于解决1寸照片修改为2寸照片,同时将DPI修改为300,当然也可以根据自己的情况修改代码: HTML <input type"file" id&…...

EDA实验----四选一多路选择器设计(QuartusII)
目录 一.实验目的 二.实验仪器设备 三.实验原理: 四.实验要求 五.实验内容及步骤 1.实验内容 2.实验步骤 六.实验报告 七.实验过程 1.创建Verilog文件,写代码 2.波形仿真 …...

从windows iso文件中提取install.wim
1、首先从微软官方下载需要的windows镜像 https://www.microsoft.com/zh-cn/software-download/windows10/ 2、在下载的iso文件右键,打开压缩包,在sources文件夹下,应该就可以看到install.wim了。但似乎在最新的win10版本,微软采…...

Python的flask网页编程的GET和POST方法的区别
关于flask网页编程的GET及POST方法之间存在哪些区别问题,我们主要从以下六个关键点予以详细阐述: 首先需要明确的是,GET与POST两种不同类型的HTTP方法所采用的请求模式有所差别。其中,GET方法采用的是基于URL请求的机制ÿ…...
15 # 手写 throttle 节流方法
什么是节流 节流是限制事件触发的频率,当持续触发事件时,在一定时间内只执行一次事件,这个效果跟英雄联盟里的闪现技能释放差不多。 函数防抖关注一定时间连续触发的事件只在最后执行一次,而函数节流侧重于一段时间内只执行一次…...

puzzle(1612)拼单词、wordlegame
目录 拼单词 wordlegame 拼单词 在线play 找出尽可能多的单词。 如果相邻的话(在任何方向上),你可以拖拽鼠标从一个字母(方格)到另一个字母(方格)。在一个单词中,你不能多次使用…...
【解决方案】pytion 运行时提示 import psutil ModuleNotFoundError: No module named ‘psutil‘
报错原因分析 import psutil ModuleNotFoundError: No module named psutil报错原因分析 当前环境pytion中缺少了psutil包,使用pip命令进行安装 解决方案 pip install psutil...
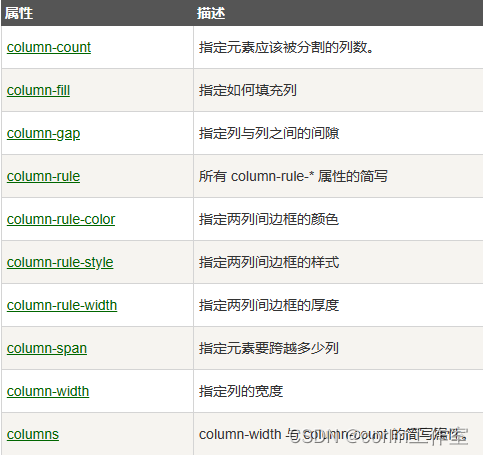
CSS3 过度效果、动画、多列
一、CSS3过度: CSS3过渡是元素从一种样式逐渐改变为另一种的效果。要实现这一点,必须规定两相内容:指定要添加效果的CSS属性;指定效果的持续时间。如果为指定持续时间,transition将没有任何效果。 <style> div…...

java使用geotools解析矢量数据kml、geojson、shp文件
geotools解析kml、geojson geotools环境准备公共获取属性方法解析kml解析geojson解析shp geotools环境准备 这里使用的是maven引用geotools包,引用geotools包需要添加maven仓库,pom.xml文件如下: <properties><!-- geotools版本 -…...

原生 JS DOM 常用操作大全
DOM DOM文档对象模型 又称为DOM树 DOM树 由文档、元素、节点 组成文档:一个页面就是一个文档,元素:文档中的所有标签都称为元素。DOM中使用Element表示节点:文档中的所有内容,在文档中都是节点(标签、属性…...
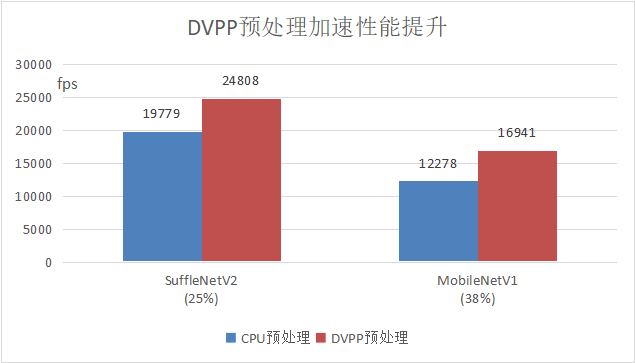
昇腾CANN 7.0 黑科技:DVPP硬件加速训练数据预处理,友好解决Host CPU预处理瓶颈
在NPU/GPU上进行模型训练计算,为了充分使用计算资源,一般采用批量数据处理方式,因此一般情况下为提升整体吞吐率,batch值会设置的比较大,常见的batch数为256/512,这样一来,对数据预处理处理速度…...

Aria2 任意文件写入漏洞复现
漏洞描述 Aria2 是一款轻量级、多协议、多源下载工具(支持 HTTP/HTTPS、FTP、BitTorrent、Metalink),内置 XML-RPC 和 JSON-RPC 接口。 我们可以使用 RPC 接口来操作 aria2 并将文件下载到任意目录,从而造成任意文件写入漏洞。 …...

思维模型 多看效应
本系列文章 主要是 分享 思维模型,涉及各个领域,重在提升认知。越熟悉,越喜欢。 1 多看效应的应用 1.1 多看效应在广告和营销领域的应用 1 可口可乐之歌 可口可乐公司在 20 世纪 60 年代推出了“可口可乐之歌”广告,这个广告通…...
持续集成交付CICD:Jenkins Pipeline与远程构建触发器
目录 一、实验 1.Jenkins Pipeline本地构建触发器 2.Jenkins Pipeline与远程构建触发器(第一种方式) 3.Jenkins Pipeline与远程构建触发器(第二种方式) 4.Jenkins Pipeline与远程构建触发器(第三种方式࿰…...

【无标题(PC+WAP)花卉租赁盆栽绿植类pbootcms站模板
(PCWAP)花卉租赁盆栽绿植类pbootcms网站模板 PbootCMS内核开发的网站模板,该模板适用于盆栽绿植网站等企业,当然其他行业也可以做,只需要把文字图片换成其他行业的即可; PCWAP,同一个后台,数据即时同步&…...
)
DM V5.0.6.03.103 Windows 2000 (2026.04.13)
DM V5.0.6.03.103 Windows 2000看样子要换windows 2000 或者windows xp,没法子在新的操作系统安装...

AI 英语阅读 APP的开发
开发一款 AI 英语阅读 APP 在 2026 年的核心逻辑已从“电子书查词”转变为“内容动态生成与理解增强”。这种应用的核心竞争力在于能根据用户的实时掌握情况,自动调整文本的难度、背景和互动方式。以下是该项目的核心开发流程与关键技术模块:1. 核心功能…...

玄域靶场越权系列第1关实战复盘
不止是通关,更是总结一套通用高效的漏洞挖掘思路。最近在刷几个网络安全靶场,准备把一路上的 WriteUp 整理成系列分享出来。后续会陆续更新国内知名靶场、HackTheBox、VulnHub等国际靶场的通关思路,内容涵盖 SRC、渗透测试、应急响应、内网与…...

C语言分支与循环学习笔记
一、分支语句1. if 语句多分支:例题:判断奇偶数注意: 条件要用 比较,不要写成 (赋值)即使只有一条语句,也建议加 {},避免后面加语句时出错2. switch 语句适合同一个表达式与多个固…...

Windows环境下IDEA集成Java与Protobuf的高效开发指南
1. 环境准备:Protobuf与IDEA的安装配置 在Windows系统下搭建Java与Protobuf的开发环境,就像组装一台高性能电脑——每个部件都要选对型号、正确安装。我经历过无数次环境配置的翻车现场,这里把最稳妥的配置方案分享给你。 首先去Protobuf的…...

ESP32C3 mini 开发实战:从供电问题到WiFi稳定的解决方案
1. ESP32C3 mini开发中的供电问题诊断 最近在折腾ESP32C3 mini开发板时,遇到了一个让人头疼的问题:WiFi连接极不稳定,经常莫名其妙断开。刚开始以为是代码问题,反复检查了WiFi配置都没发现异常。直到用万用表测量供电电压时才发现…...

深入解析UDS协议:汽车电子诊断服务的核心机制与应用实践
1. UDS协议:汽车电子诊断的通用语言 想象一下你是一位汽车医生,手里拿着听诊器准备给车辆做全面体检。UDS协议就是你与车辆沟通的专用语言,它让诊断设备(Tester)和电子控制单元(ECU)能够准确理解…...

**发散创新:用Python构建可视化编程环境——从代码到图形的跃迁之旅**在传统编程思维中,我们习惯于“写代码
发散创新:用Python构建可视化编程环境——从代码到图形的跃迁之旅 在传统编程思维中,我们习惯于“写代码 → 运行结果”的线性流程。但随着低代码、可视化开发趋势兴起,一种全新的编程范式正在悄然改变开发者的工作方式:将程序逻辑…...

上传视频时截取正脸照片
借助ai模型vladmandic/face-api实现截取视频中的正脸照片 npm i vladmandic/face-api 加载模型 //可以加载CDN资源 const MODEL_URL ‘https://cdn.jsdelivr.net/npm/vladmandic/face-api/model/’ //也可以将face-api的模型直接拷贝下来放在public下 const MODEL_URL ‘/mod…...

VideoSrt:终极视频字幕自动生成解决方案,让字幕制作变得简单快速
VideoSrt:终极视频字幕自动生成解决方案,让字幕制作变得简单快速 【免费下载链接】video-srt-windows 这是一个可以识别视频语音自动生成字幕SRT文件的开源 Windows-GUI 软件工具。 项目地址: https://gitcode.com/gh_mirrors/vi/video-srt-windows …...