Electron 开发页面应用
简介
Electron集成了包括chromium(理解为具备chrom浏览器的工具),nodejs,native apis
chromium:支持最新特性的浏览器。
nodejs:js运行时,可实现文件读写等。
native apis :提供统一的原生界面能力。直接与操作系统通信。例如:系统通知,快捷键等。底层硬件的参数等。
Electron有一个主进程,以及渲染进程,启动时首先启动main.js或index.js,然后创建一个native ui,会生成多个browserWindow,用window呈现界面,这里就是web界面,是在chromium上展示的前端页面,此时browserWindow就是渲染进程,不同的渲染进程是相互独立的,各自运行在自己的沙箱环境当中,不同的窗口之间需要数据交互,因此electron内部提供了IPC和RPC通信机制。
主进程可以看做是package.json中main属性对应的文件,一个应用只会有一个主进程,只有主进程可以进行GUI的api操作,也就是可以调用native apis。
windows中展示的界面通过渲染进程表现,支持dom操作以及node api的调用操作。一个应用可以有多个渲染进程,渲染进程也可以和调用native apis,但是必须先和主进程建立通信,然后由主进程调用。
Electron环境搭建(windows)
npm initnpm install --save-dev electron{"name": "electron","version": "1.0.0","description": "","main": "main.js","scripts": {"test": "echo \"Error: no test specified\" && exit 1"},"author": "","license": "ISC","devDependencies": {"electron": "^26.3.0"}
}
创建main.js文件
const {app,BrowserWindow} =require('electron')//当app启动后执行串口创建等操作
app.whenReady().then(()=>{const mainWin = new BrowserWindow({width:600,height:400,})//在当前窗口中加载指定界面让它显示具体的内容mainWin.loadFile('index.html')//退出时的生命周期函数mainWin.on('close',()=>{console.log('close~~~~~');})
})app.on('window-all-closed',()=>{console.log('all closed');app.quit()
})
创建index.html
<!DOCTYPE html>
<html lang="en">
<head><meta charset="UTF-8"><meta name="viewport" content="width=device-width, initial-scale=1.0"><title>elelctron</title>
</head>
<body><h2>自定义桌面应用</h2>
</body>
</html>
electron生命周期
ready:app初始化完成
dom-ready:一个窗口的文本加载完成
did-finish-load:导航完成时触发
window-all-close:所有窗口都被关闭时触发,如果没有监听这个事件,默认会执行退出操作,如果监听了这个事件,那么就需要我们自己决定是否将当前的应用程序退出。如果没有写之星退出操作,那么之后的三个生命周期都会失效。
before-quit:在关闭窗口之前触发。
will-quit:在窗口关闭并且应用退出时触发
quit:当所有窗口被关闭时触发(app)
closed:当窗口关闭时触发,此时应删除窗口引用。
const {app,BrowserWindow} =require('electron')//创建窗口
function createWindow(){let mainWin = new BrowserWindow({width:800,height:400})mainWin.loadFile('index.html')//控制dom元素的对象mainWin.webContents.on("did-finish-load",()=>{console.log(3333);})mainWin.webContents.on("dom-ready",()=>{console.log(2222);})mainWin.on('close',()=>{console.log('8888this window is closed');//关闭释放mainWin = null})
}app.on('ready',()=>{console.log(1111);createWindow()
})
app.on('window-all-closed',()=>{console.log(4444);app.quit()
})
app.on('before-quit',()=>{console.log(5555);
})app.on('will-quit',()=>{console.log(666);
})app.on('quit',()=>{console.log(77777);
})
执行顺序:1,2,3,8,4,5,6,7
窗口尺寸
首先做一下监听渲染
"scripts": {"test": "echo \"Error: no test specified\" && exit 1","start": "nodemon --watch main.js --exec npm run build","build": "chcp 65001 && electron ." //防止控制台打印乱码},const {app,BrowserWindow} =require('electron')//创建窗口
function createWindow(){let mainWin = new BrowserWindow({x:100, //相对于左上角的横坐标,设置位置y:100, //相对于左上角的纵坐标,设置位置show:false, //内容加载会有延迟,设置为false不显示应用width:800,height:400,maxHeight:600,//最大高度maxWidth:1000,//最大宽度minHeight:200,//最小高度minWidth:300,//最小宽度 resizable:false //不能支持缩放操作})mainWin.loadFile('index.html')//等内容加载准备好展示时,改为true显示窗体mainWin.on("ready-to-show",()=>{mainWin.show()})mainWin.on('close',()=>{//关闭释放mainWin = null})
}app.on('ready',()=>{createWindow()
})
app.on('window-all-closed',()=>{app.quit()
})启动项目
npm start窗口标题
const {app,BrowserWindow} =require('electron')//创建窗口
function createWindow(){let mainWin = new BrowserWindow({show:false, //内容加载会有延迟,设置为false不显示应用width:800,// transparent:true,//透明窗体height:600,autoHideMenuBar:true, //隐藏菜单条icon:'IDisk Globe.ico', //显示图标title:'electron', //软件标题,在HTML文件不设置title则生效。frame:true //决定显不显示工具栏以及标题})mainWin.loadFile('index.html')//等内容加载准备好展示时,改为true显示窗体mainWin.on("ready-to-show",()=>{mainWin.show()})mainWin.on('close',()=>{//关闭释放mainWin = null})
}app.on('ready',()=>{createWindow()
})
app.on('window-all-closed',()=>{app.quit()
})
创建一个新的窗体
先需要在主进程中创建,要注意electron高版本引入remote写法会不一样这里使用的是26
npm install --save @electron/remote
添加webPreferences属性,并且初始化remote
const { app, BrowserWindow } = require('electron')
const remote = require("@electron/remote")//创建窗口
function createWindow() {let mainWin = new BrowserWindow({show: false, //内容加载会有延迟,设置为false不显示应用width: 800,// transparent:true,//透明窗体height: 600,autoHideMenuBar: true, //隐藏菜单条icon: 'IDisk Globe.ico', //显示图标title: 'electron', //软件标题,在HTML文件不设置title则生效。frame: true, //决定显不显示工具栏以及标题webPreferences: { //设置在渲染分支能够使用node写法nodeIntegration: true,contextIsolation: false,}})//初始化remote模块remote.initialize()remote.enable(mainWin.webContents)mainWin.loadFile('index.html')//等内容加载准备好展示时,改为true显示窗体mainWin.on("ready-to-show", () => {mainWin.show()})mainWin.on('close', () => {//关闭释放mainWin = null})
}app.on('ready', () => {createWindow()
})
app.on('window-all-closed', () => {app.quit()
})
渲染进程
const {BrowserWindow} = require("@electron/remote")
addEventListener('DOMContentLoaded',()=>{ //dom内容加载完成后触发//点击按钮打开一个新的窗口btn.onclick=()=>{let indexMin = new BrowserWindow({width:200,height:200})indexMin.loadFile('list.html')}
})
<!DOCTYPE html>
<html lang="en">
<head><meta charset="UTF-8"><meta name="viewport" content="width=新窗口, initial-scale=1.0"><title>Document</title>
</head>
<body>list
</body>
</html>快捷键
control + r 渲染html页面
control + shift + r 打开调试控制台
自定义窗口
实现自定义的最大化,最小化以及关闭窗口
<!DOCTYPE html>
<html lang="en"><head><meta charset="UTF-8"><meta name="viewport" content="width=device-width, initial-scale=1.0"><title></title>
</head>
<style>*{margin: 0;padding: 0;}
.head{display: flex;justify-content: space-between;font-size: 12px;line-height: 16px;border-bottom: 1px solid #c2c2c2;padding: 10px;
}
.head div{display: flex;align-items: center;
}
.head img{width: 16px;height: 16px;margin-right: 10px;
}
</style><body><div class="head"><div><img src="./IDisk Globe.ico" alt=""><span>自定义窗口</span></div><div><img id="minimize" src="./image/ic_zoom_out_2.png" alt=""><img id="max" src="./image/最大化.png" alt=""><img id="closeWindow" src="./image/关闭.png" alt=""></div></div><h2>主体内容</h2>
</body>
<script src="./index.js"></script></html>
渲染进程
const { BrowserWindow,getCurrentWindow } = require("@electron/remote")
addEventListener('DOMContentLoaded', () => { //dom内容加载完成后触发let mainWin = getCurrentWindow() //获取当前的窗口minimize.onclick=function (){if(!mainWin.isMaximized()){mainWin.minimize()}}max.onclick=function (){if(!mainWin.isMaximized()){ //检测是否是最大化mainWin.maximize() //不是则最大化}else{mainWin.restore()//否则回到原始状态}}closeWindow.onclick=function (){//关闭窗口mainWin.close()}
})
主进程
const { app, BrowserWindow } = require('electron')
const remote = require("@electron/remote/main")//创建窗口
function createWindow() {let mainWin = new BrowserWindow({show: false, //内容加载会有延迟,设置为false不显示应用width: 800,// transparent:true,//透明窗体height: 600,autoHideMenuBar: true, //隐藏菜单条icon: 'IDisk Globe.ico', //显示图标title: 'electron', //软件标题,在HTML文件不设置title则生效。frame: false, //决定显不显示工具栏以及标题webPreferences: { //设置在渲染分支能够使用node写法nodeIntegration: true,contextIsolation: false,}})//初始化remote模块remote.initialize()remote.enable(mainWin.webContents)mainWin.loadFile('index.html')//等内容加载准备好展示时,改为true显示窗体mainWin.on("ready-to-show", () => {mainWin.show()})mainWin.on('close', () => {//关闭释放mainWin = null})
}app.on('ready', () => {createWindow()
})
app.on('window-all-closed', () => {app.quit()
})
这只是基础的api调用,同时我们也可以加入一些再记得逻辑,比如关闭时可以弹出确认框,确认按钮关闭,否则就不关闭。
onbeforeunload=function (){//满足弹窗条件后mainWin.destroy() //继续执行销毁return false}父子及模态窗口
创建父子关系
parent:getCurrentWindow(), //建立父子关系
modal:true, //模态框,子窗口打开时,父窗口不可以操作
const subWin = new BrowserWindow({parent:getCurrentWindow(), //建立父子关系modal:true, //模态框,子窗口打开时,父窗口不可以操作width: 400,height: 400})代码:主进程
<!DOCTYPE html>
<html lang="en"><head><meta charset="UTF-8"><meta name="viewport" content="width=device-width, initial-scale=1.0"><title>主界面</title>
</head>
<style></style><body><h2>子窗口以及模态窗口</h2><button id="btn">新增窗口</button>
</body>
<script src="./index.js"></script></html>
const { app, BrowserWindow } = require('electron')
const remote = require("@electron/remote/main")//创建窗口
function createWindow() {let mainWin = new BrowserWindow({show: false, //内容加载会有延迟,设置为false不显示应用width: 800,// transparent:true,//透明窗体height: 600,autoHideMenuBar: true, //隐藏菜单条icon: 'IDisk Globe.ico', //显示图标title: 'electron', //软件标题,在HTML文件不设置title则生效。frame: true, //决定显不显示工具栏以及标题webPreferences: { //设置在渲染分支能够使用node写法nodeIntegration: true,contextIsolation: false,}})//初始化remote模块remote.initialize()remote.enable(mainWin.webContents)mainWin.loadFile('index.html')//等内容加载准备好展示时,改为true显示窗体mainWin.on("ready-to-show", () => {mainWin.show()})mainWin.on('close', () => {//关闭释放mainWin = null})
}app.on('ready', () => {createWindow()
})
app.on('window-all-closed', () => {app.quit()
})渲染进程
<!DOCTYPE html>
<html lang="en">
<head><meta charset="UTF-8"><meta name="viewport" content="width=新窗口, initial-scale=1.0"><title>xx窗口</title>
</head>
<body><h2>子窗口</h2>
</body>
</html>
const { BrowserWindow,getCurrentWindow } = require("@electron/remote")
addEventListener('DOMContentLoaded', () => { //dom内容加载完成后触发btn.onclick = function () {const subWin = new BrowserWindow({parent:getCurrentWindow(), //建立父子关系modal:true, //模态框,子窗口打开时,父窗口不可以操作width: 400,height: 400})subWin.loadFile('sub.html')}subWin.on('close',()=>{subWin = null})
})自定义菜单
label:菜单名称
submenu:二级菜单
click:点击事件
type:选项之间的分割线
role:这里使用about,会显示关于electron的版本信息
// 定义自己的菜单let menuTemp = [{label:'文件',submenu:[{label:"打开文件",click(){console.log('打开文件');}},{type:'separator'},{label:"关闭文件"},{label:"关于",role:"about"},]},{label:'编辑'},]// 利用上述模板生成一个菜单let menu = Menu.buildFromTemplate(menuTemp)//将上述的自定义菜单,添加到应用里Menu.setApplicationMenu(menu)代码:主进程,菜单必须可见
const { app, BrowserWindow,Menu } = require('electron')
const remote = require("@electron/remote/main")
console.log(process.platform); //通过操作系统来做跨端兼容//创建窗口
function createWindow() {let mainWin = new BrowserWindow({show: false, //内容加载会有延迟,设置为false不显示应用width: 800,height: 600,icon: 'IDisk Globe.ico', //显示图标title:'自定义菜单', //软件标题,在HTML文件不设置title则生效。frame: true, //决定显不显示工具栏以及标题webPreferences: { //设置在渲染分支能够使用node写法nodeIntegration: true,contextIsolation: false,}})//初始化remote模块remote.initialize()remote.enable(mainWin.webContents)// 定义自己的菜单let menuTemp = [{label:'文件',submenu:[{label:"打开文件",click(){console.log('打开文件');}},{type:'separator'},{label:"关闭文件"},{label:"关于",role:"about"},]},{label:'编辑'},]// 利用上述模板生成一个菜单let menu = Menu.buildFromTemplate(menuTemp)//将上述的自定义菜单,添加到应用里Menu.setApplicationMenu(menu)mainWin.loadFile('index.html')//等内容加载准备好展示时,改为true显示窗体mainWin.on("ready-to-show", () => {mainWin.show()})mainWin.on('close', () => {//关闭释放mainWin = null})
}app.on('ready', () => {createWindow()
})
app.on('window-all-closed', () => {app.quit()
})
菜单角色及类型
//自定义菜单的内容let menuTemp = [{label: '角色',submenu: [{ label: "复制", role: 'copy' },{ label: "剪切", role: 'cut' },{ label: "粘贴", role: 'paste' },{ label: "最小化", role: 'minimize' }]},{label: '类型',submenu: [{ label: "选项1", type: 'checkbox' }, //多选框{ label: "选项2", type: 'checkbox' },{ label: "选项3", type: 'checkbox' },{ type: 'separator' },{ label: "item1", type: 'radio' },//单选框{ label: "item2", type: 'radio' },{ type: 'separator' },{ label: "windows", type: 'submenu', role: 'windowMenu' }, //window的一些操作{label: "其他", submenu: [{ label: '打开',icon:'./IDisk Globe.ico',accelerator:'ctrl + o',click(){ //设置快捷键console.log('open执行');}}]},]},]动态创建菜单
使用MenuItem,可以动态的传入需要的菜单属性,实现动态的菜单
main.js
const { app, BrowserWindow, Menu } = require('electron')
const remote = require("@electron/remote/main")
console.log(process.platform); //通过操作系统来做跨端兼容//创建窗口
function createWindow() {let mainWin = new BrowserWindow({show: false, //内容加载会有延迟,设置为false不显示应用width: 800,height: 600,icon: 'IDisk Globe.ico', //显示图标title: 'Electron', //软件标题,在HTML文件不设置title则生效。frame: true, //决定显不显示工具栏以及标题webPreferences: { //设置在渲染分支能够使用node写法nodeIntegration: true,contextIsolation: false,}})//初始化remote模块remote.initialize()remote.enable(mainWin.webContents)mainWin.loadFile('index.html')//等内容加载准备好展示时,改为true显示窗体mainWin.on("ready-to-show", () => {mainWin.show()})mainWin.on('close', () => {//关闭释放mainWin = null})
}app.on('ready', () => {createWindow()
})
app.on('window-all-closed', () => {app.quit()
})
index.js
const { BrowserWindow,getCurrentWindow ,Menu,MenuItem} = require("@electron/remote")
let menuItem = new Menu()
addEventListener('DOMContentLoaded', () => { //dom内容加载完成后触发//自定义全局变量存放菜单项addMenu.onclick=function(){//创建菜单let menuFile = new MenuItem({label:'文件',type:'normal'})let menuEdit = new MenuItem({label:'编辑',type:'normal'})let customMenu = new MenuItem({label:'自定义菜单项',submenu:menuItem})//将自定义菜单添加至menulet menu = new Menu()menu.append(menuFile)menu.append(menuEdit)menu.append(customMenu)//放置于app中Menu.setApplicationMenu(menu)}
})addItem.onclick = function (){let con = menuCon.value.trim()if(con){menuItem.append(new MenuItem({label:con,type:"normal"}))}menuCon.value = null
}
index.html
<!DOCTYPE html>
<html lang="en"><head><meta charset="UTF-8"><meta name="viewport" content="width=device-width, initial-scale=1.0"><title></title>
</head>
<style></style><body><h2>自定义菜单</h2><button id="addMenu">创建自定义菜单</button><br><br><input type="text" id="menuCon"><br><br><button id="addItem">添加菜单项</button><script src="./index.js"></script>
</body>
</html>
右键菜单
主进程同上
//index.js渲染进程
const {Menu,getCurrentWindow} = require("@electron/remote")const menuTemp = [{label:'Run Code'},{label:'转到定义'},{label:'separator'},{label:'其他功能',click(){console.log('其他功能选项');}},
]let menu = Menu.buildFromTemplate(menuTemp)// 给右击鼠标添加监听事件
addEventListener('DOMContentLoaded',()=>{addEventListener('contextmenu',ev=>{ev.preventDefault()menu.popup({window:getCurrentWindow()}) //弹出菜单},false)
})
主进程与渲染进程通信
渲染进程主动发起到主进程
渲染进程使用ipcRender
const {getCurrentWindow} = require("@electron/remote")
const { ipcRenderer} = require('electron')window.onload = function (){//采用异步的方式在渲染进程中各主进程发送数据aBtn.onclick=function (){ipcRenderer.send('msg1','来自渲染进程的异步消息')}//异步接收消息ipcRenderer.on('msg1Re',(ev,data)=>{console.log(data);})//采用同步的方式在渲染进程中各主进程发送数据aBtn2.onclick=function (){let val = ipcRenderer.sendSync('msg2','来自渲染进程的同步消息')console.log(val);}//同步接收消息ipcRenderer.on('msg2Re',(ev,data)=>{console.log(data);})
}
主进程使用ipcMain
const { app, BrowserWindow, Menu, ipcMain } = require('electron')
const remote = require("@electron/remote/main")
console.log(process.platform); //通过操作系统来做跨端兼容//创建窗口
function createWindow() {let mainWin = new BrowserWindow({show: false, //内容加载会有延迟,设置为false不显示应用width: 800,height: 600,icon: 'IDisk Globe.ico', //显示图标title: 'Electron', //软件标题,在HTML文件不设置title则生效。frame: true, //决定显不显示工具栏以及标题webPreferences: { //设置在渲染分支能够使用node写法nodeIntegration: true,contextIsolation: false,}})//初始化remote模块remote.initialize()remote.enable(mainWin.webContents)mainWin.loadFile('index.html')//等内容加载准备好展示时,改为true显示窗体mainWin.on("ready-to-show", () => {mainWin.show()})mainWin.on('close', () => {//关闭释放mainWin = null})
}app.on('ready', () => {createWindow()
})
app.on('window-all-closed', () => {app.quit()
})//主进程接收消息
ipcMain.on('msg1',(ev,data)=>{console.log(data);ev.sender.send('msg1Re','这是来自主进程的异步消息')
})ipcMain.on('msg2',(ev,data)=>{console.log(data);ev.returnValue = '这是来自主进程的同步消息'
})
index.html
<!DOCTYPE html>
<html lang="en"><head><meta charset="UTF-8"><meta name="viewport" content="width=device-width, initial-scale=1.0"><title></title>
</head>
<style></style><body><h2>主进程与渲染进程通信</h2><button id="aBtn">渲染进程到主进程异步操作</button><br><br><button id="aBtn2">渲染进程到主进程同步操作</button>
</body>
<script src ='./index.js'></script>
</html>
主进程主动发起到渲染进程
渲染进程
const {getCurrentWindow} = require("@electron/remote")
const { ipcRenderer} = require('electron')window.onload = function (){ipcRenderer.on('mtp',(ev,data)=>{console.log(data);})
}主进程使用webContents来发送给渲染进程,每个窗口都有一个webContents,能够控制当前窗口的所有内容
const { app, BrowserWindow, Menu, ipcMain } = require('electron')
const remote = require("@electron/remote/main")
console.log(process.platform); //通过操作系统来做跨端兼容//创建窗口
function createWindow() {let mainWin = new BrowserWindow({show: false, //内容加载会有延迟,设置为false不显示应用width: 800,height: 600,icon: 'IDisk Globe.ico', //显示图标title: 'Electron', //软件标题,在HTML文件不设置title则生效。frame: true, //决定显不显示工具栏以及标题webPreferences: { //设置在渲染分支能够使用node写法nodeIntegration: true,contextIsolation: false,}})//初始化remote模块remote.initialize()remote.enable(mainWin.webContents)let temp = [{label:'send',click(){BrowserWindow.getFocusedWindow().webContents.send('mtp','来自主进程的消息')}}]let menu = Menu.buildFromTemplate(temp)Menu.setApplicationMenu(menu)mainWin.loadFile('index.html')mainWin.webContents.openDevTools() //打开开发控制台//等内容加载准备好展示时,改为true显示窗体mainWin.on("ready-to-show", () => {mainWin.show()})mainWin.on('close', () => {//关闭释放mainWin = null})
}app.on('ready', () => {createWindow()
})
app.on('window-all-closed', () => {app.quit()
})
基于本地存储的渲染进程通信
此处利用localStorage来进行通信
渲染进程一
const {getCurrentWindow} = require("@electron/remote")
const { ipcRenderer} = require('electron')window.onload = function (){aBtn.onclick=function (){ipcRenderer.send('openWindow2')//打开窗口2,保存数据至localStoragelocalStorage.setItem('name','test')}
}
<!DOCTYPE html>
<html lang="en"><head><meta charset="UTF-8"><meta name="viewport" content="width=device-width, initial-scale=1.0"><title></title>
</head>
<style></style><body><h2>渲染进程间通信</h2><button id="aBtn">打开窗口2</button>
</body>
<script src ='./index.js'></script>
</html>主进程创建新的窗口
const { app, BrowserWindow, Menu, ipcMain } = require('electron')
const remote = require("@electron/remote/main")
console.log(process.platform); //通过操作系统来做跨端兼容
// 定义全局变量存放主窗口
let mainWinId = null
//创建窗口
function createWindow() {let mainWin = new BrowserWindow({show: false, //内容加载会有延迟,设置为false不显示应用width: 800,height: 600,icon: 'IDisk Globe.ico', //显示图标title: 'Electron', //软件标题,在HTML文件不设置title则生效。frame: true, //决定显不显示工具栏以及标题webPreferences: { //设置在渲染分支能够使用node写法nodeIntegration: true,contextIsolation: false,}})//初始化remote模块remote.initialize()remote.enable(mainWin.webContents)mainWin.loadFile('index.html')mainWinId = mainWin.id//等内容加载准备好展示时,改为true显示窗体mainWin.on("ready-to-show", () => {mainWin.show()})mainWin.on('close', () => {//关闭释放mainWin = null})
}//接受其他进程发送的数据
ipcMain.on('openWindow2',()=>{let subWin1 = new BrowserWindow({parent:BrowserWindow.fromId(mainWinId),width:400,height:300,webPreferences: { //设置在渲染分支能够使用node写法nodeIntegration: true,contextIsolation: false,}})//初始化remote模块remote.enable(subWin1.webContents)subWin1.loadFile('subWin1.html')subWin1.on('close',()=>{subWin1 = null})
})app.on('ready', () => {createWindow()
})
app.on('window-all-closed', () => {app.quit()
})
渲染进程二
window.onload= function(){oInput.value = localStorage.getItem('name')
}
渲染进程二对应的html窗口
<!DOCTYPE html>
<html lang="en">
<head><meta charset="UTF-8"><meta name="viewport" content="width=新窗口, initial-scale=1.0"><title>xx窗口</title>
</head>
<body><h2>子窗口</h2><input id="oInput" type="text">
</body>
<script src="./subWin1.js"></script>
</html>
在此处新的窗口和主进程窗口形成父子关系,这里采用mainId的属性来确定当前的父窗口。
反过来父窗口给子窗口传数据
父窗口渲染进程index.js
const {getCurrentWindow} = require("@electron/remote")
const { ipcRenderer} = require('electron')window.onload = function (){aBtn.onclick=function (){ipcRenderer.send('openWindow2','来自 index 进程')}ipcRenderer.on('mti',(ev,data)=>{console.log(data);})
}
主进程,收到数据后,难点在于找到对应的窗体对象,通过窗体对象发送数据。在这里是在子窗口加载完毕后,发送数据,创建的subWin1窗口,可以直接使用。父窗口使用mainId来获取。
const { app, BrowserWindow, Menu, ipcMain } = require('electron')
const remote = require("@electron/remote")
console.log(process.platform); //通过操作系统来做跨端兼容
// 定义全局变量存放主窗口
let mainWinId = null
//创建窗口
function createWindow() {let mainWin = new BrowserWindow({show: false, //内容加载会有延迟,设置为false不显示应用width: 800,height: 600,icon: 'IDisk Globe.ico', //显示图标title: 'Electron', //软件标题,在HTML文件不设置title则生效。frame: true, //决定显不显示工具栏以及标题webPreferences: { //设置在渲染分支能够使用node写法nodeIntegration: true,contextIsolation: false,}})//初始化remote模块remote.initialize()remote.enable(mainWin.webContents)mainWin.loadFile('index.html')mainWinId = mainWin.id//等内容加载准备好展示时,改为true显示窗体mainWin.on("ready-to-show", () => {mainWin.show()})mainWin.on('close', () => {//关闭释放mainWin = null})
}//接受其他进程发送的数据
ipcMain.on('openWindow2',(ev,data)=>{console.log(data);let subWin1 = new BrowserWindow({parent:BrowserWindow.fromId(mainWinId),width:400,height:300,webPreferences: { //设置在渲染分支能够使用node写法nodeIntegration: true,contextIsolation: false,}})//初始化remote模块remote.enable(subWin1.webContents)subWin1.loadFile('subWin1.html')subWin1.on('close',()=>{subWin1 = null})//此时我们是可以直接拿到sub进程的窗口对象,等加载完毕后执行数据发送subWin1.webContents.on('did-finish-load',()=>{subWin1.webContents.send('its',data)})
})app.on('ready', () => {createWindow()
})
app.on('window-all-closed', () => {app.quit()
})ipcMain.on('stm',(ev,data)=>{//将data经过main进程给到index渲染进程console.log(data);//可以根据指定窗口 id 来获取对应的渲染进程,然后执行消息的发送let mainWin = BrowserWindow.fromId(mainWinId)mainWin.webContents.send('mti',data)
})
子窗口渲染进程
const {ipcRenderer} = require('electron')window.onload= function(){oInput.value = localStorage.getItem('name')// 发送数据给index.jsbtn.onclick=function(){ipcRenderer.send('stm','来自于sub的数据')}ipcRenderer.on('its',(ev,data)=>{console.log(data);})
}
Dialog模块
显示用于打开和保存文件、警报等的本机系统对话框。
dialog.showSaveDialogSync
包含以下属性:
| title string (可选) | 对话框窗口的标题 |
| defaultPath string (可选) | 对话框的默认展示路径 |
| buttonLabel string (可选) | 「确认」按钮的自定义标签, 当为空时, 将使用默认标签。 |
| filters FileFilter[] (可选) | 可以选择默认展示哪些类型的文件 |
| nameFieldLabel string (可选) macOS | 文件名输入框对应的自定义标签名。 |
| showsTagField boolean (可选) macOS | 显示标记输入框, 默认为 true。 |
| properties string[] (可选) | 包含对话框相关属性。 支持以下属性值: openFile - 允许选择文件 openDirectory - 允许选择文件夹 multiSelections-允许多选。 showHiddenFiles-显示对话框中的隐藏文件。 createDirectory macOS -允许你通过对话框的形式创建新的目录。 promptToCreate Windows-如果输入的文件路径在对话框中不存在, 则提示创建。 这并不是真的在路径上创建一个文件,而是允许返回一些不存在的地址交由应用程序去创建。 noResolveAliases macOS-禁用自动的别名路径(符号链接) 解析。 所选别名现在将会返回别名路径而非其目标路径。 treatPackageAsDirectory macOS -将包 (如 .app 文件夹) 视为目录而不是文件。 dontAddToRecent Windows - 不要将正在打开的项目添加到最近的文档列表中。 |
| message string (可选) | macOS -显示在输入框上方的消息。 |
| securityScopedBookmarks boolean (可选) | macOS MAS - 在打包提交到Mac App Store时创建 security scoped bookmarks |
showOpenDialog返回promise对象,所以支持.then以及catch的写法。返回一个对象
{cancel:false //选择文件操作的状态filePath:'' //选择文件的路径
}
const { BrowserWindow, dialog } = require("@electron/remote")window.onload = function () {aBtn.onclick = function () {dialog.showOpenDialog({defaultPath: __dirname,buttonLabel: '请选择',title: 'Electron',properties: ['openFile', 'multiSelections'],filters: [{'name': '代码文件', extensions: ['js', 'json', 'html']},{'name': '图片文件', extensions: ['ico', 'jpeg', 'png']},{'name': '媒体类型', extensions: ['MP4', 'MP3', 'avi']},{ 'name': 'All Files', extensions: ['*'] }]}).then(ret=>{console.log(ret);}).catch(err=>{})}
}
<!DOCTYPE html>
<html lang="en"><head><meta charset="UTF-8"><meta name="viewport" content="width=device-width, initial-scale=1.0"><title></title>
</head>
<style></style><body><h2>Dialog模块</h2><button id="aBtn">显示对话框</button>
</body>
<script src ='./index.js'></script>
</html>showErrorBox
参数:
title string - 显示在错误框中的标题.
content string - 显示在错误框中的文本内容.
const { BrowserWindow, dialog } = require("@electron/remote")window.onload = function () {aBtn.onclick = function () {dialog.showErrorBox('自定义标题','当前错误内容')}
}
其余还包括:
showOpenDialogSync,showSaveDialogSync,showMessageBoxSync,showMessageBox,showCertificateTrustDialog可参考文档:dialog | Electron
showMessageBox可以作为消息提示确认框(常用)
shell与iframe
shell 模块提供与桌面集成相关的功能。但是要注意,因为版本的问题,shell要通过remote插件实现引入。
openExternal
通过默认浏览器打开外部网页
const {shell} = require("@electron/remote")
window.onload = function () {aBtn.onclick = function () {}btnUrl.addEventListener('click', ev => {ev.preventDefault()let urlPath = btnUrl.getAttribute('href')shell.openExternal(urlPath)})}
<!DOCTYPE html>
<html lang="en"><head><meta charset="UTF-8"><meta name="viewport" content="width=device-width, initial-scale=1.0"><title></title>
</head>
<style></style><body><h2>Dialog模块</h2><button id="aBtn">打开目录</button><br><br><a id="btnUrl" href="https://baidu.com">打开url</a>
</body>
<script src ='./index.js'></script>
</html>showItemInFolder
在文件管理器中显示指定的文件。 如果可能,请选择文件。
const {shell} = require("@electron/remote")
const path = require('path')
window.onload = function () {aBtn.onclick = function () {}btnUrl.addEventListener('click', ev => {ev.preventDefault()let urlPath = btnUrl.getAttribute('href')shell.openExternal(urlPath)})aBtn.addEventListener('click', ev => {shell.showItemInFolder(path.resolve(__filename))})
}
iframe
使用自定义菜单打开,默认浏览器,以及窗口中的ifram.src
<!DOCTYPE html>
<html lang="en"><head><meta charset="UTF-8"><meta name="viewport" content="width=device-width, initial-scale=1.0"><title></title>
</head>
<style></style><body><h2>Dialog模块</h2><button id="aBtn">打开目录</button><br><br><a id="btnUrl" href="https://baidu.com">打开url</a><iframe referrerpolicy="origin-when-cross-origin" frameborder="0" id="webview"></iframe></body>
<script src='./index.js'></script></html>
//main.js
const { app, BrowserWindow ,shell,Menu} = require('electron')
const remote = require("@electron/remote/main")
console.log(process.platform); //通过操作系统来做跨端兼容
// 定义全局变量存放主窗口
let mainWinId = null
//创建窗口
function createWindow() {let mainWin = new BrowserWindow({show: false, //内容加载会有延迟,设置为false不显示应用width: 800,height: 600,icon: 'IDisk Globe.ico', //显示图标title: 'Electron', //软件标题,在HTML文件不设置title则生效。frame: true, //决定显不显示工具栏以及标题webPreferences: { //设置在渲染分支能够使用node写法nodeIntegration: true,contextIsolation: false,}})//初始化remote模块remote.initialize()remote.enable(mainWin.webContents)let tmp = [{label:'菜单',submenu: [{label:'关于',click(){shell.openExternal('https://baidu.com')}},{label:'打开',click(){BrowserWindow.getFocusedWindow().webContents.send('openUrl')}}]}]let menu = Menu.buildFromTemplate(tmp)Menu.setApplicationMenu(menu)mainWin.loadFile('index.html')mainWinId = mainWin.id//等内容加载准备好展示时,改为true显示窗体mainWin.on("ready-to-show", () => {mainWin.show()})mainWin.on('close', () => {//关闭释放mainWin = null})
}app.on('ready', () => {createWindow()
})
app.on('window-all-closed', () => {app.quit()
})//index.js
const { ipcRenderer } = require("electron")
window.onload = function () {ipcRenderer.on('openUrl',()=>{webview.src = 'https://baidu.com'})
}消息通知Notification
window.onload = function () {btn.onclick=function(){let option = {title:'electron',body:'这是一个消息提示框',ico:'./IDisk Globe.ico'}let myNotification = new window.Notification(option.title,option)myNotification.onclick = function (){console.log('点击了页卡');}}
}
全局快捷键
main.js主进程中配置
globalShortcut.register('ctrl + q',function(){console.log('快捷键注册成功');
})globalShortcut.unregister('ctrl + q')
globalShortcut.unregisterAll() //取消所有的快捷键
app.on('ready', () => {//返回true或者falselet ret = globalShortcut.register('ctrl + q',function(){console.log('快捷键注册成功');})if(!ret){console.log('注册失败');}
})
app.on('will-quit',()=>{globalShortcut.unregister('ctrl + q')globalShortcut.unregisterAll() //取消所有的快捷键
})剪切板操作
clipboard以及nativeImage的使用
<!DOCTYPE html>
<html lang="en"><head><meta charset="UTF-8"><meta name="viewport" content="width=device-width, initial-scale=1.0"><title></title>
</head>
<style></style><body><h2>剪切板</h2><input type="text" id='ainput'> <button id='abtn'>复制</button><br><br><input type="text" id='binput'> <button id='bbtn'>粘贴</button><br><br><button id='getImage'>将图片拷贝纸剪切板再粘贴至界面</button>
</body>
<script src='./index.js'></script></html>
const { clipboard,nativeImage } = require('electron')
window.onload = function () {abtn.onclick = function () {clipboard.writeText(ainput.value)}bbtn.onclick = function () {binput.value = clipboard.readText()}getImage.onclick = function () {//将图片放入剪切板时要求图片类型属于nativeImage实例let image = nativeImage.createFromPath('./image/ic_zoom_out_2.png')clipboard.writeImage(image)//将剪切板中的图片作为dom元素显示在界面上let image2 = clipboard.readImage().toDataURL() //转为base64let imgDom = new Image()console.log(imgDom);imgDom.src = image2document.body.appendChild(imgDom)}
}项目初始化
这里以react为例,创建react项目脚手架后,安装依赖
npm i electron npm i electron-is-devpackage.json添加electron打包用的文件,在根目录下创建main.js
"main":"main.js",const {app,BrowserWindow} = require('electron')
const remote = require("@electron/remote/main")
const electronIsDev = require('electron-is-dev') // 获取但钱环境 开发或生产
let mainWindow app.on('ready',()=>{mainWindow = new BrowserWindow({width:1024,height:650,minWidth:600,webPreferences:{nodeIntegration:true,contextIsolation: false,}})remote.initialize()remote.enable(mainWindow.webContents)const urlLocation = electronIsDev?'http://localhost:3000':"myurl"mainWindow.loadURL(urlLocation)
})同时添加一个脚本指令:
"scripts": {"start": "react-scripts start","build": "react-scripts build","test": "react-scripts test","eject": "react-scripts eject","dev": "electron ."},此时需要先启动react项目,然后再开一个终端,启动electron
npm start //启动react项目npm run dev //启动electron但此时的方式比较麻烦,我们希望可以简化一下,需要安装一下插件
npm install concurrently //连接多个命令,中间使用空格分开npm i wait-on //等待某个结果执行之后再去执行后续的命令npm i cross-env //跨平台变量设置,可以不启动浏览器"scripts": {"start": "react-scripts start","build": "react-scripts build","test": "react-scripts test","eject": "react-scripts eject","dev": "concurrently \"cross-env BROWSER=none npm start\" \"wait-on http://localhost:3000 && electron .\""},启动项目
npm run dev此处有坑,如果使用node环境过高,那么将不会唤起electron,所以版本不要过高,我这里使用版本16。
引入Bootsrap和style-components
npm i bootstrap npm i styled-componentsAPP.js
import React from 'react'
import styled from 'styled-components'
import 'bootstrap/dist/css/bootstrap.min.css'let LeftDiv = styled.div.attrs({className: 'col-3 left-panel'
})`background-color:#7b8c7c;min-height:100vh
`let RightDiv = styled.div.attrs({className: 'col-9 right-panel'
})`
background-color:#c9d8cd
`
function App() {return (<div className="App container-fluid px-0"><div className='row no-gutters'><LeftDiv>左侧</LeftDiv><RightDiv>右侧</RightDiv></div></div>);
}export default App;
接下来就可以进行react前端项目的开发即可。
数据持久化
使用模块
npm i electron-store//main.js
const Store = require('electron-store')
Store.initRenderer()//APP.js
const Store = window.require('electron-store')
const fileStore = new Store({ 'name': 'filesInfo' }) //创建一个数据管理
fileStore.set('files', storeObj) //存储数据具体使用方法见项目文件。
关于打包,会重新开一篇写。
相关文章:

Electron 开发页面应用
简介 Electron集成了包括chromium(理解为具备chrom浏览器的工具),nodejs,native apis chromium:支持最新特性的浏览器。 nodejs:js运行时,可实现文件读写等。 native apis :提供…...

CSDN写博文的128天
起因 为什么要写博文? 写博文是因为当我还是编程小白时,我那会啥也不懂,不懂函数调用,不懂指针,更不懂结构体,别更说Linux,平时不会也没有可以问的人,也幸好有CSDN,遇到…...
Linux学习教程(第二章 Linux系统安装)1
第二章 Linux系统安装 学习 Linux,首先要学会搭建 Linux 系统环境,也就是学会在你的电脑上安装 Linux 系统。 很多初学者对 Linux 望而生畏,多数是因为对 Linux 系统安装的恐惧,害怕破坏电脑本身的系统,害怕硬盘数据…...

vue2手机项目如何使用蓝牙功能
要在Vue2手机项目中使用蓝牙功能,你需要先了解基本的蓝牙知识和API。以下是一些基本的步骤: 确认你的手机设备支持蓝牙功能。在Vue2项目中安装蓝牙插件或库,例如vue-bluetooth或vue-bluetooth-manager。你可以通过npm安装它们。在Vue2项目中…...

魔兽服务器学习-笔记1
文章目录 一、环境准备1)依赖安装2)源码下载和编译 二、生成数据信息1)地图数据信息(客户端信息)2)数据库信息 三、启动服务器四、日志模块五、数据库模块六、场景模块1)地图管理2)A…...

代码随想录day60|84.柱状图中最大的矩形
84.柱状图中最大的矩形(找到右边第一个更小的元素) 1、对于每一个柱子:找到左边第一个比他矮的,再找到右边第一个比他矮的。 2、首尾加0: 为什么要在末尾加0:否则如果原数组就是单调递增的话,就…...
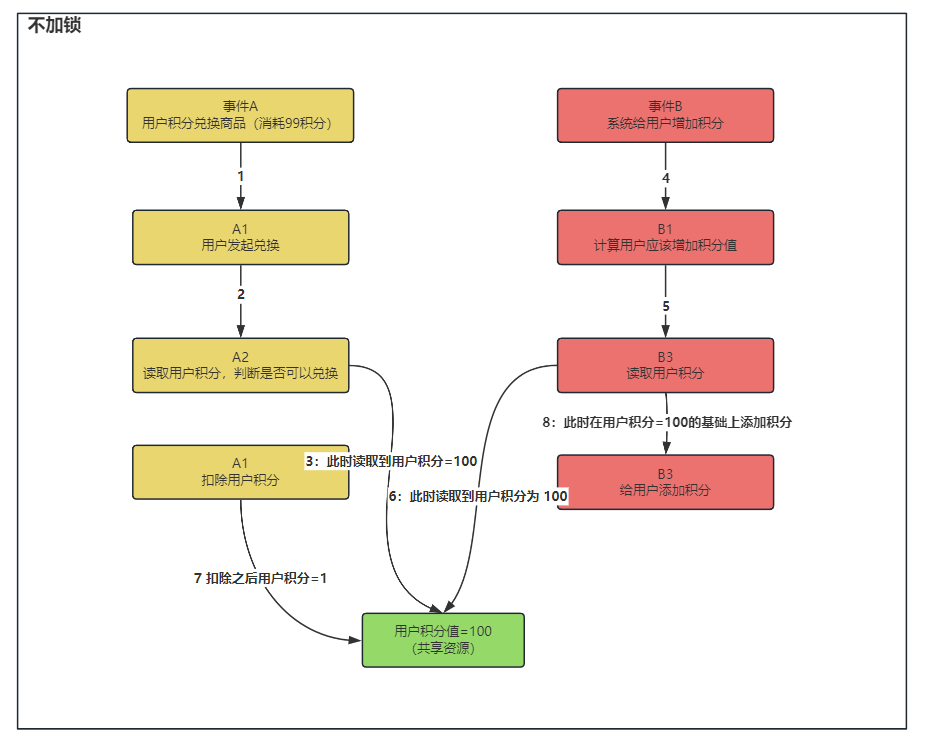
常见面试题-分布式锁
Redisson 分布式锁?在项目中哪里使用?多久会进行释放?如何加强一个分布式锁? 答: 什么时候需要使用分布式锁呢? 在分布式的场景下,使用 Java 的单机锁并不可以保证多个应用的同时操作共享资源…...

vue开发 安装一些工具
下载 node.js环境 nodeJs 官网 命令行输入 node -v 和 npm -v 出现版本号 代表nodejs 安装成功选择安装pnpm npm install -g pnpmpnpm -v 出现版本号即成功安装安装 scss vue3 组件库 Element Plus Element 官网 安装 pnpm install Element-Plus --save第一次使用开发v…...

Vue.js 组件 - 自定义事件
Vue.js 组件 - 自定义事件 父组件是使用 props 传递数据给子组件,但如果子组件要把数据传递回去,就需要使用自定义事件! 我们可以使用 v-on 绑定自定义事件, 每个 Vue 实例都实现了事件接口(Events interface),即: …...
深度学习 python opencv 火焰检测识别 计算机竞赛
文章目录 0 前言1 基于YOLO的火焰检测与识别2 课题背景3 卷积神经网络3.1 卷积层3.2 池化层3.3 激活函数:3.4 全连接层3.5 使用tensorflow中keras模块实现卷积神经网络 4 YOLOV54.1 网络架构图4.2 输入端4.3 基准网络4.4 Neck网络4.5 Head输出层 5 数据集准备5.1 数…...

PHP中传值与引用的区别
在PHP中,变量的传递方式主要分为传值和传引用两种。这两种方式在操作中有一些重要的区别,影响着变量在函数调用或赋值操作中的表现。下面详细解释一下这两种传递方式的区别。 传值(By Value) 传值是指将变量的值复制一份传递给函…...
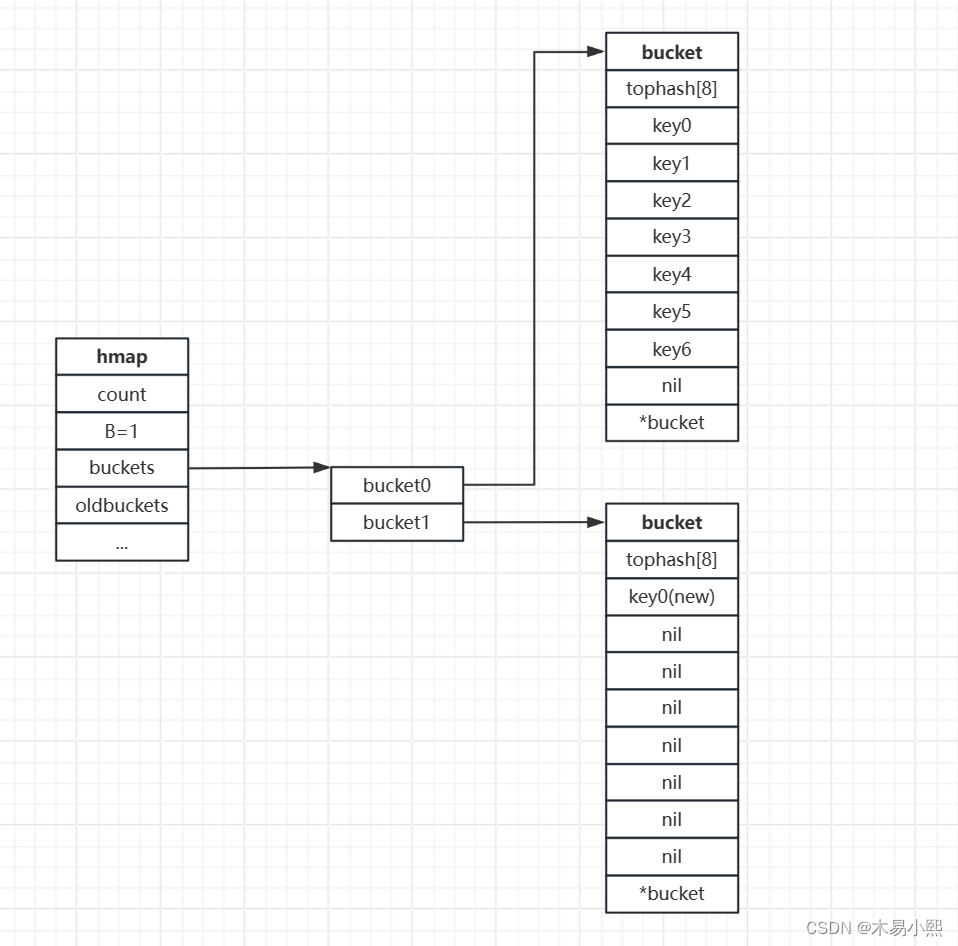
Go常见数据结构的实现原理——map
(一)基础操作 版本:Go SDK 1.20.6 1、初始化 map分别支持字面量初始化和内置函数make()初始化。 字面量初始化: m : map[string] int {"apple": 2,"banana": 3,}使用内置函数make()初始化: m …...
第二十五节——Vuex--历史遗留
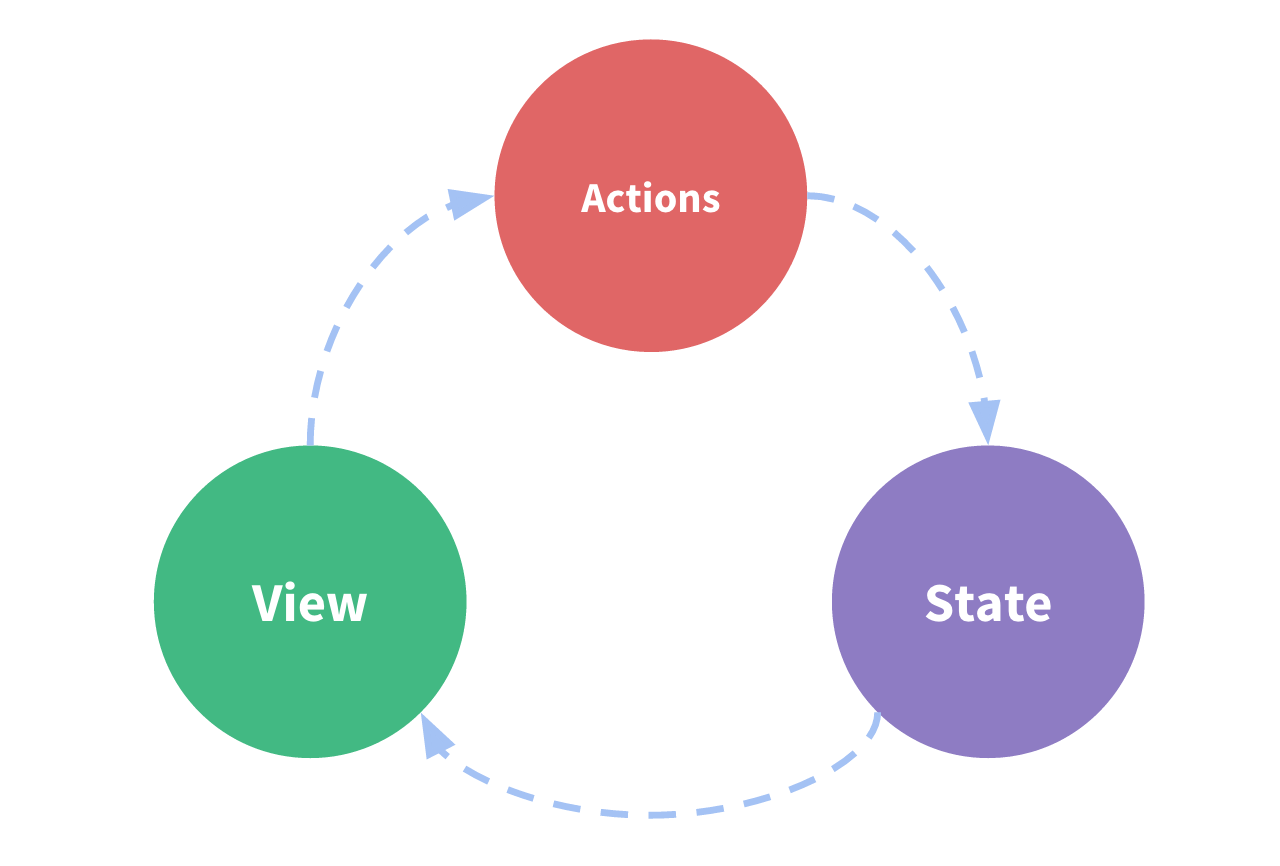
文档地址 Vuex 是什么? | Vuex version V4.x 一、概念 Vuex 是一个专为 Vue.js 应用程序开发的状态管理模式 库。它采用集中式存储管理应用的所有组件的状态,并以相应的规则保证状态以一种可预测的方式发生变化。一个状态自管理应用包含以下几个部…...

大数据Doris(二十一):数据导入演示
文章目录 数据导入演示 一、启动zookeeper集群(三台节点都启动) 二、启动hdfs集群...
[100天算法】-面试题 04.01.节点间通路(day 72)
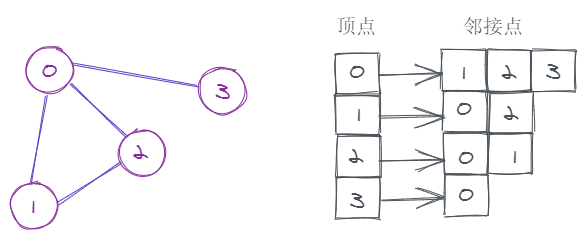
题目描述 节点间通路。给定有向图,设计一个算法,找出两个节点之间是否存在一条路径。示例1:输入:n 3, graph [[0, 1], [0, 2], [1, 2], [1, 2]], start 0, target 2 输出:true 示例2:输入:n 5, graph [[0, 1], …...
linux_day02
1、链接:LN 一个点表示当前工作目录,两个点表示上一层工作目录; 目录的本质:文件(该文件储存目录项,以链表的形式链接,每个结点都是目录项,创建文件相当于把目录项添加到链表中&…...
OpenCV-Python小应用(九):通过灰度直方图检测图像异常点
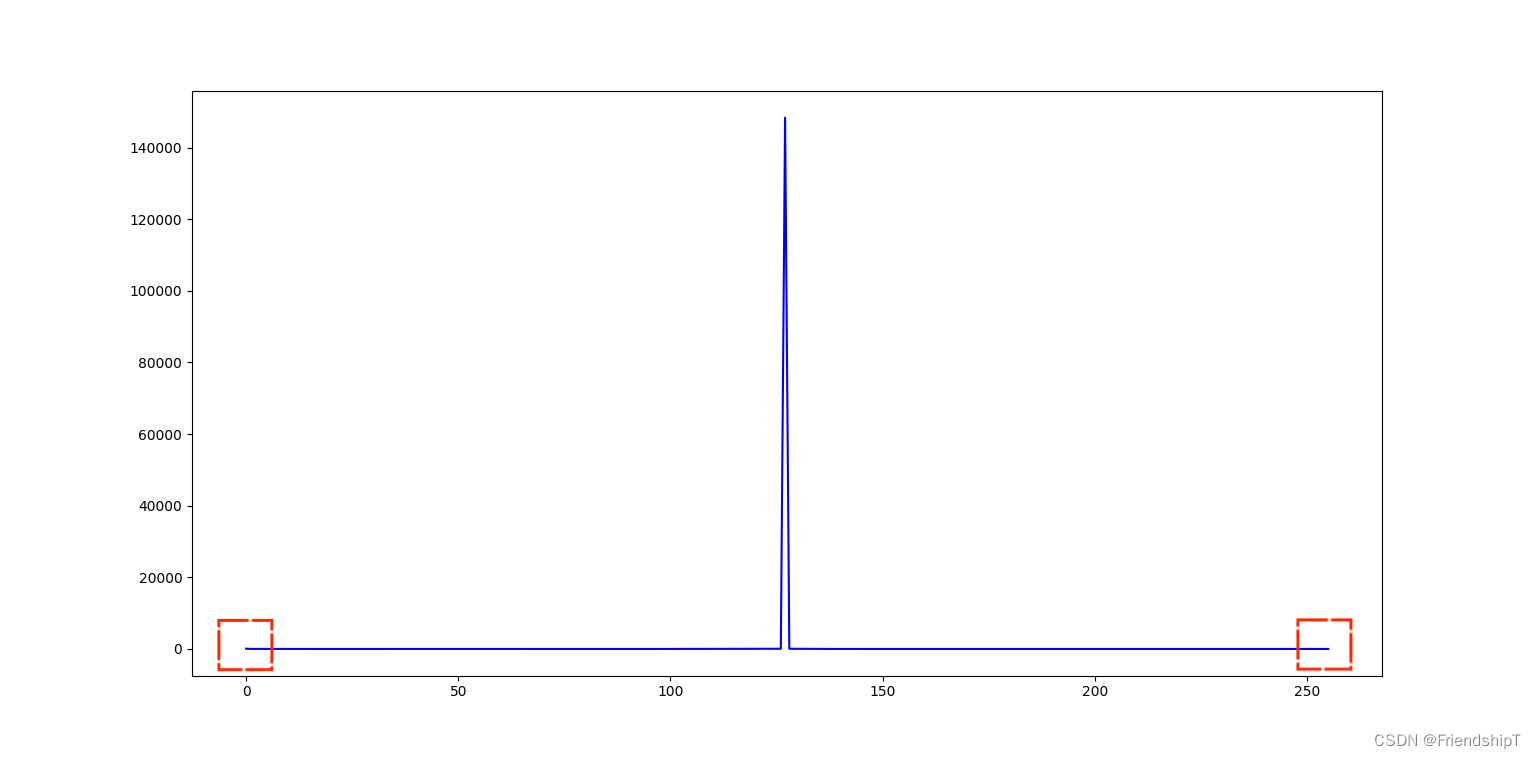
OpenCV-Python小应用(九):通过灰度直方图检测图像异常点 前言前提条件相关介绍实验环境通过灰度直方图检测图像异常点代码实现输出结果 参考 前言 由于本人水平有限,难免出现错漏,敬请批评改正。更多精彩内容ÿ…...
关于el-table+el-input+el-propover的封装
一、先放图片便于理解 需求: 1、el-input触发focus事件,弹出el-table(当然也可以为其添加搜索功能、分页) 2、el-table中的复选共能转化成单选共能 3、选择或取消的数据在el-input中动态显示 4、勾选数据后,因为分页过多,原先选好…...

基于Python+OpenCV+SVM车牌识别系统-车牌预处理系统
欢迎大家点赞、收藏、关注、评论啦 ,由于篇幅有限,只展示了部分核心代码。 文章目录 一项目简介简介系统流程系统优势 二、功能三、系统四. 总结 一项目简介 ## PythonOpenCVSVM车牌识别系统介绍 简介 PythonOpenCVSVM车牌识别系统是一种基于计算机视…...
 C++ 动态规划 附Java代码)
力扣第72题 编辑距离 (增 删 改) C++ 动态规划 附Java代码
题目 72. 编辑距离 中等 相关标签 字符串 动态规划 给你两个单词 word1 和 word2, 请返回将 word1 转换成 word2 所使用的最少操作数 。 你可以对一个单词进行如下三种操作: 插入一个字符删除一个字符替换一个字符 示例 1: 输入&a…...

2026年怎么安装OpenClaw?6分钟阿里云零门槛安装及百炼Coding Plan指南
2026年怎么安装OpenClaw?6分钟阿里云零门槛安装及百炼Coding Plan指南。本文面向零基础用户,完整说明在轻量服务器与本地Windows11、macOS、Linux系统中部署OpenClaw(Clawdbot)的流程,包含环境配置、服务启动、Skills集…...

前端可视化拖拽搭建方案
前端可视化拖拽搭建方案正在改变传统开发模式,让非技术背景的用户也能快速构建页面。通过直观的拖拽操作和实时预览功能,这种方案大幅降低了开发门槛,同时提升了效率。无论是企业官网、管理后台还是移动端H5,可视化搭建工具都能满…...

PyInstaller打包YOLO目标检测exe,文件体积太大?试试这几个优化技巧
PyInstaller打包YOLO目标检测exe的7个极致瘦身方案 当你兴奋地用PyInstaller打包完YOLO目标检测项目,却发现生成的.exe文件像个臃肿的巨人——动辄500MB起步,甚至轻松突破1GB。这种"肥胖症"不仅让程序启动缓慢,更让分发变得困难。本…...

基于STC8的智能无线充电系统:从恒功率控制到超级电容快速充电完整指南
基于STC8的智能无线充电系统:从恒功率控制到超级电容快速充电完整指南 【免费下载链接】Wireless-Charging 项目地址: https://gitcode.com/gh_mirrors/wi/Wireless-Charging 无线充电技术正从高端设备标配向消费电子普及,而本项目展示了一个基于…...

开源CC6920差分霍尔电流传感器模块——2025.03.25
文章目录开源链接模块特性应用场景模块接口使用说明注意事项支持开源协议实测波形开源链接 差分霍尔电流采集模块:https://oshwhub.com/eda_hgmmyvaxr/cha-fen-huo-er-dian-liu-cai-ji-mo-kuai 模块特性 多量程:模块默认使用CC6920-5A提供5A电流量程&…...

新手必看:星图平台5步搞定Qwen3-VL:30B私有化部署,打造飞书看图聊天机器人
新手必看:星图平台5步搞定Qwen3-VL:30B私有化部署,打造飞书看图聊天机器人 1. 为什么选择Qwen3-VL:30B作为飞书助手? 1.1 超越普通OCR的多模态理解能力 传统图像识别工具只能识别图片中的文字或物体,而Qwen3-VL:30B能真正理解图…...
基于Transformer架构的BERT文本分割效果深度解析
基于Transformer架构的BERT文本分割效果深度解析 不知道你有没有遇到过这样的烦恼:面对一篇动辄上万字、结构复杂的专业文档,想快速理清它的脉络,却感觉无从下手。或者,在处理海量文本数据时,需要将它们精准地切割成有…...

构建AIGC内容工厂:DeOldify作为图像处理环节的自动化集成
构建AIGC内容工厂:DeOldify作为图像处理环节的自动化集成 你有没有想过,一个简单的文本描述,如何能像流水线一样,自动变成一段生动的彩色短视频?这听起来像是科幻电影里的场景,但现在,借助AIGC…...

2026年必看!国内热门仿小红书APP源码供应商大盘点
随着社交媒体和内容电商的快速发展,越来越多的企业和创业者希望打造自己的“小红书”式平台。本文将为您盘点国内几家热门的仿小红书APP源码供应商,并重点推荐湖南宠友信息技术有限公司(以下简称“宠友信息”)。 一、市场现状与需…...

1、MySQL故障排查与运维案例
MySQL故障排查与运维案例全集 一、连接类故障 1. 连接超时 现象:ERROR 2003 (HY000): Cant connect to MySQL server on host (110 "Connection timed out") 排查流程: # 检查网络连通性 nc -zv host 3306 mtr host# 检查防火墙 iptables -L -…...