01_ddim_inversion_CN
DDIM反转
设置
# !pip install -q transformers diffusers accelerate
import torch
import requests
import torch.nn as nn
import torch.nn.functional as F
from PIL import Image
from io import BytesIO
from tqdm.auto import tqdm
from matplotlib import pyplot as plt
from torchvision import transforms as tfms
from diffusers import StableDiffusionPipeline, DDIMScheduler# Useful function for later
def load_image(url, size=None):response = requests.get(url,timeout=0.2)img = Image.open(BytesIO(response.content)).convert('RGB')if size is not None:img = img.resize(size)return img
device = torch.device("cuda" if torch.cuda.is_available() else "cpu")
加载一个已训练的pipeline
# Load a pipeline
pipe = StableDiffusionPipeline.from_pretrained("runwayml/stable-diffusion-v1-5").to(device)
# Set up a DDIM scheduler:
pipe.scheduler = DDIMScheduler.from_config(pipe.scheduler.config)```python
# Sample an image to make sure it is all working
prompt = 'Beautiful DSLR Photograph of a penguin on the beach, golden hour'
negative_prompt = 'blurry, ugly, stock photo'
im = pipe(prompt, negative_prompt=negative_prompt).images[0]
im.resize((256, 256)) # resize for convenient viewing

DDIM取样过程
在给定时间 t t t, 带噪图像 x t x_t xt 是原始图像( x 0 x_0 x0)与一些噪声 ( ϵ \epsilon ϵ)的叠加。这是在DDIM论文中 x t x_t xt的定义式,我们把它引用到此节里:
x t = α t x 0 + 1 − α t ϵ x_t = \sqrt{\alpha_t}x_0 + \sqrt{1-\alpha_t}\epsilon xt=αtx0+1−αtϵ
ϵ \epsilon ϵ 是一些归一方差的高斯噪声
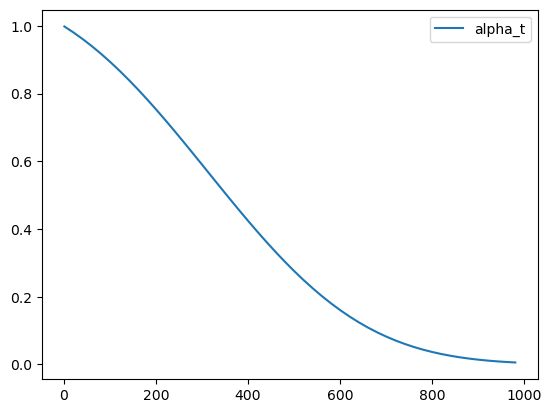
α t \alpha_t αt (‘alpha’)在DDPM论文中也被叫做 α ˉ \bar{\alpha} αˉ (‘alpha_bar’),被用来定义噪声调度器(scheduler)。在扩散模型中,alpha调度器是被计算出来并排序存储在scheduler.alphas_cumprod中。这令人费解,我理解!我们把这些值画出来,然后在下文中我们会使用DDIM的标注方式。
# Plot 'alpha' (alpha_bar in DDPM language, alphas_cumprod in diffusers for clarity)
timesteps = pipe.scheduler.timesteps.cpu()
alphas = pipe.scheduler.alphas_cumprod[timesteps]
plt.plot(timesteps, alphas, label='alpha_t');
plt.legend();
最初(timestep 0 ,图中左侧)是从一个无噪的干净图像开始, α t = 1 \alpha_t = 1 αt=1。当我们到达更高的timesteps,我们得到一个几乎全是噪声的图像, α t \alpha_t αt也几乎下降到0。
在采样过程,我们从timestep1000的纯噪声开始,慢慢地向timestep0前进。为了计算采样轨迹中的下一时刻( x t − 1 x_{t-1} xt−1因为我们是从后向前移动)的值,我们预测噪声( ϵ θ ( x t ) \epsilon_\theta(x_t) ϵθ(xt),这就是我们模型的输出),用它来预测出无噪的图片 x 0 x_0 x0。在这之后我们用这个预测结果朝着’ x t x_t xt的方向’方向移动一小步。最终,我们可以加一些带 σ t \sigma_t σt系数的额外噪声。这是论文中与上述操作相关的章节内容:
好,我们有了在可控量度噪声下,从 x t x_t xt 移动到 x t − 1 x_{t-1} xt−1的公式。今天我们所说案例是不需要再额外添加噪声的 - 即完全确定的DDIM采样。我们来看看这些是如何用代码表达的。
# Sample function (regular DDIM)
@torch.no_grad()
def sample(prompt, start_step=0, start_latents=None,guidance_scale=3.5, num_inference_steps=30,num_images_per_prompt=1, do_classifier_free_guidance=True,negative_prompt='', device=device):# Encode prompttext_embeddings = pipe._encode_prompt(prompt, device, num_images_per_prompt, do_classifier_free_guidance, negative_prompt)# Set num inference stepspipe.scheduler.set_timesteps(num_inference_steps, device=device)# Create a random starting point if we don't have one alreadyif start_latents is None:start_latents = torch.randn(1, 4, 64, 64, device=device)start_latents *= pipe.scheduler.init_noise_sigmalatents = start_latents.clone()for i in tqdm(range(start_step, num_inference_steps)):t = pipe.scheduler.timesteps[i]# expand the latents if we are doing classifier free guidancelatent_model_input = torch.cat([latents] * 2) if do_classifier_free_guidance else latentslatent_model_input = pipe.scheduler.scale_model_input(latent_model_input, t)# predict the noise residualnoise_pred = pipe.unet(latent_model_input, t, encoder_hidden_states=text_embeddings).sample# perform guidanceif do_classifier_free_guidance:noise_pred_uncond, noise_pred_text = noise_pred.chunk(2)noise_pred = noise_pred_uncond + guidance_scale * (noise_pred_text - noise_pred_uncond)# Normally we'd rely on the scheduler to handle the update step:# latents = pipe.scheduler.step(noise_pred, t, latents).prev_sample# Instead, let's do it ourselves:prev_t = max(1, t.item() - (1000//num_inference_steps)) # t-1alpha_t = pipe.scheduler.alphas_cumprod[t.item()]alpha_t_prev = pipe.scheduler.alphas_cumprod[prev_t]predicted_x0 = (latents - (1-alpha_t).sqrt()*noise_pred) / alpha_t.sqrt()direction_pointing_to_xt = (1-alpha_t_prev).sqrt()*noise_predlatents = alpha_t_prev.sqrt()*predicted_x0 + direction_pointing_to_xt# Post-processingimages = pipe.decode_latents(latents)images = pipe.numpy_to_pil(images)return images
# Test our sampling function by generating an image
sample('Watercolor painting of a beach sunset', negative_prompt=negative_prompt, num_inference_steps=50)[0].resize((256, 256))

看看你是否能把这些代码和论文中的公式对应起来。注意 σ \sigma σ=0是因为我们只注意 无-额外-噪声 的场景,所以我们略去了公式中的那部分。
反转
反转的目标就是’颠倒’取样的过程。我们想最终得到一个带噪的隐式(latent),如果把它作为我们正常取样过程的起始点,结果将生成一副原图像。
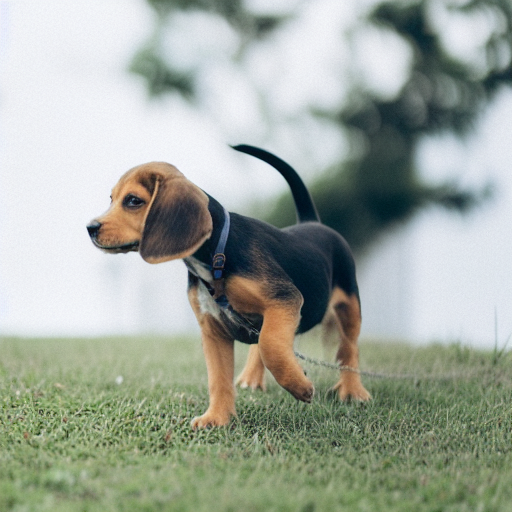
这里我们先加载一个原始图像,当然你也可以生成一副图像来代替。
# https://www.pexels.com/photo/a-beagle-on-green-grass-field-8306128/
input_image = load_image('https://images.pexels.com/photos/8306128/pexels-photo-8306128.jpeg', size=(512, 512))
input_image

我们可以用包含随意分类指引(classifier-free-guidance)的prompt来做反转操作,输入一个图片的描述:
input_image_prompt = "Photograph of a puppy on the grass"
接下来我们来把这个PIL图像变成一些列隐式,它们会被用来当作反转的起点:
# encode with VAE
with torch.no_grad(): latent = pipe.vae.encode(tfms.functional.to_tensor(input_image).unsqueeze(0).to(device)*2-1)
l = 0.18215 * latent.latent_dist.sample()
好了,到有趣的部分了。这个函数看起来和上面的取样函数很像,但我们在timesteps上是在向相反的方向移动,从t=0开始,向越来越多的噪声前进。代替更新隐式时噪声会越来越少,我们估计所预测出的噪声,用它来撤回一步更新操作,把它们从t移动到t+1。
## Inversion
@torch.no_grad()
def invert(start_latents, prompt, guidance_scale=3.5, num_inference_steps=80,num_images_per_prompt=1, do_classifier_free_guidance=True,negative_prompt='', device=device):# Encode prompttext_embeddings = pipe._encode_prompt(prompt, device, num_images_per_prompt, do_classifier_free_guidance, negative_prompt)# latents are now the specified start latentslatents = start_latents.clone()# We'll keep a list of the inverted latents as the process goes onintermediate_latents = []# Set num inference stepspipe.scheduler.set_timesteps(num_inference_steps, device=device)# Reversed timesteps <<<<<<<<<<<<<<<<<<<<timesteps = reversed(pipe.scheduler.timesteps)for i in tqdm(range(1, num_inference_steps), total=num_inference_steps-1):# We'll skip the final iterationif i >= num_inference_steps - 1: continuet = timesteps[i]# expand the latents if we are doing classifier free guidancelatent_model_input = torch.cat([latents] * 2) if do_classifier_free_guidance else latentslatent_model_input = pipe.scheduler.scale_model_input(latent_model_input, t)# predict the noise residualnoise_pred = pipe.unet(latent_model_input, t, encoder_hidden_states=text_embeddings).sample# perform guidanceif do_classifier_free_guidance:noise_pred_uncond, noise_pred_text = noise_pred.chunk(2)noise_pred = noise_pred_uncond + guidance_scale * (noise_pred_text - noise_pred_uncond)current_t = max(0, t.item() - (1000//num_inference_steps))#tnext_t = t # min(999, t.item() + (1000//num_inference_steps)) # t+1alpha_t = pipe.scheduler.alphas_cumprod[current_t]alpha_t_next = pipe.scheduler.alphas_cumprod[next_t]# Inverted update step (re-arranging the update step to get x(t) (new latents) as a function of x(t-1) (current latents)latents = (latents - (1-alpha_t).sqrt()*noise_pred)*(alpha_t_next.sqrt()/alpha_t.sqrt()) + (1-alpha_t_next).sqrt()*noise_pred# Storeintermediate_latents.append(latents)return torch.cat(intermediate_latents)
把它在小狗图片的隐式表达上运行,我们可以在反转的中间过程得到一系列的隐式:
inverted_latents = invert(l, input_image_prompt,num_inference_steps=50)
inverted_latents.shape
0%| | 0/49 [00:00<?, ?it/s]torch.Size([48, 4, 64, 64])
我们可以来看一下最终的隐式 - 希望这可以作为我们尝试新的取样过程的起点噪声:
# Decode the final inverted latents:
with torch.no_grad():im = pipe.decode_latents(inverted_latents[-1].unsqueeze(0))
pipe.numpy_to_pil(im)[0]

你可以把这个反转隐式通过正常的 call 方法来传递给pipeline。
pipe(input_image_prompt, latents=inverted_latents[-1][None], num_inference_steps=50, guidance_scale=3.5).images[0] 0%| | 0/50 [00:00<?, ?it/s]

但这里我们遇见了第一个问题:这 并不是我们一开始的那张图片!这是因为DDIM的反转依赖一个重要的假设,在t时刻预测的噪声与t+1时刻会是相同的 - 这在我们只反转50或100步时是不陈立的。我们可以寄希望于更多的timesteps开得到一个更准确的反转,但我们也可以’作弊’一下,就是说直接从做对应反转过程中的第20/50步的隐式开始:
# The reason we want to be able to specify start step
start_step=20
sample(input_image_prompt, start_latents=inverted_latents[-(start_step+1)][None], start_step=start_step, num_inference_steps=50)[0]
0%| | 0/30 [00:00<?, ?it/s]
距离我们的输入图像已经很接近了!我们为什么要这么做?嗯,这是因为如果我们现在若要用一个新的prompt来生成图像,我们会得到一个匹配于源图像,除了,与新prompt相关的内容。例如,把’小狗’替换为’猫’,我们能看到一只猫在几乎一样草地背景上:
# Sampling with a new prompt
start_step=10
new_prompt = input_image_prompt.replace('puppy', 'cat')
sample(new_prompt, start_latents=inverted_latents[-(start_step+1)][None], start_step=start_step, num_inference_steps=50)[0]
0%| | 0/40 [00:00<?, ?it/s]

为什么不直接用 img2img?
为什么要做反转,不是多此一举吗?为什么不直接对输入图片加入噪声,然后用新的promt直接来去噪呢?我们可以这么做,但这会带来一个到处都被改变得夸张得多的照片(如果我们加入了很多噪声),或哪也没怎么变的图像(如果加了太少的噪声)。来自己试试:
start_step = 10
num_inference_steps=50
pipe.scheduler.set_timesteps(num_inference_steps)
noisy_l = pipe.scheduler.add_noise(l, torch.randn_like(l), pipe.scheduler.timesteps[start_step])
sample(new_prompt, start_latents=noisy_l, start_step=start_step, num_inference_steps=num_inference_steps)[0]
0%| | 0/40 [00:00<?, ?it/s]

注意背景和草坪有着非常大的变化。
把它们都组装起来
来把我们目前所写的代码都组装在一个简单的函数里,输入一张图像和两个prompts,就会得到一个通过反转得到的修改后的图片:
def edit(input_image, input_image_prompt, edit_prompt, num_steps=100, start_step=30, guidance_scale=3.5):with torch.no_grad(): latent = pipe.vae.encode(tfms.functional.to_tensor(input_image).unsqueeze(0).to(device)*2-1)l = 0.18215 * latent.latent_dist.sample()inverted_latents = invert(l, input_image_prompt,num_inference_steps=num_steps)final_im = sample(edit_prompt, start_latents=inverted_latents[-(start_step+1)][None], start_step=start_step, num_inference_steps=num_steps, guidance_scale=guidance_scale)[0]return final_im
And in action:
实际操作起来:
edit(input_image, 'A puppy on the grass', 'an old grey dog on the grass', num_steps=50, start_step=10)
0%| | 0/49 [00:00<?, ?it/s]0%| | 0/40 [00:00<?, ?it/s]

edit(input_image, 'A puppy on the grass', 'A blue dog on the lawn', num_steps=50, start_step=12, guidance_scale=6)
0%| | 0/49 [00:00<?, ?it/s]0%| | 0/38 [00:00<?, ?it/s]

相关文章:
01_ddim_inversion_CN
DDIM反转 设置 # !pip install -q transformers diffusers accelerateimport torch import requests import torch.nn as nn import torch.nn.functional as F from PIL import Image from io import BytesIO from tqdm.auto import tqdm from matplotlib import pyplot as p…...
ElasticSearch的文档、字段、映射和高级查询
1. 文档(Document) 在ES中一个文档是一个可被索引的基础信息单元,也就是一条数据 比如:你可以拥有某一个客户的文档,某一个产品的一个文档,当然,也可以拥有某个订单的一个文档。文档以JSON&…...
vim相关命令讲解!
本文旨在讲解vim 以及其相关的操作! 希望读完本文,读者会有一定的收获!好的,干货马上就来! 初识vim 在讲解vim之前,我们首先要了解vim是什么,有什么作用?只有了解了vim才能更好的理…...

22.构造一个关于员工信息的结构体数组,存储十个员工的信息
结构体问题。构造一个关于员工信息的结构体数组,存储十个员工的信息,包括员工工号,员工工资,员工所得税,员工实发工资。要求工号和工资由键盘输入,并计算出员工所得税(所得税工资*0.2࿰…...

calico
calico:默认是ip-ip模式, ipip 开销小 vxlan模式:后期版本才支持 不会创建虚拟交换机 Calico 是一种用于构建和管理容器网络的开源软件定义网络(SDN)解决方案。它专门设计用于在容器和虚拟机之间提供高性能、高可扩展性和灵活的…...
web前端开发第3次Dreamweave课堂练习/html练习代码《网页设计语言基础练习案例》
目标图片: 文字素材: 网页设计语言基础练习案例 ——几个从语义上和文字相关的标签 * h标签(h1~h6):用来定义网页的标题,成对出现。 * p标签:用来设置网页的段落,成对出现。 * b…...
APP备案获取安卓app证书公钥获取方法和签名MD5值
前言 在开发和发布安卓应用程序时,了解应用程序证书的公钥和签名MD5值是很重要的。这些信息对于应用程序的安全性和合规性至关重要。现在又因为今年开始APP必须接入备案才能在国内各大应用市场上架,所以获取这两个值成了所有开发者的必经之路。本文将介…...

cefsharp 93.1.140 如何在js中暴露c#类
从cefsharp79版本开始,旧的RegisterJsObject方法被删除了。 也就是说想使用79以后的版本,就必须更新js暴露c#对象的方法了。由于79之前的注册方法是不需要在js中进行注册的,在93版本上如何在不改动前端页面的基础上实现内核升级咧,…...
)
同一台Linux同时安装MYSQL5.7和MYSQL8(第一篇)
在一台Linxu上面同时安装mysql5.7和mysql8.0的步骤,记录一下,方便后续回顾,后续文章之后会接着介绍搭建两台虚拟机一主一从的架构。 其中配置的文件名称、目录、端口号、IP地址要根据自己电脑的实际情况进行更改。 安装完成后效果 [rootzong…...

【CSS】解决上层盒子遮挡下层图片点击事件的三种方法
1. Pointer Events 属性 CSS 的 pointer-events 属性是一个强大的工具,可以控制元素是否接收用户的交互事件。通过将上层盒子的 pointer-events 设置为 none,我们可以确保它不会阻止下层图片的点击事件。 .upper-box {z-index: 999; /* 设置更高的 z-i…...
力扣每日一题 ---- 2906. 构造乘积矩阵
这题很简单(一下就能想到是前缀和的提米),但是在处理12345上面需要仔细一点,本来我最开始想到的时候全部累乘在除掉当前数,但是这样就没有把12345考虑进去,如果他本身是12345的话,那么除他以外的乘积并不一定是0&#…...
Tomcat学习
一、入门 在webapp里面必须先创建一个文件夹,文件夹里面放的内容,才会被访问到。 创建一个javaweb项目后 二、servlet 1.概述 2.servlet生命周期 3.servlet实例的创建时机 4.Servlet实例的初始化参数 5.HTTP状态码 6.servelet返回JSON数据 7.服务端设置…...
Linux系统上搭建高可用Kafka集群(使用自带的zookeeper)
本次在CentOS7.6上搭建Kafka集群 Apache Kafka 是一个高吞吐量的分布式消息系统,被广泛应用于大规模数据处理和实时数据管道中。本文将介绍在CentOS操作系统上搭建Kafka集群的过程,以便于构建可靠的消息处理平台。 文件分享(KafkaUI、kafka…...
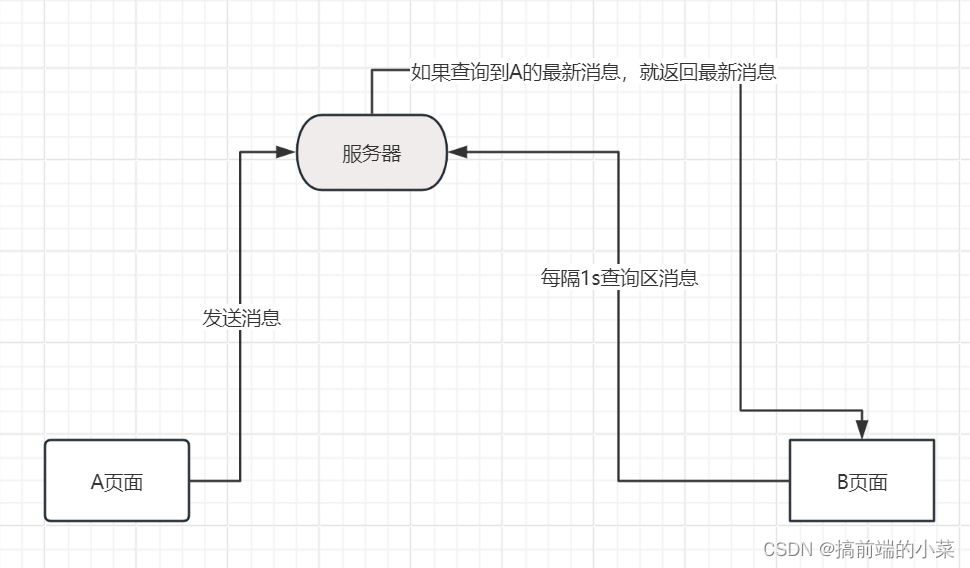
WebSocket在node端和客户端的使用
摘要 如果想要实现一个聊天的功能,就会想到使用WebSocket来搭建。那如果没有WebSocet的时候,我们会以什么样的思路来实现聊天功能呢? 假如有一个A页面 和 B页面进行通信,当A发送信息后,我们可以将信息存储在文件或者…...
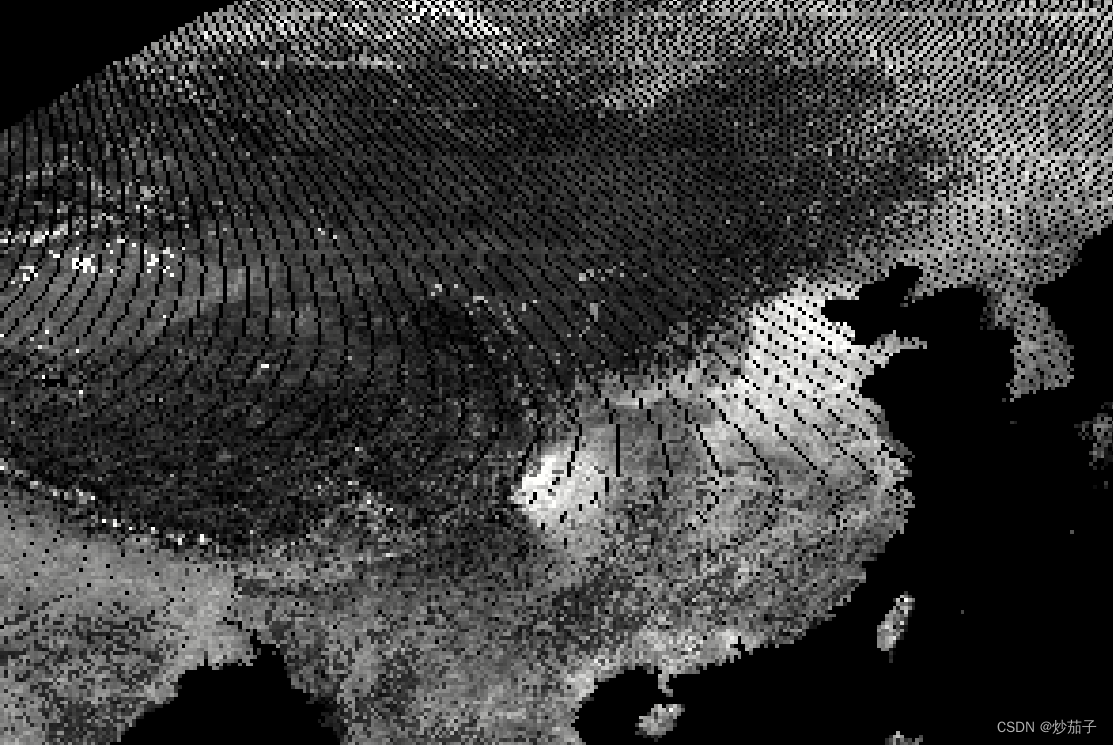
ENVI IDL:如何将txt文本文件转化为GeoTIFF文件?
01 前言 此处的文本文件形式如下: 里面包含了众多点位信息(不是站点数据),我们需要依据上述点的经纬度信息放到对应位置的像素点位置,放置完后如下: 可以发现,还存在部分缺失值,我们…...
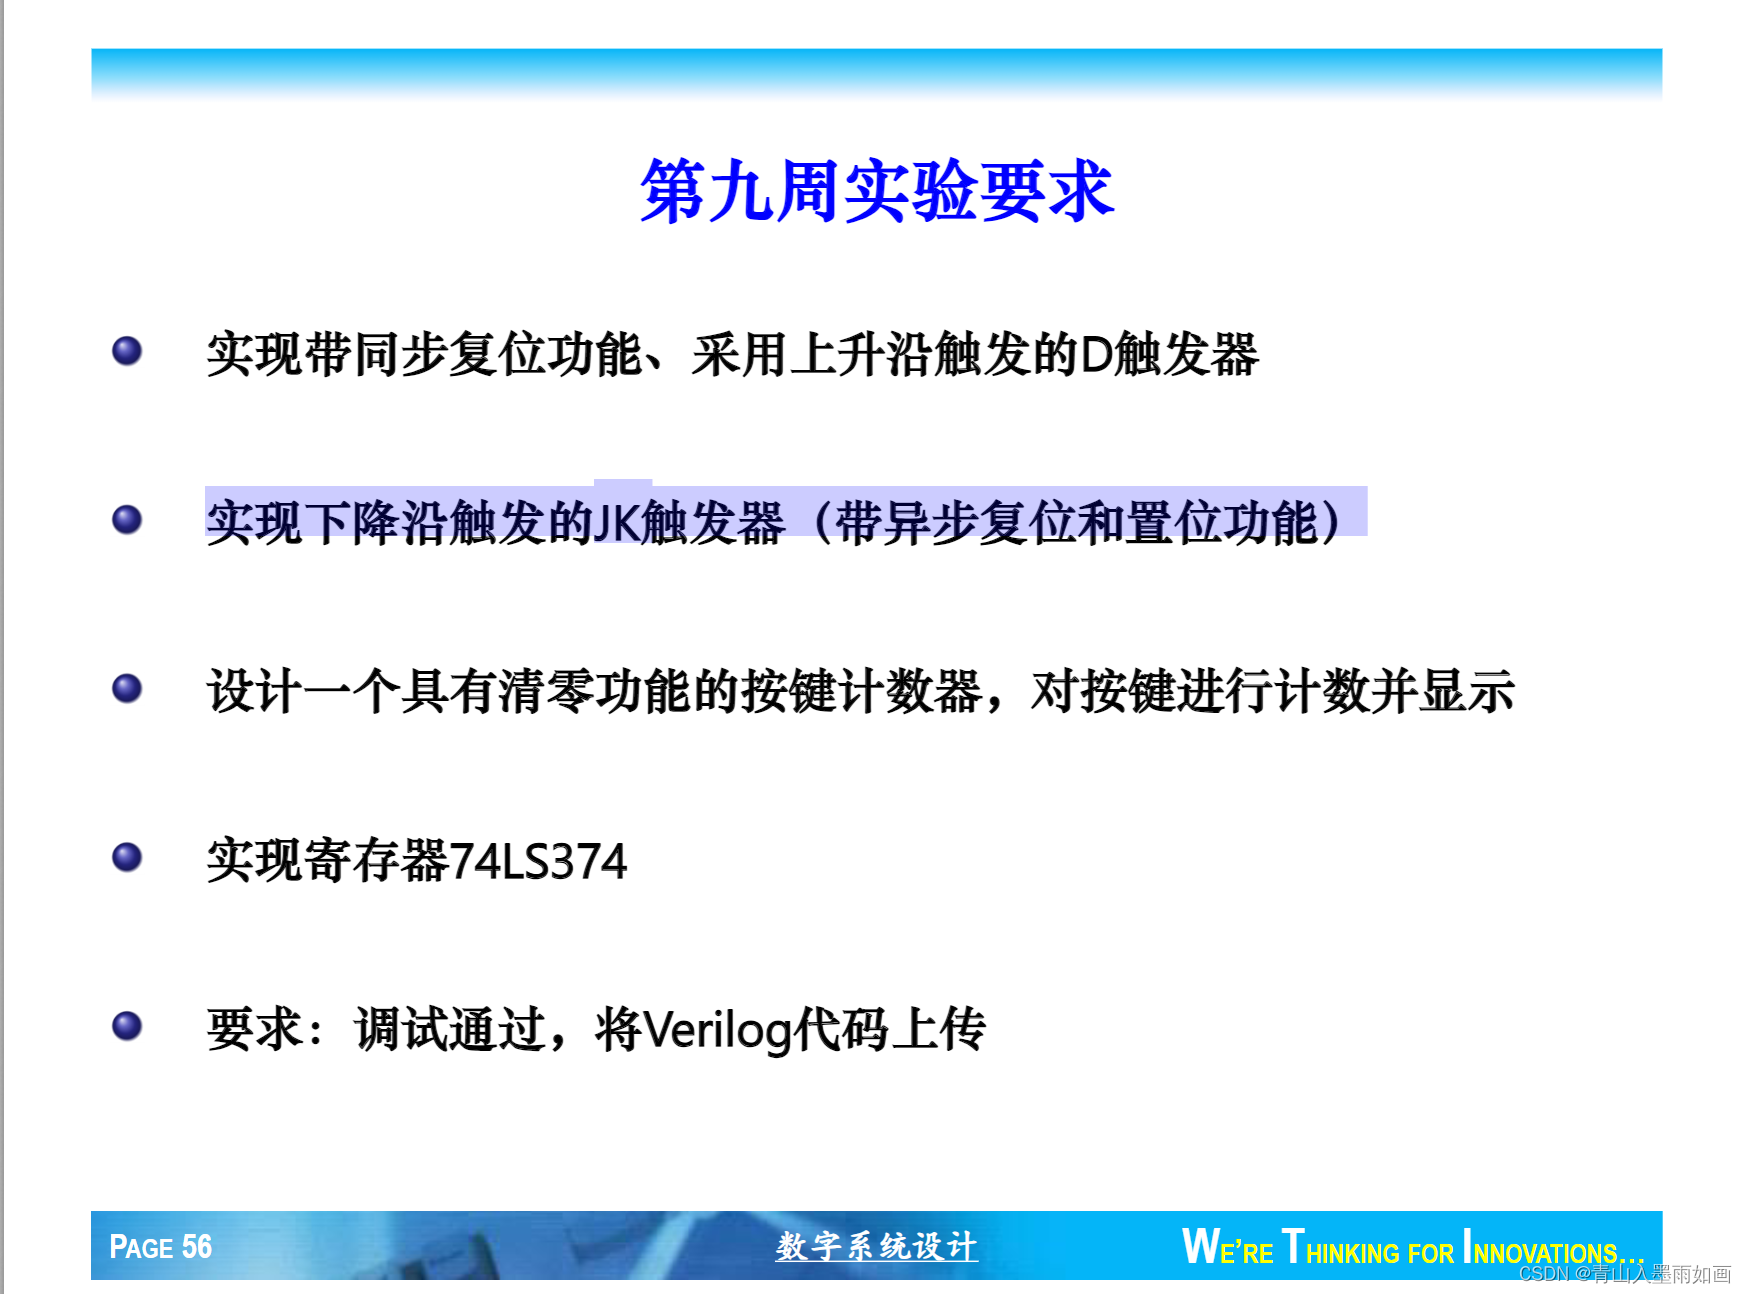
北邮22级信通院数电:Verilog-FPGA(9)第九周实验(2)实现下降沿触发的JK触发器(带异步复位和置位功能)
北邮22信通一枚~ 跟随课程进度更新北邮信通院数字系统设计的笔记、代码和文章 持续关注作者 迎接数电实验学习~ 获取更多文章,请访问专栏: 北邮22级信通院数电实验_青山如墨雨如画的博客-CSDN博客 JK.v module JK (input clk,input J,input K,input…...

pyqt5UI同步加载
问题记录:pyqt5 怎样实现修改ui而不改变py代码,例如一个文件存入ui代码,另一个文件引入ui代码 起因:由于在写一个漏扫工具,由于ui的平频繁改动导致主体代码结构变动,所以先有没有方法能够不改变主题代码&am…...
)
CentOS 7 安装 Redis 5 (单机 6379)
CentOS 7 安装 Redis 5 (单机 6379) 自己准备好 Redis 5 的安装包并上传至 /opt/ 下的 redis 文件夹下: cd /opt mkdir redis cd redis准备好 Redis 所需的编译环境: yum -y install gcc yum -y install gcc-c解压上传的 Redis…...

sqlplus set参数大区
通过设置不同的SET参数,可以定制SQLPlus的行为和输出格式: SET 参数描述SET AUTOTRACE显示SQL语句的执行计划和统计信息,用于性能优化。SET FEEDBACK控制是否显示SQL语句执行的行数,可提高结果可读性。SET LINESIZE设置每行的最大…...

XHS-Downloader:3分钟快速上手!小红书无水印下载神器全攻略
XHS-Downloader:3分钟快速上手!小红书无水印下载神器全攻略 【免费下载链接】XHS-Downloader 小红书(XiaoHongShu、RedNote)链接提取/作品采集工具:提取账号发布、收藏、点赞、专辑作品链接;提取搜索结果作…...

清音刻墨Qwen3在知识付费内容中的应用:自动生成课程字幕
清音刻墨Qwen3在知识付费内容中的应用:自动生成课程字幕 1. 知识付费行业的字幕痛点 在知识付费行业蓬勃发展的今天,高质量的视频课程已成为主流内容形式。然而,许多创作者在制作课程时都会遇到一个共同的难题:字幕制作。 传统…...

HunyuanVideo-FoleyGPU算力适配:RTX4090D与A100/H100推理性能对比
HunyuanVideo-FoleyGPU算力适配:RTX4090D与A100/H100推理性能对比 1. 引言 在视频生成与音效合成领域,HunyuanVideo-Foley作为一款集成视频生成和Foley音效合成的AI模型,对GPU算力有着极高的要求。本文将重点对比RTX4090D与专业级A100/H100…...

SDMatte问题解决:抠图边缘不理想?试试调整框选范围
SDMatte问题解决:抠图边缘不理想?试试调整框选范围 1. 问题现象与原因分析 1.1 常见边缘问题表现 在使用SDMatte进行抠图时,用户可能会遇到以下几种边缘不理想的情况: 边缘锯齿:主体边缘出现明显的锯齿状不平滑细节…...

InstructPix2Pix实现LaTeX文档图像自动处理
InstructPix2Pix实现LaTeX文档图像自动处理 告别繁琐的手工修图,用自然语言指令让LaTeX文档中的图片自动变完美 写学术论文、技术文档时,最头疼的就是处理图片素材。尺寸不一致、风格不统一、需要添加标注或水印...这些琐碎工作往往占用大量时间。现在&a…...

OpenClaw+SecGPT-14B组合方案:5步搭建个人安全运营中心
OpenClawSecGPT-14B组合方案:5步搭建个人安全运营中心 1. 为什么需要个人安全运营中心 去年我的家庭实验室遭遇了一次未遂的入侵尝试。当时我正在外地出差,NAS上的异常登录提醒被淹没在几百条通知里。这件事让我意识到:安全监控不能只依赖碎…...

RGB LED控制器库:嵌入式PWM驱动与色彩语义化实践
1. RGB LED控制器库技术解析:面向嵌入式工程师的深度实践指南RGB LED作为嵌入式系统中最基础、最直观的视觉反馈单元,其控制看似简单,实则涉及PWM精度、色彩空间映射、硬件资源分配、电流驱动安全等多重工程考量。Arduino平台虽以易用性见长&…...

OpenClaw多模型切换指南:Qwen3-4B与Llama3混合调用策略
OpenClaw多模型切换指南:Qwen3-4B与Llama3混合调用策略 1. 为什么需要多模型切换? 去年夏天,当我第一次尝试用OpenClaw自动化处理技术文档时,发现单一模型很难满足所有需求。代码生成任务需要模型有严谨的逻辑性,而文…...

Meshlab实战指南:从稀疏点云到纹理模型的完整流程
1. Meshlab入门:为什么选择它处理3D重建数据? 第一次接触三维建模的朋友可能会问:Meshlab到底是什么?简单来说,它是一款开源的3D网格处理软件,特别擅长处理从照片重建出来的三维数据。我在实际项目中用它处…...

OpenClaw跨平台控制:Qwen3-32B同步操作多台设备的配置方法
OpenClaw跨平台控制:Qwen3-32B同步操作多台设备的配置方法 1. 为什么需要分布式OpenClaw控制? 去年冬天,当我需要在三台不同操作系统的设备上同步执行数据清洗任务时,第一次意识到单机OpenClaw的局限性。每台设备需要单独登录、…...