SpringBoot学习笔记-创建个人中心页面(下)
笔记内容转载自 AcWing 的 SpringBoot 框架课讲义,课程链接:AcWing SpringBoot 框架课。
CONTENTS
- 1. 实现个人中心页面
- 2. POJO时区修改
- 3. 集成代码编辑器
本节实现个人中心的前端页面,用户能够查看自己的 Bot 信息,并能创建、修改或删除 Bot,此外还集成了 Vue Ace Editor 代码编辑器,方便用户输入 Bot 的代码。
1. 实现个人中心页面
我们要实现用户的个人中心页面,能够展示用户的头像以及自己所有 Bot 的信息,例如 Bot 名字、创建时间等,还需要具有创建/修改/删除 Bot 等功能,在很早之前创建的 MyBotsIndexView 组件中实现:
<template><div class="container"><div class="card text-bg-secondary" style="margin-top: 20px;"><div class="card-header"><h3>My Bots</h3></div><div class="card-body" style="background-color: rgba(255, 255, 255, 0.5);"><div class="row"><div class="col-md-3"><div class="card"><!-- 用户头像与用户名 --><div class="card-body text-center"><img class="img-fluid" :src="$store.state.user.photo" style="width:50%; border-radius: 50%;"><div style="font-size: 20px; margin-top: 10px; font-weight: bold;">{{ $store.state.user.username }}</div></div></div></div><div class="col-md-9"><div class="card"><div class="card-header"><span style="font-size: 25px;">Bot 管理</span><!-- 点击创建按钮能够打开模态框 --><button class="btn btn-outline-success float-end" type="button" data-bs-toggle="modal" data-bs-target="#add_bot_modal">创建 Bot</button><!-- 创建 Bot 的模态框 --><div class="modal fade" id="add_bot_modal" tabindex="-1"><div class="modal-dialog modal-xl"><div class="modal-content"><div class="modal-header" style="background-color: #198754;"><h1 class="modal-title fs-5" style="color: white;">创建 Bot</h1><button type="button" class="btn-close" data-bs-dismiss="modal"></button></div><div class="modal-body"><div class="mb-3"><label for="title" class="form-label">名称</label><input v-model="new_bot.title" type="email" class="form-control" id="title" placeholder="请输入 Bot 名称"></div><div class="mb-3"><label for="description" class="form-label">简介</label><textarea v-model="new_bot.description" class="form-control" id="description" rows="3" placeholder="介绍一下你的 Bot 吧~(可以暂时不填)"></textarea></div><div class="mb-3"><label for="content" class="form-label">代码</label><textarea v-model="new_bot.content" class="form-control" id="content" rows="14" placeholder="在这里编写你的 Bot 代码~"></textarea></div></div><div class="modal-footer"><div class="error_message" style="color: red;">{{ new_bot.error_message }}</div><button type="button" class="btn btn-success" @click="add_bot">创建</button><button type="button" class="btn btn-secondary" data-bs-dismiss="modal">取消</button></div></div></div></div></div><!-- 用户的 Bot 列表 --><div class="card-body"><table class="table table-striped table-hover"><thead><tr><th>名称</th><th>创建时间</th><th>操作</th></tr></thead><tbody><tr v-for="bot in bots" :key="bot.id"><td style="line-height: 32px;">{{ bot.title }}</td><td style="line-height: 32px;">{{ bot.createtime }}</td><td><button class="btn btn-outline-primary" type="button" data-bs-toggle="modal" :data-bs-target="'#update_bot_modal_' + bot.id" style="margin-right: 10px; padding: 3px 10px;">修改</button><button class="btn btn-outline-danger" type="button" data-bs-toggle="modal" :data-bs-target="'#remove_bot_modal_' + bot.id" style="padding: 3px 10px;">删除</button><!-- 修改 Bot 的模态框 --><div class="modal fade" :id="'update_bot_modal_' + bot.id" tabindex="-1"><div class="modal-dialog modal-xl"><div class="modal-content"><div class="modal-header" style="background-color: #0D6EFD;"><h1 class="modal-title fs-5" style="color: white;">修改 Bot</h1><button type="button" class="btn-close" data-bs-dismiss="modal"></button></div><div class="modal-body"><div class="mb-3"><label for="title" class="form-label">名称</label><input v-model="bot.title" type="email" class="form-control" id="title" placeholder="请输入 Bot 名称"></div><div class="mb-3"><label for="description" class="form-label">简介</label><textarea v-model="bot.description" class="form-control" id="description" rows="3" placeholder="介绍一下你的 Bot 吧~(可以暂时不填)"></textarea></div><div class="mb-3"><label for="content" class="form-label">代码</label><textarea v-model="bot.content" class="form-control" id="content" rows="14" placeholder="在这里编写你的 Bot 代码~"></textarea></div></div><div class="modal-footer"><div class="error_message" style="color: red;">{{ new_bot.error_message }}</div><button type="button" class="btn btn-primary" @click="update_bot(bot)">保存修改</button><button type="button" class="btn btn-secondary" data-bs-dismiss="modal">取消</button></div></div></div></div><!-- 删除 Bot 的确认模态框 --><div class="modal fade" :id="'remove_bot_modal_' + bot.id" tabindex="-1"><div class="modal-dialog modal-dialog-centered"><div class="modal-content"><div class="modal-header" style="background-color: #DC3545;"><h1 class="modal-title fs-5" style="color: white;">警告</h1><button type="button" class="btn-close" data-bs-dismiss="modal"></button></div><div class="modal-body" style="font-size: 20px;">确认删除?该操作无法撤销哦~</div><div class="modal-footer"><button type="button" class="btn btn-danger" @click="remove_bot(bot)">删除</button><button type="button" class="btn btn-secondary" data-bs-dismiss="modal">取消</button></div></div></div></div></td></tr></tbody></table></div></div></div></div></div></div></div>
</template><script>
import { ref, reactive } from "vue";  // reactive用来让组件绑定对象
import { useStore } from "vuex";
import { Modal } from "bootstrap/dist/js/bootstrap";
import $ from "jquery";export default {setup() {const store = useStore();let bots = ref([]);  // bot列表const new_bot = reactive({  // 要新创建的bot对象title: "",description: "",content: "",error_message: "",});const get_bots = () => {$.ajax({url: "http://localhost:3000/user/bot/getlist/",type: "GET",headers: {Authorization: "Bearer " + store.state.user.jwt_token,},success(resp) {bots.value = resp;  // 后端返回的就是一个列表},});};get_bots();  // 定义完后直接执行一遍const add_bot = () => {new_bot.error_message = "";$.ajax({url: "http://localhost:3000/user/bot/add/",type: "POST",data: {title: new_bot.title,description: new_bot.description,content: new_bot.content,},headers: {Authorization: "Bearer " + store.state.user.jwt_token,},success(resp) {if (resp.result === "success") {// 需要清空信息防止下次打开创建模态框时还留有上次的信息new_bot.title = "";new_bot.description = "";new_bot.content = "";Modal.getInstance("#add_bot_modal").hide();  // 关闭模态框get_bots();  // 刷新一下Bot列表} else {new_bot.error_message = resp.result;}},});};const remove_bot = (bot) => {$.ajax({url: "http://localhost:3000/user/bot/remove/",type: "POST",data: {bot_id: bot.id,},headers: {Authorization: "Bearer " + store.state.user.jwt_token,},success(resp) {if (resp.result === "success") {Modal.getInstance("#remove_bot_modal_" + bot.id).hide();get_bots();}},});};const update_bot = (bot) => {new_bot.error_message = "";$.ajax({url: "http://localhost:3000/user/bot/update/",type: "POST",data: {bot_id: bot.id,title: bot.title,description: bot.description,content: bot.content,},headers: {Authorization: "Bearer " + store.state.user.jwt_token,},success(resp) {if (resp.result === "success") {Modal.getInstance("#update_bot_modal_" + bot.id).hide();get_bots();} else {new_bot.error_message = resp.result;}},});};return {bots,new_bot,add_bot,remove_bot,update_bot,};},
};
</script><style scoped></style>
注意,我们实现了当点击创建 Bot 按钮时弹出一个模态框(Bootstrap 中的 Modal)的效果,然后用户可以在里面编辑 Bot 的信息。但对于每个 Bot 的修改和删除应该都会分别对应一个模态框,而不像创建那样只有一个模态框,因此每个模态框还需要加一个 ID 来对应。
2. POJO时区修改
现在我们会发现前端页面中显示的 Bot 创建时间和后端数据库中的不一致,需要在 pojo 中的 Bot 类中修改:
package com.kob.backend.pojo;import com.baomidou.mybatisplus.annotation.IdType;
import com.baomidou.mybatisplus.annotation.TableId;
import com.fasterxml.jackson.annotation.JsonFormat;
import lombok.AllArgsConstructor;
import lombok.Data;
import lombok.NoArgsConstructor;import java.util.Date;@Data
@NoArgsConstructor
@AllArgsConstructor
public class Bot {@TableId(value = "id", type = IdType.AUTO)  // 声明id为自增类型private Integer id;private Integer userId;  // 注意驼峰命名,userId之后会被解析为user_id,别写成userID,因为这样会解析成user_i_dprivate String title;private String description;private String content;private Integer rating;@JsonFormat(pattern = "yyyy-MM-dd HH:mm:ss", timezone = "Asia/Shanghai")  // 注意日期格式和时区的设置private Date createtime;@JsonFormat(pattern = "yyyy-MM-dd HH:mm:ss", timezone = "Asia/Shanghai")private Date modifytime;
}
3. 集成代码编辑器
由于 Bot 的内容有代码部分,之前我们用的是 <textarea> 让用户编写代码,这样编写体验不好,因此我们需要集成一个代码编辑器,我们使用的是 Vue Ace Editor(Ace GitHub 官网:Ace (Ajax.org Cloud9 Editor),Vue 3 版 Ace GitHub 官网:vue3-ace-editor)。
先在 Vue 的控制台中安装以下依赖:
vue3-ace-editorace-builds
然后就可以用 <VAceEditor> 替代之前的 <textarea>:
<template><div class="container"><div class="card text-bg-secondary" style="margin-top: 20px;">...<div class="card-body" style="background-color: rgba(255, 255, 255, 0.5);"><div class="row">...<div class="col-md-9"><div class="card"><div class="card-header">...<!-- 创建 Bot 的模态框 --><div class="modal fade" id="add_bot_modal" tabindex="-1"><div class="modal-dialog modal-xl"><div class="modal-content">...<div class="modal-body">...<div class="mb-3"><label for="content" class="form-label">代码</label><VAceEditorv-model:value="new_bot.content"@init="editorInit"lang="c_cpp"theme="textmate"style="height: 400px":options="{enableBasicAutocompletion: true,  //启用基本自动完成enableSnippets: true,  // 启用代码段enableLiveAutocompletion: true,  // 启用实时自动完成fontSize: 16,  //设置字号tabSize: 4,  // 标签大小showPrintMargin: false,  //去除编辑器里的竖线highlightActiveLine: true,  // 选中行高亮显示}"/></div></div>...</div></div></div></div><!-- 用户的 Bot 列表 --><div class="card-body"><table class="table table-striped table-hover">...<tbody><tr v-for="bot in bots" :key="bot.id"><td style="line-height: 32px;">{{ bot.title }}</td><td style="line-height: 32px;">{{ bot.createtime }}</td><td>...<!-- 修改 Bot 的模态框 --><div class="modal fade" :id="'update_bot_modal_' + bot.id" tabindex="-1"><div class="modal-dialog modal-xl"><div class="modal-content">...<div class="modal-body">...<div class="mb-3"><label for="content" class="form-label">代码</label><VAceEditorv-model:value="bot.content"@init="editorInit"lang="c_cpp"theme="textmate"style="height: 400px":options="{enableBasicAutocompletion: true,enableSnippets: true,enableLiveAutocompletion: true,fontSize: 16,tabSize: 4,showPrintMargin: false,highlightActiveLine: true,}"/></div></div>...</div></div></div><!-- 删除 Bot 的确认模态框 -->...</td></tr></tbody></table></div></div></div></div></div></div></div>
</template><script>
...
import { VAceEditor } from "vue3-ace-editor";
import ace from "ace-builds";
import "ace-builds/src-noconflict/mode-json";
import "ace-builds/src-noconflict/theme-chrome";
import "ace-builds/src-noconflict/ext-language_tools";
import "ace-builds/src-noconflict/mode-c_cpp";export default {components: {VAceEditor,},setup() {ace.config.set("basePath","https://cdn.jsdelivr.net/npm/ace-builds@" +require("ace-builds").version +"/src-noconflict/");...},
};
</script><style scoped></style>
相关文章:
)
SpringBoot学习笔记-创建个人中心页面(下)
笔记内容转载自 AcWing 的 SpringBoot 框架课讲义,课程链接:AcWing SpringBoot 框架课。 CONTENTS 1. 实现个人中心页面2. POJO时区修改3. 集成代码编辑器 本节实现个人中心的前端页面,用户能够查看自己的 Bot 信息,并能创建、修改…...

电子秤方案:做一个宠物勺方案设计
养宠物是一件费心劳力的事情,但同时也是能够给你带来快乐和幸福感的事情。就是有时候会怕宠物毫无征兆地生病令人措手不及,所以电子秤方案设计鼎盛合科技分享一个小方案,能够及时了解到宠物的身体状况问题。 蓝牙宠物勺是一种具有记录和称重…...
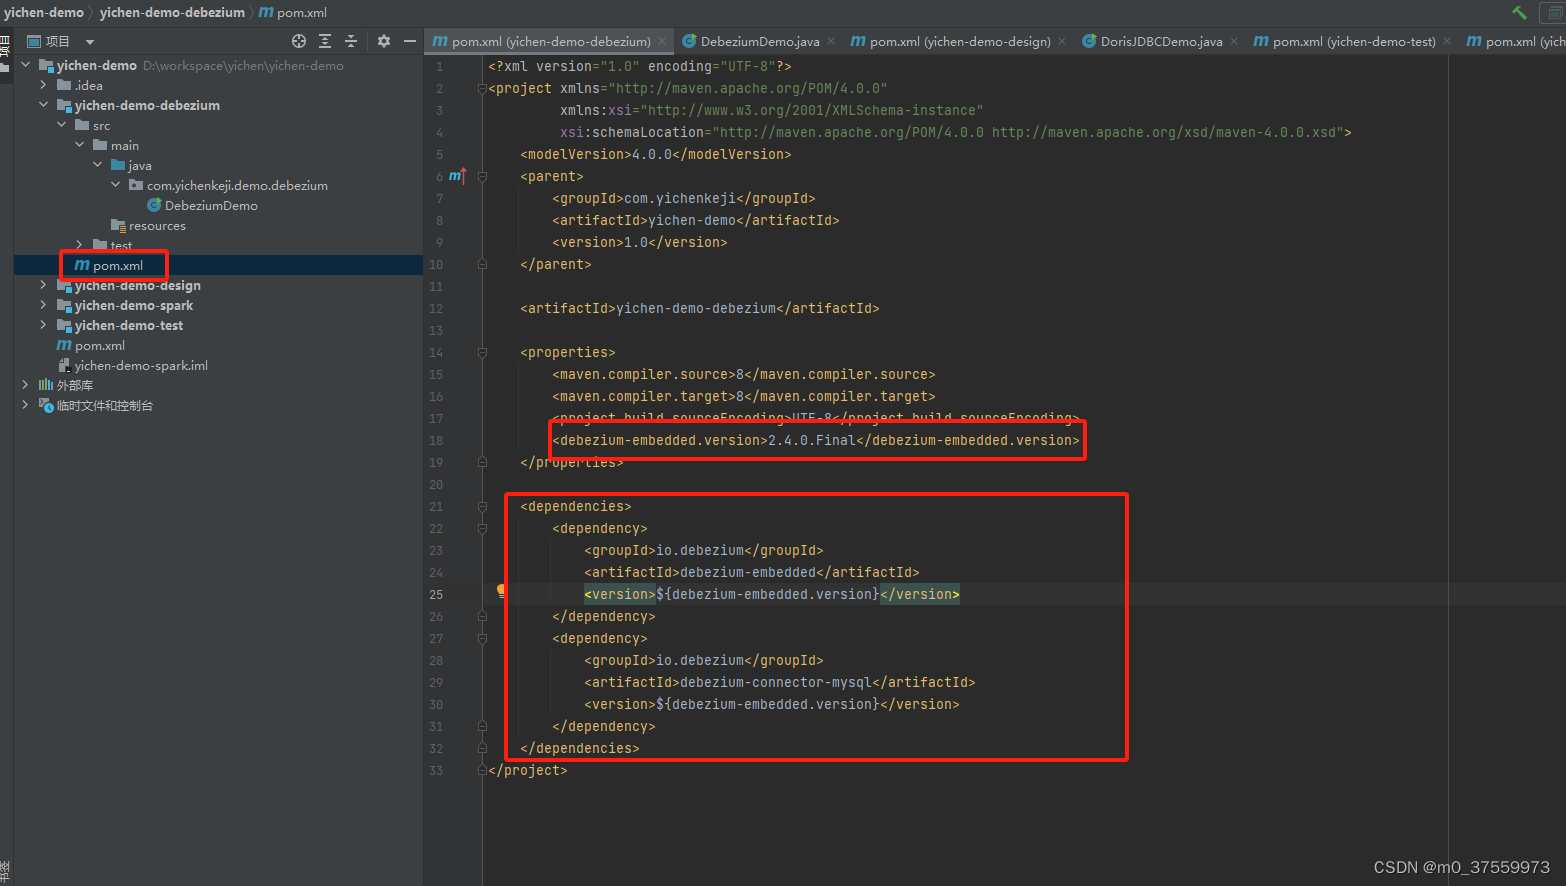
Debezium-Embedded 实时监控MySQL数据变更
1.Debezium-Embedded 简介 Debezium连接器的操作通常是将它们部署到Kafka Connect服务,并配置一个或多个连接器来监控上游数据库,并为它们在上游数据库中看到的所有更改生成数据更改事件。这些数据更改事件被写入Kafka,在那里它们可以被许多不…...
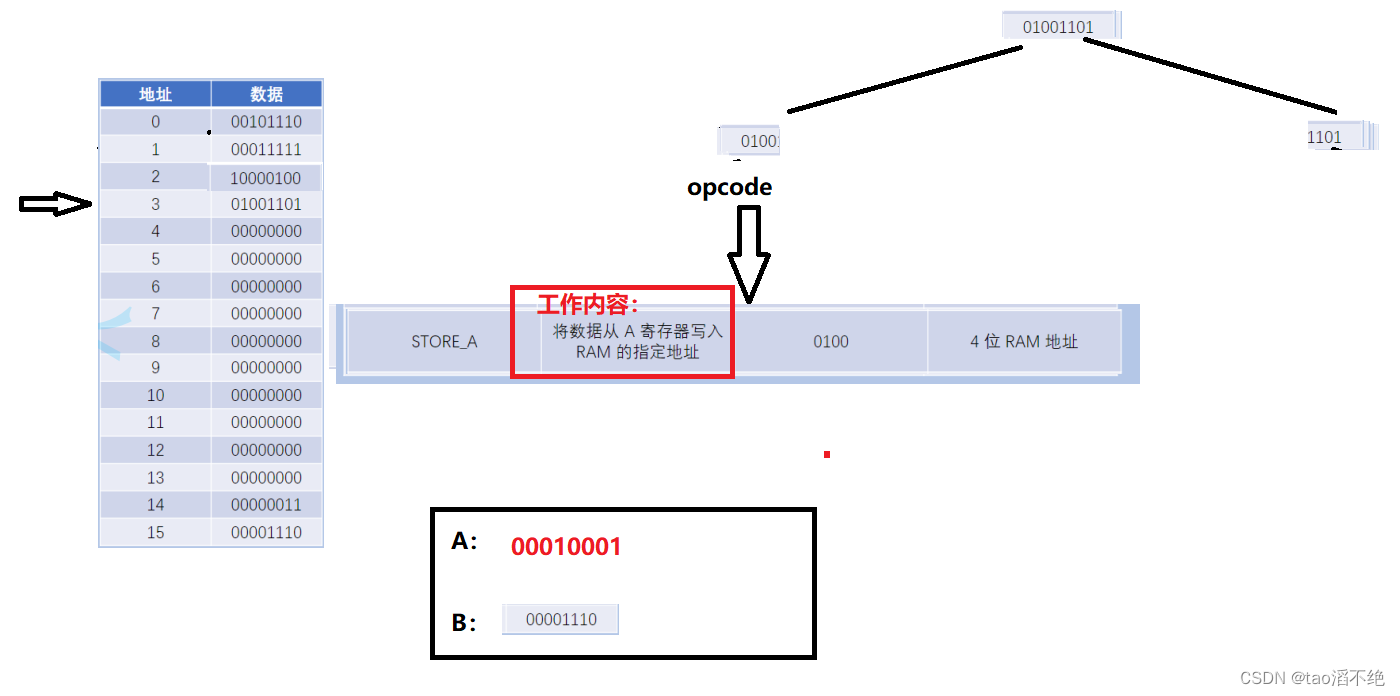
计算机是如何工作的(简单介绍)
目录 一、冯诺依曼体系 二、CPU基本流程工作 逻辑⻔ 电⼦开关——机械继电器(Mechanical Relay) ⻔电路(Gate Circuit) 算术逻辑单元 ALU(Arithmetic & Logic Unit) 算术单元(ArithmeticUnit) 逻辑单元(Logic Unit) ALU 符号 寄存器(Regis…...
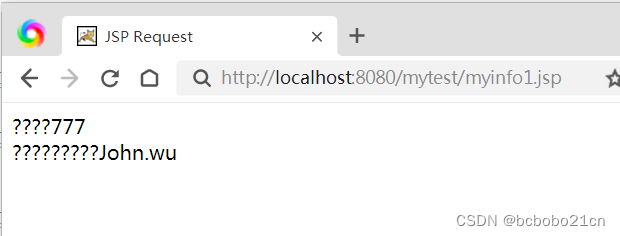
JSP基本表单和Request对象使用例子
表单的jsp; <%page contentType"text/html;charsetgbk" pageEncoding"UTF-8"%> <!DOCTYPE html> <html><head><meta http-equiv"Content-Type" content"text/html; charsetUTF-8"><titl…...
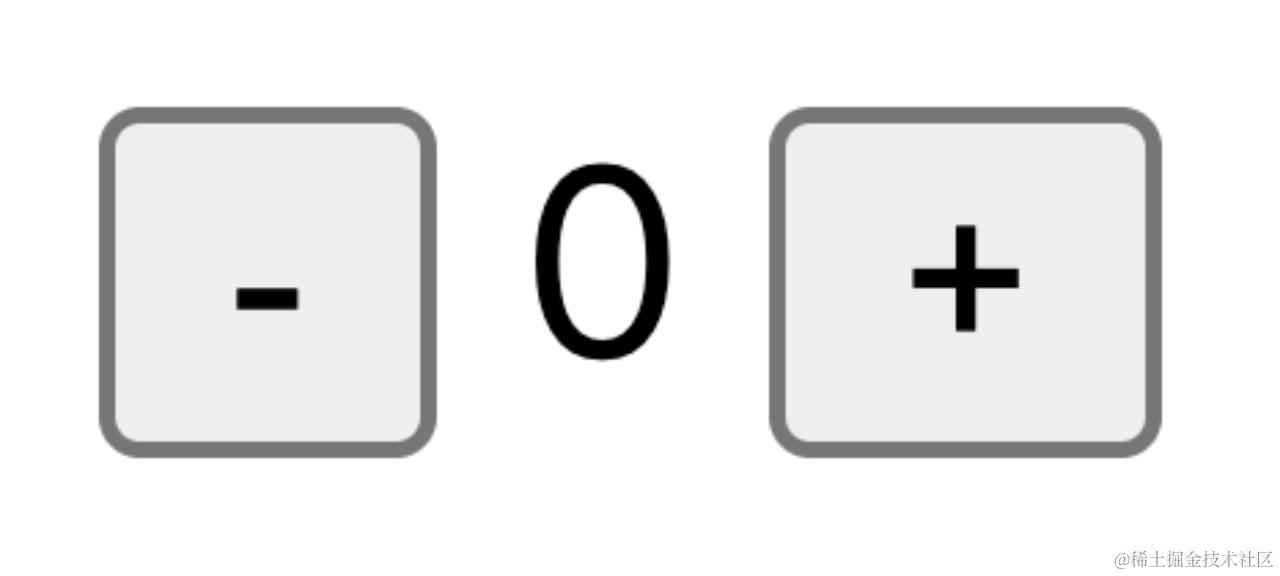
【Redux】Redux 基本使用
1. Redux 快速上手 Redux 是 React 最常用的集中状态管理工具,类似于Vue中的Pinia(Vuex),可以独立于框架运行。 <button id"decrement">-</button> <span id"count">0</span> <…...
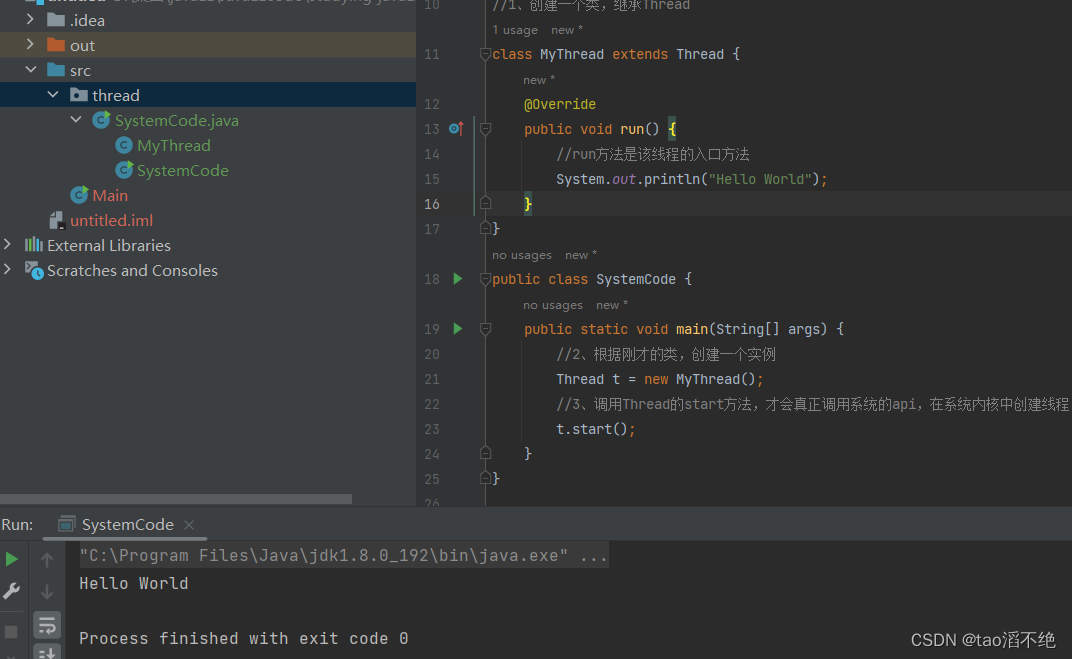
多线程Thread(初阶一:认识线程)
目录 一、引用线程的原因 二、线程的概念 三、进程和线程的区别 四、多线程编程 一、引用线程的原因 多任务操作系统,希望系统能同时运行多个任务。所以会涉及到进程,需要对进程进行管理、调度等。 而单任务操作系统,就完全不涉及到进程…...
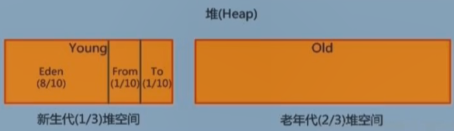
系列五、GC垃圾回收【四大垃圾算法-复制算法】
一、堆的内存组成 二、复制算法 2.1、发生位置 复制算法主要发生在新生代,发生在新生代的垃圾回收也被叫做Minor GC。 2.2、 Minor GC的过程 复制>清空》交换 1、eden、from区中的对象复制到to区,年龄1 首先,当eden区满的时候会触发第一…...

LeetCode(24)文本左右对齐【数组/字符串】【困难】
目录 1.题目2.答案3.提交结果截图 链接: 文本左右对齐 1.题目 给定一个单词数组 words 和一个长度 maxWidth ,重新排版单词,使其成为每行恰好有 maxWidth 个字符,且左右两端对齐的文本。 你应该使用 “贪心算法” 来放置给定的单…...

Spring-Spring之事务底层源码解析
EnableTransactionManagement工作原理 开启Spring事务本质上就是增加了一个Advisor,但我们使用EnableTransactionManagement注解来开启Spring事务是,该注解代理的功能就是向Spring容器中添加了两个Bean: AutoProxyRegistrarProxyTransactio…...
后端面经学习自测(三)
文章目录 1、ArrayList和Linkedlist区别?2、ArrayList扩容机制?3、ArrayList和Linkedlist分别能做什么场景?4、事务特性?MySQL事务Redis事务Spring事务5、在Spring中事务失效的场景?6、Java泛型?7、泛型擦除…...

力扣labuladong——一刷day40
提示:文章写完后,目录可以自动生成,如何生成可参考右边的帮助文档 文章目录 前言一、力扣341. 扁平化嵌套列表迭代器 前言 N叉树的结构,构造迭代器 一、力扣341. 扁平化嵌套列表迭代器 /*** // This is the interface that allo…...
在VS Code中使用VIM
文章目录 安装和基本使用设置 安装和基本使用 VIM是VS Code的强大对手,其简化版本VI是Linux内置的文本编辑器,堪称VS Code问世之前最流行的编辑器,也是VS Code问世之后,我仍在使用的编辑器。 对VIM无法割舍的原因有二࿰…...

注解【元数据,自定义注解等概念详解】(超简单的好吧)
注解的理解与使用 注解的释义元数据的含义基础阶段常见的注解注解的作用(包括但不限于)教你读懂注解内部代码内容五种元注解尝试解读简单注解我当时的疑惑点 自定义注解自定义注解举例 注解的原理总结 注解的释义 我们都知道注释是拿来给程序员看的&…...
vue-pdf在vue框架中的使用
在components目录下新建PdfViewer/index.vue vue-pdf版本为4.3.0 <template><div :id"containerId" v-if"hasProps" class"container"><div class"right-btn"><div class"pageNum"><input v-m…...

Wordpress页面生成器:Elementor 插件制作网站页面教程(图文完整)
本文来教大家怎么使用Wordpress Elementor页面编辑器插件来自由创建我们的网页内容。很多同学在面对建站的时候,一开始都是热血沸腾信心满满的,等到实际上手的时候就会发现有很多问题都是无法解决的,希望本篇Elementor插件使用指南能够帮助到你。 Wordpress Elementor页面编…...
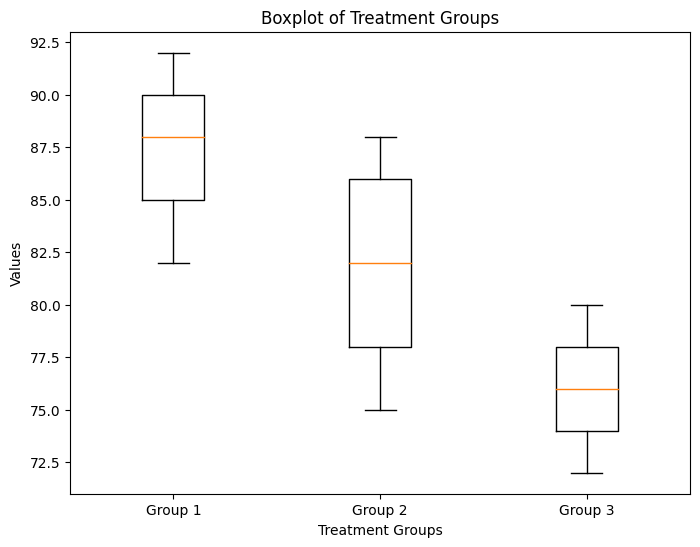
完全随机设计的方差分析
一、说明 实验设计在科学研究中发挥着至关重要的作用,使研究人员能够从数据中得出有意义的结论。一种常见的实验设计是完全随机设计(CRD),其特征是将实验单元随机分配到治疗组。CRD 的方差分析 (ANOVA) 是一种统计技术,…...
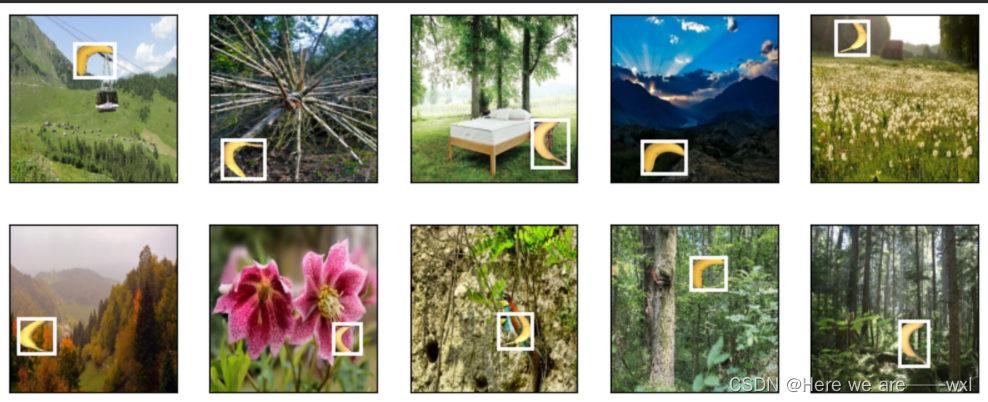
035、目标检测-物体和数据集
之——物体检测和数据集 目录 之——物体检测和数据集 杂谈 正文 1.目标检测 2.目标检测数据集 3.目标检测和边界框 4.目标检测数据集示例 杂谈 目标检测是计算机视觉中应用最为广泛的,之前所研究的图片分类等都需要基于目标检测完成。 在图像分类任务中&am…...

【开源】基于Vue.js的社区买菜系统的设计和实现
项目编号: S 011 ,文末获取源码。 \color{red}{项目编号:S011,文末获取源码。} 项目编号:S011,文末获取源码。 目录 一、摘要1.1 项目介绍1.2 项目录屏 二、系统设计2.1 功能模块设计2.1.1 数据中心模块2.1…...
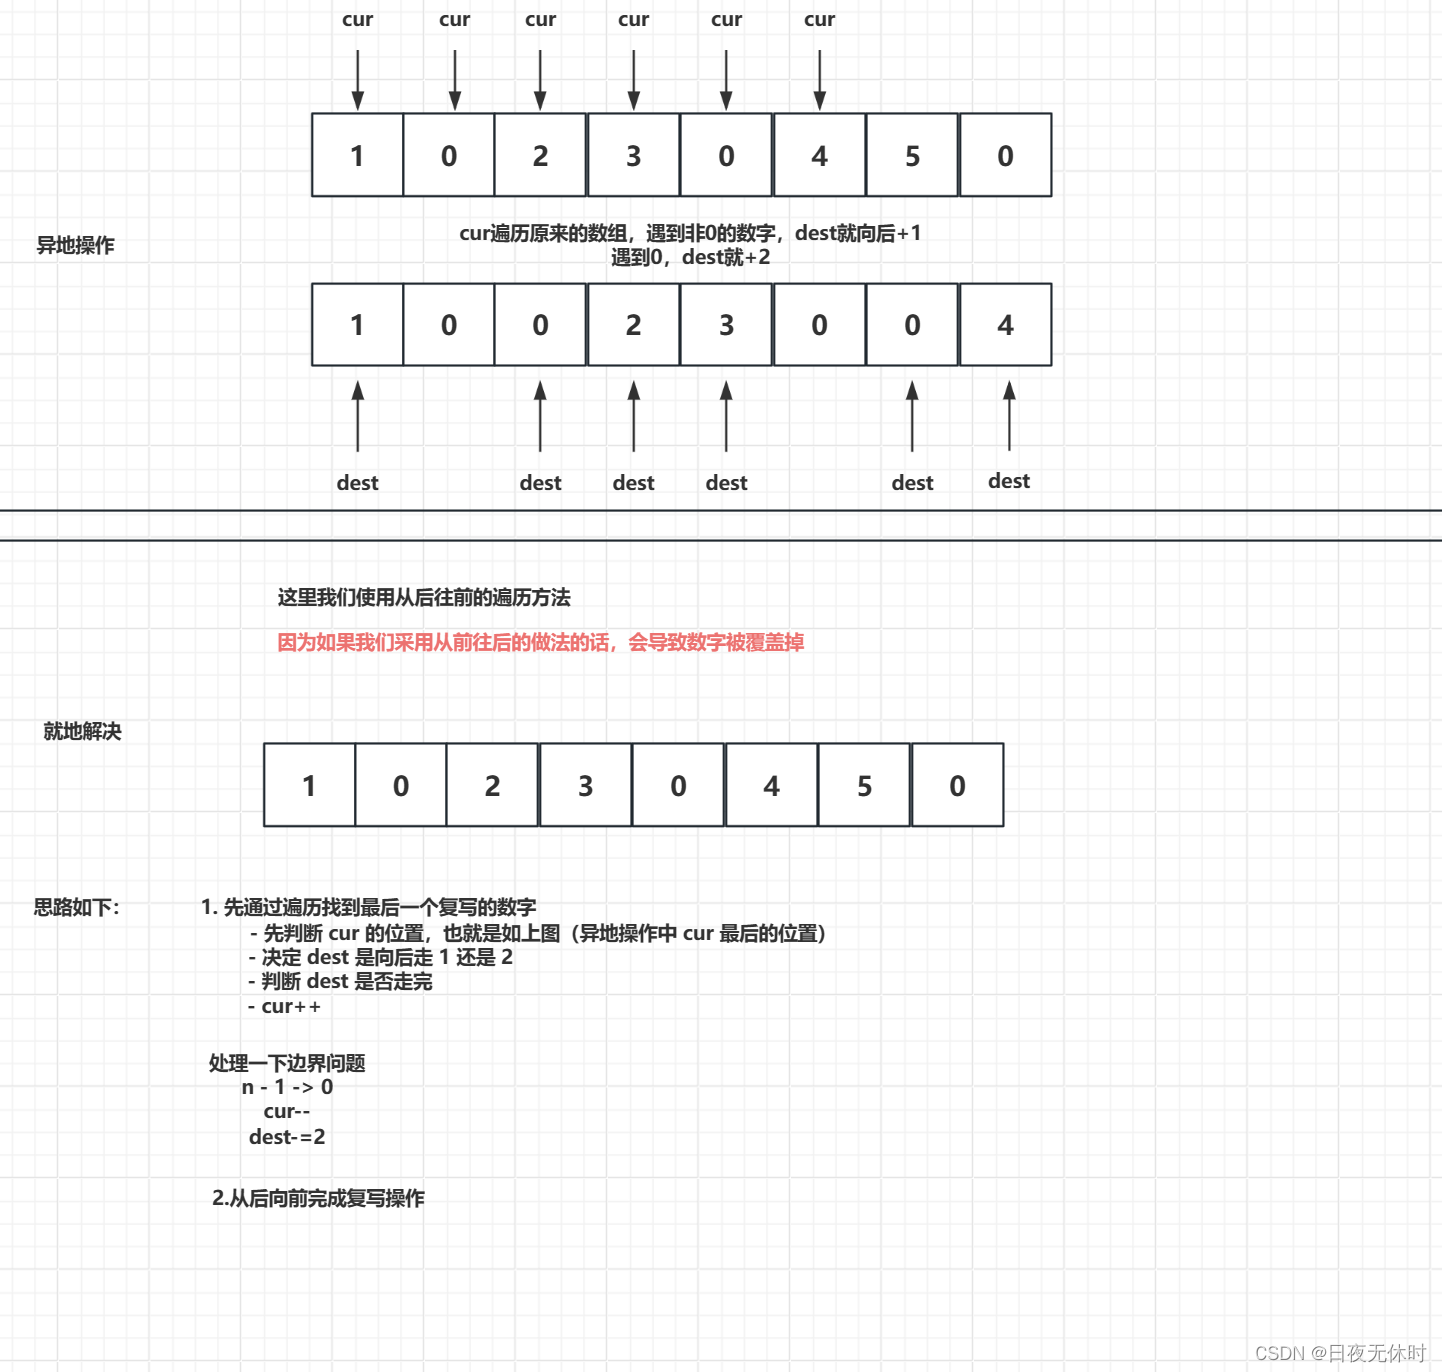
【双指针】复写0
复写0 1089. 复写零 - 力扣(LeetCode) 给你一个长度固定的整数数组 arr ,请你将该数组中出现的每个零都复写一遍,并将其余的元素向右平移。 注意:请不要在超过该数组长度的位置写入元素。请对输入的数组 就地 进行上…...
---ESP32S3矩阵Matrix开发板之搭建开发环境)
【花雕学编程】Arduino动手做(252)---ESP32S3矩阵Matrix开发板之搭建开发环境
37款传感器与模块的提法,在网络上广泛流传,其实Arduino能够兼容的传感器模块肯定是不止37种的。鉴于本人手头积累了一些传感器和执行器模块,依照实践出真知(一定要动手做)的理念,以学习和交流为目的,这里准备逐一动手试试多做实验,不管成功与否,都会记录下来——小小的…...

深度解析Deep3D:专业级实时2D转3D视频转换技术实战指南
深度解析Deep3D:专业级实时2D转3D视频转换技术实战指南 【免费下载链接】Deep3D Real-Time end-to-end 2D-to-3D Video Conversion, based on deep learning. 项目地址: https://gitcode.com/gh_mirrors/dee/Deep3D Deep3D是一款基于深度学习的开源2D转3D视频…...

全栈开发真的是万能解药吗?3年全栈开发者的血泪教训
一、从测试视角看全栈热:光环下的误解作为软件测试从业者,你一定不止一次在行业论坛、招聘启事里看到“全栈开发”这四个字。它像一个自带聚光灯的概念,被描绘成能独当一面解决所有技术问题的“万能解药”——前端页面布局、后端逻辑搭建、数…...

30.【Verilog】Verilog 除法器设计
第一步:分析与整理Verilog 除法器设计 1. 除法器原理(定点)与十进制竖式除法类似,以 27 5 为例(二进制): 取被除数高位(与除数同宽,如 3bit),与除…...

工业物联网通信技术:iCOMOX平台与三大方案解析
1. iCOMOX平台与工业物联网通信技术概述在工业4.0和智能制造的浪潮中,设备状态监测(CbM)系统正经历从传统定期维护到预测性维护的范式转变。iCOMOX作为一款开源的传感器融合平台,集成了振动、声音、温度和磁场位移等多模态传感能力,其核心价值…...


E-GEO:基于多智能体架构的AI搜索引擎优化工具实战指南
1. 项目概述:E-GEO,一个为AI搜索引擎而生的零门槛优化工具 如果你和我一样,最近几个月一直在琢磨怎么让自家网站的内容在ChatGPT、Claude、Perplexity这些AI搜索引擎里排得更靠前,那你肯定听说过“生成式引擎优化”这个概念。传统…...

Z轴传感技术在大屏触控中的应用与优化
1. Z轴传感技术:重新定义大屏触控的物理维度十年前我第一次接触银行ATM的触控屏时,那种生硬的点击反馈让人总想多戳几下确认操作是否成功。如今站在商场里观察用户操作自助点餐机,类似的迟疑依然普遍存在——这正是传统二维触控的体验天花板。…...

为什么83%的企业在2025年底紧急替换AI Agent?2026年必须升级的4个底层能力清单
更多请点击: https://intelliparadigm.com 第一章:为什么83%的企业在2025年底紧急替换AI Agent?2026年必须升级的4个底层能力清单 2025年Q3起,全球头部金融、制造与医疗企业集中触发AI Agent架构重构——Gartner最新调研显示&…...

突破性AI编程工具破解方案:cursor-free-vip技术深度解析与全栈实施指南
突破性AI编程工具破解方案:cursor-free-vip技术深度解析与全栈实施指南 【免费下载链接】cursor-free-vip [Support 0.45](Multi Language 多语言)自动注册 Cursor Ai ,自动重置机器ID , 免费升级使用Pro 功能: Youve …...