【技术追踪】SAM(Segment Anything Model)代码解析与结构绘制之Mask Decoder
论文:Segment Anything
代码:https://github.com/facebookresearch/segment-anything
系列篇:
(1)【技术追踪】SAM(Segment Anything Model)代码解析与结构绘制之Image Encoder
(2)【技术追踪】SAM(Segment Anything Model)代码解析与结构绘制之Prompt Encoder
本篇示例依然采用系列篇中的狗狗图像运行代码,预测部分代码如下:
input_point = np.array([[1300, 800]])   # 输入point的坐标
input_label = np.array([1])   # label=1表示前景, label=0表示背景
# 输入box的坐标,(700,400)为左上角坐标, (1900,1100)为右下角坐标
input_box = np.array([[700, 400, 1900, 1100]])
# 调用预测函数
masks, scores, logits = predictor.predict(point_coords=input_point,point_labels=input_label,box=input_box,multimask_output=True,
)
1. Mask Decoder代码解析
(1)输入参数
在【segment_anything/predictor.py --> SamPredictor类 -->predict_torch函数】中调用了mask_decoder实现mask预测,如下所示:
low_res_masks, iou_predictions = self.model.mask_decoder(image_embeddings=self.features,image_pe=self.model.prompt_encoder.get_dense_pe(),sparse_prompt_embeddings=sparse_embeddings,dense_prompt_embeddings=dense_embeddings,multimask_output=multimask_output,)
①参数self.features为input_image经过image_encoder嵌入后的向量,本例中大小为 [ 1 , 256 , 64 , 64 ] {[1, 256, 64, 64]} [1,256,64,64] ;
②参数sparse_embeddings为prompt point和prompt box经过prompt_encoder得到的嵌入向量,本例中其大小为 [ 1 , 3 , 256 ] {[1, 3, 256]} [1,3,256] ;
③参数dense_embeddings在本例中为无prompt mask输入时采用 nn.Embedding 的预定义嵌入向量, 其大小为 [ 1 , 256 , 64 , 64 ] {[1, 256, 64, 64]} [1,256,64,64] ;
④参数multimask_output是bool型参数,默认为True,支持多mask输出;
⑤参数self.model.prompt_encoder.get_dense_pe()调用PositionEmbeddingRandom实现位置编码,其大小为 [ 1 , 256 , 64 , 64 ] {[1, 256, 64, 64]} [1,256,64,64] ;
def get_dense_pe(self) -> torch.Tensor:return self.pe_layer(self.image_embedding_size).unsqueeze(0)
(2)MaskDecoder类
位置:【segment_anything/modeling/mask_decoder.py -->MaskDecoder类】
作用: 初始化网络结构,并调用predict_masks函数实现mask和iou预测
先看MaskDecoder的 _ _ i n i t _ _ {\_\_init\_\_} __init__ 初始化函数和 f o r w a r d {forward} forward 函数:
class MaskDecoder(nn.Module):def __init__(self,*,transformer_dim: int,transformer: nn.Module,num_multimask_outputs: int = 3,activation: Type[nn.Module] = nn.GELU,iou_head_depth: int = 3,iou_head_hidden_dim: int = 256,) -> None:super().__init__()self.transformer_dim = transformer_dim # transformer的通道维度 = 256self.transformer = transformer # 用于mask预测的transformer = TwoWayTransformerself.num_multimask_outputs = num_multimask_outputs # 消除歧义时需要的mask数量 = 3self.iou_token = nn.Embedding(1, transformer_dim) # (1, 256)self.num_mask_tokens = num_multimask_outputs + 1 # mask数目加1 = 4self.mask_tokens = nn.Embedding(self.num_mask_tokens, transformer_dim) # (4, 256)# 以反卷积实现4倍上采样self.output_upscaling = nn.Sequential(nn.ConvTranspose2d(transformer_dim, transformer_dim // 4, kernel_size=2, stride=2),LayerNorm2d(transformer_dim // 4),activation(),nn.ConvTranspose2d(transformer_dim // 4, transformer_dim // 8, kernel_size=2, stride=2),activation(),)# 4个mask对应的mlpself.output_hypernetworks_mlps = nn.ModuleList([MLP(transformer_dim, transformer_dim, transformer_dim // 8, 3)for i in range(self.num_mask_tokens)])# iou预测对应的mlpself.iou_prediction_head = MLP(transformer_dim, iou_head_hidden_dim, self.num_mask_tokens, iou_head_depth)def forward(self,image_embeddings: torch.Tensor,image_pe: torch.Tensor,sparse_prompt_embeddings: torch.Tensor,dense_prompt_embeddings: torch.Tensor,multimask_output: bool,) -> Tuple[torch.Tensor, torch.Tensor]:masks, iou_pred = self.predict_masks(image_embeddings=image_embeddings, # image encoder嵌入 [1, 256, 64, 64]image_pe=image_pe, # 图像嵌入大小对应的位置编码 [1, 256, 64, 64]sparse_prompt_embeddings=sparse_prompt_embeddings, # prompt point和box嵌入 [1, 3, 256]dense_prompt_embeddings=dense_prompt_embeddings, # prompt mask嵌入[1, 256, 64, 64]) # 输出mask.size()=[1,4,256,256], iou_pred.size()=[1,4]# Select the correct mask or masks for outputif multimask_output:mask_slice = slice(1, None) # 从索引1开始取后面全部else:mask_slice = slice(0, 1) # 从索引0开始取到1结束masks = masks[:, mask_slice, :, :] # [1, 3, 256, 256]iou_pred = iou_pred[:, mask_slice] # [1, 3]return masks, iou_pred
传送门:【python函数】内置函数slice()用法解析
f o r w a r d {forward} forward 的过程中主要完成了 predict_masks 函数调用;而在 _ _ i n i t _ _ {\_\_init\_\_} __init__函数中定义了 t r a n s f o r m e r {transformer} transformer , o u t p u t _ u p s c a l i n g {output\_upscaling} output_upscaling , o u t p u t _ h y p e r n e t w o r k s _ m l p s {output\_hypernetworks\_mlps} output_hypernetworks_mlps 和 i o u _ p r e d i c t i o n _ h e a d {iou\_prediction\_head} iou_prediction_head 这四个玩意儿,接下来咱来瞅瞅他们是啥样的。
① transformer: 在【segment_anything/build_sam.py】中可以看到为transformer定义为TwoWayTransformer,prompt_embed_dim参数为256。
mask_decoder=MaskDecoder(num_multimask_outputs=3,transformer=TwoWayTransformer(depth=2,embedding_dim=prompt_embed_dim, # 256mlp_dim=2048,num_heads=8,),transformer_dim=prompt_embed_dim,iou_head_depth=3,iou_head_hidden_dim=256,),
TwoWayTransformer 结构如下:
class TwoWayTransformer(nn.Module):def __init__(self,depth: int,embedding_dim: int,num_heads: int,mlp_dim: int,activation: Type[nn.Module] = nn.ReLU,attention_downsample_rate: int = 2,) -> None:super().__init__()self.depth = depth # =2self.embedding_dim = embedding_dim # =256self.num_heads = num_heads # =8self.mlp_dim = mlp_dim # =2048self.layers = nn.ModuleList()# 2个TwoWayAttentionBlock模块for i in range(depth):self.layers.append(TwoWayAttentionBlock(embedding_dim=embedding_dim, # 256num_heads=num_heads, # 8mlp_dim=mlp_dim, # 2048activation=activation, # nn.ReLUattention_downsample_rate=attention_downsample_rate, # 降采样率=2skip_first_layer_pe=(i == 0), # 第1个TwoWayAttentionBlock为True, 第2个TwoWayAttentionBlock为False))# 1个Attention模块self.final_attn_token_to_image = Attention(embedding_dim, num_heads, downsample_rate=attention_downsample_rate)self.norm_final_attn = nn.LayerNorm(embedding_dim)def forward(self,image_embedding: Tensor, # 图像编码:[1,256,64,64]image_pe: Tensor, # 图像位置编码:[1,256,64,64]point_embedding: Tensor, # iou_token,mask_tokens和sparse_prompt_embeddings的拼接向量:[1,8,256]) -> Tuple[Tensor, Tensor]:# BxCxHxW -> BxHWxC == B x N_image_tokens x Cbs, c, h, w = image_embedding.shape # [1, 256, 64, 64]image_embedding = image_embedding.flatten(2).permute(0, 2, 1) # [1,4096,256]image_pe = image_pe.flatten(2).permute(0, 2, 1) # [1,4096,256]# Prepare queriesqueries = point_embedding # 查询Q:[1,8,256]keys = image_embedding # 键值K:[1,4096,256]# Apply transformer blocks and final layernormfor layer in self.layers:queries, keys = layer(queries=queries,keys=keys,query_pe=point_embedding,key_pe=image_pe,) # 经过两个TwoWayAttentionBlock后, queries:[1,8,256], keys:[1,4096,256]# Apply the final attention layer from the points to the imageq = queries + point_embedding # [1,8,256]k = keys + image_pe # [1,4096,256]attn_out = self.final_attn_token_to_image(q=q, k=k, v=keys) # [1,8,256]queries = queries + attn_out # [1,8,256]queries = self.norm_final_attn(queries) # [1,8,256]return queries, keys
Attention 结构如下:
以TwoWayAttentionBlock的第一个Attention模块为例,即:
# embedding_dim = 256, num_heads=8
self.self_attn = Attention(embedding_dim, num_heads)
Attention模块主要实现了Transformer中基本的attention机制,若参数downsample_rate不为1,则会先对维度进行下采样映射:
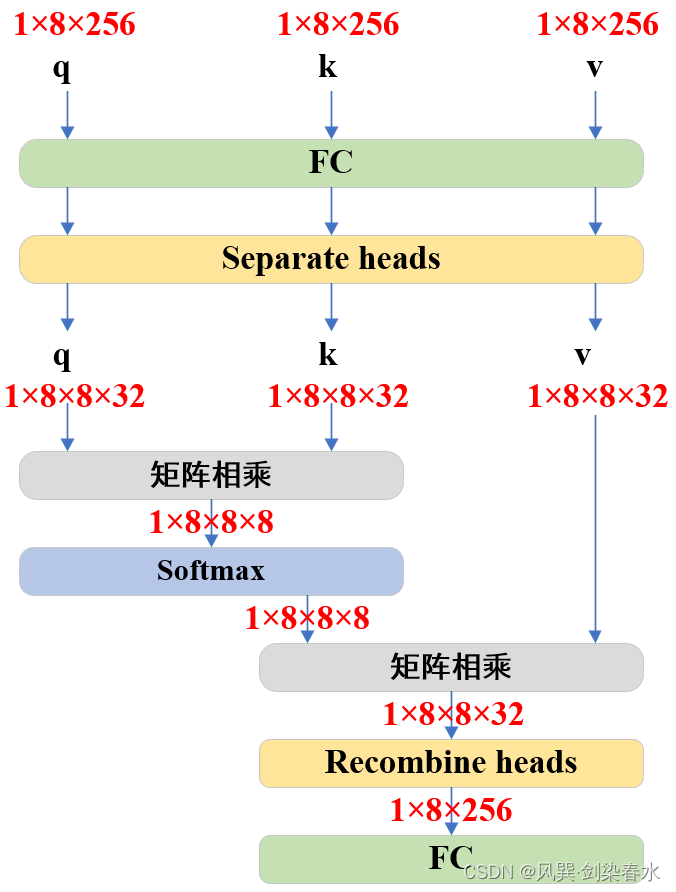
class Attention(nn.Module):def __init__(self,embedding_dim: int, # 256num_heads: int, # 8downsample_rate: int = 1, # 1) -> None:super().__init__()self.embedding_dim = embedding_dim # 256self.internal_dim = embedding_dim // downsample_rate # 256self.num_heads = num_heads # 8assert self.internal_dim % num_heads == 0, "num_heads must divide embedding_dim."self.q_proj = nn.Linear(embedding_dim, self.internal_dim) # (256,256)self.k_proj = nn.Linear(embedding_dim, self.internal_dim) # (256,256)self.v_proj = nn.Linear(embedding_dim, self.internal_dim) # (256,256)self.out_proj = nn.Linear(self.internal_dim, embedding_dim) # (256,256)def _separate_heads(self, x: Tensor, num_heads: int) -> Tensor:b, n, c = x.shapex = x.reshape(b, n, num_heads, c // num_heads)return x.transpose(1, 2) # B x N_heads x N_tokens x C_per_headdef _recombine_heads(self, x: Tensor) -> Tensor:b, n_heads, n_tokens, c_per_head = x.shapex = x.transpose(1, 2)return x.reshape(b, n_tokens, n_heads * c_per_head) # B x N_tokens x Cdef forward(self, q: Tensor, k: Tensor, v: Tensor) -> Tensor:# Input projections# 输入q:[1,8,256];k:[1,8,256];v:[1,8,256]q = self.q_proj(q) # [1,8,256]k = self.k_proj(k) # [1,8,256]v = self.v_proj(v) # [1,8,256]# Separate into headsq = self._separate_heads(q, self.num_heads) # [1,8,8,32]k = self._separate_heads(k, self.num_heads) # [1,8,8,32]v = self._separate_heads(v, self.num_heads) # [1,8,8,32]_, _, _, c_per_head = q.shape # 每个head的维度c_per_head=32# attention机制-----------------------------------------------------------------------# 每个head实现q乘k的转置: [1,8,8,32]@[1,8,32,8]->[1,8,8,8]attn = q @ k.permute(0, 1, 3, 2) # B x N_heads x N_tokens x N_tokensattn = attn / math.sqrt(c_per_head) # q @ k(^T) / 根号dattn = torch.softmax(attn, dim=-1) # [1,8,8,8]# -----------------------------------------------------------------------------------# Get outputout = attn @ v # softmax( q @ k(^T) / 根号d ) @ v ---> [1,8,8,32]out = self._recombine_heads(out) # [1,8,256]out = self.out_proj(out) # [1,8,256]return out
为避免代码看的太晕,把Attention可视化一下,没错,就是最基本的Multi-head Attention啦~
TwoWayAttentionBlock 结构如下:
以TwoWayTransformer的第一个TwoWayAttentionBlock模块为例,即:
TwoWayAttentionBlock(embedding_dim=embedding_dim, # 256num_heads=num_heads, # 8mlp_dim=mlp_dim, # 2048activation=activation, # nn.ReLUattention_downsample_rate=attention_downsample_rate, # 降采样率=2skip_first_layer_pe=(i == 0), # 第1个TwoWayAttentionBlock为True)
TwoWayAttentionBlock模块:
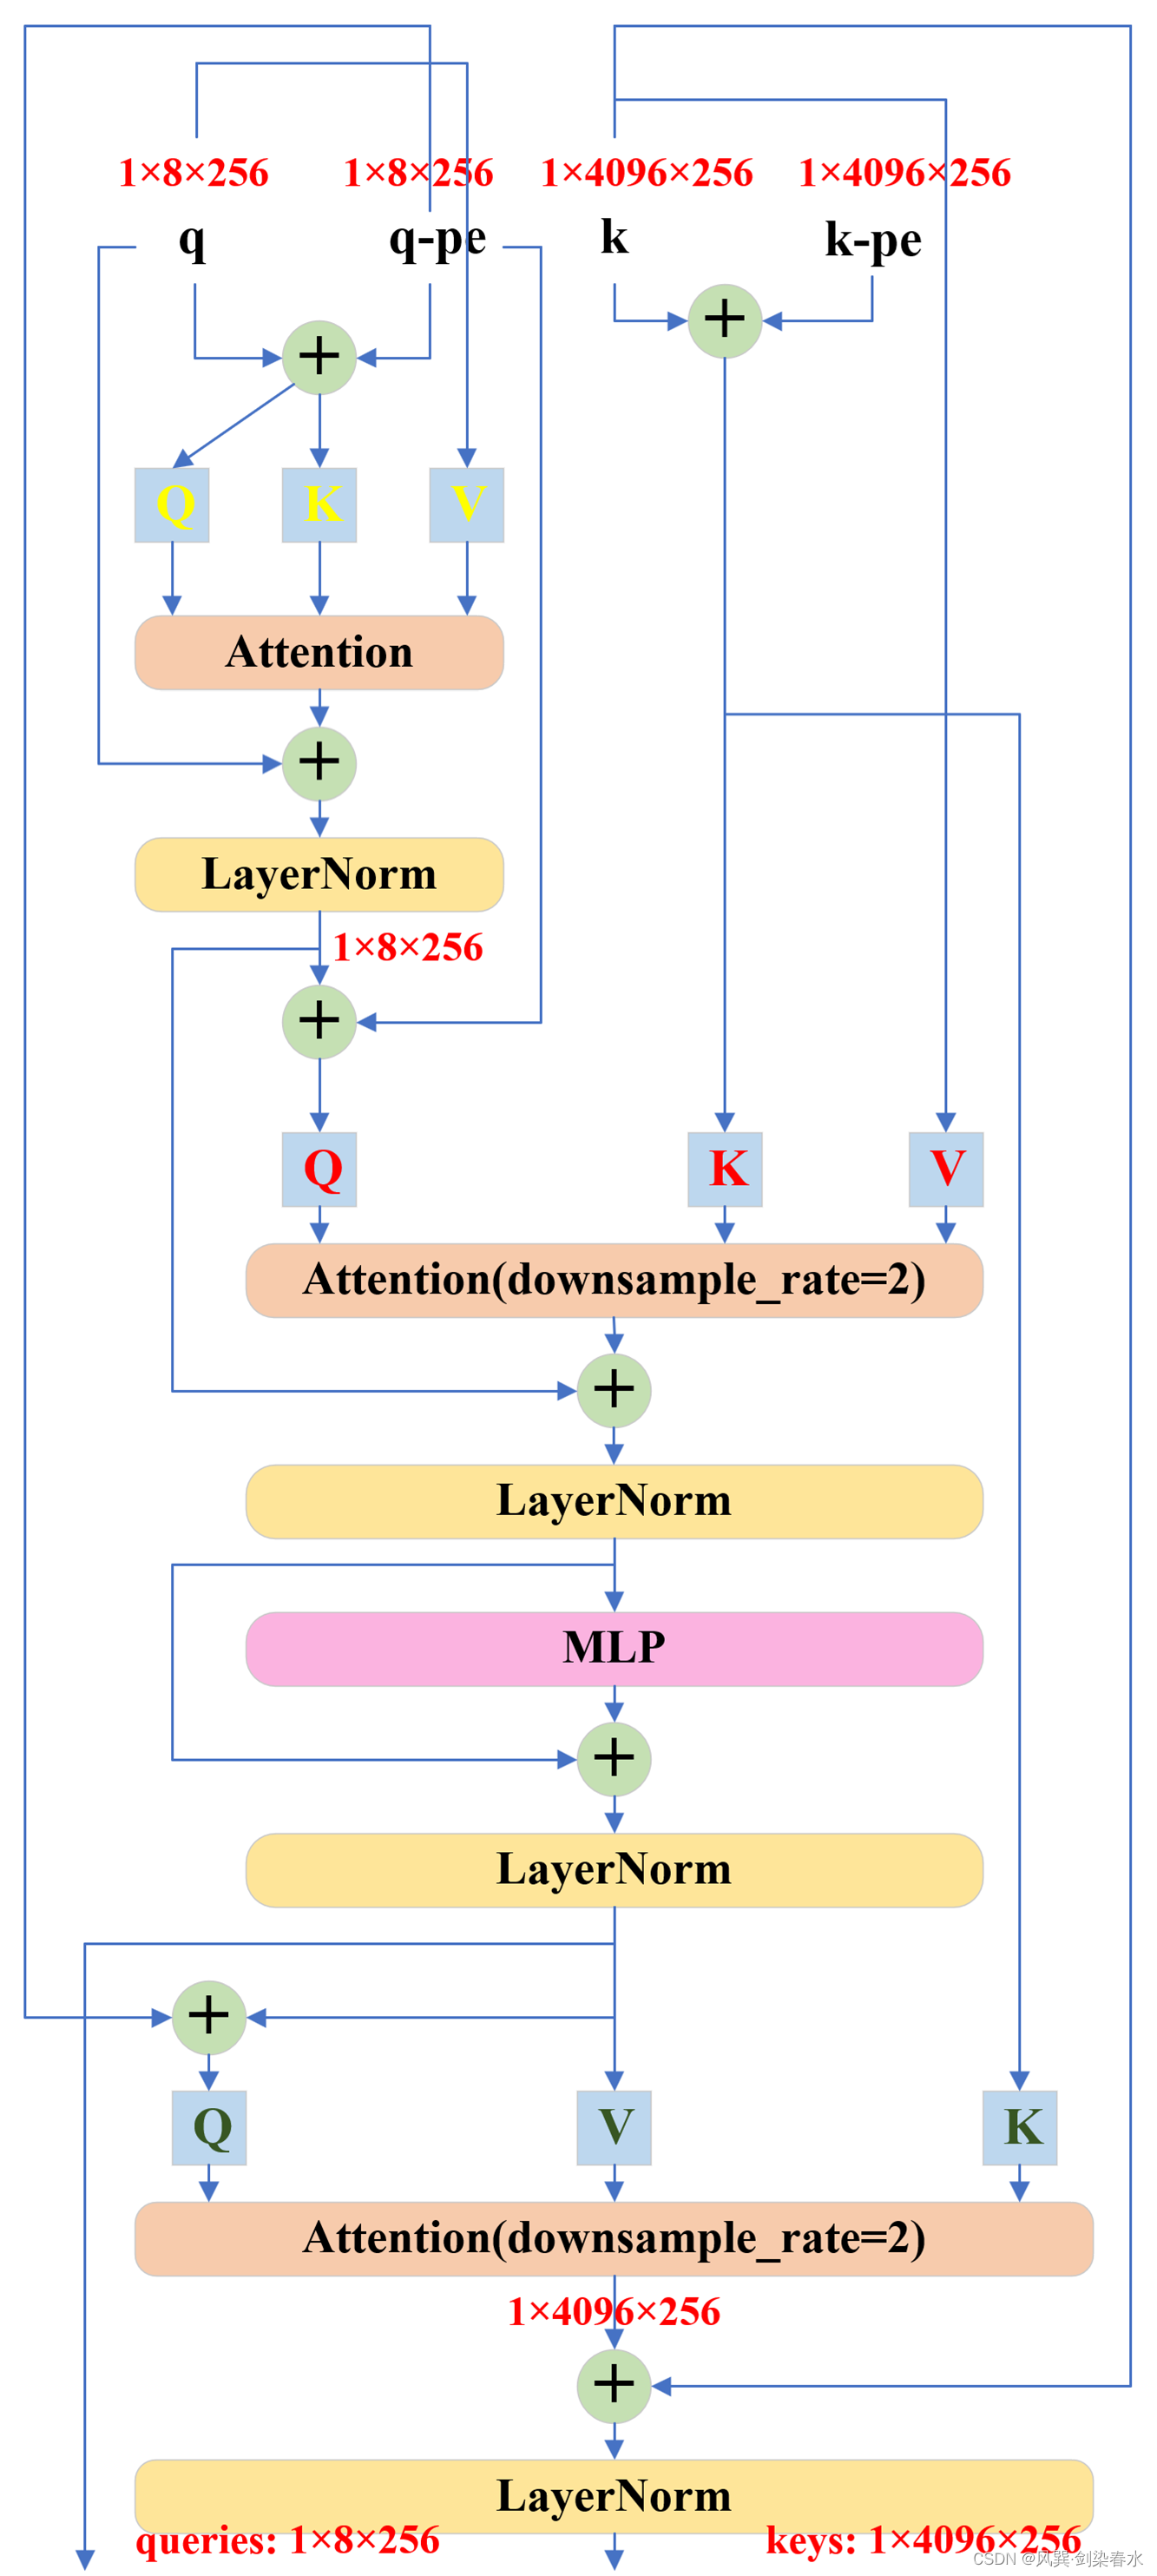
class TwoWayAttentionBlock(nn.Module):def __init__(self,embedding_dim: int,num_heads: int,mlp_dim: int = 2048,activation: Type[nn.Module] = nn.ReLU,attention_downsample_rate: int = 2,skip_first_layer_pe: bool = False,) -> None:super().__init__()self.self_attn = Attention(embedding_dim, num_heads) # embedding_dim=256, num_heads=8self.norm1 = nn.LayerNorm(embedding_dim) # 256self.cross_attn_token_to_image = Attention(embedding_dim, num_heads, downsample_rate=attention_downsample_rate) # embedding_dim=256, num_heads=8, attention_downsample_rate=2self.norm2 = nn.LayerNorm(embedding_dim) # 256# embedding_dim=256, mlp_dim=2048, activation=nn.ReLUself.mlp = MLPBlock(embedding_dim, mlp_dim, activation)self.norm3 = nn.LayerNorm(embedding_dim) # 256self.norm4 = nn.LayerNorm(embedding_dim) # 256self.cross_attn_image_to_token = Attention(embedding_dim, num_heads, downsample_rate=attention_downsample_rate) # embedding_dim=256, num_heads=8, attention_downsample_rate=2self.skip_first_layer_pe = skip_first_layer_pe # Truedef forward(self, queries: Tensor, keys: Tensor, query_pe: Tensor, key_pe: Tensor) -> Tuple[Tensor, Tensor]:# 输入queries:[1,8,256], keys:[1,4096,256], query_pe:[1,8,256], key_pe:[1,4096,256]# Self attention blockif self.skip_first_layer_pe:queries = self.self_attn(q=queries, k=queries, v=queries) # [1,8,256]else:q = queries + query_peattn_out = self.self_attn(q=q, k=q, v=queries)queries = queries + attn_outqueries = self.norm1(queries) # [1,8,256]# Cross attention block, tokens attending to image embeddingq = queries + query_pe # [1,8,256]k = keys + key_pe # [1,4096,256]attn_out = self.cross_attn_token_to_image(q=q, k=k, v=keys) # [1,8,256]queries = queries + attn_out # [1,8,256]queries = self.norm2(queries) # [1,8,256]# MLP blockmlp_out = self.mlp(queries) # [1,8,256]queries = queries + mlp_out # [1,8,256]queries = self.norm3(queries) # [1,8,256]# Cross attention block, image embedding attending to tokensq = queries + query_pe # [1,8,256]k = keys + key_pe # [1,4096,256]attn_out = self.cross_attn_image_to_token(q=k, k=q, v=queries) # [1,4096,256]keys = keys + attn_out # [1,4096,256]keys = self.norm4(keys) # [1,4096,256]return queries, keys
可以看到TwoWayTransformer的结构以及token维度变化并不复杂,但其交错的 Q {Q} Q, K {K} K, V {V} V 确实令人眼花缭乱:
TwoWayTransformer中的MLP:
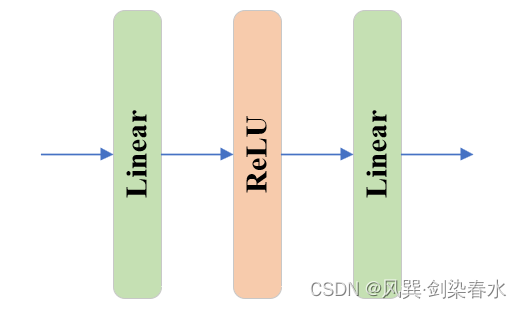
class MLPBlock(nn.Module):def __init__(self,embedding_dim: int,mlp_dim: int,act: Type[nn.Module] = nn.GELU,) -> None:super().__init__()# embedding_dim=256, mlp_dim=2048self.lin1 = nn.Linear(embedding_dim, mlp_dim) self.lin2 = nn.Linear(mlp_dim, embedding_dim)self.act = act()def forward(self, x: torch.Tensor) -> torch.Tensor:return self.lin2(self.act(self.lin1(x)))
MLP为简单的线性、激活、线性结构:
② output_upscaling:
Sequential((0): ConvTranspose2d(256, 64, kernel_size=(2, 2), stride=(2, 2))(1): LayerNorm2d()(2): GELU(approximate='none')(3): ConvTranspose2d(64, 32, kernel_size=(2, 2), stride=(2, 2))(4): GELU(approximate='none')
)
output_upscaling模块由两个反卷积、两个GELU激活和一个LayerNorm组成,实现了特征图的四倍上采样,在 predict_masks函数 中将 [ 1 , 256 , 64 , 64 ] {[1,256,64,64]} [1,256,64,64] 上采样至 [ 1 , 32 , 256 , 256 ] {[1,32,256,256]} [1,32,256,256] 。
src = src.transpose(1, 2).view(b, c, h, w)   # reshape: [1,4096,256]-> [1,256,64,64]
upscaled_embedding = self.output_upscaling(src) # [1,32,256,256]
③ output_hypernetworks_mlps:
ModuleList((0-3): 4 x MLP((layers): ModuleList((0-1): 2 x Linear(in_features=256, out_features=256, bias=True)(2): Linear(in_features=256, out_features=32, bias=True)))
)
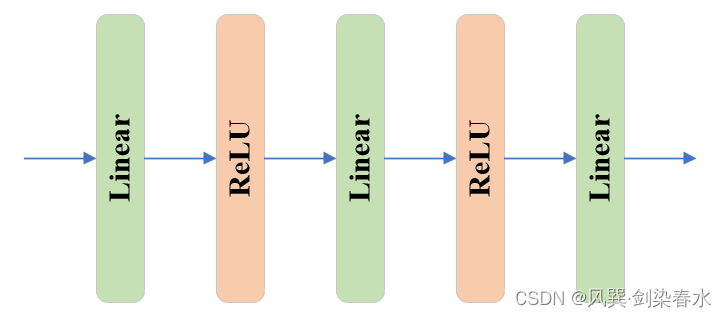
output_hypernetworks_mlps由4个MLP组成,在 predict_masks函数 中将 [ 1 , 256 ] {[1,256]} [1,256] 下采样至 [ 1 , 32 ] {[1,32]} [1,32] 。与TwoWayAttentionBlock中的MLP不同,其结构稍稍多一丢丢:
class MLP(nn.Module):def __init__(self,input_dim: int, # 256hidden_dim: int, # 256output_dim: int, # 32num_layers: int, # 3sigmoid_output: bool = False, # False) -> None:super().__init__()self.num_layers = num_layers # 3h = [hidden_dim] * (num_layers - 1) # [256,256]self.layers = nn.ModuleList(# [input_dim] + h: [256,256,256], h + [output_dim]:[256,256,32]nn.Linear(n, k) for n, k in zip([input_dim] + h, h + [output_dim]))self.sigmoid_output = sigmoid_outputdef forward(self, x):for i, layer in enumerate(self.layers):# i<2经线性层后relu激活x = F.relu(layer(x)) if i < self.num_layers - 1 else layer(x) if self.sigmoid_output:x = F.sigmoid(x)return x
④ iou_prediction_head:
MLP((layers): ModuleList((0-1): 2 x Linear(in_features=256, out_features=256, bias=True)(2): Linear(in_features=256, out_features=4, bias=True))
)
iou_prediction_head用以实现iou预测,由1个MLP完成,其结构与output_hypernetworks_mlps中的MLP一样,只是最终将 [ 1 , 256 ] {[1,256]} [1,256] 映射至 [ 1 , 4 ] {[1,4]} [1,4] ,分别代表非multimask预测时的1个mask和multimask预测时的3个mask的iou。
(3)predict_masks函数
位置:【segment_anything/modeling/mask_decoder.py --> MaskDecoder类 --> predict_masks函数】
作用: 利用上述 t r a n s f o r m e r {transformer} transformer , o u t p u t _ u p s c a l i n g {output\_upscaling} output_upscaling , o u t p u t _ h y p e r n e t w o r k s _ m l p s {output\_hypernetworks\_mlps} output_hypernetworks_mlps 和 i o u _ p r e d i c t i o n _ h e a d {iou\_prediction\_head} iou_prediction_head 四个模块,实现mask和iou预测
此时此刻,首先来重温一下,传入predict_masks函数的参数分别是什么:
① image_embeddings:image encoder嵌入,大小为 [ 1 , 256 , 64 , 64 ] {[1, 256, 64, 64]} [1,256,64,64] ;
② image_pe:图像嵌入大小对应的位置编码,大小同为 [ 1 , 256 , 64 , 64 ] {[1, 256, 64, 64]} [1,256,64,64] ;
③ sparse_prompt_embeddings:prompt point和box嵌入,大小为 [ 1 , 3 , 256 ] {[1, 3, 256]} [1,3,256] ;
④ dense_prompt_embeddings:prompt mask嵌入,大小为 [ 1 , 256 , 64 , 64 ] {[1, 256, 64, 64]} [1,256,64,64] ;
def predict_masks(self,image_embeddings: torch.Tensor, # [1, 256, 64, 64]image_pe: torch.Tensor, # [1, 256, 64, 64]sparse_prompt_embeddings: torch.Tensor, # [1, 3, 256]dense_prompt_embeddings: torch.Tensor, # [1, 256, 64, 64]
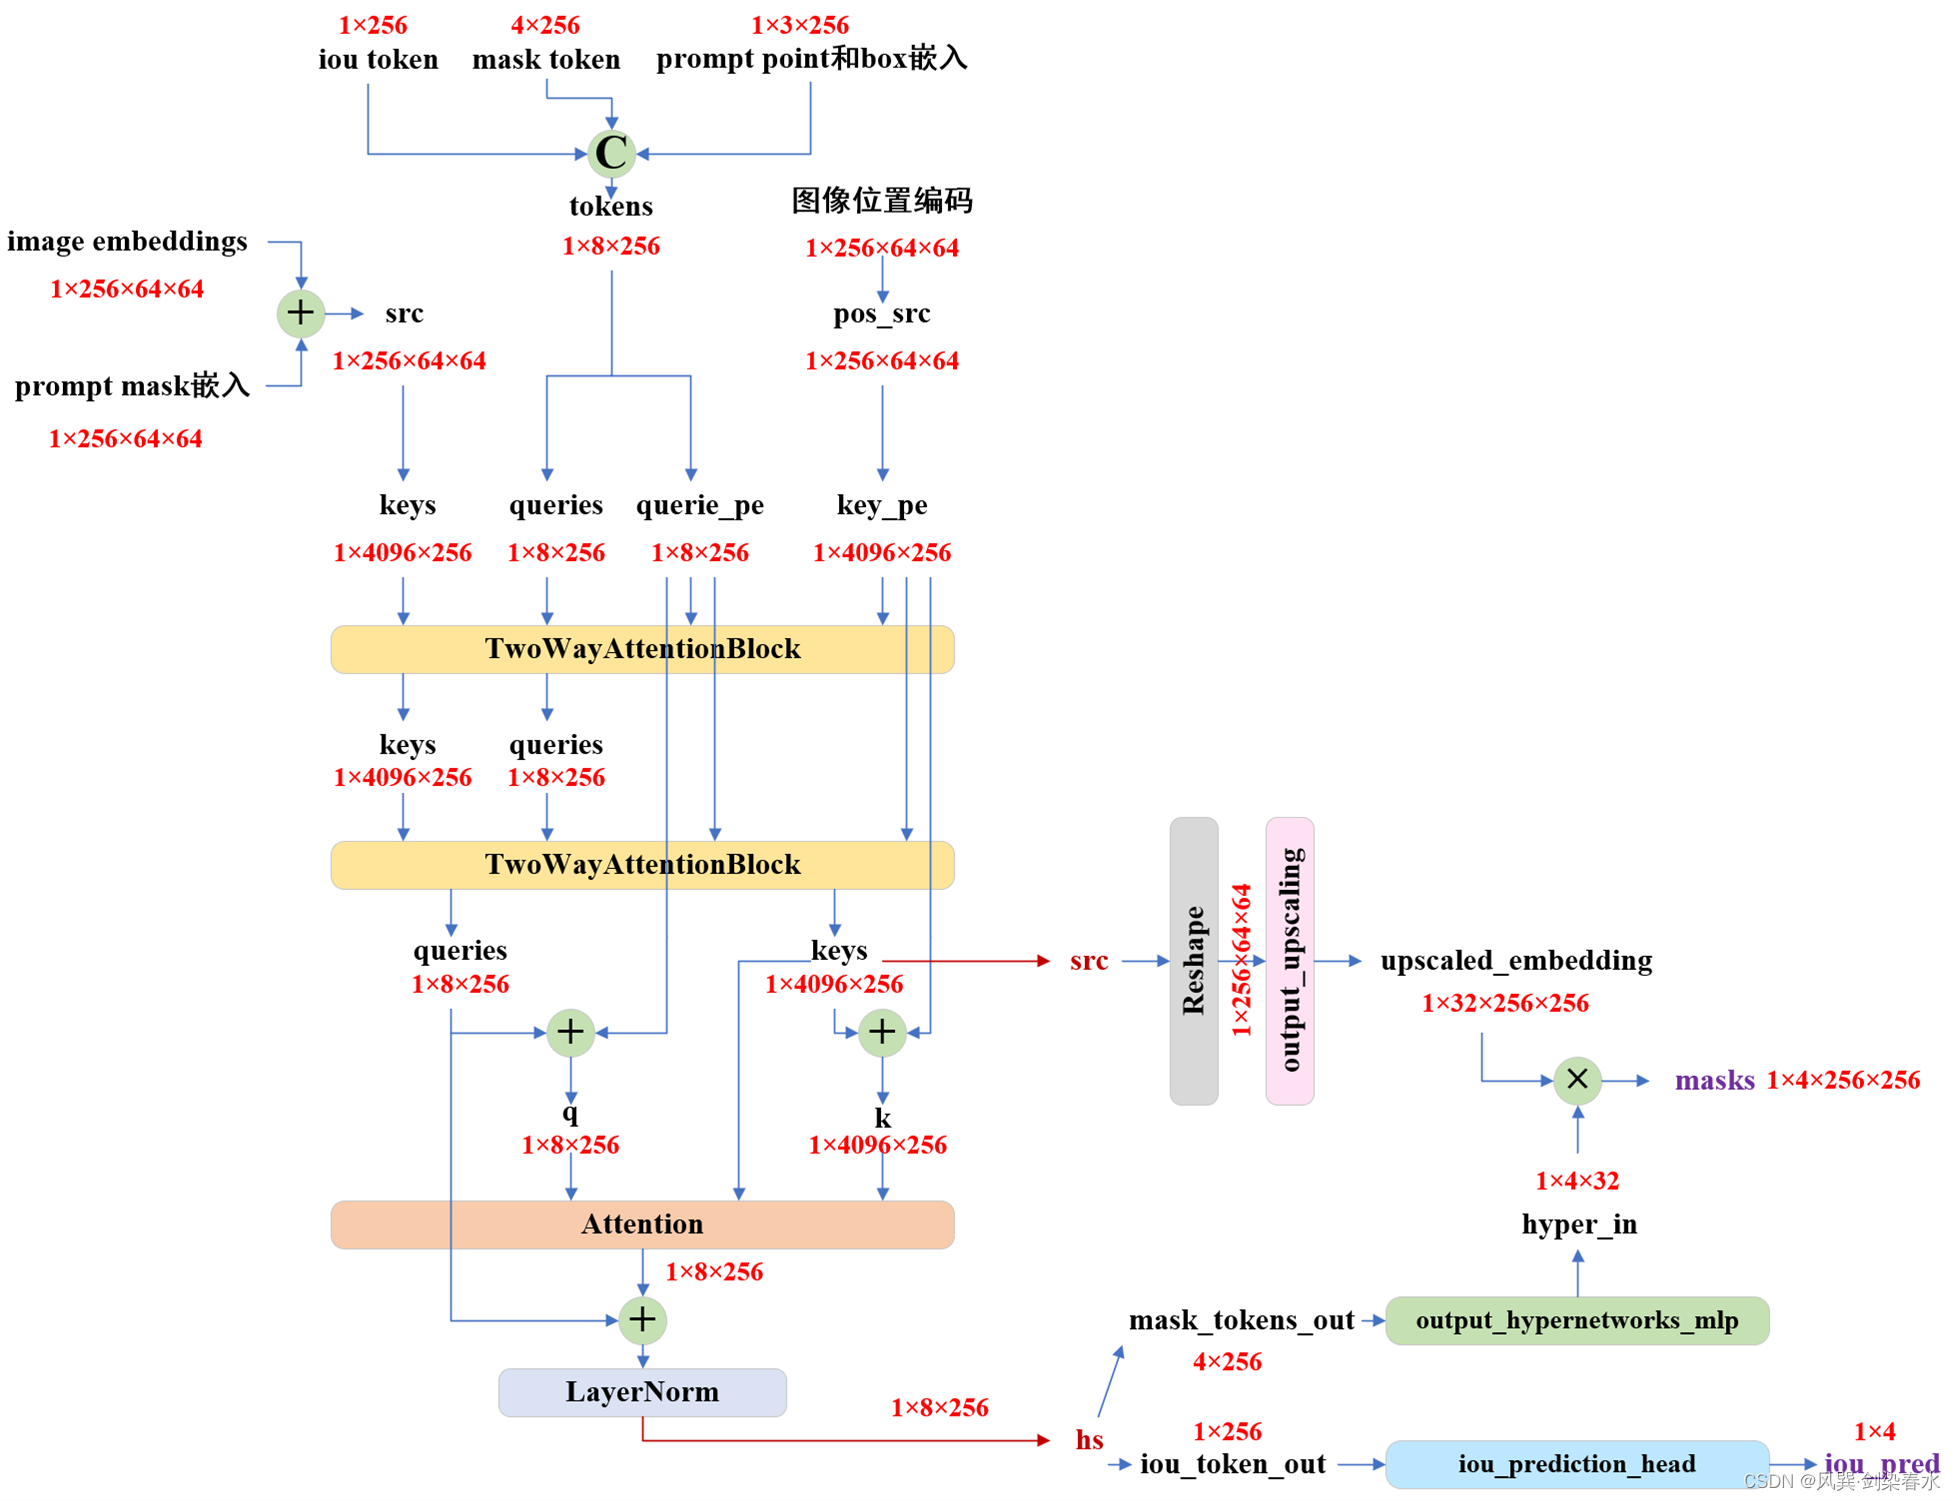
) -> Tuple[torch.Tensor, torch.Tensor]:"""Predicts masks. See 'forward' for more details."""# Concatenate output tokens# 拼接iou的token和mask的token: [1,256]+[4,256]->[5,256]output_tokens = torch.cat([self.iou_token.weight, self.mask_tokens.weight], dim=0)output_tokens = output_tokens.unsqueeze(0).expand(sparse_prompt_embeddings.size(0), -1, -1) # [1,5,256]# iou的token和mask的token + prompt point和box嵌入tokens = torch.cat((output_tokens, sparse_prompt_embeddings), dim=1) # [1,8,256]# Expand per-image data in batch direction to be per-masksrc = torch.repeat_interleave(image_embeddings, tokens.shape[0], dim=0) # 按batch重复: [1,256,64,64]src = src + dense_prompt_embeddings # [1,256,64,64]pos_src = torch.repeat_interleave(image_pe, tokens.shape[0], dim=0) # 按batch重复: [1,256,64,64]b, c, h, w = src.shape # 1,256,64,64# Run the transformer# src是image encoder嵌入和prompt mask嵌入# pos_src是图像嵌入大小对应的位置编码# tokens是iou的token和mask的token + prompt point和box嵌入hs, src = self.transformer(src, pos_src, tokens) # hs:[1,8,256], src:[1,4096,256]iou_token_out = hs[:, 0, :] # 第1个为iou的token输出[1,256]mask_tokens_out = hs[:, 1: (1 + self.num_mask_tokens), :] # 随后4个为mask的token输出[4,256]# Upscale mask embeddings and predict masks using the mask tokenssrc = src.transpose(1, 2).view(b, c, h, w) # reshape: [1,4096,256]-> [1,256,64,64]upscaled_embedding = self.output_upscaling(src) # [1,32,256,256]hyper_in_list: List[torch.Tensor] = []for i in range(self.num_mask_tokens):hyper_in_list.append(self.output_hypernetworks_mlps[i](mask_tokens_out[:, i, :]))hyper_in = torch.stack(hyper_in_list, dim=1) # [1,4,32]b, c, h, w = upscaled_embedding.shape # 1,32,256,256masks = (hyper_in @ upscaled_embedding.view(b, c, h * w)).view(b, -1, h, w) # [1,4,256,256]# Generate mask quality predictionsiou_pred = self.iou_prediction_head(iou_token_out) # [1,4]return masks, iou_pred
由此可见,经TwoWayTransformer获得了iou_token_out和mask_tokens_out,iou_token_out由iou_prediction_head(1个MLP)实现iou预测,4个mask_tokens_out分别经过1个MLP所获得的映射拼接后,与经过output_upscaling上采样后的图像嵌入(包含image encoder嵌入和prompt mask嵌入)进行矩阵相乘,得到mask预测。
2. Mask Decoder结构绘制
(1)结构打印
MaskDecoder((transformer): TwoWayTransformer((layers): ModuleList((0-1): 2 x TwoWayAttentionBlock((self_attn): Attention((q_proj): Linear(in_features=256, out_features=256, bias=True)(k_proj): Linear(in_features=256, out_features=256, bias=True)(v_proj): Linear(in_features=256, out_features=256, bias=True)(out_proj): Linear(in_features=256, out_features=256, bias=True))(norm1): LayerNorm((256,), eps=1e-05, elementwise_affine=True)(cross_attn_token_to_image): Attention((q_proj): Linear(in_features=256, out_features=128, bias=True)(k_proj): Linear(in_features=256, out_features=128, bias=True)(v_proj): Linear(in_features=256, out_features=128, bias=True)(out_proj): Linear(in_features=128, out_features=256, bias=True))(norm2): LayerNorm((256,), eps=1e-05, elementwise_affine=True)(mlp): MLPBlock((lin1): Linear(in_features=256, out_features=2048, bias=True)(lin2): Linear(in_features=2048, out_features=256, bias=True)(act): ReLU())(norm3): LayerNorm((256,), eps=1e-05, elementwise_affine=True)(norm4): LayerNorm((256,), eps=1e-05, elementwise_affine=True)(cross_attn_image_to_token): Attention((q_proj): Linear(in_features=256, out_features=128, bias=True)(k_proj): Linear(in_features=256, out_features=128, bias=True)(v_proj): Linear(in_features=256, out_features=128, bias=True)(out_proj): Linear(in_features=128, out_features=256, bias=True))))(final_attn_token_to_image): Attention((q_proj): Linear(in_features=256, out_features=128, bias=True)(k_proj): Linear(in_features=256, out_features=128, bias=True)(v_proj): Linear(in_features=256, out_features=128, bias=True)(out_proj): Linear(in_features=128, out_features=256, bias=True))(norm_final_attn): LayerNorm((256,), eps=1e-05, elementwise_affine=True))(iou_token): Embedding(1, 256)(mask_tokens): Embedding(4, 256)(output_upscaling): Sequential((0): ConvTranspose2d(256, 64, kernel_size=(2, 2), stride=(2, 2))(1): LayerNorm2d()(2): GELU(approximate='none')(3): ConvTranspose2d(64, 32, kernel_size=(2, 2), stride=(2, 2))(4): GELU(approximate='none'))(output_hypernetworks_mlps): ModuleList((0-3): 4 x MLP((layers): ModuleList((0-1): 2 x Linear(in_features=256, out_features=256, bias=True)(2): Linear(in_features=256, out_features=32, bias=True))))(iou_prediction_head): MLP((layers): ModuleList((0-1): 2 x Linear(in_features=256, out_features=256, bias=True)(2): Linear(in_features=256, out_features=4, bias=True)))
)
(2)结构绘制
整体结构就是这样的啦,完结,撒花~
相关文章:
【技术追踪】SAM(Segment Anything Model)代码解析与结构绘制之Mask Decoder
论文:Segment Anything 代码:https://github.com/facebookresearch/segment-anything 系列篇: (1)【技术追踪】SAM(Segment Anything Model)代码解析与结构绘制之Image Encoder &am…...

认识Tomcat
文章目录 什么是tomcat?tomcat的使用tomcat的下载tomcat的目录结构tomcat的启动在tomcat上部署页面通过浏览器访问部署的页面 学习servlet的原因 什么是tomcat? 盖棺定论:Tomcat是一个HTTP服务器。 我们接下来要长期学习的东西都是关于前后…...

c语言通信之串口通信
在C语言中,可以使用串口通信、网络通信等多种方式实现计算机之间的通信。其中,串口通信通常用于近距离、低速率的通信,而网络通信则适用于远距离、高速率的通信。 下面以串口通信为例,介绍在C语言中如何实现串口通信。 1.打开串…...
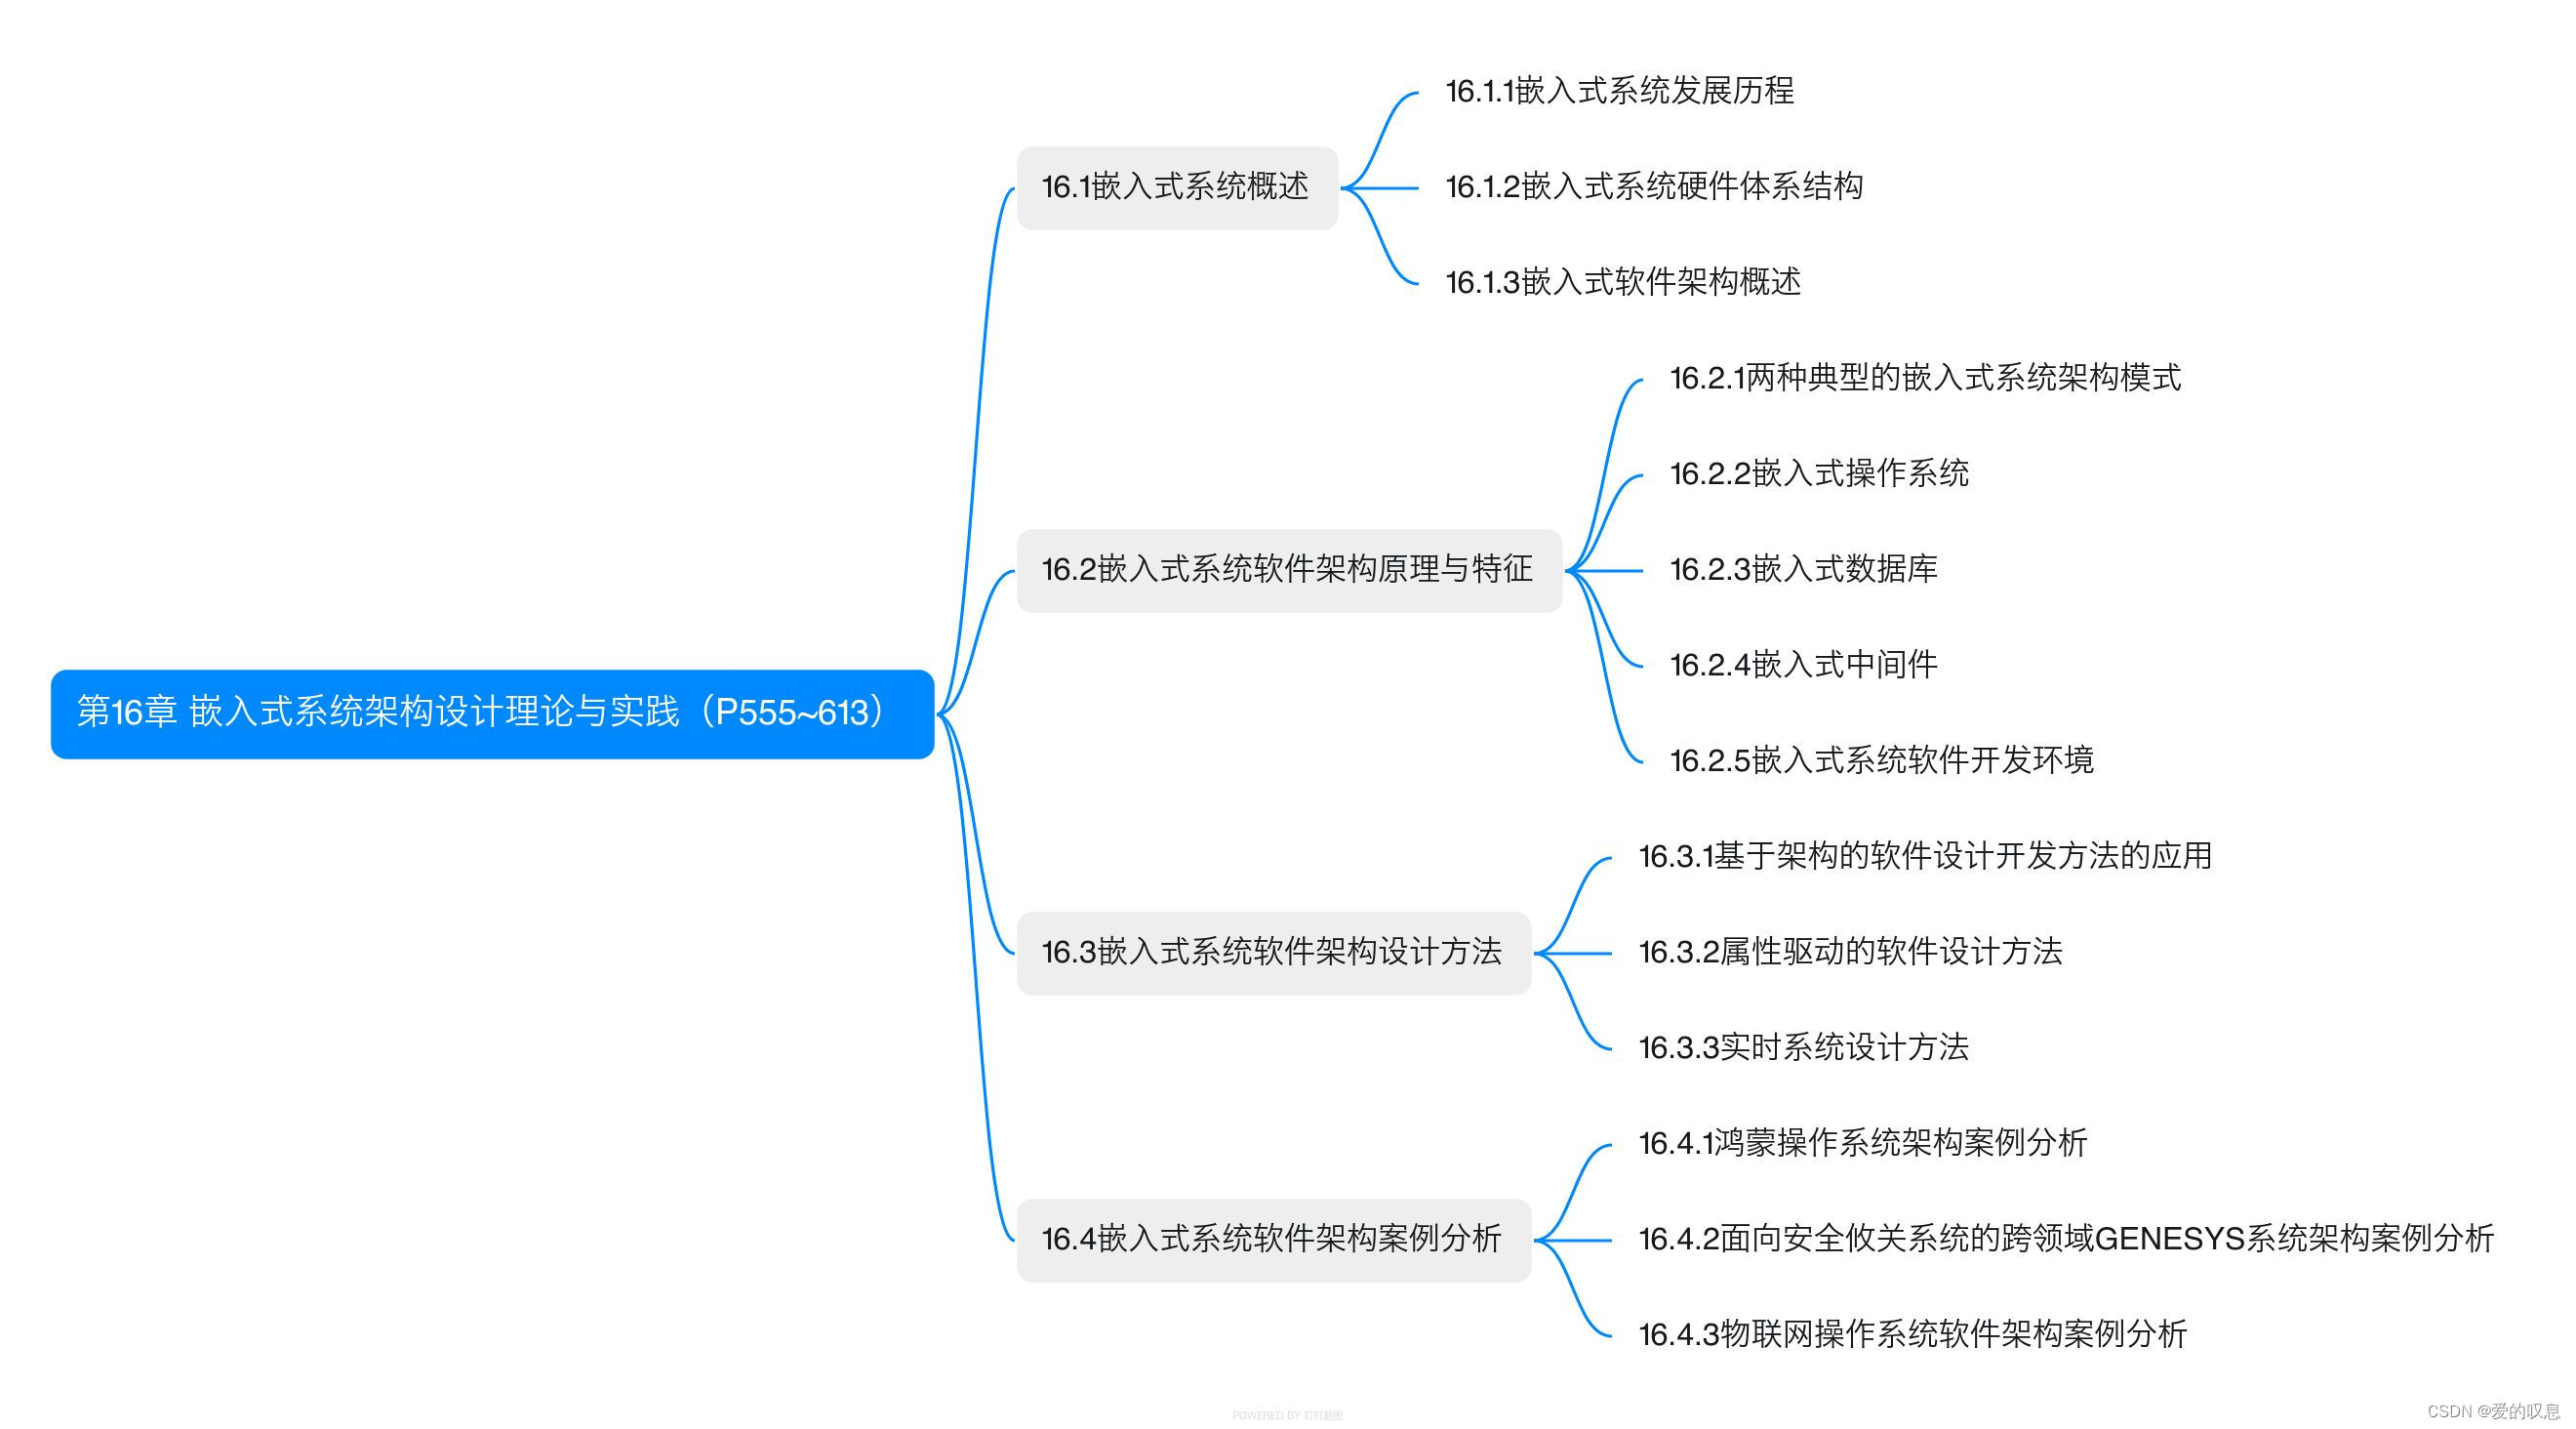
软考-高级-系统架构设计师教程(清华第2版)【第16章 嵌入式系统架构设计理论与实践(P555~613)-思维导图】
软考-高级-系统架构设计师教程(清华第2版)【第16章 嵌入式系统架构设计理论与实践(P555~613)-思维导图】 课本里章节里所有蓝色字体的思维导图...

2024年山东省职业院校技能大赛中职组 “网络安全”赛项竞赛试题-B卷
2024年山东省职业院校技能大赛中职组 “网络安全”赛项竞赛试题-B卷 2024年山东省职业院校技能大赛中职组 “网络安全”赛项竞赛试题-B卷A模块基础设施设置/安全加固(200分)A-1:登录安全加固(Windows, Linux)A-2&#…...

【Python数据结构与算法】——(线性结构)精选好题分享,不挂科必看系列
🌈个人主页: Aileen_0v0🔥系列专栏:<<Python数据结构与算法专栏>>💫个人格言:"没有罗马,那就自己创造罗马~" 时间复杂度大小比较 1.time complexity of algorithm A is O(n^3) while algorithm B is O(2^n). Which o…...
)
大数据-之LibrA数据库系统告警处理(ALM-12054 证书文件失效)
告警解释 系统在每天二十三点检查当前系统中的证书文件是否失效(即当前集群中的证书文件是否过期,或者尚未生效)。如果证书文件失效,产生该告警。 当重新导入一个正常证书,并且状态不为失效状态,该告警恢…...

Linux 之 journalctl 查看系统与 kernel 日志
目录 1. Linux 之 journalctl 查看系统与 kernel 日志 1. Linux 之 journalctl 查看系统与 kernel 日志 1 概述 日志管理工具 journalctl 是 centos7 上专有的日志管理工具, 该工具是从 message 这个文件里读取信息。Systemd 统一管理所有 Unit 的启动日志。带来的好处就是, …...

【PTA题目】7-3 冰雹猜想。 分数 10
7-3 冰雹猜想。 分数 10 全屏浏览题目 切换布局 作者 赵静静 单位 浙江工贸职业技术学院 冰雹猜想的内容是:任何一个大于1的整数n,按照n为偶数则除等2,n为奇数则乘3后再加1的规则不断变化,最终都可以变化为1。 例如ÿ…...

springBoot 配置druid多数据源 MySQL+SQLSERVER
1:pom 文件引入数据 <dependency> <groupId>com.alibaba</groupId> <artifactId>druid-spring-boot-starter</artifactId> <version>1.1.0</version> </dependency>…...
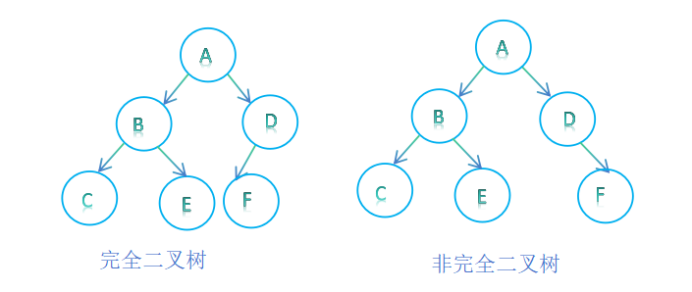
二叉树的创建与遍历
目录 前言: 二叉树的概念与结构 二叉树的链式存储 二叉树的创建 二叉树的销毁 二叉树结点个数计算 二叉树叶子结点个数计算 二叉树第k层节点个数的计算 二叉树高度的计算 二叉树查找值为x的结点 二叉树的遍历 二叉树的前序遍历 二叉树的中序遍历 二叉树…...

Mysql相关操作命令合集
参考文档:2021-06-25MySQL8.0创建用户和权限控制 - 简书 mysql登陆命令: mysql -u用户名 -p密码; 若遇到复杂密码,包含特殊字符,则需要做转义(以下密码为:rootry?elyl!): mysql…...
前端开发学习 (一) 搭建Vue基础环境
一、环境搭建 1、安装nodejs #下载地址 https://nodejs.org/dist/v20.9.0/node-v20.9.0-x64.msi 2、配置环境变量 上面下载完安装包后自行安装,安装完成后安装下图操作添加环境变量 #查看版本 node --version v20.9.0# npm --version 10.1.03、配置npm加速源 np…...

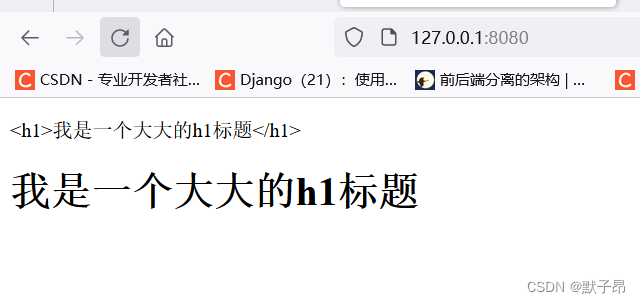
二维码智慧门牌管理系统升级解决方案:查询功能大提升,让地址查找变得轻松便捷!
文章目录 前言一、支持地址名称、小区等信息进行模糊查询二、支持地图上绘制多边形、圆形、矩形进行范围查询三、高效的数据处理能力,保证查询速度四、灵活的应用场景,满足多种需求 前言 随着科技的快速发展和城市化的加速推进,传统的门牌管…...

vite+vue3+electron开发环境搭建
环境 node 18.14.2 yarn 1.22 项目创建 yarn create vite test01安装vue环境 cd test01 yarn yarn dev说明vue环境搭建成功 安装electron # 因为有的版本会报错所以指定了版本 yarn add electron26.1.0 -D安装vite-plugin-electron yarn add -D vite-plugin-electron根目…...
:多态介绍与代码演示)
C#入门(9):多态介绍与代码演示
多态性是面向对象编程的一个核心概念,它允许你使用一个父类引用来指向一个子类对象。这可以使程序具有可扩展性,并且可以用来实现一些高级编程技术,如接口、事件、抽象类等。 多态相关的概念 以下是一些在C#中使用多态性的关键概念…...

可拖动、可靠边的 popupWindow 实现
0 背景 开发要实现一个可以拖动的圆角小窗,要求松手时,哪边近些靠哪边。并且还规定了拖动范围。样式如下: 1 实现 首先把 PopupWindow 的布局文件 pop.xml 实现 <?xml version"1.0" encoding"utf-8"?> <R…...

C# 依赖注入如何实现
在 C# 中,依赖注入(Dependency Injection,简称 DI)是一种编程技术,用于减少代码之间的耦合。依赖注入可以通过构造函数注入、属性注入或方法注入实现。在 .NET Core 和 .NET 5 中,还提供了一个内置的依赖注…...
Redis 9 数据库
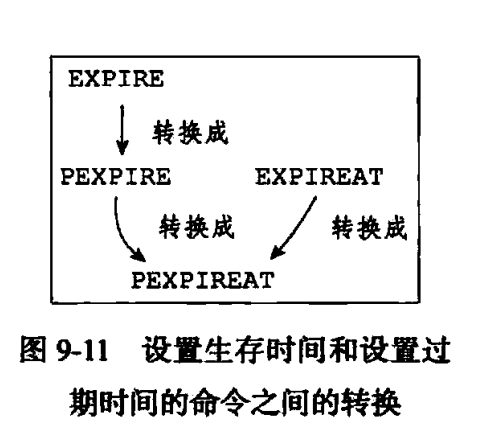
4 设置键的生存时间或过期时间 通过EXPIRE命令或者PEXPIRE命令,客户端可以以秒或者毫秒精度为数据库中的某个键设置生存时间(TimeToLive,TTL),在经过指定的秒数或者毫秒数之后,服务器就会自动删除生存时间…...

43-设计问题-最小栈
原题链接: 198. 打家劫舍 题目描述: 你是一个专业的小偷,计划偷窃沿街的房屋。每间房内都藏有一定的现金,影响你偷窃的唯一制约因素就是相邻的房屋装有相互连通的防盗系统,如果两间相邻的房屋在同一晚上被小偷闯入&a…...

ZYNQ中断避坑指南:PL端信号线如何正确‘连线’到PS端处理函数?
ZYNQ中断系统深度解析:从硬件信号到软件响应的全链路实践 在嵌入式系统开发中,中断处理是实时响应的核心机制。对于ZYNQ这种集成了ARM处理器(PS)和可编程逻辑(PL)的异构计算平台,其中断系统既有传统处理器的特性,又具备FPGA灵活定…...

3步终结Windows热键冲突:Hotkey Detective终极排查指南
3步终结Windows热键冲突:Hotkey Detective终极排查指南 【免费下载链接】hotkey-detective A small program for investigating stolen key combinations under Windows 7 and later. 项目地址: https://gitcode.com/gh_mirrors/ho/hotkey-detective 你是否曾…...

QQ群数据采集终极教程:5分钟掌握批量抓取技巧
QQ群数据采集终极教程:5分钟掌握批量抓取技巧 【免费下载链接】QQ-Groups-Spider QQ Groups Spider(QQ 群爬虫) 项目地址: https://gitcode.com/gh_mirrors/qq/QQ-Groups-Spider 还在为手动收集QQ群信息而烦恼吗?QQ-Groups…...

MySQL 分区表实战:大表治理的利器与陷阱
开场白 分区表这个东西,我之前一直觉得就是个语法糖,直到有一次运维一张 2 亿行的日志表,查询慢到飞起,索引也建不动了,才认真研究分区表。结果发现分区表确实好用,但坑也不少——分区键选错了、分区裁剪没…...

RISC-V模拟器终极指南:如何快速掌握处理器可视化调试
RISC-V模拟器终极指南:如何快速掌握处理器可视化调试 【免费下载链接】Ripes A graphical processor simulator and assembly editor for the RISC-V ISA 项目地址: https://gitcode.com/gh_mirrors/ri/Ripes RISC-V模拟器Ripes是一款强大的图形化处理器仿真…...

量子机器学习:平衡数据复杂度与电路表达力的核心策略
1. 项目概述:量子机器学习中的核心平衡艺术在量子机器学习这个前沿交叉领域摸爬滚打了几年,我越来越深刻地意识到,决定一个模型成败的,往往不是最炫酷的量子门设计,而是一个看似基础却极易被忽视的平衡问题:…...

VLC for Unity:工业级高性能视频渲染替代方案
1. 这不是“又一个视频插件”——VLC for Unity 解决的是 Unity 视频管线里最顽固的硬伤 你有没有在 Unity 项目里,把一段 4K H.265 的监控流拖进 VideoPlayer 组件,结果帧率直接掉到 8 FPS,GPU 占用飙到 95%,而 CPU 却只用了 30%…...

如何快速搭建Windows虚拟路由器:VirtualRouter完整使用指南
如何快速搭建Windows虚拟路由器:VirtualRouter完整使用指南 【免费下载链接】VirtualRouter Wifi Hotspot for Windows computers (Windows 7, 8.x, Server 2012 and newer!) 项目地址: https://gitcode.com/gh_mirrors/vi/VirtualRouter VirtualRouter是一款…...

2026 收藏版|LangGraph 智能体三大核心工作流,程序员零基础上手大模型开发
本篇全面剖析 2026 主流 LangGraph 智能体三类经典工作流架构,依托任务拆分校验、智能任务分发、多任务并行处理三种思路,全方位提升大模型智能体运行精度与处理效率。每类模式均搭配可直接运行的实战代码案例,贴合新手学习场景,帮…...

P15729 [JAG 2024 Summer Camp #2] Add Add Add 题解
P15729 [JAG 2024 Summer Camp #2] Add Add Add Link: https://www.luogu.com.cn/problem/P15729 题目描述 给定两个长度为 NNN 的正整数序列 (A1,A2,…,AN)(A_1, A_2, \ldots, A_N)(A1,A2,…,AN) 和 (B1,B2,…,BN)(B_1, B_2, \ldots, B_N)(B1,B2,…,BN)。对于 …...