update_engine-FilesystemVerifierAction和PostinstallRunnerAction
在介绍完了DownloadAction之后,还剩下FilesystemVerifierAction和PostinstallRunnerAction,下面开始对其进行分析。
FilesystemVerifierAction
在数据下载完成后,在DownloadAction中会切换到FilesystemVerifierAction
void DownloadAction::TransferComplete(HttpFetcher* fetcher, bool successful) {
if (writer_) {
........
// Write the path to the output pipe if we're successful.
if (code == ErrorCode::kSuccess && HasOutputPipe())
SetOutputObject(install_plan_);
processor_->ActionComplete(this, code);
}
最后的ActionComplete会开始执行FilesystemVerifierAction。
src/system/update_engine/payload_consumer/filesystem_verifer_action.cc
1 void FilesystemVerifierAction::PerformAction() {2 // Will tell the ActionProcessor we've failed if we return.3 ScopedActionCompleter abort_action_completer(processor_, this);4 5 if (!HasInputObject()) {6 LOG(ERROR) << "FilesystemVerifierAction missing input object.";7 return;8 }9 install_plan_ = GetInputObject(); //获取上一个Action传过来的install_plan_ 10 11 if (install_plan_.partitions.empty()) { 12 LOG(INFO) << "No partitions to verify."; 13 if (HasOutputPipe()) 14 SetOutputObject(install_plan_); 15 abort_action_completer.set_code(ErrorCode::kSuccess); 16 return; 17 } 18 19 StartPartitionHashing(); //开始计算分区的hash 20 abort_action_completer.set_should_complete(false); 21 }接着看StartPartitionHashing
 1 void FilesystemVerifierAction::StartPartitionHashing() {2   if (partition_index_ == install_plan_.partitions.size()) {       //判断是否验证到了最后一个分区3     Cleanup(ErrorCode::kSuccess);4     return;5   }6   InstallPlan::Partition& partition =7       install_plan_.partitions[partition_index_];8 9   string part_path;
10   switch (verifier_step_) {                    //默认值是KVerifyTargetHash
11     case VerifierStep::kVerifySourceHash:
12       part_path = partition.source_path;
13       remaining_size_ = partition.source_size;
14       break;
15     case VerifierStep::kVerifyTargetHash:
16       part_path = partition.target_path;         //分区的路径
17       remaining_size_ = partition.target_size;   //大小
18       break;
19   }
20   LOG(INFO) << "Hashing partition " << partition_index_ << " ("
21             << partition.name << ") on device " << part_path;
22   if (part_path.empty())
23     return Cleanup(ErrorCode::kFilesystemVerifierError);
24
25   brillo::ErrorPtr error;
26   src_stream_ = brillo::FileStream::Open(             //打开对应的分区文件
27       base::FilePath(part_path),
28       brillo::Stream::AccessMode::READ,
29       brillo::FileStream::Disposition::OPEN_EXISTING,
30       &error);
31
32   if (!src_stream_) {
33     LOG(ERROR) << "Unable to open " << part_path << " for reading";
34     return Cleanup(ErrorCode::kFilesystemVerifierError);
35   }
36
37   buffer_.resize(kReadFileBufferSize);   //重置缓存区的大小
38   read_done_ = false;                    //未被读取完成
39   hasher_.reset(new HashCalculator());   //设置HashCalculator
40
41   // Start the first read.
42   ScheduleRead();               //开始读取
43 }
首先判断是否验证的分区的所有hash,如果验证完成了,调用CleanUp做最后的工作。
CleanUp
 1 void FilesystemVerifierAction::Cleanup(ErrorCode code) {2   src_stream_.reset();3   // This memory is not used anymore.4   buffer_.clear();5 6   if (cancelled_)7     return;8   if (code == ErrorCode::kSuccess && HasOutputPipe())9     SetOutputObject(install_plan_);
10   processor_->ActionComplete(this, code);
11 }
可以看到主要就是清空缓存区,设置install_plan_,切换到下一个Action。如果没有验证完成,就获取要验证的分区路径和大小,这个大小只是要验证的大小,不一定是分区的真正大小。对于镜像文件而言1G的大小能被安装在2G的分区上。接下来调用ScheduleRead()开始进行验证。
ScheduleRead()
 1 void FilesystemVerifierAction::ScheduleRead() {2   size_t bytes_to_read = std::min(static_cast<int64_t>(buffer_.size()), 3                                   remaining_size_);  //获取要读取数据的大小4   if (!bytes_to_read) {   //读取完成5     OnReadDoneCallback(0);6     return;7   }8 9   bool read_async_ok = src_stream_->ReadAsync(
10     buffer_.data(),
11     bytes_to_read,
12     base::Bind(&FilesystemVerifierAction::OnReadDoneCallback,
13                base::Unretained(this)),
14     base::Bind(&FilesystemVerifierAction::OnReadErrorCallback,
15                base::Unretained(this)),
16     nullptr);  //开始读取
17
18   if (!read_async_ok) {
19     LOG(ERROR) << "Unable to schedule an asynchronous read from the stream.";
20     Cleanup(ErrorCode::kError);
21   }
22 }
获取读取数据的真实大小,开始读取数据。
 1 void FilesystemVerifierAction::OnReadDoneCallback(size_t bytes_read) {2   if (bytes_read == 0) {        //读取完成3     read_done_ = true;4   } else {5     remaining_size_ -= bytes_read;  6     CHECK(!read_done_);                                     7     if (!hasher_->Update(buffer_.data(), bytes_read)) {   //计算hash8       LOG(ERROR) << "Unable to update the hash.";9       Cleanup(ErrorCode::kError);
10       return;
11     }
12   }
13
14   // We either terminate the current partition or have more data to read.
15   if (cancelled_)
16     return Cleanup(ErrorCode::kError);
17
18   if (read_done_ || remaining_size_ == 0) {
19     if (remaining_size_ != 0) {
20       LOG(ERROR) << "Failed to read the remaining " << remaining_size_
21                  << " bytes from partition "
22                  << install_plan_.partitions[partition_index_].name;
23       return Cleanup(ErrorCode::kFilesystemVerifierError);
24     }
25     return FinishPartitionHashing();   //计算完成后
26   }
27   ScheduleRead();   //如果没有计算完成,继续计读取计算
28 }
在这个方法中会对读取的数据进行hash计算,每次计算其实都是基于前一次的计算结果来进行的,不然就会有太对的数据加载到内存中,导致内存不足。当计算完成后
 1 void FilesystemVerifierAction::FinishPartitionHashing() {2   if (!hasher_->Finalize()) {3     LOG(ERROR) << "Unable to finalize the hash.";4     return Cleanup(ErrorCode::kError);5   }6   InstallPlan::Partition& partition =7       install_plan_.partitions[partition_index_];8   LOG(INFO) << "Hash of " << partition.name << ": "9             << Base64Encode(hasher_->raw_hash());
10
11   switch (verifier_step_) {
12     case VerifierStep::kVerifyTargetHash:
13       if (partition.target_hash != hasher_->raw_hash()) {   //对保存的targethash和计算得到的hash进行一个比较
14         LOG(ERROR) << "New '" << partition.name
15                    << "' partition verification failed.";
16         if (partition.source_hash.empty()) {
17           // No need to verify source if it is a full payload.
18           return Cleanup(ErrorCode::kNewRootfsVerificationError);
19         }
20         // If we have not verified source partition yet, now that the target
21         // partition does not match, and it's not a full payload, we need to
22         // switch to kVerifySourceHash step to check if it's because the source
23         // partition does not match either.
24         verifier_step_ = VerifierStep::kVerifySourceHash;  //计算source hash
25       } else {
26         partition_index_++;   //计算下一个分区
27       }
28       break;
29     case VerifierStep::kVerifySourceHash:
30       if (partition.source_hash != hasher_->raw_hash()) {  //保存的source hash和计算得到的也不相同
31         LOG(ERROR) << "Old '" << partition.name
32                    << "' partition verification failed.";
33         LOG(ERROR) << "This is a server-side error due to mismatched delta"
34                    << " update image!";
35         LOG(ERROR) << "The delta I've been given contains a " << partition.name
36                    << " delta update that must be applied over a "
37                    << partition.name << " with a specific checksum, but the "
38                    << partition.name
39                    << " we're starting with doesn't have that checksum! This"
40                       " means that the delta I've been given doesn't match my"
41                       " existing system. The "
42                    << partition.name << " partition I have has hash: "
43                    << Base64Encode(hasher_->raw_hash())
44                    << " but the update expected me to have "
45                    << Base64Encode(partition.source_hash) << " .";
46         LOG(INFO) << "To get the checksum of the " << partition.name
47                   << " partition run this command: dd if="
48                   << partition.source_path
49                   << " bs=1M count=" << partition.source_size
50                   << " iflag=count_bytes 2>/dev/null | openssl dgst -sha256 "
51                      "-binary | openssl base64";
52         LOG(INFO) << "To get the checksum of partitions in a bin file, "
53                   << "run: .../src/scripts/sha256_partitions.sh .../file.bin";
54         return Cleanup(ErrorCode::kDownloadStateInitializationError);
55       }
56       // The action will skip kVerifySourceHash step if target partition hash
57       // matches, if we are in this step, it means target hash does not match,
58       // and now that the source partition hash matches, we should set the error
59       // code to reflect the error in target partition.
60       // We only need to verify the source partition which the target hash does
61       // not match, the rest of the partitions don't matter.
62       return Cleanup(ErrorCode::kNewRootfsVerificationError);
63   }
64   // Start hashing the next partition, if any.
65   hasher_.reset();   //重置hash计算器
66   buffer_.clear();  //清空缓存
67   src_stream_->CloseBlocking(nullptr);
68   StartPartitionHashing(); //接着计算
69 }
可见当一个分区的hash被计算出来的时候就会根据保存好的进行比较,如果target的hash不一致就会转向比较该分区的source hash,其实比较source hash主要就是为了确定错误的类型,只要target hash不一致,无论source hash是否一致都不会继续下一个分区的计算了。就这样一直到最后一个分区验证完后,执行最后一个Action,PostinstallRunnerAction。
PostinstallRunnerAction
PostinstallRunnerAction执行每个分区更新完后的postinstall script。但是在高通平台的,android8.0上无论是全包还是差分包升级并没有实质性的postinstall script。在PostinstallRunnerAction中仅仅是将target_slot标记为active状态。目前只分析于执行相关的代码。
src/system/update_engine/payload_consumer/postinstall_runner_action.cc
 1 void PostinstallRunnerAction::PerformAction() {2   CHECK(HasInputObject());3   install_plan_ = GetInputObject();   //获取install_plan_4 5   if (install_plan_.powerwash_required) {    //是否需要进行数据的擦除6     if (hardware_->SchedulePowerwash()) {7       powerwash_scheduled_ = true;8     } else {9       return CompletePostinstall(ErrorCode::kPostinstallPowerwashError);
10     }
11   }
12
13   // Initialize all the partition weights.
14   partition_weight_.resize(install_plan_.partitions.size());  //初始化每个分区的权重
15   total_weight_ = 0;
16   for (size_t i = 0; i < install_plan_.partitions.size(); ++i) {
17     // TODO(deymo): This code sets the weight to all the postinstall commands,
18     // but we could remember how long they took in the past and use those
19     // values.
20     partition_weight_[i] = install_plan_.partitions[i].run_postinstall;
21     total_weight_ += partition_weight_[i];  //计算总的权重
22   }
23   accumulated_weight_ = 0;
24   ReportProgress(0);                      //更新进度
25
26   PerformPartitionPostinstall();          //开始真正的流程
27 }
来看PerformPartitionPostinstall()
 1 void PostinstallRunnerAction::PerformPartitionPostinstall() {2   if (install_plan_.download_url.empty()) {3     LOG(INFO) << "Skipping post-install during rollback";4     return CompletePostinstall(ErrorCode::kSuccess);5   }6 7   // Skip all the partitions that don't have a post-install step.8   while (current_partition_ < install_plan_.partitions.size() &&9          !install_plan_.partitions[current_partition_].run_postinstall) {   //run_postinstall为false
10     VLOG(1) << "Skipping post-install on partition "
11             << install_plan_.partitions[current_partition_].name;
12     current_partition_++;
13   }
14   if (current_partition_ == install_plan_.partitions.size())
15     return CompletePostinstall(ErrorCode::kSuccess);
16   ...................
17   ...................
18   ...................
19 }
在当前分析中run_postinstall为false,会跳过post-install。之后会直接执行CompletePostinstall(ErrorCode::kSuccess)
 1 void PostinstallRunnerAction::CompletePostinstall(ErrorCode error_code) {2   // We only attempt to mark the new slot as active if all the postinstall3   // steps succeeded.4   if (error_code == ErrorCode::kSuccess &&5       !boot_control_->SetActiveBootSlot(install_plan_.target_slot)) {   //设置target_slot为active6     error_code = ErrorCode::kPostinstallRunnerError;7   }8 9   ScopedActionCompleter completer(processor_, this);
10   completer.set_code(error_code);
11
12   if (error_code != ErrorCode::kSuccess) {
13     LOG(ERROR) << "Postinstall action failed.";
14
15     // Undo any changes done to trigger Powerwash.
16     if (powerwash_scheduled_)
17       hardware_->CancelPowerwash();
18
19     return;
20   }
21
22   LOG(INFO) << "All post-install commands succeeded";
23   if (HasOutputPipe()) {                      //设置输出的install_plan
24     SetOutputObject(install_plan_);
25   }
26 }
最终将target_slot设置为active在重启之后就会从target_slot开始启动了。
分析到这里就算是对update_engine的核心过程有了个大概的了解,除了对升级的知识点的认识,还体会到了它的架构。不足之处就是还有很多的细节未涉及。
相关文章:

update_engine-FilesystemVerifierAction和PostinstallRunnerAction
在介绍完了DownloadAction之后,还剩下FilesystemVerifierAction和PostinstallRunnerAction,下面开始对其进行分析。 FilesystemVerifierAction 在数据下载完成后,在DownloadAction中会切换到FilesystemVerifierAction void DownloadAction:…...

深度学习乳腺癌分类 计算机竞赛
文章目录 1 前言2 前言3 数据集3.1 良性样本3.2 病变样本 4 开发环境5 代码实现5.1 实现流程5.2 部分代码实现5.2.1 导入库5.2.2 图像加载5.2.3 标记5.2.4 分组5.2.5 构建模型训练 6 分析指标6.1 精度,召回率和F1度量6.2 混淆矩阵 7 结果和结论8 最后 1 前言 &…...

【Python百宝箱】掌握Python Web开发三剑客:Flask、Django、FastAPI一网打尽
前言 在当今互联网时代,Web应用的开发变得愈发重要和复杂。选择一个合适的Web框架,掌握安全性与认证、数据库与ORM库、前端框架与交互、测试与调试工具等关键知识点,是每个Web开发者都必须面对的挑战。本文将带你深入了解三个流行的Python W…...

【人工智能时代的刑法体系与责任主体概述】
第一节:引言 随着科技的快速发展,人工智能 (Artificial Intelligence, AI) 正日益成为我们生活中不可或缺的一部分。从自动驾驶汽车到语音助手,从智能家居到金融机器人,AI 的广泛应用正不断改变着我们的生活方式和社会结构。然而…...
透视maven打包编译正常,intellj idea编译失败问题的本质
前言 maven多模块类型的项目,在Java的中大型应用中非常常见, 在 module 很多的情况,经常会出现各种各样的编辑依赖错误问题,今天记录一种比较常见的 case : A 子模块依赖 B 子模块,在 Terminal 上终端上 …...

npm报错
npm报错 npm ERR! Fix the upstream dependency conflict, or retry npm ERR! this command with --force or --legacy-peer-deps npm ERR! to accept an incorrect (and potentially broken) dependency resolution. npm ERR! npm ERR! npm ERR! For a full report s…...

【FFmpeg实战】ffmpeg播放器-音视频解码流程
音视频介绍 音视频解码流程 FFmpeg解码的数据结构说明 AVFormatContext:封装格式上下文结构体,全局结构体,保存了视频文件封装格式相关信息AVInputFormat:每种封装格式,对应一个该结构体AVStream[0]:视频文件中每个视频ÿ…...
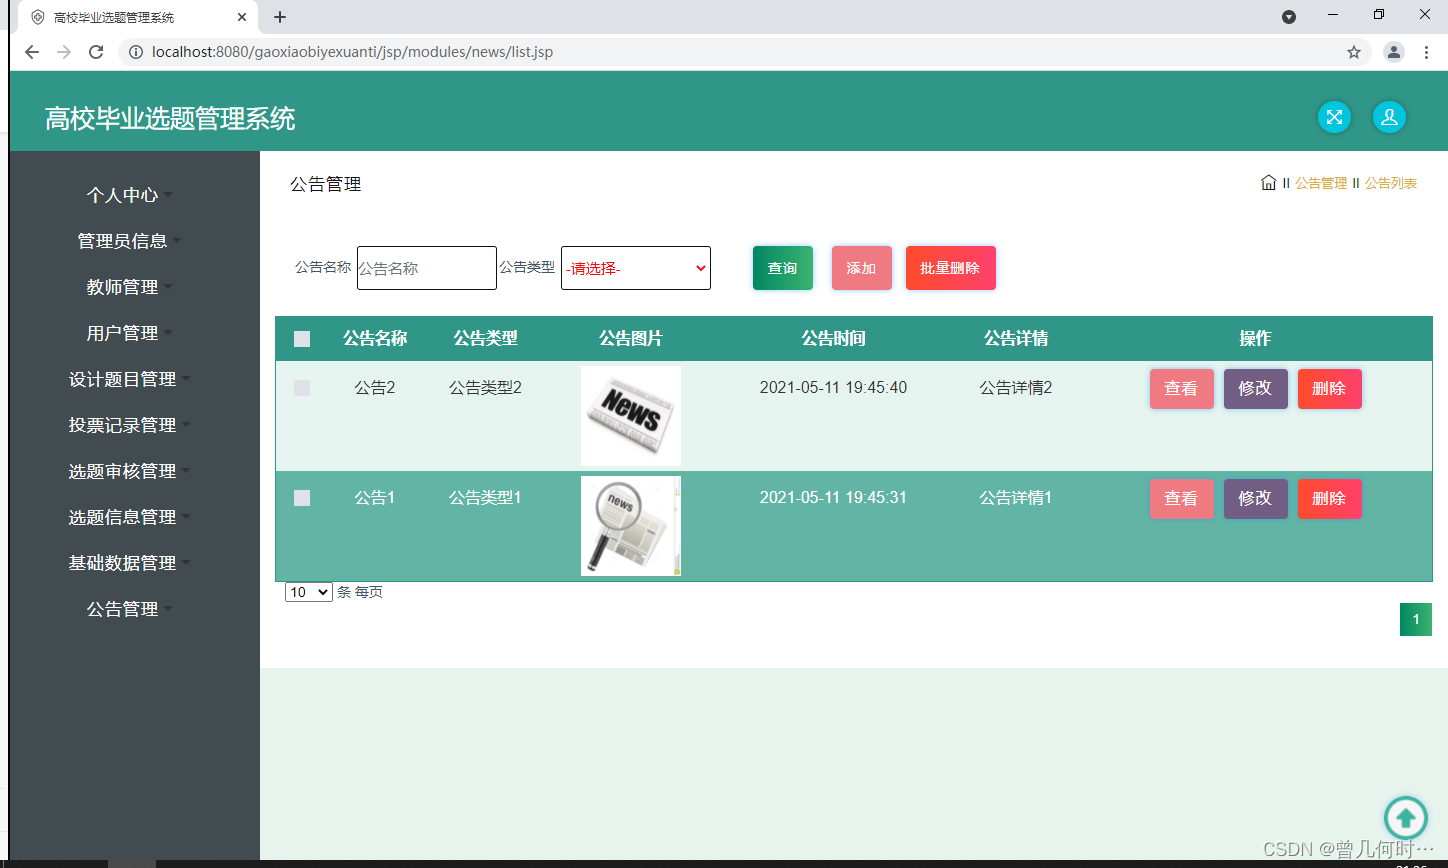
基于SSM的高校毕业选题管理系统设计与实现
末尾获取源码 开发语言:Java Java开发工具:JDK1.8 后端框架:SSM 前端:采用JSP技术开发 数据库:MySQL5.7和Navicat管理工具结合 服务器:Tomcat8.5 开发软件:IDEA / Eclipse 是否Maven项目&#x…...

一个简单的Oracle Redaction实验
本实验包含了: 简单的Oracle Redaction演示针对指定用户的Redaction 实验环境 假设有一个19c多租户数据库,PDB名为orclpdb1。 我们将在orclpdb1中建立2个用户: redact_user: redact管理员schema_user: schema用户 基础实验 首先进入数…...

getchar函数的功能有哪些
getchar函数是C语言标准库中的一个函数,主要用于从标准输入(通常是键盘)获取一个字符。它的功能包括: 从标准输入获取一个字符:getchar函数会等待用户输入一个字符,然后将其返回给程序。可以通过控制台输入…...

信息机房监控系统(动环辅助监控系统)
信息机房监控系统是一个综合性的系统,用于对机房的所有设备及其环境进行集中监控和管理。这种系统主要针对机房的各个子系统进行监控,包括动力系统、环境系统、消防系统、保安系统、网络系统等。 依托电易云-智慧电力物联网,以下是信息机房监…...
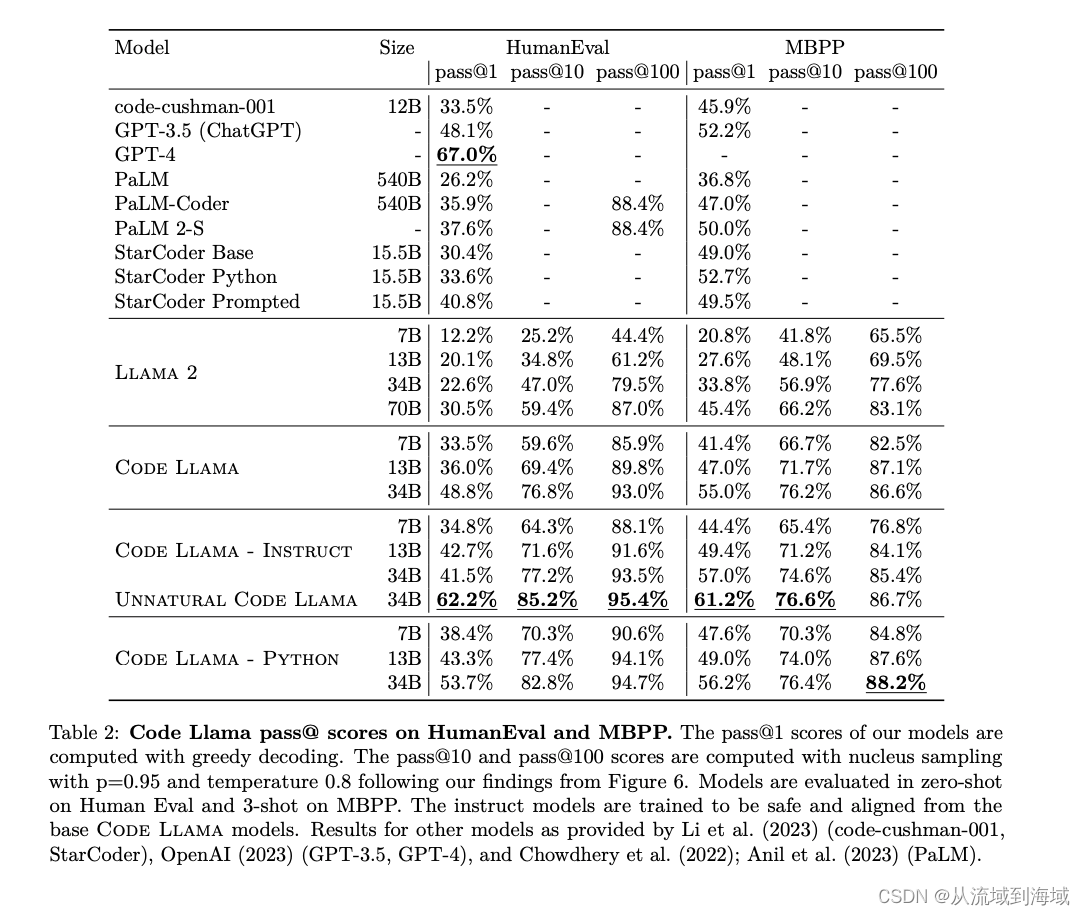
最强英文开源模型Llama2架构与技术细节探秘
prerequisite: 最强英文开源模型LLaMA架构探秘,从原理到源码 Llama2 Meta AI于2023年7月19日宣布开源LLaMA模型的二代版本Llama2,并在原来基础上允许免费用于研究和商用。 作为LLaMA的延续和升级,Llama2的训练数据扩充了40%,达到…...
编程刷题网站以及实用型网站推荐
1、牛客网在线编程 牛客网在线编程https://www.nowcoder.com/exam/oj?page1&tab%E8%AF%AD%E6%B3%95%E7%AF%87&topicId220 2、力扣 力扣https://leetcode.cn/problemset/all/ 3、练码 练码https://www.lintcode.com/ 4、PTA | 程序设计类实验辅助教学平台 PTA | 程…...
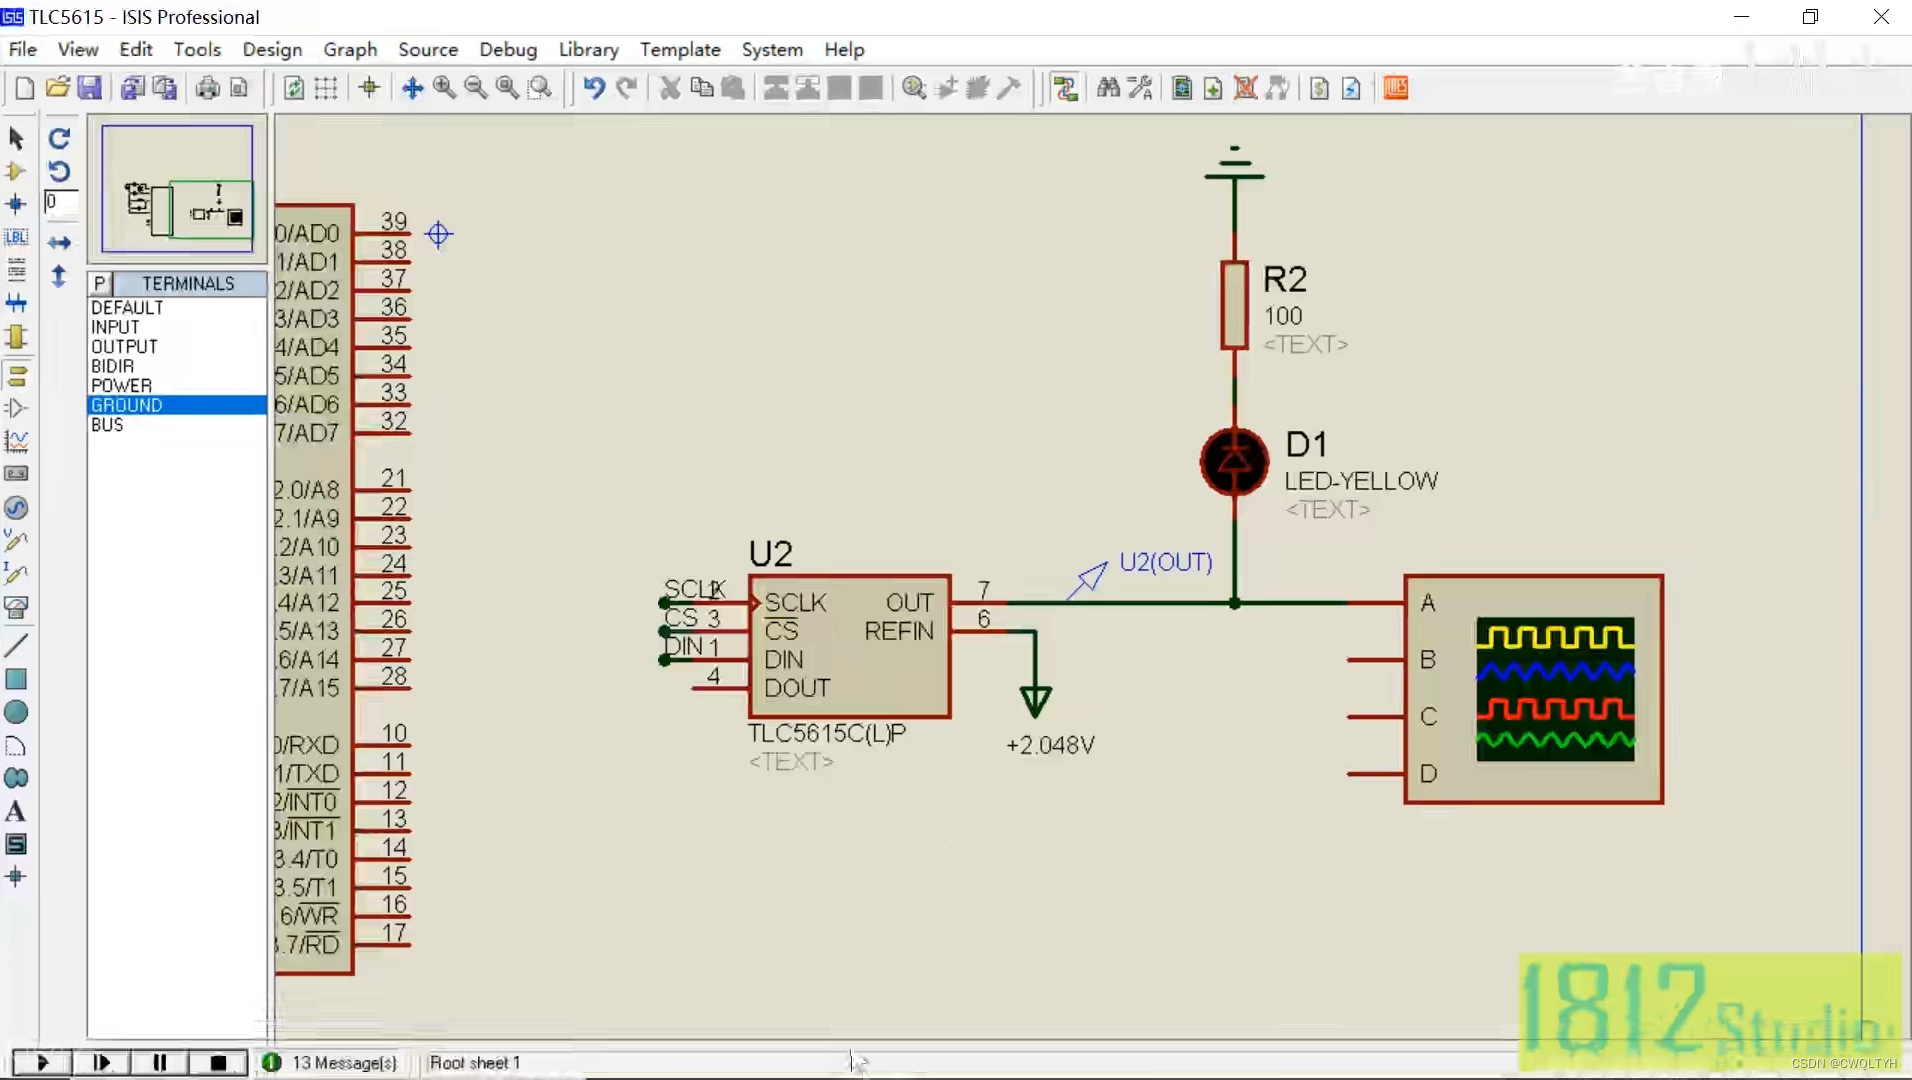
基于STC12C5A60S2系列1T 8051单片机的SPI总线器件数模芯片TLC5615实现数模转换应用
基于STC12C5A60S2系列1T 8051单片的SPI总线器件数模芯片TLC5615实现数模转换应用 STC12C5A60S2系列1T 8051单片机管脚图STC12C5A60S2系列1T 8051单片机I/O口各种不同工作模式及配置STC12C5A60S2系列1T 8051单片机I/O口各种不同工作模式介绍SPI总线器件数模芯片TLC5615介绍通过按…...

【并发编程】Synchronized的使用
📫作者简介:小明java问道之路,2022年度博客之星全国TOP3,专注于后端、中间件、计算机底层、架构设计演进与稳定性建设优化,文章内容兼具广度、深度、大厂技术方案,对待技术喜欢推理加验证,就职于…...

【Python】Python基础
文章目录 一、字面值常量和表达式二、变量2.1 定义变量2.2 变量的命名规则2.3 变量的类型2.4 不同类型大小2.5 动态类型 三、注释四、输入与输出五、运算符5.1 算术运算符5.2 关系运算符5.3 逻辑运算符5.4 赋值运算符 一、字面值常量和表达式 print(1 2 * 3) # 7 print(1 2 …...
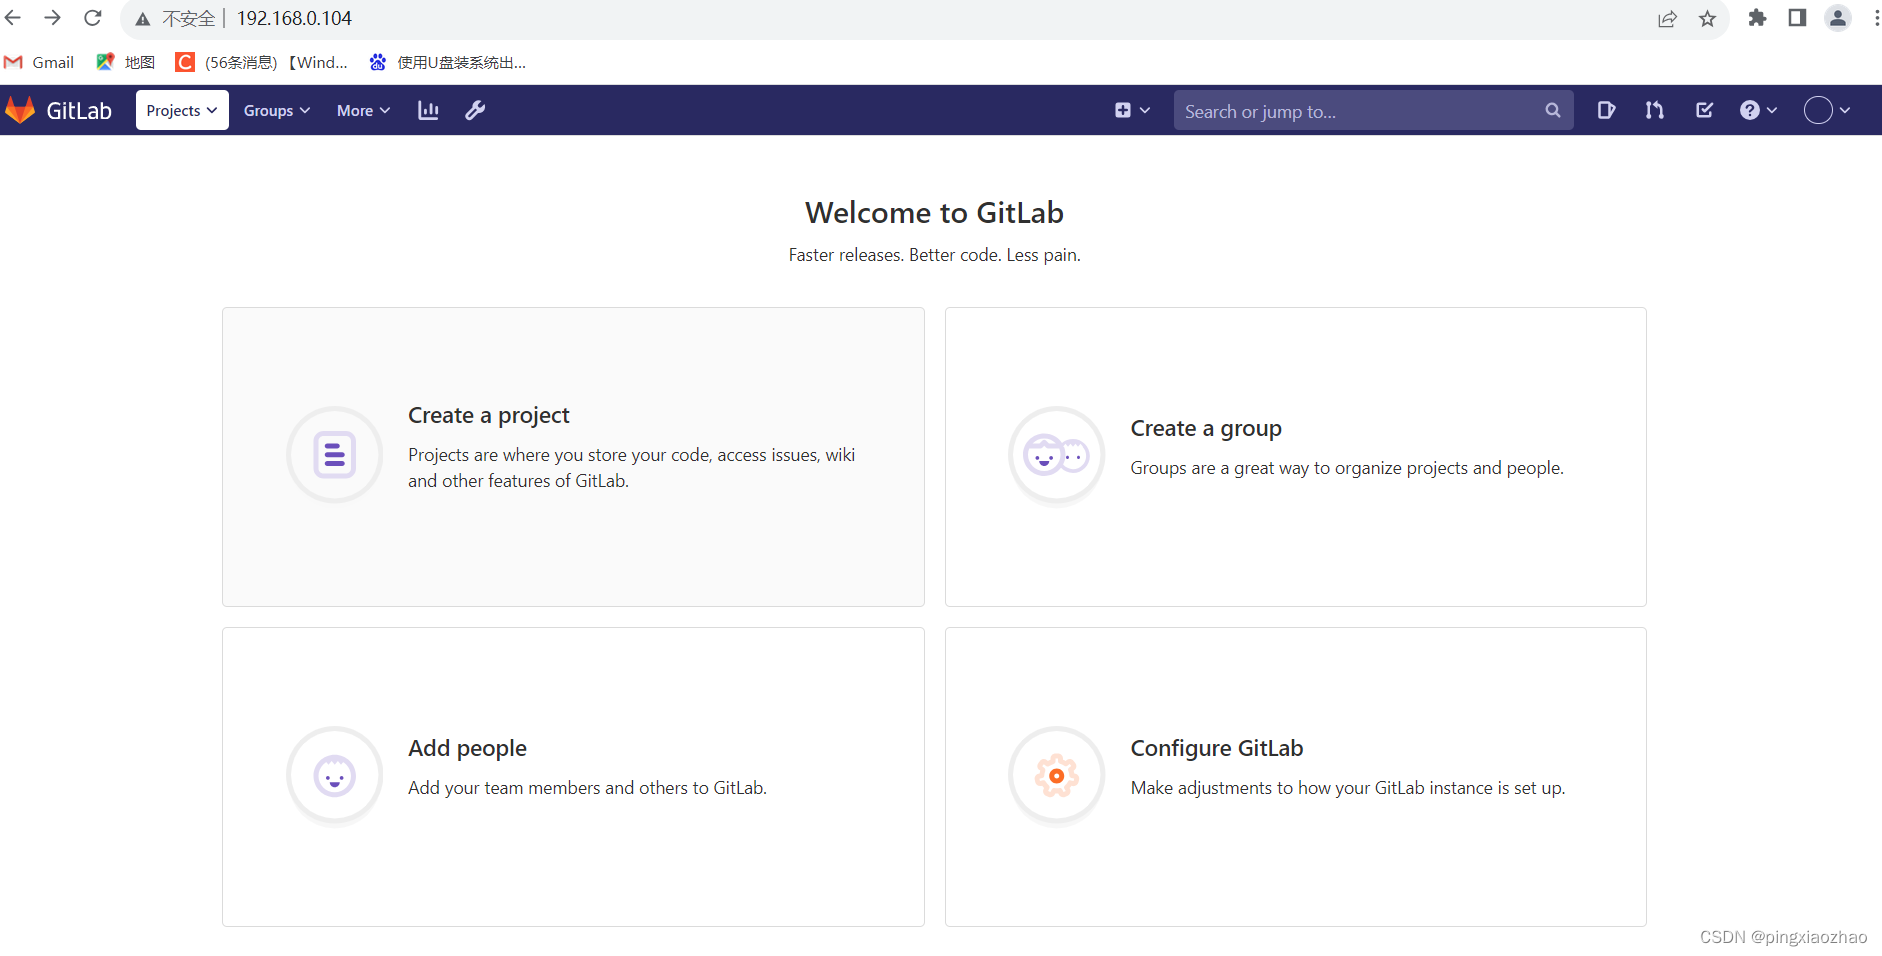
gitlab环境准备
1.准备环境 gitlab只支持linux系统,本人在虚拟机下使用Ubuntu作为操作系统,gitlab镜像要使用和操作系统版本对应的版本,(ubuntu18.04,gitlab-ce_13.2.3-ce.0_amd64 .deb) book100ask:/$ lsb_release -a No LSB modules are available. Dist…...

Apache Doris (五十四): Doris Join类型 - Bucket Shuffle Join
🏡 个人主页:IT贫道_大数据OLAP体系技术栈,Apache Doris,Clickhouse 技术-CSDN博客 🚩 私聊博主:加入大数据技术讨论群聊,获取更多大数据资料。 🔔 博主个人B栈地址:豹哥教你大数据的个人空间-豹哥教你大数据个人主页-哔哩哔哩视频 目录...

【AI】行业消息精选和分析(23-11-20)
技术发展 🎨 LCM即时绘画,体验所见所得: - LCM LoRA支持即时绘图生成,体验直观。 - 在线体验地址提供直接访问。 - 清华大学SimianLuo开发,加速稳定扩散模型运行。 💊 VM Pill:可吞咽装置追踪生…...
Matplotlib实现Label及Title都在下方的最佳姿势
Matplotlib实现Label及Title都在下方的最佳姿势 1. 问题背景2. 基本思想(可以不看)3. 方法封装4. 调用实例5. 总结6. 起飞 1. 问题背景 用python绘制下面这种图的时候,一般用xlable作为子图的标题,这是因为plt.title()方法绘制的…...

电脑自动化 OpenClaw 安装教程 自然语言操控电脑
告别命令行!Windows OpenClaw 一键安装,5 分钟一键部署 ✨ 前言 OpenClaw(小龙虾)是一款能直接操控电脑的 AI 智能体,无需复杂配置、不用敲命令行,Windows 环境下全程可视化操作,5 分钟即可完…...

动物森友会存档编辑神器:NHSE新手完全入门指南
动物森友会存档编辑神器:NHSE新手完全入门指南 【免费下载链接】NHSE Animal Crossing: New Horizons save editor 项目地址: https://gitcode.com/gh_mirrors/nh/NHSE 你是否曾经梦想过在《集合啦!动物森友会》中拥有无限铃钱、稀有家具…...

2026 年 AI 工具聚合站:从模型入口到开发基础设施的进化之路
在 2026 年的 AI 开发生态中,开发者正面临一个矛盾的现状:一方面是 GPT-5.5、Claude 4.7、Gemini 3.1 等大模型的能力持续突破,带来了前所未有的技术红利;另一方面,模型碎片化、接口异构化、成本高企等问题,…...

如何用elan终极解决Lean版本管理难题:完整开发者指南
如何用elan终极解决Lean版本管理难题:完整开发者指南 【免费下载链接】elan The Lean version manager 项目地址: https://gitcode.com/gh_mirrors/el/elan 在Lean定理证明器的开发过程中,你是否遇到过这样的困境:项目A需要Lean 4.0.0…...
式API的实现原理)
CargoBay源码解析:深入理解块(block)式API的实现原理
CargoBay源码解析:深入理解块(block)式API的实现原理 【免费下载链接】CargoBay The Essential StoreKit Companion 项目地址: https://gitcode.com/gh_mirrors/ca/CargoBay CargoBay是一个功能强大的iOS StoreKit辅助库,它为Apple的应用内购买框…...

Beyond Compare 5密钥生成器终极指南:如何通过Python工具免费解锁专业功能
Beyond Compare 5密钥生成器终极指南:如何通过Python工具免费解锁专业功能 【免费下载链接】BCompare_Keygen Keygen for BCompare 5 项目地址: https://gitcode.com/gh_mirrors/bc/BCompare_Keygen 还在为Beyond Compare 5的30天试用期到期而烦恼吗…...

三周、1.81倍、百亿:中国AI的压制性时刻
调用量飙升、百亿美元涌入、智能体密集落地——过去七天,中国AI正在改写全球游戏规则。与此同时,内容创作者的“AI红利窗口”也正在打开。连续三周,中国AI压住美国5月18日,OpenRouter最新数据显示,5月11日至17日当周&a…...

MoE大模型核心揭秘:Router路由机制与活跃参数原理
1. 这不是“参数越多越强”的简单故事:拆解大模型里那个被悄悄藏起来的“开关”你肯定见过这类标题:“GPT-4参数量达1.8万亿!”、“DeepSeek-R1狂堆6710亿参数!”——光看数字,像在比谁家粮仓更大。但真正干过模型部署…...
)
告别C盘爆满!手把手教你将VS2010旗舰版安装到其他盘(附完整配置流程)
告别C盘爆满!手把手教你将VS2010旗舰版安装到其他盘(附完整配置流程) 对于开发者而言,Visual Studio 2010(VS2010)作为经典的开发环境,至今仍被许多项目所依赖。然而,随着系统盘空间…...

Closures实战指南:简化UITableView和UICollectionView数据绑定的终极教程 [特殊字符]
Closures实战指南:简化UITableView和UICollectionView数据绑定的终极教程 🚀 【免费下载链接】Closures Swifty closures for UIKit and Foundation 项目地址: https://gitcode.com/gh_mirrors/cl/Closures Closures是一个强大的iOS框架ÿ…...