【精选】Spring整合MyBatis,Junit 及Spring 事务Spring AOP面向切面详解
Spring整合MyBatis
搭建环境
我们知道使用MyBatis时需要写大量创建SqlSessionFactoryBuilder、SqlSessionFactory、SqlSession等对象的代码,而Spring的作用是帮助我们创建和管理对象,所以我们可以使用Spring整合MyBatis,简化MyBatis开发。
创建maven项目,引入依赖。
<dependencies><!--  mybatis  --><dependency><groupId>org.mybatis</groupId><artifactId>mybatis</artifactId><version>3.5.7</version></dependency><!--  mysql驱动包  --><dependency><groupId>mysql</groupId><artifactId>mysql-connector-java</artifactId><version>8.0.26</version></dependency><!-- spring --><dependency><groupId>org.springframework</groupId><artifactId>spring-context</artifactId><version>5.3.13</version></dependency><dependency><groupId>org.springframework</groupId><artifactId>spring-tx</artifactId><version>5.3.13</version></dependency><dependency><groupId>org.springframework</groupId><artifactId>spring-jdbc</artifactId><version>5.3.13</version></dependency><!-- MyBatis与Spring的整合包,该包可以让Spring创建MyBatis的对象 --><dependency><groupId>org.mybatis</groupId><artifactId>mybatis-spring</artifactId><version>2.0.6</version></dependency>
</dependencies>
编写配置文件
-
编写数据库配置文件db.properties
jdbc.driverClassName=com.mysql.jdbc.Driver jdbc.url=jdbc:mysql:///student jdbc.username=root jdbc.password=root -
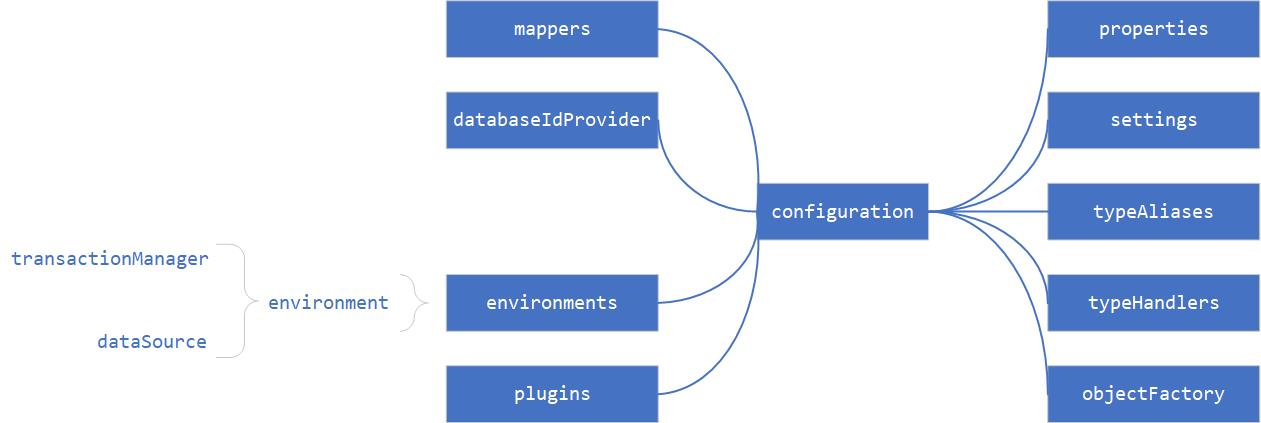
创建MyBatis配置文件SqlMapConfig.xml,数据源、扫描接口都交由Spring管理,不需要在MyBatis配置文件中设置。
<?xml version="1.0" encoding="UTF-8"?> <!DOCTYPE configurationPUBLIC "-//mybatis.org//DTD Config 3.0//EN""http://mybatis.org/dtd/mybatis-3-config.dtd"> <configuration></configuration> -
创建Spring配置文件applicationContext.xml
<?xml version="1.0" encoding="UTF-8"?>
<beans xmlns="http://www.springframework.org/schema/beans"xmlns:context="http://www.springframework.org/schema/context"xmlns:xsi="http://www.w3.org/2001/XMLSchema-instance"xsi:schemaLocation="http://www.springframework.org/schema/beanshttp://www.springframework.org/schema/beans/spring-beans.xsdhttp://www.springframework.org/schema/contexthttp://www.springframework.org/schema/context/spring-context.xsd"><!--配置扫描包--><context:component-scan base-package="com.Spring"/><!--读取配置文件--><context:property-placeholder location="classpath:db.properties"/><!--创建druid数据源对象--><bean name="dataSource" class="com.alibaba.druid.pool.DruidDataSource"><property name="driverClassName" value="${jdbc.driverClassName}"/><property name="url" value="${jdbc.url}"/><property name="username" value="${jdbc.username}"/><property name="password" value="${jdbc.password}"/></bean><!-- Spring创建封装过的SqlSessionFactory --><bean name="sqlSessionFactory" class="org.mybatis.spring.SqlSessionFactoryBean"><property name="dataSource" ref="dataSource"/></bean><!-- Spring创建封装过的SqlSession --><bean name="sqlSession" class="org.mybatis.spring.SqlSessionTemplate"><constructor-arg name="sqlSessionFactory" ref="sqlSessionFactory"/></bean></beans>
准备数据库和实体类
准备数据库
CREATE DATABASE `student`;
USE `student`;
DROP TABLE IF EXISTS `student`;
CREATE TABLE `student` (`id` int(11) NOT NULL AUTO_INCREMENT,`name` varchar(255) DEFAULT NULL,`sex` varchar(10) DEFAULT NULL,`address` varchar(255) DEFAULT NULL,PRIMARY KEY (`id`)
) ENGINE=InnoDB AUTO_INCREMENT=3 DEFAULT CHARSET=utf8;insert into `student`(`id`,`name`,`sex`,`address`) values (1,'李四','男','北京'),(2,'张三','女','北京');
准备实体类
public class Student {private int id;private String name;private String sex;private String address;// 省略构造方法/getter/setter/tostring
}
编写持久层接口和service类
编写持久层接口
@Repository
public interface StudentDao {//查询所有学生@Select("select * from student")List<Student> findAll();//添加学生@Insert("insert into student values (null,#{name},#{sex},#{address})")void add(Student student);
}
编写service类
@Service
public class StudentService {//SqlSession对象@Autowiredprivate SqlSessionTemplate sqlSession;// 使用SqlSession获取代理对象public List<Student> findAllStudent(){StudentDao studentDao = sqlSession.getMapper(StudentDao.class);return studentDao.findAll();}
}
Spring整合Junit进行单元测试
之前进行单元测试时都需要手动创建Spring容器,能否在测试时让Spring自动创建容器呢?
-
引入Junit和Spring整合Junit依赖
<!-- junit,如果Spring5整合junit,则junit版本至少在4.12以上 --> <dependency><groupId>junit</groupId><artifactId>junit</artifactId><version>4.12</version><scope>test</scope> </dependency> <!-- spring整合测试模块 --> <dependency><groupId>org.springframework</groupId><artifactId>spring-test</artifactId><version>5.3.13</version> </dependency> -
编写测试类
// JUnit使用Spring方式运行代码,即自动创建spring容器。
@RunWith(SpringJUnit4ClassRunner.class)
// 告知创建spring容器时读取哪个配置类或配置文件
// 配置类写法:@ContextConfiguration(classes=配置类.class)
@ContextConfiguration(locations="classpath:applicationContext.xml")
public class StudentServiceTest {@Autowiredprivate StudentService studentService;@Testpublic void testFindAll(){List<Student> allStudent = studentService.findAllStudent();allStudent.forEach(System.out::println);}
}
注:使用SqlSessionTemplate创建代理对象还是需要注册接口或者映射文件的。
在MyBatis配置文件注册接口
<configuration><mappers><mapper class="com.Spring.dao.StudentDao"></mapper></mappers>
</configuration>
创建sqlSessionFactory时指定MyBatis配置文件
<!-- 创建Spring封装过的SqlSessionFactory -->
<bean id="sqlSessionFactory" class="org.mybatis.spring.SqlSessionFactoryBean"><property name="dataSource" ref="dataSource"></property><property name="configLocation" value="classpath:SqlMapConfig.xml"></property>
</bean>
自动创建代理对象
Spring提供了MapperScannerConfigurer对象,该对象可以自动扫描包创建代理对象,并将代理对象放入容器中,此时不需要使用SqlSession手动创建代理对象。
-
创建MapperScannerConfigurer对象
<!-- 该对象可以自动扫描持久层接口,并为接口创建代理对象 --> <bean id="mapperScanner" class="org.mybatis.spring.mapper.MapperScannerConfigurer"><!-- 配置扫描的接口包 --><property name="basePackage" value="com.Spring.dao"></property> </bean> -
Service类直接使用代理对象即可
@Service public class StudentService {// 直接注入代理对象@Autowiredprivate StudentDao studentDao;// 直接使用代理对象public void addStudent(Student student){studentDao.add(student);} } -
测试
@RunWith(SpringJUnit4ClassRunner.class)
@ContextConfiguration(locations="classpath:applicationContext.xml")
public class StudentServiceTest {@Autowiredprivate StudentService studentService;@Testpublic void testAddStudent(){Student student = new Student("郭家旗","男","上海");studentService.addStudent(student);}
}
SpringAOP
AOP简介
AOP的全称是Aspect Oriented Programming,即面向切面编程。是实现功能统一维护的一种技术,它将业务逻辑的各个部分进行隔离,使开发人员在编写业务逻辑时可以专心于核心业务,从而提高了开发效率。
- 作用:在不修改源码的基础上,对已有方法进行增强。
- 实现原理:动态代理技术。
- 优势:减少重复代码、提高开发效率、维护方便
- 应用场景:事务处理、日志管理、权限控制、异常处理等方面。
AOP相关术语
为了更好地理解AOP,就需要对AOP的相关术语有一些了解
| 名称 | 说明 |
|---|---|
| Joinpoint(连接点) | 指能被拦截到的点,在Spring中只有方法能被拦截。 |
| Pointcut(切点) | 指要对哪些连接点进行拦截,即被增强的方法。 |
| Advice(通知) | 指拦截后要做的事情,即切点被拦截后执行的方法。 |
| Aspect(切面) | 切点+通知称为切面 |
| Target(目标) | 被代理的对象 |
| Proxy(代理) | 代理对象 |
| Weaving(织入) | 生成代理对象的过程 |
AOP入门
AspectJ是一个基于Java语言的AOP框架,在Spring框架中建议使用AspectJ实现AOP。
接下来我们写一个AOP入门案例:dao层的每个方法结束后都可以打印一条日志:
-
引入依赖
<!-- spring --> <dependency><groupId>org.springframework</groupId><artifactId>spring-context</artifactId><version>5.3.13</version> </dependency> <!-- AspectJ --> <dependency><groupId>org.aspectj</groupId><artifactId>aspectjweaver</artifactId><version>1.8.7</version> </dependency> <!-- junit --> <dependency><groupId>junit</groupId><artifactId>junit</artifactId><version>4.12</version><scope>test</scope> </dependency> -
编写连接点
@Repository public class UserDao {public void add(){System.out.println("用户新增");}public void delete(){System.out.println("用户删除");}public void update(){System.out.println("用户修改");} } -
编写通知类
public class MyAspectJAdvice {// 后置通知public void myAfterReturning() {System.out.println("打印日志...");} } -
配置切面
<?xml version="1.0" encoding="UTF-8"?> <beans xmlns="http://www.springframework.org/schema/beans"xmlns:context="http://www.springframework.org/schema/context"xmlns:aop="http://www.springframework.org/schema/aop"xmlns:xsi="http://www.w3.org/2001/XMLSchema-instance"xsi:schemaLocation="http://www.springframework.org/schema/beanshttp://www.springframework.org/schema/beans/spring-beans.xsdhttp://www.springframework.org/schema/contexthttp://www.springframework.org/schema/context/spring-context.xsdhttp://www.springframework.org/schema/aophttp://www.springframework.org/schema/aop/spring-aop.xsd"><context:component-scan base-package="com.Spring"></context:component-scan><!-- 通知对象 --><bean id="myAspectJAdvice" class="com.Spring.advice.MyAspectAdvice"></bean><!-- 配置AOP --><aop:config><!-- 配置切面 --><aop:aspect ref="myAspectJAdvice"><!-- 配置切点 --><aop:pointcut id="myPointcut" expression="execution(* com.Spring.dao.UserDao.*(..))"/><!-- 配置通知 --><aop:after-returning method="myAfterReturning" pointcut-ref="myPointcut"/></aop:aspect></aop:config> </beans> -
测试
public class UserDaoTest {@Testpublic void testAdd(){ApplicationContext ac = new ClassPathXmlApplicationContext("bean.xml");UserDao userDao = (UserDao) ac.getBean("userDao");userDao.add();}@Testpublic void testDelete(){ApplicationContext ac = new ClassPathXmlApplicationContext("bean.xml");UserDao userDao = (UserDao) ac.getBean("userDao");userDao.delete();}@Testpublic void testUpdate(){ApplicationContext ac = new ClassPathXmlApplicationContext("bean.xml");UserDao userDao = (UserDao) ac.getBean("userDao");userDao.update();}
}
通知类型
AOP有以下几种常用的通知类型:
| 通知类型 | 描述 |
|---|---|
| 前置通知 | 在方法执行前添加功能 |
| 后置通知 | 在方法正常执行后添加功能 |
| 异常通知 | 在方法抛出异常后添加功能 |
| 最终通知 | 无论方法是否抛出异常,都会执行该通知 |
| 环绕通知 | 在方法执行前后添加功能 |
-
编写通知方法
// 通知类 public class MyAspectAdvice {// 后置通知public void myAfterReturning(JoinPoint joinPoint) {System.out.println("切点方法名:" + joinPoint.getSignature().getName());System.out.println("目标对象:" + joinPoint.getTarget());System.out.println("打印日志" + joinPoint.getSignature().getName() + "方法被执行了!");}// 前置通知public void myBefore() {System.out.println("前置通知...");}// 异常通知public void myAfterThrowing(Exception ex) {System.out.println("异常通知...");System.err.println(ex.getMessage());}// 最终通知public void myAfter() {System.out.println("最终通知");}// 环绕通知public Object myAround(ProceedingJoinPoint proceedingJoinPoint) throws Throwable {System.out.println("环绕前");Object obj = proceedingJoinPoint.proceed(); // 执行方法System.out.println("环绕后");return obj;} } -
配置切面
<!-- 配置AOP -->
<aop:config><!-- 配置切面 --><aop:aspect ref="myAspectJAdvice"><!-- 配置切点 --><aop:pointcut id="myPointcut" expression="execution(* com.Spring.dao.UserDao.*(..))"/><!-- 前置通知 --><aop:before method="myBefore" pointcut-ref="myPointcut"></aop:before><!-- 后置通知 --><aop:after-returning method="myAfterReturning" pointcut-ref="myPointcut"/><!-- 异常通知 --><aop:after-throwing method="myAfterThrowing" pointcut-ref="myPointcut" throwing="ex"/><!-- 最终通知 --><aop:after method="myAfter" pointcut-ref="myPointcut"></aop:after><!-- 环绕通知 --><aop:around method="myAround" pointcut-ref="myPointcut"></aop:around></aop:aspect>
</aop:config>
切点表达式
使用AspectJ需要使用切点表达式配置切点位置,写法如下:
- 标准写法:访问修饰符 返回值 包名.类名.方法名(参数列表)
- 访问修饰符可以省略。
- 返回值使用
*代表任意类型。 - 包名使用
*表示任意包,多级包结构要写多个*,使用*..表示任意包结构 - 类名和方法名都可以用
*实现通配。 - 参数列表
- 基本数据类型直接写类型
- 引用类型写
包名.类名 *表示匹配一个任意类型参数..表示匹配任意类型任意个数的参数
- 全通配:
* *..*.*(..)
多切面配置
我们可以为切点配置多个通知,形成多切面,比如希望dao层的每个方法结束后都可以打印日志并发送邮件:
-
编写发送邮件的通知:
public class MyAspectJAdvice2 {// 后置通知public void myAfterReturning(JoinPoint joinPoint) {System.out.println("发送邮件");} } -
配置切面:
<!-- 通知对象 -->
<bean id="myAspectJAdvice" class="com.Spring.advice.MyAspectAdvice"></bean>
<bean id="myAspectJAdvice2" class="com.Spring.advice.MyAspectAdvice2"></bean><!-- 配置AOP -->
<aop:config><!-- 配置切面 --><aop:aspect ref="myAspectJAdvice"><!-- 配置切点 --><aop:pointcut id="myPointcut" expression="execution(* *..*.*(..))"/><!-- 后置通知 --><aop:after-returning method="myAfterReturning" pointcut-ref="myPointcut"/></aop:aspect><aop:aspect ref="myAspectJAdvice2"><aop:pointcut id="myPointcut2" expression="execution(* com.Spring.dao.UserDao.*(..))"/><aop:after-returning method="myAfterReturning" pointcut-ref="myPointcut2"/></aop:aspect>
</aop:config>
注解配置AOP
Spring可以使用注解代替配置文件配置切面:
-
在xml中开启AOP注解支持
<!-- 开启注解配置Aop --> <aop:aspectj-autoproxy></aop:aspectj-autoproxy> -
在通知类上方加入注解
@Aspect -
在通知方法上方加入注解
@Before/@AfterReturning/@AfterThrowing/@After/@Around@Aspect @Component public class MyAspectAdvice {// 后置通知@AfterReturning("execution(* com.Spring.dao.UserDao.*(..))")public void myAfterReturning(JoinPoint joinPoint) {System.out.println("切点方法名:" + joinPoint.getSignature().getName());System.out.println("目标对象:" + joinPoint.getTarget());System.out.println("打印日志" + joinPoint.getSignature().getName() + "方法被执行了!");}// 前置通知@Before("execution(* com.Spring.dao.UserDao.*(..))")public void myBefore() {System.out.println("前置通知...");}// 异常通知@AfterThrowing(value = "execution(* com.Spring.dao.UserDao.*(..))",throwing = "ex")public void myAfterThrowing(Exception ex) {System.out.println("异常通知...");System.err.println(ex.getMessage());}// 最终通知@After("execution(* com.Spring.dao.UserDao.*(..))")public void myAfter() {System.out.println("最终通知");}// 环绕通知@Around("execution(* com.Spring.dao.UserDao.*(..))")public Object myAround(ProceedingJoinPoint proceedingJoinPoint) throws Throwable {System.out.println("环绕前");Object obj = proceedingJoinPoint.proceed(); // 执行方法System.out.println("环绕后");return obj;} } -
测试:
@Test
public void testAdd2(){ApplicationContext ac = new ClassPathXmlApplicationContext("bean1.xml");UserDao userDao = (UserDao) ac.getBean("userDao");userDao.update();
}
如何为一个类下的所有方法统一配置切点:
在通知类中添加方法配置切点
@Pointcut("execution(* com.Spring.dao.UserDao.*(..))")
public void pointCut(){}
在通知方法上使用定义好的切点
@Before("pointCut()")
public void myBefore(JoinPoint joinPoint) {System.out.println("前置通知...");
}
@AfterReturning(“pointCut()”)
public void myAfterReturning(JoinPoint joinPoint) {
System.out.println(“后置通知…”);
}
配置类如何代替xml中AOP注解支持?
在配置类上方添加@EnableAspectJAutoProxy即可
@Configuration
@ComponentScan("com.Spring")
@EnableAspectJAutoProxy
public class SpringConfig {}
原生Spring实现AOP
除了AspectJ,Spring支持原生方式实现AOP。
-
引入依赖
<!-- AOP --> <dependency><groupId>org.springframework</groupId><artifactId>spring-aop</artifactId><version>5.3.13</version> </dependency> -
编写通知类
// Spring原生Aop的通知类
public class SpringAop implements MethodBeforeAdvice, AfterReturningAdvice, ThrowsAdvice, MethodInterceptor {/*** 前置通知* @param method 目标方法* @param args 目标方法的参数列表* @param target 目标对象* @throws Throwable*/@Overridepublic void before(Method method, Object[] args, Object target) throws Throwable {System.out.println("前置通知");}/*** 后置通知* @param returnValue 目标方法的返回值* @param method 目标方法* @param args 目标方法的参数列表* @param target 目标对象* @throws Throwable*/@Overridepublic void afterReturning(Object returnValue, Method method, Object[] args, Object target) throws Throwable {System.out.println("后置通知");}/*** 环绕通知* @param invocation 目标方法* @return* @throws Throwable*/@Overridepublic Object invoke(MethodInvocation invocation) throws Throwable {System.out.println("环绕前");Object proceed = invocation.proceed();System.out.println("环绕后");return proceed;}/*** 异常通知* @param ex 异常对象*/public void afterThrowing(Exception ex){System.out.println("发生异常了!");}
}
Spring原生方式实现AOP时,只支持四种通知类型:
通知类型 实现接口 前置通知 MethodBeforeAdvice 后置通知 AfterReturningAdvice 异常通知 ThrowsAdvice 环绕通知 MethodInterceptor -
编写配置类
<!-- 通知对象 --> <bean id="springAop" class="com.Spring.advice.SpringAop"></bean><!-- 配置代理对象 --> <bean id="userDaoProxy" class="org.springframework.aop.framework.ProxyFactoryBean"><!-- 配置目标对象 --><property name="target" ref="userDao"></property><!-- 配置通知 --><property name="interceptorNames"><list><value>springAop</value></list></property><!-- 代理对象的生成方式 true:使用CGLib false:使用原生JDK生成--><property name="proxyTargetClass" value="true"></property> </bean> -
编写测试类
public class UserDaoTest2 {@Testpublic void testAdd(){ApplicationContext ac = new ClassPathXmlApplicationContext("bean2.xml");UserDao userDao = (UserDao) ac.getBean("userDaoProxy"); // 获取的是代理对象userDao.update();}
}
SchemaBased实现AOP
SchemaBased(基础模式)配置方式是指使用Spring原生方式定义通知,而使用AspectJ框架配置切面。
-
编写通知类
public class SpringAop implements MethodBeforeAdvice, AfterReturningAdvice, ThrowsAdvice, MethodInterceptor {/*** 前置通知* @param method 目标方法* @param args 目标方法的参数列表* @param target 目标对象* @throws Throwable*/@Overridepublic void before(Method method, Object[] args, Object target) throws Throwable {System.out.println("前置通知");}/*** 后置通知* @param returnValue 目标方法的返回值* @param method 目标方法* @param args 目标方法的参数列表* @param target 目标对象* @throws Throwable*/@Overridepublic void afterReturning(Object returnValue, Method method, Object[] args, Object target) throws Throwable {System.out.println("后置通知");}/*** 环绕通知* @param invocation 目标方法* @return* @throws Throwable*/@Overridepublic Object invoke(MethodInvocation invocation) throws Throwable {System.out.println("环绕前");Object proceed = invocation.proceed();System.out.println("环绕后");return proceed;}/*** 异常通知* @param ex 异常对象*/public void afterThrowing(Exception ex){System.out.println("发生异常了!");} } -
配置切面
<!-- 通知对象 --> <bean id="springAop2" class="com.Spring.aop.SpringAop2"/><!-- 配置切面 --> <aop:config><!-- 配置切点--><aop:pointcut id="myPointcut" expression="execution(* com.Spring.dao.UserDao.*(..))"/><!-- 配置切面:advice-ref:通知对象 pointcut-ref:切点 --><aop:advisor advice-ref="springAop2" pointcut-ref="myPointcut"/> </aop:config> -
测试
@Test
public void t6(){ApplicationContext ac = new ClassPathXmlApplicationContext("aop3.xml");UserDao userDao = (UserDao) ac.getBean("userDao");userDao.add();
}
Spring事务
事务简介
事务:不可分割的原子操作。即一系列的操作要么同时成功,要么同时失败。
开发过程中,事务管理一般在service层,service层中可能会操作多次数据库,这些操作是不可分割的。否则当程序报错时,可能会造成数据异常。
如:张三给李四转账时,需要两次操作数据库:张三存款减少、李四存款增加。如果这两次数据库操作间出现异常,则会造成数据错误。
-
准备数据库
CREATE DATABASE `spring` ; USE `spring`; DROP TABLE IF EXISTS `account`;CREATE TABLE `account` (`id` int(11) NOT NULL AUTO_INCREMENT,`username` varchar(255) DEFAULT NULL,`balance` double DEFAULT NULL,PRIMARY KEY (`id`) ) ENGINE=InnoDB AUTO_INCREMENT=3 DEFAULT CHARSET=utf8;insert into `account`(`id`,`username`,`balance`) values (1,'张三',1000),(2,'李四',1000); -
创建maven项目,引入依赖
<dependencies><!-- mybatis --><dependency><groupId>org.mybatis</groupId><artifactId>mybatis</artifactId><version>3.5.7</version></dependency><!-- mysql驱动包 --><dependency><groupId>mysql</groupId><artifactId>mysql-connector-java</artifactId><version>8.0.26</version></dependency><!-- druid连接池 --><dependency><groupId>com.alibaba</groupId><artifactId>druid</artifactId><version>1.2.8</version></dependency><!-- spring --><dependency><groupId>org.springframework</groupId><artifactId>spring-context</artifactId><version>5.3.13</version></dependency><dependency><groupId>org.springframework</groupId><artifactId>spring-tx</artifactId><version>5.3.13</version></dependency><dependency><groupId>org.springframework</groupId><artifactId>spring-jdbc</artifactId><version>5.3.13</version></dependency><!-- MyBatis与Spring的整合包,该包可以让Spring创建MyBatis的对象 --><dependency><groupId>org.mybatis</groupId><artifactId>mybatis-spring</artifactId><version>2.0.6</version></dependency><!-- junit,如果Spring5整合junit,则junit版本至少在4.12以上 --><dependency><groupId>junit</groupId><artifactId>junit</artifactId><version>4.12</version><scope>test</scope></dependency><!-- spring整合测试模块 --><dependency><groupId>org.springframework</groupId><artifactId>spring-test</artifactId><version>5.3.13</version><scope>test</scope></dependency> </dependencies> -
创建配置文件
<?xml version="1.0" encoding="UTF-8"?> <beans xmlns="http://www.springframework.org/schema/beans"xmlns:context="http://www.springframework.org/schema/context"xmlns:xsi="http://www.w3.org/2001/XMLSchema-instance"xsi:schemaLocation="http://www.springframework.org/schema/beanshttp://www.springframework.org/schema/beans/spring-beans.xsdhttp://www.springframework.org/schema/contexthttp://www.springframework.org/schema/context/spring-context.xsd"><!-- 包扫描 --><context:component-scan base-package="com.Spring"></context:component-scan><!-- 创建druid数据源对象 --><bean id="dataSource" class="com.alibaba.druid.pool.DruidDataSource"><property name="driverClassName" value="com.mysql.jdbc.Driver"></property><property name="url" value="jdbc:mysql:///spring"></property><property name="username" value="root"></property><property name="password" value="root"></property></bean><bean id="sqlSessionFactory" class="org.mybatis.spring.SqlSessionFactoryBean"><property name="dataSource" ref="dataSource"></property></bean><bean id="mapperScanner" class="org.mybatis.spring.mapper.MapperScannerConfigurer"><property name="basePackage" value="com.Spring.dao"></property></bean> </beans> -
编写Java代码
// 账户 public class Account {private int id; // 账号private String username; // 用户名private double balance; // 余额// 省略getter/setter/tostring/构造方法 }@Repository public interface AccountDao {// 根据id查找用户@Select("select * from account where id = #{id}")Account findById(int id);// 修改用户@Update("update account set balance = #{balance} where id = #{id}")void update(Account account); }@Service public class AccountService {@Autowiredprivate AccountDao accountDao;/*** 转账* @param id1 转出人id* @param id2 转入人id* @param price 金额*/public void transfer(int id1, int id2, double price) {// 转出人减少余额Account account1 = accountDao.findById(id1);account1.setBalance(account1.getBalance()-price);accountDao.update(account1);int i = 1/0; // 模拟程序出错// 转入人增加余额Account account2 = accountDao.findById(id2);account2.setBalance(account2.getBalance()+price);accountDao.update(account2);} } -
测试转账
@RunWith(SpringJUnit4ClassRunner.class)
@ContextConfiguration(locations="classpath:applicationContext.xml")
public class AccountServiceTest {@Autowiredprivate AccountService accountService;@Testpublic void testTransfer(){accountService.transfer(1,2,500);}
}
此时没有事务管理,会造成张三的余额减少,而李四的余额并没有增加。所以事务处理位于业务层,即一个service方法是不能分割的。
Spring事务管理方案
在service层手动添加事务可以解决该问题:
@Autowired
private SqlSessionTemplate sqlSession;public void transfer(int id1, int id2, double price) {try{// account1修改余额Account account1 = accountDao.findById(id1);account1.setBalance(account1.getBalance()-price);accountDao.update(account1);int i = 1/0; // 模拟转账出错// account2修改余额Account account2 = accountDao.findById(id2);account2.setBalance(account2.getBalance()+price);accountDao.update(account2); sqlSession.commit();}catch(Exception ex){sqlSession.rollback();}
}
但在Spring管理下不允许手动提交和回滚事务。此时我们需要使用Spring的事务管理方案,在Spring框架中提供了两种事务管理方案:
- 编程式事务:通过编写代码实现事务管理。
- 声明式事务:基于AOP技术实现事务管理。
在Spring框架中,编程式事务管理很少使用,我们对声明式事务管理进行详细学习。
Spring的声明式事务管理在底层采用了AOP技术,其最大的优点在于无需通过编程的方式管理事务,只需要在配置文件中进行相关的规则声明,就可以将事务规则应用到业务逻辑中。
使用AOP技术为service方法添加如下通知:
Spring事务管理器
Spring依赖事务管理器进行事务管理,事务管理器即一个通知类,我们为该通知类设置切点为service层方法即可完成事务自动管理。由于不同技术操作数据库,进行事务操作的方法不同。如:JDBC提交事务是connection.commit(),MyBatis提交事务是sqlSession.commit(),所以Spring提供了多个事务管理器。
| 事务管理器名称 | 作用 |
|---|---|
| org.springframework.jdbc.datasource.DataSourceTransactionManager | 针对JDBC技术提供的事务管理器。适用于JDBC和MyBatis。 |
| org.springframework.orm.hibernate3.HibernateTransactionManager | 针对于Hibernate框架提供的事务管理器。适用于Hibernate框架。 |
| org.springframework.orm.jpa.JpaTransactionManager | 针对于JPA技术提供的事务管理器。适用于JPA技术。 |
| org.springframework.transaction.jta.JtaTransactionManager | 跨越了多个事务管理源。适用在两个或者是多个不同的数据源中实现事务控制。 |
我们使用MyBatis操作数据库,接下来使用DataSourceTransactionManager进行事务管理。
-
引入依赖
<!-- 事务管理 --> <dependency><groupId>org.springframework</groupId><artifactId>spring-tx</artifactId><version>5.3.13</version> </dependency> <!-- AspectJ --> <dependency><groupId>org.aspectj</groupId><artifactId>aspectjweaver</artifactId><version>1.8.7</version> </dependency> -
在配置文件中引入约束
xmlns:aop="http://www.springframework.org/schema/aop" xmlns:tx="http://www.springframework.org/schema/tx"http://www.springframework.org/schema/aop http://www.springframework.org/schema/aop/spring-aop.xsd http://www.springframework.org/schema/tx http://www.springframework.org/schema/tx/spring-tx.xsd -
进行事务配置
<!-- 事务管理器  -->
<bean id="transactionManager" class="org.springframework.jdbc.datasource.DataSourceTransactionManager"><property name="dataSource" ref="dataSource"></property>
</bean><!-- 进行事务相关配置 -->
<tx:advice id = "txAdvice"><tx:attributes><tx:method name="*"/></tx:attributes>
</tx:advice><!-- 配置切面 -->
<aop:config><!-- 配置切点 --><aop:pointcut id="pointcut" expression="execution(* com.Spring.service.*.*(..))"/><!-- 配置通知 --><aop:advisor advice-ref="txAdvice" pointcut-ref="pointcut"></aop:advisor>
</aop:config>
事务控制的API
Spring进行事务控制的功能是由三个接口提供的,这三个接口是Spring实现的,在开发中我们很少使用到,只需要了解他们的作用即可:
PlatformTransactionManager接口
PlatformTransactionManager是Spring提供的事务管理器接口,所有事务管理器都实现了该接口。该接口中提供了三个事务操作方法:
- TransactionStatus getTransaction(TransactionDefinition definition):获取事务状态信息。
- void commit(TransactionStatus status):事务提交
- void rollback(TransactionStatus status):事务回滚
TransactionDefinition接口
TransactionDefinition是事务的定义信息对象,它有如下方法:
- String getName():获取事务对象名称。
- int getIsolationLevel():获取事务的隔离级别。
- int getPropagationBehavior():获取事务的传播行为。
- int getTimeout():获取事务的超时时间。
- boolean isReadOnly():获取事务是否只读。
TransactionStatus接口
TransactionStatus是事务的状态接口,它描述了某一时间点上事务的状态信息。它有如下方法:
- void flush() 刷新事务
- boolean hasSavepoint() 获取是否存在保存点
- boolean isCompleted() 获取事务是否完成
- boolean isNewTransaction() 获取是否是新事务
- boolean isRollbackOnly() 获取是否回滚
- void setRollbackOnly() 设置事务回滚
事务的相关配置
在<tx:advice>中可以进行事务的相关配置:
<tx:advice id="txAdvice"><tx:attributes><tx:method name="*"/><tx:method name="find*" read-only="true"/></tx:attributes>
</tx:advice>
<tx:method>中的属性:
- name:指定配置的方法。
*表示所有方法,find*表示所有以find开头的方法。- read-only:是否是只读事务,只读事务不存在数据的修改,数据库将会为只读事务提供一些优化手段,会对性能有一定提升,建议在查询中开启只读事务。
- timeout:指定超时时间,在限定的时间内不能完成所有操作就会抛异常。默认永不超时
- rollback-for:指定某个异常事务回滚,其他异常不回滚。默认所有异常回滚。
- no-rollback-for:指定某个异常不回滚,其他异常回滚。默认所有异常回滚。
- propagation:事务的传播行为
- isolation:事务的隔离级别
事务的传播行为
事务传播行为是指多个含有事务的方法相互调用时,事务如何在这些方法间传播。
如果在service层的方法中调用了其他的service方法,假设每次执行service方法都要开启事务,此时就无法保证外层方法和内层方法处于同一个事务当中。
// method1的所有方法在同一个事务中
public void method1(){// 此时会开启一个新事务,这就无法保证method1()中所有的代码是在同一个事务中method2();System.out.println("method1");
}public void method2(){System.out.println("method2");
}
事务的传播特性就是解决这个问题的,Spring帮助我们将外层方法和内层方法放入同一事务中。
| 传播行为 | 介绍 |
|---|---|
| REQUIRED | 默认。支持当前事务,如果当前没有事务,就新建一个事务。这是最常见的选择。 |
| SUPPORTS | 支持当前事务,如果当前没有事务,就以非事务方式执行。 |
| MANDATORY | 支持当前事务,如果当前没有事务,就抛出异常。 |
| REQUIRES_NEW | 新建事务,如果当前存在事务,把当前事务挂起。 |
| NOT_SUPPORTED | 以非事务方式执行操作,如果当前存在事务,就把当前事务挂起。 |
| NEVER | 以非事务方式执行,如果当前存在事务,则抛出异常。 |
| NESTED | 必须在事务状态下执行,如果没有事务则新建事务,如果当前有事务则创建一个嵌套事务 |
事务的隔离级别
事务隔离级别反映事务提交并发访问时的处理态度,隔离级别越高,数据出问题的可能性越低,但效率也会越低。
| 隔离级别 | 脏读 | 不可重复读 | 幻读 |
|---|---|---|---|
| READ_UNCOMMITTED(读取未提交内容) | Yes | Yes | Yes |
| READ_COMMITTED(读取提交内容) | No | Yes | Yes |
| REPEATABLE_READ(重复读) | No | No | Yes |
| SERIALIZABLE(可串行化) | No | No | No |
如果设置为DEFAULT会使用数据库的隔离级别。
- SqlServer , Oracle默认的事务隔离级别是READ_COMMITTED
- Mysql的默认隔离级别是REPEATABLE_READ
注解配置声明式事务
Spring支持使用注解配置声明式事务。用法如下:
-
注册事务注解驱动
<!-- 注册事务注解驱动 --> <tx:annotation-driven transaction-manager="transactionManager"></tx:annotation-driven> -
在需要事务支持的方法或类上加@Transactional
@Service // 作用于类上时,该类的所有public方法将都具有该类型的事务属性 @Transactional(propagation = Propagation.REQUIRED,isolation = Isolation.DEFAULT) public class AccountService {@Autowiredprivate AccountDao accountDao;/*** 转账* @param id1 转出人id* @param id2 转入人id* @param price 金额*/// 作用于方法上时,该方法将都具有该类型的事务属性@Transactional(propagation = Propagation.REQUIRED,isolation = Isolation.DEFAULT)public void transfer(int id1, int id2, double price) {// account1修改余额Account account1 = accountDao.findById(id1);account1.setBalance(account1.getBalance()-price);accountDao.update(account1);int i = 1/0; // 模拟转账出错// account2修改余额Account account2 = accountDao.findById(id2);account2.setBalance(account2.getBalance()+price);accountDao.update(account2);} } -
配置类代替xml中的注解事务支持:在配置类上方写@EnableTranscationManagement
@Configuration
@ComponentScan("com.Spring")
@EnableTransactionManagement
public class SpringConfig {@Beanpublic DataSource getDataSource(){DruidDataSource druidDataSource = new DruidDataSource();druidDataSource.setDriverClassName("com.mysql.jdbc.Driver");druidDataSource.setUrl("jdbc:mysql:///spring");druidDataSource.setUsername("root");druidDataSource.setPassword("root");return druidDataSource;}@Beanpublic SqlSessionFactoryBean getSqlSession(DataSource dataSource){SqlSessionFactoryBean sqlSessionFactoryBean = new SqlSessionFactoryBean();sqlSessionFactoryBean.setDataSource(dataSource);return sqlSessionFactoryBean;}@Beanpublic MapperScannerConfigurer getMapperScanner(){MapperScannerConfigurer mapperScannerConfigurer = new MapperScannerConfigurer();mapperScannerConfigurer.setBasePackage("com.Spring.dao");return mapperScannerConfigurer;}@Beanpublic DataSourceTransactionManager getTransactionManager(DataSource dataSource){DataSourceTransactionManager dataSourceTransactionManager = new DataSourceTransactionManager();dataSourceTransactionManager.setDataSource(dataSource);return dataSourceTransactionManager;}
}
相关文章:
【精选】Spring整合MyBatis,Junit 及Spring 事务Spring AOP面向切面详解
Spring整合MyBatis 搭建环境 我们知道使用MyBatis时需要写大量创建SqlSessionFactoryBuilder、SqlSessionFactory、SqlSession等对象的代码,而Spring的作用是帮助我们创建和管理对象,所以我们可以使用Spring整合MyBatis,简化MyBatis开发。 …...
获取Spring容器Bean工具类
获取Spring容器Bean工具类 1、创建SpringUtils工具类2、注册 SpringUtils工具类3、如果打包的是War方式,可能上面两个注册工具类的方法都没用 1、创建SpringUtils工具类 public class SpringUtils implements ApplicationContextAware {private static Application…...
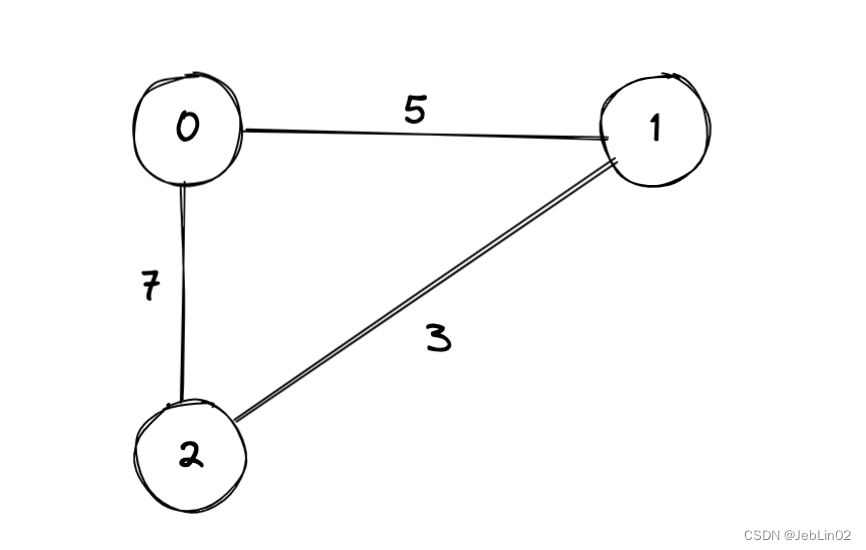
图面试专题
一、概念 和二叉树的区别:图可能有环 常见概念 顶点(Vertex): 图中的节点或点。边(Edge): 顶点之间的连接线,描述节点之间的关系。有向图(Directed Graph)&…...

VUE的计算属性
<!DOCTYPE html> <html> <head> <meta charset"UTF-8" /> <title>计算属性</title> </head> <style> table { border: 1px solid #000; text-align: center; width: 240px; } th,td { border: 1px solid #000; …...

uniapp中使用pageScrollTo让页面滚动到固定节点或距离
uniapp中使用pageScrollTo让页面滚动到固定节点或距离 思路:计算当前节点距离顶部的距离滚动距离然后使用pageScrollTo进行滚动(要保证页面加载完成之后在执行) #topic" id :页面的节点 changeTop(id) {let query uni.c…...

使用机器学习方法进行分析和处理:对高质量图像进行压缩
使用SVD(奇异值分解)进行图像压缩与普通压缩工具压缩的主要区别在于压缩原理和压缩效果。 压缩原理: 普通图像压缩工具通常采用有损压缩或无损压缩算法,如JPEG、PNG等,它们主要针对图像的像素进行变换和编码。而SVD图像…...

多线程面试总结
1. 创建线程有哪几种方式 创建线程有三种方式,分别是继承Thread类、实现Runnable接口、实现Callable接口。 通过继承Thread类来创建并启动线程的步骤如下: 定义Thread类的子类,并重写该类的run()方法,该run()方法将作为线程执行…...

android11-隐藏状态栏和导航栏
隐藏导航栏 /android11/frameworks/base/packages/SystemUI/res/layout/navigation_bar.xml diff --git a/frameworks/base/packages/SystemUI/res/layout/navigation_bar.xml b/frameworks/base/packages/SystemUI/res/layout/navigation_bar.xml index ba6b6956f1..6db2348…...
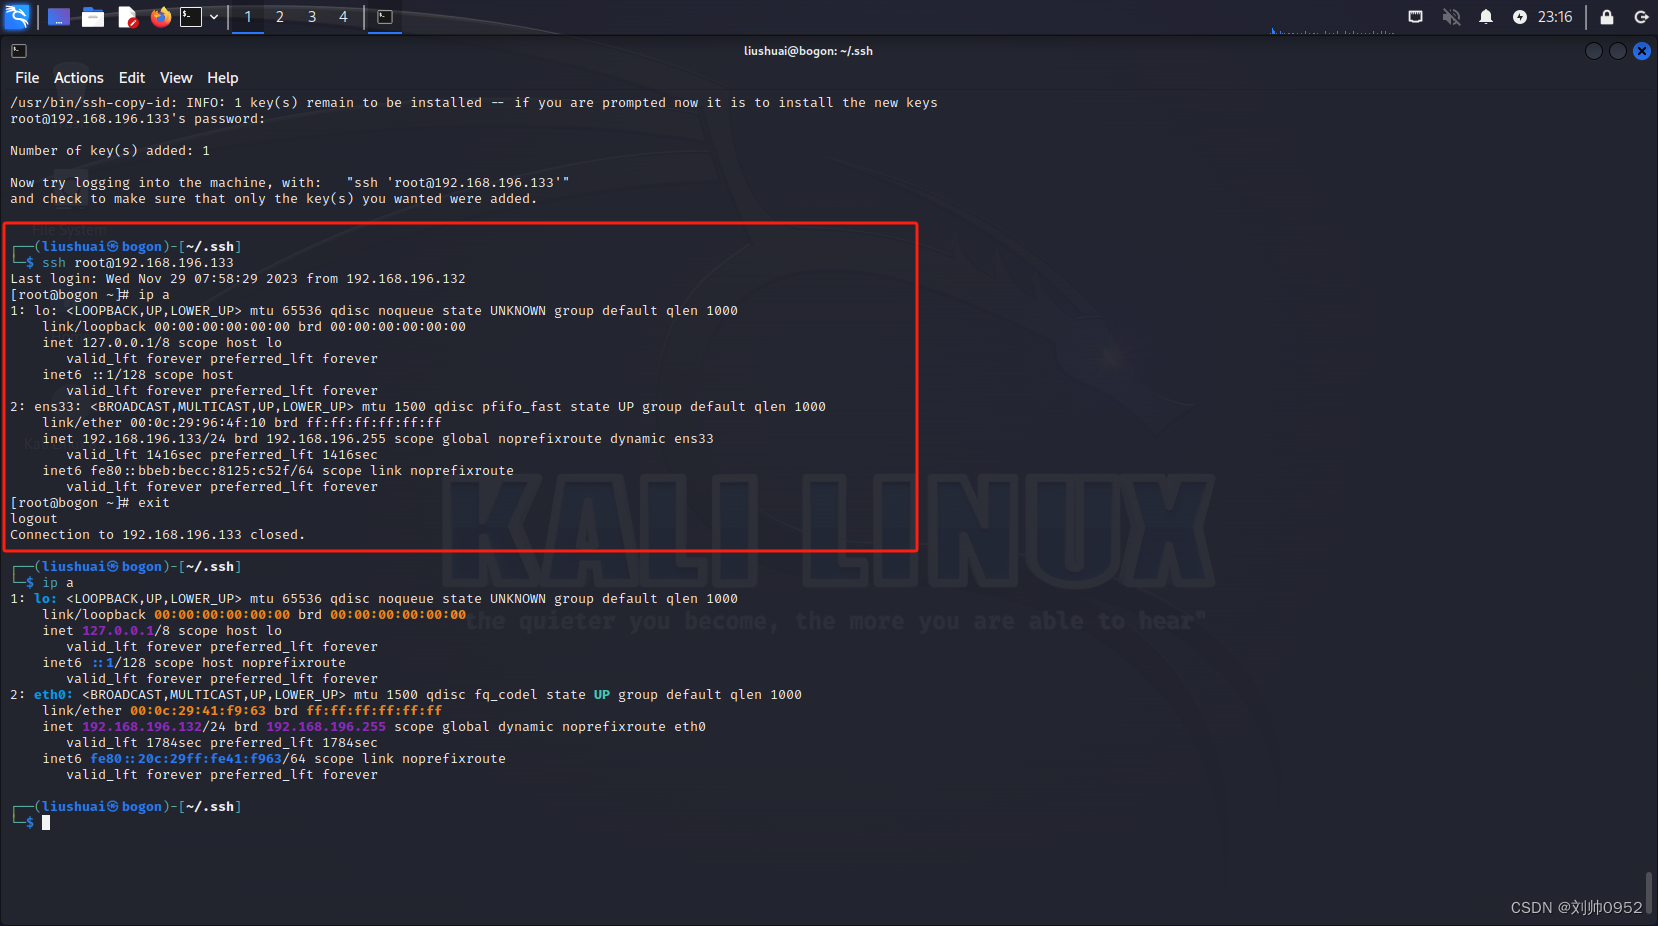
血的教训--kail系统免密centos7的坑【高版本ssh免密低版本ssh的坑】
血的教训–kail系统免密centos7的坑【高版本ssh免密低版本ssh的坑】 最近下载了一个2023版本的kail系统,但是经过几次设置免密后,ssh过去一直让提供密码,所以就仔细的分析了一下,果然还是发现了点猫腻 接上一个博客,大…...
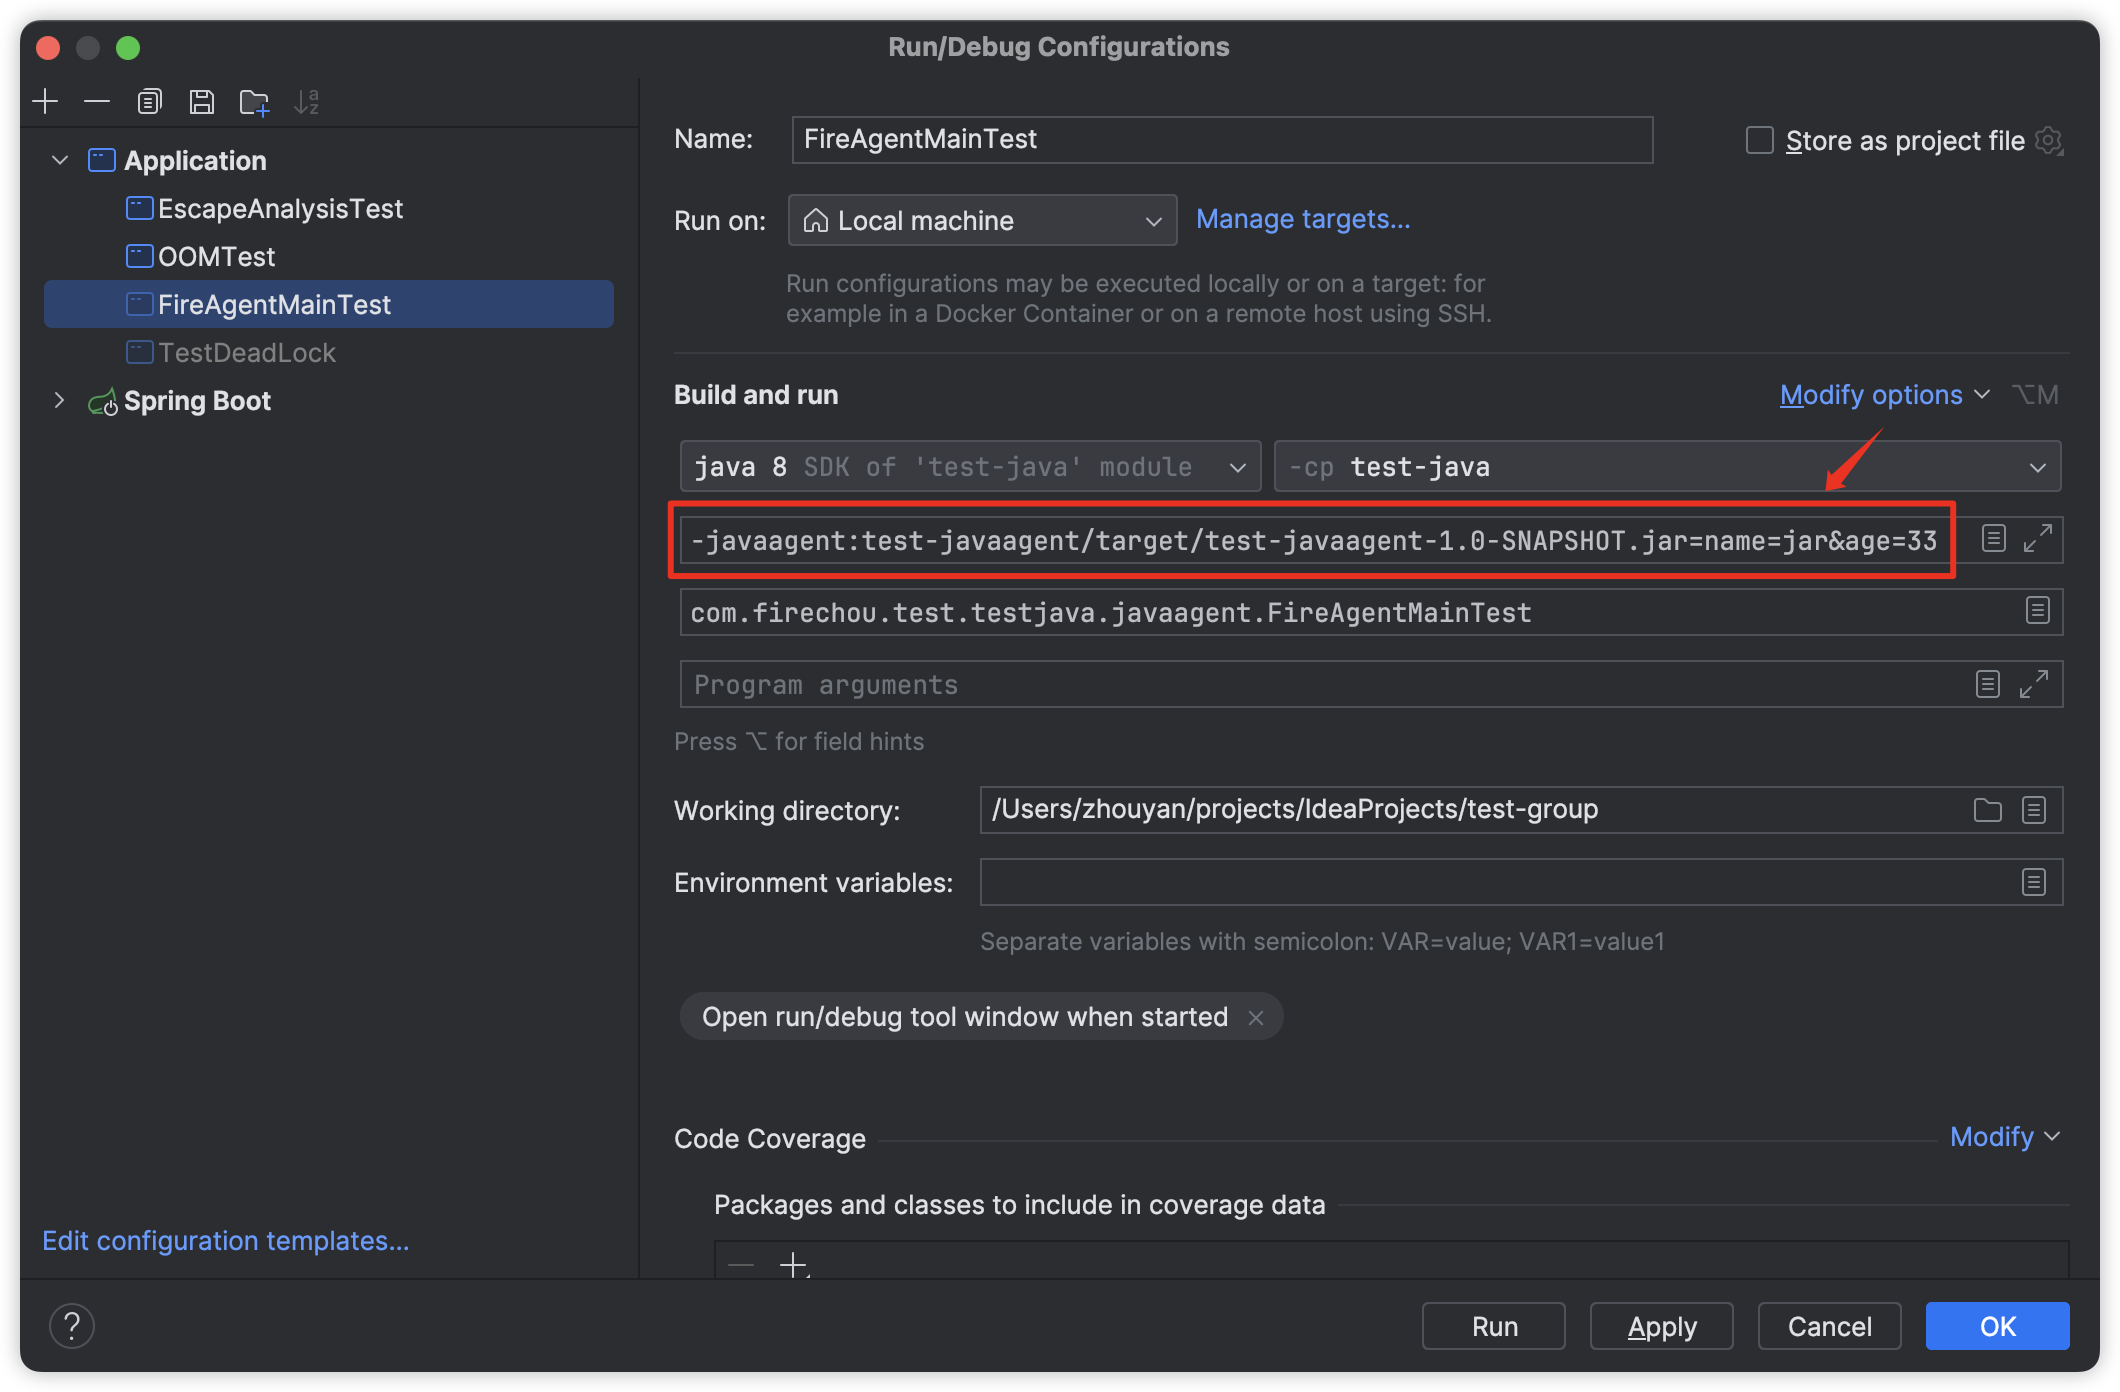
javaagent字节码增强浅尝
概述 javaagent 技术广泛应用于对代码的增强,比如统计方法执行时间、GC 信息打印、分布式链路跟踪等;实现方式包括 javassist 和 bytebuddy,bytebuddy 是对 javassist 的改进;类似于 spring 中的 AOP; Instrumentati…...
计算机组成原理-Cache替换算法
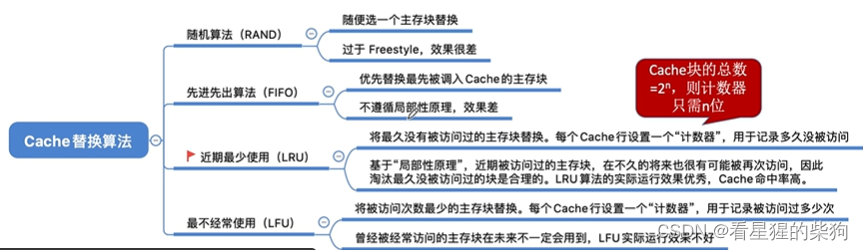
文章目录 总览随机算法(RAND)先进先出算法(FIFO)近期最少使用算法(LRU)最不经常使用算法(LFU)总结 总览 随机算法(RAND) 没有选择性地考虑替换哪一块Cache&a…...

Adobe 家族系列download
adobe 前言 Adobe公司的产品线中拥有多个家族桶,下面是Adobe全家桶产品的功能介绍: Creative Cloud(创意云):包含Photoshop、Illustrator、InDesign、Premiere Pro、After Effects、Lightroom等创意设计、视频制作和…...
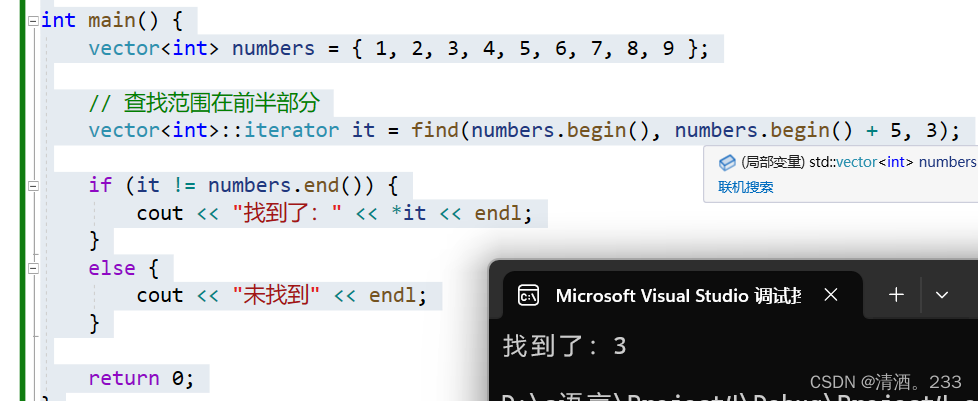
97.STL-查找算法 find
目录 STL-查找算法find 1.基本用法: 2.查找自定义类型: 3.查找范围: STL-查找算法find 在C的STL(标准模板库)中,find 算法用于在指定范围内查找指定值的元素。 功能描述: 查找指定元素&…...

如何应对雨天飞行的挑战?无人机机库防护能力解析
一、 背景介绍 无人机机库是无人机停放和起降场所,类似传统飞机的 hangar(飞机库)。它是一个专门用于存储、维护和保护无人机的设施。无人机机库的存在有助于提高无人机的安全性,同时也为无人机提供了一个有序的管理场所。 雨天…...

机器学习笔记 - 3D数据的常见表示方式
一、简述 从单一角度而自动合成3D数据是人类视觉和大脑的基本功能,这对计算机视觉算法来说是比较难的。但随着LiDAR、RGB-D 相机(RealSense、Kinect)和3D扫描仪等3D传感器的普及和价格的降低,3D 采集技术的最新进展取得了巨大飞跃。与广泛使用的 2D 数据不同,3D 数据具有丰…...
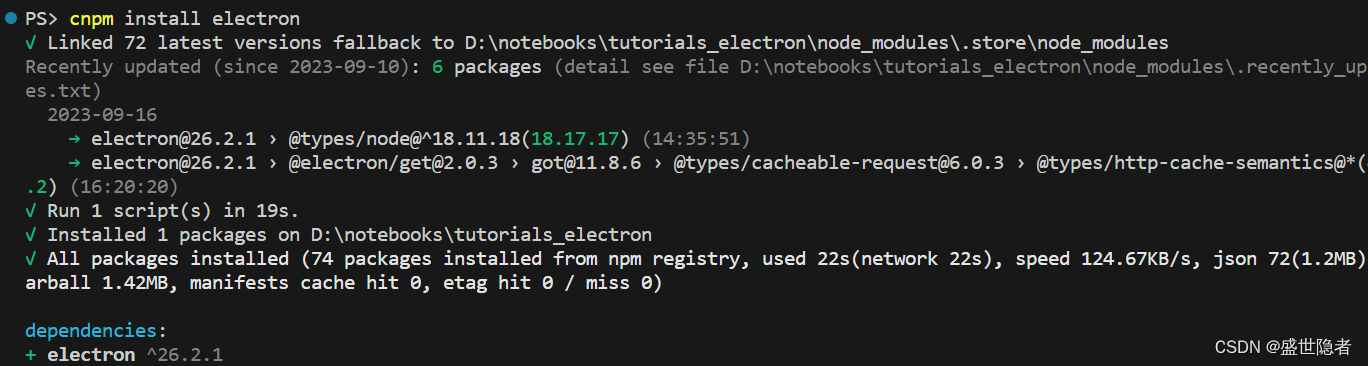
【Node.js】解决npm报错:RequestError: unable to verify the first certificate
1. 问题简述 帖主从nodejs官网下载安装nodejs后,发现使用以下命令安装electron会报错: npm install electron 报错信息如下: npm ERR! RequestError: unable to verify the first certificate 2. 解决方案 网上列举的方案,无…...
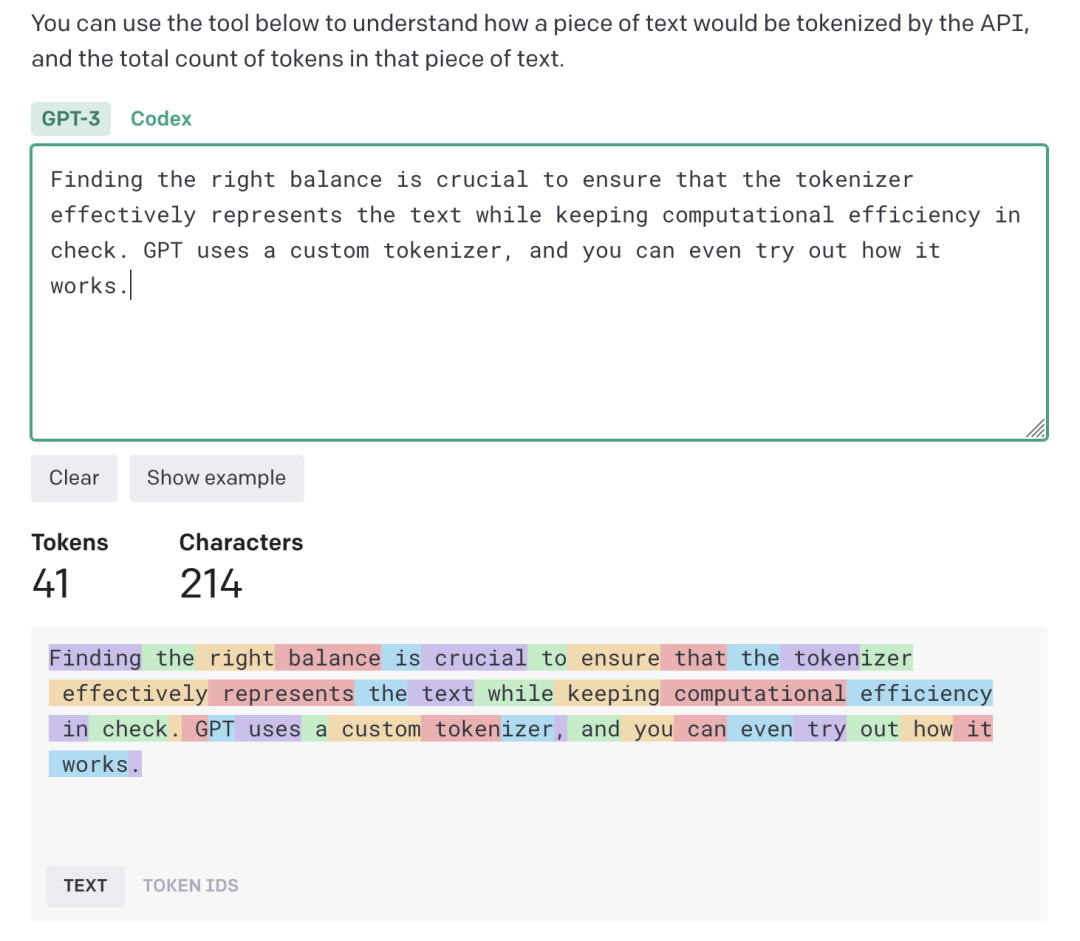
语言模型文本处理基石:Tokenizer简明概述
编者按:近年来,人工智能技术飞速发展,尤其是大型语言模型的问世,让 AI 写作、聊天等能力有了质的飞跃。如何更好地理解和利用这些生成式 AI,成为许多开发者和用户关心的问题。 今天,我们推出的这篇文章有助…...
淘宝商品详情数据接口(店铺搬家、数据分析、代购商城、ERP选品、无货源铺货、品牌监控)
使用淘宝API接口需要以下步骤: 注册开发者账号:在淘宝开放平台(https://o0b.cn/anzexi)上注册一个开发者账号,并创建一个应用。 获取API密钥:在应用页面上获取API密钥,这是后续调用API接口的凭…...
面试篇之微服务(一)
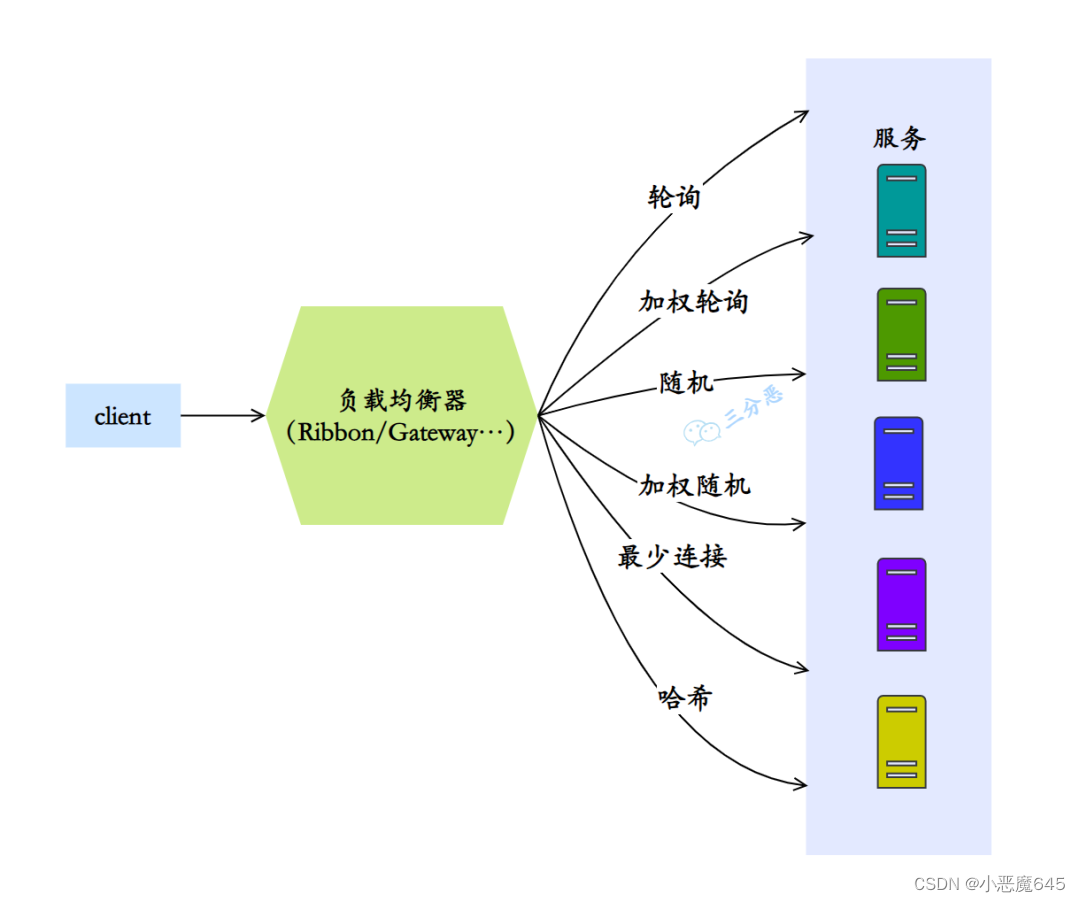
目录 概览 1.什么是微服务? 2.微服务带来了哪些挑战? 3.现在有哪些流行的微服务解决方案? 这三种方案有什么区别吗? 4.说下微服务有哪些组件? 注册中心 5.注册中心是用来干什么的? 6.SpringCloud可…...

智慧科研助力科研数据的分析处理
如今,科研领域的发展日新月异,数据量也越来越大。这时,智慧科研可视化技术不仅为科研人员提供了快速高效的数据分析手段,而且为科研工作的推进提供了新的思路和方法。通过可视化手段,我们可以将各种数据、信息、知识以…...

微信红包助手终极指南:无需ROOT的智能抢红包解决方案
微信红包助手终极指南:无需ROOT的智能抢红包解决方案 【免费下载链接】WeChatLuckyMoney :money_with_wings: WeChats lucky money helper (微信抢红包插件) by Zhongyi Tong. An Android app that helps you snatch red packets in WeChat groups. 项目地址: ht…...
)
从数据到模型:手把手教你预处理MPIIFaceGaze和EyeDiap数据集(Python实战)
从数据到模型:手把手教你预处理MPIIFaceGaze和EyeDiap数据集(Python实战)当你第一次打开MPIIFaceGaze或EyeDiap数据集的压缩包时,那种面对杂乱文件夹和神秘.mat文件的迷茫感,我太熟悉了。作为计算机视觉工程师…...
)
保姆级教程:手把手教你为ESXi 6.7配置主板BIOS(VT-x/VT-d/AES全开)
从零开始:ESXi 6.7主板BIOS设置完全指南当你第一次接触企业级虚拟化平台时,那种既兴奋又忐忑的心情我完全理解。作为过来人,我清楚地记得自己第一次为ESXi配置BIOS时的迷茫——那些专业术语像天书一样,生怕设置错误导致服务器无法…...

WarcraftHelper:让魔兽争霸3在现代电脑上完美运行的关键插件
WarcraftHelper:让魔兽争霸3在现代电脑上完美运行的关键插件 【免费下载链接】WarcraftHelper Warcraft III Helper , support 1.20e, 1.24e, 1.26a, 1.27a, 1.27b 项目地址: https://gitcode.com/gh_mirrors/wa/WarcraftHelper 你是否还在为《魔兽争霸3》这…...

告别依赖冲突:在Debian12上为特定项目搭建Python2.7.18独立运行环境
告别依赖冲突:在Debian12上为特定项目搭建Python2.7.18独立运行环境 当现代Linux系统已全面拥抱Python3的时代,突然需要维护一个仅支持Python2.7的遗留项目,这种场景对开发者而言无异于一场噩梦。本文将带你用工程化的思维,在Deb…...

Mysql?基础语法!!!
作为程序员、数据分析从业者,甚至是产品运营,SQL都是必须掌握的核心技能。不管是后端开发对数据库增删改查,还是数据分析提取业务数据,本质都是在写SQL语句。很多新手觉得SQL难,其实是没有理清逻辑。SQL的核心逻辑非常…...

XZ9971,60V,5A,NMOS 封装:SOT223
封装:SOT223类型:NVDS:60V VGS: 20V ID:5ARDS(ON):10V <50mΩRDS(ON):4.5V <60mΩ型号: XZ9971 封装:SOT223类型&…...

LLM驱动的高性能计算日志解析技术实践
1. 项目概述:LLM驱动的HPC日志解析革命高性能计算(HPC)系统如同数字世界的巨型望远镜,每天产生PB级的观测数据——系统日志。这些日志记录了从硬件底层到应用层的所有活动,但它们的价值长期被埋没在非结构化文本的泥沼中。传统日志解析方法就…...

yuzu模拟器:在PC上完美运行Switch游戏的终极解决方案
yuzu模拟器:在PC上完美运行Switch游戏的终极解决方案 【免费下载链接】yuzu 任天堂 Switch 模拟器 项目地址: https://gitcode.com/GitHub_Trending/yu/yuzu 想要在电脑上体验任天堂Switch游戏的魅力吗?yuzu模拟器作为目前最成熟的开源Switch模拟…...

摆脱论文困扰!2026年最值得拥有的专业AI智能降重工具
2026年论文降AI率工具已从“基础改写”升级为多维度智能优化系统,核心评价维度涵盖AI生成内容识别精度、语义逻辑一致性、学术格式合规性、查重适配能力及多语言处理水平。本次测评覆盖6款主流工具,测试场景包括中文与英文论文、全流程与专项功能、免费与…...