深度学习TensorFlow2基础知识学习前半部分
目录
测试TensorFlow是否支持GPU:
自动求导:
数据预处理 之 统一数组维度
定义变量和常量
训练模型的时候设备变量的设置
生成随机数据
交叉熵损失CE和均方误差函数MSE
全连接Dense层
维度变换reshape
增加或减小维度
数组合并
广播机制:
简单范数运算
矩阵转置
框架本身只是用来编写的工具,每个框架包括Pytorch,tensorflow、mxnet、paddle、mandspore等等框架编程语言上其实差别是大同小异的,不同的点是他们在编译方式、运行方式或者计算速度上,我也浅浅的学习一下这个框架以便于看github上的代码可以轻松些。
我的环境:
google colab的T4 GPU
首先是
测试TensorFlow是否支持GPU:
打开tf的config包,里面有个list_pysical_devices("GPU")
import os
import tensorflow as tfos.environ['TF_CPP_Min_LOG_LEVEL']='3'
os.system("clear")
print("GPU列表:",tf.config.list_logical_devices("GPU"))
运行结果:
GPU列表: [LogicalDevice(name='/device:GPU:0', device_type='GPU')]

检测运行时间:
def run():n=1000#CPU计算矩阵with tf.device('/cpu:0'):cpu_a = tf.random.normal([n,n])cpu_b = tf.random.normal([n,n])print(cpu_a.device,cpu_b.device)#GPU计算矩阵with tf.device('/gpu:0'):gpu_a = tf.random.normal([n,n])gpu_b = tf.random.normal([n,n])print(gpu_a.device,gpu_b.device)def cpu_run():with tf.device('/cpu:0'):c = tf.matmul(cpu_a,cpu_b)return cdef gpu_run():with tf.device('/cpu:0'):c = tf.matmul(gpu_a,gpu_b)return cnumber=1000print("初次运行:")cpu_time=timeit.timeit(cpu_run,number=number)gpu_time=timeit.timeit(gpu_run,number=number)print("cpu计算时间:",cpu_time)print("Gpu计算时间:",gpu_time)print("再次运行:")cpu_time=timeit.timeit(cpu_run,number=number)gpu_time=timeit.timeit(gpu_run,number=number)print("cpu计算时间:",cpu_time)print("Gpu计算时间:",gpu_time)run()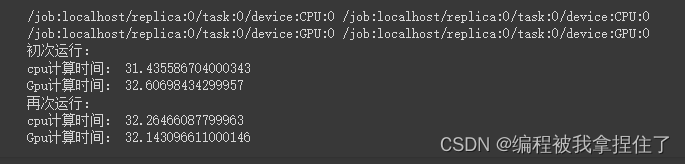
可能T4显卡不太好吧...体现不出太大的效果,也可能是GPU在公用或者还没热身。
自动求导:
公式:
f(x)=x^n微分(导数):
f'(x)=n*x^(n-1)例:
y=x^2
微分(导数):
dy/dx=2x^(2-1)=2x
x = tf.constant(10.)   # 定义常数变量值
with tf.GradientTape() as tape:   #调用tf底下的求导函数tape.watch([x])   # 使用tape.watch()去观察和跟踪watchy=x**2dy_dx = tape.gradient(y,x)
print(dy_dx)
运行结果:tf.Tensor(20.0, shape=(), dtype=float32)
数据预处理 之 统一数组维度
对拿到的脏数据进行预处理的时候需要进行统一数组维度操作,使用tensorflow.keras.preprocessing.sequence 底下的pad_sequences函数,比如下面有三个不等长的数组,我们需要对数据处理成相同的长度,可以进行左边或者补个数
import numpy as np
import pprint as pp #让打印出来的更加好看
from tensorflow.keras.preprocessing.sequence import pad_sequencescomment1 = [1,2,3,4]
comment2 = [1,2,3,4,5,6,7]
comment3 = [1,2,3,4,5,6,7,8,9,10]x_train = np.array([comment1, comment2, comment3], dtype=object)
print(), pp.pprint(x_train)# 左补0,统一数组长度
x_test = pad_sequences(x_train)
print(), pp.pprint(x_test)# 左补255,统一数组长度
x_test = pad_sequences(x_train, value=255)
print(), pp.pprint(x_test)# 右补0,统一数组长度
x_test = pad_sequences(x_train, padding="post")
print(), pp.pprint(x_test)# 切取数组长度, 只保留后3位
x_test = pad_sequences(x_train, maxlen=3)
print(), pp.pprint(x_test)# 切取数组长度, 只保留前3位
x_test = pad_sequences(x_train, maxlen=3, truncating="post")
print(), pp.pprint(x_test)
array([list([1, 2, 3, 4]), list([1, 2, 3, 4, 5, 6, 7]),list([1, 2, 3, 4, 5, 6, 7, 8, 9, 10])], dtype=object)array([[ 0, 0, 0, 0, 0, 0, 1, 2, 3, 4],[ 0, 0, 0, 1, 2, 3, 4, 5, 6, 7],[ 1, 2, 3, 4, 5, 6, 7, 8, 9, 10]], dtype=int32)array([[255, 255, 255, 255, 255, 255, 1, 2, 3, 4],[255, 255, 255, 1, 2, 3, 4, 5, 6, 7],[ 1, 2, 3, 4, 5, 6, 7, 8, 9, 10]], dtype=int32)array([[ 1, 2, 3, 4, 0, 0, 0, 0, 0, 0],[ 1, 2, 3, 4, 5, 6, 7, 0, 0, 0],[ 1, 2, 3, 4, 5, 6, 7, 8, 9, 10]], dtype=int32)array([[ 2, 3, 4],[ 5, 6, 7],[ 8, 9, 10]], dtype=int32)array([[1, 2, 3],[1, 2, 3],[1, 2, 3]], dtype=int32)(None, None)
定义变量和常量
tf中变量定义为Variable,常量Tensor(这里懂了吧,pytorch里面都是Tensor,但是tf里面的Tensor代表向量其实也是可变的),要注意的是Variable数组和变量数值之间的加减乘除可以进行广播机制的运算,而且常量和变量之间也是可以相加的。
import os
os.environ['TF_CPP_MIN_LOG_LEVEL'] = '3'
os.system("cls")import tensorflow as tf################################
# 定义变量
a = tf.Variable(1)
b = tf.Variable(1.)
c = tf.Variable([1.])
d = tf.Variable(1., dtype=tf.float32)print("-" * 40)
print(a)
print(b)
print(c)
print(d)# print(a+b)  # error:类型不匹配
print(b+c)    # 注意这里是Tensor类型
print(b+c[0]) # 注意这里是Tensor类型################################
# 定义Tensor
x1 = tf.constant(1)
x2 = tf.constant(1.)
x3 = tf.constant([1.])
x4 = tf.constant(1, dtype=tf.float32)print("-" * 40)
print(x1)
print(x2)
print(x3)
print(x4)print(x2+x3[0])
运行结果:
----------------------------------------
<tf.Variable 'Variable:0' shape=() dtype=int32, numpy=1> <tf.Variable 'Variable:0' shape=() dtype=float32, numpy=1.0> <tf.Variable 'Variable:0' shape=(1,) dtype=float32, numpy=array([1.], dtype=float32)> <tf.Variable 'Variable:0' shape=() dtype=float32, numpy=1.0> tf.Tensor([2.], shape=(1,), dtype=float32) tf.Tensor(2.0, shape=(), dtype=float32)
----------------------------------------
tf.Tensor(1, shape=(), dtype=int32) tf.Tensor(1.0, shape=(), dtype=float32) tf.Tensor([1.], shape=(1,), dtype=float32) tf.Tensor(1.0, shape=(), dtype=float32) tf.Tensor(2.0, shape=(), dtype=float32)
训练模型的时候设备变量的设置
使用Variable:
如果定义整数默认定义在CPU,定义浮点数默认在GPU上,但是咱们在tf2.0上不用去关心他的变量类型,因为2.0进行运算的变量都在GPU上进行运算(前提上本地有GPU).
使用identity指定变量所定义的设备,在2.0其实不用管了,1.0可能代码得有两个不同设备的版本,但在2.0就不需要在意这个问题了。
################################
# 定义变量后看设备
a = tf.Variable(1)
b = tf.Variable(10.)print("-" * 40)
print("a.device:", a.device, a) # CPU
print("b.device:", b.device, b) # GPU################################
# 定义Tensor后看设备
x1 = tf.constant(100)
x2 = tf.constant(1000.)print("-" * 40)
print("x1.device:", x1.device, x1) # CPU
print("x2.device:", x2.device, x2) # CPU################################
print("-" * 40)# CPU+CPU
ax1 = a + x1
print("ax1.device:", ax1.device, ax1) # GPU# CPU+GPU
bx2 = b + x2
print("bx2.device:", bx2.device, bx2) # GPU################################
# 指定GPU设备定义Tensor
gpu_a = tf.identity(a)
gpu_x1 = tf.identity(x1)print("-" * 40)
print("gpu_a.device:", gpu_a.device, gpu_a)
print("gpu_x1.device:", gpu_x1.device, gpu_x1)
生成随机数据
其实tf和numpy在创建上是大同小异的,除了变量类型不一样。
a = np.ones(12)
print(a)
a = tf.convert_to_tensor(a)#其实没必要转换,直接像下面的方法进行定义。
a = tf.zeros(12)
a = tf.zeros([4,3])
a = tf.zeros([4,6,3])
b = tf.zeros_like(a)
a = tf.ones(12)
a = tf.ones_like(b)
a = tf.fill([3,2], 10.)
a = tf.random.normal([12])
a = tf.random.normal([4,3])
a = tf.random.truncated_normal([3,2])
a = tf.random.uniform([4,3], minval=0, maxval=10)
a = tf.random.uniform([12], minval=0, maxval=10, dtype=tf.int32)
a = tf.range([12], dtype=tf.int32)
b = tf.random.shuffle(a)
print(b)
代码我就不贴了。
交叉熵损失CE和均方误差函数MSE
假设batch=1
直接看怎么用,以图像分类为例,输出是类别个数,选择最大神经原的下标,然后进行独热编码把它变成[1,0,0,0,...],然后就可以与softmax之后的输出概率值之间做交叉熵损失。
rows = 1
out = tf.nn.softmax(tf.random.uniform([rows,2]),axis=1)
print("out:", out)
print("预测值:", tf.math.argmax(out, axis=1), "\n")y = tf.range(rows)
print("y:", y, "\n")y = tf.one_hot(y, depth=10)
print("y_one_hot:", y, "\n")loss = tf.keras.losses.binary_crossentropy(y,out)
# loss = tf.keras.losses.mse(y, out)
print("row loss", loss, "\n")
假设batch=2
rows = 2
out = tf.random.uniform([rows,1])
print("预测值:", out, "\n")y = tf.constant([1])
print("y:", y, "\n")# y = tf.one_hot(y, depth=1)print("y_one_hot:", y, "\n")loss = tf.keras.losses.mse(y,out)
# loss = tf.keras.losses.mse(y, out)
print("row loss", loss, "\n")loss = tf.reduce_mean(loss)
print("总体损失:", loss, "\n")
总损失就是一个batch的损失求均值。
全连接Dense层
###################################################
# Dense: y=wx+b
rows = 1
net = tf.keras.layers.Dense(1) # 一个隐藏层,一个神经元
net.build((rows, 1)) # (编译)每个训练数据有1个特征
print("net.w:", net.kernel) # 参数个数
print("net.b:", net.bias) # 和Dense数一样
假设有一个特征输出,如果讲bulid参数改成(rows,3),那么神经元个数的w参数输出就变成了(3,1)大小的数据。
维度变换reshape
跟numpy一毛一样不用看了
# 10张彩色图片
a = tf.random.normal([10,28,28,3])
print(a)
print(a.shape) # 形状
print(a.ndim)  # 维度b = tf.reshape(a, [10, 784, 3])
print(b)
print(b.shape) # 形状
print(b.ndim)  # 维度c = tf.reshape(a, [10, -1, 3])
print(c)
print(c.shape) # 形状
print(c.ndim)  # 维度d = tf.reshape(a, [10, 784*3])
print(d)
print(d.shape) # 形状
print(d.ndim)  # 维度e = tf.reshape(a, [10, -1])
print(e)
print(e.shape) # 形状
print(e.ndim)  # 维度
增加或减小维度
a = tf.range([24])
# a = tf.reshape(a, [4,6])
print(a)
print(a.shape)
print(a.ndim)# 增加一个维度,相当于[1,2,3]->[[1,2,3]]
b = tf.expand_dims(a, axis=0)
print(b)
print(b.shape)
print(b.ndim)# 减少维度,相当于[[1,2,3]]->[1,2,3]
c = tf.squeeze(b, axis=0)
print(c)
print(c.shape)
print(c.ndim)
数组合并
真t和numpy一毛一样
####################################################
# 数组合并
# tf.concat
a = tf.zeros([2,4,3])
b = tf.ones([2,4,3])print(a)
print(b)# 0轴合并,4,4,3
c = tf.concat([a,b], axis=0)
print(c)# 1轴合并,2,8,3
c = tf.concat([a,b], axis=1)
print(c)# 2轴合并,2,4,6
c = tf.concat([a,b], axis=2)
print(c)# 扩充一维,例如把多个图片放入一个大数组中 -> 2,2,4,3
c = tf.stack([a,b], axis=0)
print(c)# 降低维数,拆分数组
m, n = tf.unstack(c, axis=0)
print(m)
print(n)
广播机制:
a = tf.constant([1, 2, 3])
print(a)x = 1
print(a + x)b = tf.broadcast_to(a, [3, 3])
print(b)x = 10
print(b * x)
运行结果:
tf.Tensor([1 2 3], shape=(3,), dtype=int32)
tf.Tensor([2 3 4], shape=(3,), dtype=int32)
tf.Tensor( [[1 2 3] [1 2 3] [1 2 3]], shape=(3, 3), dtype=int32)
tf.Tensor( [[10 20 30] [10 20 30] [10 20 30]], shape=(3, 3), dtype=int32)
简单范数运算
def log(prefix="", val=""):print(prefix, val, "\n")# 2范数:平方和开根号
a = tf.fill([1,2], value=2.)
log("a:", a)
b = tf.norm(a) # 计算a的范数
log("a的2范数b:", b)# 计算验证
a = tf.square(a)
log("a的平方:", a)a = tf.reduce_sum(a)
log("a平方后的和:", a)b = tf.sqrt(a)
log("a平方和后开根号:", b)# a = tf.range(10, dtype=tf.float32)
矩阵转置
#####################################################
# 矩阵转置
a = tf.range([12])
a = tf.reshape(a, [4,3])
print(a)b = tf.transpose(a) # 行列交换
print(b)# 1张4x4像素的彩色图片
a = tf.random.uniform([4,4,3], minval=0, maxval=10, dtype=tf.int32)
print(a)# 指定变换的轴索引
b = tf.transpose(a, perm=[0,2,1])
print(b)# 把刚才的b再变换回来
c = tf.transpose(b, perm=[0,2,1])
print(c)
今天先敲到这里,这里推荐两个TensorFlow学习教程:
[1]TensorFlow2.0官方教程https://www.tensorflow.org/tutorials/quickstart/beginner?hl=zh-cn
[2]小马哥
相关文章:
深度学习TensorFlow2基础知识学习前半部分
目录 测试TensorFlow是否支持GPU: 自动求导: 数据预处理 之 统一数组维度 定义变量和常量 训练模型的时候设备变量的设置 生成随机数据 交叉熵损失CE和均方误差函数MSE 全连接Dense层 维度变换reshape 增加或减小维度 数组合并 广播机制&#…...
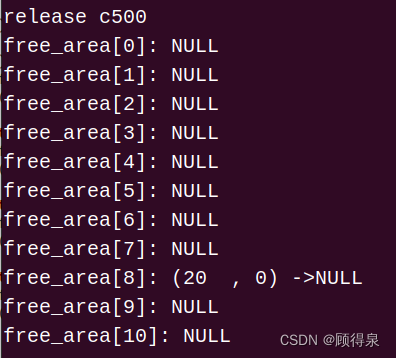
Linux系统---简易伙伴系统
顾得泉:个人主页 个人专栏:《Linux操作系统》 《C/C》 《LeedCode刷题》 键盘敲烂,年薪百万! 一、题目要求 1.采用C语言实现 2.伙伴系统采用free_area[11]数组来组织。要求伙伴内存最小为一个页面,页面大小为4KB…...

Redis使用Lua脚本
Lua脚本 redis可以支持lua脚本,可以使用lua脚本来将几个命令整合为一个整体来执行,这样可以使得多个命令原子操作,且可以减少网络开销 Lua的数据类型 Lua是一个动态类型的语言,一个变量可以存储任何类型的值,类型有&am…...

macos安装metal 加速版 pytorch
categories: [Python] tags: Python MacOS 写在前面 试试 m3 的 metal 加速效果如何 Mac computers with Apple silicon or AMD GPUsmacOS 12.3 or laterPython 3.7 or laterXcode command-line tools: xcode-select --install 安装 Python: conda-forge brew install minif…...
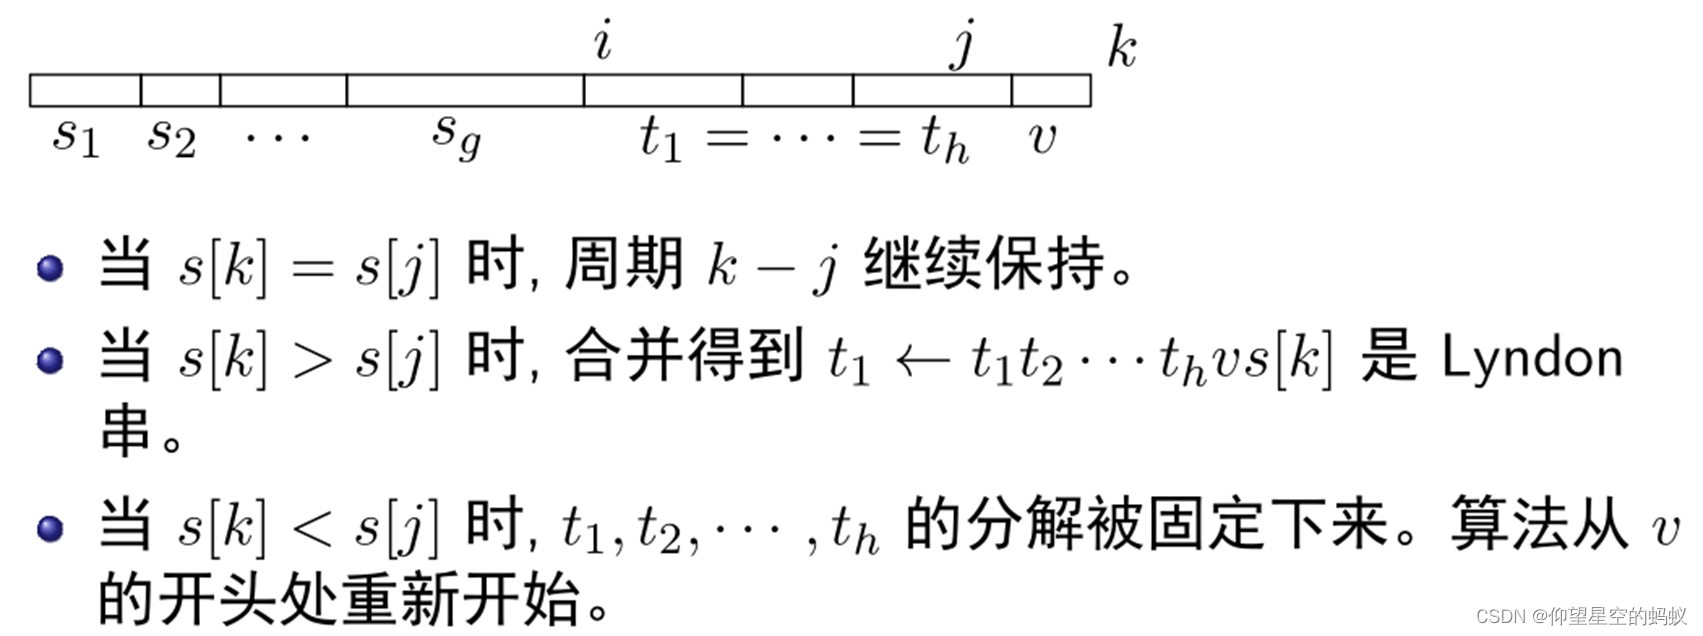
【学习笔记】lyndon分解
摘抄自quack的ppt。 这部分和 s a sa sa的关联比较大,可以加深对 s a sa sa的理解。 Part 1 如果字符串 s s s的字典序在 s s s以及 s s s的所有后缀中是最小的,则称 s s s是一个 lyndon \text{lyndon} lyndon串。 lyndon \text{lyndon} lyndon分解&a…...

21、命令执行
文章目录 一、命令执行概述1.1 基本定义1.2 原理1.3 两个条件1.4 命令执行漏洞产生的原因1.5 管道符号和通用命令符 二、远程命令执行2.1 远程命令执行相关函数2.2 远程命令执行漏洞的利用 三、系统命令执行3.1 相关函数3.2 系统命令执行漏洞利用 四、命令执行漏洞防御 一、命令…...
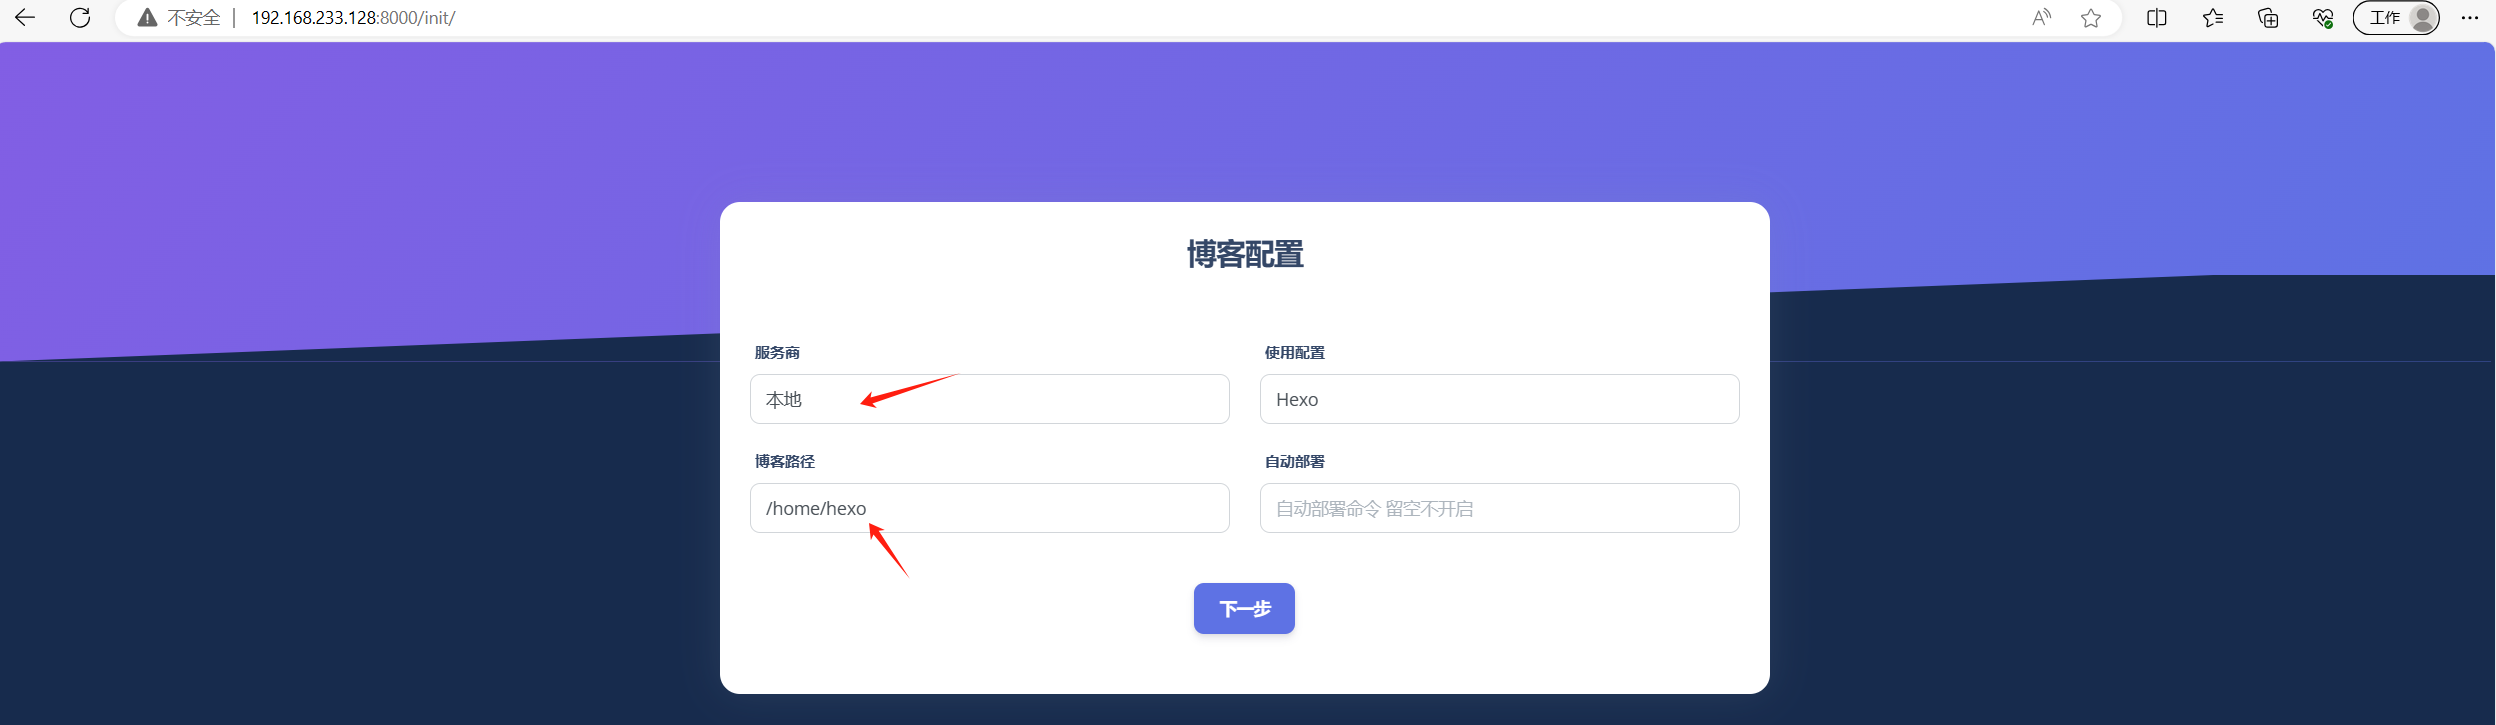
Qexo博客后台管理部署
Qexo博客后台管理部署 个人主页 个人博客 参考文档 https://www.oplog.cn/qexo/本地部署 采用本地Docker部署管理本地Hexo 下载代码包 若无法下载使用科学工具下载到本地在上传到服务器 wget https://github.com/Qexo/Qexo/archive/refs/tags/3.0.1.zip# 解压 unzip Qexo…...

最小生成树prim
最小生成树(三)Prim算法及存储结构_哔哩哔哩_bilibili 311 最小生成树 Prim 算法_哔哩哔哩_bilibili #include <iostream> #include <queue> #include <string> #include <stack> #include <vector> #include <set…...
实用篇 | 一文学会人工智能中API的Flask编写(内含模板)
----------------------- 🎈API 相关直达 🎈-------------------------- 🚀Gradio: 实用篇 | 关于Gradio快速构建人工智能模型实现界面,你想知道的都在这里-CSDN博客 🚀Streamlit :实用篇 | 一文快速构建人工智能前端展…...
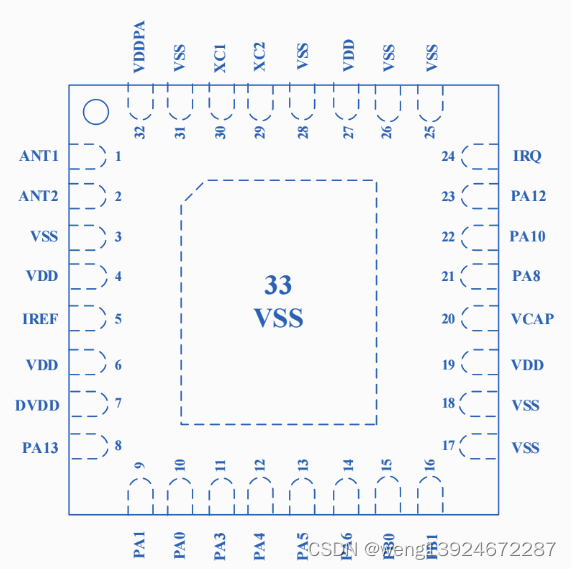
Si24R03—低功耗 SOC 芯片(集成RISC-V内核+2.4GHz无线收发器)
Si24R03是一款高度集成的低功耗SOC芯片,其集成了基于RISC-V核的低功耗MCU和工作在2.4GHz ISM频段的无线收发器模块。 MCU模块具有低功耗、Low Pin Count、宽电压工作范围,集成了13/14/15/16位精度的ADC、LVD、UART、SPI、I2C、TIMER、WUP、IWDG、RTC等丰…...

C# Winform 日志系统
目录 一、效果 1.刷新日志效果 2.单独日志的分类 3.保存日志的样式 二、概述 三、日志系统API 1.字段 Debug.IsScrolling Debug.Version Debug.LogMaxLen Debug.LogTitle Debug.IsConsoleShowLog 2.方法 Debug.Log(string) Debug.Log(string, params object[]) …...

【Java 基础】27 XML 解析
文章目录 1.SAX 解析器1)什么是 SAX2)SAX 工作流程初始化实现事件处理类解析 3)示例代码 2.DOM 解析器1)什么是 DOM2)DOM 工作流程初始化解析 XML 文档操作 DOM 树 3)示例代码 总结 在项目开发中࿰…...

地图服务 ArcGIS API for JavaScript基础用法全解析
地图服务 ArcGIS API for JavaScript基础用法全解析 前言 在接触ArcGIS之前,开发web在线地图时用过Leaflet来构建地图应用,作为一个轻量级的开源js库,在我使用下来Leaflet还有易懂易用的API文档,是个很不错的选择。在接触使用Ar…...
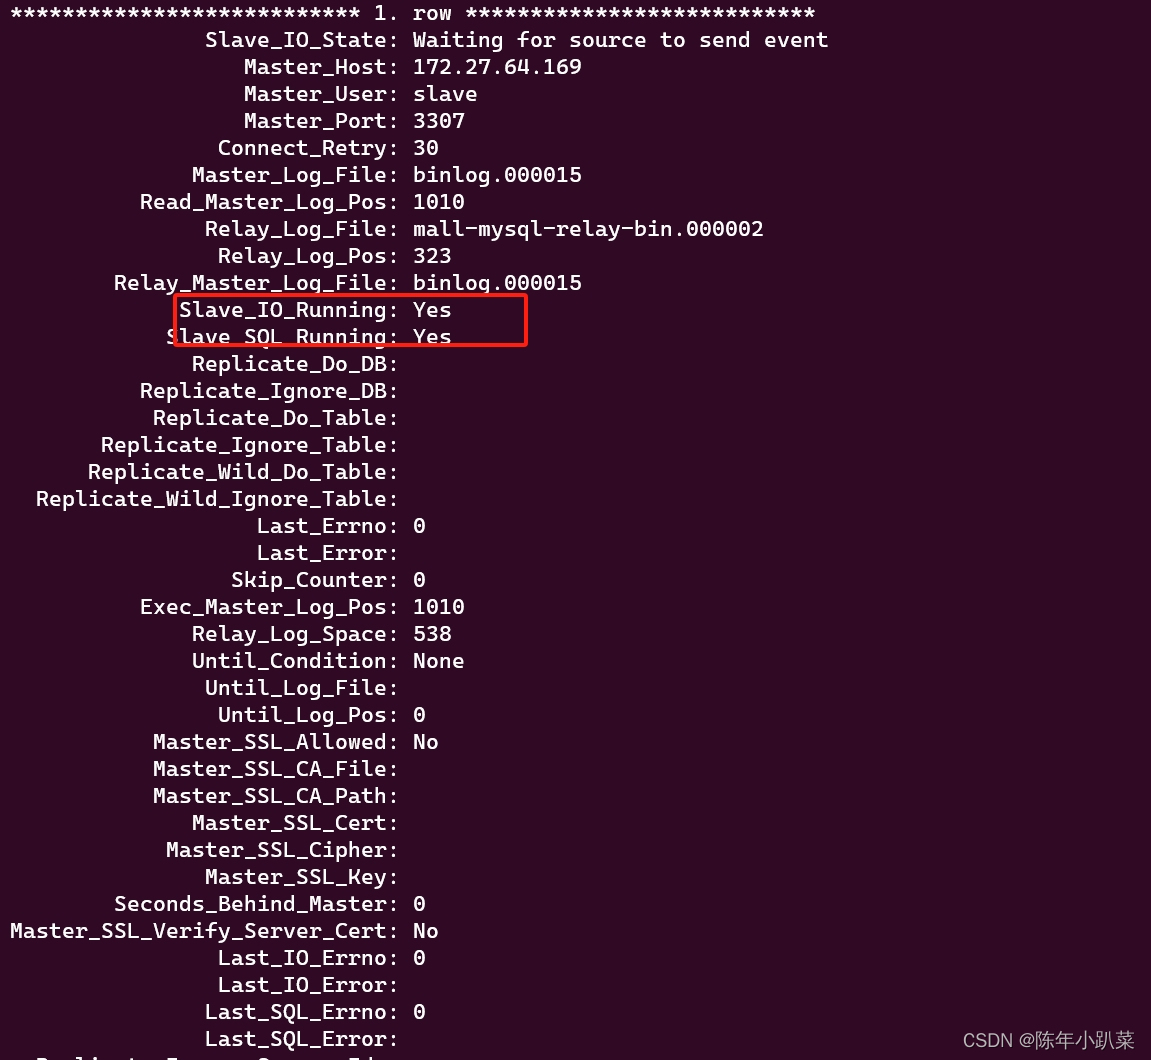
docker学习(八、mysql8.2主从复制遇到的问题)
在我配置主从复制的时候,遇到了一直connecting的问题。 起初可能是我ip配置的不对,slave_io_running一直connecting。(我的环境:windows中安装了wsl,是ubuntu环境的,在wsl中装了miniconda,mini…...
:表单验证)
React-hook-form-mui(三):表单验证
前言 在上一篇文章中,我们介绍了react-hook-form-mui的基础用法。本文将着重讲解表单验证功能。 react-hook-form-mui提供了丰富的表单验证功能,可以通过validation属性来设置表单验证规则。本文将详细介绍validation的三种实现方法,以及如何…...

【私域运营秘籍】4大用户调研方法,让你轻松掌握用户心理!
我们常说私域运营的核心是用户运营。根据二八法则,20%的超级用户贡献企业80%的利润。因此,企业应该根据用户的价值贡献来有针对性地进行运营。 然而,在实际的私域运营中,我们不仅需要找出贡献价值不同的用户,还可以从…...

2.8寸 ILI9341 TFTLCD 学习移植到STM32F103C8T6
2.8寸 ILI9341 TFTLCD 学习移植到STM32F103C8T6 文章目录 2.8寸 ILI9341 TFTLCD 学习移植到STM32F103C8T6前言第1章 LCD简介1.1 LCD硬件接口介绍 第2章 LCD指令介绍第3章 LCD 8080驱动方式3.1 8080写时序3.2 8080读时序 第4章 LCD 驱动代码部分4.1 修改代码部分4.2 代码工程下载…...

Java利用TCP实现简单的双人聊天
一、创建新项目 首先创建一个新的项目,并命名为聊天。然后创建包,创建两个类,客户端(SocketClient)和服务器端(SocketServer) 二、实现代码 客户端代码: package 聊天; import ja…...

软件压力测试的重要性与用途
在当今数字化的时代,软件已经成为几乎所有行业不可或缺的一部分。随着软件应用规模的增加和用户数量的上升,软件的性能变得尤为关键。为了确保软件在面对高并发和大负载时仍然能够保持稳定性和可靠性,软件压力测试变得至关重要。下面是软件压…...

【数据挖掘】国科大苏桂平老师数据库新技术课程作业 —— 第二次作业
1 设 F { A B → C , B → D , C D → E , C E → G H , G → A } F\{AB\rightarrow C,B\rightarrow D, CD\rightarrow E, CE\rightarrow GH, G\rightarrow A \} F{AB→C,B→D,CD→E,CE→GH,G→A},用推理的方法证明 F ∣ A B → G F\;|AB\rightarrow G F∣AB→…...

PlayAI在特殊教育中的突破性应用:自闭症儿童社交训练响应率提升4.8倍的神经反馈模型首次公开
更多请点击: https://kaifayun.com 第一章:PlayAI教育领域应用案例 PlayAI 是一个面向教育场景的轻量级AI交互平台,支持教师快速构建可对话、可评估、可追踪的学习代理。其核心优势在于无需深度学习背景即可配置多轮问答逻辑、知识图谱链接…...

Qwen模型 LeetCode 2584. 分割数组使乘积互质 JavaScript实现
哇!JavaScript版本来啦~这道题用JS写起来特别优雅,让我给你展示一个清晰又高效的实现!javascript /*** param {number[]} nums* return {number}*/ var findValidSplit function(nums) {const n nums.length;if (n 1) return -…...
)
为什么顶尖团队禁用Claude自动生成微服务?(内部泄露的5条红线规则与替代性增强方案)
更多请点击: https://intelliparadigm.com 第一章:为什么顶尖团队禁用Claude自动生成微服务?(内部泄露的5条红线规则与替代性增强方案) 顶尖工程团队在微服务架构演进中,普遍将大语言模型(LLM&…...

【限时解密】Claude 3.5 Sonnet专属编程模式:仅开放给前500家企业的上下文感知补全协议
更多请点击: https://kaifayun.com 第一章:Claude 3.5 Sonnet编程辅助的核心能力边界与适用场景 Claude 3.5 Sonnet 在编程辅助领域展现出显著的推理深度与上下文理解能力,但其本质仍是基于大规模语言模型的生成式系统,不具备实时…...

从仿真曲线到实际性能:手把手教你用IPKISS分析MZI Lattice Filter的插损与带宽
从仿真曲线到实际性能:手把手教你用IPKISS分析MZI Lattice Filter的插损与带宽 在光子集成电路设计中,仿真结果往往只是第一步。真正考验工程师功力的,是如何从这些曲线中提取出有工程价值的性能指标。本文将带您深入解读MZI Lattice Filter的…...

嵌入式开发硬件生态构建:MIPI屏、UVC摄像头与4G模块的选型与集成实战
1. 项目概述:一次面向嵌入式开发者的硬件生态补全最近,我们团队负责的睿擎派(一个基于瑞芯微RK3566/RK3588等主流芯片的嵌入式开发板品牌)项目,迎来了一次重要的硬件配件更新。这次上新不是简单的“换个壳”࿰…...

论文写到一半卡壳了?师兄推荐这几个AI写作辅助软件
写论文最怕的就是卡壳,尤其是当思路混乱、资料繁杂、格式要求又高时,很容易陷入停滞。其实,论文写作的关键不在于苦熬,而在于用对工具、走对流程——不少资深教授都建议学生提前布局,借助 AI 工具提升效率。比如千笔AI…...

2026 河北 GEO 优化服务商测评:理性看实力,盘古开物AI智推适配才是硬道理
覆盖石家庄、唐山、保定、邯郸、邢台,立足华北,辐射全国,不搞噱头,只讲真实能力随着生成式 AI 全面融入商业营销,GEO 优化已经从河北企业的可选服务,变成抢占区域流量、提升线上可见度的重要方式。尤其制造…...

Android动态换肤框架深度解析:如何5分钟实现应用主题实时切换
Android动态换肤框架深度解析:如何5分钟实现应用主题实时切换 【免费下载链接】Android-Skin-Loader 一个通过动态加载本地皮肤包进行换肤的皮肤框架 项目地址: https://gitcode.com/gh_mirrors/an/Android-Skin-Loader 在Android应用开发中,主题…...

2026年企业直播平台怎么选?选型清单与避坑指南
选企业直播平台,99%的企业会踩这5个坑:首年低价续费涨价、CDN质量差导致直播卡顿、功能演示≠实际能力、售后响应慢、数据安全隐患。 本文整理了企业直播平台选型7维度、5大常见坑、5个典型场景的建议,以及一份可直接使用的选型检查清单。 …...