docker-centos中基于keepalived+niginx模拟主从热备完整过程
文章目录
- 一、环境准备
- 二、主机
- 1、环境搭建
- 1.1 镜像拉取
- 1.2 创建网桥
- 1.3 启动容器
- 1.4 配置镜像源
- 1.5 下载工具包
- 1.6 下载keepalived
- 1.7 下载nginx
- 2、配置
- 2.1 配置keepalived
- 2.2 配置nginx
- 2.2.1 查看nginx.conf
- 2.2.2 修改index.html
- 3、启动
- 3.1 启动nginx
- 3.2 启动keepalived
- 4、状态查看
- 4.1 查看nginx状态
- 4.2 查看keepalived状态
- 4、停止
- 4.1 停止nginx
- 4.2 停止keepalived
- 三、从机
- 1、方法一:重复主机步骤
- 1.1 将步骤 (1.2 创建网桥)改为如下:
- 1.2 将步骤2.1 配置keepalived内容改为如下
- 1.3 将步骤(2.2.2 修改index.html)修改网页内容(可选)
- 2、方法二:克隆主机虚拟机
- 2.1 克隆完成、启动虚拟机,修改网桥
- 2.1.1 创建网桥
- 2.1.2 启动容器连接到创建的网桥
- 2.2 修改keepalived的配置
- 四、路由
- 1、主机
- 1.1 网卡情况
- 1.2 查看路由
- 1.3 添加路由
- 1.4 最后路由表
- 2、从机
- 2.1 网卡情况
- 2.2 查看路由
- 2.3 添加路由
- 2.4 最后路由情况
- 3、宿主机(windows主机)
- 3.1 添加路由
一、环境准备
| 根据宿主机的系统选择安装docker 🔗在Ubuntu中安装docker 🔗在CentOS中安装docker |
二、主机
1、环境搭建
1.1 镜像拉取
docker pull centos
1.2 创建网桥
docker network create -d=bridge --subnet=192.168.99.0/24 br2
1.3 启动容器
docker run -it --name centos-1 --privileged -v /home/vac/linux:/mnt/software -p 9901:80 --net=br2 centos bash
1.4 配置镜像源
找到目录
cd /etc/yum.repos.d/
修改源
sed -i 's/mirrorlist/#mirrorlist/g' /etc/yum.repos.d/CentOS-*
修改url
sed -i 's|#baseurl=http://mirror.centos.org|baseurl=http://vault.centos.org|g' /etc/yum.repos.d/CentOS-*
更新一下(时间较长)
yum -y update
1.5 下载工具包
ifconfig、route命令使用的net-tools工具包
yum -y install net-tools
vim编辑器
yum -y install vim
1.6 下载keepalived
yum -y install keepalived
1.7 下载nginx
yum -y install nginx
2、配置
2.1 配置keepalived
编辑keepalived.conf文件
vim /etc/keepalived/keepalived.conf
输入以下内容
! Configuration File for keepalivedglobal_defs {#路由id:当前安装keepalived节点主机的标识符,全局唯一router_id keep_150
}vrrp_instance VI_1 {# 表示的状态,当前的130服务器为nginx的主节点,MASTER/BACKUPstate MASTER# 当前实例绑定的网卡interface eth0# 保证主备节点一致virtual_router_id 51# 优先级/权重,谁的优先级高,在MASTER挂掉以后,就能成为MASTERpriority 100# 主备之间同步检查的时间间隔,默认1sadvert_int 1# 认证授权的密码,防止非法节点的进入authentication {auth_type PASSauth_pass 1111}virtual_ipaddress {192.168.200.17}
}
2.2 配置nginx
2.2.1 查看nginx.conf
vim /etc/nginx/nginx.conf
内容如下
# For more information on configuration, see:
#   * Official English Documentation: http://nginx.org/en/docs/
#   * Official Russian Documentation: http://nginx.org/ru/docs/user nginx;
worker_processes auto;
error_log /var/log/nginx/error.log;
pid /run/nginx.pid;# Load dynamic modules. See /usr/share/doc/nginx/README.dynamic.
include /usr/share/nginx/modules/*.conf;events {worker_connections 1024;
}http {log_format  main  '$remote_addr - $remote_user [$time_local] "$request" ''$status $body_bytes_sent "$http_referer" ''"$http_user_agent" "$http_x_forwarded_for"';access_log  /var/log/nginx/access.log  main;sendfile            on;tcp_nopush          on;tcp_nodelay         on;keepalive_timeout   65;types_hash_max_size 2048;include             /etc/nginx/mime.types;default_type        application/octet-stream;# Load modular configuration files from the /etc/nginx/conf.d directory.# See http://nginx.org/en/docs/ngx_core_module.html#include# for more information.include /etc/nginx/conf.d/*.conf;server {listen       80 default_server;listen       [::]:80 default_server;server_name  _;root         /usr/share/nginx/html;# Load configuration files for the default server block.include /etc/nginx/default.d/*.conf;location / {}error_page 404 /404.html;location = /40x.html {}error_page 500 502 503 504 /50x.html;location = /50x.html {}}# Settings for a TLS enabled server.
#
#    server {
#        listen       443 ssl http2 default_server;
#        listen       [::]:443 ssl http2 default_server;
#        server_name  _;
#        root         /usr/share/nginx/html;
#
#        ssl_certificate "/etc/pki/nginx/server.crt";
#        ssl_certificate_key "/etc/pki/nginx/private/server.key";
2.2.2 修改index.html
vim /usr/share/nginx/html/index.html
输入以下内容
<!DOCTYPE html PUBLIC "-//W3C//DTD XHTML 1.1//EN" "http://www.w3.org/TR/xhtml11/DTD/xhtml11.dtd"><html xmlns="http://www.w3.org/1999/xhtml" xml:lang="en"><head><title>Test Page for the Nginx HTTP Server on Red Hat Enterprise Linux</title><meta http-equiv="Content-Type" content="text/html; charset=UTF-8" /><style type="text/css">/*<![CDATA[*/body {background-color: #fff;color: #000;font-size: 0.9em;font-family: sans-serif,helvetica;margin: 0;padding: 0;}:link {color: #c00;}:visited {color: #c00;}a:hover {color: #f50;}h1 {text-align: center;margin: 0;padding: 0.6em 2em 0.4em;background-color: #900;color: #fff;font-weight: normal;font-size: 1.75em;border-bottom: 2px solid #000;}h1 strong {font-weight: bold;font-size: 1.5em;}h2 {text-align: center;background-color: #900;font-size: 1.1em;font-weight: bold;color: #fff;margin: 0;padding: 0.5em;border-bottom: 2px solid #000;}hr {display: none;}.content {padding: 1em 5em;}.alert {border: 2px solid #000;}img {border: 2px solid #fff;padding: 2px;margin: 2px;}a:hover img {border: 2px solid #294172;}.logos {margin: 1em;text-align: center;}/*]]>*/</style></head><body><h1>Welcome to <strong>nginx</strong> on Red Hat Enterprise Linux!(Master)</h1><h1>192.168.99.2</h1><div class="content"><p>This page is used to test the proper operation of the<strong>nginx</strong> HTTP server after it has beeninstalled. If you can read this page, it means that theweb server installed at this site is workingproperly.</p><div class="alert"><h2>Website Administrator</h2><div class="content"><p>This is the default <tt>index.html</tt> page thatis distributed with <strong>nginx</strong> onRed Hat Enterprise Linux.  It is located in<tt>/usr/share/nginx/html</tt>.</p><p>You should now put your content in a location ofyour choice and edit the <tt>root</tt> configurationdirective in the <strong>nginx</strong>configuration file<tt>/etc/nginx/nginx.conf</tt>.</p><p>For information on Red Hat Enterprise Linux, please visit the <a href="http://www.redhat.com/">Red Hat, Inc. website</a>. The documentation for Red Hat Enterprise Linux is <a href="http://www.redhat.com/docs/manuals/enterprise/">available on the Red Hat, Inc. website</a>.</p></div></div><div class="logos"><a href="http://nginx.net/"><imgsrc="nginx-logo.png" alt="[ Powered by nginx ]"width="121" height="32" /></a><a href="http://www.redhat.com/"><imgsrc="poweredby.png"alt="[ Powered by Red Hat Enterprise Linux ]"width="88" height="31" /></a></div></div></body>
</html>
3、启动
3.1 启动nginx
nginx
3.2 启动keepalived
keepalived -l -f /etc/keepalived/keepalived.conf
4、状态查看
4.1 查看nginx状态
ps -ef|grep nginx
打印返回
root          43       1  0 08:40 ?        00:00:00 nginx: master process nginx
nginx         44      43  0 08:40 ?        00:00:00 nginx: worker process
nginx         45      43  0 08:40 ?        00:00:00 nginx: worker process
nginx         46      43  0 08:40 ?        00:00:00 nginx: worker process
nginx         47      43  0 08:40 ?        00:00:00 nginx: worker process
root          57      19  0 08:49 pts/1    00:00:00 grep --color=auto nginx
4.2 查看keepalived状态
查看进程
ps -ef|grep keepalived
打印返回
root          62       1  2 08:51 ?        00:00:00 keepalived -l -f /etc/keepalived/keepalived.conf
root          63      62  4 08:51 ?        00:00:00 keepalived -l -f /etc/keepalived/keepalived.conf
root          67      19  0 08:51 pts/1    00:00:00 grep --color=auto keepalived
查看vip挂载情况
ip a
打印返回
1: lo: <LOOPBACK,UP,LOWER_UP> mtu 65536 qdisc noqueue state UNKNOWN group default qlen 1000link/loopback 00:00:00:00:00:00 brd 00:00:00:00:00:00inet 127.0.0.1/8 scope host lovalid_lft forever preferred_lft forever
26: eth0@if27: <BROADCAST,MULTICAST,UP,LOWER_UP> mtu 1500 qdisc noqueue state UP group default link/ether 02:42:c0:a8:63:02 brd ff:ff:ff:ff:ff:ff link-netnsid 0inet 192.168.99.2/24 brd 192.168.99.255 scope global eth0valid_lft forever preferred_lft foreverinet 192.168.200.17/32 scope global eth0valid_lft forever preferred_lft forever
4、停止
4.1 停止nginx
nginx -s stop
4.2 停止keepalived
pkill keepalived
三、从机
1、方法一:重复主机步骤
1.1 将步骤 (1.2 创建网桥)改为如下:
docker network create -d=bridge --subnet=192.168.111.0/24 br2
1.2 将步骤2.1 配置keepalived内容改为如下
! Configuration File for keepalivedglobal_defs {#路由id:当前安装keepalived节点主机的标识符,全局唯一router_id keep_151
}vrrp_instance VI_1 {# 表示的状态,当前的130服务器为nginx的主节点,MASTER/BACKUPstate BACKUP# 当前实例绑定的网卡interface eth0# 保证主备节点一致virtual_router_id 51# 优先级/权重,谁的优先级高,在MASTER挂掉以后,就能成为MASTERpriority 60# 主备之间同步检查的时间间隔,默认1sadvert_int 1# 认证授权的密码,防止非法节点的进入authentication {auth_type PASSauth_pass 1111}virtual_ipaddress {192.168.200.17}
}
1.3 将步骤(2.2.2 修改index.html)修改网页内容(可选)
<!DOCTYPE html PUBLIC "-//W3C//DTD XHTML 1.1//EN" "http://www.w3.org/TR/xhtml11/DTD/xhtml11.dtd"><html xmlns="http://www.w3.org/1999/xhtml" xml:lang="en"><head><title>Test Page for the Nginx HTTP Server on Red Hat Enterprise Linux</title><meta http-equiv="Content-Type" content="text/html; charset=UTF-8" /><style type="text/css">/*<![CDATA[*/body {background-color: #fff;color: #000;font-size: 0.9em;font-family: sans-serif,helvetica;margin: 0;padding: 0;}:link {color: #c00;}:visited {color: #c00;}a:hover {color: #f50;}h1 {text-align: center;margin: 0;padding: 0.6em 2em 0.4em;background-color: #900;color: #fff;font-weight: normal;font-size: 1.75em;border-bottom: 2px solid #000;}h1 strong {font-weight: bold;font-size: 1.5em;}h2 {text-align: center;background-color: #900;font-size: 1.1em;font-weight: bold;color: #fff;margin: 0;padding: 0.5em;border-bottom: 2px solid #000;}hr {display: none;}.content {padding: 1em 5em;}.alert {border: 2px solid #000;}img {border: 2px solid #fff;padding: 2px;margin: 2px;}a:hover img {border: 2px solid #294172;}.logos {margin: 1em;text-align: center;}/*]]>*/</style></head><body><h1>Welcome to <strong>nginx</strong> on Red Hat Enterprise Linux!(Master)</h1><h1>192.168.111.2</h1><div class="content"><p>This page is used to test the proper operation of the<strong>nginx</strong> HTTP server after it has beeninstalled. If you can read this page, it means that theweb server installed at this site is workingproperly.</p><div class="alert"><h2>Website Administrator</h2><div class="content"><p>This is the default <tt>index.html</tt> page thatis distributed with <strong>nginx</strong> onRed Hat Enterprise Linux.  It is located in<tt>/usr/share/nginx/html</tt>.</p><p>You should now put your content in a location ofyour choice and edit the <tt>root</tt> configurationdirective in the <strong>nginx</strong>configuration file<tt>/etc/nginx/nginx.conf</tt>.</p><p>For information on Red Hat Enterprise Linux, please visit the <a href="http://www.redhat.com/">Red Hat, Inc. website</a>. The documentation for Red Hat Enterprise Linux is <a href="http://www.redhat.com/docs/manuals/enterprise/">available on the Red Hat, Inc. website</a>.</p></div></div><div class="logos"><a href="http://nginx.net/"><imgsrc="nginx-logo.png" alt="[ Powered by nginx ]"width="121" height="32" /></a><a href="http://www.redhat.com/"><imgsrc="poweredby.png"alt="[ Powered by Red Hat Enterprise Linux ]"width="88" height="31" /></a></div></div></body>
</html>
2、方法二:克隆主机虚拟机
2.1 克隆完成、启动虚拟机,修改网桥
2.1.1 创建网桥
docker network create -d=bridge --subnet=192.168.111.0/24 br0
2.1.2 启动容器连接到创建的网桥
docker run -it --name centos-1 --privileged -v /home/vac/linux:/mnt/software -p 9901:80 --network=br0 centos bash
2.2 修改keepalived的配置
输入命令
vim /etc/keepalived/keepalived.conf
修改内容如下:
! Configuration File for keepalivedglobal_defs {#路由id:当前安装keepalived节点主机的标识符,全局唯一router_id keep_151
}vrrp_instance VI_1 {# 表示的状态,当前的130服务器为nginx的主节点,MASTER/BACKUPstate BACKUP# 当前实例绑定的网卡interface eth0# 保证主备节点一致virtual_router_id 51# 优先级/权重,谁的优先级高,在MASTER挂掉以后,就能成为MASTERpriority 60# 主备之间同步检查的时间间隔,默认1sadvert_int 1# 认证授权的密码,防止非法节点的进入authentication {auth_type PASSauth_pass 1111}virtual_ipaddress {192.168.200.17}
}
四、路由
具体路由情况示意图

1、主机
1.1 网卡情况
输入命令
ifconfig
打印返回
br-4bd1ee90e211: flags=4163<UP,BROADCAST,RUNNING,MULTICAST> mtu 1500inet 192.168.99.1 netmask 255.255.255.0 broadcast 192.168.99.255inet6 fe80::42:29ff:fee8:aade prefixlen 64 scopeid 0x20<link>ether 02:42:29:e8:aa:de txqueuelen 0 (Ethernet)RX packets 51808 bytes 3263249 (3.2 MB)RX errors 0 dropped 0 overruns 0 frame 0TX packets 71190 bytes 130020293 (130.0 MB)TX errors 0 dropped 0 overruns 0 carrier 0 collisions 0docker0: flags=4099<UP,BROADCAST,MULTICAST> mtu 1500inet 172.17.0.1 netmask 255.255.0.0 broadcast 172.17.255.255inet6 fe80::42:65ff:fe2d:ef09 prefixlen 64 scopeid 0x20<link>ether 02:42:65:2d:ef:09 txqueuelen 0 (Ethernet)RX packets 4 bytes 224 (224.0 B)RX errors 0 dropped 0 overruns 0 frame 0TX packets 228 bytes 23485 (23.4 KB)TX errors 0 dropped 0 overruns 0 carrier 0 collisions 0ens33: flags=4163<UP,BROADCAST,RUNNING,MULTICAST> mtu 1500inet 192.168.100.157 netmask 255.255.255.0 broadcast 192.168.100.255inet6 fe80::f040:fdbe:78e1:5077 prefixlen 64 scopeid 0x20<link>ether 00:0c:29:b6:5d:6c txqueuelen 1000 (Ethernet)RX packets 4329116 bytes 940869997 (940.8 MB)RX errors 0 dropped 345204 overruns 0 frame 0TX packets 284583 bytes 29536782 (29.5 MB)TX errors 0 dropped 0 overruns 0 carrier 0 collisions 0lo: flags=73<UP,LOOPBACK,RUNNING> mtu 65536inet 127.0.0.1 netmask 255.0.0.0inet6 ::1 prefixlen 128 scopeid 0x10<host>loop txqueuelen 1000 (Local Loopback)RX packets 26728 bytes 3141066 (3.1 MB)RX errors 0 dropped 0 overruns 0 frame 0TX packets 26728 bytes 3141066 (3.1 MB)TX errors 0 dropped 0 overruns 0 carrier 0 collisions 0vethd5c0922: flags=4163<UP,BROADCAST,RUNNING,MULTICAST> mtu 1500inet6 fe80::a075:3cff:fe3c:d62 prefixlen 64 scopeid 0x20<link>ether a2:75:3c:3c:0d:62 txqueuelen 0 (Ethernet)RX packets 385 bytes 20670 (20.6 KB)RX errors 0 dropped 0 overruns 0 frame 0TX packets 1841 bytes 83533 (83.5 KB)TX errors 0 dropped 0 overruns 0 carrier 0 collisions 0
1.2 查看路由
输入命令
route -n
打印返回
Kernel IP routing table
Destination     Gateway         Genmask         Flags Metric Ref    Use Iface
0.0.0.0         192.168.100.1   0.0.0.0         UG    100    0        0 ens33
169.254.0.0     0.0.0.0         255.255.0.0     U     1000   0        0 ens33
172.17.0.0      0.0.0.0         255.255.0.0     U     0      0        0 docker0
192.168.99.0    0.0.0.0         255.255.255.0   U     0      0        0 br-4bd1ee90e211
192.168.100.0   0.0.0.0         255.255.255.0   U     100    0        0 ens33
1.3 添加路由
主机到从机的路由
route add -net 192.168.111.0/24 gw 192.168.100.158
主机到vip的路由
route add -net 192.168.200.0/24 gw 192.168.99.2
vip到从机的路由
route add -net 192.168.200.0/24 gw 192.168.100.158
1.4 最后路由表
输入命令
route -n
打印返回
Kernel IP routing table
Destination     Gateway         Genmask         Flags Metric Ref    Use Iface
0.0.0.0         192.168.100.1   0.0.0.0         UG    100    0        0 ens33
169.254.0.0     0.0.0.0         255.255.0.0     U     1000   0        0 ens33
172.17.0.0      0.0.0.0         255.255.0.0     U     0      0        0 docker0
192.168.99.0    0.0.0.0         255.255.255.0   U     0      0        0 br-4bd1ee90e211
192.168.100.0   0.0.0.0         255.255.255.0   U     100    0        0 ens33
192.168.111.0   192.168.100.158 255.255.255.0   UG    0      0        0 ens33
192.168.200.0   192.168.99.2    255.255.255.0   UG    0      0        0 br-4bd1ee90e211
192.168.200.0   192.168.100.158 255.255.255.0   UG    0      0        0 ens33
2、从机
2.1 网卡情况
输入命令
ip a
打印返回
br-feca604495c7: flags=4099<UP,BROADCAST,MULTICAST> mtu 1500inet 192.168.111.1 netmask 255.255.255.0 broadcast 192.168.111.255inet6 fe80::42:7ff:fe57:5d4d prefixlen 64 scopeid 0x20<link>ether 02:42:07:57:5d:4d txqueuelen 0 (Ethernet)RX packets 86544 bytes 7152949 (7.1 MB)RX errors 0 dropped 0 overruns 0 frame 0TX packets 92024 bytes 132312772 (132.3 MB)TX errors 0 dropped 0 overruns 0 carrier 0 collisions 0docker0: flags=4099<UP,BROADCAST,MULTICAST> mtu 1500inet 172.17.0.1 netmask 255.255.0.0 broadcast 172.17.255.255inet6 fe80::42:69ff:fe89:fc8c prefixlen 64 scopeid 0x20<link>ether 02:42:69:89:fc:8c txqueuelen 0 (Ethernet)RX packets 4358 bytes 264361 (264.3 KB)RX errors 0 dropped 0 overruns 0 frame 0TX packets 8778 bytes 19961998 (19.9 MB)TX errors 0 dropped 0 overruns 0 carrier 0 collisions 0ens33: flags=4163<UP,BROADCAST,RUNNING,MULTICAST> mtu 1500inet 192.168.100.158 netmask 255.255.255.0 broadcast 192.168.100.255inet6 fe80::5d22:1c65:d887:63e6 prefixlen 64 scopeid 0x20<link>ether 00:0c:29:6a:2e:27 txqueuelen 1000 (Ethernet)RX packets 4140156 bytes 766431979 (766.4 MB)RX errors 0 dropped 342651 overruns 0 frame 0TX packets 212125 bytes 22585816 (22.5 MB)TX errors 0 dropped 0 overruns 0 carrier 0 collisions 0lo: flags=73<UP,LOOPBACK,RUNNING> mtu 65536inet 127.0.0.1 netmask 255.0.0.0inet6 ::1 prefixlen 128 scopeid 0x10<host>loop txqueuelen 1000 (Local Loopback)RX packets 47516 bytes 4932330 (4.9 MB)RX errors 0 dropped 0 overruns 0 frame 0TX packets 47516 bytes 4932330 (4.9 MB)TX errors 0 dropped 0 overruns 0 carrier 0 collisions 0vethbe7b7fe: flags=4163<UP,BROADCAST,RUNNING,MULTICAST> mtu 1500inet6 fe80::18e7:2fff:fea9:3b8e prefixlen 64 scopeid 0x20<link>ether 1a:e7:2f:a9:3b:8e txqueuelen 0 (Ethernet)RX packets 271733 bytes 15045369 (15.0 MB)RX errors 0 dropped 0 overruns 0 frame 0TX packets 43223 bytes 2358797 (2.3 MB)TX errors 0 dropped 0 overruns 0 carrier 0 collisions 0
2.2 查看路由
输入命令
route -n
打印返回
Kernel IP routing table
Destination     Gateway         Genmask         Flags Metric Ref    Use Iface
0.0.0.0         192.168.100.1   0.0.0.0         UG    100    0        0 ens33
169.254.0.0     0.0.0.0         255.255.0.0     U     1000   0        0 ens33
172.17.0.0      0.0.0.0         255.255.0.0     U     0      0        0 docker0
192.168.100.0   0.0.0.0         255.255.255.0   U     100    0        0 ens33
192.168.111.0   0.0.0.0         255.255.255.0   U     0      0        0 br-feca604495c7
2.3 添加路由
从机到主机的路由
route add -net 192.168.99.0/24 gw 192.168.100.157
从机到vip的路由
route add -net 192.168.200.0/24 gw 192.168.111.2
vip到主机的路由
route add -net 192.168.200.0/24 gw 192.168.100.157
2.4 最后路由情况
route -n
Kernel IP routing table
Destination     Gateway         Genmask         Flags Metric Ref    Use Iface
0.0.0.0         192.168.100.1   0.0.0.0         UG    100    0        0 ens33
169.254.0.0     0.0.0.0         255.255.0.0     U     1000   0        0 ens33
172.17.0.0      0.0.0.0         255.255.0.0     U     0      0        0 docker0
192.168.99.0    192.168.100.157 255.255.255.0   UG    0      0        0 ens33
192.168.100.0   0.0.0.0         255.255.255.0   U     100    0        0 ens33
192.168.111.0   0.0.0.0         255.255.255.0   U     0      0        0 br-feca604495c7
192.168.200.0   192.168.111.2   255.255.255.0   UG    0      0        0 br-feca604495c7
192.168.200.0   192.168.100.157 255.255.255.0   UG    0      0        0 ens33
3、宿主机(windows主机)
3.1 添加路由
vip到主机
route add 192.168.200.0 mask 255.255.255.0 192.168.100.157
vip到从机
route add 192.168.200.0 mask 255.255.255.0 192.168.100.158
相关文章:
docker-centos中基于keepalived+niginx模拟主从热备完整过程
文章目录 一、环境准备二、主机1、环境搭建1.1 镜像拉取1.2 创建网桥1.3 启动容器1.4 配置镜像源1.5 下载工具包1.6 下载keepalived1.7 下载nginx 2、配置2.1 配置keepalived2.2 配置nginx2.2.1 查看nginx.conf2.2.2 修改index.html 3、启动3.1 启动nginx3.2 启动keepalived 4、…...

软件科技成果鉴定测试需提供哪些材料?
为了有效评估科技成果的质量,促进科技理论向实际应用转化,所以需要进行科技成果鉴定测试。申请鉴定的科技成果范围是指列入国家和省、自治区、直辖市以及国务院有关部门科技计划内的应用技术成果,以及少数科技计划外的重大应用技术成果。 …...
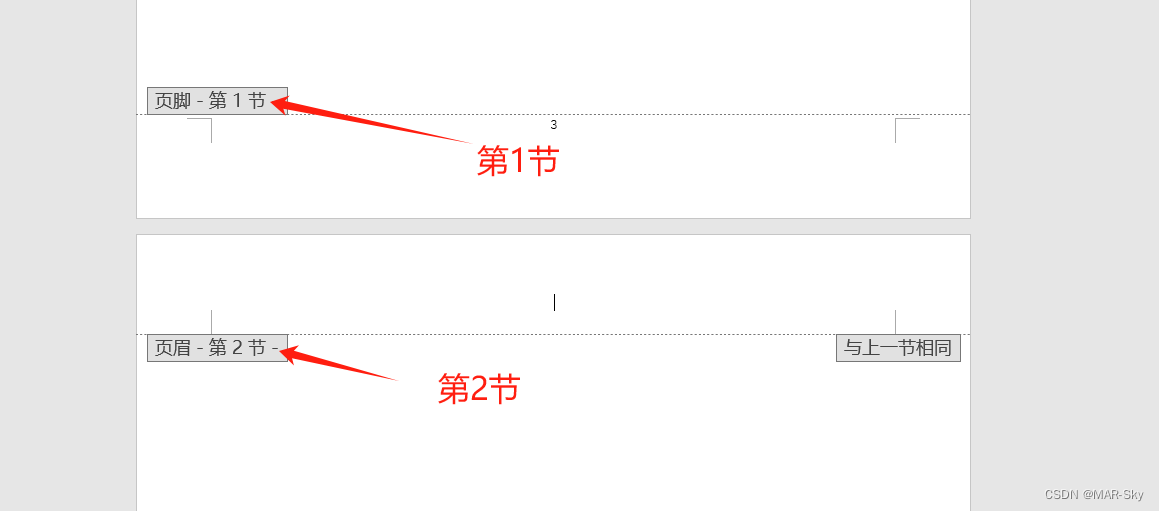
办公word-从不是第一页添加页码
总结 实际需要注意的是,分隔符、分节符和分页符并不是一个含义 分隔符包含其他两个;分页符:是增加一页;分节符:指将文档分为几部分。 从不是第一页插入页码1步骤 1,插入默认页码 自己可以测试时通过**…...
Android笔记(十七):PendingIntent简介
PendingIntent翻译成中文为“待定意图”,这个翻译很好地表示了它的涵义。PendingIntent描述了封装Intent意图以及该意图要执行的目标操作。PendingIntent封装Intent的目标行为的执行是必须满足一定条件,只有条件满足,才会触发意图的目标操作。…...
为 Compose MultiPlatform 添加 C/C++ 支持(2):在 jvm 平台使用 jni 实现桌面端与 C/C++ 互操作
前言 在上篇文章中我们已经介绍了实现 Compose MultiPlatform 对 C/C 互操作的基本思路。 并且先介绍了在 kotlin native 平台使用 cinterop 实现与 C/C 的互操作。 今天这篇文章将补充在 jvm 平台使用 jni。 在 Compose MultiPlatform 中,使用 jvm 平台的是 An…...
【PyTorch】卷积神经网络
文章目录 1. 理论介绍1.1. 从全连接层到卷积层1.1.1. 背景1.1.2. 从全连接层推导出卷积层 1.2. 卷积层1.2.1. 图像卷积1.2.2. 填充和步幅1.2.3. 多通道 1.3. 池化层(又称汇聚层)1.3.1. 背景1.3.2. 池化运算1.3.3. 填充和步幅1.3.4. 多通道 1.4. 卷积神经…...

qt可以详细写的项目或技术
1.QT 图形视图框架 2.QT 模型视图结构 3.QT列表显示大量信息 4.QT播放器 5.QT 编解码 6.QT opencv...
操作系统笔记——储存系统、文件系统(王道408)
文章目录 前言储存系统地址转换内存扩展覆盖交换 储存器分配——连续分配固定大小分区动态分区分配动态分区分配算法 储存器分配——非连续分配页式管理基本思想地址变换硬件快表(TLB)多级页表 段式管理段页式管理 虚拟储存器——基于交换的内存扩充技术…...

基于Html+腾讯云播SDK开发的m3u8播放器
周末业余时间在家无事,学习了一下腾讯的云播放sdk,并制作了一个小demo(m3u8播放器),该在线工具是基于腾讯的云播sdk开发的,云播sdk非常牛,可以支持多种播放格式。 预览地址 m3u8player.org 源码…...

uniapp小程序分享为灰色
引用:https://www.cnblogs.com/panwudi/p/17074172.html uniapp开发的微信小程序,没有转发,分享: 创建一个mixin:common/share.js export default {onShareAppMessage(res) { //发送给朋友return {}},onShareTimeline(res) {//…...
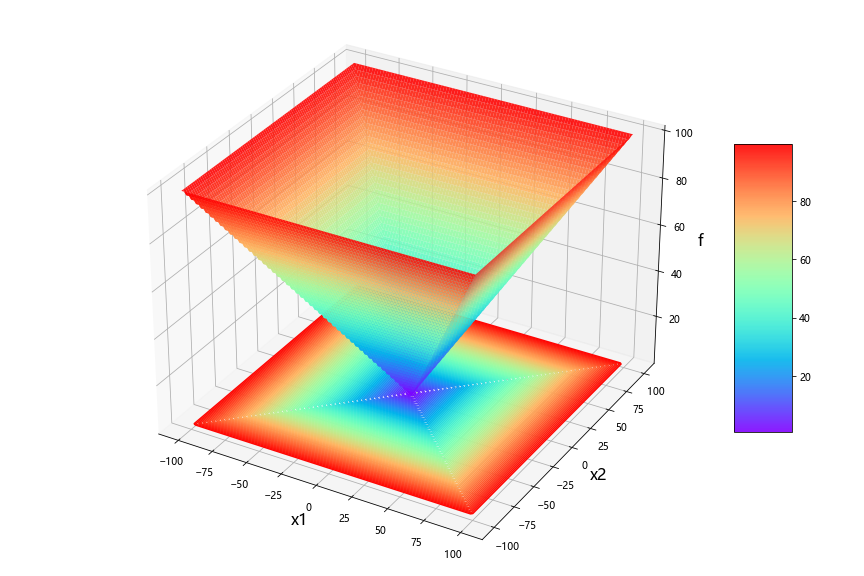
python:五种算法(OOA、WOA、GWO、PSO、GA)求解23个测试函数(python代码)
一、五种算法简介 1、鱼鹰优化算法OOA 2、鲸鱼优化算法WOA 3、灰狼优化算法GWO 4、粒子群优化算法PSO 5、遗传算法GA 二、5种算法求解23个函数 (1)23个函数简介 参考文献: [1] Yao X, Liu Y, Lin G M. Evolutionary programming made…...
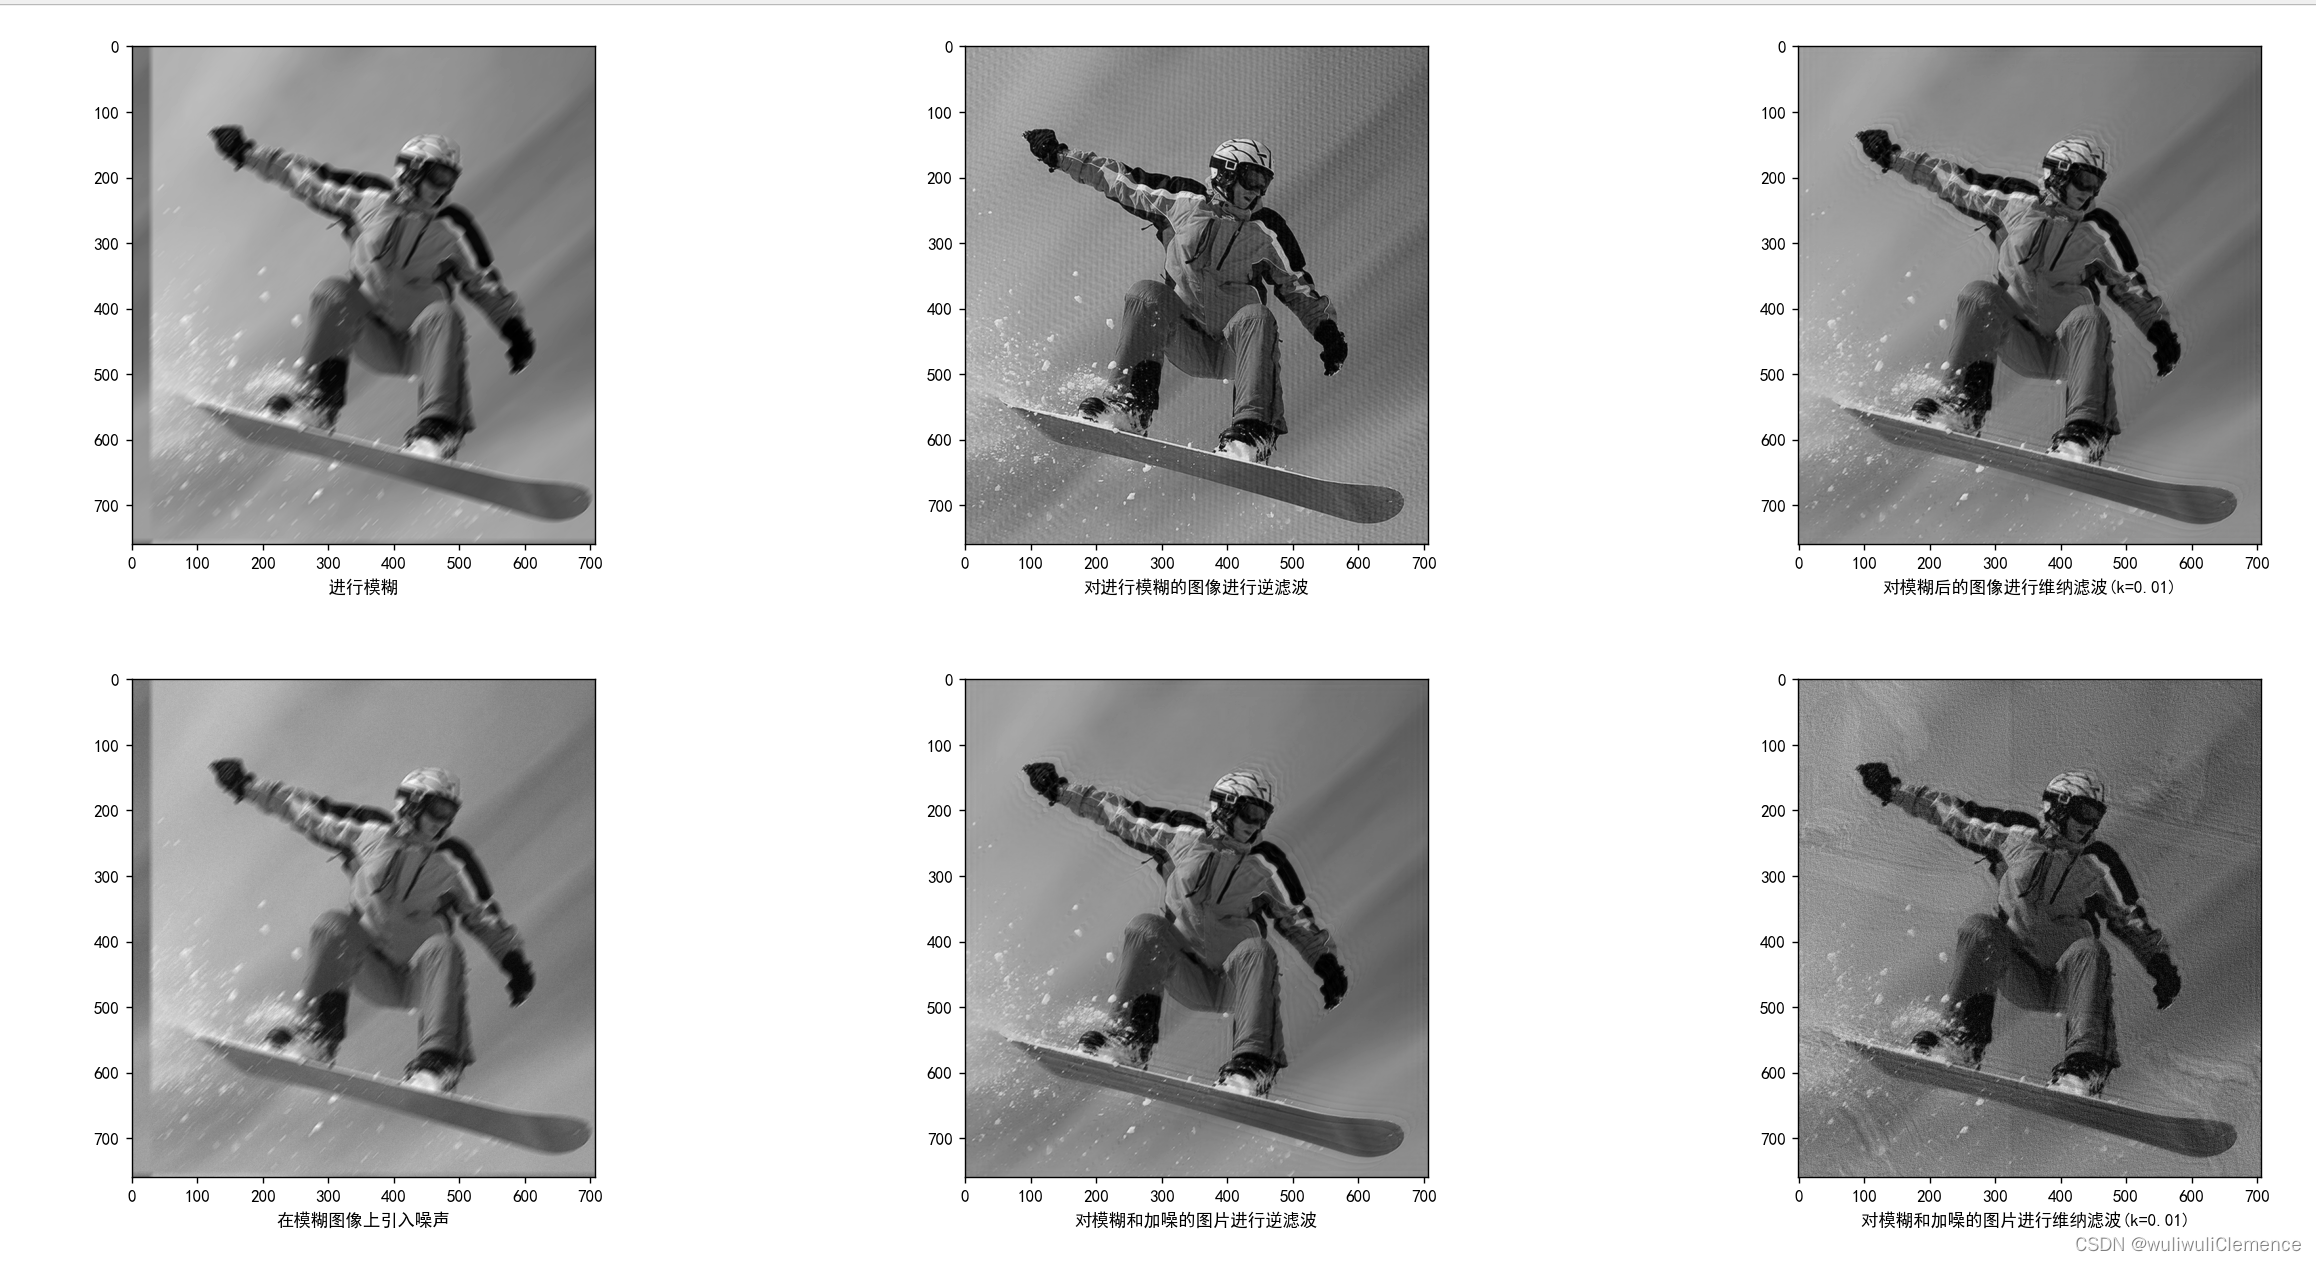
DIP——添加运动模糊与滤波
1.运动模糊 为了模拟图像退化的过程,在这里创建了一个用于模拟运动模糊的点扩散函数,具体模糊的方向取决于输入的motion_angle。如果运动方向接近水平,则模糊效果近似水平,如果运动方向接近垂直,则模糊效果近似垂直。具…...
——SQL处理过程)
SQL Server查询计划(Query Plan)——SQL处理过程
6. 查询计划(Query Plan) 6.1. SQL处理过程 就SQL语句的处理过程而言,各关系库间大同小异,尤其是商业库之间实现机制和细节差别更小些,其功能及性能支持方面也更加强大和完善。SQL Server作为商业库中的后起之秀,作为SQL语句处理过程的主要支撑和保障,其优化器及相关机…...

【动手学深度学习】(十二)现代卷积神经网络
文章目录 一、深度卷积神经网络AlexNet1.理论知识 一、深度卷积神经网络AlexNet 1.理论知识 ImageNet(2010) 图片自然物体的彩色图片手写数字的黑色图片大小468 * 38728*28样本数1.2M60K类数100010 AlexNet AlexNet赢了2012ImageNet竞赛更深更大的LeNet主要改进ÿ…...

【小沐学Python】Python实现TTS文本转语音(speech、pyttsx3、百度AI)
文章目录 1、简介2、Windows语音2.1 简介2.2 安装2.3 代码 3、pyttsx33.1 简介3.2 安装3.3 代码 4、ggts4.1 简介4.2 安装4.3 代码 5、SAPI6、SpeechLib7、百度AI8、百度飞桨结语 1、简介 TTS(Text To Speech) 译为从文本到语音,TTS是人工智能AI的一个模组…...
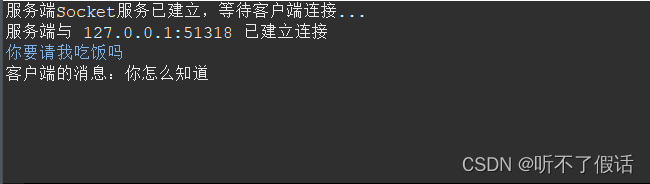
TCP通信
第二十一章 网络通信 本章节主要讲解的是TCP和UDP两种通信方式它们都有着自己的优点和缺点 这两种通讯方式不通的地方就是TCP是一对一通信 UDP是一对多的通信方式 接下来会一一讲解 TCP通信 TCP通信方式呢 主要的通讯方式是一对一的通讯方式,也有着优点和缺点…...
2023济南大学acm新生赛题解
通过答题情况的难度系数: 签到:ACI 铜牌题:BG 银牌题:EF 金牌题:DHJKO 赛中暂未有人通过:LMNP A - AB Problem 直接根据公式计算就行。 #include<stdio.h> int main(){int a,b;scanf("%…...

docker-compose安装教程
1.确认docker-compose是否安装 docker-compose -v如上图所示表示未安装,需要安装。 如上图所示表示已经安装,不需要再安装,如果觉得版本低想升级,也可以继续安装。 2.离线安装 下载docker-compose安装包,上传到服务…...
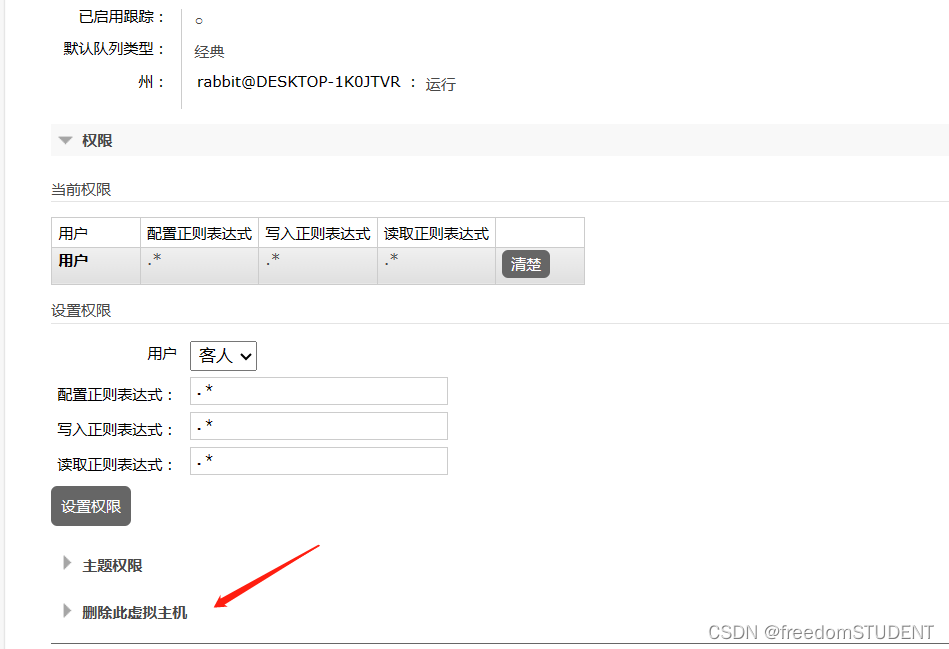
【rabbitMQ】rabbitMQ用户,虚拟机地址(添加,修改,删除操作)
rabbitMQ的下载,安装和配置 https://blog.csdn.net/m0_67930426/article/details/134892759?spm1001.2014.3001.5502 rabbitMQ控制台模拟收发消息 https://blog.csdn.net/m0_67930426/article/details/134904365?spm1001.2014.3001.5502 目录 用户 添加用户…...

Python高级算法——动态规划
Python中的动态规划:高级算法解析 动态规划是一种解决多阶段决策问题的数学方法,常用于优化问题。它通过将问题分解为子问题,并在解决这些子问题的基础上构建全局最优解。在本文中,我们将深入讲解Python中的动态规划,…...

树莓派4B部署YOLOv8保姆级避坑指南:从PyTorch版本选择到模型推理全流程
树莓派4B部署YOLOv8实战手册:从版本适配到高效推理的深度解析 引言 在嵌入式设备上部署现代计算机视觉模型,就像给一辆微型赛车装上F1引擎——潜力巨大但挑战重重。最近帮朋友在树莓派4B上部署YOLOv8时,我们花了三天时间才走出"依赖地狱…...
)
逆向思维拆解:我是如何通过AST“翻译”极验4混淆代码的逻辑的(含控制流平坦化详解)
逆向工程实战:用AST解析技术破解JavaScript混淆的艺术 当面对一团被精心混淆过的JavaScript代码时,就像侦探面对加密的线索——每个字符都可能是关键,每个变量名都可能是陷阱。本文将带你走进AST(抽象语法树)的世界&am…...

机械/土木 专业是否可以转嵌入式?
机械专业是否可以转嵌入式?总有人担心 “我学机械的能转嵌入式吗?”答案是:完全可以!连学土木工程的,我都带出了好几个成功转行嵌入式的! 干机械的甚至比纯 电子 / 计算机的 更有优势 !📌 为什么机械转嵌入…...

“冠珠·美乐童行”公益行动走进广州市增城区高滩小学,唱响爱、筑就美
在520爱家日十周年之际,冠珠瓷砖积极响应国家美育浸润与乡村教育振兴的政策号召,暖心开启 “冠珠美乐童行”公益行动。首站活动由冠珠瓷砖、广州市越秀山体育中心共同主办,以 “乐动童心美育同行” 为主题,走进广州市增城区高滩小…...
:休息计时器与演讲节奏控制——倒计时、番茄钟与现场掌控力)
《Sysinternals实战指南》ZoomIt 学习笔记(11.11):休息计时器与演讲节奏控制——倒计时、番茄钟与现场掌控力
🔥个人主页:杨利杰YJlio❄️个人专栏:《Sysinternals实战教程》《Windows PowerShell 实战》《WINDOWS教程》《IOS教程》《微信助手》《锤子助手》 《Python》 《Kali Linux》 《那些年未解决的Windows疑难杂症》🌟 让复杂的事情更…...

S200驱动器报A1489故障
安全配置未受保护A01637报警处理方法(西门子S200驱动器UMAC详细配置) https://rxxw-control.blog.csdn.net/article/details/157173145?spm=1011.2415.3001.5331https://rxxw-control.blog.csdn.net/article/details/157173145?spm=1011.2415.3001.5331 1、连接驱动器...

技术人准备英文面试:除了刷题,这五个表达习惯更关键
许多软件测试工程师在准备英文面试时,往往会陷入一个误区:将大量时间花在背诵专业术语(如“Equivalence Partitioning”、“Regression Testing”),或者在技术问答环节机械地复述测试用例的设计逻辑。诚然,…...

AI赋能·精准适配——API风险监测系统筑牢教育数据流转安全防线
一、概要提示:本文围绕数据流转安全与静态数据安全的核心差异,结合教育行业数字化转型特性,系统阐述API风险监测系统的核心逻辑、核心能力、常见疑问及发展趋势,全面呈现系统在教育场景中的数据化应用成效,凸显“AI赋能…...

成都制造企业供应链价格波动频繁,AI智能体该先预警哪些信号?
一、价格波动不是采购一个部门能扛住的问题很多制造企业谈供应链价格波动,第一反应是让采购去谈价、催报价、找替代供应商。但在真实经营里,价格风险很少只停留在采购单价上。铜、铝、钢材、塑料、电子元器件、包装材料、运费、汇率和供应商产能变化&…...

STM32F103RCT6国内供应商
在众多STM32F103RCT6的国内供应商中,深圳市粤科源兴科技有限公司以其专业的服务和优质的产品赢得了市场的认可。本文将从产品特性、价格优势以及售后服务等方面详细介绍深圳市粤科源兴科技有限公司为何是您选择STM32F103RCT6的理想合作伙伴。一、产品特性与兼容性产…...