spring之基于注解管理Bean
学习的最大理由是想摆脱平庸,早一天就多一份人生的精彩;迟一天就多一天平庸的困扰。各位小伙伴,如果您:
想系统/深入学习某技术知识点…
一个人摸索学习很难坚持,想组团高效学习…
想写博客但无从下手,急需写作干货注入能量…
热爱写作,愿意让自己成为更好的人…
文章目录
- 前言
- 一、搭建子模块spring6-ioc-annotation
- 二、开启组件扫描
- 三、使用注解定义 Bean
- 四、实验一:@Autowired注入
- ①场景一:属性注入
- ②场景二:set注入
- ③场景三:构造方法注入
- ④场景四:形参上注入
- ⑤场景五:只有一个构造函数,无注解
- ⑥场景六:@Autowired注解和@Qualifier注解联合
- 五、实验二:@Resource注入
- ①场景一:根据name注入
- ②场景二:name未知注入
- ③场景三 其他情况
- 六、Spring全注解开发
- 总结
前言
从 Java 5 开始,Java 增加了对注解(Annotation)的支持,它是代码中的一种特殊标记,可以在编译、类加载和运行时被读取,执行相应的处理。开发人员可以通过注解在不改变原有代码和逻辑的情况下,在源代码中嵌入补充信息。
Spring 从 2.5 版本开始提供了对注解技术的全面支持,我们可以使用注解来实现自动装配,简化 Spring 的 XML 配置。
Spring 通过注解实现自动装配的步骤如下:
- 引入依赖
- 开启组件扫描
- 使用注解定义 Bean
- 依赖注入
一、搭建子模块spring6-ioc-annotation
①搭建模块
搭建方式如:spring6-ioc-xml
②引入配置文件
引入spring-ioc-xml模块日志log4j2.xml
③添加依赖
<dependencies><!--spring context依赖--><!--当你引入Spring Context依赖之后,表示将Spring的基础依赖引入了--><dependency><groupId>org.springframework</groupId><artifactId>spring-context</artifactId><version>6.0.3</version></dependency><!--junit5测试--><dependency><groupId>org.junit.jupiter</groupId><artifactId>junit-jupiter-api</artifactId><version>5.3.1</version></dependency><!--log4j2的依赖--><dependency><groupId>org.apache.logging.log4j</groupId><artifactId>log4j-core</artifactId><version>2.19.0</version></dependency><dependency><groupId>org.apache.logging.log4j</groupId><artifactId>log4j-slf4j2-impl</artifactId><version>2.19.0</version></dependency>
</dependencies>
二、开启组件扫描
Spring 默认不使用注解装配 Bean,因此我们需要在 Spring 的 XML 配置中,通过 context:component-scan 元素开启 Spring Beans的自动扫描功能。开启此功能后,Spring 会自动从扫描指定的包(base-package 属性设置)及其子包下的所有类,如果类上使用了 @Component 注解,就将该类装配到容器中。
<?xml version="1.0" encoding="UTF-8"?>
<beans xmlns="http://www.springframework.org/schema/beans"xmlns:xsi="http://www.w3.org/2001/XMLSchema-instance"xmlns:context="http://www.springframework.org/schema/context"xsi:schemaLocation="http://www.springframework.org/schema/beanshttp://www.springframework.org/schema/beans/spring-beans-3.0.xsdhttp://www.springframework.org/schema/contexthttp://www.springframework.org/schema/context/spring-context.xsd"><!--开启组件扫描功能--><context:component-scan base-package="com.gedeshidai.spring6"></context:component-scan>
</beans>
注意:在使用 context:component-scan 元素开启自动扫描功能前,首先需要在 XML 配置的一级标签 中添加 context 相关的约束。
情况一:最基本的扫描方式
<context:component-scan base-package="com.gedeshidai.spring6">
</context:component-scan>
情况二:指定要排除的组件
<context:component-scan base-package="com.gedeshidai.spring6"><!-- context:exclude-filter标签:指定排除规则 --><!-- type:设置排除或包含的依据type="annotation",根据注解排除,expression中设置要排除的注解的全类名type="assignable",根据类型排除,expression中设置要排除的类型的全类名--><context:exclude-filter type="annotation" expression="org.springframework.stereotype.Controller"/><!--<context:exclude-filter type="assignable" expression="com.gedeshidai.spring6.controller.UserController"/>-->
</context:component-scan>
情况三:仅扫描指定组件
<context:component-scan base-package="com.gedeshidai" use-default-filters="false"><!-- context:include-filter标签:指定在原有扫描规则的基础上追加的规则 --><!-- use-default-filters属性:取值false表示关闭默认扫描规则 --><!-- 此时必须设置use-default-filters="false",因为默认规则即扫描指定包下所有类 --><!-- type:设置排除或包含的依据type="annotation",根据注解排除,expression中设置要排除的注解的全类名type="assignable",根据类型排除,expression中设置要排除的类型的全类名--><context:include-filter type="annotation" expression="org.springframework.stereotype.Controller"/><!--<context:include-filter type="assignable" expression="com.gedeshidai.spring6.controller.UserController"/>-->
</context:component-scan>
三、使用注解定义 Bean
Spring 提供了以下多个注解,这些注解可以直接标注在 Java 类上,将它们定义成 Spring Bean。
| 注解 | 说明 |
|---|---|
| @Component | 该注解用于描述 Spring 中的 Bean,它是一个泛化的概念,仅仅表示容器中的一个组件(Bean),并且可以作用在应用的任何层次,例如 Service 层、Dao 层等。 使用时只需将该注解标注在相应类上即可。 |
| @Repository | 该注解用于将数据访问层(Dao 层)的类标识为 Spring 中的 Bean,其功能与 @Component 相同。 |
| @Service | 该注解通常作用在业务层(Service 层),用于将业务层的类标识为 Spring 中的 Bean,其功能与 @Component 相同。 |
| @Controller | 该注解通常作用在控制层(如SpringMVC 的 Controller),用于将控制层的类标识为 Spring 中的 Bean,其功能与 @Component 相同。 |
四、实验一:@Autowired注入
单独使用@Autowired注解,默认根据类型装配。【默认是byType】
查看源码:
package org.springframework.beans.factory.annotation;import java.lang.annotation.Documented;
import java.lang.annotation.ElementType;
import java.lang.annotation.Retention;
import java.lang.annotation.RetentionPolicy;
import java.lang.annotation.Target;@Target({ElementType.CONSTRUCTOR, ElementType.METHOD, ElementType.PARAMETER, ElementType.FIELD, ElementType.ANNOTATION_TYPE})
@Retention(RetentionPolicy.RUNTIME)
@Documented
public @interface Autowired {boolean required() default true;
}
源码中有两处需要注意:
-
第一处:该注解可以标注在哪里?
-
- 构造方法上
- 方法上
- 形参上
- 属性上
- 注解上
-
第二处:该注解有一个required属性,默认值是true,表示在注入的时候要求被注入的Bean必须是存在的,如果不存在则报错。如果required属性设置为false,表示注入的Bean存在或者不存在都没关系,存在的话就注入,不存在的话,也不报错。
①场景一:属性注入
创建UserDao接口
package com.gedeshidai.spring6.dao;public interface UserDao {public void print();
}
创建UserDaoImpl实现
package com.gedeshidai.spring6.dao.impl;import com.gedeshidai.spring6.dao.UserDao;
import org.springframework.stereotype.Repository;@Repository
public class UserDaoImpl implements UserDao {@Overridepublic void print() {System.out.println("Dao层执行结束");}
}
创建UserService接口
package com.gedeshidai.spring6.service;public interface UserService {public void out();
}
创建UserServiceImpl实现类
package com.gedeshidai.spring6.service.impl;import com.gedeshidai.spring6.dao.UserDao;
import com.gedeshidai.spring6.service.UserService;
import org.springframework.beans.factory.annotation.Autowired;
import org.springframework.stereotype.Service;@Service
public class UserServiceImpl implements UserService {@Autowiredprivate UserDao userDao;@Overridepublic void out() {userDao.print();System.out.println("Service层执行结束");}
}
创建UserController类
package com.gedeshidai.spring6.controller;import com.gedeshidai.spring6.service.UserService;
import org.springframework.beans.factory.annotation.Autowired;
import org.springframework.stereotype.Controller;@Controller
public class UserController {@Autowiredprivate UserService userService;public void out() {userService.out();System.out.println("Controller层执行结束。");}}
测试一
package com.gedeshidai.spring6.bean;import com.gedeshidai.spring6.controller.UserController;
import org.junit.jupiter.api.Test;
import org.slf4j.Logger;
import org.slf4j.LoggerFactory;
import org.springframework.context.ApplicationContext;
import org.springframework.context.support.ClassPathXmlApplicationContext;public class UserTest {private Logger logger = LoggerFactory.getLogger(UserTest.class);@Testpublic void testAnnotation(){ApplicationContext context = new ClassPathXmlApplicationContext("Beans.xml");UserController userController = context.getBean("userController", UserController.class);userController.out();logger.info("执行成功");}}
②场景二:set注入
修改UserServiceImpl类
package com.gedeshidai.spring6.service.impl;import com.gedeshidai.spring6.dao.UserDao;
import com.gedeshidai.spring6.service.UserService;
import org.springframework.beans.factory.annotation.Autowired;
import org.springframework.stereotype.Service;@Service
public class UserServiceImpl implements UserService {private UserDao userDao;@Autowiredpublic void setUserDao(UserDao userDao) {this.userDao = userDao;}@Overridepublic void out() {userDao.print();System.out.println("Service层执行结束");}
}
修改UserController类
package com.gedeshidai.spring6.controller;import com.gedeshidai.spring6.service.UserService;
import org.springframework.beans.factory.annotation.Autowired;
import org.springframework.stereotype.Controller;@Controller
public class UserController {private UserService userService;@Autowiredpublic void setUserService(UserService userService) {this.userService = userService;}public void out() {userService.out();System.out.println("Controller层执行结束。");}}
测试:成功调用
③场景三:构造方法注入
修改UserServiceImpl类
package com.gedeshidai.spring6.service.impl;import com.gedeshidai.spring6.dao.UserDao;
import com.gedeshidai.spring6.service.UserService;
import org.springframework.beans.factory.annotation.Autowired;
import org.springframework.stereotype.Service;@Service
public class UserServiceImpl implements UserService {private UserDao userDao;@Autowiredpublic UserServiceImpl(UserDao userDao) {this.userDao = userDao;}@Overridepublic void out() {userDao.print();System.out.println("Service层执行结束");}
}
修改UserController类
package com.gedeshidai.spring6.controller;import com.gedeshidai.spring6.service.UserService;
import org.springframework.beans.factory.annotation.Autowired;
import org.springframework.stereotype.Controller;@Controller
public class UserController {private UserService userService;@Autowiredpublic UserController(UserService userService) {this.userService = userService;}public void out() {userService.out();System.out.println("Controller层执行结束。");}}
测试:成功调用
④场景四:形参上注入
修改UserServiceImpl类
package com.gedeshidai.spring6.service.impl;import com.gedeshidai.spring6.dao.UserDao;
import com.gedeshidai.spring6.service.UserService;
import org.springframework.beans.factory.annotation.Autowired;
import org.springframework.stereotype.Service;@Service
public class UserServiceImpl implements UserService {private UserDao userDao;public UserServiceImpl(@Autowired UserDao userDao) {this.userDao = userDao;}@Overridepublic void out() {userDao.print();System.out.println("Service层执行结束");}
}
修改UserController类
package com.gedeshidai.spring6.controller;import com.gedeshidai.spring6.service.UserService;
import org.springframework.beans.factory.annotation.Autowired;
import org.springframework.stereotype.Controller;@Controller
public class UserController {private UserService userService;public UserController(@Autowired UserService userService) {this.userService = userService;}public void out() {userService.out();System.out.println("Controller层执行结束。");}}
测试:成功调用
⑤场景五:只有一个构造函数,无注解
修改UserServiceImpl类
package com.gedeshidai.spring6.service.impl;import com.gedeshidai.spring6.dao.UserDao;
import com.gedeshidai.spring6.service.UserService;
import org.springframework.beans.factory.annotation.Autowired;
import org.springframework.beans.factory.annotation.Qualifier;
import org.springframework.stereotype.Service;@Service
public class UserServiceImpl implements UserService {@Autowiredprivate UserDao userDao;public UserServiceImpl(UserDao userDao) {this.userDao = userDao;}@Overridepublic void out() {userDao.print();System.out.println("Service层执行结束");}
}
测试通过
当有参数的构造方法只有一个时,@Autowired注解可以省略。
说明:有多个构造方法时呢?大家可以测试(再添加一个无参构造函数),测试报错
⑥场景六:@Autowired注解和@Qualifier注解联合
添加dao层实现
package com.gedeshidai.spring6.dao.impl;import com.gedeshidai.spring6.dao.UserDao;
import org.springframework.stereotype.Repository;@Repository
public class UserDaoRedisImpl implements UserDao {@Overridepublic void print() {System.out.println("Redis Dao层执行结束");}
}
测试:测试异常
错误信息中说:不能装配,UserDao这个Bean的数量等于2
怎么解决这个问题呢?当然要byName,根据名称进行装配了。
修改UserServiceImpl类
package com.gedeshidai.spring6.service.impl;import com.gedeshidai.spring6.dao.UserDao;
import com.gedeshidai.spring6.service.UserService;
import org.springframework.beans.factory.annotation.Autowired;
import org.springframework.stereotype.Service;@Service
public class UserServiceImpl implements UserService {@Autowired@Qualifier("userDaoImpl") // 指定bean的名字private UserDao userDao;@Overridepublic void out() {userDao.print();System.out.println("Service层执行结束");}
}
总结
- @Autowired注解可以出现在:属性上、构造方法上、构造方法的参数上、setter方法上。
- 当带参数的构造方法只有一个,@Autowired注解可以省略。()
- @Autowired注解默认根据类型注入。如果要根据名称注入的话,需要配合@Qualifier注解一起使用。
五、实验二:@Resource注入
@Resource注解也可以完成属性注入。那它和@Autowired注解有什么区别?
- @Resource注解是JDK扩展包中的,也就是说属于JDK的一部分。所以该注解是标准注解,更加具有通用性。(JSR-250标准中制定的注解类型。JSR是Java规范提案。)
- @Autowired注解是Spring框架自己的。
- @Resource注解默认根据名称装配byName,未指定name时,使用属性名作为name。通过name找不到的话会自动启动通过类型byType装配。
- @Autowired注解默认根据类型装配byType,如果想根据名称装配,需要配合@Qualifier注解一起用。
- @Resource注解用在属性上、setter方法上。
- @Autowired注解用在属性上、setter方法上、构造方法上、构造方法参数上。
@Resource注解属于JDK扩展包,所以不在JDK当中,需要额外引入以下依赖:【如果是JDK8的话不需要额外引入依赖。高于JDK11或低于JDK8需要引入以下依赖。】
<dependency><groupId>jakarta.annotation</groupId><artifactId>jakarta.annotation-api</artifactId><version>2.1.1</version>
</dependency>
源码:
package jakarta.annotation;import java.lang.annotation.ElementType;
import java.lang.annotation.Repeatable;
import java.lang.annotation.Retention;
import java.lang.annotation.RetentionPolicy;
import java.lang.annotation.Target;@Target({ElementType.TYPE, ElementType.FIELD, ElementType.METHOD})
@Retention(RetentionPolicy.RUNTIME)
@Repeatable(Resources.class)
public @interface Resource {String name() default "";String lookup() default "";Class<?> type() default Object.class;Resource.AuthenticationType authenticationType() default Resource.AuthenticationType.CONTAINER;boolean shareable() default true;String mappedName() default "";String description() default "";public static enum AuthenticationType {CONTAINER,APPLICATION;private AuthenticationType() {}}
}
①场景一:根据name注入
修改UserDaoImpl类
package com.gedeshidai.spring6.dao.impl;import com.gedeshidai.spring6.dao.UserDao;
import org.springframework.stereotype.Repository;@Repository("myUserDao")
public class UserDaoImpl implements UserDao {@Overridepublic void print() {System.out.println("Dao层执行结束");}
}
修改UserServiceImpl类
package com.gedeshidai.spring6.service.impl;import com.gedeshidai.spring6.dao.UserDao;
import com.gedeshidai.spring6.service.UserService;
import jakarta.annotation.Resource;
import org.springframework.beans.factory.annotation.Autowired;
import org.springframework.beans.factory.annotation.Qualifier;
import org.springframework.stereotype.Service;@Service
public class UserServiceImpl implements UserService {@Resource(name = "myUserDao")private UserDao myUserDao;@Overridepublic void out() {myUserDao.print();System.out.println("Service层执行结束");}
}
测试通过
②场景二:name未知注入
修改UserDaoImpl类
package com.gedeshidai.spring6.dao.impl;import com.gedeshidai.spring6.dao.UserDao;
import org.springframework.stereotype.Repository;@Repository("myUserDao")
public class UserDaoImpl implements UserDao {@Overridepublic void print() {System.out.println("Dao层执行结束");}
}
修改UserServiceImpl类
package com.gedeshidai.spring6.service.impl;import com.gedeshidai.spring6.dao.UserDao;
import com.gedeshidai.spring6.service.UserService;
import jakarta.annotation.Resource;
import org.springframework.beans.factory.annotation.Autowired;
import org.springframework.beans.factory.annotation.Qualifier;
import org.springframework.stereotype.Service;@Service
public class UserServiceImpl implements UserService {@Resourceprivate UserDao myUserDao;@Overridepublic void out() {myUserDao.print();System.out.println("Service层执行结束");}
}
测试通过
当@Resource注解使用时没有指定name的时候,还是根据name进行查找,这个name是属性名。
③场景三 其他情况
修改UserServiceImpl类,userDao1属性名不存在
package com.gedeshidai.spring6.service.impl;import com.gedeshidai.spring6.dao.UserDao;
import com.gedeshidai.spring6.service.UserService;
import jakarta.annotation.Resource;
import org.springframework.beans.factory.annotation.Autowired;
import org.springframework.beans.factory.annotation.Qualifier;
import org.springframework.stereotype.Service;@Service
public class UserServiceImpl implements UserService {@Resourceprivate UserDao userDao1;@Overridepublic void out() {userDao1.print();System.out.println("Service层执行结束");}
}
测试异常
根据异常信息得知:显然当通过name找不到的时候,自然会启动byType进行注入,以上的错误是因为UserDao接口下有两个实现类导致的。所以根据类型注入就会报错。
@Resource的set注入可以自行测试
总结:
@Resource注解:默认byName注入,没有指定name时把属性名当做name,根据name找不到时,才会byType注入。byType注入时,某种类型的Bean只能有一个
六、Spring全注解开发
全注解开发就是不再使用spring配置文件了,写一个配置类来代替配置文件。
package com.gedeshidai.spring6.config;import org.springframework.context.annotation.ComponentScan;
import org.springframework.context.annotation.Configuration;@Configuration
//@ComponentScan({"com.gedeshidai.spring6.controller", "com.gedeshidai.spring6.service","com.gedeshidai.spring6.dao"})
@ComponentScan("com.gedeshidai.spring6")
public class Spring6Config {
}
测试类
@Test
public void testAllAnnotation(){ApplicationContext context = new AnnotationConfigApplicationContext(Spring6Config.class);UserController userController = context.getBean("userController", UserController.class);userController.out();logger.info("执行成功");
}
总结
以上就是spring之基于注解管理Bean的相关知识点,希望对你有所帮助。
积跬步以至千里,积怠惰以至深渊。时代在这跟着你一起努力哦!
相关文章:

spring之基于注解管理Bean
学习的最大理由是想摆脱平庸,早一天就多一份人生的精彩;迟一天就多一天平庸的困扰。各位小伙伴,如果您: 想系统/深入学习某技术知识点… 一个人摸索学习很难坚持,想组团高效学习… 想写博客但无从下手,急需…...

Wireshark在云计算中的应用
第一章:Wireshark基础及捕获技巧 1.1 Wireshark基础知识回顾 1.2 高级捕获技巧:过滤器和捕获选项 1.3 Wireshark与其他抓包工具的比较 第二章:网络协议分析 2.1 网络协议分析:TCP、UDP、ICMP等 2.2 高级协议分析:HTTP…...
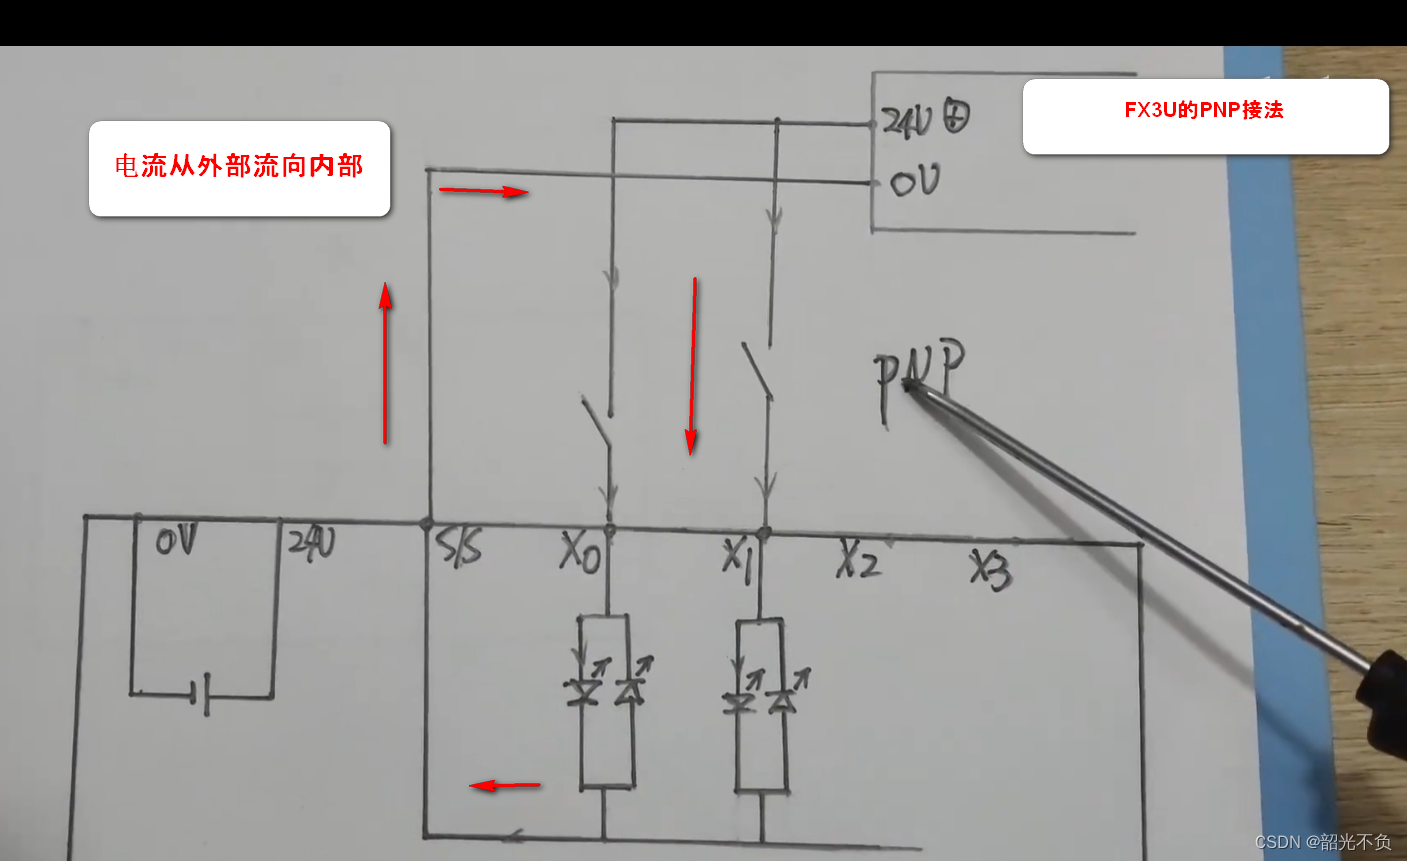
三菱plc学习入门(一,认识三菱plc)
今天就开始对三菱的plc软件入一个门,希望小编的文章对读者和初学者有所帮助!欢迎评论指正,废话不多说,下面开始学习。 目录 plc的型号介绍 M表示什么? T表示什么? R表示什么? 为什么三菱没…...
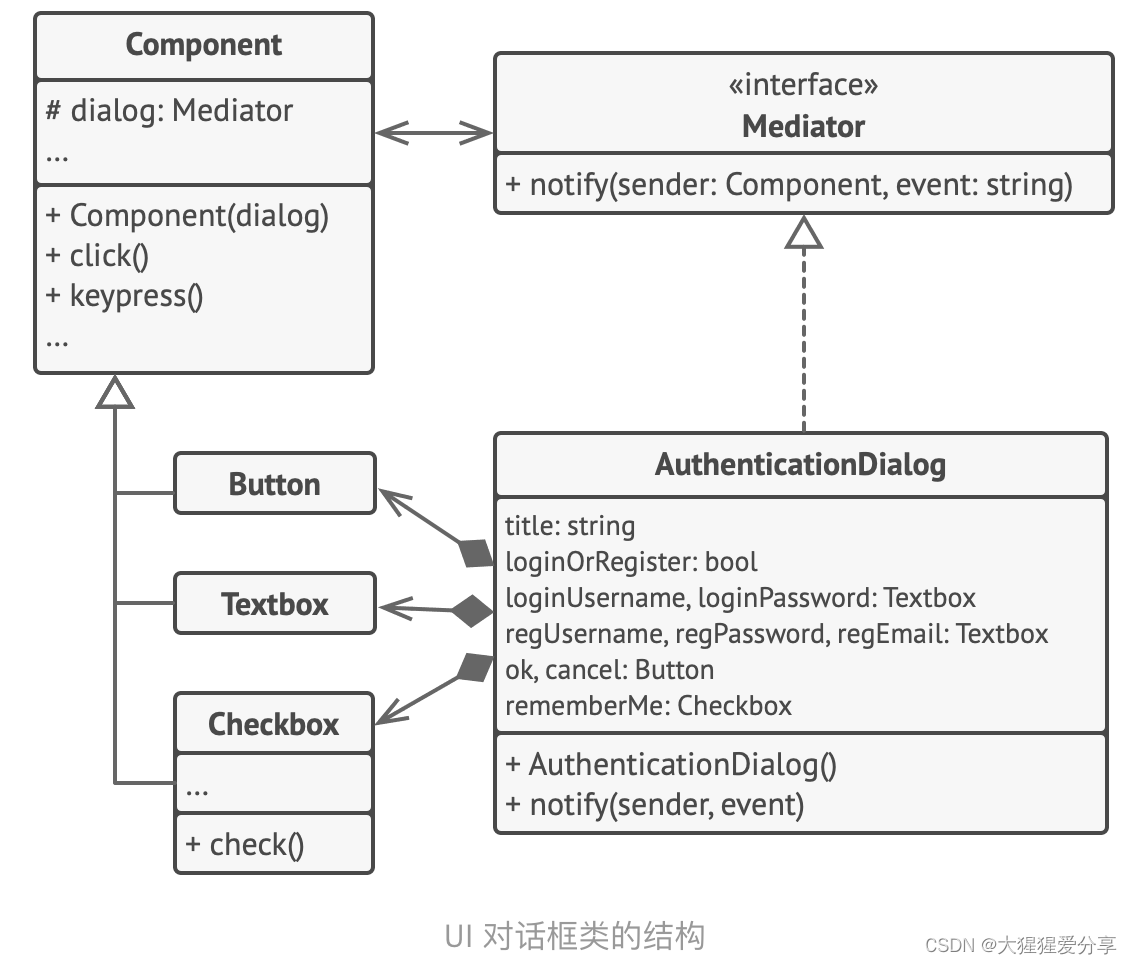
设计模式——中介者模式
引言 中介者模式是一种行为设计模式, 能让你减少对象之间混乱无序的依赖关系。 该模式会限制对象之间的直接交互, 迫使它们通过一个中介者对象进行合作。 问题 假如你有一个创建和修改客户资料的对话框, 它由各种控件组成, 例如…...
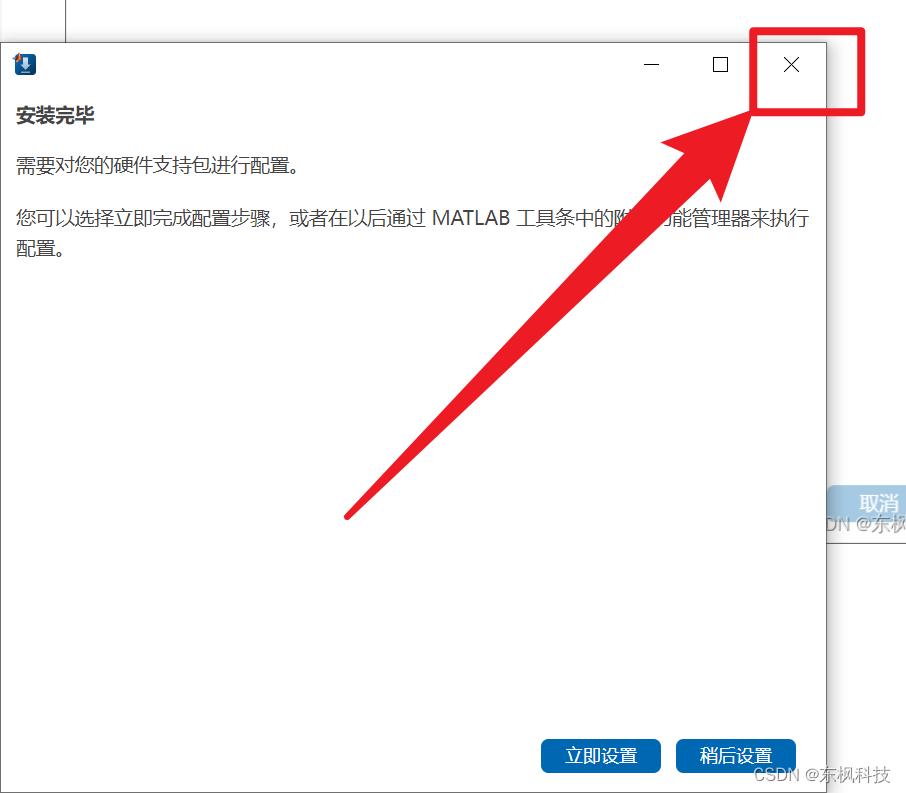
【 USRP安装教程】MATLAB 2023B
步骤 matlabdocusrp驱动包 doc 安装包内容列表 双击“R2023b_Doc_Windows.iso” 打开cmd 查看盘符 切换盘符 因为是F盘,所以cmd输入:“F:” F:进入可安装界面 cd F:\bin\win64安装离线文档库 .\mpm install-doc --matlabroot"C:\MATLAB\R202…...

AI绘画中UNet用于预测噪声
介绍 在AI绘画领域中,UNet是一种常见的神经网络架构,广泛用于图像相关的任务,尤其是在图像分割领域中表现突出。UNet最初是为了解决医学图像分割问题而设计的,但其应用已经扩展到了多种图像处理任务。 特点 对称结构:…...
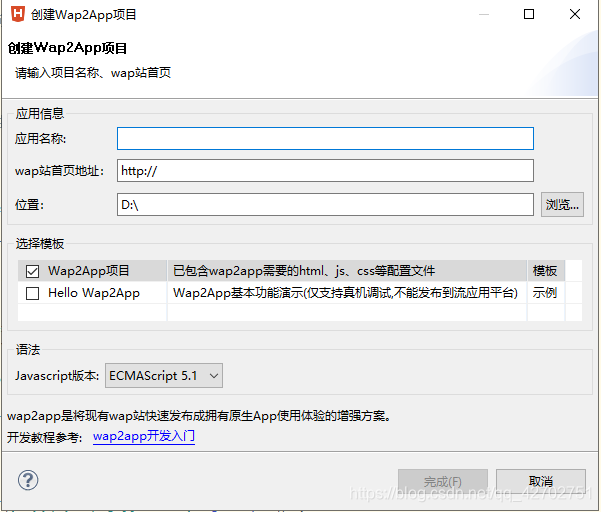
解决 Hbuilder打包 Apk pad 无法横屏 以及 H5 直接打包 成Apk
解决 Hbuilder打包 Apk pad 无法横屏 前言云打包配置 前言 利用VUE 写了一套H5 想着 做一个APP壳 然后把 H5 直接嵌进去 客户要求 在pad 端 能够操作 然后页面风格 也需要pad 横屏展示 云打包 配置 下面是manifest.json 配置文件 {"platforms": ["iPad"…...

云原生之深入解析如何在K8S环境中使用Prometheus来监控CoreDNS指标
一、什么是 Kubernetes CoreDNS? CoreDNS 是 Kubernetes 环境的DNS add-on 组件,它是在控制平面节点中运行的组件之一,使其正常运行和响应是 Kubernetes 集群正常运行的关键。DNS 是每个体系结构中最敏感和最重要的服务之一。应用程序、微服…...

Unity3D UDP传输大文件怎么提高速度详解
前言 Unity3D是一款强大的游戏开发引擎,但是在处理大文件传输时,往往会遇到速度较慢的问题。本文将详细介绍如何通过使用UDP协议来提高大文件传输的速度,并给出相应的技术详解和代码实现。 对惹,这里有一个游戏开发交流小组&…...
数据结构——栈和队列的应用
1.栈在括号匹配中的应用 算法的思想如下; 1)初始设置一个空栈,顺序读入括号。 2)若是右括号,则或使置于栈顶的最急迫期待得以消解,或是不合法的情况(括号序列不 匹配,退出程序)。 3)若是左括号,则作为一个新的更急迫…...
第7章 排序
前言 在这一章,我们讨论数组元素的排序问题。为简单起见,假设在我们的例子中数组只包含整数,虽然更复杂的结构显然也是可能的。对于本章的大部分内容,我们还假设整个排序工作能够在主存中完成,因此,元素的个…...
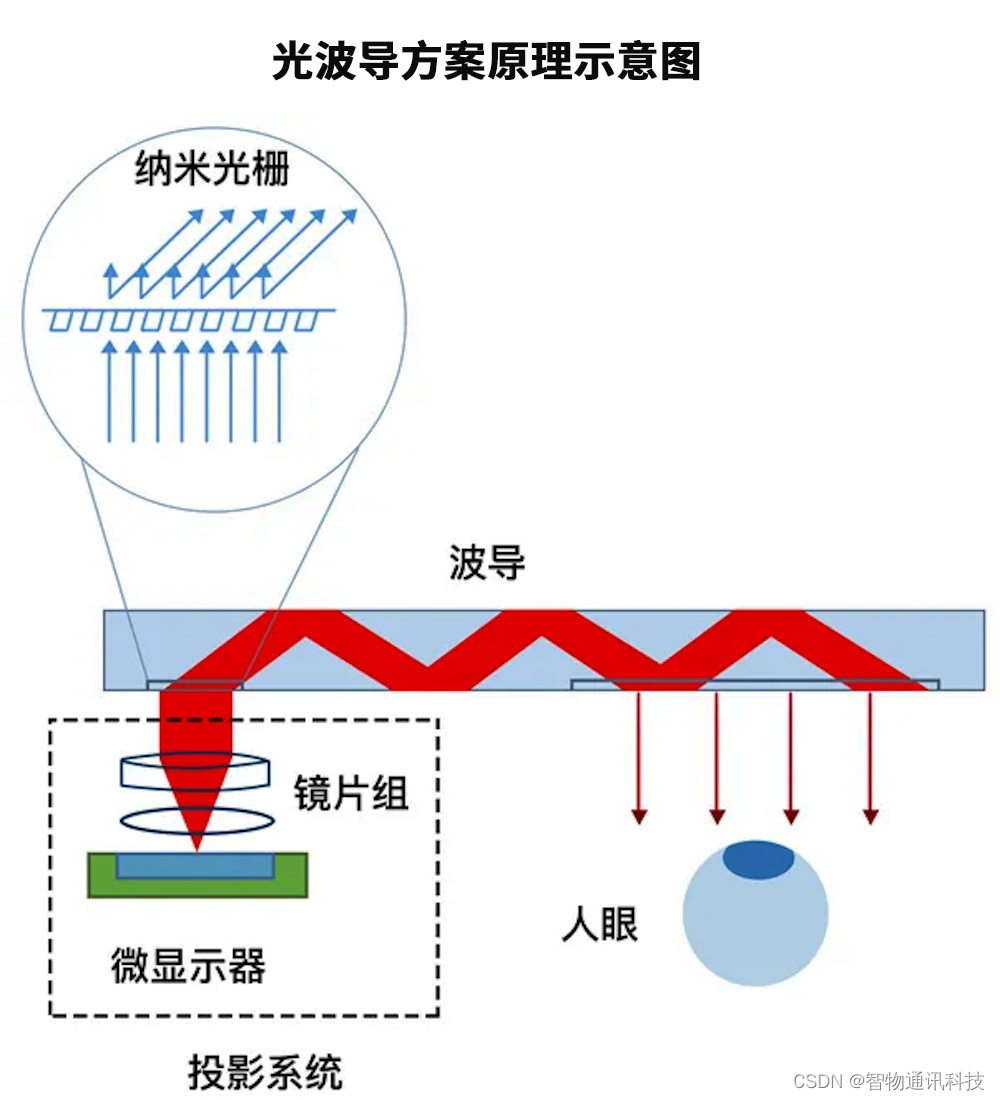
AR眼镜光学方案_AR眼镜整机硬件定制
增强现实(Augmented Reality,AR)技术通过将计算机生成的虚拟物体或其他信息叠加到真实世界中,实现对现实的增强。AR眼镜作为实现AR技术的重要设备,具备虚实结合、实时交互的特点。为了实现透视效果,AR眼镜需要同时显示真实的外部世…...
Linux shell编程学习笔记36:read命令
*更新日志 *2023-12-18 1.根据[美] 威廉肖特斯 (Willian shotts)所著《Linux命令行大全(第2版)》 更新了-e、-i、-r选项的说明 2.更新了 2.8 的实例,增加了gif动图 3.补充了-i的应用实例 2.1…...

Python表达式
表达式 本章将解释 Python 中组成表达式的各种元素的的含义。 语法注释: 在本章和后续章节中,会使用扩展 BNF 标注来描述语法而不是词法分析。 当(某种替代的)语法规则具有如下形式 name :: othername并且没有给出语义,则这种…...
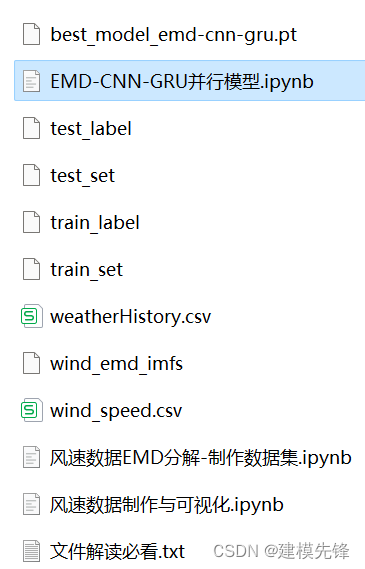
风速预测(六)基于Pytorch的EMD-CNN-GRU并行模型
目录 前言 1 风速数据EMD分解与可视化 1.1 导入数据 1.2 EMD分解 2 数据集制作与预处理 2.1 先划分数据集,按照8:2划分训练集和测试集 2.2 设置滑动窗口大小为96,制作数据集 3 基于Pytorch的EMD-CNN-GRU并行模型预测 3.1 数据加载&a…...
【Stm32-F407】全速DAP仿真器下载程序
文章内容如下: 1) 全速DAP仿真器简介2) 全速DAP仿真器下载程序流程 1) 全速DAP仿真器简介 1)全速DAP仿真器简介 DAP全称 Data Acquisition Processor,是一种用于数据采集和实时控制的设备。本文使用的全速DAP仿真器遵循ARM公司的CMSIS-DAP标准ÿ…...

ArcGIS Pro SDK导出的几何XML和Json
本博主会持续更新关于ArcGIS Pro SDK的相关内容,请读者关注一下 圆 XML <PolygonN xmlns:xsi"http://www.w3.org/2001/XMLSchema-instance" xmlns:xs"http://www.w3.org/2001/XMLSchema" xmlns:typens"http://www.esri.com/schemas/…...

随笔记录-springboot_LoggingApplicationListener+LogbackLoggingSystem
环境:springboot-2.3.1 加载日志监听器初始化日志框架 SpringApplication#prepareEnvironment SpringApplicationRunListeners#environmentPrepared EventPublishingRunListener#environmentPrepared SimpleApplicationEventMulticaster#multicastEvent(Applicati…...

超级计算机与天气预报:精准预测的科技革命
超级计算机与天气预报:精准预测的科技革命 一、引言 随着科技的飞速发展,超级计算机已经成为现代社会不可或缺的一部分。它们在科研、工业、军事等领域发挥着重要作用,其中天气预报是一个颇具代表性的应用领域。本文将探讨超级计算机在天气…...

【uniapp小程序-分享】
//分享到聊天onShareAppMessage() {let shareMessage {title: this.liveInfo.wx_title,path: /subPages/livePages/liveCourse/live_course_info?courseid this.courseid,imageUrl: this.liveInfo.wx_thumb};let shearMsg uni.getStorageSync(shearImg this.courseid);if (…...

小学期第一周学习记录
这周自学了Multisim仿真软件,完成了555方波发生器二阶低通滤波器的搭建,成功实现了方波到正弦波的转换。学习过程1. 555方波发生器搭建参考课本公式 f ≈ 1.44 / ((R12R2)C1) 设计参数,一开始因为电容单位看错(把nF写成μF&…...
)
【法学研究效率革命】:NotebookLM如何将文献综述时间压缩73%?(20年法律AI实践者亲测)
更多请点击: https://codechina.net 第一章:NotebookLM法学研究辅助 NotebookLM 是 Google 推出的基于用户自有文档构建的 AI 助手,其核心能力在于对上传文本进行深度语义理解与上下文感知问答。在法学研究场景中,它可高效处理判…...

如何使用witr快速定位占用端口的神秘进程?完整指南
如何使用witr快速定位占用端口的神秘进程?完整指南 【免费下载链接】witr Why is this running? 项目地址: https://gitcode.com/GitHub_Trending/wi/witr 你是否曾经遇到过端口被占用却不知道是哪个进程在捣乱的情况?😫 想要启动Web…...

ActionView开发者指南:基于Laravel+ReactJS的二次开发完整教程 [特殊字符]
ActionView开发者指南:基于LaravelReactJS的二次开发完整教程 🚀 【免费下载链接】actionview An issue tracking tool based on laravelreactjs for small and medium-sized enterprises, open-source and free, similar to Jira. 项目地址: https://…...
)
ssm图书在线商城(10044)
有需要的同学,源代码和配套文档领取,加文章最下方的名片哦 一、项目演示 项目演示视频 二、资料介绍 完整源代码(前后端源代码SQL脚本)配套文档(LWPPT开题报告/任务书)远程调试控屏包运行一键启动项目&…...

【RT-DETR实战】044、Task-Aligned Assigner 原理与适配:从标签分配混乱到检测精度提升 2.3% 的实战记录
问题现场:为什么加了更好的 Backbone,mAP 反而掉了? 上周在部署 RT-DETR 的轻量化版本时遇到了一个典型问题:我把原来的 CSPDarkNet 换成了更轻、计算量更小的 GhostNet,理论上应该保持精度或微跌,但实际训练时验证集 mAP 掉了 1.5%。 排查了一圈数据增强、学习率、梯度…...

Claude Code 安装后如何配置 Taotoken 密钥与聚合端点
🚀 告别海外账号与网络限制!稳定直连全球优质大模型,限时半价接入中。 👉 点击领取海量免费额度 Claude Code 安装后如何配置 Taotoken 密钥与聚合端点 基础教程类,针对刚安装 Claude Code 但无法直连或担心封号的开发…...

保障企业级应用安全,如何利用 Taotoken 管理 API 密钥与审计日志
🚀 告别海外账号与网络限制!稳定直连全球优质大模型,限时半价接入中。 👉 点击领取海量免费额度 保障企业级应用安全,如何利用 Taotoken 管理 API 密钥与审计日志 在中大型企业的开发实践中,将大模型能力集…...

如何为《欧洲卡车模拟2》实现完整智能驾驶体验?ETS2LA自动驾驶插件终极指南
如何为《欧洲卡车模拟2》实现完整智能驾驶体验?ETS2LA自动驾驶插件终极指南 【免费下载链接】Euro-Truck-Simulator-2-Lane-Assist Plugin based interface program for ETS2/ATS. 项目地址: https://gitcode.com/gh_mirrors/eur/Euro-Truck-Simulator-2-Lane-Ass…...

别再死记硬背了!用Python模拟超前进位加法器,直观理解其速度优势
用Python模拟超前进位加法器:从硬件原理到算法思维的跨越 在计算机科学和电子工程交叉领域,加法器是最基础却又最精妙的设计之一。传统教学中,我们往往通过抽象的电路图来理解超前进位加法器(CLA)的速度优势࿰…...