Unity组件开发--相机跟随角色和旋转
1.相机跟随组件,节点:
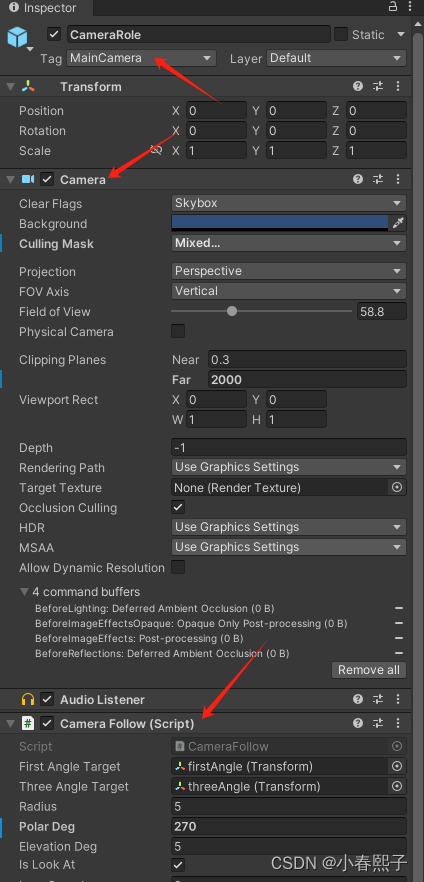
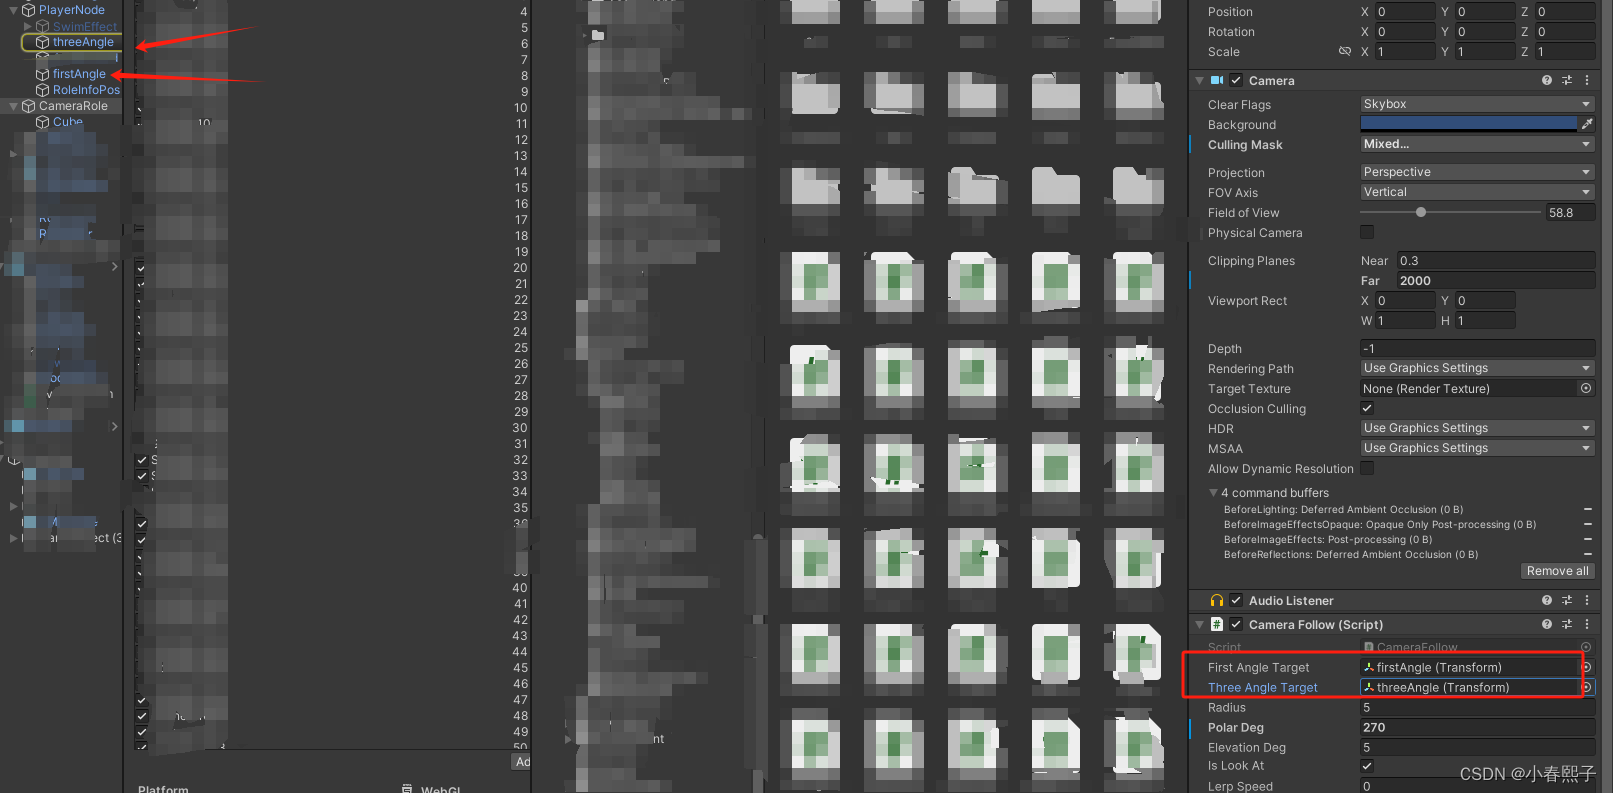
2.相机跟随组件脚本:
using System;
using System.Collections;
using System.Collections.Generic;
using Unity.Burst.Intrinsics;
using UnityEngine;
using UnityEngine.UI;public class CameraFollow : Singleton<CameraFollow> {public Transform firstAngleTarget; //第一人称跟随的目标public Transform threeAngleTarget; //第三人称跟随的目标public float radius;public float polarDeg;public float elevationDeg;private Transform target;public bool isLookAt;public float lerpSpeed = 0;//是否第一人称视角private bool isFirstAngle = false;LayerMask mask;/// <summary>/// 极坐标转换成笛卡尔坐标/// </summary>/// <param name="radius"></param>/// <param name="angle"></param>/// <returns></returns>/// private bool isDriven;private void Awake() {EventManager.Instance.AddListener(EventName.PlayerDriving, (s, e) => {  //开车事件触发var arg = e as PlayerDrivingEventArgs;if (arg.driveObj && arg.driveObj.GetComponent<VehicleBase>() && arg.driveObj.GetComponent<VehicleBase>().driveCam) {gameObject.SetActive(false);}else {isDriven = true;}});EventManager.Instance.AddListener(EventName.PlayerDown, (s, e) => {  //开车事件触发var arg = e as PlayerDrivingEventArgs;                                              //isDriven = false;if (arg.driveObj && arg.driveObj.GetComponent<VehicleBase>() && arg.driveObj.GetComponent<VehicleBase>().driveCam) {gameObject.SetActive(true);}else {isDriven = false;}});}private void Start(){mask.value = (1 << LayerMask.NameToLayer("Ground")) | (1 << LayerMask.NameToLayer("Wall"));this.target = this.threeAngleTarget;EventManager.Instance.AddListener(EventName.ChangeAngle, changeAngle);var offset = SphericalToCartesian(radius, DegreeToRadian(polarDeg), DegreeToRadian(elevationDeg));//transform.position = Vector3.Lerp(transform.position, target.position + offset, Time.deltaTime * 10);transform.position = target.position + offset;}private void changeAngle(object sender, EventArgs e) {var data = e as AngleChangeEventArgs;if (data != null) {if (data.angleIndex == 1) {this.target = this.firstAngleTarget;this.radius = 0;isFirstAngle = true;transform.position = target.position;transform.forward = target.forward;} else if (data.angleIndex == 3) {this.target = this.threeAngleTarget;this.radius = 6;isFirstAngle = false;}}Debug.Log("摄像机视角改变" + e);}public Vector2 PolarToCartesian(float radius, float angle) {float x = radius * Mathf.Cos(angle);float y = radius * Mathf.Sin(angle);return new Vector2(x, y);}public static float DegreeToRadian(float degree) {return degree * Mathf.Deg2Rad;}public static Vector3 SphericalToCartesian(float radius, float polar, float elevation) {float a = radius * Mathf.Cos(elevation);float x = a * Mathf.Cos(polar);float y = radius * Mathf.Sin(elevation);float z = a * Mathf.Sin(polar);return new Vector3(x, y, z);}public static void CartesianToSpherical(Vector3 cartesian, out float radius, out float polar, out float elevation) {radius = Mathf.Sqrt(Mathf.Pow(cartesian.x, 2) + Mathf.Pow(cartesian.y, 2) + Mathf.Pow(cartesian.z, 2));polar = Mathf.Atan2(cartesian.z, cartesian.x);elevation = Mathf.Asin(cartesian.y / radius);}void LateUpdate() {if (isDriven) {var offset = SphericalToCartesian(6f, DegreeToRadian(270), DegreeToRadian(-15));transform.position = Vector3.Lerp(transform.position, target.TransformPoint(target.localPosition + offset), Time.deltaTime * 3);//transform.position = target.TransformPoint(target.localPosition + offset);transform.LookAt(target);return;}if (isFirstAngle) {//var offset = SphericalToCartesian(radius, DegreeToRadian(polarDeg), DegreeToRadian(elevationDeg));target.eulerAngles = new Vector3(elevationDeg, -polarDeg, 0);transform.forward = target.forward;transform.position = target.position;if (PlayerController.Instance.animator) {var euler = PlayerController.Instance.animator.transform.eulerAngles;PlayerController.Instance.animator.transform.eulerAngles = new Vector3(euler.x, target.eulerAngles.y, euler.z);}}else {Ctrl_Cam_Move();CtrThird();}}void CtrThird() {var offset = SphericalToCartesian(radius, DegreeToRadian(polarDeg), DegreeToRadian(elevationDeg));//更新相机位置//transform.position = target.position + offset;transform.position = target.position + offset;//TODO:做成CAMERA NEAR OBJ,进行隐藏if (PlayerController.Instance.animator != null) PlayerController.Instance.animator.gameObject.SetActive(true);//计算完位置之后处理让镜头不会穿墙Vector3 direction = transform.position - target.position;float distance = direction.magnitude;direction.Normalize();RaycastHit hit;if (Physics.Raycast(target.transform.position, direction, out hit, distance, mask.value)) {var dstPos = hit.point - distance * distance * direction * 0.01f;var offsetDis = target.position - dstPos;CartesianToSpherical(offsetDis, out var compareRadius, out _, out _);if (compareRadius < 1f)  {if (PlayerController.Instance.animator != null)  PlayerController.Instance.animator.gameObject.SetActive(false);}transform.position = dstPos;}transform.eulerAngles = target.eulerAngles;if (isLookAt) {transform.LookAt(target);}}public void Ctrl_Cam_Move(){if (EditorModel.Instance.CurrentUnlock != null) { //解锁其他物体的时候,镜头不动, 要前后移动的是物体return;}if (Input.GetAxis("Mouse ScrollWheel") > 0){//transform.Translate(Vector3.forward * 1f);//速度可调  自行调整radius = Math.Clamp(radius - 1.0f, 2, 15);}if (Input.GetAxis("Mouse ScrollWheel") < 0){//transform.Translate(Vector3.forward * -1f);//速度可调  自行调整radius = Math.Clamp(radius + 1.0f, 2, 15);}}
}
3.相机跟随角色视角旋转:
using System;
using System.Collections;
using System.Collections.Generic;
using UnityEngine;
using UnityEngine.EventSystems;public class CameraRotate : MonoBehaviour
{public float speedH;//public float speedVertical;public bool isMobile;//[Range(0f, 1f)]//public float damping;CameraFollow cameraFollow;private float currentHorizontal;private float currentVertical;private Vector3 lastMousePosition;private bool isDragging;float time;private float velocityY;private float velocityX;PointerEventData eventDataCurrentPosition;//private bool isDragging;public static CameraRotate instance;private void Awake() {instance = this;//UI交互要禁用玩家的控制cameraFollow = Camera.main.GetComponent<CameraFollow>();currentHorizontal = cameraFollow.polarDeg;time = Time.realtimeSinceStartup;}// Start is called before the first frame updatevoid Start() {}public void SetPolarDeg(float degree) {currentHorizontal = degree;cameraFollow.polarDeg = degree;}private bool IsPointerOverUIObject() {//判断是否点击的是UI,有效应对安卓没有反应的情况,true为UIif (eventDataCurrentPosition == null) {eventDataCurrentPosition = new PointerEventData(EventSystem.current);}eventDataCurrentPosition.position = new Vector2(Input.mousePosition.x, Input.mousePosition.y);List<RaycastResult> results = new List<RaycastResult>();EventSystem.current.RaycastAll(eventDataCurrentPosition, results);return results.Count > 0;}// Update is called once per framevoid LateUpdate() {//if (IsPointerOverUIObject()) {//    lastMousePosition = Input.mousePosition;//    return;//点击到UI不处理//}// 检查鼠标左键是否按下如果按下的那一下是在UI之上,则不让其旋转if (PlayerData.Instance.isRunningPC){if (Input.GetMouseButtonDown(0) && IsPointerOverUIObject() == false){// 记录鼠标点击位置lastMousePosition = Input.mousePosition;isDragging = true;}else if (Input.GetMouseButtonUp(0)){// 如果鼠标抬起,则需要重新按下鼠标来记录新的点击位置isDragging = false;}}else {if (Input.GetMouseButtonDown(0)){// 记录鼠标点击位置lastMousePosition = Input.mousePosition;isDragging = true;}else if (Input.GetMouseButtonUp(0)){// 如果鼠标抬起,则需要重新按下鼠标来记录新的点击位置isDragging = false;}}if (isDragging) {float speedHorizontal = speedH;float speedVertical = 0.1f;// 计算鼠标移动的增量Vector3 deltaMousePosition = Input.mousePosition - lastMousePosition;//Debug.Log("deltaMousePosition.x:" + deltaMousePosition.x + "deltaMousePosition.y:" + deltaMousePosition.y);// 计算水平旋转角度// 计算水平旋转角度float deltaHorizontal = speedHorizontal * deltaMousePosition.x;var newHorizontal = currentHorizontal - deltaHorizontal;//newHorizontal = Mathf.SmoothDamp(currentHorizontal, newHorizontal,ref velocityX, Time.unscaledDeltaTime);// 更新摄像机跟随脚本的旋转角度cameraFollow.polarDeg = newHorizontal;//Debug.Log("cameraFollow.polarDeg" + cameraFollow.polarDeg);currentHorizontal = newHorizontal;float deltaVertical = speedVertical * deltaMousePosition.y;var newVertical = currentVertical - deltaVertical;//newHorizontal = Mathf.SmoothDamp(currentVertical, newVertical, ref velocityY, Time.unscaledDeltaTime);// 更新摄像机跟随脚本的旋转角度cameraFollow.elevationDeg = Mathf.Clamp(newVertical, -90f, 89);currentVertical = newVertical;lastMousePosition = Input.mousePosition;}else {}}}
相关文章:
Unity组件开发--相机跟随角色和旋转
1.相机跟随组件,节点: 2.相机跟随组件脚本: using System; using System.Collections; using System.Collections.Generic; using Unity.Burst.Intrinsics; using UnityEngine; using UnityEngine.UI;public class CameraFollow : Singleton&…...
)
JavaScript系列——Proxy(代理)
文章目录 概要Proxy 语法handler 对象的方法Proxy 示例常用handler 对象的方法的参数handler.get()语法示例 handler.set()语法示例 使用场景验证值修正及附加属性 小结 概要 Proxy 用于创建一个对象的代理,将对原对象上的操作(属性获取、赋值、函数调用…...
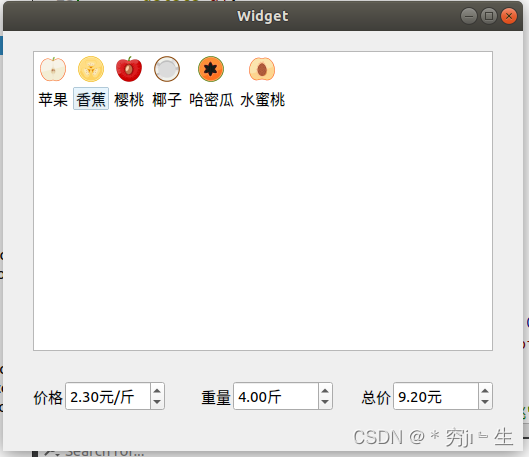
QT第三天
使用QT完成水果计价界面和功能,如下图: 运行结果: 代码: widget.h #ifndef WIDGET_H #define WIDGET_H#include <QWidget> #include <QListWidgetItem>QT_BEGIN_NAMESPACE namespace Ui { class Widget; } QT_END_N…...
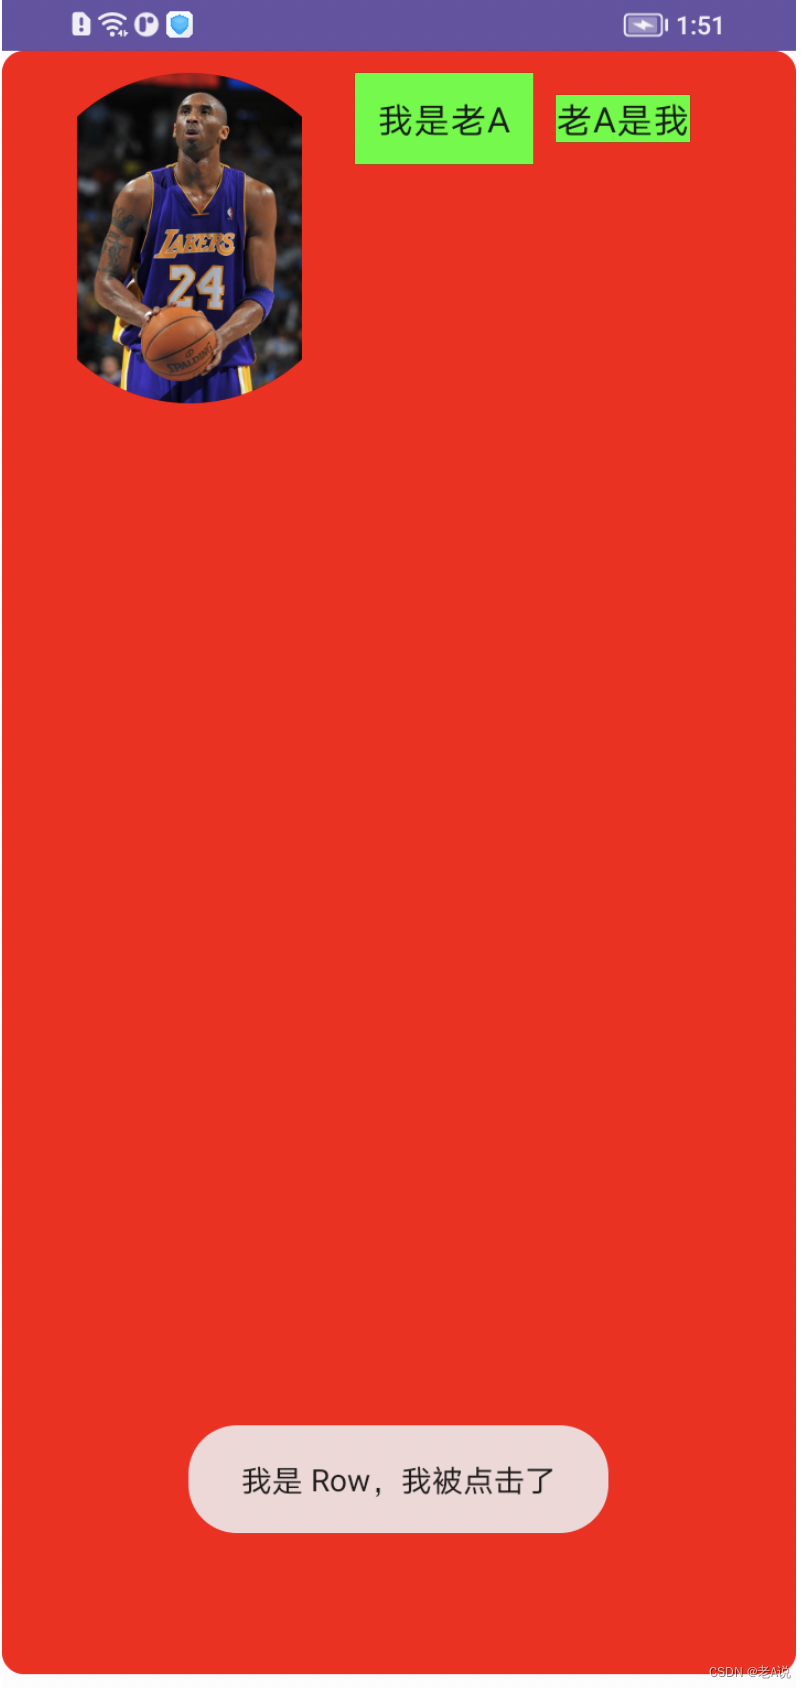
Jetpack Compose -> 声明式UI Modifier
前言 本章主要介绍下 Compose 的声明式 UI 以及初级写法; 什么是声明式UI 传统UI 传统 UI 方式来声明UI <androidx.appcompat.widget.LinearLayoutCompat android:layout_width"match_parent" android:layout_height"match_parent&quo…...
windows10 装docker和docker compose
一.windows环境准备 开启过程中的问题,进入bios修复 二.docker下载安装 1.下载 Docker Desktop: The #1 Containerization Tool for Developers | Docker 下载最新版有问题,下载老版本试试 Docker Desktop release notes | Docker Docs 2.安装 三.do…...

第二次面试总结 - 宏汉科技 - Java后端开发
🧸欢迎来到dream_ready的博客,📜相信您对专栏 “本人真实面经” 很感兴趣o (ˉ▽ˉ;) 专栏 —— 本人真实面经,更多真实面试经验,中大厂面试总结等您挖掘 目录 总结 (非详细) 面试内容(提问内容) - 带答案…...

GPT-4:人工智能的新纪元与未来的无限可能
在人工智能的发展史上,GPT-4的问世标志着一个新的里程碑。作为最新一代的自然语言处理模型,GPT-4不仅在技术上取得了突破,更在应用层面展现了前所未有的潜力。本文将探讨GPT-4的核心技术、应用场景以及它对未来社会的潜在影响。 GPT-4的技术…...
2.右值引用和移动语义
文章目录 右值引用和移动语义&&的特性右值引用优化性能,避免深拷贝移动(move )语义forward 完美转发emplace_back 减少内存拷贝和移动unordered container 无序容器map和unordered_map的差别内部实现机理不同优缺点以及适用处 小结优缺点以及适用处 小结 代…...
深入浅出线程原理
Linux 中的线程本质 线程接口由 Native POSIX Thread Library 提供,即:NPTL 库函数 线程被称为轻量级进程 (Light Weight Process) 每一个线程在内核中都对应一个调度实体,拥有独立的结构体 (task_struct) 内核设计:一个进程对…...

openssl3.2 - 官方demo学习 - saccept.c
文章目录 openssl3.2 - 官方demo学习 - saccept.cEND openssl3.2 - 官方demo学习 - saccept.c 建立TLSServer(使用了证书, 和证书中的私钥), 接收客户端的连接, 并将客户端发来的信息打印到屏幕 笔记 /*! \file saccept.c */ /*! \brief 建立TLSServer(使用了证书, 和证书中…...
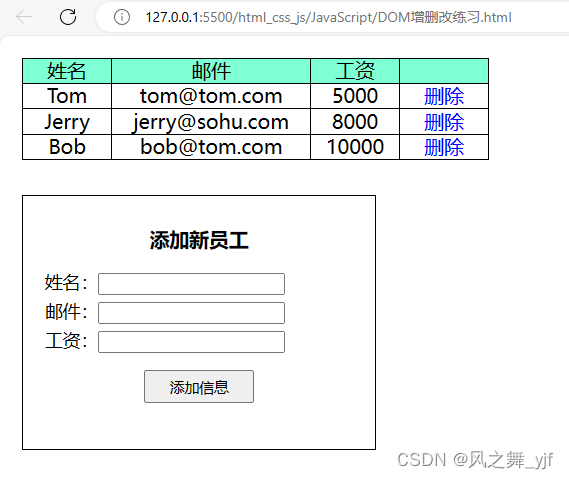
JavaScript基础(26)_dom增删改练习
<!DOCTYPE html> <html lang"zh"><head><meta charset"UTF-8"><title>DOM增删改练习</title><link rel"stylesheet" href"../browser_default_style/reset.css"><style>table {borde…...
mac上部署单体hbase
1. 简介 HBase 是一个开源的、分布式的、版本化的典型非关系型数据库。它是 Google BigTable 的开源实现,并且是 Apache 基金会的 Hadoop 项目的一部分1。HBase 在 Hadoop Distributed File System (HDFS) 上运行,作为一个列式存储非关系数据库管理系统…...

【RV1126 学习】SDK/ U-Boot/kernel/rootfs 编译学习
文章目录 RV1126芯片介绍rv1126 模块代码目录相关说明 SDK 包下的脚本使用build.sh 脚本使用envsetup.sh 脚本使用mkfirmware.sh 脚本使用rkflash.sh 脚本使用 U-Boot 编译和配置uboot 的配置修改编译操作 kernel 的修改编译rootfs 编译和配置buildroot 配置busybox 配置 RV112…...

Golang 使用 AST 获取方法和参数名以及应用举例
背景 在做一些自动生成的代码工作时,有时需要知道方法以及对应的参数名 如果仅是方法,利用反射机制就可以解决 而参数名,程序编译后,已经丢失 可以通过 AST 事先获取方法的参数名 有了方法、参数名,加上反射&…...
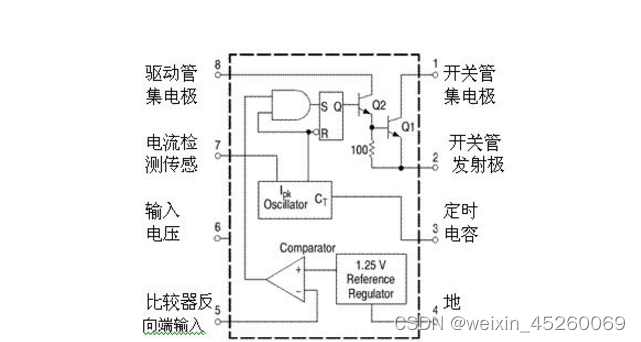
DC-DC变换集成电路芯片B34063——工作电压范围宽,静态电流小
B34063为一单片DC-DC变换集成电路,内含温度补偿的参考电压源(1.25V)、比较器、能有效限制电流及控制工作周期的振荡器,驱动器及大电流输出开关管等,外配少量元件,就能组成升压、降压及电压反转型DC-DC变换器。 主要特点: ● 工作…...
强力推荐:本地文件加密软件—超详细加密步骤来了!
在数字化时代,数据安全问题日益受到人们的关注。 为了保护个人和企业的重要信息不被泄露,越来越多的人开始使用文件加密软件。 尤其是常常会有数据泄露风险的企业更是需要一款非常给力的加密工具来保护企业数据安全。 一、选择合适的加密软件 在选择加…...

在qml中,ListModel可以与WorkerScript一起使用,从多个线程访问列表模型
在QML中,您可以使用ListModel和WorkerScript一起实现多线程访问列表模型。以下是一个简单的例子,演示了如何在QML中使用这两个元素: import QtQuick 2.15 import QtQuick.Controls 2.15ApplicationWindow {visible: truewidth: 400height: 3…...

rocketmq实现延迟消息
SpringBoot整合RocketMQ发送延时消息 springboot rocketmq 延迟消息 Windows下RocketMQ安装及可视化界面搭建 Java 客户端 RocketMQ延迟消息 项目背景 项目中有延时消息的需求,综合考量RocketMQ比较适合。 RocketMQ支持多维度的延迟级别 支持多种消息类型 基…...

vue倒计时60秒改变按钮状态效果demo(整理)
你可以使用Vue的计时器和绑定状态的方法来实现这个功能。 首先,在data中添加一个计时器countdown,初始值为0。 data() {return {countdown: 0} }<template><div><button click"startCountdown" :disabled"countdown > …...
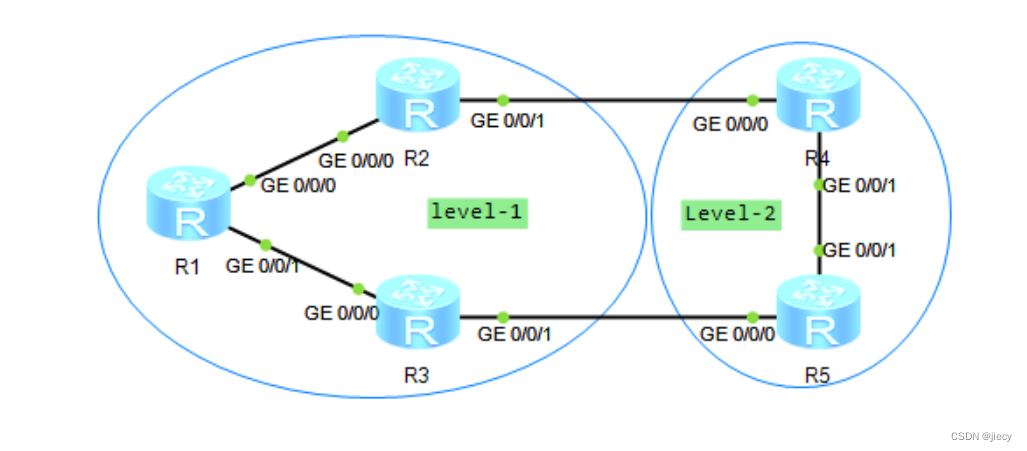
多区域isis配置实验
一、预习: IS-IS:Intermediate System to Intermediate System,中间系统到中间系统,是ISO为它的CLNP(ConnectionLess Network Protocol)设计的一种动态路由协议,后来为了提供对IP路由的支持&…...

pose-search:Web端人体姿态识别与动作检索的革新实践
pose-search:Web端人体姿态识别与动作检索的革新实践 【免费下载链接】pose-search x6ud.github.io/pose-search 项目地址: https://gitcode.com/gh_mirrors/po/pose-search 在计算机视觉与Web技术深度融合的今天,pose-search作为一款开源项目&am…...

SiameseUniNLU多任务统一处理实战:医疗问诊文本中症状、疾病、部位联合识别
SiameseUniNLU多任务统一处理实战:医疗问诊文本中症状、疾病、部位联合识别 1. 引言:医疗文本处理的挑战与机遇 医疗问诊文本中包含了大量有价值的信息:患者描述的症状、医生诊断的疾病、身体部位的具体情况等。传统方法需要针对每种信息类…...
)
手把手解决Simulink与贝加莱Automation Studio联调的5个典型报错(附详细截图)
手把手解决Simulink与贝加莱Automation Studio联调的5个典型报错(附详细截图) 在工业自动化领域,Simulink与贝加莱PLC的联合开发已经成为复杂控制系统设计的黄金组合。但当你满怀期待地将精心设计的Simulink模型转换为Automation Studio可执行…...

ai辅助开发:让快马智能解析你的需求,自动生成最优homebrew环境配置方案
最近在折腾数据科学环境配置时,发现一个特别实用的开发技巧:用AI辅助生成Homebrew环境配置方案。传统方式需要手动查文档、处理依赖冲突,现在通过InsCode(快马)平台的AI能力,整个过程变得异常简单。 需求描述阶段 比如我输入"…...

道德迷宫工程:让伦理审查永远卡关
当伦理成为迷宫在数字化转型的浪潮中,软件系统深度渗透医疗、金融、公共治理等核心领域。伦理审查本应是技术创新的安全阀,却被一种名为道德迷宫工程(Ethical Maze Engineering) 的策略系统性破坏——通过精心设计的流程复杂性、模…...

百川2-13B-4bits模型微调实战:用OpenClaw日志数据提升任务理解力
百川2-13B-4bits模型微调实战:用OpenClaw日志数据提升任务理解力 1. 为什么需要针对OpenClaw任务做模型微调 去年夏天,当我第一次尝试用OpenClaw自动化处理日常工作报告时,发现一个有趣的现象:当我直接说"帮我整理上周的销…...

openclaw喂饭教程!在 Linux 环境下快速完成安装、初始化与 Web UI 配置
基础示例:单工作表 Excel 转 TXT 以下是将一个 Excel 文件中的第一个工作表转换为 TXT 的完整步骤: 1. 加载并读取Excel文件 from spire.xls import * from spire.xls.common import * workbook Workbook() workbook.LoadFromFile("示例.xlsx"…...

bge-large-zh-v1.5在RAG中的应用:提升问答系统准确率
bge-large-zh-v1.5在RAG中的应用:提升问答系统准确率 1. RAG系统与Embedding模型的关系 1.1 什么是RAG系统 RAG(Retrieval-Augmented Generation)系统是现代问答系统的核心技术架构,它通过两个关键步骤回答用户问题:…...

企业级后台快速开发解决方案:Element-UI Admin全指南
企业级后台快速开发解决方案:Element-UI Admin全指南 【免费下载链接】element-ui-admin 基于 element-ui 的单页面后台管理项目模版 项目地址: https://gitcode.com/gh_mirrors/el/element-ui-admin Element-UI Admin是一款基于Element-UI组件库的单页面后台…...

SEO_网站SEO诊断与性能优化的关键步骤
<h3 id"seo">网站SEO诊断与性能优化的关键步骤</h3> <p>在当今竞争激烈的互联网环境中,一个成功的网站不仅需要精美的设计,还需要优化的搜索引擎优化(SEO)和高效的性能。SEO和性能优化不仅能够提高网…...