数据结构----链表介绍、模拟实现链表、链表的使用
文章目录
- 1. ArrayList存在的问题
- 2. 链表定义
- 2.1 链表的概念及结构
- 2.2 链表的组合类型
- 3. 链表的实现
- 3.1 单向、不带头、非循环链表的实现
- 3.2 双向、不带头节点、非循环链表的实现
- 4.LinkedList的使用
- 4.1 什么是LinkedList
- 4.2 LinkedList的使用
- 4.2.1. LinkedList的构造
- 4.2.2. LinkedList的其他常用方法介绍
- 4.2.3. LinkedList的遍历
- 5. ArrayList和LinkedList的区别
1. ArrayList存在的问题
- ArrayList底层使用连续的空间,任意位置插入或删除元素时,需要将该位置后序元素整体往前或者往后搬移,故时间复杂度为O(N)
- 增容需要申请新空间,拷贝数据,释放旧空间。会有不小的消耗。
- 增容一般是呈2倍的增长,势必会有一定的空间浪费。例如当前容量为100,满了以后增容到200,我们再继续插入了5个数据,后面没有数据插入了,那么就浪费了95个数据空间。
由于其底层是一段连续空间,当在ArrayList任意位置插入或者删除元素时,就需要将后序元素整体往前或者往后搬移,时间复杂度为O(n),效率比较低,因此ArrayList不适合做任意位置插入和删除比较多的场景。因此:java集合中又引入了LinkedList,即链表结构。
2. 链表定义
2.1 链表的概念及结构
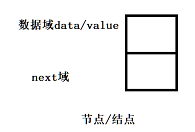
链表是一种常见的数据结构,它由一系列节点组成,每个节点包含两部分:数据元素 (value) 和指向下一个节点的指针 ( next 域 )。通过这些节点的连接,可以形成一个链式结构。
【单个节点】:
节点(Node):链表的基本单元,包含数据域和next指针域。数据域可以是任意类型的数据,指针指向下一个节点。每个节点都是一个对象。
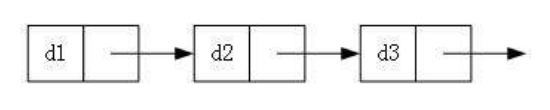
【节点组成的链式结构】:


结论: 链表是一种物理存储结构上非连续存储结构,数据元素的逻辑顺序是通过链表中的引用链接次序实现的 。
2.2 链表的组合类型
1、单向或者双向
根据节点的指针数量,链表可以分为单向链表和双向链表。
单向链表每个节点只有一个指针,指向下一个节点;

双向链表每个节点有两个指针,分别指向前一个节点和后一个节点。

2、带头或者不带头
带头节点的链表在第一个节点之前有一个额外的头节点,用于标识链表的起始位置。(head的value是无意义的,如果想从最开头插入数据时,head是不可变的,从head后面插入)

不带头节点的链表则直接以第一个节点作为链表的起始位置。(head是第一个节点,有value的,如果想从最开头插入数据时,head是可变的,变成新插入的节点)
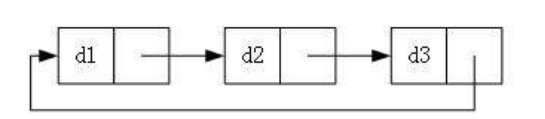
3、是否循环:

循环链表是在链表的尾部节点和头部节点之间形成一个循环连接,使得链表的最后一个节点指向头部节点。
结合上述结构可以组合出8中链表种类:
单向、带头节点、非循环链表
单向、带头节点、循环链表
单向、不带头节点、非循环链表(重点)
单向、不带头节点、循环链表
双向、不带头节点、非循环链表(重点)
双向、不带头节点、循环链表
双向、带头节点、非循环链表
双向、带头节点、循环链表
3. 链表的实现
3.1 单向、不带头、非循环链表的实现
- 节点的定义
//静态内部类定义节点public static class ListNode {public int data;//数据域public ListNode next;//指向下一个节点public ListNode(int data) {this.data = data;}}public ListNode head; // 表示当前链表的头节点 方便找到链表的第一个元素

2. 创建链表(穷举法)
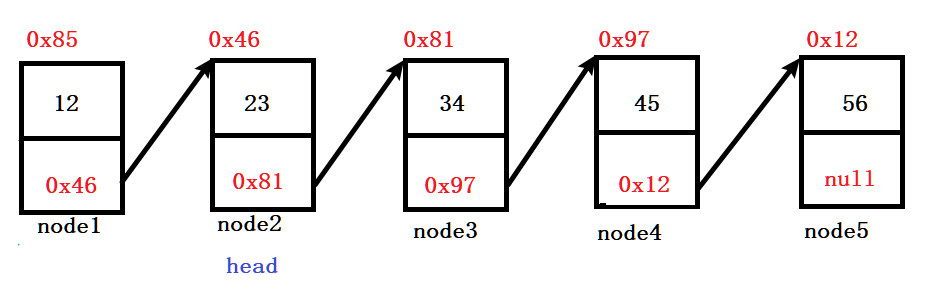
public void createLinkedList() {ListNode node1 = new ListNode(12);ListNode node2 = new ListNode(23);ListNode node3 = new ListNode(34);ListNode node4 = new ListNode(45);ListNode node5 = new ListNode(56);//把链表的节点连起来node1.next = node2;node2.next = node3;node3.next = node4;node4.next = node5;//使用head节点来记录链表的入口this.head = node1;}
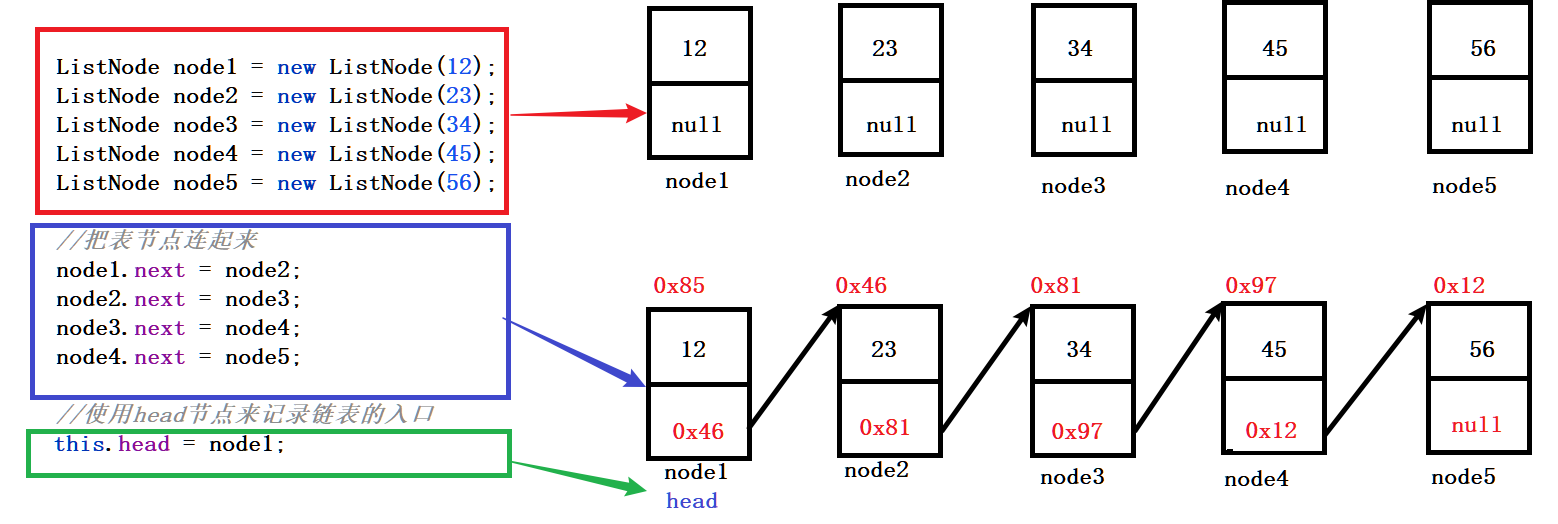
使用debug,发现所有节点链接起来了
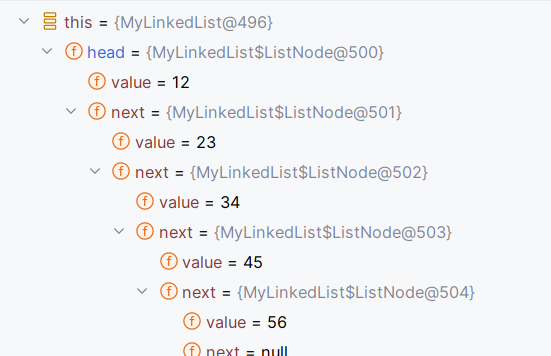
之后,可以使用head节点,获取所有的节点
- 打印链表
(1) 怎么从一个节点走向下一个节点
移动head,走向下一个节点,使用head = head.next;就可以实现
(2)怎么判断所有节点都遍历完
当head指向null时,则所有节点遍历完毕
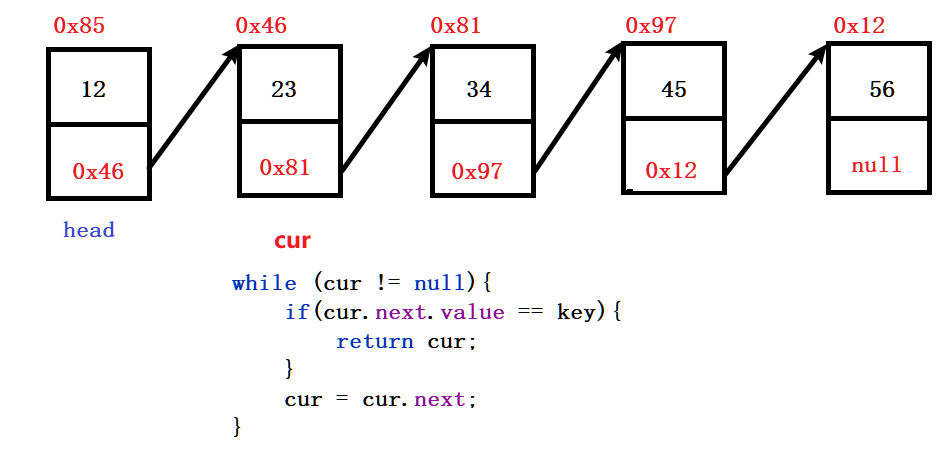
public void display() {ListNode cur = this.head;//防止其他方法无法使用head,无法找到链表的第一个元素,使用临时变量curwhile (cur != null) {//当cur指向null时,则所有节点遍历完,循环结束System.out.print(cur.value + " ");cur = cur.next;//不断移动cur指向下一个节点}System.out.println();}
- 头插法添加数据
头插法插入数据分为三步:
(1)实例化一个节点
(2)改变插入结点的next指向原来链表的第一个节点
(3)改变head指向新节点
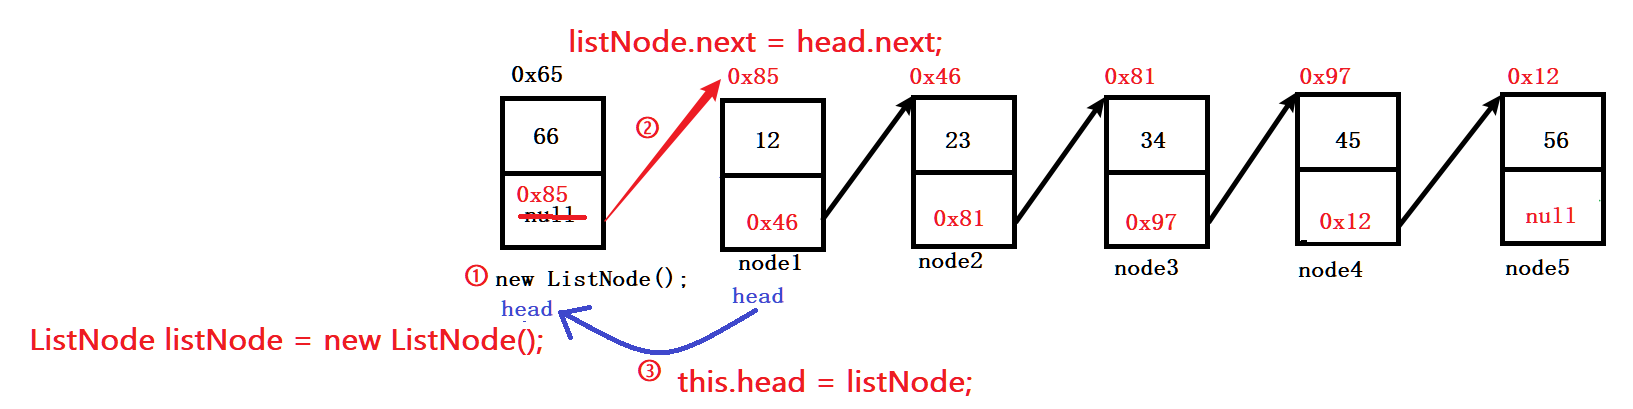
@Overridepublic void addFirst(int data) {ListNode listNode = new ListNode(data);if (this.head == null) {this.head = listNode;} else {listNode.next = this.head;this.head = listNode;}}
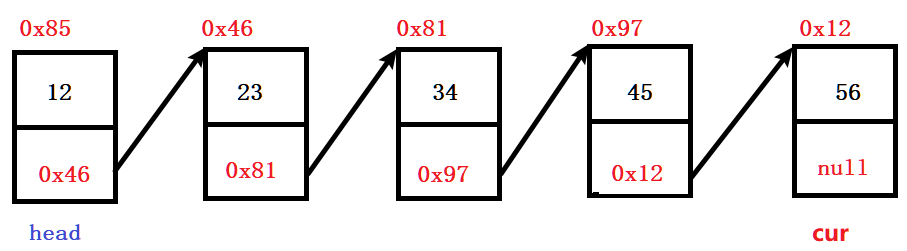
- 尾插法添加数据
尾插法添加数据分为二步:
(1)实例化一个节点
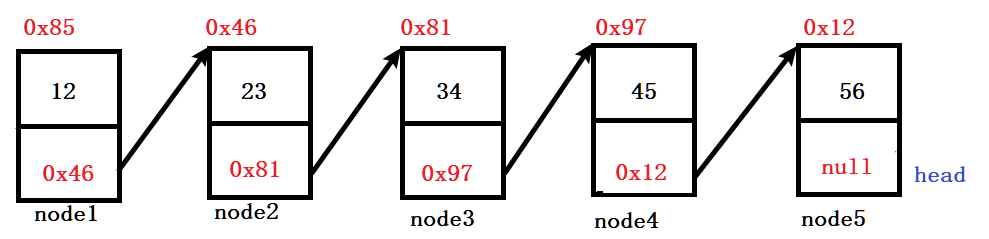
(2)找到最后一个节点
(3)将链表的原来的最后一个节点指向新的节点
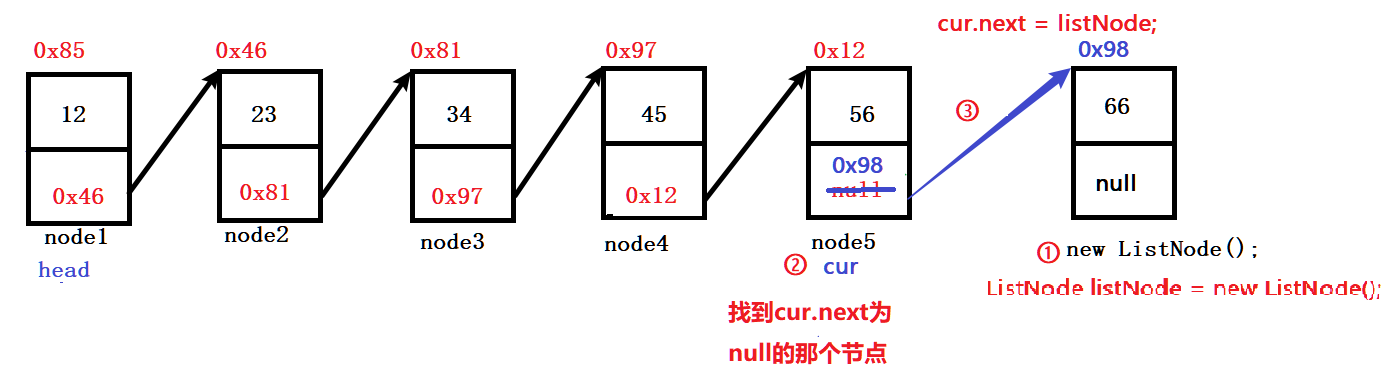
public void addLast(int data) {ListNode listNode = new ListNode(data);if (this.head == null) {this.head = listNode;} else {ListNode cur = this.head;while (cur.next != null) {cur = cur.next;}cur.next = listNode;}}
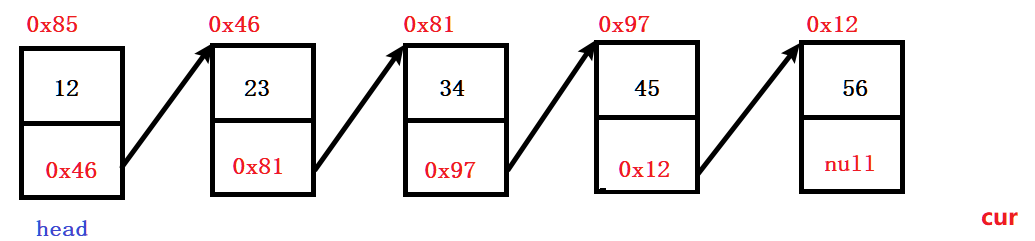
【小总结】:
- 如果想让cur指向最后一个节点的位置,使用cur.next == null
- 如果想把整个链表遍历完成,那么就是cur == null
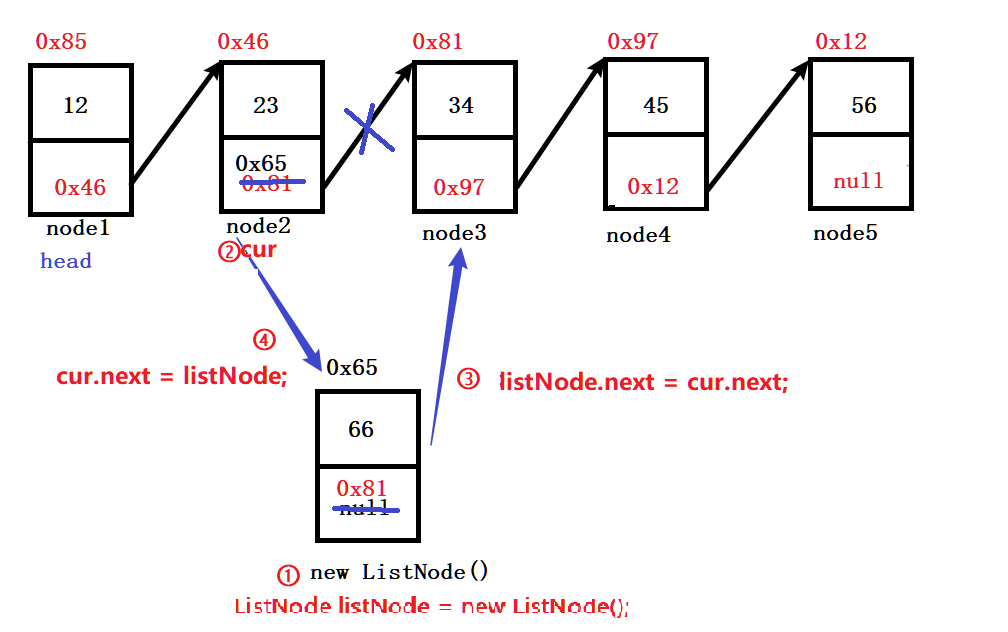
5.任意位置插入,第一个数据节点为0号下标
在链表随意位置插入数据分为四步:
(1)找到该节点要插入位置的前一个节点cur(前一个节点的原因,可以由前一个节点得到后一个节点,无法无法从后一个节点得到前一个结点),让cur走index-1步。
(2)实例化一个节点
(3)让新插入的节点的next指向要插入位置的节点,listNode.next = cur.next;
(4)让要插入位置的前一个节点cur的next指向新节点,cur.next = listNode;
注意:(3)和(4)的顺序要正确,再插入一个节点时,一定要先绑定后面这个节点
public void addIndex(int index, int data) {if(index<0||index>size()){//要先判断index的合法性throw new IndexOutOfBounds("链表下标越界");//自定义异常链表下标越界}if(index == 0){//在第一个位置插入,使用头插法的方法addFirst(data);}else if(index == size()){//在最后一个位置插入,使用尾插法的方法addLast(data);}else {//在中间位置插入ListNode listNode = new ListNode(data);//要插入的节点ListNode cur = searchPrev(index);//要插入位置的前一个节点listNode.next = cur.next;cur.next = listNode;}}private ListNode searchPrev(int index){ListNode cur = this.head;int count = 0;while (count != index -1){cur = cur.next;count++;}return cur;}- 删除第一次出现关键字为key的节点
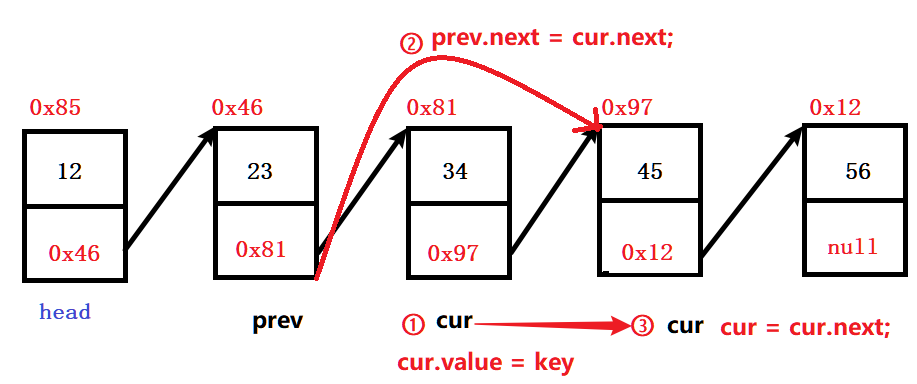
删除链表中的节点分为三步:
(1)找到要删除节点的前一个节点cur
(2) 标记要删除的要素(也可以不要这一步)ListNode del = cur.next;
(3)让cur的next指向要删除的节点的下一个节点(要删除的节点没有被引用,JVM会自动回收)

在第一步中找到要删除节点的前一个节点cur,需要找到cur.next.value 和 key的值相等的节点,如果是引用类型时,现需要使用equals()方法,而不是==
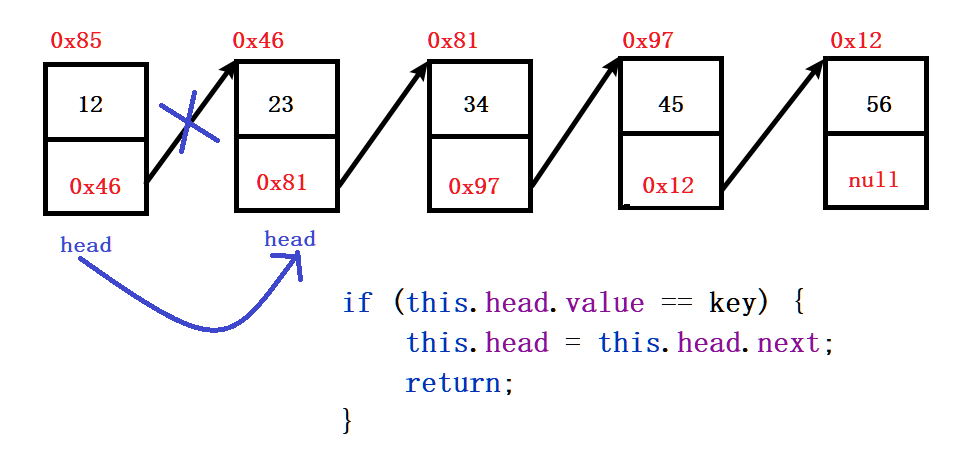
还有一种情况,当要删除的数据是第一个节点时,只需要让head指向第二个节点即可做到删除第一个节点
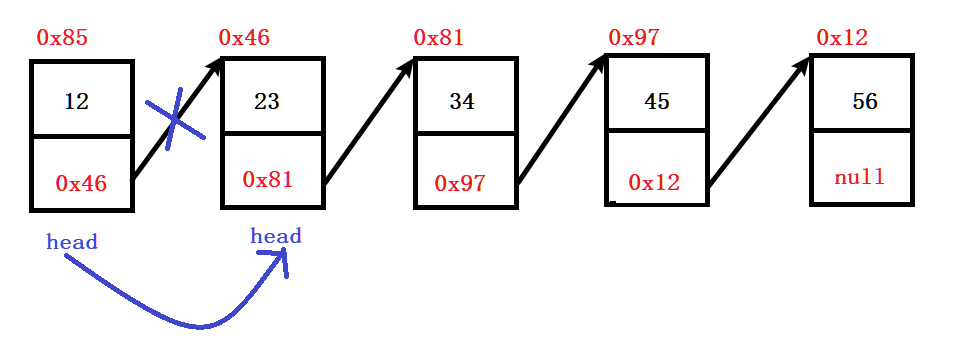
public void remove(int key) {//当要删除的数据是第一个节点if (this.head.value == key) {this.head = this.head.next;} else {//找到前驱ListNode cur = getPrev(key);//判断前驱是否存在if (cur == null) {System.out.println("要删除的数字不存在");} else {//删除节点ListNode del = cur.next;cur.next = del.next;}}}private ListNode getPrev(int key) {ListNode cur = this.head;while (cur != null) {if (cur.next.value == key) {return cur;}cur = cur.next;}return null;}
- 删除所有值为key的节点
删除所有值为key的节点分为三步:
(1)遍历链表,找到要删除节点cur
(2) 让cur的上一个节点指向cur的下一个节点,删除cur
(3)继续遍历链表,找到所有与key相等的节点,重复(1)(2)步骤,直至遍历完链表
还有要考虑一种情况,当要删除的数据是第一个节点时,只需要让head指向第二个节点即可做到删除第一个节点
public void removeAllKey(int key) {if(this.head == null){return;}ListNode prev = this.head;ListNode cur = this.head.next;while (cur != null) {if (cur.value == key) {prev.next = cur.next;cur = cur.next;} else {prev = cur;cur = cur.next;}}if (this.head.value == key) {this.head = this.head.next;return;}}
- 清空链表
清空链表分为两种方式:
方式一:直接将head置为null(不推荐)
方式二:遍历节点,将每个节点的数值域和next域置为空
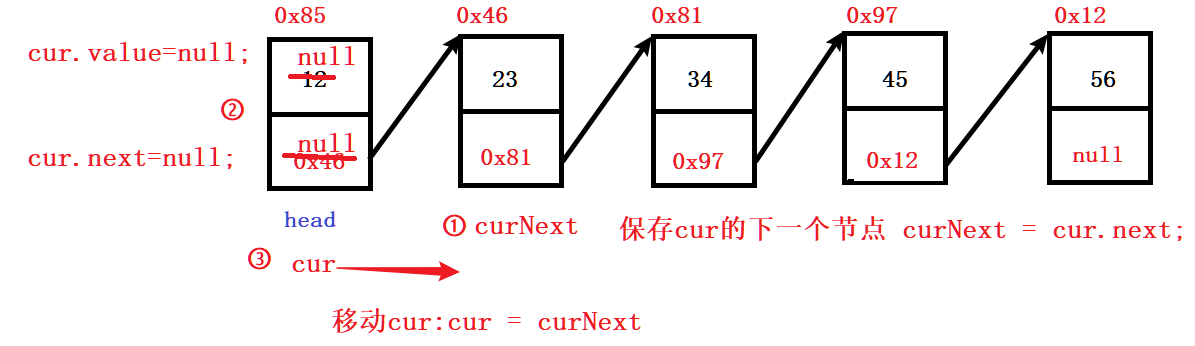
public void clear() {ListNode cur = this.head;while (cur != null) {ListNode curNext = cur.next;
//            cur.value = null;//  引用类型value要置为nullcur.next = null;cur = curNext;}this.head = null;}
完整代码:
ILst接口:
public interface IList {//头插法public void addFirst(int data);//尾插法public void addLast(int data);//任意位置插入,第一个数据节点为0号下标public void addIndex(int index, int data);//查找是否包含关键字key是否在单链表当中public boolean contains(int key);//删除第一次出现关键字为key的节点public void remove(int key);//删除所有值为key的节点public void removeAllKey(int key);//得到单链表的长度public int size();public void clear();public void display();
}
自定义异常IndexOutOfBounds类
public class IndexOutOfBounds extends RuntimeException{public IndexOutOfBounds(String message) {super(message);}
}
MyLinkedList类:
public class MyLinkedList implements IList {//静态内部类public static class ListNode {public int value;public ListNode next;public ListNode(int value) {this.value = value;}}public ListNode head; //方便找到链表的第一个元素public void createLinkedList() {ListNode node1 = new ListNode(12);ListNode node2 = new ListNode(23);ListNode node3 = new ListNode(34);ListNode node4 = new ListNode(45);ListNode node5 = new ListNode(56);//把表节点连起来node1.next = node2;node2.next = node3;node3.next = node4;node4.next = node5;//使用head节点来记录链表的入口this.head = node1;}//头插法@Overridepublic void addFirst(int data) {ListNode listNode = new ListNode(data);if (this.head == null) {this.head = listNode;} else {listNode.next = this.head;this.head = listNode;}}//尾插法@Overridepublic void addLast(int data) {ListNode listNode = new ListNode(data);if (this.head == null) {this.head = listNode;} else {ListNode cur = this.head;while (cur.next != null) {cur = cur.next;}cur.next = listNode;}}@Overridepublic void addIndex(int index, int data) {if (index < 0 || index > size()) {//要先判断index的合法性throw new IndexOutOfBounds("链表下标越界");//自定义异常链表下标越界}if (index == 0) {//在第一个位置插入,使用头插法的方法addFirst(data);} else if (index == size()) {//在最后一个位置插入,使用尾插法的方法addLast(data);} else {//在中间位置插入ListNode listNode = new ListNode(data);//要插入的节点ListNode cur = searchPrev(index);//要插入位置的前一个节点listNode.next = cur.next;cur.next = listNode;}}private ListNode searchPrev(int index) {ListNode cur = this.head;int count = 0;while (count != index - 1) {cur = cur.next;count++;}return cur;}@Overridepublic boolean contains(int key) {ListNode cur = this.head;while (cur != null) {if (cur.value == key) {return true;}cur = cur.next;}return false;}@Overridepublic void remove(int key) {if (this.head.value == key) {this.head = this.head.next;} else {ListNode cur = getPrev(key);if (cur == null) {System.out.println("要删除的数字不存在");} else {ListNode del = cur.next;cur.next = del.next;}}}private ListNode getPrev(int key) {ListNode cur = this.head;while (cur != null) {if (cur.next.value == key) {return cur;}cur = cur.next;}return null;}@Overridepublic void removeAllKey(int key) {if (this.head == null) {return;}ListNode prev = this.head;ListNode cur = this.head.next;while (cur != null) {if (cur.value == key) {prev.next = cur.next;cur = cur.next;} else {prev = cur;cur = cur.next;}}if (this.head.value == key) {this.head = this.head.next;return;}}@Overridepublic int size() {int count = 0;ListNode cur = this.head;while (cur != null) {cur = cur.next;count++;}return count;}@Overridepublic void clear() {ListNode cur = this.head;while (cur != null) {ListNode curNext = cur.next;
//            cur.value = null;cur.next = null;cur = curNext;}this.head = null;}@Overridepublic void display() {ListNode cur = this.head;while (cur != null) {System.out.print(cur.value + " ");cur = cur.next;}System.out.println();}
}
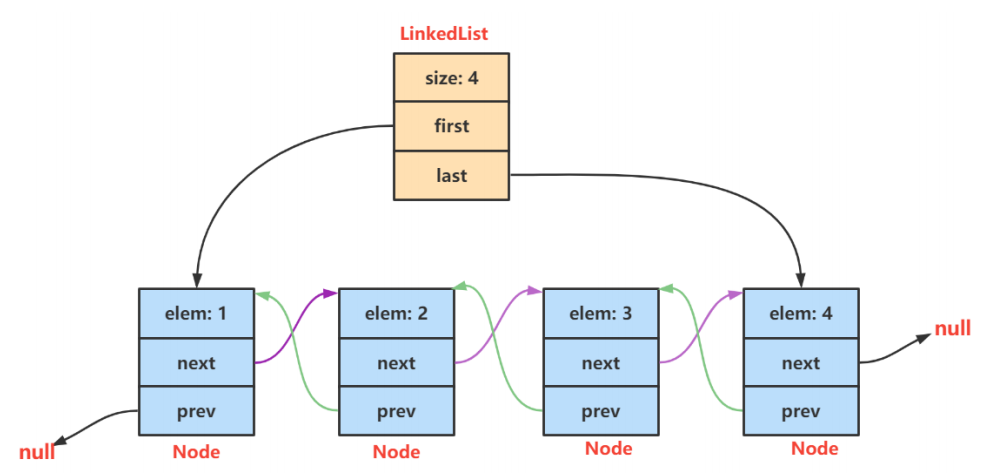
3.2 双向、不带头节点、非循环链表的实现
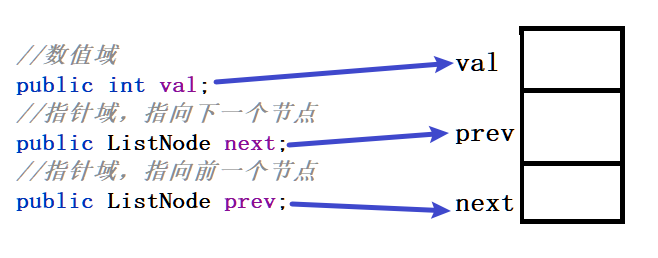
- 结点的定义
static class ListNode {public int val;//数值域public ListNode next;//指针域,指向下一个节点public ListNode prev;//指针域,指向前一个节点public ListNode(int val) {this.val = val;}}
2. 头插法
第一步:让新插入的next 指向head节点
第二步:让head节点的prev指向新插入的节点
第三步:让head指向新插入的节点
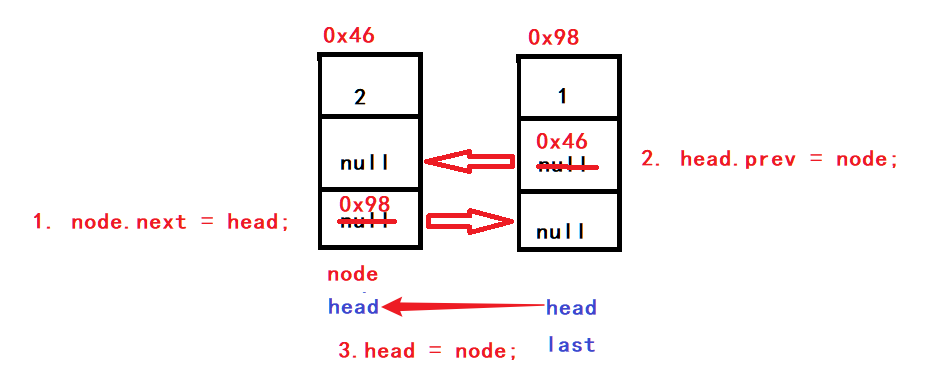
public void addFirst(int data) {ListNode node = new ListNode(data);if(head == null){head = node;last = node;}else {node.next = head;head.prev = node;head = node;}}
- 尾插法
第一步:让last节点的next指向新插入的节点
第二步:让新插入的prev指向last节点
第三步:让last指向新插入的节点

public void addLast(int data) {ListNode node = new ListNode(data);if (head == null) {head = node;last = node;} else {last.next = node;node.prev = last;last = node;}}
- 在指定位置插入元素
第一步:判断要插入的位置是否合法(0<=index<=链表的长度)
第二步:判断要插入的节点是否在0位置,如果在0位置,那么就使用头插法
第三步:判断要插入的节点是否在最后一个位置,如果在最后一个位置,那么就使用尾插法
第四步:如果要在中间插入,需要插入位置前一个节点的next域指向新节点,新节点的next域指向插入位置的原来的节点,新节点的prev域指向需要插入位置前一个节点,需要插入位置的原来的节点的prev域指向新节点,改变四个指针域的指向便可以将新节点插入需要插入的位置。
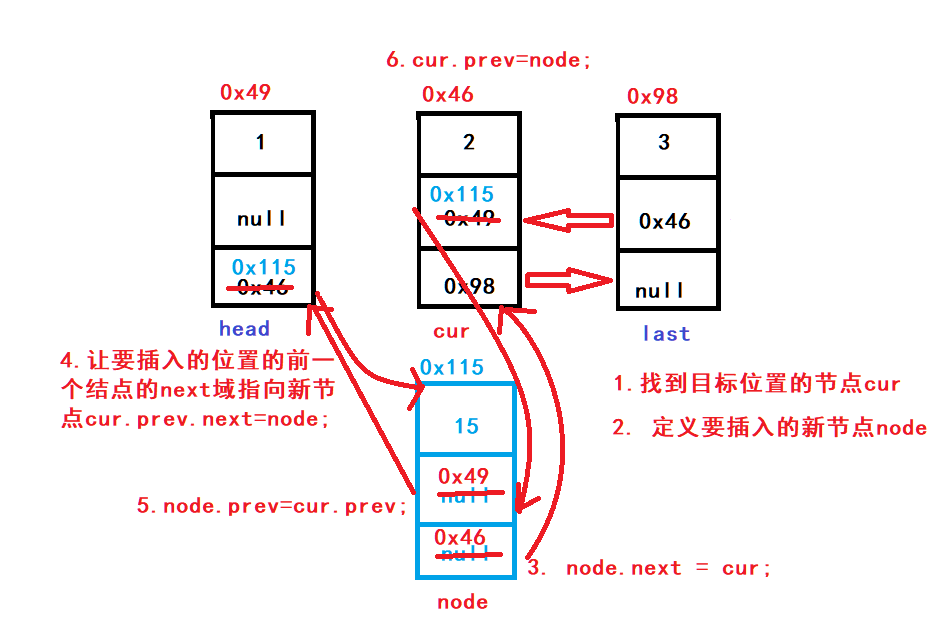
public void addIndex(int index, int data) {int len = size();//index小于0,或者大于链表的长度,插入位置不合法if (index < 0 || index > len) {throw new IndexOutOfBounds("要插入的位置小于0或者超过链表的长度,该位置不合法");}//如果在第一个节点插入,使用头插法if (index == 0) {addFirst(data);return;}//如果在最后一个节点插入,使用尾插法if (index == len) {addLast(data);return;}//中间位置//获取要插入的位置的节点ListNode cur = getNode(index);//新插入的节点ListNode node = new ListNode(data);//在中间位置插入节点元素ListNode prev = cur.prev;prev.next = node;node.next = cur;node.prev = prev;cur.prev = node;}public ListNode getNode(int index) {ListNode cur = this.head;while (index != 0) {index--;cur = cur.next;}return cur;}
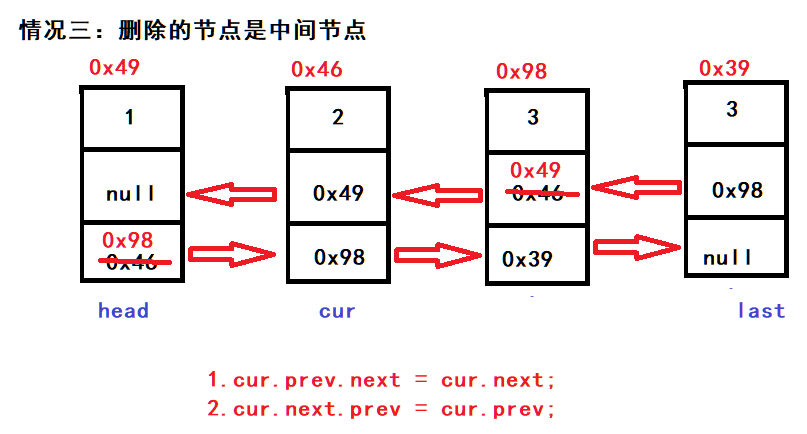
5.删除指定节点
总共分为三种情况,分别如下:
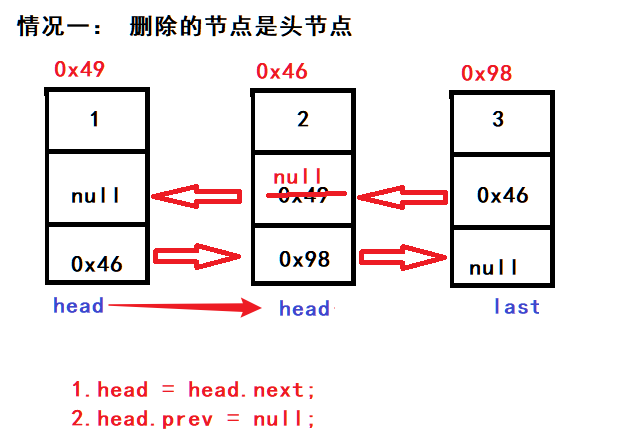

特殊情况:还需要考虑一种特殊情况,当量表中只存在一个节点,并且该结点时需要删除的节点的情况
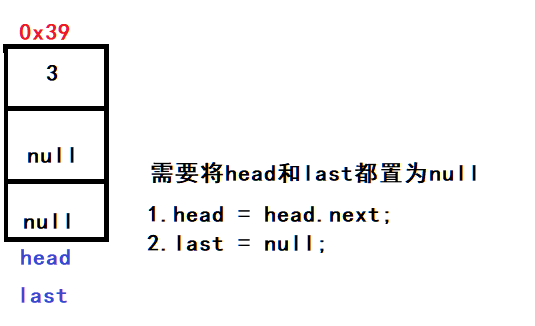
public void remove(int key) {ListNode cur = this.head;while (cur != null) {//判断是否找到目标节点if(cur.val == key) {//要删除的节点是头节点的情况if(cur == head) {head = head.next;//链表中只有头节点一个节点,删除之后链表为空链表,last需要置为nullif(head == null) {last = null;}else {//链表中不止一个节点,需要将头节点的prev置为nullhead.prev = null;}return;}//要删除的节点是尾节点的情况if(cur == last) {cur.prev.next = cur.next;last = last.prev;return;}//要删除的节点是中间的节点的情况cur.prev.next = cur.next;cur.next.prev = cur.prev;return;}else {cur = cur.next;}}System.out.println("该节点不存在");}
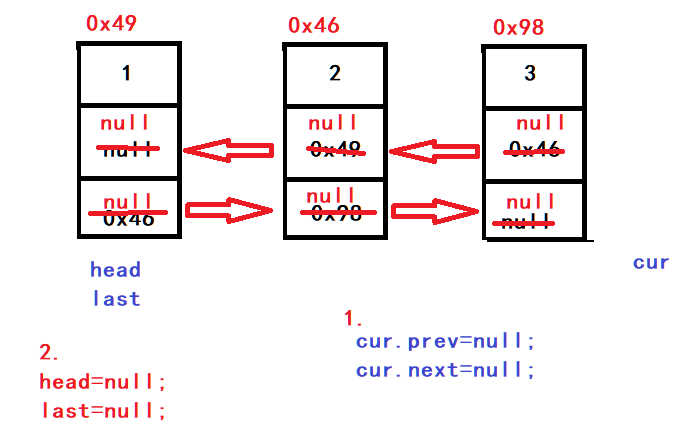
- 链表置空
方式一:
head=null; last=null;
方式二:
1.使用cur局部变量,遍历链表,将每一个节点都置为null
2.将头节点和尾节点置为空
public void clear() {ListNode cur = this.head;while (cur != null) {ListNode curNext = cur.next;//如果是引用类型,还需要将数值域置为空
//            cur.val = null;cur.prev = null;cur.next = null;cur = curNext;}head = null;last = null;}
【完整代码】:
双向、不带头节点、非循环链表的实现:LinkedList .class
public class LinkedList2 implements IList {static class ListNode {public int val;//数值域public ListNode next;//指针域,指向下一个节点public ListNode prev;//指针域,指向前一个节点public ListNode(int val) {this.val = val;}}public ListNode head;public ListNode last;@Overridepublic void addFirst(int data) {ListNode node = new ListNode(data);if (head == null) {head = node;last = node;} else {node.next = head;head.prev = node;head = node;}}@Overridepublic void addLast(int data) {ListNode node = new ListNode(data);if (head == null) {head = node;last = node;} else {last.next = node;node.prev = last;last = node;}}@Overridepublic void addIndex(int index, int data) {int len = size();//index小于0,或者大于链表的长度,插入位置不合法if (index < 0 || index > len) {throw new IndexOutOfBounds("要插入的位置小于0或者超过链表的长度,该位置不合法");}//如果在第一个节点插入,使用头插法if (index == 0) {addFirst(data);return;}//如果在最后一个节点插入,使用尾插法if (index == len) {addLast(data);return;}//中间位置//获取要插入的位置的节点ListNode cur = getNode(index);//新插入的节点ListNode node = new ListNode(data);//在中间位置插入节点元素ListNode curPrev = cur.prev;curPrev.next = node;node.next = cur;node.prev = curPrev;cur.prev = node;}public ListNode getNode(int index) {ListNode cur = this.head;while (index != 0) {index--;cur = cur.next;}return cur;}@Overridepublic boolean contains(int key) {ListNode cur = head;while (cur != null) {if (cur.val == key) {return true;}cur = cur.next;}return false;}@Overridepublic void remove(int key) {ListNode cur = this.head;while (cur != null) {//判断是否找到目标节点if (cur.val == key) {//要删除的节点是头节点的情况if (cur == head) {head = head.next;//链表中只有头节点一个节点,删除之后链表为空链表,last需要置为nullif (head == null) {last = null;} else {//链表中不止一个节点,需要将头节点的prev置为nullhead.prev = null;}} else if (cur == last) {//要删除的节点是尾节点的情况cur.prev.next = cur.next;last = last.prev;} else {//要删除的节点是中间的节点的情况cur.prev.next = cur.next;cur.next.prev = cur.prev;}return;} else {cur = cur.next;}}System.out.println("该节点不存在");}@Overridepublic void removeAllKey(int key) {ListNode cur = this.head;while (cur != null) {//判断是否找到目标节点if (cur.val == key) {//要删除的节点是头节点的情况if (cur == head) {head = head.next;//链表中只有头节点一个节点,删除之后链表为空链表,last需要置为nullif (head == null) {last = null;} else {//链表中不止一个节点,需要将头节点的prev置为nullhead.prev = null;}} else if (cur == last) {//要删除的节点是尾节点的情况cur.prev.next = cur.next;last = last.prev;} else {//要删除的节点是中间的节点的情况cur.prev.next = cur.next;cur.next.prev = cur.prev;}cur = cur.next;}System.out.println("该节点不存在");}}@Overridepublic int size() {int count = 0;ListNode cur = head;while (cur != null) {cur = cur.next;count++;}return count;}@Overridepublic void clear() {ListNode cur = this.head;while (cur != null) {ListNode curNext = cur.next;
//            cur.val = null;cur.prev = null;cur.next = null;cur = curNext;}head = null;last = null;}@Overridepublic void display() {ListNode cur = head;while (cur != null) {System.out.print(cur.val + " ");cur = cur.next;}System.out.println();}
}
4.LinkedList的使用
4.1 什么是LinkedList
LinkedList 的官方文档
LinkedList的底层是双向链表结构(链表后面介绍),由于链表没有将元素存储在连续的空间中,元素存储在单独的节点中,然后通过引用将节点连接起来了,因此在在任意位置插入或者删除元素时,不需要搬移元素,效率比较高。
在集合框架中,LinkedList也实现了List接口,具体如下:
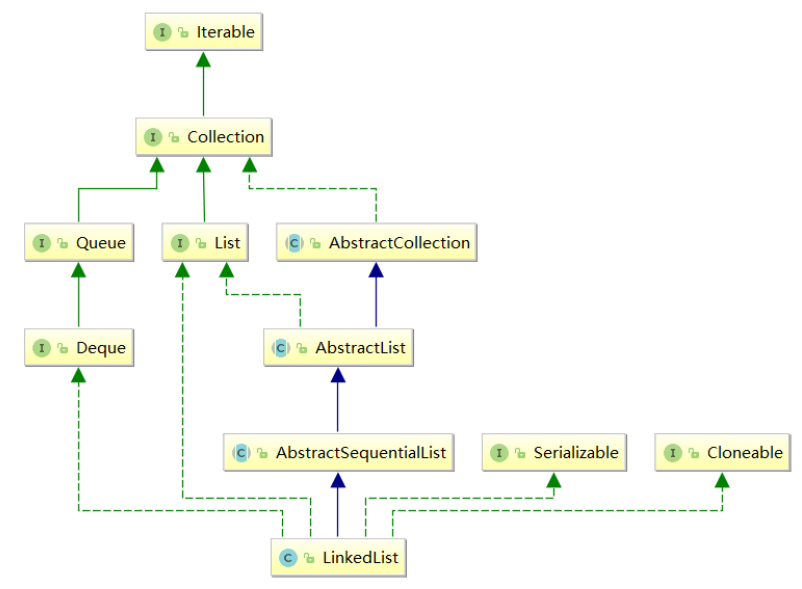
【说明】
1. LinkedList实现了List接口
2. LinkedList的底层使用了双向链表
3. LinkedList没有实现RandomAccess接口,因此LinkedList不支持随机访问
4. LinkedList的任意位置插入和删除元素时效率比较高,时间复杂度为O(1)
5. LinkedList比较适合任意位置插入的场景
4.2 LinkedList的使用
4.2.1. LinkedList的构造
| 方法 | 解释 |
|---|---|
| LinkedList() | 无参构造 |
| public LinkedList(Collection<? extends E> c) | 使用其他集合容器中元素构造List |
public static void main(String[] args) {// 构造一个空的LinkedListList<Integer> list1 = new LinkedList<>();List<String> list2 = new java.util.ArrayList<>();list2.add("JavaSE");list2.add("JavaWeb");list2.add("JavaEE");// 使用ArrayList构造LinkedListList<String> list3 = new LinkedList<>(list2);
}
4.2.2. LinkedList的其他常用方法介绍
| 方法 | 解释 |
|---|---|
| boolean add(E e) | 尾插 e |
| void add(int index, E element) | 将 e 插入到 index 位置 |
| boolean addAll(Collection<? extends E> c) | 尾插 c 中的元素 |
| E remove(int index) | 删除 index 位置元素 |
| boolean remove(Object o) | 删除遇到的第一个 o |
| E get(int index) | 获取下标 index 位置元素 |
| E set(int index, E element) | 将下标 index 位置元素设置为 element |
| void clear() | 清空 |
| boolean contains(Object o) | 判断 o 是否在线性表中 |
| int indexOf(Object o) | 返回第一个 o 所在下标 |
| int lastIndexOf(Object o) | 返回最后一个 o 的下标 |
| List subList(int fromIndex, int toIndex) | 截取部分 list |
public static void main(String[] args) {LinkedList<Integer> list = new LinkedList<>();list.add(1);   // add(elem): 表示尾插list.add(2);list.add(3);list.add(4);list.add(5);list.add(6);list.add(7);System.out.println(list.size());System.out.println(list);// 在起始位置插入0list.add(0, 0);  // add(index, elem): 在index位置插入元素elemSystem.out.println(list);list.remove();         // remove(): 删除第一个元素,内部调用的是removeFirst()list.removeFirst();    // removeFirst(): 删除第一个元素list.removeLast();    // removeLast(): 删除最后元素list.remove(1);  // remove(index): 删除index位置的元素System.out.println(list);// contains(elem): 检测elem元素是否存在,如果存在返回true,否则返回falseif(!list.contains(1)){list.add(0, 1);}list.add(1);System.out.println(list);System.out.println(list.indexOf(1));   // indexOf(elem): 从前往后找到第一个elem的位置System.out.println(list.lastIndexOf(1));  // lastIndexOf(elem): 从后往前找第一个1的位置int elem = list.get(0);    // get(index): 获取指定位置元素list.set(0, 100);          // set(index, elem): 将index位置的元素设置为elemSystem.out.println(list);// subList(from, to): 用list中[from, to)之间的元素构造一个新的LinkedList返回List<Integer> copy = list.subList(0, 3);   System.out.println(list);System.out.println(copy);list.clear();              // 将list中元素清空System.out.println(list.size());
}
4.2.3. LinkedList的遍历
public static void main(String[] args) {LinkedList<Integer> list = new LinkedList<>();list.add(1);   // add(elem): 表示尾插list.add(2);list.add(3);list.add(4);list.add(5);list.add(6);list.add(7);System.out.println(list.size());//方式一: foreach遍历for (int e:list) {System.out.print(e + " ");}System.out.println();//方式二:for循环for (int i = 0;i < list.size();i++) {System.out.print(list.get(i) + " ");}System.out.println();//方式三:迭代器// 使用迭代器遍历---正向遍历ListIterator<Integer> it = list.listIterator();while(it.hasNext()){System.out.print(it.next()+ " ");}System.out.println();// 使用反向迭代器---反向遍历ListIterator<Integer> rit = list.listIterator(list.size());while (rit.hasPrevious()){System.out.print(rit.previous() +" ");}System.out.println();
}
5. ArrayList和LinkedList的区别
| 不同点 | ArrayList | LinkedList |
|---|---|---|
| 存储空间上 | 物理上一定连续 | 逻辑上连续,但物理上不一定连续 |
| 随机访问 | 支持O(1) | 不支持:O(N) |
| 头插 | 需要搬移元素,效率低O(N) | 只需修改引用的指向,时间复杂度为O(1) |
| 插入 | 空间不够时需要扩容 | 没有容量的概念 |
| 应用场景 | 元素高效存储+频繁访问 | 任意位置插入和删除频繁 |
- 如果是经常根据下标进行查找使用顺序表(ArrayList)
- 如果是经常插入和删除操作的可以使用链表(LinkedList)
相关文章:
数据结构----链表介绍、模拟实现链表、链表的使用
文章目录 1. ArrayList存在的问题2. 链表定义2.1 链表的概念及结构2.2 链表的组合类型 3. 链表的实现3.1 单向、不带头、非循环链表的实现3.2 双向、不带头节点、非循环链表的实现 4.LinkedList的使用4.1 什么是LinkedList4.2 LinkedList的使用4.2.1. LinkedList的构造4.2.2. L…...

微信小程序如何控制元素的显示和隐藏
目录 方式一:display 方式二:wx:if 有时在微信小程序元素的显示需要通过特定的条件,比如组件的显示,通常需要在主界面有指定操作。可以通过以下两种方式控制元素的显示和隐藏。 方式一:display 在wxml或者wxss中设置display样式可以控制元素显示情况,元素默认显示,可…...

解决ssh: connect to host github.com port 22: Connection timed out
当连接 GitHub 时无法连接到 22 端口时,可以尝试将端口更换为 443 首先,尝试使用以下命令从 GitHub 克隆仓库: $ git clone gitgithub.com:xxxxx/xxxx.git my-awesome-proj如果出现以下错误信息: Cloning into my-awesome-proj…...
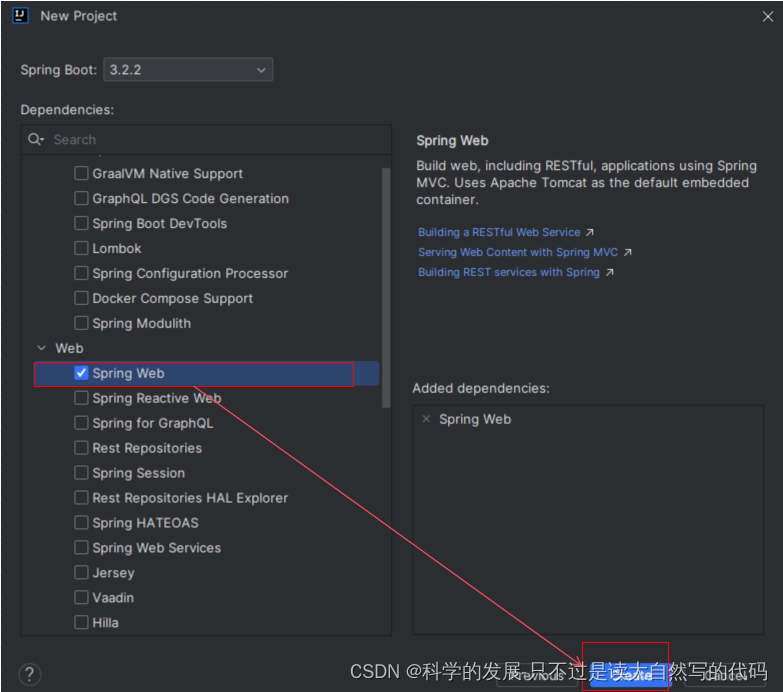
idea 创建 spring boot
1.创建步骤 2. 编码添加 2.1 这是自动生成的启动函数 package com.example.comxjctest4;import org.springframework.boot.SpringApplication; import org.springframework.boot.autoconfigure.SpringBootApplication;SpringBootApplication public class Application {publi…...
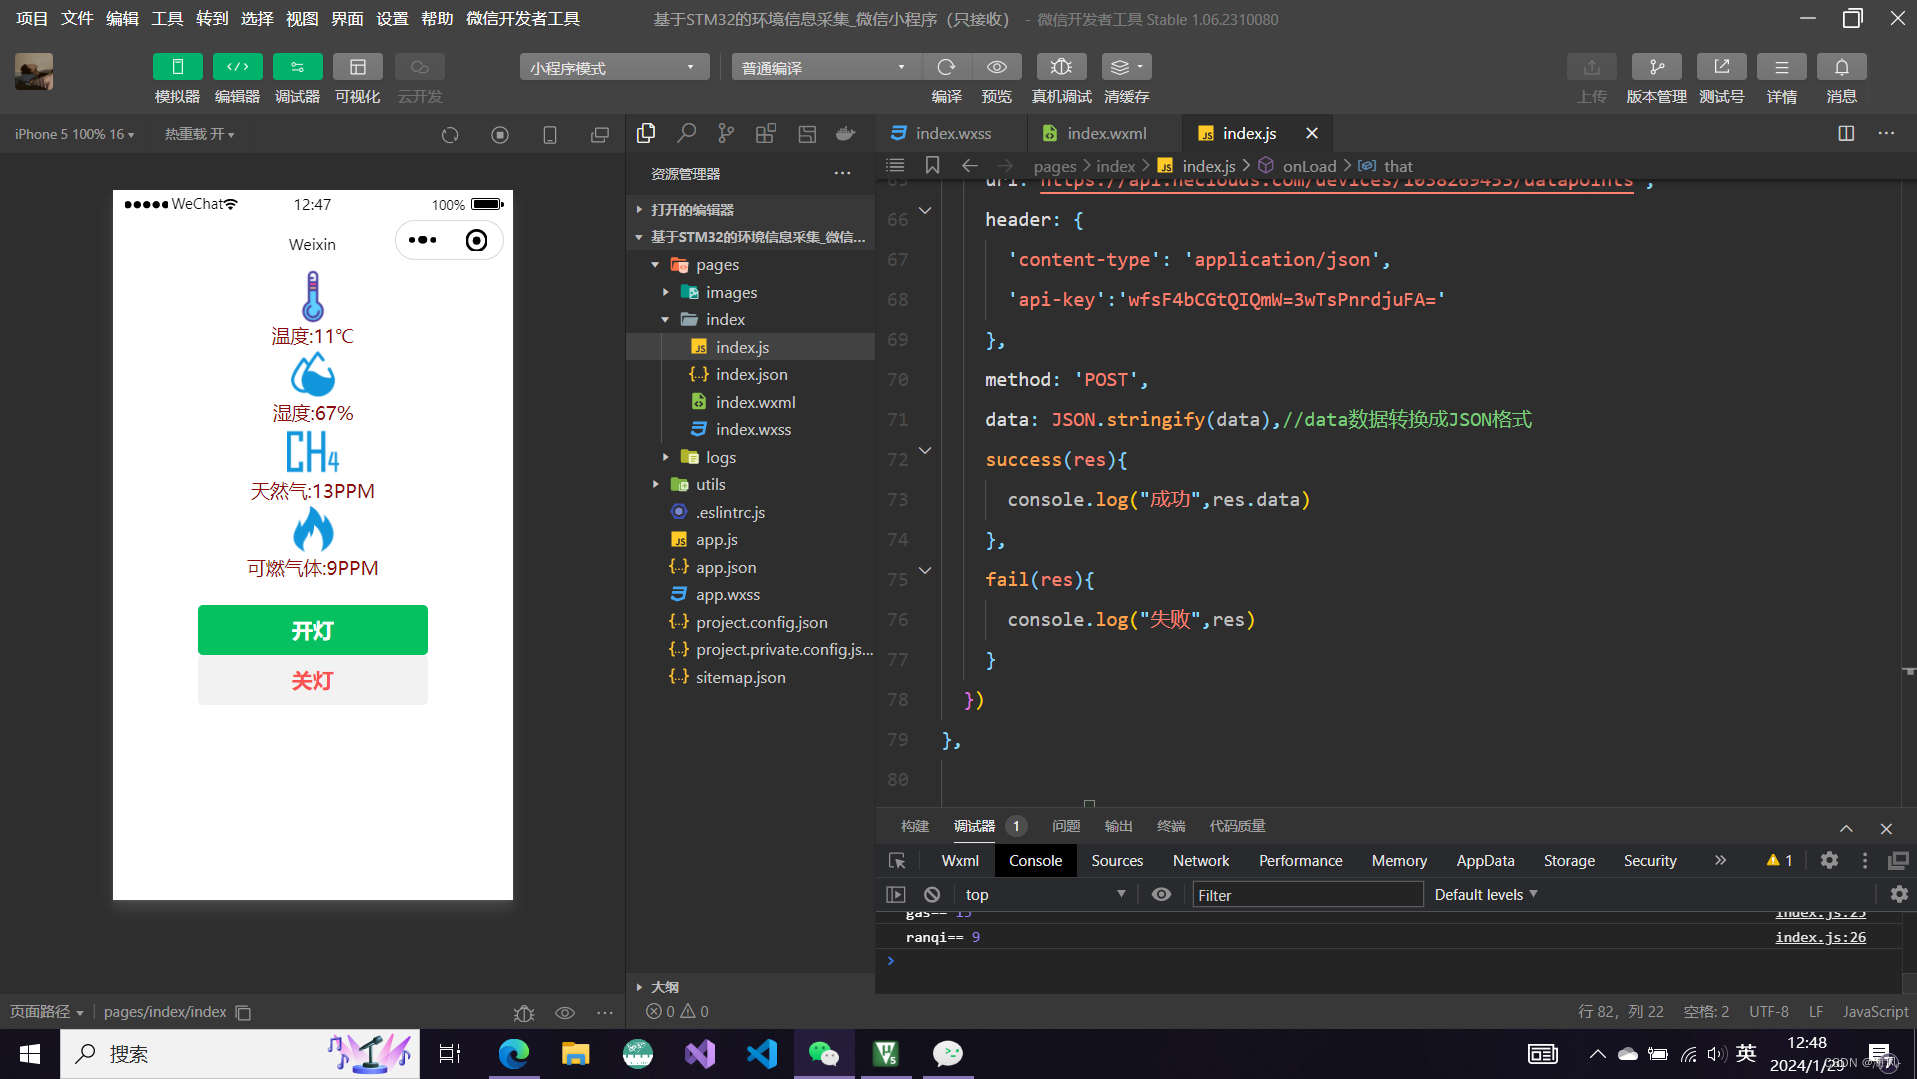
【智能家居入门之微信小程序控制下位机】(STM32、ONENET云平台、微信小程序、HTTP协议)
实现微信小程序控制单片机外设动作 一、使用ONENET可视化组件控制单片机外设动作二、使用微信小程序控制单片机外设动作三、总结 本篇博客话接上文: https://blog.csdn.net/m0_71523511/article/details/135892908 上一篇博客实现了微信小程序接收单片机上传的数据…...
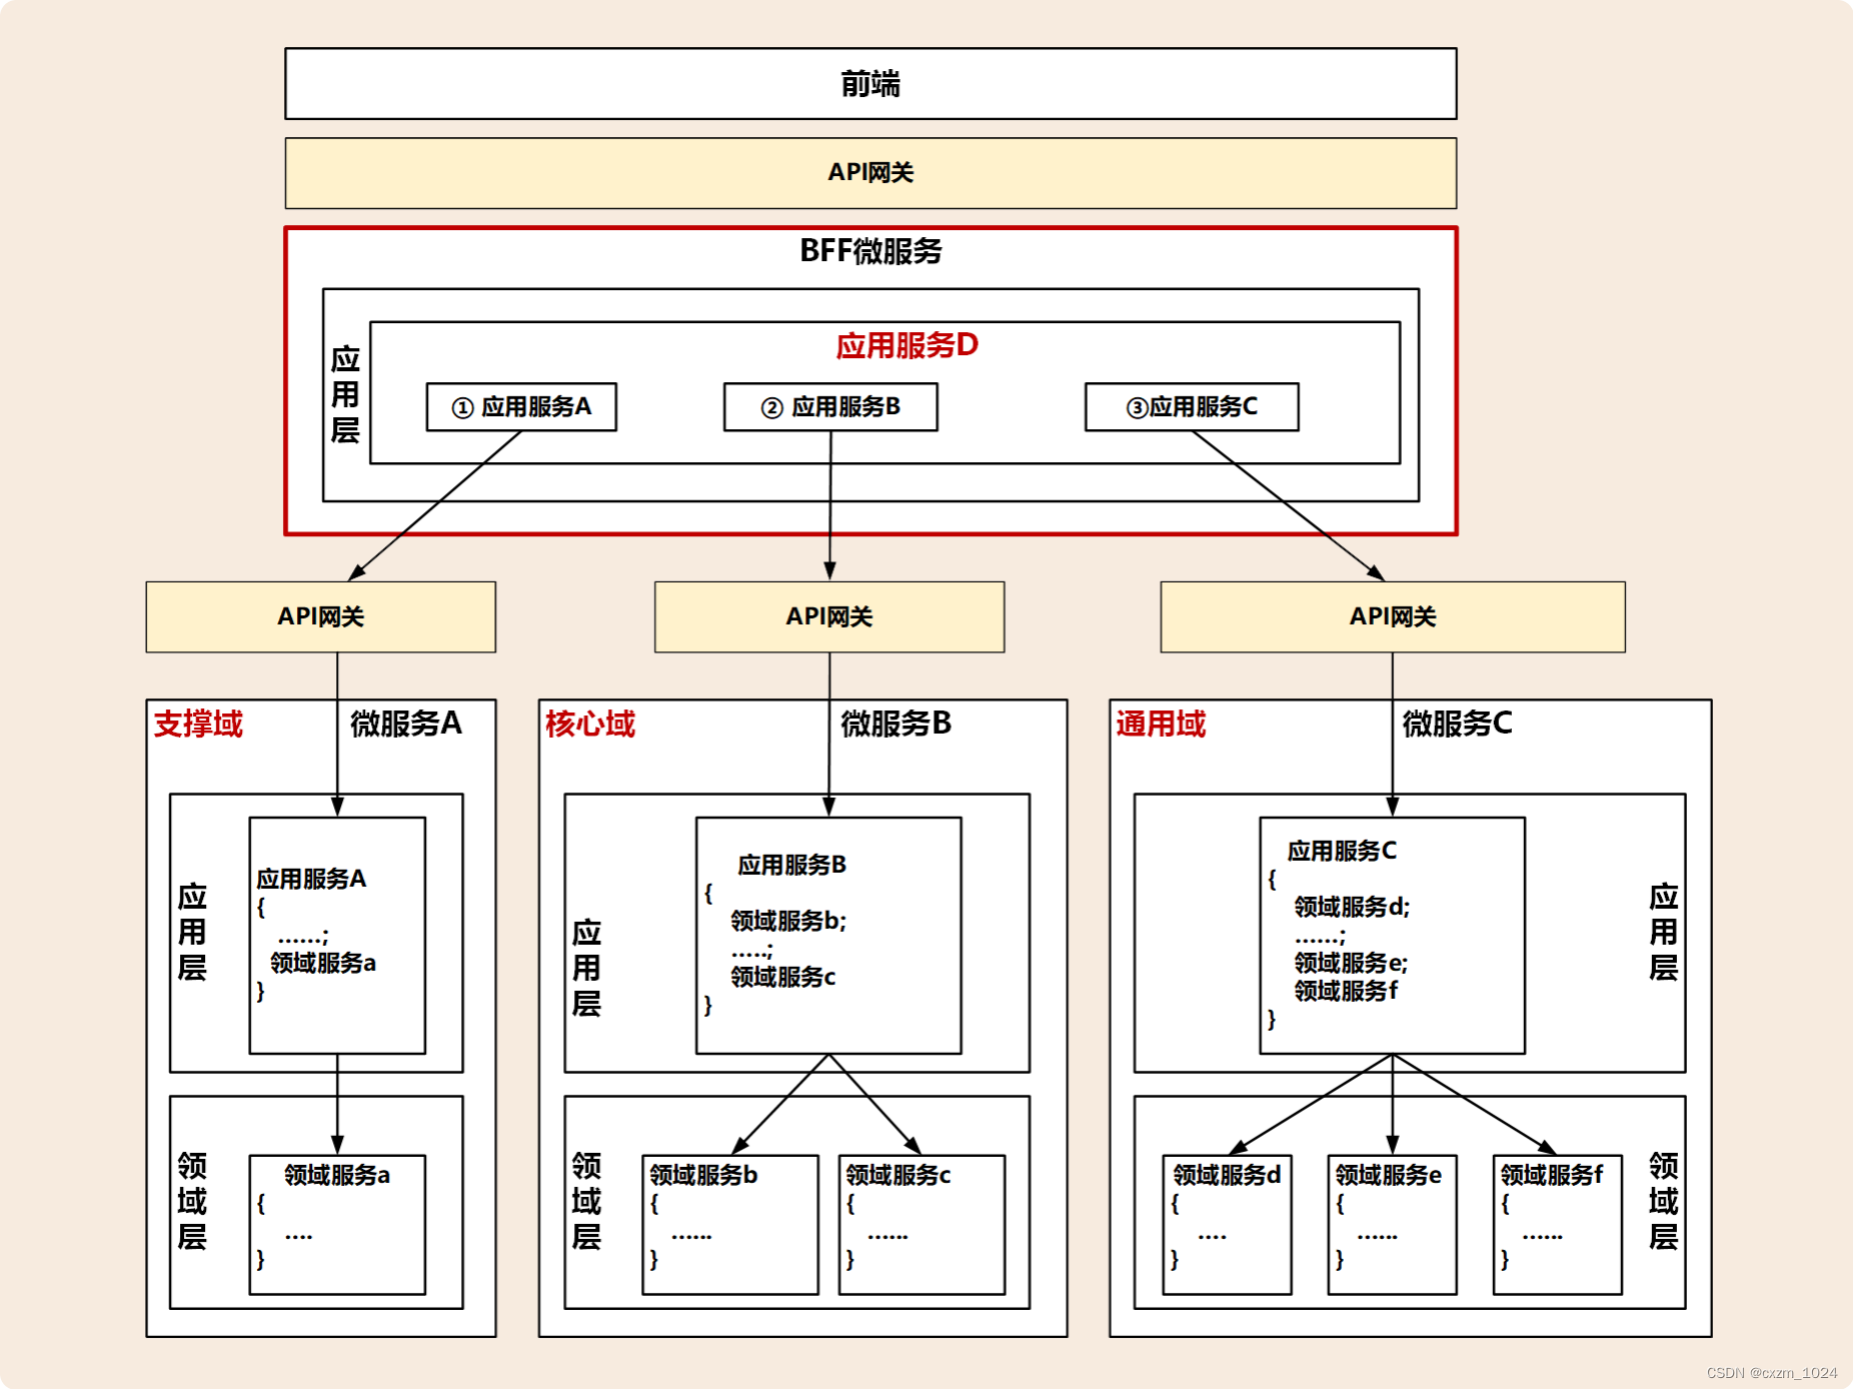
07.领域驱动设计:了解3种常见微服务架构模型的对比和分析
目录 1、概述 2、整洁架构 3、六边形架构 4、三种微服务架构模型的对比和分析 5、从三种架构模型看中台和微服务设计 5.1 中台建设要聚焦领域模型 5.2 微服务要有合理的架构分层 5.2.1 项目级微服务 5.2.2 企业级中台微服务 5.3 应用和资源的解耦与适配 6、总结 1、概…...
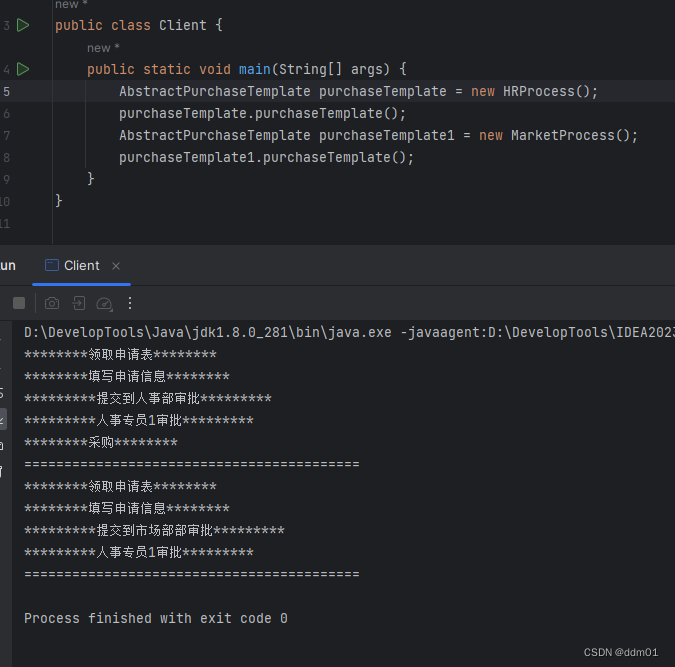
设计模式——模板方法模式(Template Method Pattern)
概述 模板方法模式:定义一个操作中算法的框架,而将一些步骤延迟到子类中。模板方法模式使得子类可以不改变一个算法的结构即可重定义该算法的某些特定步骤。模板方法模式是一种基于继承的代码复用技术,它是一种类行为型模式。模板方法模式是结…...
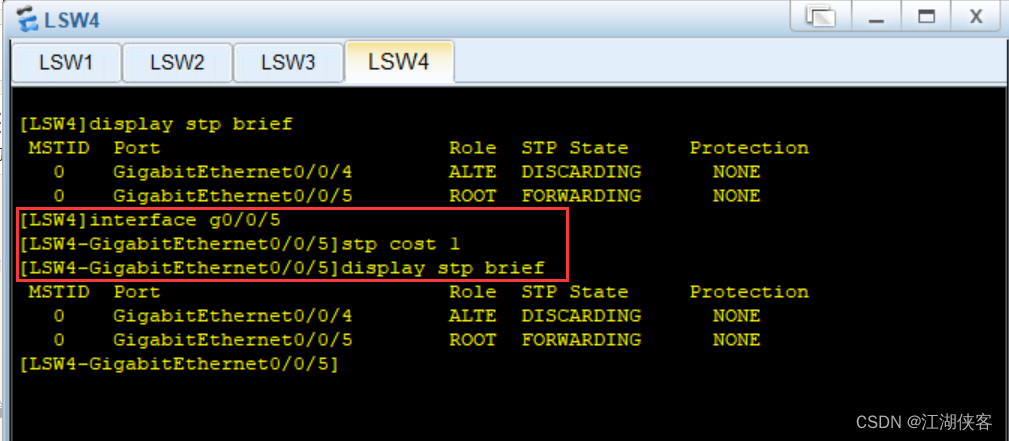
07. STP的基本配置
文章目录 一. 初识STP1.1. STP概述1.2. STP的出现1.3. STP的作用1.4. STP的专业术语1.5. BPDU的报文格式1.6. STP的选择原则(1)选择根桥网桥原则(2)选择根端口原则 1.7. 端口状态1.8. STP报文类型1.9. STP的收敛时间 二. 实验专题…...

oracle分区范围修改与数据迁移处理
背景 由于对应用上线后流量越来越大,原来的按年自动分区性能跟不上,因此决定改成按月自动分区,同时将原有分区数据重新迁移到新的分区 步骤 修改表分区为一个月一个分区 alter table my_table set INTERVAL (NUMTOYMINTERVAL(1, month));…...

回归预测 | Matlab实现CPO-LSSVM【24年新算法】冠豪猪优化最小二乘支持向量机多变量回归预测
回归预测 | Matlab实现CPO-LSSVM【24年新算法】冠豪猪优化最小二乘支持向量机多变量回归预测 目录 回归预测 | Matlab实现CPO-LSSVM【24年新算法】冠豪猪优化最小二乘支持向量机多变量回归预测效果一览基本介绍程序设计参考资料 效果一览 基本介绍 1.Matlab实现CPO-LSSVM【24年…...
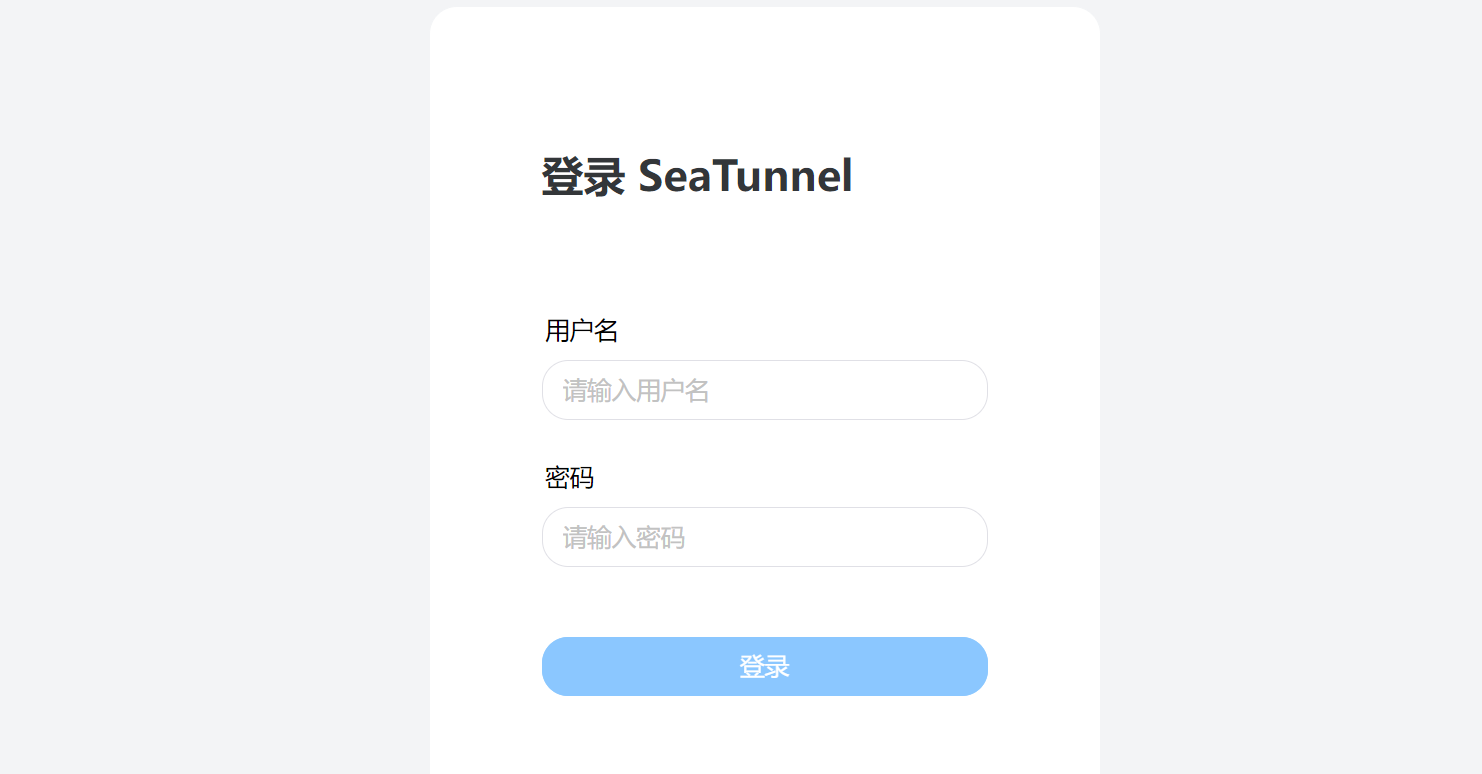
SeaTunnel Web安装 一把成
安装相关jar包,以及SeaTunnel 和Web 打成的包,可以直接使用,但是需要安装MySQL客户端的分享: 链接:https://pan.baidu.com/s/1qrt1RAX38SgIpNklbQJ7pA 提取码:0kmf 1. 环境准备 环境名称版本系统环境C…...

对话泛能网程路:能源产业互联网,行至中程
泛能网的能源产业互联网的标杆价值还不仅于此。其在产业互联之外,也更大的特殊性在于其也更在成为整个碳市场的“辅助运营商”,包括电力、碳等一系列被泛能网帮助企业改造和沉淀的要素资产,都在构成着碳交易市场的未来底层。 这恰是产业互联…...
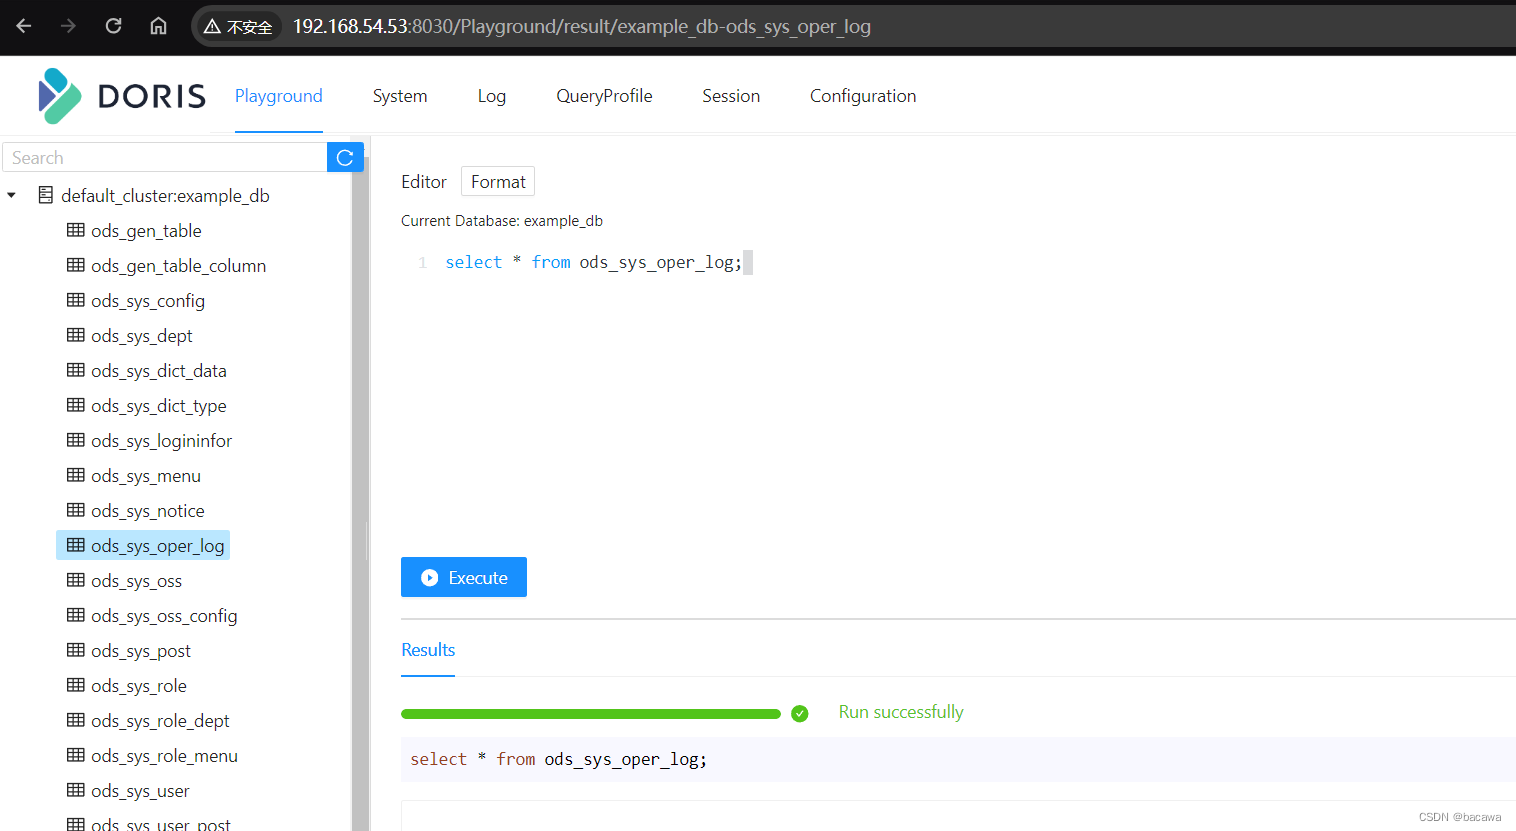
Doris简介及单机部署(超详细)
文章目录 一、Doris简介1、Doris介绍2、Doris架构 二、Doris单机部署(Centos7.9)1、下载Doris2、准备环境3、安装部署3.1 创建存储目录3.2 配置 FE3.3 启动 FE3.4 查看 FE 运行状态3.5 配置 BE3.6 启动 BE3.7 添加 BE 节点到集群3.8 查看 BE 运行状态3.9…...
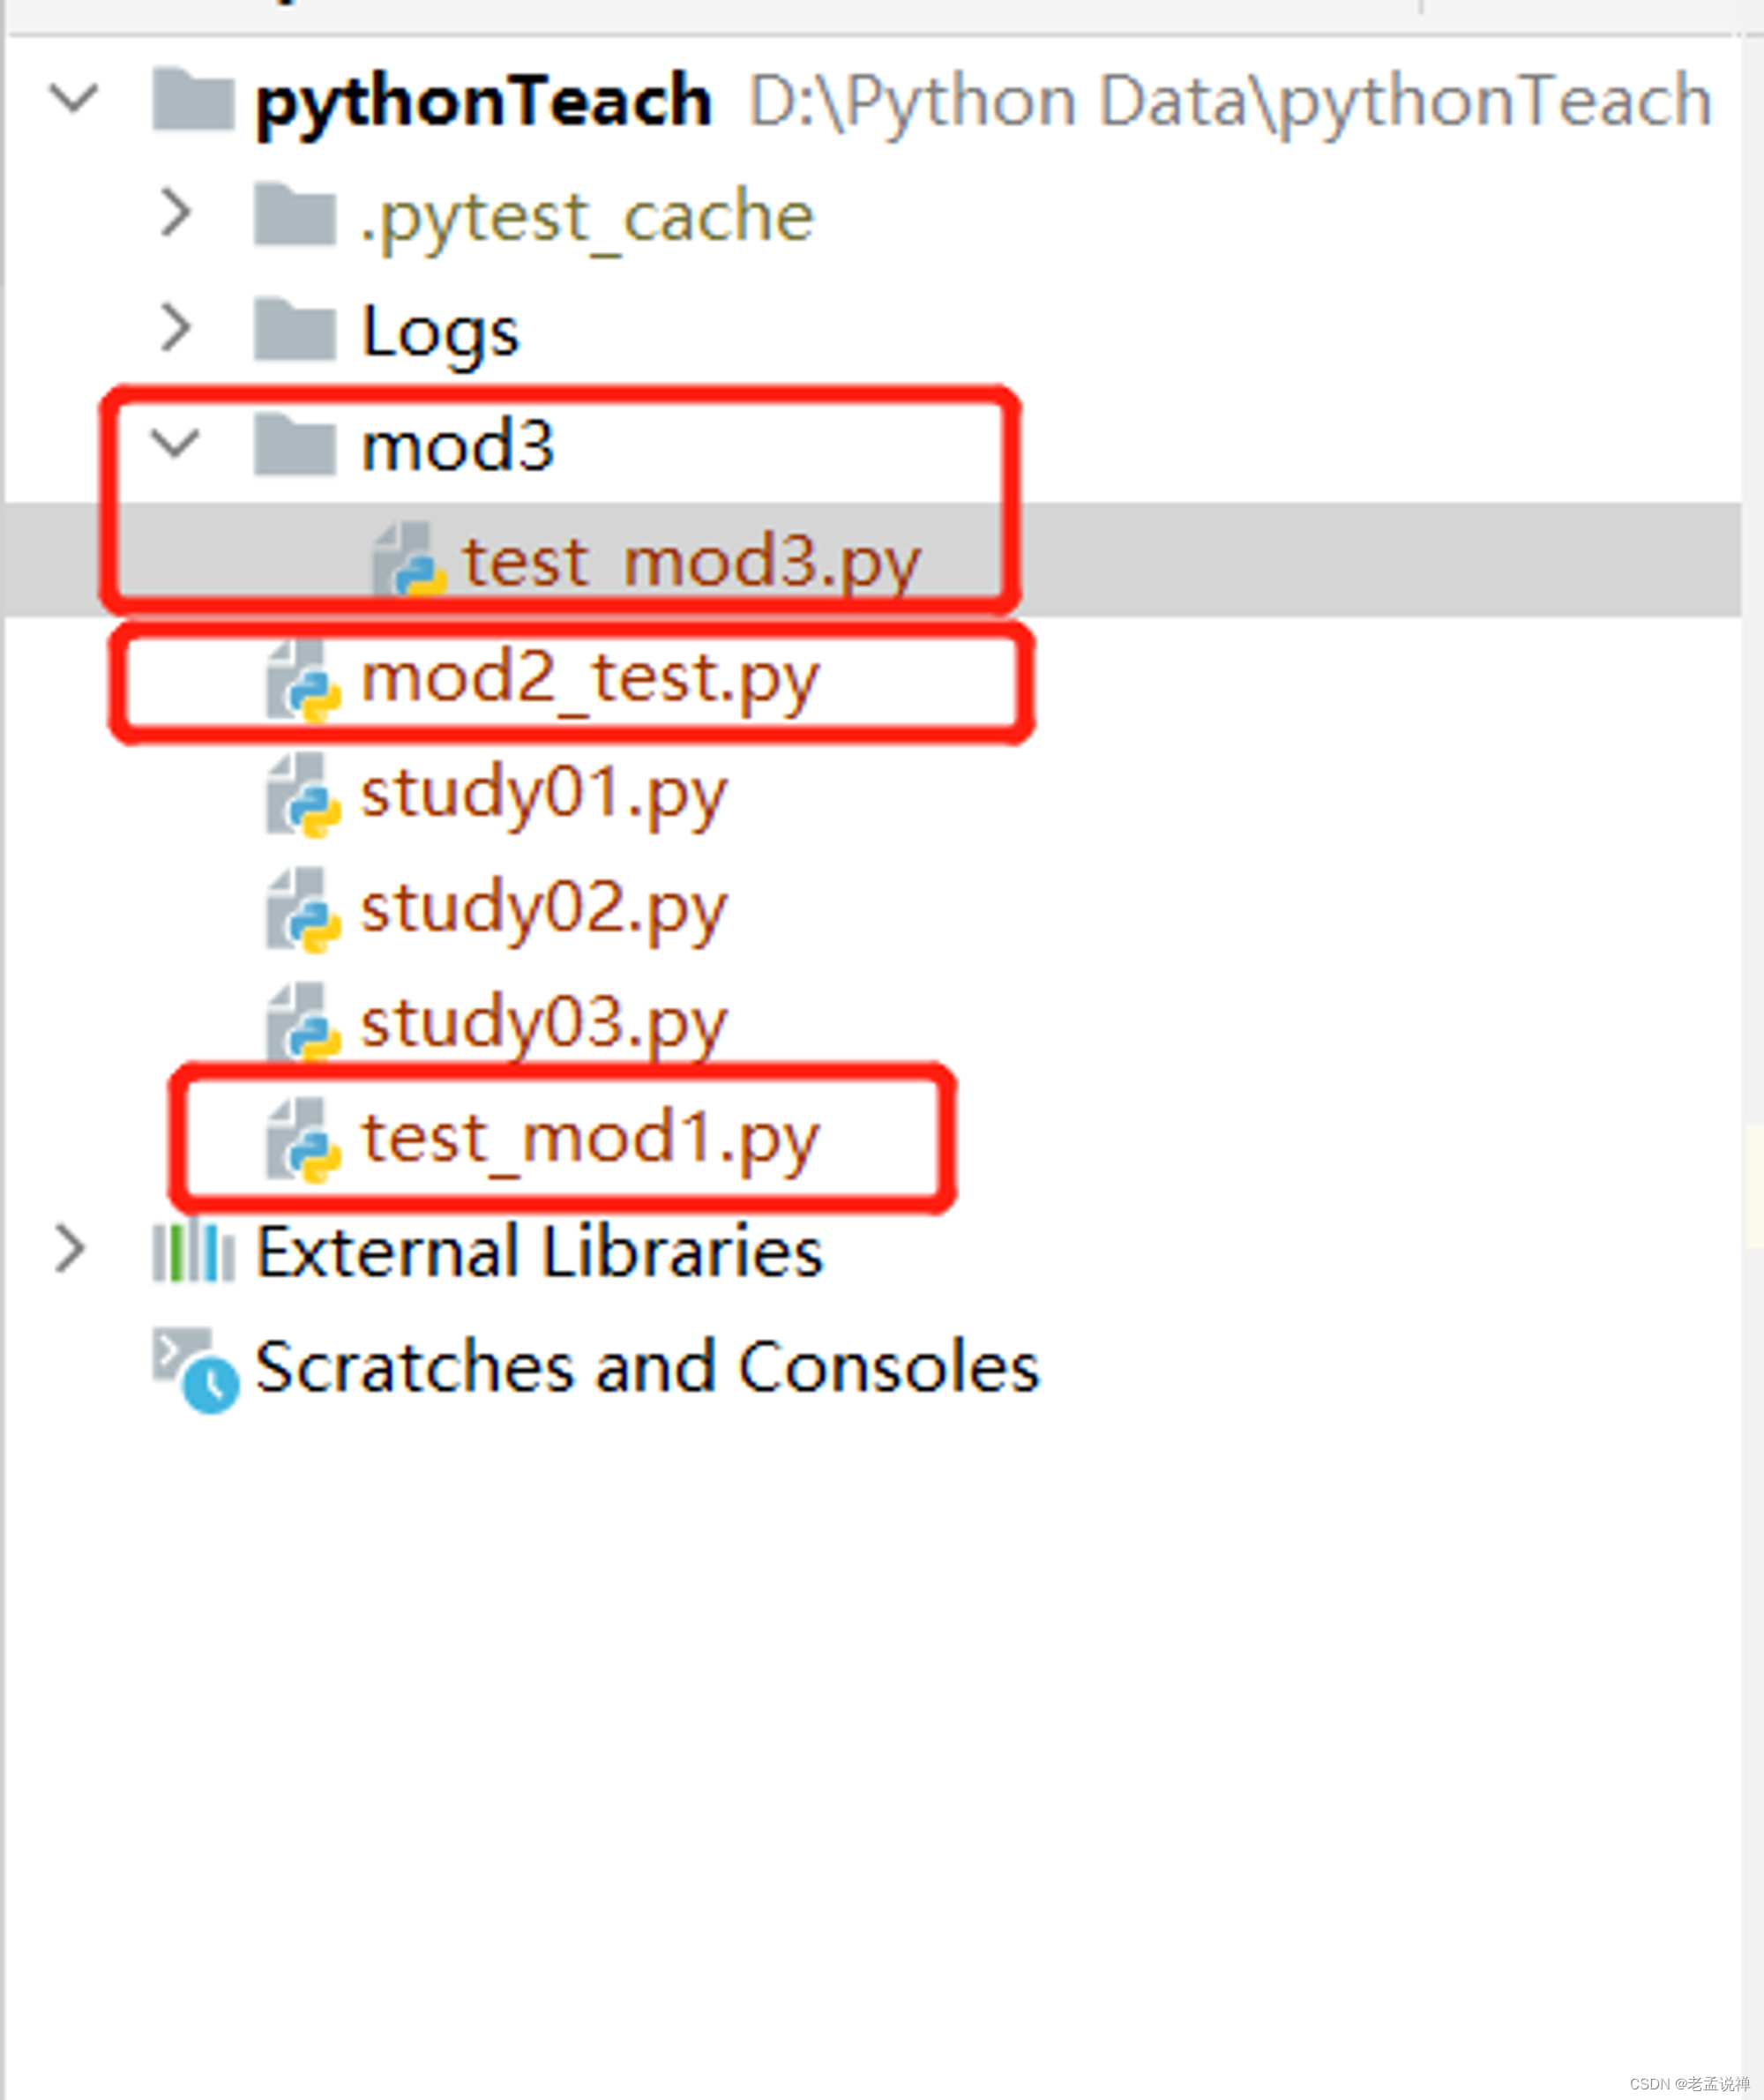
Pytest 识别case规则
一、Python测试框架,主要特点有以下几点: 简单灵活,容易上手;支持参数化;能够支持简单的单元测试和复杂的功能测试,还可以用来做selenium/appnium等自动化测试、接口自动化测试(pytestrequests…...

gorm+mysql查询/修改json列相关操作汇总
目录 具体操作 1,查询JSON段落指定key的值是否有等于value的 或 指定keyvalue的数据记录 2,查询JSON段落中price>19的记录 3,查询JSON段中key为k0的记录 4、JSON段落中提取指定键值对到指定结构 5,查询JSON数组是否包含…...

CMake-Cookbook 第0章 配置环境
文章目录 第0章 配置环境0.1 获取代码0.2 Docker镜像0.3 安装必要的软件0.3.1 获取CMake0.3.2 编译器0.3.3 自动化构建工具0.3.4 Python0.3.5 依赖软件0.3.5.1 BLAS和LAPACk0.3.5.2 消息传递接口(MPI)0.3.5.3 线性代数模板库0.3.5.4 Boost库0.3.5.5 交叉编译器0.3.5.6 ZeroMQ, …...
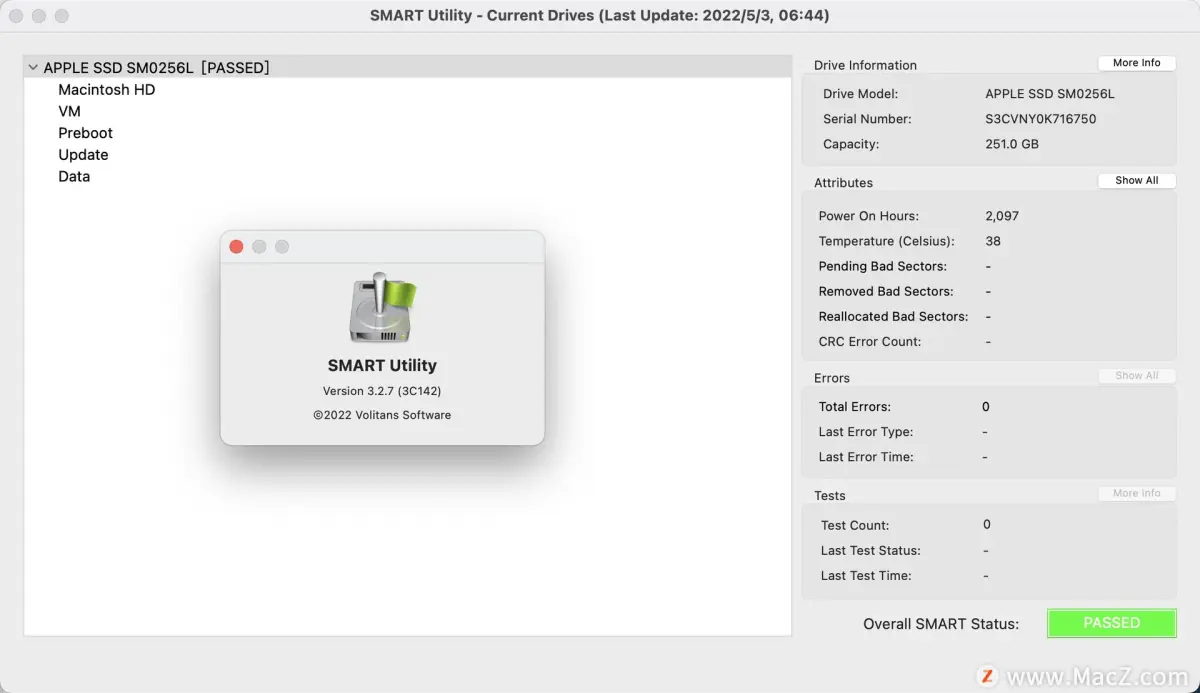
优质硬盘检测工具SMART Utility,保障您的Mac数据安全
在日常使用Mac电脑的过程中,我们经常会存储大量的重要数据,如照片、文档、视频等。然而,硬盘故障却是一件令人头疼的事情,可能会导致数据丢失、系统崩溃等严重后果。为了保障您的数据安全,我们推荐一款专业的硬盘检测工…...
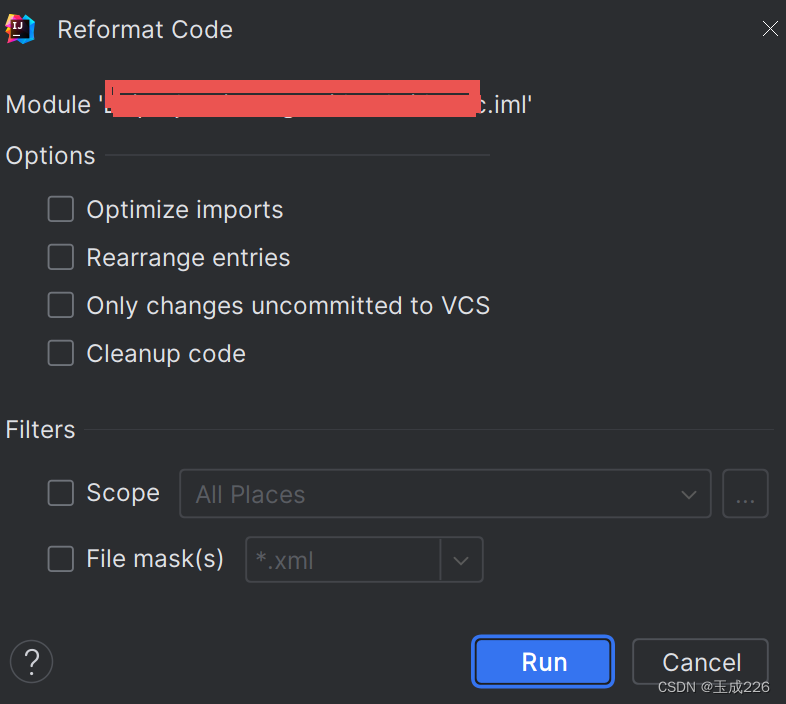
Spring: alibaba代码规范校验工具checkstyle
文章目录 一、idea配置checkstyle插件二、激活CheckStyle三、配置自动格式化功能四、使用代码格式化 一、idea配置checkstyle插件 下载 Intellij IDEA Checkstyle 插件:File -> setting -> plugin通过关键字CheckStyle-IDEA搜索并安装。 安裝完成后重启idea…...

c++线程thread示例
本文章记录c创建线程,启动线程和结束线程的代码。 需要注意,编译时需要添加-lpthread依赖。 代码: ThreadTest.h #ifndef TEST_THREAD_TEST_H #define TEST_THREAD_TEST_H#include <thread> #include <mutex>class ThreadTes…...
Compose | UI组件(十一) | Spacer - 留白
文章目录 前言Spacer组件的参数说明Spacer组件的使用 总结 前言 Spacer组件是让两组件之间留有空白间隔 Spacer组件的参数说明 Spacer只有一个修饰符,修饰留空白的大小和比例,颜色 Spacer(modifier: Modifier)Spacer组件的使用 Row {Box(modifier M…...
实战选型指南)
别再乱用分支了!Flowable四种网关(排他/并行/包容/事件)实战选型指南
Flowable四大网关实战选型:从混乱到精准的决策艺术当你在设计一个请假审批流程时,是否遇到过这样的困惑:部门经理审批后需要同时通知HR和财务,但某些特殊情况下又需要跳过财务直接归档?这种看似简单的业务需求…...

为Alchitry Au FPGA开发板外接JTAG接口的完整指南
1. 项目概述与核心价值如果你正在使用基于Xilinx Artix-7 FPGA的Alchitry Au或Au开发板,并且已经厌倦了每次调试或烧录都要依赖板载的USB-JTAG桥接芯片,或者你的项目已经将板载USB接口挪作他用,那么为你的开发板外接一个独立的JTAG调试器&…...

别再盲跑了!手把手教你用Arduino Zero在IDE 2.0里设置断点单步调试
告别盲跑时代:Arduino Zero与IDE 2.0的源码级调试实战指南 当你的Arduino项目逻辑越来越复杂,仅靠串口打印调试就像在迷宫里摸黑前行——直到遇见Arduino Zero与IDE 2.0的调试组合。本文将揭示如何用这套工具实现 源码级精准调试 ,即使你手…...

XML 服务器
XML 服务器 引言 XML(可扩展标记语言)服务器在现代互联网技术中扮演着至关重要的角色。它为数据的传输和处理提供了灵活且高效的方式。本文将深入探讨XML服务器的概念、工作原理、应用场景及其在软件开发中的重要性。 什么是XML服务器? XML服务器是一种用于存储、处理和…...

Airtest Poco实战:5分钟搞定微信小程序自动化测试环境搭建与元素抓取
Airtest Poco实战:5分钟搞定微信小程序自动化测试环境搭建与元素抓取微信小程序作为轻量级应用的代表,已经渗透到电商、社交、工具等各个领域。随着小程序功能的日益复杂,自动化测试成为保障产品质量的重要手段。本文将带你快速搭建微信小程序…...

电信运营商每月处理海量工单,如何不再出错?基于AI Agent的端到端自动化解决方案
在2026年的电信行业,海量工单处理已不再仅仅是效率问题,而是合规与生存的底线。随着2026年5月20日《电信和互联网服务 基础电信企业网上营业厅服务规范》国家标准的正式实施,监管层对“信息透明、流程闭环、计费精准”的要求达到了前所未有的…...

Unity动态自然系统:Forest Environment-Dynamic Nature深度解析
1. 这不是“贴图堆砌”,而是自然系统级建模:Forest Environment-Dynamic Nature 的真实定位你有没有试过在Unity里拖进几棵树、铺点草、加个天空盒,然后发现场景像一张静止的风景明信片——风不动、叶不摇、雨不落、雾不散?我做过…...

3步快速部署:智能茅台抢购平台的终极自动化解决方案
3步快速部署:智能茅台抢购平台的终极自动化解决方案 【免费下载链接】campus-imaotai i茅台app自动预约,每日自动预约,支持docker一键部署(本项目不提供成品,使用的是已淘汰的算法) 项目地址: https://gi…...

Unlock-Music:浏览器中一键解锁加密音乐文件的完整指南
Unlock-Music:浏览器中一键解锁加密音乐文件的完整指南 【免费下载链接】unlock-music 在浏览器中解锁加密的音乐文件。原仓库: 1. https://github.com/unlock-music/unlock-music ;2. https://git.unlock-music.dev/um/web 项目地址: http…...

【RT-DETR实战】070、模型分析工具:PyTorch Profiler性能分析
上周在部署RT-DETR到边缘设备时遇到一个诡异现象:模型推理时延波动极大,有时30ms,偶尔突然跳到200ms。 盯着代码看了半天没发现逻辑问题,数据流也正常。这种时候,靠猜是没用的,必须上性能分析工具——PyTorch Profiler。 今天我们就来聊聊怎么用它揪出那些藏在细节里的…...