flutter开发实战-Camera自定义相机拍照功能实现
flutter开发实战-Camera自定义相机拍照功能实现

一、前言
在项目中使用image_picker插件时候,在android设备上使用无法默认设置前置摄像头(暂时不清楚什么原因),由于项目默认需要使用前置摄像头,所以最终采用自定义相机实现拍照功能。
二、Camera使用前设置
在工程的iOS的info.plist文件中添加相机、麦克风权限描述
<key>NSCameraUsageDescription</key>
<string>your usage description here</string>
<key>NSMicrophoneUsageDescription</key>
<string>your usage description here</string>
在工程的Android的gradle设置minSdkVersion
找到android/app/build.gradle文件
minSdkVersion 21二、使用插件Camera插件
camera : 适用于iOS、Android和Web的Flutter插件,允许访问设备摄像头。
我们需要在工程中引入camera插件
pubspec.yaml中引入插件
# Camera相机拍照等camera: ^0.10.5+5处理相机访问权限
在初始化相机控制器时可能会引发权限错误,需要处理这些错误。
-
CameraAccessDenied:当用户拒绝相机访问权限时抛出。
-
CameraAccessDeniedWithoutPrompt:仅限iOS。当用户先前拒绝该权限时抛出。iOS不允许再次提示警报对话框。用户必须进入“设置”>“隐私”>“相机”才能访问相机。
-
CameraAccessRestricted:仅限iOS。当摄像头访问受到限制且用户无法授予权限(家长控制)时抛出。
-
AudioAccessDenied:当用户拒绝音频访问权限时抛出。
-
AudioAccessDeniedWithoutPrompt:目前仅限iOS。当用户先前拒绝该权限时抛出。iOS不允许再次提示警报对话框。用户必须转到“设置”>“隐私”>“麦克风”才能启用音频访问。
-
AudioAccessRestricted:目前仅限iOS。当音频访问受到限制并且用户无法授予权限(家长控制)时抛出。
2.1、camera功能设置
当使用camera时,我们需要设置一些camera的属性内容,比如切换前后摄像头、开启拍照、开启预览、停止预览等。
获取cameras
final cameras = await availableCameras();camera中使用CameraController来控制相关功能。
设置缩放级别zoomLevel
Future<void> setZoomLevel(double scale) async {await controller!.setZoomLevel(scale);}切换闪光灯模式
void onSetFlashModeButtonPressed(FlashMode mode) {setFlashMode(mode).then((_) {if (mounted) {setState(() {});}showInSnackBar('Flash mode set to ${mode.toString().split('.').last}');});}设置曝光模式
void onSetExposureModeButtonPressed(ExposureMode mode) {setExposureMode(mode).then((_) {if (mounted) {setState(() {});}showInSnackBar('Exposure mode set to ${mode.toString().split('.').last}');});}设置焦距模式
void onSetFocusModeButtonPressed(FocusMode mode) {setFocusMode(mode).then((_) {if (mounted) {setState(() {});}showInSnackBar('Focus mode set to ${mode.toString().split('.').last}');});}开启预览
Future<void> onResumePreview() async {final CameraController? cameraController = controller;if (cameraController == null || !cameraController.value.isInitialized) {print('Error: select a camera first.');return;}if (cameraController.value.isPreviewPaused) {await cameraController.resumePreview();}}暂停预览
Future<void> onPausePreview() async {final CameraController? cameraController = controller;if (cameraController == null || !cameraController.value.isInitialized) {print('Error: select a camera first.');return;}if (!cameraController.value.isPreviewPaused) {await cameraController.pausePreview();}}切换前后摄像头
void onViewFinderTap(TapDownDetails details, BoxConstraints constraints) {if (controller == null) {return;}final CameraController? cameraController = controller;final Offset offset = Offset(details.localPosition.dx / constraints.maxWidth,details.localPosition.dy / constraints.maxHeight,);cameraController?.setExposurePoint(offset);cameraController?.setFocusPoint(offset);}Future<void> onNewCameraSelected(CameraDescription cameraDescription) async {final CameraController cameraController = CameraController(cameraDescription,ResolutionPreset.high,enableAudio: enableAudio,imageFormatGroup: ImageFormatGroup.jpeg,);controller = cameraController;// If the controller is updated then update the UI.cameraController.addListener(() {if (mounted) {setState(() {});}if (cameraController.value.hasError) {print("Camera error ${cameraController.value.errorDescription}");}});try {await cameraController.initialize();await Future.wait(<Future<Object>>[// The exposure mode is currently not supported on the web.cameraController.getMaxZoomLevel().then((double value) => _maxAvailableZoom = value),cameraController.getMinZoomLevel().then((double value) => _minAvailableZoom = value),]);} on CameraException catch (e) {// _showCameraException(e);}setState(() {isCameraStarting = true;});controller!.initialize().then((_) {if (!mounted) {return;}setState(() {isCameraStarting = false;});}).catchError((Object e) {if (e is CameraException) {switch (e.code) {case 'CameraAccessDenied':// Handle access errors here.break;default:// Handle other errors here.break;}}});if (mounted) {setState(() {});}}上面介绍了一些CameraController的常用设置,当然肯定不全,大致列了几条。
2.2、WidgetsBinding 生命周期改变相机设置
我们自定义Camera,需要在didChangeAppLifecycleState来处理相机。我们需要添加mixin WidgetsBindingObserver
在initState中添加WidgetsBinding.instance?.addObserver(this);
在dispose中移除WidgetsBinding.instance?.removeObserver(this);
这样我们就可以在app的生命周期状态改变时候,更新相机
@overridevoid didChangeAppLifecycleState(AppLifecycleState state) {final CameraController? cameraController = controller;// App state changed before we got the chance to initialize.if (cameraController == null || !cameraController.value.isInitialized) {return;}if (state == AppLifecycleState.inactive) {cameraController.dispose();} else if (state == AppLifecycleState.resumed) {onNewCameraSelected(cameraController.description);}}2.3、处理预览的画面出现变形的问题
在处理自定义相机功能,我们需要处理预览的画面出现变形的问题。这里我们需要使用CameraPreview。
我们需要使用Transform.scale来进行处理,处理预览的画面出现变形的问题的解决代码如下
Widget buildCameraPreviewWidget(BuildContext context) {final Size size = MediaQuery.of(context).size;final CameraController? cameraController = controller;return Container(width: size.width,height: size.height,child: Stack(alignment: Alignment.center,clipBehavior: Clip.hardEdge,children: [RepaintBoundary(key: _cameraViewGlobalKey,child: Transform.scale(scale: 1.0,// scale: controller!.value.aspectRatio / deviceRatio,alignment: Alignment.center,child: AspectRatio(aspectRatio: size.aspectRatio,child: OverflowBox(alignment: Alignment.center,child: FittedBox(fit: BoxFit.fitHeight,child: SizedBox(width: size.width,height: size.width * cameraController!.value.aspectRatio,child: Stack(fit: StackFit.expand, children: <Widget>[_cameraPreviewWidget(),]),),),),),),),],),);}/// Display the preview from the camera (or a message if the preview is not available).Widget _cameraPreviewWidget() {final CameraController? cameraController = controller;if (cameraController == null || !cameraController.value.isInitialized) {return const Text('cameraController未初始化完成',style: TextStyle(color: Colors.white,fontSize: 24.0,fontWeight: FontWeight.w900,),);} else {return Listener(onPointerDown: (_) => _pointers++,onPointerUp: (_) => _pointers--,child: CameraPreview(controller!,child: LayoutBuilder(builder: (BuildContext context, BoxConstraints constraints) {return GestureDetector(behavior: HitTestBehavior.opaque,onScaleStart: _handleScaleStart,onScaleUpdate: _handleScaleUpdate,onTapDown: (TapDownDetails details) =>onViewFinderTap(details, constraints),);}),),);}}在代码中,我们使用Transform.scale设置为1.0,当设置AspectRatio来设置size.aspectRatio。
2.4、实现拍照功能
在我们代码中,我们使用takePicture来实现拍照,拍照代码如下
Future<void> onTakePicture() async {setState(() {isTaking = true;});takePicture().then((XFile? file) async {if (mounted) {onPausePreview();if (file != null) {// 保存到相册// await SaveToAlbumUtil.saveLocalImage(file.path);RenderBox renderBox = _cameraContainerGlobalKey.currentContext!.findRenderObject() as RenderBox;// offset.dx , offset.dy 就是控件的左上角坐标Offset offset = renderBox.localToGlobal(Offset.zero);//获取sizeSize size = renderBox.size;// 创建文件pathString imageDir = await PathUtil.createDirectory("local_images");String imagePath = '$imageDir/${TimeUtil.currentTimeMillis()}.png';// // 获取当前设备的像素比double dpr = ui.window.devicePixelRatio;print("devicePixelRatio:${dpr}");print("offset:(${offset.dx},${offset.dy})--size:(${size.width},${size.height})");File? targetFile = await ImageUtil.cropImage(file.path,imagePath,x: (dpr * offset.dx).floor(),y: (dpr * offset.dy).floor(),width: (dpr * size.width).ceil(),height: (dpr * size.height).ceil(),flipHorizontal: isCameraFront,);print("cropImage targetFile:${targetFile}");if (targetFile != null) {selectedImagePath = targetFile.path;// await SaveToAlbumUtil.saveLocalImage(targetFile.path);}setState(() {isHasTakePhoto = true;});} else {// 没有获得图片,重试}setState(() {isTaking = false;});}});}在裁剪图片中实现如下
import 'dart:io';
import 'dart:math';
import 'dart:ui' as ui;
import 'dart:math' as math;
import 'package:flutter/cupertino.dart';
import 'package:flutter/foundation.dart';
import 'package:flutter/rendering.dart';
import 'package:image/image.dart' as IMG;class ImageUtil {//拿到图片的字节数组static Future<ui.Image> loadImageByFile(String path) async {var list = await File(path).readAsBytes();return ImageUtil.loadImageByUInt8List(list);}//通过[Uint8List]获取图片static Future<ui.Image> loadImageByUInt8List(Uint8List list) async {ui.Codec codec = await ui.instantiateImageCodec(list);ui.FrameInfo frame = await codec.getNextFrame();return frame.image;}// 根据GlobalKey来截图Widgetstatic Future<Uint8List?> makeImageUInt8List(GlobalKey globalKey) async {RenderRepaintBoundary boundary =globalKey.currentContext?.findRenderObject() as RenderRepaintBoundary;// 这个可以获取当前设备的像素比var dpr = ui.window.devicePixelRatio;ui.Image image = await boundary.toImage(pixelRatio: dpr);ByteData? byteData = await image.toByteData(format: ui.ImageByteFormat.png);Uint8List? pngBytes = byteData?.buffer.asUint8List();return pngBytes;}static Future<File?> cropSquare(String srcFilePath, String destFilePath, bool flip) async {var bytes = await File(srcFilePath).readAsBytes();IMG.Image? src = IMG.decodeImage(bytes);if (src != null) {var cropSize = min(src.width, src.height);int offsetX = (src.width - min(src.width, src.height)) ~/ 2;int offsetY = (src.height - min(src.width, src.height)) ~/ 2;// IMG.Image destImage = IMG.copyCrop(src, offsetX, offsetY, cropSize, cropSize);IMG.Image destImage = IMG.copyCrop(src,x: offsetX, y: offsetY, width: cropSize, height: cropSize);if (flip) {destImage = IMG.flipVertical(destImage);}var jpg = IMG.encodeJpg(destImage);return await File(destFilePath).writeAsBytes(jpg);} else {throw StateError("cropSquare error");}}static Future<File?> cropImage(String srcFilePath,String destFilePath, {required int x,required int y,required int width,required int height,bool flipVertical = false,bool flipHorizontal = false,}) async {var bytes = await File(srcFilePath).readAsBytes();IMG.Image? src = IMG.decodeImage(bytes);if (src != null) {print("cropImage scr size:(${src.width},${src.height})");IMG.Image destImage = IMG.copyCrop(src,x: x, y: y, width: width, height: height);if (flipVertical) {destImage = IMG.flipVertical(destImage);}if (flipHorizontal) {destImage = IMG.flipHorizontal(destImage);}var jpg = IMG.encodeJpg(destImage);return await File(destFilePath).writeAsBytes(jpg);} else {throw StateError("cropSquare error");}}
}
2.5、拍照完重拍逻辑
当拍照后可能需要重新拍照,这时候我们需要重拍逻辑。
void onRetakeButtonPressed() {setState(() {isHasTakePhoto = false;});selectedImagePath = null;onResumePreview();}Future<void> onResumePreview() async {final CameraController? cameraController = controller;if (cameraController == null || !cameraController.value.isInitialized) {print('Error: select a camera first.');return;}if (cameraController.value.isPreviewPaused) {await cameraController.resumePreview();}}三、实现自定义相机拍照的功能完整代码
我们实现了实现自定义相机拍照的功能完整代码如下
// Copyright 2013 The Flutter Authors. All rights reserved.
// Use of this source code is governed by a BSD-style license that can be
// found in the LICENSE file.// ignore_for_file: public_member_api_docsimport 'dart:async';
import 'dart:io';
import 'package:camera/camera.dart';
import 'package:flutter/foundation.dart';
import 'package:flutter/material.dart';
import 'package:flutter_app_demolab/image_util.dart';
import 'package:flutter_app_demolab/path_util.dart';
import 'dart:ui' as ui;import 'package:flutter_app_demolab/tools/utils/color_util.dart';
import 'package:flutter_app_demolab/tools/utils/time_util.dart';
import 'package:flutter_screenutil/flutter_screenutil.dart';class MyCameraPage extends StatefulWidget {const MyCameraPage({super.key,required this.cameras,required this.onSelectedImagePathPressed,});final List<CameraDescription> cameras;final Function(String? selectedImagePath) onSelectedImagePathPressed;@overrideState<MyCameraPage> createState() => _MyCameraPageState();
}class _MyCameraPageState extends State<MyCameraPage>with WidgetsBindingObserver, TickerProviderStateMixin {CameraController? controller;GlobalKey _cameraViewGlobalKey = GlobalKey();GlobalKey _cameraContainerGlobalKey = GlobalKey();bool enableAudio = false;// Counting pointers (number of user fingers on screen)///以下是关于手指缩放画面的变量int _pointers = 0;double _minAvailableZoom = 1.0;double _maxAvailableZoom = 1.0;double _currentScale = 1.0;double _baseScale = 1.0;Size? mediaSize;double? scale;double? defaultZoomLevel;bool isHasTakePhoto = false;bool isCameraFront = true;String? selectedImagePath;bool isTaking = false;bool isCameraStarting = false;@overridevoid initState() {super.initState();// To display the current output from the Camera,// create a CameraController.if (widget.cameras.isNotEmpty && widget.cameras.length >= 2) {controller = CameraController(// Get a specific camera from the list of available cameras.widget.cameras[1],// Define the resolution to use.ResolutionPreset.high,);// Next, initialize the controller. This returns a Future.setState(() {isCameraStarting = true;});controller!.initialize().then((_) {if (!mounted) {return;}setState(() {isCameraStarting = false;});}).catchError((Object e) {if (e is CameraException) {switch (e.code) {case 'CameraAccessDenied':// Handle access errors here.break;default:// Handle other errors here.break;}}});}WidgetsBinding.instance?.addObserver(this);}@overridevoid dispose() {WidgetsBinding.instance?.removeObserver(this);controller?.dispose();super.dispose();}@overridevoid didChangeAppLifecycleState(AppLifecycleState state) {final CameraController? cameraController = controller;// App state changed before we got the chance to initialize.if (cameraController == null || !cameraController.value.isInitialized) {return;}if (state == AppLifecycleState.inactive) {cameraController.dispose();} else if (state == AppLifecycleState.resumed) {onNewCameraSelected(cameraController.description);}}final GlobalKey<ScaffoldState> _scaffoldKey = GlobalKey<ScaffoldState>();@overrideWidget build(BuildContext context) {return Scaffold(key: _scaffoldKey,body: buildCameraContainer(context),);}Widget buildCameraContainer(BuildContext context) {final Size size = MediaQuery.of(context).size;if (widget.cameras.isEmpty) {return Container(width: size.width,height: size.height,decoration: const BoxDecoration(color: Colors.black,),child: Text("未获取到可用的相机,请退出重试。",textAlign: TextAlign.center,maxLines: 2,overflow: TextOverflow.ellipsis,softWrap: true,style: TextStyle(fontSize: 16,fontWeight: FontWeight.w500,fontStyle: FontStyle.normal,color: ColorUtil.hexColor(0xffffff),decoration: TextDecoration.none,),),);} else {return Container(key: _cameraContainerGlobalKey,width: size.width,height: size.height,decoration: const BoxDecoration(color: Colors.black,),child: Stack(alignment: Alignment.center,children: [Column(children: [Expanded(child: buildFutureBuilder(context),)],),buildStackBarWidget(context),],),);}}Widget buildFutureBuilder(BuildContext context) {if (controller != null && controller!.value.isInitialized) {///初始化完成以后,再获取可以缩放画面最大最小的参数mediaSize = MediaQuery.of(context).size;scale = 1 / (controller!.value.aspectRatio * mediaSize!.aspectRatio);controller!.getMaxZoomLevel().then((double value) => _maxAvailableZoom = value);controller!.getMinZoomLevel().then((double value) => _minAvailableZoom = value);return buildCameraPreviewWidget(context);}return const Center(child: CircularProgressIndicator());}Widget buildStackBarWidget(BuildContext context) {final Size size = MediaQuery.of(context).size;double bottomBarHeight = 120;double cameraHeight = size.height - bottomBarHeight;EdgeInsets viewPadding = MediaQuery.of(context).viewPadding;return Container(child: Stack(children: [Positioned(bottom: 0,child: Container(width: size.width,height: bottomBarHeight,color: Colors.transparent,child: Stack(alignment: Alignment.center,children: [Positioned(left: 25,child: buildCloseIcon(context),),buildTakePhotoButton(context),Positioned(right: 25,child: buildRetakeButton(context),),],),),),Positioned(top: viewPadding.top + 25,right: 10,child: buildExchangeButton(context),),],),);}Widget buildCameraPreviewWidget(BuildContext context) {final Size size = MediaQuery.of(context).size;final CameraController? cameraController = controller;return Container(width: size.width,height: size.height,child: Stack(alignment: Alignment.center,clipBehavior: Clip.hardEdge,children: [RepaintBoundary(key: _cameraViewGlobalKey,child: Transform.scale(scale: 1.0,// scale: controller!.value.aspectRatio / deviceRatio,alignment: Alignment.center,child: AspectRatio(aspectRatio: size.aspectRatio,child: OverflowBox(alignment: Alignment.center,child: FittedBox(fit: BoxFit.fitHeight,child: SizedBox(width: size.width,height: size.width * cameraController!.value.aspectRatio,child: Stack(fit: StackFit.expand, children: <Widget>[_cameraPreviewWidget(),]),),),),),),),],),);}/// Display the preview from the camera (or a message if the preview is not available).Widget _cameraPreviewWidget() {final CameraController? cameraController = controller;if (cameraController == null || !cameraController.value.isInitialized) {return const Text('cameraController未初始化完成',style: TextStyle(color: Colors.white,fontSize: 24.0,fontWeight: FontWeight.w900,),);} else {return Listener(onPointerDown: (_) => _pointers++,onPointerUp: (_) => _pointers--,child: CameraPreview(controller!,child: LayoutBuilder(builder: (BuildContext context, BoxConstraints constraints) {return GestureDetector(behavior: HitTestBehavior.opaque,onScaleStart: _handleScaleStart,onScaleUpdate: _handleScaleUpdate,onTapDown: (TapDownDetails details) =>onViewFinderTap(details, constraints),);}),),);}}Widget buildCloseIcon(BuildContext context) {return GestureDetector(onTap: () {Navigator.pop(context);},child: Container(color: Colors.transparent,child: Container(width: 50,height: 50,decoration: BoxDecoration(color: Colors.transparent,border: Border.all(color: Colors.transparent,style: BorderStyle.solid,width: 1,),borderRadius: BorderRadius.all(Radius.circular(20)),),child: Icon(Icons.close,size: 30,color: Colors.white,weight: 0.5,),),),);}Widget buildTakePhotoButton(BuildContext context) {return GestureDetector(onTap: () {if (isTaking == false) {if (isHasTakePhoto == true) {widget.onSelectedImagePathPressed(selectedImagePath);Navigator.pop(context);} else {onTakePicturePressed();}}},child: Container(color: Colors.transparent,child: Container(width: 60,height: 60,decoration: const BoxDecoration(color: Colors.transparent,),child: Stack(alignment: Alignment.center,children: [Image.asset("assets/camera/my_take_photo.png",width: 60.0,height: 60.0,fit: BoxFit.contain,),buildHasCheck(context),],),),),);}Widget buildHasCheck(BuildContext context) {if (isTaking == true) {return buildLoading(context);}if (isHasTakePhoto) {return Icon(Icons.check,size: 30,color: Colors.black,weight: 0.5,);}return Container();}Widget buildExchangeButton(BuildContext context) {if (isHasTakePhoto == true) {return Container();}return GestureDetector(onTap: () {onExchangeCameraPressed();},child: Container(color: Colors.transparent,child: Container(width: 50,height: 50,decoration: BoxDecoration(color: Colors.transparent,border: Border.all(color: Colors.transparent,style: BorderStyle.solid,width: 2,),borderRadius: BorderRadius.all(Radius.circular(20)),),child: Container(width: 40,height: 40,decoration: BoxDecoration(color: Colors.transparent,border: Border.all(color: Colors.transparent,style: BorderStyle.solid,width: 5,),borderRadius: BorderRadius.all(Radius.circular(20)),),child: Image.asset("assets/camera/my_exchange_camera.png",width: 50.0,height: 50.0,fit: BoxFit.contain,),),),),);}Widget buildRetakeButton(BuildContext context) {if (isHasTakePhoto == false) {return Container();}return GestureDetector(onTap: () {onRetakeButtonPressed();},child: Container(color: Colors.transparent,child: Container(width: 70,height: 38,alignment: Alignment.center,decoration: BoxDecoration(color: ColorUtil.hexColor(0x000000, alpha: 0.25),border: Border.all(color: Colors.transparent,style: BorderStyle.solid,width: 2,),borderRadius: BorderRadius.all(Radius.circular(5)),),child: Text("重拍",textAlign: TextAlign.center,maxLines: 2,overflow: TextOverflow.ellipsis,softWrap: true,style: TextStyle(fontSize: 16,fontWeight: FontWeight.w500,fontStyle: FontStyle.normal,color: ColorUtil.hexColor(0xffffff),decoration: TextDecoration.none,),),),),);}Widget buildLoading(BuildContext context) {return SizedBox(height: 58,width: 58,child: CircularProgressIndicator(backgroundColor: Colors.grey[200],valueColor: AlwaysStoppedAnimation(Colors.blue),),);}void onRetakeButtonPressed() {setState(() {isHasTakePhoto = false;});selectedImagePath = null;onResumePreview();}Future<void> onPausePreview() async {final CameraController? cameraController = controller;if (cameraController == null || !cameraController.value.isInitialized) {print('Error: select a camera first.');return;}if (!cameraController.value.isPreviewPaused) {await cameraController.pausePreview();}}Future<void> onResumePreview() async {final CameraController? cameraController = controller;if (cameraController == null || !cameraController.value.isInitialized) {print('Error: select a camera first.');return;}if (cameraController.value.isPreviewPaused) {await cameraController.resumePreview();}}Future<void> onExchangeCameraPressed() async {setState(() {isHasTakePhoto = false;});if (isCameraFront == true) {if (widget.cameras.isNotEmpty && widget.cameras.length >= 2) {onNewCameraSelected(widget.cameras[0]);}isCameraFront = false;} else {if (widget.cameras.isNotEmpty && widget.cameras.length >= 2) {onNewCameraSelected(widget.cameras[1]);}isCameraFront = true;}}void onTakePicturePressed() {onTakePicture();}Future<void> onTakePicture() async {setState(() {isTaking = true;});takePicture().then((XFile? file) async {if (mounted) {onPausePreview();if (file != null) {// 保存到相册// await SaveToAlbumUtil.saveLocalImage(file.path);RenderBox renderBox = _cameraContainerGlobalKey.currentContext!.findRenderObject() as RenderBox;// offset.dx , offset.dy 就是控件的左上角坐标Offset offset = renderBox.localToGlobal(Offset.zero);//获取sizeSize size = renderBox.size;// 创建文件pathString imageDir = await PathUtil.createDirectory("local_images");String imagePath = '$imageDir/${TimeUtil.currentTimeMillis()}.png';// // 获取当前设备的像素比double dpr = ui.window.devicePixelRatio;print("devicePixelRatio:${dpr}");print("offset:(${offset.dx},${offset.dy})--size:(${size.width},${size.height})");File? targetFile = await ImageUtil.cropImage(file.path,imagePath,x: (dpr * offset.dx).floor(),y: (dpr * offset.dy).floor(),width: (dpr * size.width).ceil(),height: (dpr * size.height).ceil(),flipHorizontal: isCameraFront,);print("cropImage targetFile:${targetFile}");if (targetFile != null) {selectedImagePath = targetFile.path;// await SaveToAlbumUtil.saveLocalImage(targetFile.path);}setState(() {isHasTakePhoto = true;});} else {// 没有获得图片,重试}setState(() {isTaking = false;});}});}Future<void> _handleScaleStart(ScaleStartDetails details) async {_baseScale = _currentScale;await controller!.setZoomLevel(_minAvailableZoom);}Future<void> _handleScaleUpdate(ScaleUpdateDetails details) async {// When there are not exactly two fingers on screen don't scaleif (controller == null || _pointers != 2) {return;}_currentScale = (_baseScale * details.scale).clamp(_minAvailableZoom, _maxAvailableZoom);await controller!.setZoomLevel(_currentScale);}void onViewFinderTap(TapDownDetails details, BoxConstraints constraints) {if (controller == null) {return;}final CameraController? cameraController = controller;final Offset offset = Offset(details.localPosition.dx / constraints.maxWidth,details.localPosition.dy / constraints.maxHeight,);cameraController?.setExposurePoint(offset);cameraController?.setFocusPoint(offset);}Future<void> onNewCameraSelected(CameraDescription cameraDescription) async {final CameraController cameraController = CameraController(cameraDescription,ResolutionPreset.high,enableAudio: enableAudio,imageFormatGroup: ImageFormatGroup.jpeg,);controller = cameraController;// If the controller is updated then update the UI.cameraController.addListener(() {if (mounted) {setState(() {});}if (cameraController.value.hasError) {print("Camera error ${cameraController.value.errorDescription}");}});try {await cameraController.initialize();await Future.wait(<Future<Object>>[// The exposure mode is currently not supported on the web.cameraController.getMaxZoomLevel().then((double value) => _maxAvailableZoom = value),cameraController.getMinZoomLevel().then((double value) => _minAvailableZoom = value),]);} on CameraException catch (e) {// _showCameraException(e);}setState(() {isCameraStarting = true;});controller!.initialize().then((_) {if (!mounted) {return;}setState(() {isCameraStarting = false;});}).catchError((Object e) {if (e is CameraException) {switch (e.code) {case 'CameraAccessDenied':// Handle access errors here.break;default:// Handle other errors here.break;}}});if (mounted) {setState(() {});}}Future<XFile?> takePicture() async {final CameraController? cameraController = controller;if (cameraController == null || !cameraController.value.isInitialized) {print("Error: select a camera first.");return null;}if (cameraController.value.isTakingPicture) {// A capture is already pending, do nothing.return null;}try {final XFile file = await cameraController.takePicture();return file;} on CameraException catch (e) {print("takePicture CameraException e:${e.toString()}");return null;}}
}
当需要拍照时候,我们调用showModalBottomSheet来打开camera
//显示底部弹窗static void bottomSheetDialog(BuildContext context, Widget widget) {showModalBottomSheet(context: context,isScrollControlled: true,builder: (ctx) {return widget;},);}//返回上一级static void pop(BuildContext context) {Navigator.pop(context);}打开自定义相机页面
Future<void> testCustomCamera(BuildContext context) async {final cameras = await availableCameras();DialogUtils.bottomSheetDialog(context,MyCameraPage(cameras: cameras,onSelectedImagePathPressed: (String? selectedImagePath) {print("selectedImageFilePath:${selectedImagePath}");if (selectedImagePath != null) {// File imageFile = File(selectedImagePath!);// if (callback != null) {// callback(imageFile);// }}},),);}https://brucegwo.blog.csdn.net/article/details/135997096
四、小结
flutter开发实战-Camera自定义相机拍照功能实现
学习记录,每天不停进步。
相关文章:
flutter开发实战-Camera自定义相机拍照功能实现
flutter开发实战-Camera自定义相机拍照功能实现 一、前言 在项目中使用image_picker插件时候,在android设备上使用无法默认设置前置摄像头(暂时不清楚什么原因),由于项目默认需要使用前置摄像头,所以最终采用自定义…...
LeetCode15. 三数之和
15. 三数之和 给你一个整数数组 nums ,判断是否存在三元组 [nums[i], nums[j], nums[k]] 满足 i ! j、i ! k 且 j ! k ,同时还满足 nums[i] nums[j] nums[k] 0 。请 你返回所有和为 0 且不重复的三元组。 **注意:**答案中不可以包含重复…...

Docker搭建MySQL8主从复制
之前文章我们了解了面试官:说一说Binlog是怎么实现的,这里我们用Docker搭建主从复制环境。 docker安装主从MySQL 这里我们使用MySQL8.0.32版本: 主库配置 master.cnf //基础配置 [client] port3306 socket/var/run/mysqld/mysql.sock [m…...

【前端】日期转换
记录项目中需要处理的日期格式 默认vue2 初级版 将后端传来的数组 [2024/01/29 08:55:18, 2024/01/29 09:55:18, 2024/01/29 10:11:18]转为 [2024-01-29 08:55, 2024-01-29 09:55, 2024-01-29 10:11]方法 convertDateTimeFormat(arr) {var tempArr arr.map(function (dateT…...
Git 怎么设置用户的权限
在团队协作的软件开发中,对于版本控制系统Git来说,确保代码与数据的安全性至关重要。为了实现这一目标,Git提供了灵活且可定制的用户权限管理机制。下面将简单的探讨一下Git如何设置用户的权限,以及如何保护代码和数据。 用户身份…...

大端和小端模式介绍
介绍 “大端”和“小端”通常指的是字节序(Byte Order)的两种类型,也被称为端序(Endianness)。在多字节的数据类型(如整数)中,字节可以以不同的顺序存储,这影响了计算机…...
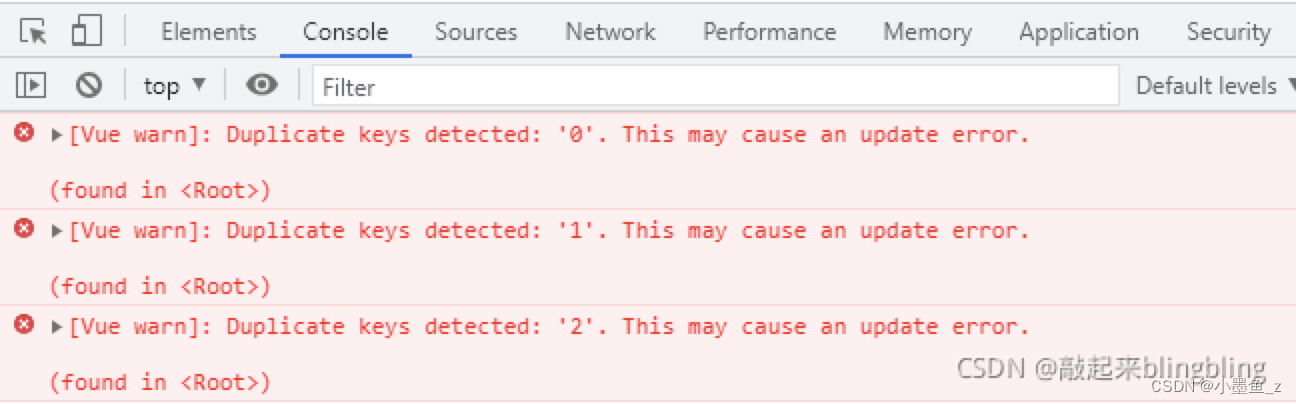
【vue】报错 Duplicate keys detected 解决方案
错误描述:Duplicate keys detected. This may cause an update error.错误直译:检测到重复的键。这可能会导致错误。错误原因:有相同父元素的多个子元素的v-for有相同的key值。 解决方法: return:{dataList:[{name:张三…...
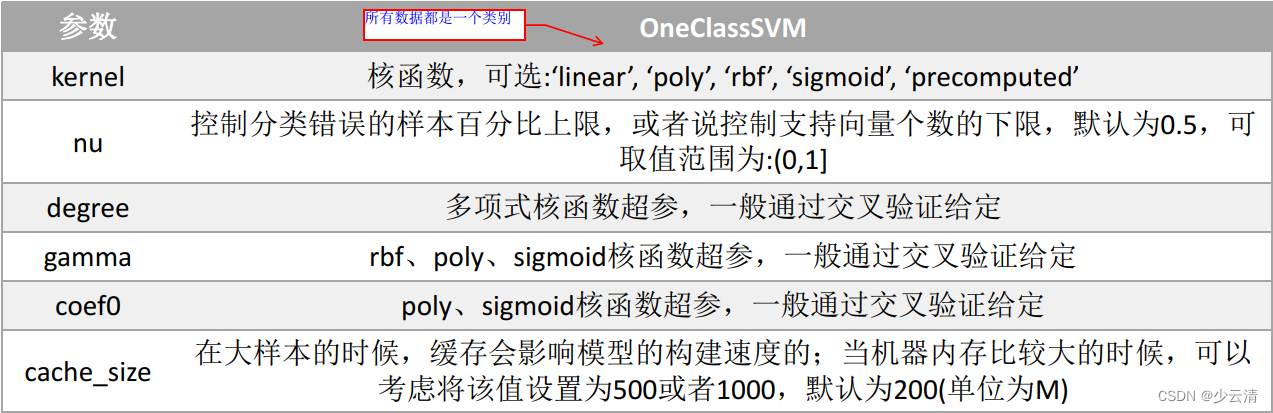
机器学习_13_SVM支持向量机、感知器模型
文章目录 1 感知器模型1.1 感知器的思想1.2 感知器模型构建1.3 损失函数构建、求解 2 SVM3 线性可分SVM3.1 线性可分SVM—概念3.2 线性可分SVM —SVM 模型公式表示3.3 线性可分SVM —SVM 损失函数3.4 优化函数求解3.5 线性可分SVM—算法流程3.6 线性可分SVM—案例3.7 线性可分S…...

OpenCV学习记录——轮廓检测
文章目录 前言一、寻找、绘制轮廓二、具体应用代码 前言 寻找目标图像的轮廓并绘制出该轮廓是我们进行图像识别时常用的手段,轮廓是图像中连续的边界线,可以用于物体检测、形状分析等应用。为了获取更高的准确性,会先进行二值化处理ÿ…...

FreeRTOS任务挂起以及延时部分源码分析
layout: post title: “任务状态” date: 2023-7-19 15:39:08 0800 tags: FreeRTOS 任务状态 fireRTOS代码分析 任务挂起 //把一个任务挂起 void vTaskSuspend( TaskHandle_t xTaskToSuspend ) {TCB_t *pxTCB;taskENTER_CRITICAL();//进入临界区{/* 参数是NULL的时候设置为当…...
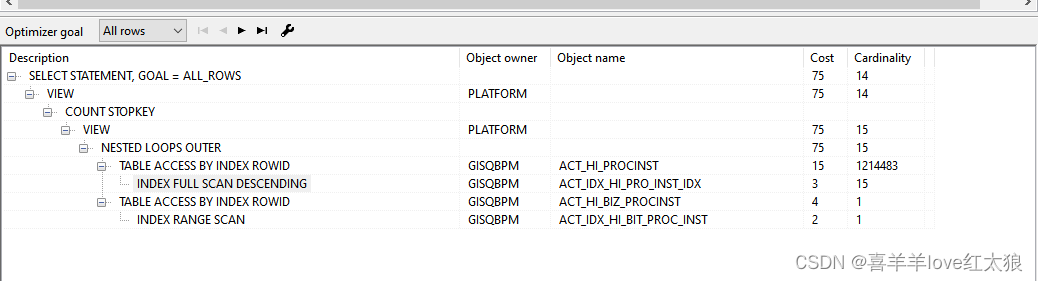
oracle数据库慢查询SQL
目录 场景: 环境: 慢SQL查询一: 问题一:办件列表查询慢 分析: 解决方法: 问题二:系统性卡顿 分析: 解决方法: 慢SQL查询二 扩展: 场景: 线…...
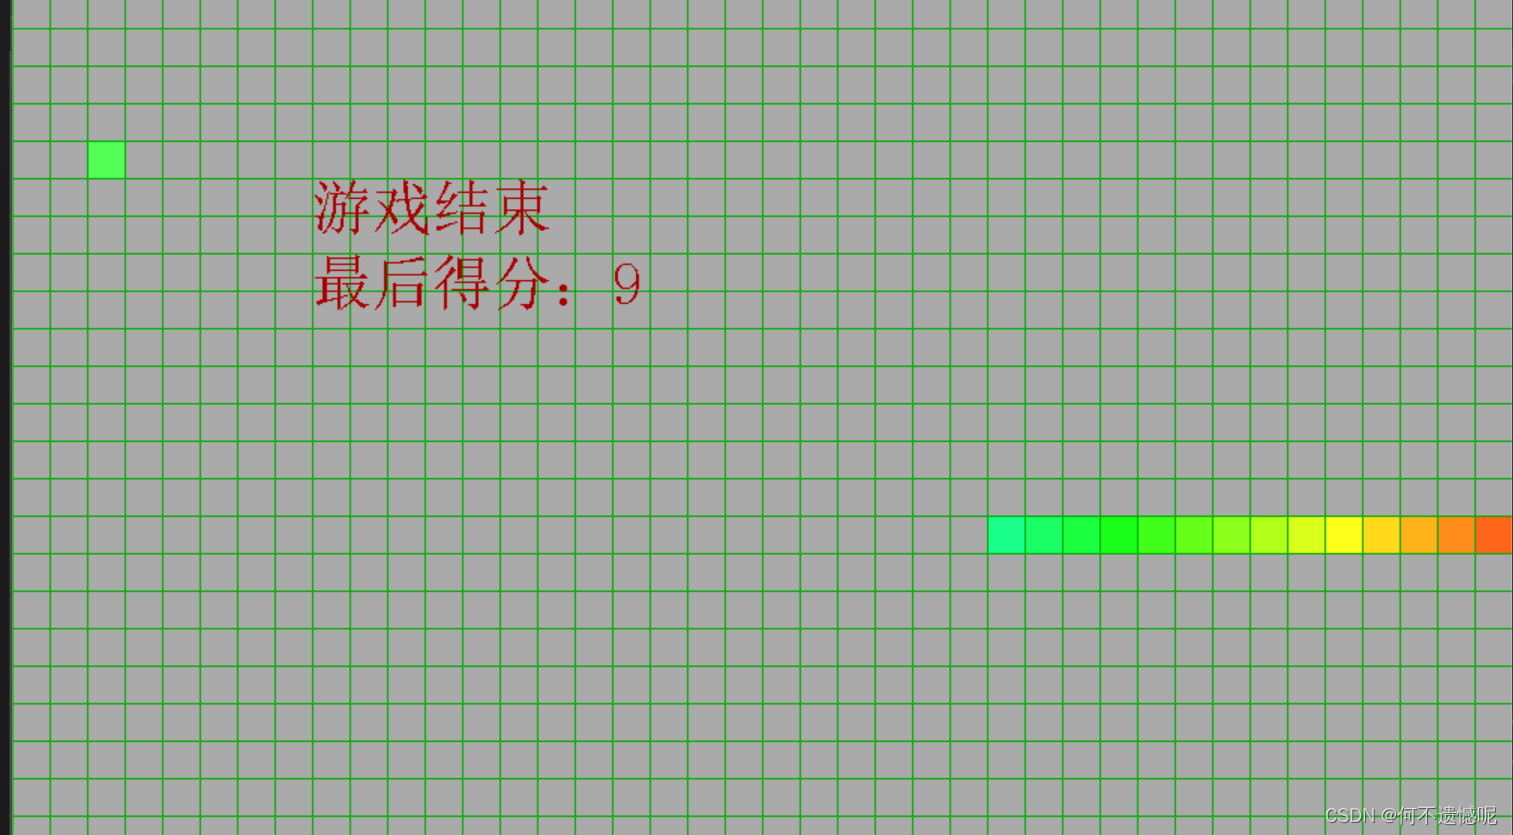
C语言搭配EasyX实现贪吃蛇小游戏
封面展示 内部展示 完整代码 #define _CRT_SECURE_NO_WARNINGS #include<easyx.h> #include<stdio.h> #include<mmsystem.h> #pragma comment (lib,"winmm.lib") #define width 40//宽有40个格子 #define height 30//长有40个格子 #define size 2…...

# 软件安装-Linux搭建nginx(单机版)
软件安装-Linux搭建nginx(单机版) 安装版本:nginx-1.24.0 文章目录 软件安装-Linux搭建nginx(单机版)一、Nginx包下载二、创建用户1.新建组和用户2.设置用户密码3.登录自己创建的目录三、安装依赖组件四、安装Nginx五、启动Nginx六、配置Nginx一、Nginx包下载 1. nginx-1.24下…...

成熟的汽车制造供应商协同平台 要具备哪些功能特性?
汽车行业是一个产业链长且“重”的行业,整个业务流程包括了研发、设计、采购、库存、生产、销售、售后等一系列环节,在每一个环节都涉及到很多信息交换的需求。对内要保证研发、采购、营销等业务环节信息流通高效安全,对外要与上、下游合作伙…...

React16源码: React中处理ref的核心流程源码实现
ref的实现过程 1 )概述 在更新流程当中如何去设置ref上面的对象的过程在我们创建fiber的时候去处理ref这个属性那我们什么时候创建fiber对象? 就是我们去更新某一个节点,然后要去调和它的子节点的时候这个时候我们会对每一个子节点去创建这个fiber对象…...
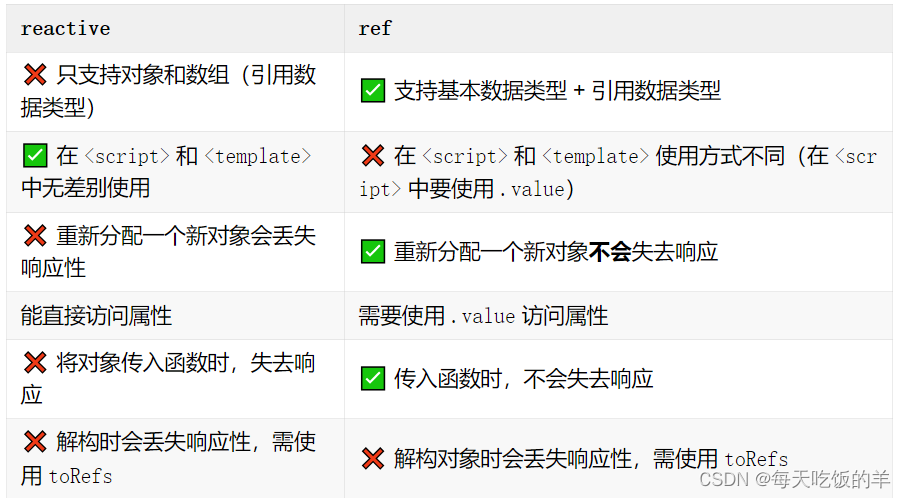
ref和reactive
看尤雨溪说:为什么Vue3 中应该使用 Ref 而不是 Reactive?...

掌握数据预测的艺术:线性回归模型详解
线性回归是统计学中用于建模两个或多个变量之间线性关系的一种方法,广泛应用于数据分析、机器学习等领域。从数学建模的角度出发,线性回归旨在找到一个线性方程,最好地描述自变量(或称为解释变量、特征变量)和因变量(或称为目标变量)之间的关系。本文将通过Python代码示…...
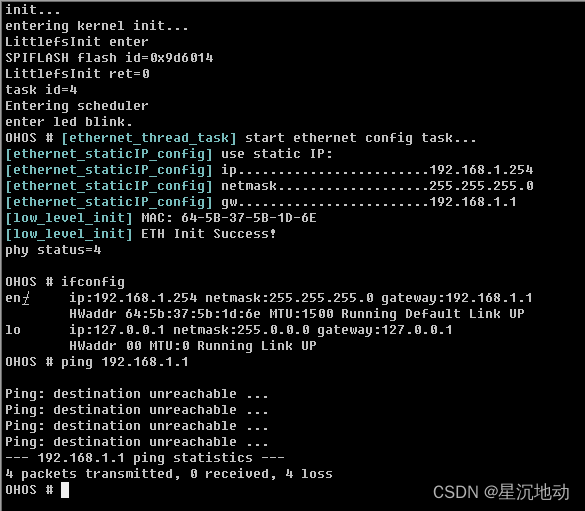
STM32F407移植OpenHarmony笔记8
继上一篇笔记,成功开启了littlefs文件系统,能读写FLASH上的文件了。 今天继续研究网络功能,让控制台的ping命令能工作。 轻量级系统使用的是liteos_m内核lwip协议栈实现网络功能,需要进行配置开启lwip支持。 lwip的移植分为两部分…...

C++:输入流/输出流
C流类库简介 C为了克服C语言中的scanf和printf存在的缺点。,使用cin/cout控制输入/输出。 cin:表示标准输入的istream类对象,cin从终端读入数据。cout:表示标准输出的ostream类对象,cout向终端写数据。cerrÿ…...
十、Qt三维图表
一、Data Visualization模块概述 Data Visualization的三维显示功能主要有三种三维图形来实现,三各类的父类都是QAbstract3DGraph,从QWindow继承而来。这三类分别是:三维柱状图Q3DBar三维空间散点Q3DScatter三维曲面Q3DSurface 1、相关类的…...
)
Python 3.14 JIT编译器调优实战:从默认0.8x到2.4x加速,7步完成生产环境级配置(附官方未公开env变量清单)
第一章:Python 3.14 JIT编译器性能调优配置详解Python 3.14 引入了实验性内置 JIT 编译器(基于 GraalPython 兼容层与自研 Pyston-style 动态优化后端),默认处于禁用状态,需通过环境变量与运行时参数显式启用并精细调优…...

Obsidian 零基础入门教程
Obsidian 零基础入门教程 目录 前言:为什么选择 Obsidian核心概念与基础操作 笔记即数据库双向链接创建你的第一个笔记库Markdown 基础语法内部链接与反向链接 核心功能实践指南 图谱视图标签的使用安装与配置核心插件 工作流示例:管理读书笔记后续学习…...

Python 爬虫实战:从入门到精通,爬取某站数据
前言 在大数据时代,数据采集是数据分析、人工智能、商业决策的基础环节。Python 凭借简洁的语法、丰富的第三方库,成为爬虫开发的首选语言。但对于大多数初学者而言,往往停留在静态网页爬取阶段,面对当下网站普遍存在的异步加载、…...

Burpsuite之暴力破解+验证码识别 | 添柴不加火萍
springboot自动配置 自动配置了大量组件,配置信息可以在application.properties文件中修改。 当添加了特定的Starter POM后,springboot会根据类路径上的jar包来自动配置bean(比如:springboot发现类路径上的MyBatis相关类ÿ…...

基恩士KV8000系列程序与电芯上料机的精密控制:EtherCAT总线技术、多轴定位与智能管理功能
基恩士KV8000程序 ~ 基恩士KV8000系列程序,KV8000KV-C64XKV-C64T等输入输出模块,KV-XH16EC定位控制模块 电芯上料机 松下A6系列总线控制伺服电机,采用EtherCAT总线控制,绝对定位、相对定位,整台设备13个轴,…...

2026届必备的十大AI科研网站解析与推荐
Ai论文网站排名(开题报告、文献综述、降aigc率、降重综合对比) TOP1. 千笔AI TOP2. aipasspaper TOP3. 清北论文 TOP4. 豆包 TOP5. kimi TOP6. deepseek 伴随人工智能技术的迅猛发展,AI论文工具已然成为学术写作范畴的关键辅助方式&…...

子系统是啥?---总线架构的实例化
目录 一、新手容易踩的认知坑 二、历史演变:从硬编码到子系统设备树的转变 (1)原始裸奔时代:无结构体、无设备树、无总线架构 (2)结构体封装时代:有结构体、无设备树、有总线架构 &…...

128. 如何在 RKE2 或 K3s 集群中更改容器日志级别
Procedure 程序The containerd log level can be set to one of the following values: trace, debug, info, warn, error, fatal or panic. In RKE2 and K3s clusters the log level is not explicitly set by default, and so containerd defaults to info level logging. D…...

Python 批量导出数据库数据至 Excel 文件页
简介 langchain专门用于构建LLM大语言模型,其中提供了大量的prompt模板,和组件,通过chain(链)的方式将流程连接起来,操作简单,开发便捷。 环境配置 安装langchain框架 pip install langchain langchain-community 其中…...

二叉树层序遍历与高度计算详解
一、先解答上次的思考题Day12 已经给出练习答案,这里不再重复,我们直接进入层序遍历。二、今天学习目标理解层序遍历(按一层一层打印)用队列实现层序遍历(BFS 思想)递归 迭代两种方式求二叉树高度完整可运…...