使用vite创建vue+ts项目,整合常用插件(scss、vue-router、pinia、axios等)和配置
一、检查node版本
指令:node -v
为什么要检查node版本?
Vite 需要 Node.js 版本 18+,20+。然而,有些模板需要依赖更高的 Node 版本才能正常运行,当你的包管理器发出警告时,请注意升级你的 Node 版本。
二、创建vite项目
指令:npm create vite@latest vue-ts-app -- --template vue-ts
参考vite官网
模板(template):
:::info
vanilla,vanilla-ts, vue, vue-ts,react,react-ts,react-swc,react-swc-ts,preact,preact-ts,lit,lit-ts,svelte,svelte-ts,solid,solid-ts,qwik,qwik-ts
:::
三、运行项目
安装插件:npm install
运行项目:npm run dev
{"name": "vue-ts-app","private": true,"version": "0.0.0","type": "module","scripts": {"dev": "vite","build": "vue-tsc && vite build","preview": "vite preview"},"dependencies": {"vue": "^3.3.11"},"devDependencies": {"@vitejs/plugin-vue": "^4.5.2","typescript": "^5.2.2","vite": "^5.0.8","vue-tsc": "^1.8.25"}
}
四、安装element plus
- 安装指令:
npm install element-plus --save - 自动按需导入指令:
npm install -D unplugin-vue-components unplugin-auto-import - 在项目配置文件中配置如下代码:
import { defineConfig } from 'vite'
import vue from '@vitejs/plugin-vue'
/** element plus 自动按需导入插件 start */
import AutoImport from 'unplugin-auto-import/vite'
import Components from 'unplugin-vue-components/vite'
import { ElementPlusResolver } from 'unplugin-vue-components/resolvers'
/** element plus 自动按需导入插件 end */// https://vitejs.dev/config/
export default defineConfig({plugins: [vue(),/** element plus 自动按需导入插件配置 start */AutoImport({resolvers: [ElementPlusResolver()],}),Components({resolvers: [ElementPlusResolver({ importStyle: 'sass' })] // importStyle: "sass" ---  解决覆盖element plus 的sass变量不生效的bug}),/** element plus 自动按需导入插件配置 end */],
})
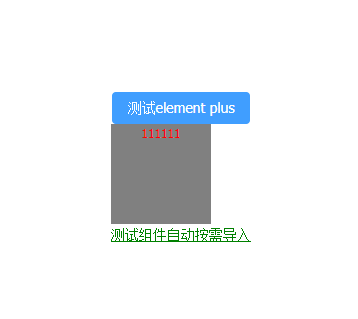
- 测试element plus按需导入是否成功:
<script setup lang="ts">
import HelloWorld from './components/HelloWorld.vue'
</script><template><div><!-- element plus组件 --><el-button type="primary">测试element plus</el-button><a href="https://vitejs.dev" target="_blank"><img src="/vite.svg" class="logo" alt="Vite logo" /></a><a href="https://vuejs.org/" target="_blank"><img src="./assets/vue.svg" class="logo vue" alt="Vue logo" /></a></div><HelloWorld msg="Vite + Vue" />
</template>
测试成功:

五、配置根目录别名
在vite.config.ts中配置:
import { fileURLToPath, URL } from 'node:url'export default defineConfig({plugins: [vue(),],resolve: {alias: {'@': fileURLToPath(new URL('./src', import.meta.url)),},},
})
在tsconfig.json中配置:
"baseUrl": "./", // 解析非相对模块的基础地址,默认是当前目录"paths": {"@/*": ["./src/*"] // 路径映射,相对于baseUrl
}

六、安装scss
- 安装指令:
npm install sass -D - 定义一个scss文件:global.scss

$theme-color: gray;
$main-width: 100px;
$main-height: 100px;
- 在配置文件中配置全局scss文件
import { fileURLToPath, URL } from 'node:url'export default defineConfig({plugins: [vue(),],resolve: {alias: {'@': fileURLToPath(new URL('./src', import.meta.url)),},},css: {preprocessorOptions: {// scss全局文件引入scss: {// additionalData: '@import "@/styles/global.scss";' 这行代码可能会导致报错additionalData: '@use "@/styles/global.scss" as *;' //建议使用这行代码},},},
})
- 在App.vue文件中进行测试
<template><el-button type="primary">测试element plus</el-button><div class="demo-box"><div class="tips">111111</div></div>
</template><style lang="scss" scoped>
/* 测试scss代码 */
.demo-box {background-color: $theme-color;width: $main-width;height: $main-height;.tips {color: red;}
}
</style>
七、配置eslint(代码检查)
- 安装pnpm:
npm i -g pnpm - 安装eslint:
npm i eslint -D - 初始化eslint:
pnpm eslint --init

- 在项目的根目录下找到eslint配置文件:
.eslintrc.json
{"env": {"browser": true,"es2021": true},"extends": ["eslint:recommended","plugin:@typescript-eslint/recommended","plugin:vue/vue3-essential"],"parserOptions": {"ecmaVersion": "latest","parser": "@typescript-eslint/parser","sourceType": "module"},"plugins": ["@typescript-eslint","vue"],"rules": {//}
}
解析:
- env:表示eslint 运行的环境
- extends:表示继承的规则
- parserOptions:指定解析器选项
- plugins:用到的插件
- rules:检验规则,参考eslint官网规则
- 配置规则
{"env": {"browser": true,"es2021": true},"extends": ["eslint:recommended", "plugin:@typescript-eslint/recommended", "plugin:vue/vue3-essential"],"parserOptions": {"ecmaVersion": "latest","parser": "@typescript-eslint/parser","sourceType": "module"},"plugins": ["@typescript-eslint", "vue"],"rules": {"vue/script-setup-uses-vars": "error","vue/no-reserved-component-names": "off","@typescript-eslint/ban-ts-ignore": "off","@typescript-eslint/explicit-function-return-type": "off","@typescript-eslint/no-explicit-any": "off","@typescript-eslint/no-var-requires": "off","@typescript-eslint/no-empty-function": "off","vue/custom-event-name-casing": "off","no-use-before-define": "off","@typescript-eslint/no-use-before-define": "off","@typescript-eslint/ban-ts-comment": "off","@typescript-eslint/ban-types": "off","@typescript-eslint/no-non-null-assertion": "off","@typescript-eslint/explicit-module-boundary-types": "off","@typescript-eslint/no-unused-vars": "error","no-unused-vars": "error","space-before-function-paren": "off","vue/attributes-order": "off","vue/one-component-per-file": "off","vue/html-closing-bracket-newline": "off","vue/max-attributes-per-line": "off","vue/multiline-html-element-content-newline": "off","vue/singleline-html-element-content-newline": "off","vue/attribute-hyphenation": "off","vue/require-default-prop": "off","vue/require-explicit-emits": "off","vue/html-self-closing": ["error",{"html": {"void": "always","normal": "never","component": "always"},"svg": "always","math": "always"}],"vue/multi-word-component-names": "off"}
}
- 在项目根目录新建
.eslintignore文件,用于配置哪些文件不用检测
dist
node_modules
- 在package.json中添加脚本
"scripts": {"lint": "eslint src","fix": "eslint src --fix"
},
- 检测eslint是否生效:由下图可得eslint有效

八、配置prettier,代码格式化、美化工具
- 安装prettier相关的插件:
npm install -D eslint-plugin-prettier prettier eslint-config-prettier - 在项目根目录下新建prettier的配置文件:
.prettierrc.json - 新建忽略文件:
.prettierignore
/dist/*
/html/*
.local
/node_modules/**
**/*.svg
**/*.sh
/public/*
- 编辑配置:参考prettier官网
{"printWidth": 100, //每行最多显示的字符数"tabWidth": 2, //tab的宽度 2个字符"useTabs": false,//使用tab代替空格"semi": false,//结尾使用分号"vueIndentScriptAndStyle": false,"singleQuote": true, "quoteProps": "as-needed","bracketSpacing": true, "trailingComma": "none","jsxSingleQuote": false,"arrowParens": "always","insertPragma": false,"requirePragma": false,"proseWrap": "never","htmlWhitespaceSensitivity": "strict","endOfLine": "auto","rangeStart": 0
}
- 更新
.eslintrc.json中的配置
在extends中新增代码:"plugin:prettier/recommended"
"extends": ["eslint:recommended","plugin:@typescript-eslint/recommended","plugin:vue/vue3-essential",// 新增的配置"plugin:prettier/recommended"
],
- 添加脚本
"format": "prettier --write \"./**/*.{html,vue,js,ts,json,md}\" "
"scripts": {"dev": "vite","build": "vue-tsc && vite build","preview": "vite preview","lint": "eslint src","fix": "eslint src --fix","format": "prettier --write \"./**/*.{html,vue,js,ts,json,md}\" "
},
- vscode中设置保存自动格式化

九、配置组件自动按需导入
- 安装插件:
npm i unplugin-vue-components -D - vite.config.ts中配置自动导入规则
import Components from 'unplugin-vue-components/vite'
import { ElementPlusResolver } from 'unplugin-vue-components/resolvers'export default defineConfig({plugins: [vue(),Components({// 要搜索组件的目录的相对路径dirs: ['src/components', 'src/layout'],// 组件的有效文件扩展名extensions: ['vue', 'md'],// 搜索子目录deep: true,// 在哪些文件下自动导入组件include: [/\.vue$/, /\.vue\?vue/],// 生成自定义 `auto-components.d.ts` 全局声明dts: 'src/types/auto-components.d.ts',// 自定义组件的解析器resolvers: [ElementPlusResolver({ importStyle: 'sass' })], // importStyle: "sass" ---  解决覆盖element plus 的sass变量不生效的bug// 在哪些目录下不自动导入组件exclude: [/[\\/]node_modules[\\/]/]})],
})
- 保存配置文件,重新运行项目后,会发现项目自动生成了如下文件:

- 检查效果
- 在components中新建
BaseLink/index.vue组件
<template><div class="base-link"><slot></slot></div>
</template>
<script setup lang="ts"></script>
<style lang="scss" scoped>
.base-link {font-size: 14px;font-weight: 500;color: green;cursor: pointer;&:hover {text-decoration: underline;}
}
</style>
- 保存组件后,会发现在
auto-components.d.ts文件中多出了对应的代码
export {}declare module 'vue' {export interface GlobalComponents {BaseLink: typeof import('./../components/BaseLink/index.vue')['default']ElButton: typeof import('element-plus/es')['ElButton']HelloWorld: typeof import('./../components/HelloWorld.vue')['default']}
}
- 在App中使用
BaseLink组件
<script setup lang="ts"></script><template><el-button type="primary">测试element plus</el-button><div class="demo-box"><div class="tips">111111</div></div><base-link>测试组件自动按需导入</base-link>
</template><style lang="scss" scoped>
.demo-box {background-color: $theme-color;width: $main-width;height: $main-height;.tips {color: red;}
}
</style>
发现可以正确使用:
十、插件自动引入
- 安装插件:
npm i unplugin-auto-import -D - 在配置文件中配置自动导入规则
import Components from 'unplugin-vue-components/vite'
import { ElementPlusResolver } from 'unplugin-vue-components/resolvers'export default defineConfig({plugins: [vue(),AutoImport({// 在哪些文件下自动导入include: [/\.[tj]sx?$/, // .ts, .tsx, .js, .jsx/\.vue$/,/\.vue\?vue/, // .vue/\.md$/ // .md],// 自动导入的内容imports: ['vue'],// 配置文件生成位置,默认是根目录dts: 'src/types/auto-imports.d.ts',// eslint检查eslintrc: {enabled: true, // Default `false`filepath: './.eslintrc-auto-import.json', // Default `./.eslintrc-auto-import.json`globalsPropValue: true // Default `true`, (true | false | 'readonly' | 'readable' | 'writable' | 'writeable')},resolvers: [ElementPlusResolver()]}),],
})
- 保存配置文件,重新运行项目,会自动生成如下文件:

- 在
.eslintrc.json中修改配置,保证eslint检查不会报错
在extends中新增配置:
"extends": ["eslint:recommended","plugin:@typescript-eslint/recommended","plugin:vue/vue3-essential","plugin:prettier/recommended",".eslintrc-auto-import.json"
],
- 在App.vue中检验效果
<script setup lang="ts">
// 这里并未导入ref,eslint也未提示报错
const number = ref(1)const handleNumberChange = () => {number.value = number.value++
}
</script><template><el-button type="primary">测试element plus</el-button><div class="demo-box"><div class="tips">111111</div></div><base-link>测试组件自动按需导入</base-link><div>这是number值:{{ number }}</div><el-button @click="handleNumberChange">改变number值</el-button>
</template><style lang="scss" scoped>
.demo-box {background-color: $theme-color;width: $main-width;height: $main-height;.tips {color: red;}
}
</style>
十一、安装vue-router
- 安装插件:
pnpm add vue-router@4 - 在src目录下新建router文件夹,结构如下:

- index.ts是路由的根文件,modules下的文件是各个路由模块
import type { App } from 'vue'
import type { RouteRecordRaw } from 'vue-router'
import { createRouter, createWebHistory } from 'vue-router'
import remainingRouter from './modules/remaining'// 创建路由实例
const router = createRouter({history: createWebHistory(import.meta.env.VITE_BASE_PATH), // createWebHashHistory URL带#,createWebHistory URL不带#strict: true,routes: remainingRouter as RouteRecordRaw[],scrollBehavior: () => ({ left: 0, top: 0 })
})export const setupRouter = (app: App<Element>) => {app.use(router)
}export default router
const remainingRouter = [{path: '/test',name: 'TestPage',component: () => import('@/views/test/index.vue'),mate: {title: '测试页面'}}
]export default remainingRouter
- 新建test页面组件
<template><div><h1>这是test页面</h1><base-link @click="handleToHome">跳转至首页</base-link></div>
</template>
<script setup lang="ts" name="">
const router = useRouter()
const handleToHome = () => {router.push('/')
}
</script>
<style lang="scss" scoped></style>
- 在入口文件main.ts中引入
import { createApp } from 'vue'
import './style.css'
import './styles/reset.scss'
import App from './App.vue'
import router, { setupRouter } from '@/router'// 创建实例
const setupAll = async () => {const app = createApp(App)setupRouter(app)await router.isReady()app.mount('#app')
}setupAll()
- App.vue中测试效果
<script setup lang="ts">
// 这里并未导入ref,eslint也未提示报错
const number = ref(1)const handleNumberChange = () => {number.value++
}const router = useRouter()
const handleToTest = () => {router.push('/test')
}
</script><template><el-button type="primary">测试element plus</el-button><div class="demo-box"><div class="tips">111111</div></div><base-link>测试组件自动按需导入</base-link><div>这是number值:{{ number }}</div><el-button @click="handleNumberChange">改变number值</el-button><base-link @click="handleToTest">跳转至test页面</base-link><router-view />
</template><style lang="scss" scoped>
.demo-box {background-color: $theme-color;width: $main-width;height: $main-height;.tips {color: red;}
}
</style>


十二、安装vite-plugin-vue-setup-extend插件,解决在setup中定义name问题
- 安装:
pnpm i vite-plugin-vue-setup-extend -D - 在vite.config.ts中配置:
import vueSetupExtend from 'vite-plugin-vue-setup-extend'// https://vitejs.dev/config/
export default defineConfig({plugins: [vue(),vueSetupExtend(),]
})
- 在vue组件中定义name
- 注意:必须要注意的是当组件的script标签中的内容为空时,name还是不会生效
十三、安装pinia状态管理
- 安装:
pnpm install pinia - 在src目录下新建stores文件夹,结构如下:

- index.ts为根文件,counter.ts中存储的是各个模块数据
import type { App } from 'vue'
import { createPinia } from 'pinia'const store = createPinia()export const setupStore = (app: App<Element>) => {app.use(store)
}export { store }
import { defineStore } from 'pinia'export const useCounterStore = defineStore('counter', () => {/*** ref() 就是 state 属性* computed() 就是 getters* function() 就是 actions,action中可以使用异步函数*///state:const count = ref(0)//getter:const getCount = computed<number>(() => {return count.value})//actions:const increment = () => {count.value++}//暴露state、computed、actions;否则无法使用return { count, getCount, increment }
})
- 在入口文件main.ts中引入
import { createApp } from 'vue'
import { setupStore } from '@/stores'// 创建实例
const setupAll = async () => {const app = createApp(App)setupStore(app)app.mount('#app')
}setupAll()
- 使用方法
<template><div><h1>这是test页面</h1><div>这是count:{{ counterStore.count }}</div></div>
</template>
<script setup lang="ts" name="TestPage">
import { useCounterStore } from '@/stores/modules/counter'
const counterStore = useCounterStore()
</script>
<style lang="scss" scoped></style>
十四、安装Axios请求插件
- 安装axios插件
pnpm install axios -D - 配置axios
一、在src根目录下创建如下目录:
api存储接口
axios存储配置文件

config.ts:
import axios, {AxiosError,type InternalAxiosRequestConfig,type AxiosInstance,type AxiosResponse
} from 'axios'const base_url = import.meta.env.BASE_URL
const request_timeout = import.meta.env.VITE_REQUEST_TIMEOUT// 创建axios实例
const service: AxiosInstance = axios.create({baseURL: base_url, // api 的 base_urltimeout: request_timeout, // 请求超时时间withCredentials: false // 禁用 Cookie
})/*** 请求拦截器*/
service.interceptors.request.use((config: InternalAxiosRequestConfig) => {// 配置请求头const token = '.....'config.headers.authorization = 'Bearer ' + tokenreturn config},(error: AxiosError) => {console.error('网络错误,请稍后重试')return Promise.reject(error)}
)/*** 响应拦截器*/
service.interceptors.response.use((response: AxiosResponse<any>) => {// 响应处理,如状态码return response},(error: AxiosError) => {return Promise.reject(error)}
)export { service }
index.ts:
import { service } from '@/axios/config'type AxiosHeaders = 'application/json' | 'application/x-www-form-urlencoded' | 'multipart/form-data'interface IAxiosConfig {base_url: stringresult_code: number | stringdefault_headers: AxiosHeadersrequest_timeout: number
}const default_headers: IAxiosConfig = {/*** api请求基础路径*/base_url: import.meta.env.VITE_BASE_URL + import.meta.env.VITE_API_URL,/*** 接口成功返回状态码*/result_code: 200,/*** 接口请求超时时间*/request_timeout: import.meta.env.VITE_REQUEST_TIMEOUT,/*** 默认接口请求类型* 可选值:application/x-www-form-urlencoded multipart/form-data*/default_headers: 'application/json'
}const request = (option: any) => {const { url, method, params, data, headersType, responseType } = optionreturn service({url: url,method,params,data,responseType: responseType,headers: {'Content-Type': headersType || default_headers}})
}export default {get: async <T = any>(option: any) => {const res = await request({ method: 'GET', ...option })return res.data as unknown as T},post: async <T = any>(option: any) => {const res = await request({ method: 'POST', ...option })return res.data as unknown as T},postOriginal: async (option: any) => {const res = await request({ method: 'POST', ...option })return res},delete: async <T = any>(option: any) => {const res = await request({ method: 'DELETE', ...option })return res.data as unknown as T},put: async <T = any>(option: any) => {const res = await request({ method: 'PUT', ...option })return res.data as unknown as T},download: async <T = any>(option: any) => {const res = await request({ method: 'GET', responseType: 'blob', ...option })return res as unknown as Promise<T>},upload: async <T = any>(option: any) => {option.headersType = 'multipart/form-data'const res = await request({ method: 'POST', ...option })return res as unknown as Promise<T>}
}
test.ts:
import request from '@/axios'export interface ITestDataParamsType {pageNo: numberpageSize: number
}/*** 获取测试数据* @param params 分页参数* @returns*/
export const getTestData = async (params: ITestDataParamsType) => {return await request.get({url: '/test/page',params})
}
- 调用接口
// template
<el-button @click="handleRequest">发起请求</el-button>// script
import { getTestData, type ITestDataParamsType } from '@/api/test'
const loading = ref(false)const handleRequest = async () => {loading.value = truetry {const params: ITestDataParamsType = {pageNo: 1,pageSize: 10}await getTestData(params)} finally {loading.value = false}
}
十五、安装vite-plugin-svg-icon插件,用于使用svg
- 安装:
pnpm i vite-plugin-svg-icons -D - 在main.ts中引入:
import 'virtual:svg-icons-register' - 在vite.config.ts中配置:
import path from 'path'
import { createSvgIconsPlugin } from 'vite-plugin-svg-icons'export default defineConfig({plugins: [// ...createSvgIconsPlugin({// 图标存放的地址iconDirs: [path.resolve(process.cwd(), 'src/assets/icons')],symbolId: 'icon-[dir]-[name]',svgoOptions: {// 解决svg图标不显示的问题plugins: [{name: 'removeAttrs',active: true,params: { elemSeparator: ',', attrs: [] }}]}})]
})
- 封装
svg-icon组件,用于使用svg图标
<template><svg class="svg-icon" aria-hidden :style="`width: ${props.size}; height: ${props.size};`"><use :xlink:href="symbolId" :fill="props.color" /></svg>
</template>
<script setup lang="ts" name="SvgIcon">
const props = defineProps({prefix: {type: String,default: 'icon'},name: {type: String,required: true},color: {type: String,default: ''},size: {type: String,default: '1em'}
})
const symbolId = computed(() => `#${props.prefix}-${props.name}`)
</script>
<style lang="scss" scoped>
.svg-icon {display: inline-block;outline: none;width: 1em;height: 1em;/* 因 icon 大小被设置为和字体大小一致,而 span 等标签的下边缘会和字体的基线对齐,故需设置一个往下的偏移比例,来纠正视觉上的未对齐效果 */vertical-align: -0.15em;/* 定义元素的颜色,currentColor 是一个变量,其值就是当前元素的 color 值,如果当前元素未设置 color 值,则从父元素继承 */fill: currentColor;overflow: hidden;
}
</style>
- 存放svg文件

- 使用:
<svg-icon name="vue" size="24px" />
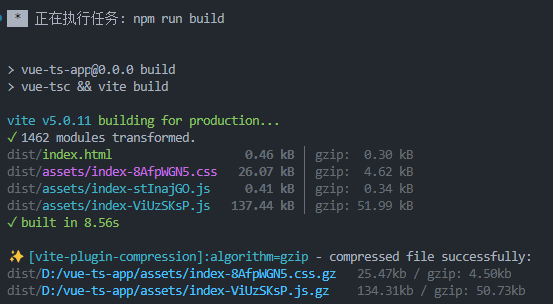
十六、安装vite-plugin-compression插件,项目打包时压缩文件
- 安装:
pnpm i vite-plugin-compression -D - 在vite.config.ts中进行配置:
export default defineConfig({plugins: [// ...viteCompression({verbose: true, // 是否在控制台输出压缩结果disable: false, // 是否禁用threshold: 10240, // 体积大于 threshold 才会被压缩,单位 balgorithm: 'gzip', // 压缩算法,可选 [ 'gzip' , 'brotliCompress' ,'deflate' , 'deflateRaw']ext: '.gz', // 生成的压缩包后缀deleteOriginFile: false //压缩后是否删除源文件})],
})
- 打包,在控制台中查看压缩结果:
十七、VITE环境基本配置
import { defineConfig } from 'vite'
import vue from '@vitejs/plugin-vue'
/** element plus 自动按需导入插件 start */
import AutoImport from 'unplugin-auto-import/vite'
import Components from 'unplugin-vue-components/vite'
import { ElementPlusResolver } from 'unplugin-vue-components/resolvers'
/** element plus 自动按需导入插件 end */
import vueSetupExtend from 'vite-plugin-vue-setup-extend'
import { fileURLToPath, URL } from 'node:url'
import path from 'path'
import { createSvgIconsPlugin } from 'vite-plugin-svg-icons'import viteCompression from 'vite-plugin-compression'// https://vitejs.dev/config/
export default defineConfig({plugins: [vue(),vueSetupExtend(),/** element plus 自动按需导入插件配置 start */AutoImport({// 在哪些文件下自动导入include: [/\.[tj]sx?$/, // .ts, .tsx, .js, .jsx/\.vue$/,/\.vue\?vue/, // .vue/\.md$/ // .md],// 自动导入的内容imports: ['vue', 'vue-router'],// 配置文件生成位置,默认是根目录dts: 'src/types/auto-imports.d.ts',// eslint检查eslintrc: {enabled: true, // Default `false`filepath: './.eslintrc-auto-import.json', // Default `./.eslintrc-auto-import.json`globalsPropValue: true // Default `true`, (true | false | 'readonly' | 'readable' | 'writable' | 'writeable')},resolvers: [ElementPlusResolver()]}),Components({// 要搜索组件的目录的相对路径dirs: ['src/components', 'src/layout'],// 组件的有效文件扩展名extensions: ['vue', 'md'],// 搜索子目录deep: true,// 在哪些文件下自动导入组件include: [/\.vue$/, /\.vue\?vue/],// 生成自定义 `auto-components.d.ts` 全局声明dts: 'src/types/auto-components.d.ts',// 自定义组件的解析器resolvers: [ElementPlusResolver({ importStyle: 'sass' })], // importStyle: "sass" ---  解决覆盖element plus 的sass变量不生效的bug// 在哪些目录下不自动导入组件exclude: [/[\\/]node_modules[\\/]/]}),/** element plus 自动按需导入插件配置 end */createSvgIconsPlugin({iconDirs: [path.resolve(process.cwd(), 'src/assets/icons')],symbolId: 'icon-[dir]-[name]',svgoOptions: {// 解决svg图标不显示的问题plugins: [{name: 'removeAttrs',active: true,params: { elemSeparator: ',', attrs: [] }}]}}),viteCompression({verbose: true, // 是否在控制台输出压缩结果disable: false, // 是否禁用threshold: 10240, // 体积大于 threshold 才会被压缩,单位 balgorithm: 'gzip', // 压缩算法,可选 [ 'gzip' , 'brotliCompress' ,'deflate' , 'deflateRaw']ext: '.gz', // 生成的压缩包后缀deleteOriginFile: false //压缩后是否删除源文件})],resolve: {alias: {'@': fileURLToPath(new URL('./src', import.meta.url))}},css: {preprocessorOptions: {// scss全局文件引入scss: {additionalData: '@use "@/styles/global.scss" as *;'}}},// 打包配置build: {minify: 'terser', // 指定使用哪种混淆器outDir: 'dist', // 指定输出路径sourcemap: false, // 构建后是否生成 source map 文件terserOptions: {// 传递给 Terser 的更多 minify 选项compress: {drop_debugger: true, // 打包时去除debuggerdrop_console: true // 打包时去除console}},// 静态文件按类型分包rollupOptions: {output: {chunkFileNames: 'static/js/[name]-[hash].js',entryFileNames: 'static/js/[name]-[hash].js',assetFileNames: 'static/[ext]/[name]-[hash].[ext]'}}}
})
相关文章:
使用vite创建vue+ts项目,整合常用插件(scss、vue-router、pinia、axios等)和配置
一、检查node版本 指令:node -v 为什么要检查node版本? Vite 需要 Node.js 版本 18,20。然而,有些模板需要依赖更高的 Node 版本才能正常运行,当你的包管理器发出警告时,请注意升级你的 Node 版本。 二、创…...
泛型、Trait 和生命周期(上)
目录 1、提取函数来减少重复 2、在函数定义中使用泛型 3、结构体定义中的泛型 4、枚举定义中的泛型 5、方法定义中的泛型 6、泛型代码的性能 每一门编程语言都有高效处理重复概念的工具。在 Rust 中其工具之一就是 泛型(generics)。泛型是具体类型…...

<网络安全>《18 数据安全交换系统》
1 概念 企业为了保护核心数据安全,都会采取一些措施,比如做网络隔离划分,分成了不同的安全级别网络,或者安全域,接下来就是需要建设跨网络、跨安全域的安全数据交换系统,将安全保障与数据交换功能有机整合…...
Kafka 生产调优
Kafka生产调优 文章目录 Kafka生产调优一、Kafka 硬件配置选择场景说明服务器台数选择磁盘选择内存选择CPU选择 二、Kafka Broker调优Broker 核心参数配置服役新节点/退役旧节点增加副本因子调整分区副本存储 三、Kafka 生产者调优生产者如何提高吞吐量数据可靠性数据去重数据乱…...
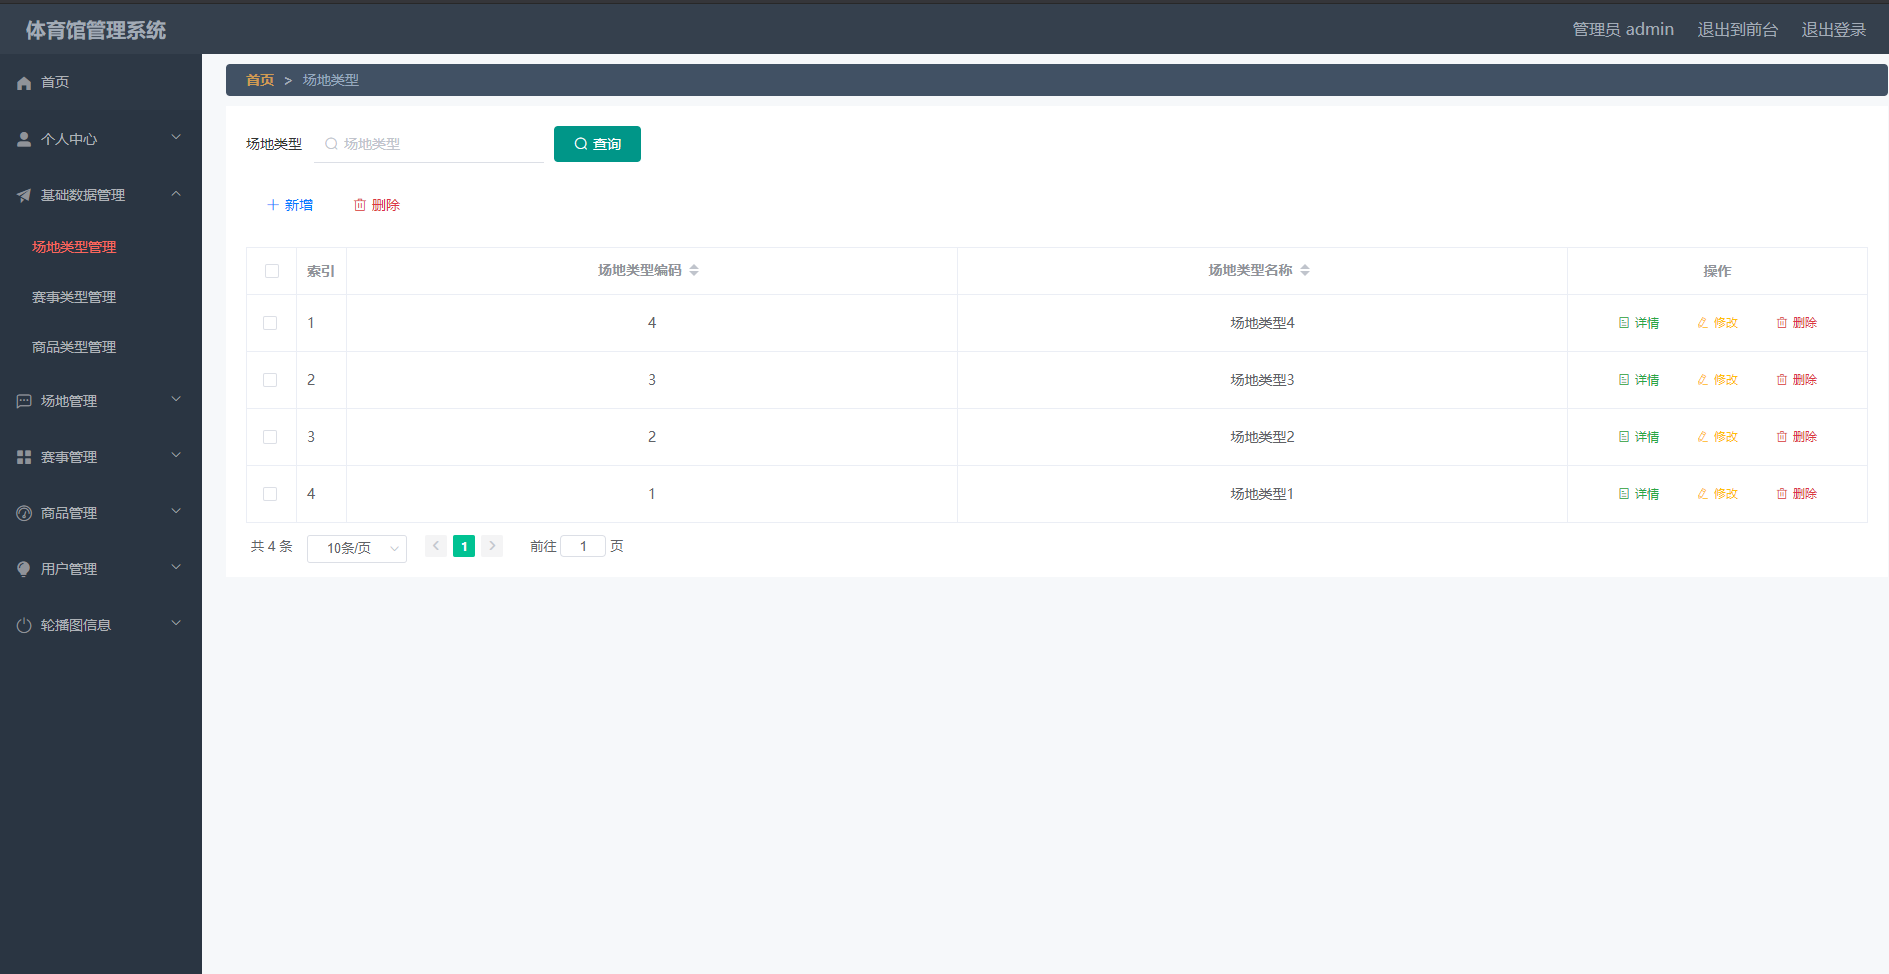
springboot162基于SpringBoot的体育馆管理系统的设计与实现
体育馆管理系统 摘 要 现代经济快节奏发展以及不断完善升级的信息化技术,让传统数据信息的管理升级为软件存储,归纳,集中处理数据信息的管理方式。本体育馆管理系统就是在这样的大环境下诞生,其可以帮助管理者在短时间内处理完毕…...

Interpolator:在Android中方便使用一些常见的CubicBezier贝塞尔曲线动画效果
说明 方便在Android中使用Interpolator一些常见的CubicBezier贝塞尔曲线动画效果。 示意图如下 import android.view.animation.Interpolator import androidx.core.view.animation.PathInterpolatorCompat/*** 参考* android https://yisibl.github.io/cubic-bezier* 实现常…...
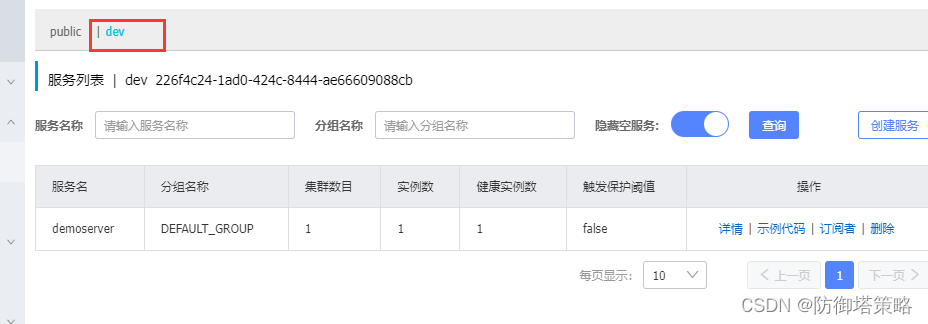
Nacos安装,服务注册,负载均衡配置,权重配置以及环境隔离
1. 安装 首先从官网下载 nacos 安装包,注意是下载 nacos-server Nacos官网 | Nacos 官方社区 | Nacos 下载 | Nacos 下载完毕后,解压找到文件夹bin,文本打开startup.cmd 修改配置如下 然后双击 startup.cmd 启动 nacos服务,默认…...

Vue3导出数据为txt文件
在Vue3中,可以通过使用Blob对象以及URL.createObjectURL()方法导出txt文档。 首先,你需要在Vue组件中创建一个方法来生成txt文档的内容。 //res.value.code 数据源 //type:格式设置 //form.name是下载文件的自定义名字 const downLoad ()&…...

Simulink中getConfigSet用法
目录 语法 说明 示例 获取配置集 getConfigSet的功能是从模型中获取配置集或配置引用。 语法 myConfigObj getConfigSet(model, configObjName) 说明 myConfigObj getConfigSet(model, configObjName) 返回关联到 model 并命名为 configObjName 的配置集或配置引用。 …...

【Algorithms 4】算法(第4版)学习笔记 05 - 2.2 归并排序
文章目录 前言参考目录学习笔记1:归并排序的简单演示1.1:基本思路1.2:归并排序的 demo 演示1.3:代码实现2:自顶向下的归并排序2.1:比较次数与访问次数的证明2.2:代码优化2.3:优化后代…...

mybatis mapper sql include用法实现sql块复用
一、总SQL <select id"getxxxMonitorData"resultType"com.xxx.module.system.dal.dataobject.xxx.xxxDO"><include refid"getxxxMonitorDataBaseSql"></include><include refid"whereContent"></include&…...
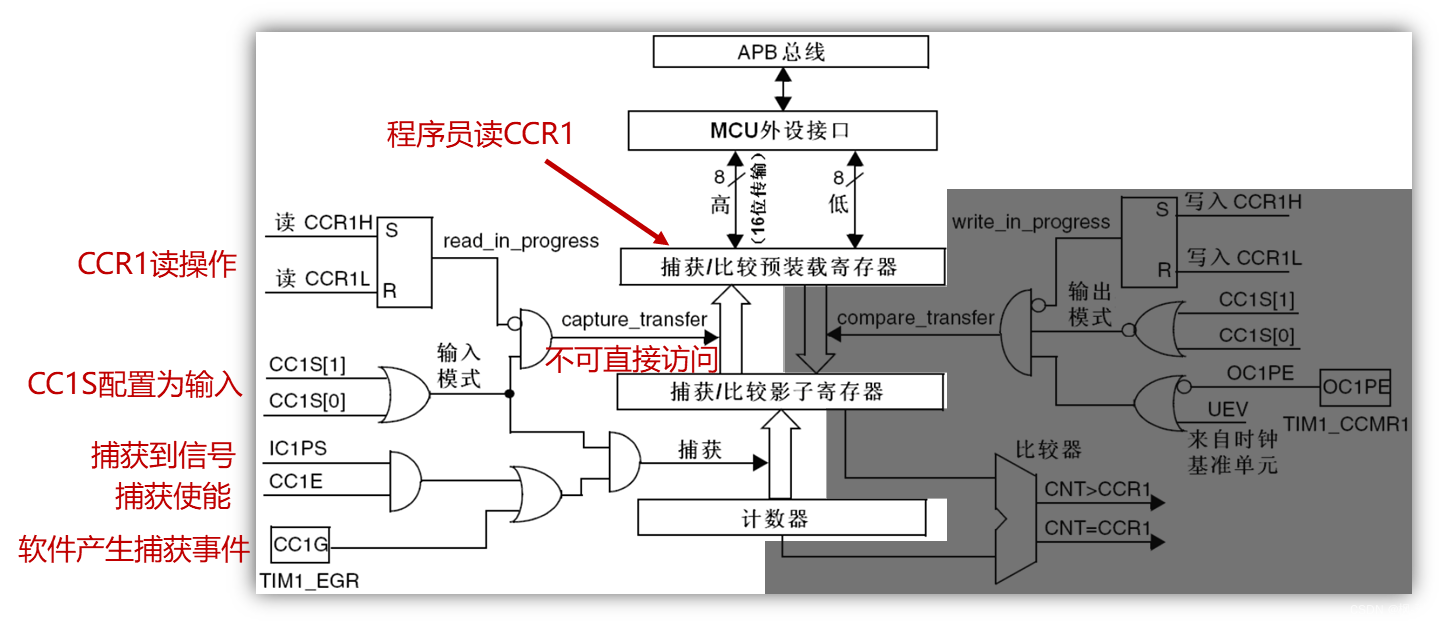
正点原子--STM32通用定时器学习笔记(2)
1. 通用定时器输入捕获部分框图介绍 捕获/比较通道的输入部分(通道1) 采样频率:控制寄存器 1(TIMx_CR1)的CKD[1:0] ⬇⬇⬇滤波方式选择: 捕获/ 比较模式寄存器 1(TIMx_CCMR1)的输入捕获部分⬇⬇…...

Flask实现异步调用sqlalchemy的模型类
事情是这样的,我这边需要在一次请求里面,搞一个异步不阻碍的任务,来执行耗时的操作。 一开始,我准备写的代码是这样的: from flask import Flask import time from concurrent.futures import ThreadPoolExecutorexec…...

Pocket2Mol + Generation of Atom Positions生成原子位置的方法有什么?联合概率是什么?
联合概率: 联合概率是统计学中的一个概念,用于描述两个或多个随机事件同时发生的概率。当我们谈论多个变量的联合概率时,我们是在探讨这些变量同时取特定值的概率。 让我们简化一下概念: 假设你有一个骰子(六面&…...

区分手机小程序以及电脑小程序;左滑、导航键返回拦截
1、区分电脑小程序和手机小程序 //区分电脑小程序、手机小程序(目标:手机小程序) // #ifdef MP-WEIXIN uni.getSystemInfo({success: (res) > {// windows | mac为pc端// android | ios为手机端// console.log(getSystemInfo,, res.plat…...

Web APIs 2 事件
Web APIs 2 事件 事件监听案例:广告关闭案例:随机问答 事件监听版本事件类型案例:轮播图完整焦点事件键盘事件输入事件案例:评论字数统计 事件对象获取事件对象事件对象常用属性案例:评论回车发布 环境对象this回调函数…...

网易腾讯面试题精选----90道设计模式面试题及答案
介绍 设计模式是软件开发的重要组成部分,为常见设计问题提供经过验证的解决方案。就设计模式面试候选人可以帮助衡量他们对软件架构的理解、解决问题的能力以及编写可维护和可扩展代码的能力。以下是一些常见的设计模式面试问题和答案,可帮助评估候选人在该领域的知识和专业知…...
程序员的数字化工作台:理解不关机背后的逻辑与需求
目录 程序员为什么不喜欢关电脑? 电脑对程序员的重要性: 工作流程与需求: 数据安全与备份: 即时性与响应: 个人习惯等方面: 程序员为什么不喜欢关电脑? 电脑对程序员的重要性:…...

Java Socket Server TCP服务端向指定客户端发送消息
实现思路 首先需要知道java里如何创建一个Socket服务器端。 //创建一个服务器端对象ServerSocket server new ServerSocket(); //绑定启动的ip和端口号server.bind(new InetSocketAddress("127.0.0.1",8082));//启动成功后,调用accept()方法阻塞…...

java日志框架总结(五、logback日志框架)
一、logback概述 Logback是由log4j创始人设计的又一个开源日志组件。 Logback当前分成三个模块: 1、logback-core, 2、logback- classic 3、logback-access。 1)logback-core是其它两个模块的基础模块。 2)logback-…...

解决AtlasOS系统中Xbox控制器驱动问题的5个实用技巧
解决AtlasOS系统中Xbox控制器驱动问题的5个实用技巧 【免费下载链接】Atlas 🚀 An open and lightweight modification to Windows, designed to optimize performance, privacy and security. 项目地址: https://gitcode.com/GitHub_Trending/atlas1/Atlas …...

墨语灵犀镜像灰度发布:Kubernetes滚动更新无感升级实践
墨语灵犀镜像灰度发布:Kubernetes滚动更新无感升级实践 1. 引言:优雅升级的艺术挑战 在现代应用部署中,如何实现平滑无感的服务升级一直是个技术难题。特别是对于「墨语灵犀」这样注重用户体验的深度翻译工具,任何服务中断或体验…...

FreeRTOS定时器防抖实战:用STM32 HAL库+按键中断,告别按键连击烦恼
FreeRTOS定时器防抖实战:用STM32 HAL库按键中断,告别按键连击烦恼 在嵌入式开发中,按键处理看似简单却暗藏玄机。我曾在一个智能家居项目中遇到这样的尴尬场景:用户按下墙壁开关时,本该只触发一次的动作,由…...

拓扑排序不止于理论:用邻接矩阵实现时,我踩过的3个坑和性能优化
拓扑排序实战:邻接矩阵实现中的性能陷阱与优化策略 邻接矩阵作为图论中最直观的存储结构,常被初学者用来实现拓扑排序算法。但当我们真正将其投入实际项目时,往往会遭遇意想不到的性能瓶颈和逻辑陷阱。本文将分享三个真实项目中踩过的坑&…...
)
WinForm实战:OxyPlot图表控件鼠标悬停显示坐标值(附完整代码)
WinForm实战:OxyPlot图表控件鼠标悬停显示坐标值(附完整代码) 在数据可视化应用中,实时交互功能往往能显著提升用户体验。当开发者需要在WinForm平台快速实现专业级图表时,OxyPlot.WindowsForms.Plot控件凭借其轻量级和…...

从YOLO到DeepLab:盘点CV任务中那些‘神级’特征融合技巧与避坑指南
从YOLO到DeepLab:盘点CV任务中那些‘神级’特征融合技巧与避坑指南 在计算机视觉领域,特征融合技术就像一位隐形的调音师,默默协调着神经网络中不同层次、不同来源的信息流。当你在目标检测任务中遇到小目标识别率低的问题,或在图…...

实时数据复制技术在大数据平台中的应用与实践
实时数据复制技术在大数据平台中的应用与实践关键词:实时数据复制、大数据平台、CDC(变更数据捕获)、数据同步、数据一致性、分布式系统、ETL摘要:本文深入探讨了实时数据复制技术在大数据平台中的核心应用场景与实践方法。我们将…...

TypeScript——模块解析
模块解析1、相对模块导入2、非相对模块导入3、模块解析策略4、模块解析策略之Classic4.1、解析相对模块导入4.2、解析非相对模块导入5、模块解析策略之Node5.1、解析相对模块导入5.2、解析非相对模块导入6、--baseUrl6.1、设置--baseUrl6.2、解析--baseUrl7、paths7.1、设置pat…...

AI建站避坑指南:十个高频问题与真相解答
# 痛点共情:用AI建站,最怕遇到哪些“坑”?\很多宣传,心里还是没底。AI建站到底靠不靠谱?会不会做出来的网站千篇一律?万一做了几年,平台跑路了怎么办?我的客户数据安不安全ÿ…...

FreeRTOS实战:基于串口空闲中断与二值信号量构建高效数据接收框架
1. 串口通信的痛点与解决方案 在嵌入式开发中,串口通信是最基础也最常用的外设之一。但处理不定长数据时,很多开发者会遇到这样的困扰:要么频繁进入接收中断导致CPU负载过高,要么需要手动设置数据包长度增加协议复杂度。我在早期项…...