OBD部署OceanBase集群-配置文件方式
前一篇文章介绍了OBD白屏可视化方式部署OceanBase集群 ,其原理是把可视化设置生成为一个配置文件,然后使用OBD命令部署集群
本篇想使用命令行加配置文件方式,只部署OceanBase和ODProxy两个组件
服务器参数配置和 oceanbase-all-in-one-*.tar.gz 软件包下载,请参考上一篇文章
三台服务器 192.168.113.161 、162、163 ,都需要在 /etc/sysctl.conf 中加入配置:
vm.max_map_count=655360
fs.file-max=6573688
使配置生效:sysctl -p
1.安装 all-in-one包
在192.168.113.161下安装all-in-one包,且会自动安装好ODB软件
tar -xzf oceanbase-all-in-one-*.tar.gz
cd oceanbase-all-in-one/bin/
./install.sh
source ~/.oceanbase-all-in-one/bin/env.sh
tar解压后,在 oceanbase-all-in-one/obd/usr/obd/example/ 目录下,有示例配置文件,因我只要部署OceanBase和OBProxy,就使用了 distributed-with-obproxy-example.yaml ,复制到root目录:cp distributed-with-obproxy-example.yaml /root/zycluster-deploy.yaml
# 解压在 /mnt/software/oceanbase-all-in-one 目录
[root@db1 ~]# cd /mnt/software/oceanbase-all-in-one/obd/usr/obd/example/
[root@db1 example]# ll
total 112
-rw-r--r-- 1 root root 15398 Dec  6 08:34 all-components-min.yaml
-rw-r--r-- 1 root root 15601 Dec  6 08:34 all-components.yaml
drwxrwxrwx 2 root root   262 Dec  6 08:34 autodeploy
-rw-r--r-- 1 root root  7193 Dec  6 08:34 default-components-min.yaml
-rw-r--r-- 1 root root  7396 Dec  6 08:34 default-components.yaml
-rw-r--r-- 1 root root  4240 Dec  6 08:34 distributed-example.yaml
-rw-r--r-- 1 root root  5765 Feb 18 08:48 distributed-with-obproxy-example.yaml
drwxrwxrwx 2 root root   129 Dec  6 08:34 grafana
-rw-r--r-- 1 root root  2289 Dec  6 08:34 local-example.yaml
-rw-r--r-- 1 root root  4226 Dec  6 08:34 mini-distributed-example.yaml
-rw-r--r-- 1 root root  5736 Dec  6 08:34 mini-distributed-with-obproxy-example.yaml
-rwxr-xr-x 1 root root  2453 Dec  6 08:34 mini-local-example.yaml
-rwxr-xr-x 1 root root  2721 Dec  6 08:34 mini-single-example.yaml
-rw-r--r-- 1 root root  4197 Dec  6 08:34 mini-single-with-obproxy-example.yaml
drwxrwxrwx 2 root root   135 Dec  6 08:34 obagent
drwxrwxrwx 2 root root   109 Dec  6 08:34 ob-configserver
drwxrwxrwx 2 root root    84 Dec  6 08:34 obproxy
drwxrwxrwx 2 root root  4096 Dec  6 08:34 oceanbase-3.x
drwxrwxrwx 2 root root    35 Dec  6 08:34 ocp-express
drwxrwxrwx 2 root root   102 Dec  6 08:34 prometheus
-rw-r--r-- 1 root root  2557 Dec  6 08:34 single-example.yaml
-rw-r--r-- 1 root root  4068 Dec  6 08:34 single-with-obproxy-example.yaml
根据我服务器配置调整 zycluster-deploy.yaml ,内容如下:
## Only need to configure when remote login is required
user:username: rootpassword: 123456key_file: /root/.ssh/id_rsa
#   port: your ssh port, default 22
#   timeout: ssh connection timeout (second), default 30
oceanbase-ce:servers:- name: server1# Please don't use hostname, only IP can be supportedip: 192.168.113.161- name: server2ip: 192.168.113.162- name: server3ip: 192.168.113.163global:# Starting from observer version 4.2, the network selection for the observer is based on the 'local_ip' parameter, and the 'devname' parameter is no longer mandatory.# If the 'local_ip' parameter is set, the observer will first use this parameter for the configuration, regardless of the 'devname' parameter.# If only the 'devname' parameter is set, the observer will use the 'devname' parameter for the configuration.# If neither the 'devname' nor the 'local_ip' parameters are set, the 'local_ip' parameter will be automatically assigned the IP address configured above.# devname: eth0# if current hardware's memory capacity is smaller than 50G, please use the setting of "mini-single-example.yaml" and do a small adjustment.memory_limit: 10G # The maximum running memory for an observer# The reserved system memory. system_memory is reserved for general tenants. The default value is 30G.system_memory: 3Gdatafile_size: 12G # Size of the data file. datafile_next: 2Gdatafile_maxsize: 20Glog_disk_size: 12G # The size of disk space used by the clog files.cpu_count: 8mysql_port: 2881rpc_port: 2882production_mode: falseenable_syslog_wf: false # Print system logs whose levels are higher than WARNING to a separate log file. The default value is true.enable_syslog_recycle: true # Enable auto system log recycling or not. The default value is false.max_syslog_file_count: 4 # The maximum number of reserved log files before enabling auto recycling. The default value is 0.# observer cluster name, consistent with obproxy's cluster_nameappname: zyclusterroot_password: /aVi*H8(0%FS_YwZ-|dmo&[hjlT7pe@E # root user password, can be emptyproxyro_password: /aVi*H8(0%FS_YwZ-|dmo&[hjlT7pe@E # proxyro user pasword, consistent with obproxy's observer_sys_password, can be empty# In this example , support multiple ob process in single node, so different process use different ports.# If deploy ob cluster in multiple nodes, the port and path setting can be same. server1:mysql_port: 2881 # External port for OceanBase Database. The default value is 2881. DO NOT change this value after the cluster is started.rpc_port: 2882 # Internal port for OceanBase Database. The default value is 2882. DO NOT change this value after the cluster is started.#  The working directory for OceanBase Database. OceanBase Database is started under this directory. This is a required field.home_path: /root/zycluster# The directory for data storage. The default value is $home_path/store.# data_dir: /data# The directory for clog, ilog, and slog. The default value is the same as the data_dir value.# redo_dir: /redozone: zone1server2:mysql_port: 2881 # External port for OceanBase Database. The default value is 2881. DO NOT change this value after the cluster is started.rpc_port: 2882 # Internal port for OceanBase Database. The default value is 2882. DO NOT change this value after the cluster is started.#  The working directory for OceanBase Database. OceanBase Database is started under this directory. This is a required field.home_path: /root/zycluster# The directory for data storage. The default value is $home_path/store.# data_dir: /data# The directory for clog, ilog, and slog. The default value is the same as the data_dir value.# redo_dir: /redozone: zone2server3:mysql_port: 2881 # External port for OceanBase Database. The default value is 2881. DO NOT change this value after the cluster is started.rpc_port: 2882 # Internal port for OceanBase Database. The default value is 2882. DO NOT change this value after the cluster is started.#  The working directory for OceanBase Database. OceanBase Database is started under this directory. This is a required field.home_path: /root/zycluster# The directory for data storage. The default value is $home_path/store.# data_dir: /data# The directory for clog, ilog, and slog. The default value is the same as the data_dir value.# redo_dir: /redozone: zone3
obproxy-ce:# Set dependent components for the component.# When the associated configurations are not done, OBD will automatically get the these configurations from the dependent components.depends:- oceanbase-ceservers:- 192.168.113.161global:listen_port: 2883 # External port. The default value is 2883.prometheus_listen_port: 2884 # The Prometheus port. The default value is 2884.home_path: /root/obproxy# oceanbase root server list# format: ip:mysql_port;ip:mysql_port. When a depends exists, OBD gets this value from the oceanbase-ce of the depends.rs_list: 192.168.113.161:2881;192.168.113.162:2881;192.168.113.163:2881enable_cluster_checkout: false# observer cluster name, consistent with oceanbase-ce's appname. When a depends exists, OBD gets this value from the oceanbase-ce of the depends.cluster_name: zyclusterskip_proxy_sys_private_check: trueenable_strict_kernel_release: falseobproxy_sys_password: /aVi*H8(0%FS_YwZ-|dmo&[hjlT7pe@E # obproxy sys user password, can be empty. When a depends exists, OBD gets this value from the oceanbase-ce of the depends.observer_sys_password: /aVi*H8(0%FS_YwZ-|dmo&[hjlT7pe@E # proxyro user pasword, consistent with oceanbase-ce's proxyro_password, can be empty. When a depends exists, OBD gets this value from the oceanbase-ce of the depends.
2.部署集群
部署: obd cluster deploy zycluster -c zycluster-deploy.yaml
销毁: obd cluster destory zycluster ,然后删除目录 rm -rf xxxx

部署成功后,在/root 目录下生成了一个 zycluster 目录,数据和日志默认存储 home_path (也就是 zycluster/store 目录下),在真实场景下,请把data_dir 和 redo_dir 分别配置在独立的磁盘上,以提高IO性能和可用性

3.启动集群
启动:obd cluster start zycluster

4.使用Navicat连接集群sys系统租户

use oceanbase
查看资源,创建租户mq_t1
1.1.查看所有资源规格信息
SELECT * FROM DBA_OB_UNIT_CONFIGS;
1.2.删除资源规格
drop resource unit S1_unit_config;
1.3.创建资源规格(请按服务器真实配置和业务需求来设置合适资源大小)
CREATE RESOURCE UNIT S1_unit_config MEMORY_SIZE = '4G', MAX_CPU = 1, MIN_CPU = 1, LOG_DISK_SIZE = '2G',  MAX_IOPS = 10000, MIN_IOPS = 10000, IOPS_WEIGHT=1;2.1.查看所有资源池信息
SELECT * FROM DBA_OB_RESOURCE_POOLS;
2.2.创建资源池
CREATE RESOURCE POOL mq_pool_01  UNIT='S1_unit_config', UNIT_NUM=1, ZONE_LIST=('zone1','zone2','zone3');3.1.查看所有的租户信息,其LOCALITY字段为租户副本分布
SELECT * FROM DBA_OB_TENANTS;
3.2.创建租户mq_t1,primary_zone=zone1
CREATE TENANT IF NOT EXISTS mq_t1  PRIMARY_ZONE='zone1', RESOURCE_POOL_LIST=('mq_pool_01') set OB_TCP_INVITED_NODES='%';
3.3.创建租户mq_t1, primary_zone=zone1;zone2;zone3,3个主zone同时读写提升数据库性能
CREATE TENANT IF NOT EXISTS mq_t1  PRIMARY_ZONE='zone1;zone2;zone3', RESOURCE_POOL_LIST=('mq_pool_01') set OB_TCP_INVITED_NODES='%';
3.4.删除租户
drop tenant mq_t1;
3.5查询租户
SELECT * FROM DBA_OB_TENANTS WHERE TENANT_NAME = 'mq_t1';4.关联查询租户资源配置信息
SELECT c.TENANT_ID, e.TENANT_NAME, concat(c.NAME, ': ', d.NAME) `pool:conf`,concat(c.UNIT_COUNT, ' unit: ', d.min_cpu, 'C/', ROUND(d.MEMORY_SIZE/1024/1024/1024,0), "G") unit_info FROM DBA_OB_RESOURCE_POOLS c, DBA_OB_UNIT_CONFIGS d, DBA_OB_TENANTS e  WHERE c.UNIT_CONFIG_ID=d.UNIT_CONFIG_ID AND c.TENANT_ID=e.TENANT_ID AND c.TENANT_ID>1000 ORDER BY c.TENANT_ID;5.查看租户的资源单元部署位置
SELECT a.TENANT_NAME,a.TENANT_ID,b.SVR_IP FROM DBA_OB_TENANTS a,GV$OB_UNITS b WHERE a.TENANT_ID=b.TENANT_ID;6.查看节点的 Unit 信息
SELECT * FROM GV$OB_UNITS;
SELECT * FROM GV$OB_UNITS where TENANT_ID=1002;7.查看 OBServer 的信息
SELECT * FROM GV$OB_SERVERS;-- 停止服务节点
-- alter system start server '192.168.113.162:2882';
-- ALTER SYSTEM  MINOR FREEZE SERVER = ('192.168.113.162:2882');
下图可看到mq_t1租户创建成功,该租户初始密码为空,使用:obclient -h192.168.113.161 -P2883 -uroot -p’/aVi*H8(0%FS_YwZ-|dmo&[hjlT7pe@E’ -Doceanbase -A 进入mq_t1租户

还可通过Navicat进入 mq_t1租户,初始密码为空,进入oceanbase后修改租户密码


5.创建数据库和添加数据
在 mq_t1 租户下创建zypcy数据库,创建person表,添加2条数据

相关文章:
OBD部署OceanBase集群-配置文件方式
前一篇文章介绍了OBD白屏可视化方式部署OceanBase集群 ,其原理是把可视化设置生成为一个配置文件,然后使用OBD命令部署集群 本篇想使用命令行加配置文件方式,只部署OceanBase和ODProxy两个组件 服务器参数配置和 oceanbase-all-in-one-*.ta…...

Flink介绍
Flink 介绍 文章目录 Flink 介绍1. 简介1.1 背景1.2 用途 2. 核心概念2.1 流(Stream)2.2 转换(Transformation)2.3 窗口(Window)2.4 状态(State) 3. 编程模型3.1 编程模型介绍3.2 程…...
vscode突然连不上服务器了,以前都可以的,并且ssh等其它方式是可以连接到服务器的
过完年回来准备开工干活,突然发现vscode连不上服务器了,奇了怪了,年前都可以的,看了一下报错,如下, 以为是服务器挂了,结果执行ssh xxxxxx 发现是可以远程连接的,看来服务器没有问题…...

【shell】Shell学习后篇
Linux 常用 Shell 文章目录 Linux 常用 ShellBanner设置字体颜色设置提示操作系统操作系统版本号系统处理器架构关闭防火墙和SELinux系统操作防火墙相关获取当前目录判断文件是否存在判断目录是否存在后台挂起静默执行判断之前的命令是否成功 Banner 设置字体颜色 RED\033[31…...

协同程序原理
一、协程的本质 //协程可以分为两个部分 //1.协程函数本体 //2.协程调度器 //协程本体就是一个能够中间暂停返回的函数 //协程调度器是Unity内部实现的,会在对应的时机帮我们继续执行协程函数 //Unity只实现了协程调度器部分 //协程的本体本质上就是 C#的一个迭代…...

怎样保证数据库和redis里的数据一致性
使用缓存更新策略:在更新数据库时,同时更新Redis中相应的数据。这可以通过编写代码来实现,在数据库更新操作完成后,同步更新Redis中对应的数据。这可以通过在代码中使用事务来保证更新的原子性,确保数据库和Redis中的数…...
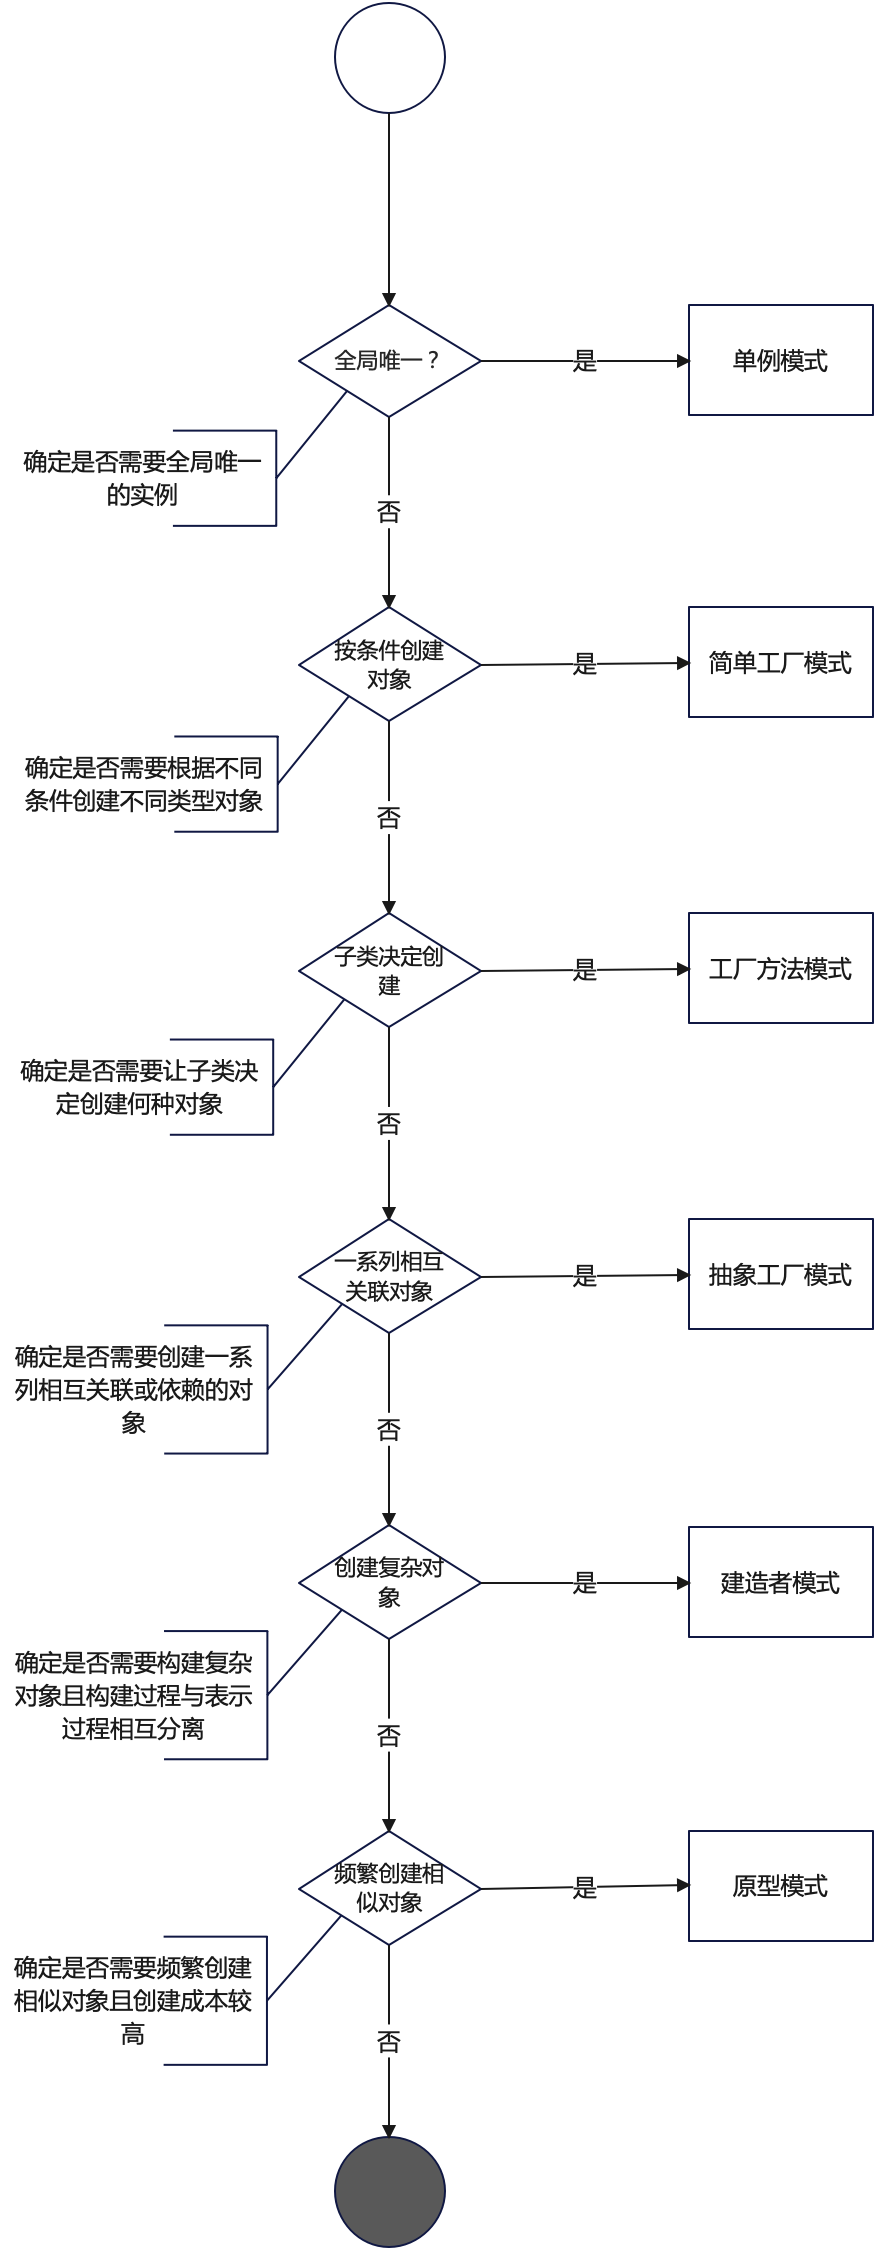
探索设计模式的魅力:创建型设计模式的比较与决策
设计模式专栏:http://t.csdnimg.cn/U54zu 目录 一、设计模式概览 1.1 创建型模式 二、比较创建型设计模式 1.1 适用场景典型用例 1.2 关键要素与差异对比 1.3 结构图 三、模式选择指南 3.1 场景分析 3.2 决策流程图 四、结语 4.1 优势 4.2 考量因素 一、…...

Linux之Shell
第 1 章 Shell 概述 1)Linux 提供的 Shell 解析器有 [zhaohadoop101 ~]$ cat /etc/shells /bin/sh /bin/bash /usr/bin/sh /usr/bin/bash /bin/tcsh /bin/csh2)bash 和 sh 的关系 [zhaohadoop101 bin]$ ll | grep bash -rwxr-xr-x. 1 root root 941880…...

nginx upstream server主动健康检测模块添加https检测功能[完整版]
目录 1 缘起1.1 功能定义2. 实现后的效果2.1 配置文件2.2 运行效果3. 代码实现3.1 配置指令3.1.1 配置指令定义:3.1.2 配置指令结构体:3.1.3 配置指令源码定义:3.2 模块的初始化3.3 添加新的健康检测类型的定义3.4 握手完成后的处理3. 5 发送http请求3.6 接收http响应3.7 连…...

django中admin页面汉化
在Django中,将admin界面汉化为中文需要进行一些配置和翻译文件的添加。下面是一个基本的步骤指南,帮助你实现Django admin的汉化: 一:安装并配置Django: 如果你还没有安装Django,首先通过pip安装它: pip…...
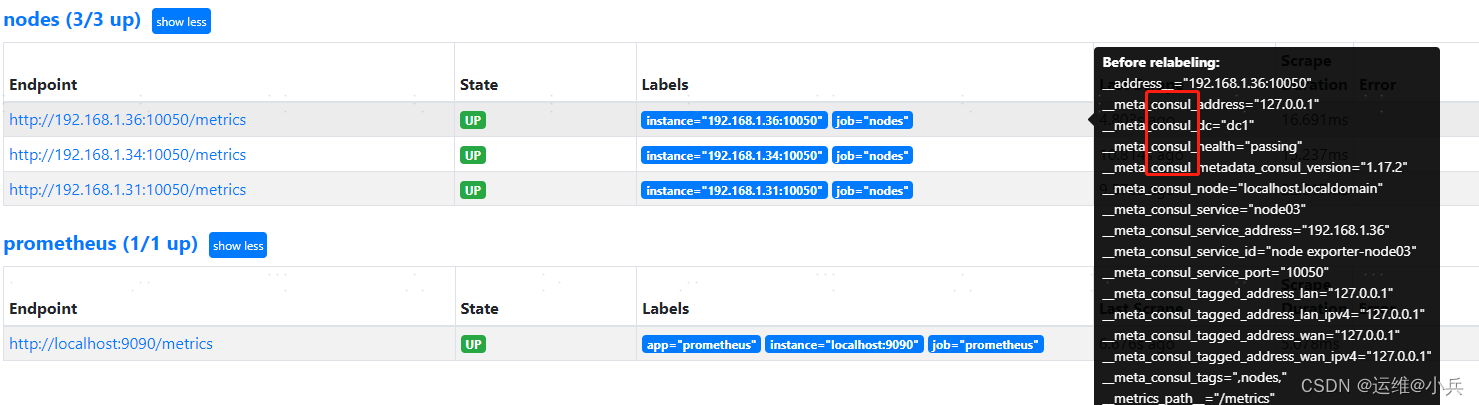
prometheus基于consul的服务发现
文章目录 一、基础二、安装consul下载地址启动consul访问consul 三、编写服务发现文件nodes.json四、prometheus配置consul发现修改prometheus.yml重启Prometheus 参考 一、基础 二、安装consul 下载地址 https://developer.hashicorp.com/consul/install 启动consul mkdi…...
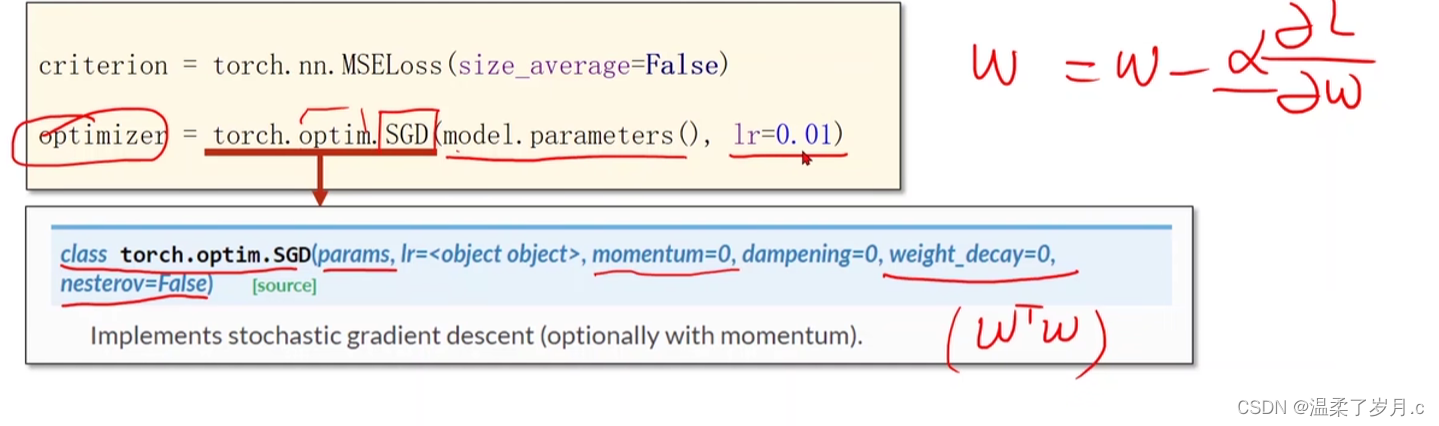
深度学习之pytorch实现线性回归
度学习之pytorch实现线性回归 pytorch用到的函数torch.nn.Linearn()函数torch.nn.MSELoss()函数torch.optim.SGD() 代码实现结果分析 pytorch用到的函数 torch.nn.Linearn()函数 torch.nn.Linear(in_features, # 输入的神经元个数out_features, # 输出神经元个数biasTrue # 是…...

Vue3快速上手(八) toRefs和toRef的用法
顾名思义,toRef 就是将其转换为ref的一种实现。详细请看: 一、toRef 1.1 示例 <script langts setup name"toRefsAndtoRef"> // 引入reactive,toRef import { reactive, toRef } from vue // reactive包裹的数据即为响应式对象 let p…...

《数学建模》专栏导读
文章分类 相关概念入门快速建模相关混合整数线性规划(MILP)加速技巧数值问题探讨相关问题解决技巧 相关概念入门 文章相关概念离散优化模型的松弛模型线性松弛问题混合整数线性规划MILP问题中增添约束的影响约束的影响 快速建模相关 文章求解器涉及步…...

App启动优化笔记 1
app大致的启动流程。有Launcher进程,system_server进程,zygote进程,APP进程。 Launcher进程:启动activity来启动应用 system_server进程:(ams是其中的一个binder):发送一个socket消息给Zygote。 zygote进程:收到消息后,fork新的进程,---》app进程启动 APP进程:…...

Spring Boot 笔记 027 添加文章分类
1.1.1 添加分类 <!-- 添加分类弹窗 --> <el-dialog v-model"dialogVisible" title"添加弹层" width"30%"><el-form :model"categoryModel" :rules"rules" label-width"100px" style"padding…...

【SQL】sql记录
1、start with star with 是一种用于层次结构查询的语法,它允许我们从指定的起始节点开始,递归查询与该节点相关联的所有子节点。 SELECT id, name, parent_id from test001 START WITH id 1 CONNECT BY PRIOR id parent_id 2、row_number() over pa…...
-Linux ARM驱动编程第六天-ARM Linux编程之SMP系统 (物联技术666))
嵌入式培训机构四个月实训课程笔记(完整版)-Linux ARM驱动编程第六天-ARM Linux编程之SMP系统 (物联技术666)
链接:https://pan.baidu.com/s/1V0E9IHSoLbpiWJsncmFgdA?pwd1688 提取码:1688 SMP(Symmetric Multi-Processing),对称多处理结构的简称,是指在一个计算机上汇集了一组处理器(多CPU),各CPU之间共享内存子系…...

html5播放 m3u8
注意:m3u8地址要为网络地址,直接把代码复制为html直接在本地打开,可能不行,需要放在nginx或者apache或者其他的web服务器上运行。 <!DOCTYPE html> <html> <head><meta charsetutf-8 /><title>测试…...

微信小程序按需注入和用时注入
官网链接 按需注入 {"lazyCodeLoading": "requiredComponents" }注意事项 启用按需注入后,小程序仅注入当前访问页面所需的自定义组件和页面代码。未访问的页面、当前页面未声明的自定义组件不会被加载和初始化,对应代码文件将不…...

如何构建企业级自动化预约系统:架构设计与工程实践
如何构建企业级自动化预约系统:架构设计与工程实践 【免费下载链接】campus-imaotai i茅台app自动预约,每日自动预约,支持docker一键部署(本项目不提供成品,使用的是已淘汰的算法) 项目地址: https://git…...

3分钟掌握Ditto:物联网设备管理的数字孪生革命
3分钟掌握Ditto:物联网设备管理的数字孪生革命 【免费下载链接】ditto Eclipse Ditto™: Digital Twin framework of Eclipse IoT - main repository 项目地址: https://gitcode.com/gh_mirrors/ditto6/ditto 还在为管理成千上万的物联网设备而头疼吗&#x…...

Android应用架构规范深度解析与面试指南
引言 在Android应用开发中,架构设计是确保应用可维护性、可扩展性和稳定性的核心要素。随着移动应用的复杂度日益增加,采用规范的架构模式不仅能提升开发效率,还能减少错误和重构成本。本文将以“架构规范”为核心重点领域,深入探讨Android应用的主流架构模式、实现细节、…...
)
【限时开放】DeepSeek R1/R2安全加固白皮书(含32项合规检测Checklist+自动扫描脚本)
更多请点击: https://codechina.net 第一章:DeepSeek模型安全加固概述 DeepSeek系列大语言模型在开源生态中广泛应用,但其默认部署配置存在若干潜在安全风险,包括提示注入、越权推理、敏感信息泄露及未经授权的模型微调访问。安全…...

Android Studio中文界面汉化终极指南:5分钟告别英文困扰
Android Studio中文界面汉化终极指南:5分钟告别英文困扰 【免费下载链接】AndroidStudioChineseLanguagePack AndroidStudio中文插件(官方修改版本) 项目地址: https://gitcode.com/gh_mirrors/an/AndroidStudioChineseLanguagePack 还在为Androi…...

跨平台资源包管理工具VPKEdit:游戏开发者的终极解决方案
跨平台资源包管理工具VPKEdit:游戏开发者的终极解决方案 【免费下载链接】VPKEdit A CLI/GUI tool to create, read, and write several pack file formats. 项目地址: https://gitcode.com/gh_mirrors/vp/VPKEdit 在游戏开发和MOD制作过程中,资源…...
)
【限时技术白皮书】:DeepSeek全版本演进时间轴+企业级选型 checklist(含许可证限制红线)
更多请点击: https://kaifayun.com 第一章:DeepSeek模型版本选择 DeepSeek 提供多个公开可获取的模型版本,涵盖不同参数规模、推理精度与部署场景需求。正确选择版本是构建高性能AI应用的前提,需综合考量硬件资源、延迟要求、任务…...

工业无网智能诊断:可执行二维码与QRind语言深度解析
1. 项目概述:当二维码“活”起来,工业现场的无网智能诊断在工业现场,尤其是那些网络信号不稳定甚至完全隔绝的区域——比如大型石化厂的深处、地下矿井的作业面,或是某些对网络安全有严格管控的精密制造车间,我们常常面…...

d2dx深度探索:经典游戏《暗黑破坏神2》现代化适配的技术架构与实现原理
d2dx深度探索:经典游戏《暗黑破坏神2》现代化适配的技术架构与实现原理 【免费下载链接】d2dx D2DX is a complete solution to make Diablo II run well on modern PCs, with high fps and better resolutions. 项目地址: https://gitcode.com/gh_mirrors/d2/d2d…...

如何高效构建金融数据采集与分析工作流:AKShare深度应用指南
如何高效构建金融数据采集与分析工作流:AKShare深度应用指南 【免费下载链接】akshare AKShare is an elegant and simple financial data interface library for Python, built for human beings! 开源财经数据接口库 项目地址: https://gitcode.com/gh_mirrors/…...